F6361 - Watch FESTINA - Free user manual and instructions
Find the device manual for free F6361 FESTINA in PDF.

User questions about F6361 FESTINA
0 question about this device. Answer the ones you know or ask your own.
Ask a new question about this device
Download the instructions for your Watch in PDF format for free! Find your manual F6361 - FESTINA and take your electronic device back in hand. On this page are published all the documents necessary for the use of your device. F6361 by FESTINA.
USER MANUAL F6361 FESTINA
D. HOW TO SET AND OPERATE EACH MODE 7
-
Hand Movement Demonstration 7
-
Setting the Time (TME) 9
-
Setting the Calendar (CAL.) 12
-
Setting the Quick-set Alarm (AL-1) 16
-
Setting the Daily Alarm (AL-2) 20
-
Stopwatch Operation (CHR) 25
-
Setting the Timer (TMR) 29
-
Setting the Local Time (L-TM) 32
-
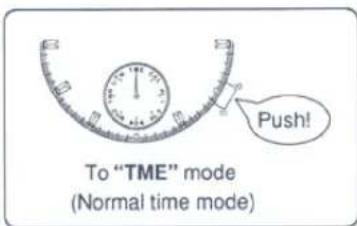
Monitoring in the Normal Time Mode 36
a. Calendar monitor 36
b. Daily alarm (AL-2) set monitor 37
-
All Reset Function 39
-
TACHYMETER BEZEL 41
E. SPECIFICATIONS 43
F. USE PRECAUTIONS 45
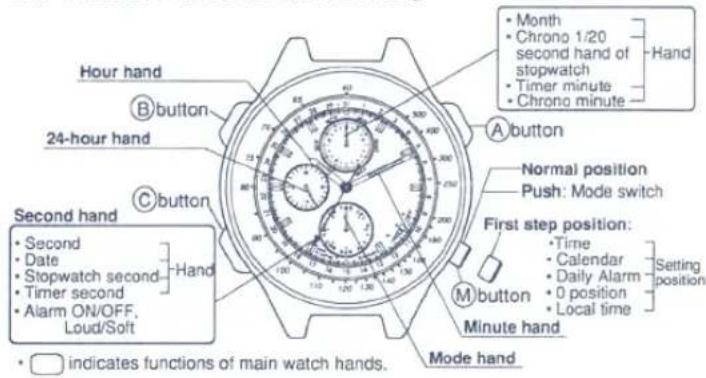
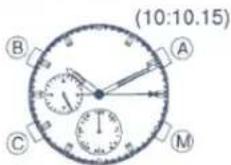
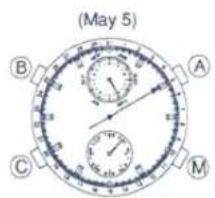
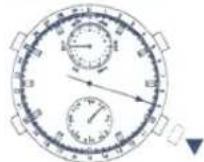
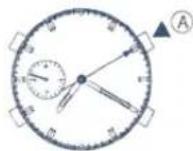
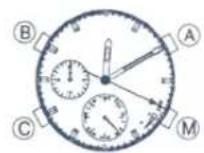
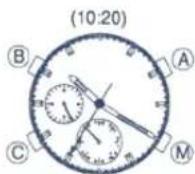
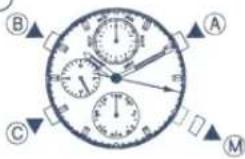
A. MAIN COMPONENTS
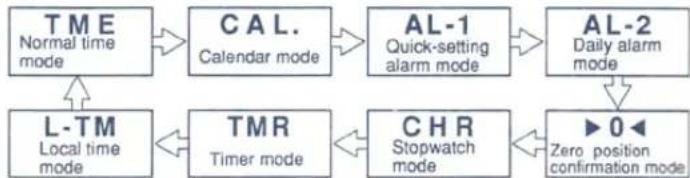
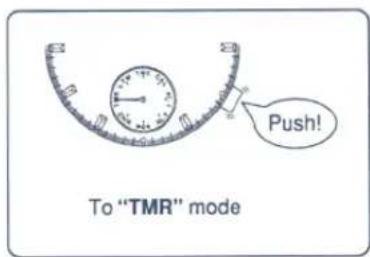
B. MODE CHANGE-OVER
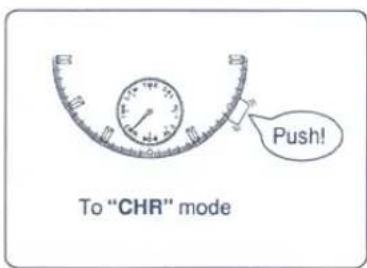
Push the (M) button in the normal position to switch between modes as shown below
flowchart
graph TD
A["TME\nNormal time mode"] --> B["CAL.\nCalendar mode"]
B --> C["AL-1\nQuick-setting alarm mode"]
C --> D["AL-2\nDaily alarm mode"]
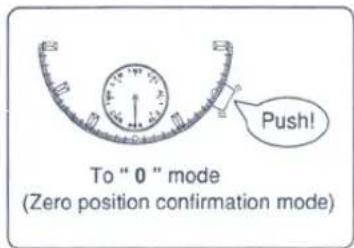
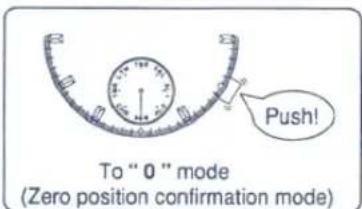
D --> E["▶ 0 ← Zero position confirmation mode"]
F["L-TM\nLocal time mode"] --> G["TMR\nTimer mode"]
G --> H["CHR\nStopwatch mode"]
H --> E
Note:
Always check the mode hand to ensure the watch is set in the desired mode during use, since pressing the (M) button unknowingly during operation may occur.
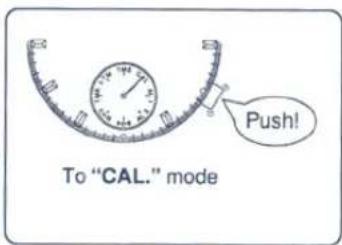
C. BEFORE USE
Before use, follow the procedures below to ensure that all watch components are in proper working order: Confirm the Zero position setting.


- All hands move to the "0" position.
•The 24-hour hand is synchronized with the hour/minute hands.

Each hand positioned as listed below confirms the "0" position setting is correct.

If the watch hands are not positioned as above, follow the Zero position setting procedures to ensure proper use.
Zero position setting
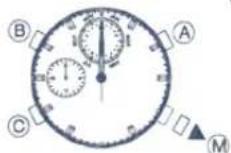
1) Pull the (M) button out to the first step position. Push the (A) button to set the second hand to the 0 sec. position. Push the (B) button to set the Aux. feature hand to the 0 hour position. Push the (C) button to set the hour/minute/24-hour hands to the 0 hour,0 minute position.
2) Be sure to push the (M) button in to its normal position. This completes the Zero position setting.
☆ Press and hold down either of the (A), (B), (C) buttons to activate the quick-advance feature.
☆ A strong shock may cause hands to move from the zero position in to shift. In this case, reset to the correct zero position.
D. HOW TO SET AND OPERATE EACH MODE
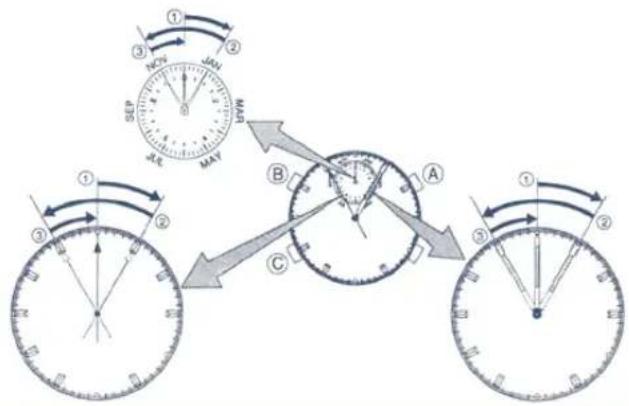
1. Hand Movement Demonstration
Pushing either of the (A), (B) and (C) buttons once will cause the second, minute and auxiliary feature hands to stop in the "0" position after moving through the following stages.
- Minute hand: ① + 5min. → ② -10min. → ③ +5min. - Second hand: ① + 5sec. → ② -10sec. → ③ +5sec. - Aux. hand: ① + 5 → ② -10 → ③ +5
8
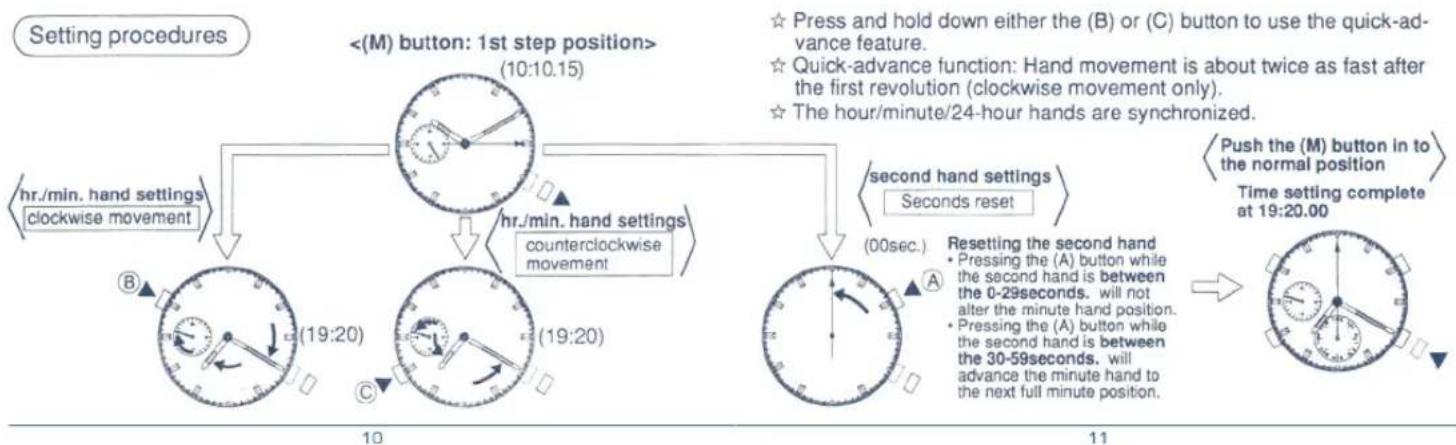
2. Setting the Time (TME)
Changing the time from 10:10.15 to 19:20.00
<(M) button normal position>
- The hour/minute hand is based on the 12-hour clock system. Use the 24-hour hand as a reference under normal time setting procedures to determine morning/afternoon times.
9
flowchart
graph TD
    A["Setting procedures"] --> B["<<M> button: 1st step position> (10:10.15)"]
    B --> C["hr./min. hand settings clockwise movement"]
    B --> D["hr./min. hand settings counterclockwise movement"]
    B --> E["second hand settings Seconds reset"]
    C --> F["10"]
    D --> G["19:20"]
    E --> H["19:20"]
    F --> I["Resetting the second hand"]
    G --> I
    H --> I
    I --> J["Pressing the (A) button while the second hand is between the 0-29seconds. will not alter the minute hand position. Pressing the (A) button while the second hand is between the 30-59seconds. will advance the minute hand to the next full minute position."]
    J --> K["Push the (M) button in to the normal position"]
    K --> L["Time setting complete at 19:20.00"]
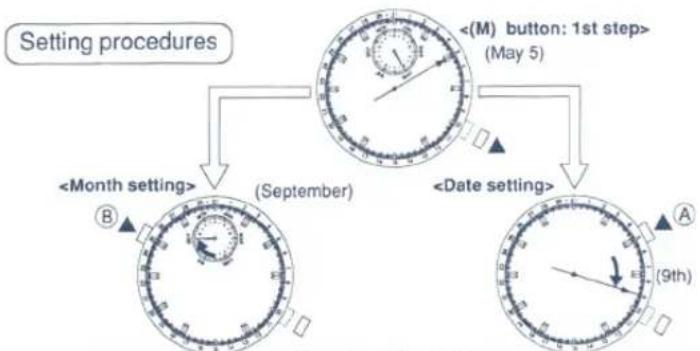
3. Setting the Calendar (CAL.) Changing the calendar from May 5
Automatic calendar system The calendar feature on this watch requires no adjustment at the end of the month. Adjustment is required for Feb. 29 during a leap year.
<(M) button normal position>
flowchart
graph TD
    A["Setting procedures"] --> B["<Month setting> (September)"]
    A --> C["<Date setting> (September)"]
    B --> D["<M) button: 1st step> (May 5)"]
    C --> E["<M) button: 1st step> (May 5)"]
☆ Press and hold down either the (A) or (B) button for the quick-advance feature.
☆ The month and date must be independently set.
〈Push the (M) button in〉
to the normal position
Calendar setting complete at Sep. 9
Automatic calendar correction system
When a nonexistent date is entered, the watch will automatically set the date to the 1st of the following month when the (M) button is pushed in to the normal position.
(For example: Feb. 30 ' March 1)
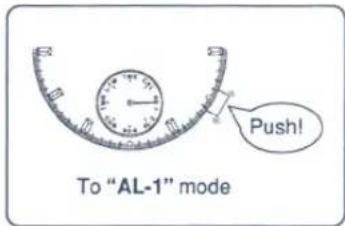
4. Setting the Quick-set Alarm (AL-1)
Setting the alarm to ring 50 minutes from the current time, 19:20, at 20:10
Quick-set alarm function
When the alarm is OFF the hr./min./sec./24-hour hands display the current time. This feature allows the alarm to be easily set to the desired time within the 23 hour 59 minute maximum limit. Following one ring of the alarm (10 seconds) the alarm setting is automatically cleared from memory and the auxiliary time display returns to the current time.

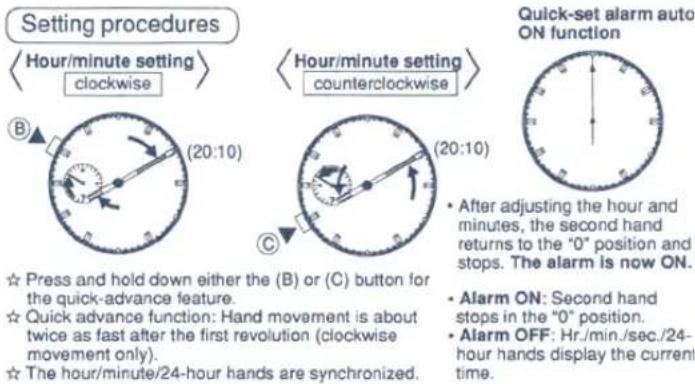
☆ Press and hold down either the (B) or (C) button for the quick-advance feature.
☆ Quick advance function: Hand movement is about twice as fast after the first revolution (clockwise movement only).
☆ The hour/minute/24-hour hands are synchronized.
• After adjusting the hour and minutes, the second hand returns to the "0" position and stops. The alarm is now ON.
- Alarm ON: Second hand stops in the "0" position.
- Alarm OFF: Hr./min./sec./24-hour hands display the current time.
Alarm quick-set is complete
(20:10)

Canceling the quick-set alarm
- Press the (A) button after setting the quick-set alarm and the hour/minute/second/24-hour hands will display the current time. The quick-set alarm will be turned OFF.
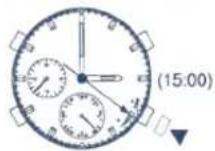
5. Setting the Daily Alarm (AL-2) Setting the alarm to ring everyday at 15:00
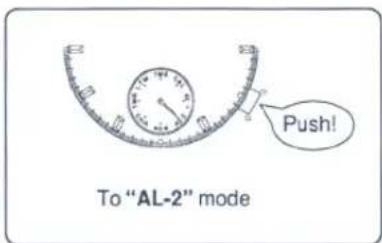
- Daily Alarm function
After the alarm time has been set once, the alarm will sound everyday at the same time for 15 seconds.
• Alarm sound switch
This switch lets you choose between 2 levels of sounds (loud or soft) for the alarm.
<(M) button normal position>

Sound monitor
(8 seconds)

• Sound can be monitored by pressing the (A) button when the daily alarm is ON or OFF.
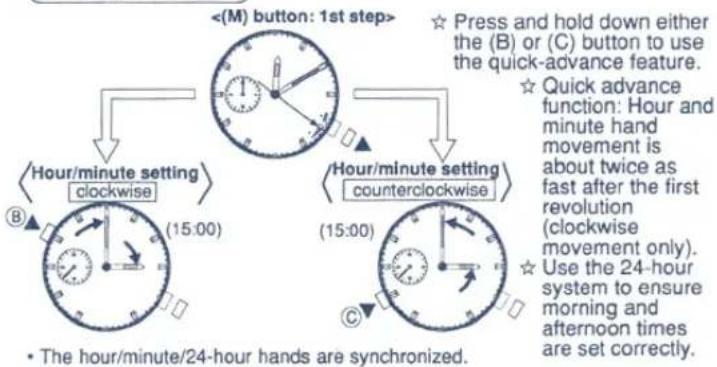
Setting procedures
flowchart
graph TD
    A["Hour/minute setting clockwise"] --> B["<M> button: 1st step"]
    B --> C["Hour/minute setting counterclockwise"]
    C --> D["• The hour/minute/24-hour hands are synchronized."]
    style A fill:#f9f,stroke:#333
    style B fill:#ccf,stroke:#333
    style C fill:#cfc,stroke:#333
    style D fill:#fcc,stroke:#333
Daily Alarm auto ON
Daily Alarm sound selector
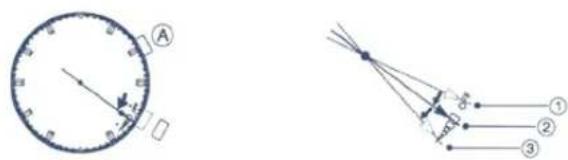
- Pull the (M) button out to the 1st step position. The second hand moves to position ② and the alarm is turned ON.
- Press the (A) button to switch between a softer or louder sound level, (The level of the alarm sound in position ③ is softer than position ②.) or to switch alarm OFF (Position ①).
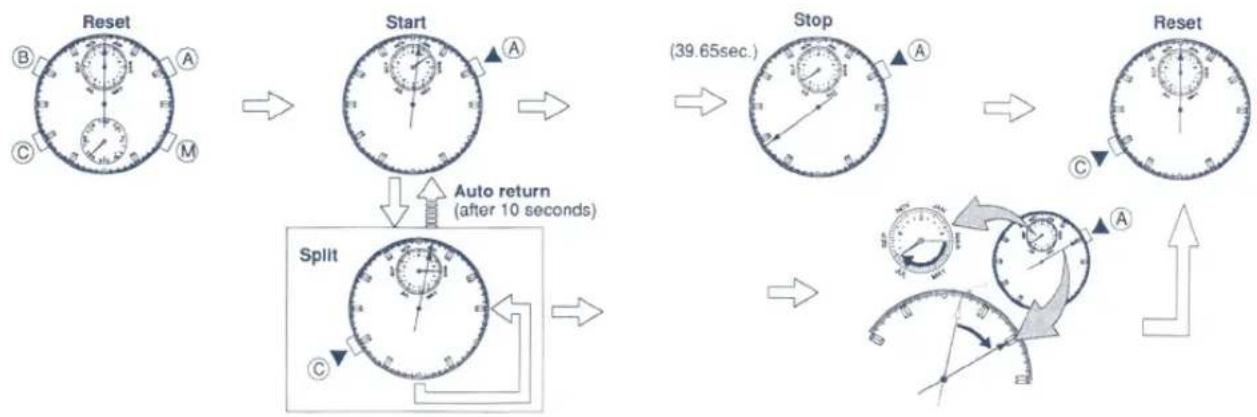
6. Stopwatch Operation (CHR)
- Max.stopwatch range: 60 minutes in 1/20sec. intervals. The auxiliary hand displays in 1/20 sec. increments.
- Starting from the stopwatch reset state, the auxiliary hand advances for 1 minute. The number of elapsed minutes exceeding one minute are displayed.
• The hour/minute/24-hour hands display the current time in the stopwatch mode.
flowchart
graph TD
    A["Reset"] --> B["Start"]
    B --> C["Stop"]
    C --> D["Reset"]
    D --> E["Split"]
    E --> F["Auto return (after 10 seconds)"]
    F --> G["Time: 39.65 sec."]
1/20 sec. Display (effective only timings exceeding 1 minute.)
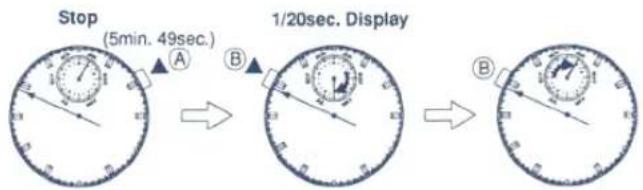
• 1/20sec. displays only while the (B) button is held down.
- Release the (B) button to display the number of elapsed minutes with the auxiliary hand.
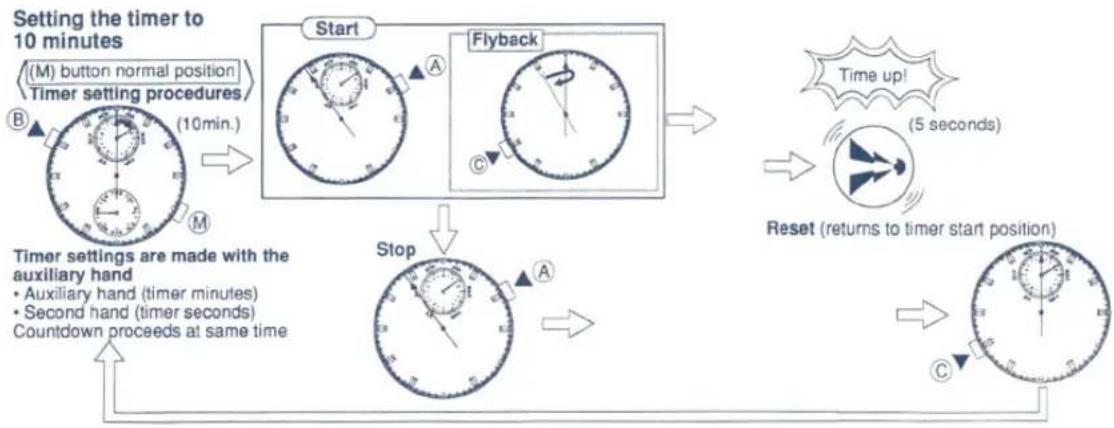
- Setting the Timer (TMR)
• Max.timer range: 60 minutes in 1-minute intervals.
- Flyback function: This feature allows you to press the (C) button after the timer countdown has started to return to the beginning of the timer setting and automatically start the countdown over again.
• The hour/minute/24-hour hands display the current time in the timer mode.
flowchart
graph TD
    A["Starting Clock"] --> B["Step 1: Setting the timer to 10 minutes"]
    B --> C["Step 2: Timer setting procedures (M) with timer normal position"]
    C --> D["Step 3: Timer setting procedure (10min)"]
    D --> E["Step 4: Timer setting procedure (M) with auxiliary hand"]
    E --> F["Stop: Timer setting procedure is made with auxiliary hand"]
    F --> G["Step 5: Check counter with second-hand hand"]
    G --> H["Reset: Time up! returns to timer start position"]
    H --> I["Step 6: Check counter with second-hand hand"]
    I --> J["End"]
☆ A confirmation beep sounds with each start, stop, reset and flyback operation.
☆ Press and hold down the (B) button to use the quick-advance feature while setting the timer.
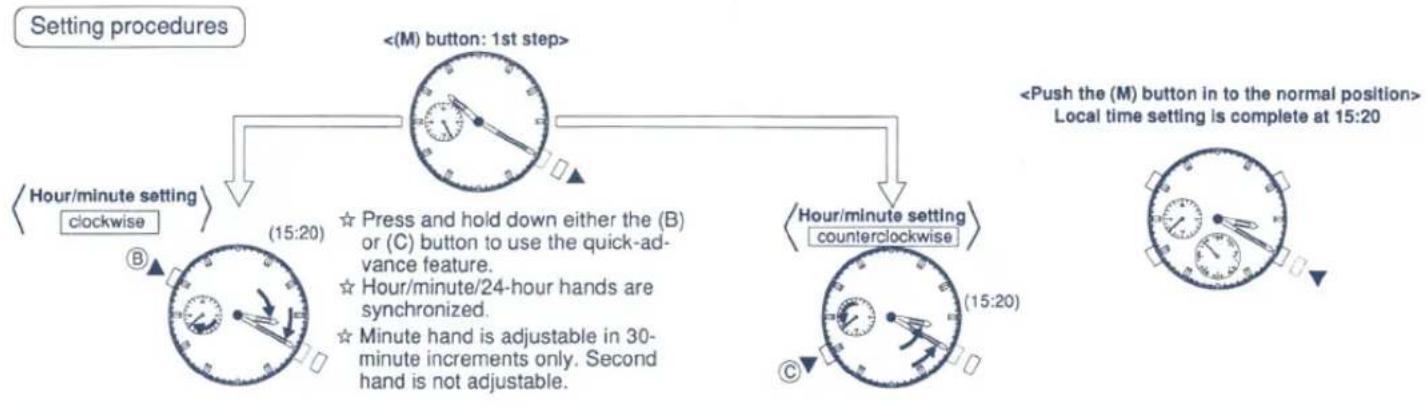
8. Setting the Local Time (L-TM) Changing the local time from 10:20 to 15:20
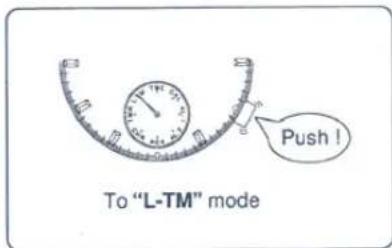
- Local time is the time in the current location. On business trips and the like, the dual time feature can be used by setting the watch to the local time.
<(M) button normal position>
flowchart
graph TD
    A["<<M) button: 1st step>"] --> B["<<Hour/minute setting clockwise"]
    A --> C["<<Hour/minute setting counterclockwise"]
    B --> D["Hour/minute setting clockwise clockwise"]
    C --> E["Hour/minute setting counterclockwise"]
    D --> F["20:00 clockwise"]
    E --> G["20:00 counterclockwise"]
    style A fill:#f9f,stroke:#333
    style B fill:#ccf,stroke:#333
    style C fill:#cfc,stroke:#333
    style D fill:#fcc,stroke:#333
    style E fill:#cff,stroke:#333
    note right of A
        Press and hold down either the (B) or (C) button to use the quick-advance feature.
        Hour/minute/24-hour hands are synchronized.
        Minute hand is adjustable in 30-minute increments only. Second hand is not adjustable.
    end
    note right of C
        <Push the (M) button in to the normal position>
        Local time setting is complete at 15:20
    end
9. Monitoring in the Normal Time Mode
a. Calendar monitor
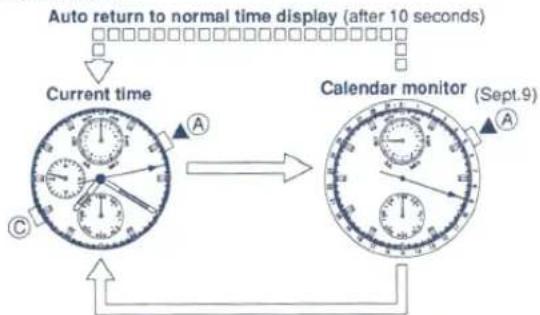
flowchart
graph TD
    A["Current time"] --> B["Calendar monitor (Sept.9)"]
    B --> C["Auto return to normal time display (after 10 seconds)"]
    style A fill:#f9f,stroke:#333
    style B fill:#bbf,stroke:#333
    style C fill:#dfd,stroke:#333
- Push the (A) or (C) button to cancel the calendar monitor.
b. Daily alarm (AL-2) set monitor
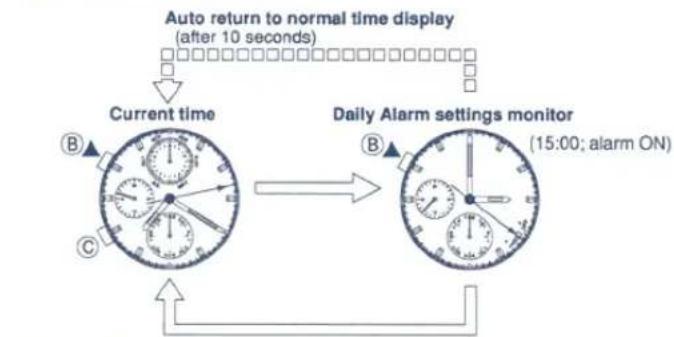
flowchart
graph TD
    A["Current time"] --> B["Auto return to normal time display (after 10 seconds)"]
    B --> C["Daily Alarm settings monitor (15:00; alarm ON)"]
    C --> D["Feedback Loop"]
    D --> E["Clock with directional arrows indicating signal flow"]
- Push the (B) or (C) button to cancel monitoring.
☆ Press the (B) button while monitoring the calendar to monitor the alarm (AL-2) settings.
☆ Press the (A) button while monitoring the daily alarm (AL-2) settings to monitor the calendar settings.
☆ Both of the above monitor modes automatically return to the current time after 10 seconds. (auto return)
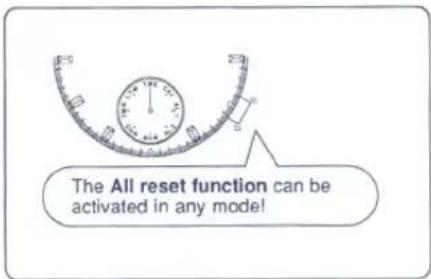
10. All Reset Function
The all reset function is used following battery replacement or abnormal watch movement
All reset procedure
- Pull the (M) button out to the first step position.
- Push and hold down the (A),(B),(C) buttons simultaneously for more than 2 seconds.
- Release all three buttons and a confirmation beep will sound and the minute, second, auxiliary hands will move slightly. Push the (M) button in to the normal position after completing the above procedures and set all hands (except mode hand) to 0. (See BEFORE USE: "Zero position setting", and then set the time.)
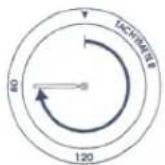
11. TACHYMETER BEZEL
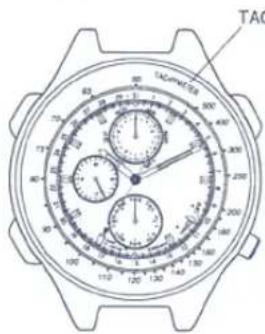
The tachymeter is the device which measures the speed of an automobile. Knowing in how many seconds the car covers a distance of 1km, the meter can measure the approximate average speed per hour during a journey (up to the maximum measurable range of; 60 seconds.)
If the stopwatch is started at the same time as measurement, and stopped after 1km, the average speed per hour can be determined according to the position of the second hand.
If the car covers the distance of 1km in 45 seconds, the average hourly speed during the journey will be about 80km.
E. SPECIFICATIONS
-
Type: Analog multi-hand quartz watch
-
Quartz oscillation frequency: 32,768 hertz
-
Accuracy: ±20 seconds per month at normal temperature (5°C-35°C/41°F-95°F)
-
Effective temperature range: -10°C to 60°C (14°F to 140°F)
-
Converters: Bi-polar step motor x 3 pcs.
-
Additional features
• Hand-display calendar
Leap year, month, date display; automatic month-end, leap year adjustment
• Alarm 1 (Quick-set alarm)
Maximum setting: 23 hours 59 minutes at 1-minute increments
• Alarm 2 (Daily alarm)
-Stopwatch
Maximum setting: 60 minutes
Split time measurements in minutes, seconds, 1/20 seconds
- Timer
Maximum setting: 60 minutes at 1-minute increments
- Local time
Hour, minute (30-minute increment settings; seconds cannot be adjusted)
- Calendar monitor
• Daily Alarm set time monitor
• Second reset function
- Battery: 1 Silver oxide cell
• Battery No.: 280-44 (SR927W)
- Battery Life: about 2 years after installation of new battery under
the following conditions
Alarm total: 25sec./day
(Alarm 1: 10sec.)
(Alarm 2: 15sec.)
Timer: once/day
Chronograph: 60min./day
- IC
1 CMOS-LSI
F. USE PRECAUTIONS
1.Resistance to water (check your watch's water resistance.)
| Watch underside | Watch face | |
| Non-water resistant | —— | —— |
| Ordinary water resistance |  These words are engraved on watch underside. These words are engraved on watch underside. | —— |
| Ordinary strengthen water resistance (5 bar) (10bar) |  WATER RESIST※※※ WATER RESIST※※※ |
* The words "WATER RESIST" on the underside of the watch indicate it is resistant to an average daily exposure to water or can be worn while doing such kitchen work as washing dishes.
* The words "WATER RESIST" followed by the number "100" or "10bar" on the dial indicate the watch is ordinary strengthen water resistant (Please note that for some types the indication cannot be shown on their faces due to their particular designs.)
* 50 or 5 bar: Water resistance at 5 atmospheres. 100 or 10 bar: Water resistance at 10 atmospheres.
| Ageinstoccasionalwater drops towhich it maybe temporarilysubjected. | Using itkitchen work,swimmingwashing a carboating orwaterskiing. | Using itskindiving. | Using itscubadiving. | Pulling outthe crownwhen thewatch is wet. | |
| Non-waterresistant watch | NO | NO | NO | NO | NO |
| Ordinary waterresistance | OK | NO | NO | NO | NO |
| Ordinary strenghtenwater resistance(5 bar) | OK | OK | NO | NO | NO |
| Ordinary strenghtenwater resistance(10bar) | OK | OK | OK | NO | NO |
After swimming
- Wash the watch in the fresh water cianly from sea water as otherwise it may rust.
• Dry the watch after washing.

With a small amount of moisture included inside the watch, the inner surface of the glass may be blurred for a while if the atmospheric temperature happens to be lower than that inside the watch. The blurred glass will soon clear. If the blurred glass does not clear, Please ask at the watch to the store where it was purchased or the store that handles Citizen Quartz watches.
2. Temperature

Do not expose the watch to direct sunlight or high temperatures for a long time as this may shorten power cell life.

Do not expose to extreme cold for a long time. This may reduce accuracy. Normal accuracy returns when the watch is restored to normal temperature.
3. Strong Shocks

This watch is designed to with stand external shocks such as those associated with golfing or playing ball.

Avoid dropping it or subjecting it to other strong jolts.
4. Magnetism
OK

This watch is not influenced by the magnetic force exuded by television sets, stereo sets and other electric home appliances.
NO

Do not place near magnets.
The watch runs faster or slower temporarily when it is placed close to magnets. Magnetic health equipment (e.g. magnetic necklace, magnetic stomach band, etc.), magnetic refrigerator door or magnetic mahjong table. In such cases, adjust the time.
5. Chemicals, Gas and Mercury
NO

Do not expose it to chemicals or gas. Be careful of using chemicals. Solvents such as benzine and paint thinner (and products containing solvents such as gasoline, manicure remover, certain cleaners and adhesives) may cause discoloration, melting and cracking the watch case. Do not expose the watch to mercury, such as that in clinical thermometers, since mercury could discolor the case, face and band of the watch.
6. Care of Leather Watch Bands
The leather band is damaged much more easily by moisture and perspiration than the metal band. Therefore, we would like to recommend you to replace to suitable metal band or rubber band if you use your watch under wet conditions frequently.

By virtue of the regulations pursuant to the handling of waste products deriving from electronic and electrical equipment, end of lifecycle watch making products must be selectively collected for processing. You may therefore dispose of your quartz watch making products at any of our retail outlets or any other authorized collection point. The selective collection, processing, rating and recycling of these products helps contribute to safeguarding the environment and protecting our health.