LAC-M6500RS - Car stereo LG - Free user manual and instructions
Find the device manual for free LAC-M6500RS LG in PDF.

| Product Type | Car Stereo Receiver |
| Brand | LG |
| Model | LAC-M6500RS |
| Form Factor | DIN (Single/Double) |
| Dimensions (W x H x D) | Approx. 178 x 50 x 160 mm |
| Weight | Approx. 1.2 kg |
| Power Supply | 12V DC (Negative Ground) |
| Maximum Power Output | 4 x 50 Watts |
| RMS Power Output | 4 x 22 Watts |
| Supported Media | CD, CD-R/RW, MP3, WMA |
| Radio Bands | FM, AM |
| Preset Stations | 30 (FM) + 12 (AM) |
| Audio Features | Equalizer, Bass/Treble, Loudness, Fader/Balance |
| Display | LCD with Backlight |
| Connectivity | AUX Input, USB Port, Front/Rear Audio Out |
| Remote Control | Included (Wired or Wireless) |
| Security Feature | Detachable Faceplate |
| Care and Cleaning | Wipe with dry cloth; avoid liquids |
| Spare Parts & Repairability | Replacement faceplate and knobs available |
| Certifications | CE, RoHS |
Frequently Asked Questions - LAC-M6500RS LG
User questions about LAC-M6500RS LG
0 question about this device. Answer the ones you know or ask your own.
Ask a new question about this device
Download the instructions for your Car stereo in PDF format for free! Find your manual LAC-M6500RS - LG and take your electronic device back in hand. On this page are published all the documents necessary for the use of your device. LAC-M6500RS by LG.
USER MANUAL LAC-M6500RS LG
Car CD/MP3/WMA Receiver
OWNER'S MANUAL MODEL : LAC-M6500RS


Please read this instruction booklet carefully and completely before connecting, operating or adjusting this product.
HON
Table of Contents 2
Safety Precautions 3
Before Use. 4-6
Front Panel....7
Remote Control....8
PREPARATION
Installation 9
Connections....10-13
OPERATION
Basic Operation 14-16
Turning the unit on....14
Turning the unit off....14
Selecting a source 14
Adjusting the volume 14
Checking the clock. 14
SOUND Adjustment....15
Adjusting the Back Lighting Color....16
Adjusting the changing time of Back Lighting Color....16
BEEP SOUND FUNCTION 16
Setting the USER mode....16
RDS Operation....17-19
RDS Display Options 17
RDS AF/REG FUNCTION 17
PROGRAM TYPE FUNCTION....17
RDS MODE Adjustment....18
Radio Operation 19
Listening to radio stations 19
Auto Search Memory 19
Storing and recalling broadcast frequencies....19
Operation with Audio CD, MP3/WMA Disc, USB and CD
changer....20-21
Playing an Audio CD and MP3/WMA Disc 20
Playing a CD changer (OPTIONAL) 20
REFERENCE
Troubleshooting 22
Specifications 23

CAUTION


Warning: To reduce the risk of electric shock, do not remove the cover or back of this product. There are no user-serviceable parts inside. Refer servicing to qualified service personnel.

Warning: To reduce the risk of fire or electric shock, do not expose this product to dripping or splashing water, rain, or moisture.

Warning: Due to high temperature outside of the unit, please use the unit only installed in a car.
CAUTION:
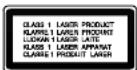
This unit employs a Laser System.
To ensure proper use of this product, please read this owner's manual carefully and retain for future reference.
Should the unit require maintenance, contact an authorized service location (see service procedure).
Use of controls, adjustments, or the performance of procedures other than those specified herein may result in hazardous radiation exposure.
To prevent direct exposure to the laser beam, do not open the enclosure. Visible laser radiation when open. DO NOT STARE INTO BEAM.

Caution: Protect this product from moisture.

Caution: If the battery is disconnected or discharged, the preset memory will be erased and must be reprogrammed.
The proper use of this product, please read this owner's staff carefully and retain for future reference.
Symbols Used in this Manual

The lightning flash symbol alerts you to the presence of dangerous voltage within the product enclosure that may constitute a risk of electric shock.

Indicates hazards likely to cause harm to the unit itself or other material damage.
NOTE
Indicates special notes and operating features.
TIP
Indicates tips and hints for making the task easier.
Notes on Discs
Handling Discs
Do not touch the playback side of the disc. Hold the disc by the edges so that fingerprints do not get on the surface. Never stick paper or tape on the disc.


Storing Discs
After playing, store the disc in its case. Do not expose the disc to direct sunlight or sources of heat and never leave it in a parked car exposed to direct sunlight.
Cleaning Discs
Fingerprints and dust on the disc can cause poor picture quality and sound distortion. Before playing, clean the disc with a clean cloth. Wipe the disc from the center out.

Do not use strong solvents such as alcohol, benzine, thinner, commercially available cleaners, or anti-static spray intended for older vinyl records.
This unit cannot be operated with 8cm disc (use 12cm discs only).

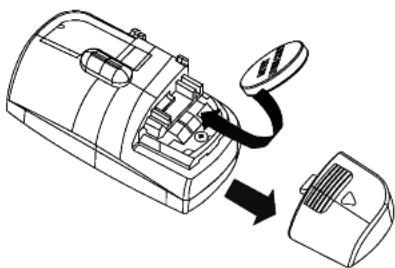
Use and care of the remote control
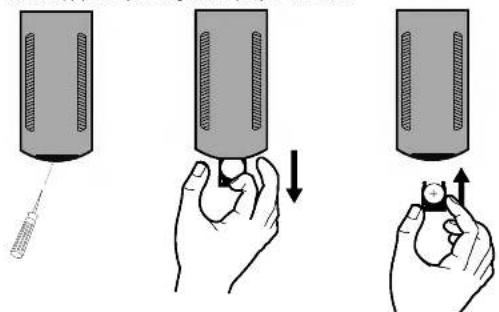
Installing the battery
Pull out the tray outward on the back of the remote control with a pencil or ball point pen and insert the battery with the plus (+) minus (-) poles pointing in the proper direction.
natural_image
Illustration of three-step procedure showing hand positioning and lifting a component (no text or symbols)Using the remote control
Point the remote control in the direction of the front panel to operate.
NOTES
- The remote control may not function properly in direct sunlight.
- Do not store the remote control in high temperatures or sunlight.
- Do not let the remote control fall onto the floor, where it may become jammed under the brake or accelerator pedal.
Handling the Unit
- This unit is designed to be operated on a 12 volt DC negative ground electrical system only.
- When replacing the fuse, be sure to use fuseone with an identically rated amperage. Use of a fuse with a higher amperage may cause serious damage to the unit.
- Periodically wipe the contacts on the back of the front panel with a cotton swap moistened with alcohol.
NOTES
• Use only one CR2025 (3V) lithium battery.
- Remove the battery if the remote control is not used for a long period of time.
- Do not recharge, disassemble, heat or dispose of the battery in fire.
- Do not handle the battery with metallic tools.
- Do not store the battery with metallic materials.
- In the event of battery leakage, wipe the remote control completely clean and install a new battery.
your unit from theft
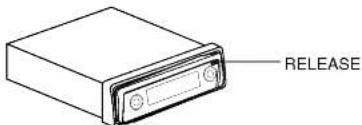
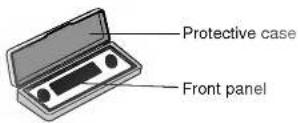
The front panel can be detached from the main body and stored in the protective case provided to discourage theft.
- Press RELEASE to open the front panel.
-
Push the front panel to the right.
-
Pull the front panel.
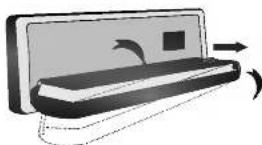
- Put the front panel into the protective case provided for safe keeping.
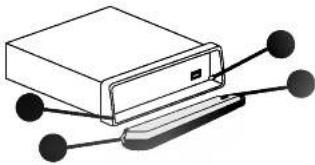
Attaching the front panel
natural_image
Diagram of a rectangular electronic device with connected ports and connectors (no text or symbols)- Place ● the front panel to ● on the main unit.
- Join ● on the front panel to ● on the main unit by pushing it to the left.
- Close the front panel
NOTES
- When detaching or attaching the front panel, do not press the display or control buttons.
- The control buttons may not work if the front panel is not attached properly. If this occurs, gently press the front panel.
- Do not leave the front panel in any area exposed to high temperatures or direct sunlight.
- Do not drop the front panel or otherwise subject it to severe impacts.
- Do not allow volatile agents such as benzine, thinner, or insecticides to come into contact with the surface of the front panel.
- Do not try to disassemble the front panel.

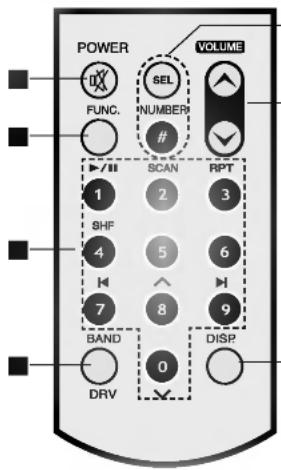
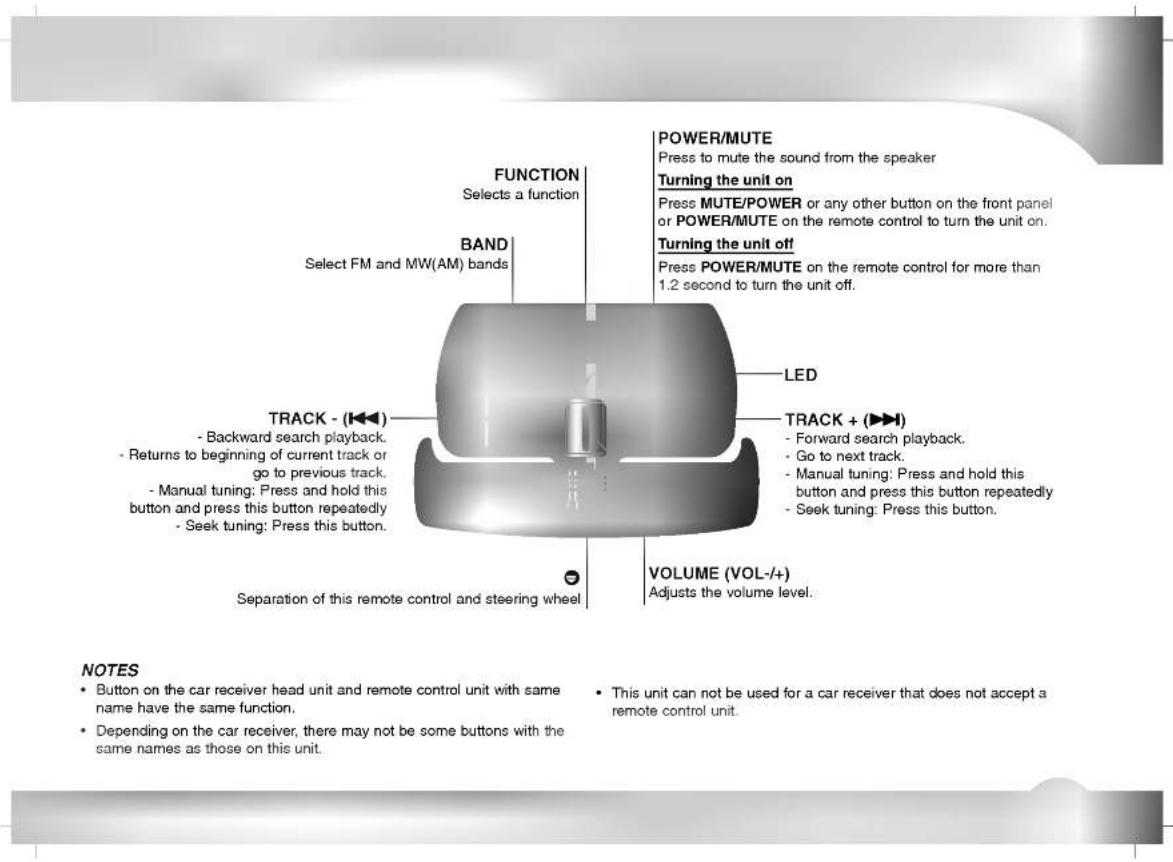
POWER/MUTE (吋)
- Switches the unit ON and OFF.
- Press to mute the sound from the speaker.
FUNCTION (FUNC.) button
Selects a function
- 0-9 number buttons
- Preset Station buttons. (1-6)
- PLAY/PAUSE (▶/II)
- Starts playback.
- Pauses playback temporarily.
• SCAN - Plays the first 10 seconds of all tracks.
• REPEAT (RPT) - Plays tracks repeatedly.
• SHF - Plays tracks in random order.
- SKIP/SEARCH (◀/▶)
- Backward or forward search playback.
- Go to next track.
Returns to the beginning of the current track or goes to the previous track.
• DISC SELECTOR (D+/-) button (Optional) - FOLDER UP/DOWM ( ^ / √ ) button
BAND
- Selects three FM and MW (AM) bands.
- DRV button.
- Go to next driver
• SEL
- Enters the audio settings.
• NUMBER (#) - To play a file directly, press NUMBER (#) button and then press the track number with 0-9 number buttons.
VOLUME (✓ / ▲)
Adjusts the volume level.
• DISPLAY (DISP.)
- Changes the display.
Basic Installation
Before installing, make sure that the ignition-switch is set to OFF and remove the car battery terminal to avoid short-circuiting.
- Remove the existing receiver unit.
- Make the necessary connections.
- Install the mounting sleeve.
- Install the unit in to the mounting sleeve.
Removing existing receiver unit
If there already is a mounting sleeve for the receiver unit in the dashboard, it must be removed.
When removing the unit from the mounting sleeve
If you need to remove the unit from the mounting sleeve, proceed as follows.
- Remove the rear support from the unit.
- Remove the front panel and trim ring from the unit.
- Insert the lever ● into the hole on one side of the unit. Perform the same operation on the other side and pull the unit out from the mounting sleeve.
ISO-DIN Installation
- Slide the unit into ISO-DIN frame.
- Install screws removed from old unit.
- Slide the unit and frame into the dash opening.
- Mount the dash panel or adapter plate.
- Mount the trim ring onto the unit.
- Install the faceplate by sliding the right edge into position and then pushing the left edge closed.

PREPARATION
ng to the Car
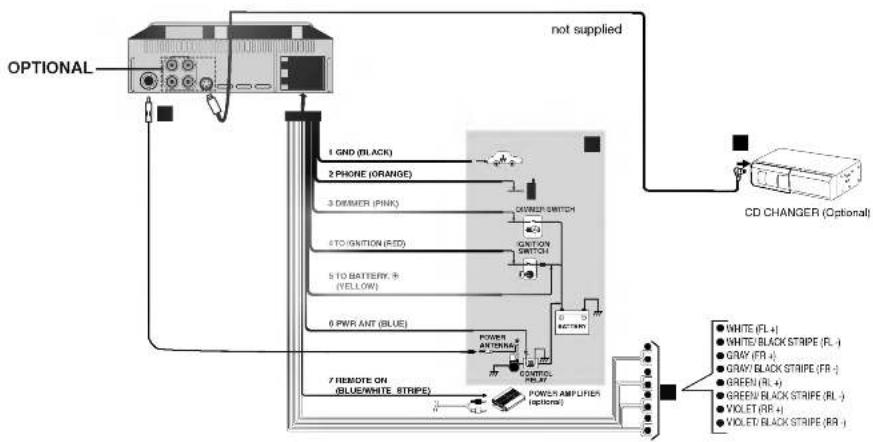
Before connecting, make sure that the ignition switch is set to OFF, and remove the battery ⊖ terminal to avoid short circuits.
flowchart
graph TD
    A["OPTIONAL"] --> B["CD CHANGER (Optional)"]
    B --> C["POWER AMPLIFIER (optional)"]
    C --> D["1 GND (BLACK)"]
    C --> E["2 PHONE (ORANGE)"]
    C --> F["3 DIAMER (PINK)"]
    C --> G["4 TO IGNITION (RED)"]
    C --> H["5 TO BATTERY R (YELLOW)"]
    C --> I["6 PWR ANT (BLUE)"]
    C --> J["7 REMOTE ON (BLUE/WHITE STRIPE)"]
    J --> K["POWER ANTONATION"]
    K --> L["POWER SWITCH"]
    L --> M["CD CHANGER (Optional)"]
    style A fill:#f9f,stroke:#333
    style B fill:#ccf,stroke:#333
    style C fill:#cfc,stroke:#333
    style D fill:#fcc,stroke:#333
    style E fill:#cff,stroke:#333
    style F fill:#ffc,stroke:#333
    style G fill:#cfc,stroke:#333
    style H fill:#fcc,stroke:#333
    style I fill:#ffc,stroke:#333
    style J fill:#fcc,stroke:#333
    style K fill:#cff,stroke:#333
    style L fill:#ffc,stroke:#333
    style M fill:#fcc,stroke:#333
    style N fill:#ffc,stroke:#333
    style O fill:#fcc,stroke:#333
    style P fill:#ffc,stroke:#333
    style Q fill:#fcc,stroke:#333
    style R fill:#ffc,stroke:#333
    style S fill:#fcc,stroke:#333
    style T fill:#ffc,stroke:#333
    style U fill:#fcc,stroke:#333
    style V fill:#ffc,stroke:#333
    style W fill:#fcc,stroke:#333
    style X fill:#ffc,stroke:#333
    style Y fill:#fcc,stroke:#333
    style Z fill:#ffc,stroke:#333
Connecting to the Car
A From antenna
B To the wiring of vehicle Colors of leads
1 BLACK : This lead is for the Ground connection.
2 ORANGE: This lead is for the phone line connection.
3 PINK : This lead is for the Dimmer line connection.
4 RED : This lead is for connection to the power supply terminal when the ignition switch is set to ACC.
5 YELLOW : This lead is for connection to the Batter (back-up) terminal from which power is always supplied.
6 BLUE : This lead is for the power antenna connection.
7 BLUE/WHITE STRIPE : This lead is for the remote amplifier on connection.
C Connect the CD changer
- Your car receiver works as the control unit for a CD changer which you can buy later, if you have not yet done so.
- The suitable cord will be provided together with the CD changer as shown on the scheme.
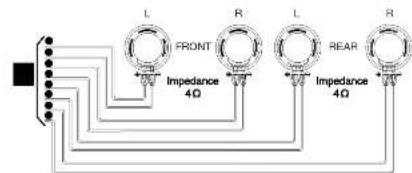
D Speaker Connections
ing to Auxiliary Equipment (OPTIONAL)
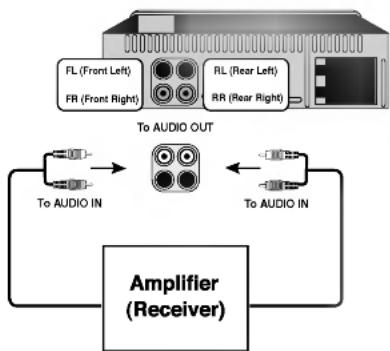
flowchart
graph TD
    A["To AUDIO OUT"] --> B["Amplifier (Receiver)"]
    B --> C["To AUDIO IN"]
    C --> D["FL (Front Left)"]
    C --> E["FR (Front Right)"]
    C --> F["RL (Rear Left)"]
    C --> G["RR (Rear Right)"]
    D --> H["Amplifier (Receiver)"]
    E --> H
    F --> H
    G --> H
- Connect the AUDIO OUTPUT connector of this unit to the AUDIO INPUT connector of Auxiliary Equipment.
Connecting USB port

- Connect the plug of USB cable into the USB port.
- Plug the USB device into the USB port of USB cable.
NOTES
- Don't remove a MP3 player or memory card while playing the USB.
- Numbers of file available are maximum 999 EA.
- Be sure to save file in the memory card after formatting.
• No cladding hard disk is supported. - The HARD MP3 (or memory, MP3 player etc.) player available is maximum 32GB.
- The MP3 player requiring installation of a drive is not supported.
• This unit is supported FAT format. - USB Hub is not supported. When connecting the this unit and USB Hub, "USB CHECK/NO USB" will be shown in display window.
- There may be memory and card not be recognized depending on the type of memory card.
the unit on
Press MUTE/POWER or any other button on the front panel or POWER/MUTE (OK) on the remote control to turn the unit on.
Turning the unit off
- Press MUTE/POWER on the front panel for more than 1.2 seconds to turn the unit off.
- Press POWER/MUTE (吋) on the remote control for more than 1.2 second to turn the unit off.
Selecting a source
You can select a source you want to listen to. Press FUNC to select a source. Press FUNC repeatedly to switch between the following sources: Tuner → USB → CD → CD Changer (optional) → Tuner...
NOTES
- When you turn the unit off, the current volume level is automatically memorized. Whenever you turn the unit back on, it will operate at the memorized volume level.
- If the USB function is not operated.
- Disconnect USB cable and then connect USB cable.
- Remove the front panel, and then attach the front panel
- When operating the USB function, Do not open the front panel.
- The unit which is connected goes wrong is a possibility of operating.
Adjusting the volume
Use VOLUME to adjust the sound level. Rotate the VOLUME KNOB on the front panel to increase or decrease the volume. Press VOLUME ( × / × ) on the remote control to increase or decrease the volume.
Checking the clock
You can see the clock press DISP..
NOTES
- If the unit is receiving RDS broadcasting with CT (Clock Time) information, the clock will be shown automatically in the display window.
- Unless, "NO CLOCK" appears in the display window.
SOUND Adjustment
Using the EQ (Equalizer)
The equalizer lets you adjust the equalization to match car interior acoustic characteristics as desired.
There are 7 stored equalizer curves which you can easily recall at any time.
Here is a list of the equalizer curves:
• EQ POP : Reproduces pop music acoustics.
• EQ CLASSIC : Reproduces orchestral music acoustics.
• EQ ROCK : Reproduces rock music acoustics.
• EQ JAZZ : Reproduces jazz music acoustics.
• EQ VOCAL: Reproduces vocal music acoustics.
• EQ USER 1 : Selects an initial user mode.
• EQ USER 2 : Selects an initial user mode.
-
Press EQ/XDSS on the front panel to select the equalizer.
-
Press EQ/XDSS repeatedly to choose between the following Equalizer settings.
$$ \text { Pop } \rightarrow \text { Classic } \rightarrow \text { Rock } \rightarrow \text { Jazz } \rightarrow \text { Vocal } \rightarrow \text { User 1 } $$
$$ \rightarrow \text { User } 2 \rightarrow \text { Flat(EQ OFF) } \rightarrow \text { Pop } \dots $$
MUTE
- Press MUTE/POWER [POWER/MUTE (吸)] to cut the sound.
- To cancel it press MUTE/POWER [POWER/MUTE (OK)] again.
XDSS+ (Extreme Dynamic Sound System)
Press and hold the EQ/XDSS button to reinforce treble, bass and middle.
$$ \text { XDSS off (No display) } \rightarrow \text { XDSS } \rightarrow \text { XDSS+... } $$
SELECTION (SEL) Button
| Turn right | Turn left | |
| VOL | Increase the volume level. | Decrease the volume level. |
| BAS | Increase the bass level. | Decrease the bass level. |
| MID | Increase the Middle level. | Decrease the Middle level. |
| TRB | Increase the Treble level. | Decrease the Treble level. |
| BAL | Decrease the level of the left speaker(s). | Decrease the level of the right speaker(s). |
| FAD | Decrease the level of the front speaker(s). | Decrease the level of the rear speaker(s). |
1. WAY
- Select the USER EQ1, USER EQ2 or EQ OFF using the EQ/XDSS button
- Press the SELECTION (SEL) button repeatedly to select the mode you want to adjust from volume, bass, middle treble, balance and fader. The mode indicator lights up in the following order.
$$ \boxed {\begin{array}{c}\rightarrow \mathrm{VOL} \rightarrow \mathrm{BAS} \rightarrow \mathrm{MID} \rightarrow \mathrm{TRB} \rightarrow \mathrm{BAL} \rightarrow \mathrm{FAD}\\hline\end{array}} $$
- Turn the CONTROL UP/DOWN left or right (or press VOLUME (☑ /▲) on the remote control) to adjust the sound quality.
2. WAY
- Press the SELECTION (SEL) button repeatedly to select the mode you want to adjust from volume, balance and fader. The mode indicator lights up in the following order.
$$ \boxed {\rightarrow \mathrm{VOL} \rightarrow \mathrm{BAL} \rightarrow \mathrm{FAD}} $$
- Turn the CONTROL UP/DOWN left or right (or press VOLUME (✓ / ▲) on the remote control) to adjust the sound quality.
NOTE
The unit can adjust the bass, middle and treble in the USER EQ1, USER EQ2 or EQ OFF.
the Back Lighting Color
- Press the SEL button for more than 2 seconds it is activated selecting mode.
- After, pressing SEL button one by one activated as selecting Back Lighting Color mode.
- Adjust the Back Lighting Color.
- Turn left or right CONTROL UP/DOWN.
- Press VOLUME (▽ / △ ).
COL AUTO → COL RD (red) → COL GR (green) → COL YL (yellow) → COL BL (blue) → COL VL (violet) → COL SB2 (sky blue) → COL SB1 (sky blue) → COL AUTO ...
Setting the changing time of Back Lighting Color
This function is operated when If you select Back Lighting Color with AUTO
-
Press the SEL button for more than 2 seconds it is activated selecting mode.
-
After, pressing SEL button one by one activated as selecting the changing time of Back Lighting Color mode.
-
Setting the changing time of Back Lighting Color
- Turn left or right CONTROL UP/DOWN. - Press VOLUME (✓ / ∧). ColTm 5s (5 sec) → ColTm10s (10 sec) → ColTm15s (15 sec) → ColTm30s (30 sec) → ColTm 5s (5 sec) ...
BEEP SOUND FUNCTION
- Press the SEL button for more than 2 seconds it is activated selecting mode.
- After, pressing SEL button one by one activated as selecting BEEP SOUND.
- Turn left or right CONTROL UP/DOWN.
- Press VOLUME (☑ / ⬆ ).
• BEEP ALL
When any button is pressed, beep sounds.
• BEEP 2ND
When the button with long key function is pressed for more than 1 seconds, beep sounds.
Setting the USER mode
- Select the EQ OFF using the EQ/XDSS button
- Press the SELECTION (SEL) button repeatedly to select the mode you want to adjust from volume, bass, middle treble, balance and fader. The mode indicator lights up in the following order.
- Turn left or right CONTROL UP/DOWN (or press VOLUME (☑/▲) on the remote control) to adjust the sound quality.
- Press the SEL button for more than 2 seconds and press the SEL button repeatedly to select "SetUser1".
- Turn left or right CONTROL UP/DOWN to select "SetUser1" or "SetUser2".
- Press the SEL button for more than 2 seconds.
$$ \boxed {\rightarrow \mathrm{VOL} \rightarrow \mathrm{BAS} \rightarrow \mathrm{MID} \rightarrow \mathrm{TRB} \rightarrow \mathrm{BAL} \rightarrow \mathrm{FAD}} $$
RDS Display Options
In normal RDS operation the display will indicate the station name. Pressing DISP on the front panel enables you to cycle through the various data types in the following sequence:
(CT→FREQUENCY→PTY→RT→PS)
• CT (Time controlled by the channel)
• PTY (Program type recognition)
• RT (Radio text recognition)
• PS (Program Service name)
• PI (Program Identification)
• AF (Alternative Frequencies for the actual program)
• TP (Traffic Program Identification)
• TA (Traffic Announcement Identification)
• EON (Enhanced Other Networks)
NOTE
• RDS is only available for FM reception.
RDS AF/REG FUNCTION
To switch on or off the AF function (Network-Tracking), shortly press the 'AF' button. To switch on or off the REG function (Regional Network Tracking), long press the 'AF' button (more than 2 seconds).
LOCAL/DX selection in EON-TA mode
In the EON-TA mode, pressing the TA button for more than 2 seconds, causes only local and strong stations to be received. When the TA button is pressed for more than 2 seconds, it receives all stations, including distant and weak ones. It is recommended to set the TA button to the local position to receive local stations with good sound quality.
PROGRAM TYPE FUNCTION
To select a certain program type out of the reception band, the following procedure can be used.
- Press BAND to select in FM mode.
- After, press the PTY button repeatedly for selecting each mode. music group→speech group→search off
- Short press one of the PRESET (1-6) buttons. Each time this button is pressed, the display mode changes as follow.
| No | Music group |
| 1. | Pop M, Rock M |
| 2. | Easy M, Light M. |
| 3. | Classics, Other M |
| 4. | Jazz, Country |
| 5. | Nation M, Oldies |
| 6. | Folk M |
| No | Speech group |
| 1. | News, Affairs, Info |
| 2. | Sport, Educate, Drama |
| 3. | Culture, Science, Varied |
| 4. | Weather, Finance, Children |
| 5. | Social, Religion, Phone In |
| 6. | Travel, Leisure, Document |
Adjustment
- Pressing the SEL button for more than 2 seconds activates the select mode.
- After, pressing SEL button repeatedly for selecting.
- Turn the CONTROL UP/DOWN left or right (or press VOLUME (✓ / ▲) on the remote control) to select the indicator.
TA SEEK mode
When the newly tuned station does not receive TP information for 5 sec, the receiver retunes to the next station which has the same PI as the last station's, but has the TP information.
TA ALARM mode
When a newly tuned station has no TP information for 5 sec, a double beep sound is output.
PI SOUND mode
If the sound of a station with different PI is heard intermittently, the receiver mutes the sound after 1 second.
PI MUTE mode
If the situation described above is repeated, the receiver instantly mutes the sound.
RETUNE L mode
The waiting time for starting TA search or PI search is programmable. Retune time is set to 90 seconds.
RETUNE S mode
The waiting time for starting TA search or PI search is selectable. Retune time is set to 30 seconds.
Listening to radio stations
- Press the POWER/MUTE (OK) [MUTE/POWER on the front panel] button to turn the unit on.
- When you select a source the unit is turned on.
- Press the FUNC button to select the tuner.
- Press the BAND button to select a band.
- Press the BAND button until the desired band is displayed, FM1, FM2, FM3, MW(AM).
- To perform seek tuning, press the ◀/▶ with quick presses.
- The tuner will scan the frequencies until a broadcast with strong enough reception is found.
- You can cancel seek tuning by pressing the ◄/▶ with quick presses.
- To perform manual tuning, press and hold the ◀/▶ on the remote control for 1 second. And then press the ◀/▶ with quick presses.
- The frequencies move up or down step by step.
NOTE
- When the selected frequency is being broadcast in stereo, the “((•))” indicator will light.
Auto Search Memory
This function lets you automatically store the six strongest broadcast frequencies.
- Press the FUNC button to select the tuner.
- Press the AS/PS button on the front panel for about 1 second.
- Scanning starts from the currently displayed frequency to higher frequencies and stops when 6 stations have been preset or the receivable frequencies have been scanned once.
NOTES
- The presetting is not performed if there is no station to be tuned in.
- When automatic presetting is performed, the previous preset stations are automatically erased.
• To stop the automatic presetting, press the BAND or the AS/PS button.
Storing and recalling broadcast frequencies
You can easily store up to six broadcast frequencies for later recall with the touch of a button.
- Select the desired frequency
- Press one of the preset station buttons (1 - 6) for more than 1 seconds. The number of the pressed preset station button is displayed.
- Repeat steps 1 and 2 to preset other stations.
NOTES
- As F1, F2, F3 have the same frequency range, up to 18 station can be preset for FM.
- When a station is preset on the preset station button on which another station of the same band has already been preset, the previously preset station is automatically erased.
To scan the preset stations
Press the AS/PS button on the front panel.
To stop the scanning, press the AS/PS button.
To tune in the preset stations
Press BAND to select the desired band and press the desired number buttons (1-6) on the remote control.
The number of the preset station button is displayed and the preset station is received.

ation with Audio CD, MP3/WMA Disc, USB and CD changer
Play
Audio CD and MP3/WMA Disc

The unit can play MP3/WMA formatted recordings on CD-ROM, CD-R or CD-RW discs.
Before playing MP3/WMA recordings, read the notes on MP3/WMA Recordings on page 23.
- To directly play a file, press NUMBER (#) button and then press the track number with 0-9 number buttons.
Playing a CD changer (OPTIONAL)
Playback Setup
- Connect the CD Changer connector of this unit to the connector on this CD Changer on page 10.
-
Audio system: Turn on the audio system and select the input source connected to the unit.
-
Press MUTE/POWER or POWER/MUTE ( × ) to turn the unit on.
- Select the CD changer function pressing FUNC repeatedly.
- Insert a disc you want to play into the magazine. Playback starts automatically.
Moving to another Disc
Press D(+/-) briefly during playback to go to the next disc or step back to the previous disc.
Pause

- Press PLAY/PAUSE (▶/III) during playback.
- To return to playback, press PLAY/PAUSE (▶/▶) again.
Moving to another Track

- Press the ◀/▶ briefly during playback to go to the next track or to return to the beginning of the current track.
- Press ◀ twice briefly to step back to the previous track. (If playing times is less then 3 seconds this function is not operated.)
Moving to another FOLDER

Press FOLDER UP/DOWN ( / ) briefly to go to the next folder or step back to the previous folder.
Search

Press and hold the ◀/▶ for about 1 second during playback and then release at the point you want.
Moving to another DRIVER

When connecting the this unit to Multi reader and partition of memory, the DRV is used.
Press DRV briefly to go to the next Driver
- You can't select previous Driver using the DRV button.
Operation with Audio CD, MP3/WMA Disc, USB and CD changer
Repeat
-
- Press RPT during playback.
The "1 RPT" appears in the display window.
Press and hold RPT during playback.
MP3/WMA: The "RPT" appears in the display window.
(All of the file on the disc is played repeatedly.)
CDC: The "RPT" appears in the display window.
(All of the file on the discs in the CD changer played repeatedly)
- Press RPT again.
The "1 RPT" or "RPT" disappears in the display window.
(The repeat mode is cancelled.)
Shuffle
-
- Press SHF during playback.
The "SHF" appears in the display window.
- Press and hold SHF during playback.
MP3/WMA: The "ALL SHF" appears in the display window.
(All of the file on the disc is played randomly)
CDC :The "ALL SHF" appears in the display window.
(All of the file on the discs in the CD changer is played randomly)
- Press SHF again
The "SHF" or "ALL SHF" disappears in the display window.
(Random play mode is cancelled.)
NOTE
- During random playback, if you press ↕ button, you won't go back to the previous track.
Intro scan
-
- Press SCAN during playback.
The "SCAN" appears in the display window.
- Press and hold SCAN during playback.
MP3/WMA: The "ALL SCAN" appears in the display window.
( It is played the first 10 seconds of the whole file within the folder.)
CDC: The "ALL SCAN" appears in the display window.
(The first 10 seconds of all of the file on the discs in the CD changer
is played.)
- Press SCAN again.
The "SCAN" or "ALL SCAN" disappears in the display window.
( The intro scan is cancelled.)
CD TEXT/ID 3 TAG
Some discs have certain information encoded on the disc during manufacture. These discs may contain such information as title, artist's name and album name and are called CD TEXT discs.
When playing a disc containing information, you can see the information (Folder name, File name, ID3 TAG, Title, Artist or Album) in the display window. If there is no information,
"NO TEXT" will be shown in the display window.
Press the DISP button repeatedly during MP3/WMA file playback.
| Circuit symptom | Cause | Correction |
| Power doesn't turn on.The unit doesn't operate. | Leads and connectors are not properly connected.The fuse is blown.Noise and other factors are causing the built-in microprocessor to operate incorrectly. | Confirm once more that all connections are correct.Rectify the problem that caused the fuse to blow, and then replace it. Be very sure to install the correct fuse with the same rate.Turn the unit off and then on. |
| The unit does not operate correctly even when the appropriate remote control buttons are pressed. | Battery power is low.Some operations are prohibited with certain discs. | Load new battery.Check using another disc. |
| Playback is not possible. | The disc is dirty.The loaded disc is of a type this unit cannot play. | Clean disc.Check what type the disc is. |
| No sound is heard.The volume level will not rise. | Cables are not connected correctly. | Connect the cables correctly. |
| There's no sound. | The volume level is low. | Adjust the volume. |
| There's audio skipping. | This unit is not firmly secured. | Secure this unit firmly. |
MP3/WMA Disc compatibility with this unit is limited as follows:
- Sampling Frequency / 8 - 48kHz (MP3) 32 - 48kHz (WMA)
- Bit rate / within 8 - 320kbps (include VBR) (MP3) 64 - 160kbps (WMA)
- CD-R/CD-RW physical format should be "ISO 9660"
- If you record MP3/WMA files using software which cannot create a FILE SYSTEM, for example "Direct-CD" etc., it is impossible to playback MP3/WMA files. We recommend that you use "Easy-CD Creator" which creates an ISO9660 file system.
Customers should also note that permission is required in order to download MP3/WMA files and music from the Internet. Our company has no right to grant such permission. Permission should always be sought from the copyright owner.
General
Output Power 50W x 4CH(M)
Power Source ....DC 12V
Speaker impedance 4 Ω
Ground System .... Negative type
Dimensions (W x H x D) ..182 x 51 x 173 mm (Without Front Panel)
Net Weight (approx.) 1.8 kg
FM tuner
Frequency Range ..... 87.5-107.9MHz or 87.5-108 MHz or
65-74 MHz, 87.5-108 MHz
S/N Ratio 55 dB
Distortion 1.0%
Usable sensitivity 12 dBμV
MW(AM) tuner
Frequency Range .....520-1720kHz or 522-1620 kHz
S/N Ratio 45 dB
Distortion 1.0%
Usable sensitivity 32 dBμV
CD
Frequency responses .20 - 20000 Hz
S/N Ratio 70 dB
Distortion 0.15%
● Design and specifications are subject to change without notice.
LAR-S150(ENG)
STEERING REMOTE CONTROL
Attachment Parts 25
Specifications 25
Safety Precautions 26
Appellation 27
Before Use....28
Install the specified battery in this unit 28
Replacing the battery 28
Installation 29-30
Installing the unit on a Left-Hand-Drive Car....30
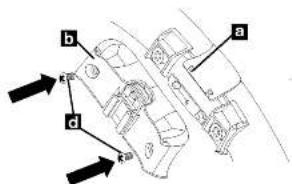
Attachment Parts
a
b
C
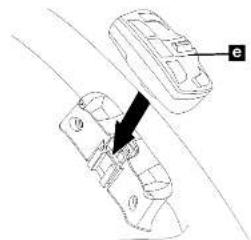
d

e
a Cover holder
b Holder Wheel
C Belt
d Screw
e Remote control
Specifications
Power source 3 V DC
Dimensions 31(W) X 59(H) X 27.6(D)mm
Weight 45g
Wavelength 940 nm ± 50nm
Output.....type;12 mw/sr per Infrared LED
- Design and specifications are subject to change without notice.
WARNING
- Keep the lithium battery out of reach of children. Should the battery be swallowed, immediately consult a doctor.
- Avoid installing this unit in such a location where the operation of safety devices such as airbags is prevented by this unit. Otherwise, there is danger of a fatal accident.
- Avoid installing this unit in such a location where the operation of the steering wheel and the gearshift lever may be prevented. Otherwise, it may result in a traffic accident.
- In case you operate this unit unavoidably during driving, do not neglect ahead carefully. Otherwise, you will be ready to run the risk of being involved in a traffic accident.
- If any of the following troubles occurs, immediately stop the use of this unit and consult with a dealer from whom you purchased unit:
- the unit is smoking.
- the unit is emitting abnormal odor.
- a foreign object has entered the unit.
- liquid has been spilled on or into the unit.
If you continue to use this unit without a remedy, the unit may be damaged badly, which leads to a serious accident or fire.
CAUTION
- Do not recharge, disassemble, heat or dispose of battery in fire.
- Use a CR2025 (3 V) lithium battery only. Never use other type of battery with this unit.
- Do not handle the battery with metallic tools.
- When disposing of used batteries, please comply with governmental regulation or environmental public institution's rules that apply in your country /area.
- Always check carefully that you are loading battery with its (+) and (-)poles facing in the proper directions.
• Installation of this unit requires specialized skills and experience. Installation of this unit should be entrusted to a dealer from whom you purchased this unit.
• Install this unit using only the parts supplied with this unit. If other parts are used, this unit may be damaged or dismounted itself, which leads to an accident or trouble.
• Install this unit as required by this manual. Failure to do so may cause an accident. - Do not install this unit near the doors where rainwater is likely to be spilled on the unit. Incursing of water into the unit may cause smoking or fire.
- The volume of the car stereo should be so adjusted that you can hear a loud sound occurring outside your car. If any happening sound outside your car is deafened by music from the car stereo when you are driving, this condition can be a factor of being involved in a traffic accident.
- Do not leave this unit free inside the car. When the car stops or turns a curve, the unit might drop on the floor. If the unit is rolled and put under the brake pebal, it might prevent the driver from braking well, causing a serious trouble. Be sure to fix this unit to the steering wheel.
- Do not disassemble or modify this unit. To do so may cause a fault.

NOTES
- Button on the car receiver head unit and remote control unit with same name have the same function.
- Depending on the car receiver, there may not be some buttons with the same names as those on this unit.
- This unit can not be used for a car receiver that does not accept a remote control unit.
Install the specified battery in this unit
Open the back lid of this unit and place a lithium battery "CR2025" in this unit with its positive (+) side up.
Replacing the battery
Replace the battery in the unit using non metallic tapered bar.
natural_image
Diagram showing a device being connected to a smaller component, with no visible text or symbols.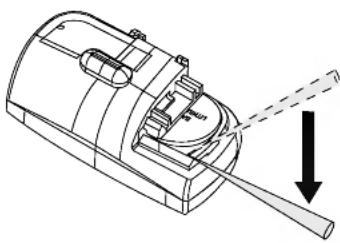
natural_image
Technical line drawing of a mechanical device with a lever and shaft, showing no text or symbolsNOTES
• Use only one CR2025 (3V) lithium battery.
- Remove the battery if the remote control is not used for long.
- Do not recharge, disassemble, heat or dispose of the battery in fire.
- Do not handle the battery with metallic tools.
- Do not store the battery with metallic materials.
- In the event of battery leakage, wipe the remote control completely clean and install a new battery.
• Always check carefully that you are loading battery with its (+) and (-)
poles facing in the proper directions.
• Do not eat lithium battery.
WARNING
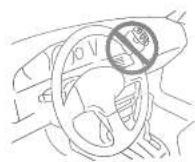
- Avoid installing this unit in such a location where the operation of safety devices such as airbags is prevented by this unit. Otherwise, there is danger of a fatal accident.
- Fix this unit securely to the steering wheel with the belt attached to the unit. If this unit is loose, it disturbs driving stability, which may result in a traffic accident.
- Do not attach this unit to the outer circumference of the steering wheel. Otherwise, it disturbs driving stability, causing a traffic accident. Always attach this unit to the inner circumference of steering wheel as shown.
NOTES
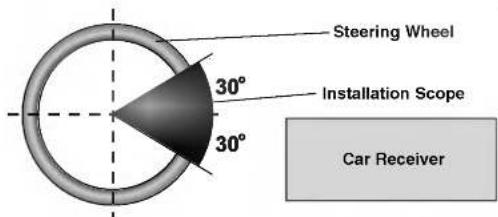
- Do not install this unit in such a place as may obstruct the driver's view.
- Since inferior layout differs depending on the type of vehicle, the ideal installation location for the unit also differ. When installing the unit, select a location that assures optimum transmission of signals from the unit to car receiver.
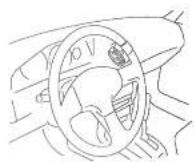
Left-Hand-Drive Car
Right-Hand-Drive Car
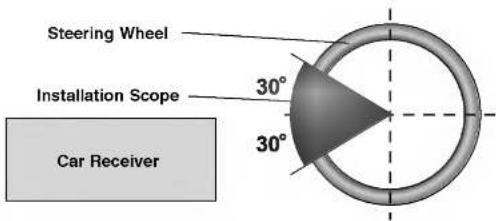
- If you install in place other than installation scope, this unit in not operated.
[Unreadable]
Installing the unit on a Left-Hand-Drive Car.
- When the unit is installed on a Right-Hand-Drive car, the horizontal position are inverted.
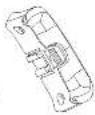
- Secure Cover holder a to the inner circumference of the steering wheel with belt c. Fit the Cover holder a to the steering wheel so that the arrow-marked side faces the driver as shown by picture.
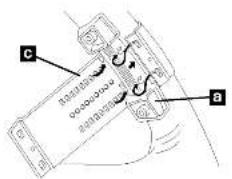
- Cut the extra portion of the belt at the center of the cover holder.

- Install holder wheel b on the cover holder a and secure with screws d. Tighten the screw with driver.
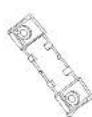
- Install the remote control unit e in the holder. When removing the remote control unit from the holder, move the corrugated release section toward the steering wheel as far as possible before sliding the remote control unit toward you.
natural_image
Diagram of a car interior showing a vehicle with a directional arrow and labeled component 'e' (no text or symbols beyond labels)
LG
P/NO : 3834RR0028X