
N10EB00 - Car radio LG - Free user manual and instructions
Find the device manual for free N10EB00 LG in PDF.


| Product Type | Car Stereo |
| Model | N10EB00 |
| Brand | LG |
| Dimensions (W x H x D) | 178 x 50 x 160 mm (Single DIN) |
| Weight | 0.5 kg |
| Power Supply | 12V DC (negative ground) |
| Maximum Power Output | 4 x 50W |
| RMS Power Output | 4 x 22W |
| Tuner Bands | FM, AM |
| Preset Stations | 30 (FM) + 12 (AM) |
| Supported Media | CD, CD-R, CD-RW, MP3 |
| Front Inputs | USB, AUX (3.5mm) |
| Bluetooth | Yes (hands-free calling, audio streaming) |
| Display | LCD, 1-line text |
| Remote Control | Included (wired or IR) |
| Security | Detachable front panel with case |
| Maintenance | Clean with soft dry cloth; avoid liquids |
| Spare Parts & Repairability | Contact LG service center for genuine parts |
| General Information | For vehicle use only; installation by qualified personnel |
Frequently Asked Questions - N10EB00 LG
User questions about N10EB00 LG
0 question about this device. Answer the ones you know or ask your own.
Ask a new question about this device
Download the instructions for your Car radio in PDF format for free! Find your manual N10EB00 - LG and take your electronic device back in hand. On this page are published all the documents necessary for the use of your device. N10EB00 by LG.
USER MANUAL N10EB00 LG
Personal Navigation Device
OWNER'S MANUAL
N10

Please read this manual carefully before operating your navigation device.
Keep it for future reference.
Designs and specifications are subject to change without prior notice for improvement.

CAUTION
RISK OF ELECTRIC SHOCK DO NOT OPEN

CAUTION : TO REDUCE THE RISK OF ELECTRIC SHOCK DO NOT SPLIT COVER(OR BACK) NO USER SERVICEABLE PARTS INSIDE. REFER SERVICING TO QUALIFIED SERVICE PERSONNEL.

The lightning flash with the arrowhead symbol, within an equilateral triangle is intended to alert the user about the presence of uninsulated dangerous voltage within the product's enclosure that may be of sufficient magnitude to constitute a risk of electric shock.

Do not handle the power plug nor the adapter with wet hands. This may result in a electrical shock.

Immediately power off the unit and unplug the car charger if you notice smoke or odors coming from the navigation device or adapter. Fire can result from improper use.

The exclamation point within an equilateral triangle is intended to alert the user to the presence of important operating and maintenance (servicing) instructions in the literature accompanying the appliance.

Make sure to insert the power plug tightly. Fire can result from improper use.

Always operate the vehicle in a safe manner. Do not become distracted by the navigation while driving, and always be fully aware of all driving conditions.

Use only the specified power adapter.
Using a different type of adapter may damage the product. (5.0 +/- 0.2V)
Minimize the amount of time spent viewing the navigation screen while driving and use voice prompts when possible.

The appliance is not intended for use by children or infirm persons without supervision.
Do not enter destinations, change settings, or access any functions requiring prolonged use of the unit's controls while driving.

Note that malfunctions may occur if you use the product in places where static electricity occurs frequently.
Pull over in a safe and legal manner before attempting such operations.

Do not use the unit near water. Do not touch the unit with wet hands.

Do not kink or crease the power cable or place heavy objects on the power cable.

Do not attempt to disassemble or repair the product yourself.
Fire can result from damaged power cables.

Do not use the product for other purposes than those described in this guide.
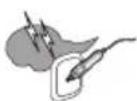
Unplug the car charger during electrical storms. This may result in electrical shock.

Do not use in extreme temeperatures. (-10°C\~60°C)
Safety notes

Avoid leaving the product in hot or humid places.

Take special attention when touching the product box, owner's manual and accessories to avoid cuts.

While driving, keep the sound volume to a level that does not distract you from driving.

Do not drop and avoid heavy impacts.

If you notice unusual odors, excessive heat coming from the product or anything else that seems unusual, stop use and contact our Customer Service Center.

Always use soft, dry cotton cloth when cleaning the product. Do not use strong solvents such as alcohol, benzine, or thinner, as these might damage the surface of the unit.

When attaching a navigation holder to the windscreen remove impurities in the area before attaching and slide the suction lever to secure to the windscreen.

Do not pull out the SD Memory Card while the navigator is in operation as this may cause mechanical problems.
Do not use the navigator for extended periods of time. This may result in battery discharge.

Please obey all traffic regulations. To aid safe driving, information on safe driving routes and routes where accidents occur frequently is included. Voice guidance and map route may differ from the actual traffic conditions.

When moving the product, separate the power plug from cigarette lighter socket then remove the navigation device from the windscreen mount. Finally slide the lever on the windscreen mount to all the suction cup to be released.
- LG is not responsible for any injury, property damage or accidents resulting from reliance on the navigation system.
- LG is not responsible for the accuracy of traffic-related information and data supplied by other parties.
- LG disclaims all liability for use of the navigation that causes or contributes to death, injury or property damage or that violates any law including traffic laws. All the stated instructions should be followed, because if not, it may lead to death, serious injury or property damage.

Disposal of your old appliance
- When this crossed-out wheeled bin symbol is attached to a product, it means the product is covered by the European Directive 2002/96/EC.
- All electrical and electronic products should be disposed of separately from the municipal waste stream via designated collection facilities appointed by the government or the local authorities.
- The correct disposal of your old appliance will help prevent potential negative consequences for the environment and human health.
- For more detailed information about disposal of your old appliance, please contact your city office, waste disposal service or the shop where you purchased the product.

This product is manufactured to comply with Directive 2005/83/EEC (ANNEX I, 3.2.9), 72/245/EEC, 99/5/EC, and 2006/95/EC.
Safety notes
- If you attach the windscreen mount on the glass for a long period of time, the pressure in the suction cup slowly reduces and the windscreen mount may fall off.
- The windscreen mount may fall off the windscreen of not properly installed. Should this occur, it is recommended that navigation device is installed as close to as possible to the dash board to avoid damage to the unit.
- Applying too much force to adjust the angle of the windscreen mount may cause damage. Take care when making adjustments.
- If the windscreen mount falls off, please follow the instructions again to reinstall and use it.
- Please note that if the product is damaged due to user negligence, it cannot be returned or refunded.
Caution : Danger of explosion if battery is incorrectly replaced. Replace only with the same or equivalent type.
Winter precaution
- The windscreen mount can easily come off the glass due to differences in temperature between inside and outside the windscreen.
Summer precautions
- The windscreen mount can easily come off the glass due to difference in temperature between inside and outside of the windscreen.
- Remove the windscreen mount and store it separately when parking for a long period of time.
- The built-in battery may be damaged when kept under direct sunlight in the car for a long period of time.
Separate the unit and store it in a cool place. A temperature rise over 60 degrees can reduce the battery life span or cause an explosion. -
Never leave your unit/accessories (including windscreen mount, car charger etc) visible in an unattended vehicle, as these are a target for thieves.
-
Back up your data using our provided software in the CD.
- In order to protect the screen and the unit, always store it in the carry case.
- Do not use the memory card (SD card) with other devices as this may cause damage to the SD card.
- The navigation device needs to have direct line of sight with the sky in order to pick up a signal. For a speedier fix on your location, please allow up to 5 minutes at a standstill for the device to locate you.
- When installing the unit, make sure that it does not block the view on the windscreen. Make sure that unit does not interfere with the safety operations of the vehicle when installed. Eg. Deployment of air bags or other safety equipment.
- The unit may require the external antenna kit if the vehicle has a heat reflective shield embedded in the windscreen. Heat reflective windscreens can prevent a signal from being received by the navigation device.
The external antenna kit is available as an optional accessory. - The guidance route is only a guide and there maybe some variances between the information on the navigation device with the actual roads. Road data is always being updated and furthers updates may be added subject to availability.
- The unit is designed to provide you with route suggestions, so it does not reflect road conditions, traffic congestion, weather conditions or other factors that may affect safety or timing while driving.
Table of contents
General information ....7
Package contents 7
Option table by models 7
Name of each component 8
Front panel 8
Rear / Side panel 8
Connecting devices 9-11
Installation sequence for the windscreen mount .9
Detaching the windscreen mount 10
Installing the external GPS antenna (Optional) 10
Connecting the USB cable .....11
Disconnecting the USB lead from the navigation device .....11
Downloading files: Mass storage .....11
Basic operation ....12-13
Initial setting 12
Turning the unit on/off 13
Adjusting the Volume/ Brightness 13
Mute 13
Lock feature ....13
Using a earphone 13
Getting started with navigation .....14-15
General operation 14
Finding and storing a destination on the map .....14
Finding the stored destination .....14
Map screen 15
Navigation Menu 16-30
Navigation menu list 16
General operations of navigation menu 16
Address 17
Recent Places 18
My Places....18-20
POI .....20-21
Route Manager .....22-23
TMC (Traffic Information) .....24-25
Setup 26-30
Table of contents
Music Player ....30-31
Photo viewer ....32
Bluetooth ....33-38
Bluetooth wireless technology 33
Connecting your unit and Bluetooth phone .33-34
Setting the Bluetooth 34
Diconnecting/Deleting/Connecting again the bluetooth phone .....34
Making a call with phone number 35
Call History 36
Using your phone book . . . . . . . . . . . . . . . . . . . . . . . . . . . . . . . . . . . . . . . . . . . . . . . . . . . . . . . . . . . . . . . . . . . 36-37
Using voice Dial 37
Incoming calls 38
Listening to music files ....38
Installation 39-40
Installing the Navigator "PC Portal" 39
Recommended PC System Requirements ....39
Starting the "PC Portal" Wizard 40
Using software .....40-43
Using the "PC Portal" 40-41
Installing Maps....42
Removing Maps 42
Importing Favorite Locations 42
General Warning Messages 43
Troubleshooting ....44-45
Bluetooth phone compatibility list .....46-47
Specifications 48
Spport-Hotline ....49
General information
Package contents

Main Body

Windscreen mount

USB Cable Car charger with TMC antenna

charger with TMC antenna

Installation CD

Quick Reference Guide

AC Adapter (Optional)

GPS Antenna (Optional)

Supporter of Cradle (Optional)
Contents may be changed without notice.
Option table by models
| Model | Bluetooth | TMC | TTS |
| N10E | X | X | X |
| N10T | X | X | O |
| N10R | X | O | X |
| N10B | O | X | X |
| N10Z | X | O | O |
| N10Y | O | O | O |
| N10S | O | X | O |
| N10Q | O | O | X |

Note
The navigation menu varies depending on TMC function.
With the TMC function

Without the TMC function

Name of each component
Front panel

- LCD
- Microphone (for only with Bluetooth wireless technology)
-
POWER ( )
-
Power on: Press and hold this button in power off status.
- Power off: Press this button for about 2 seconds in power on status.
-
Handy setup: Press this button briefly in power on status.
-
RESET hole
If the unit does not respond, press the RESET hole using a ball point pen or a similar tool.
Note
- To activate the menu function on LCD screen, touch the LCD screen with your finger.
- If you cut the external power supply or the battery level is too low, the device will be turned off after a few seconds.
Rear / Side panel

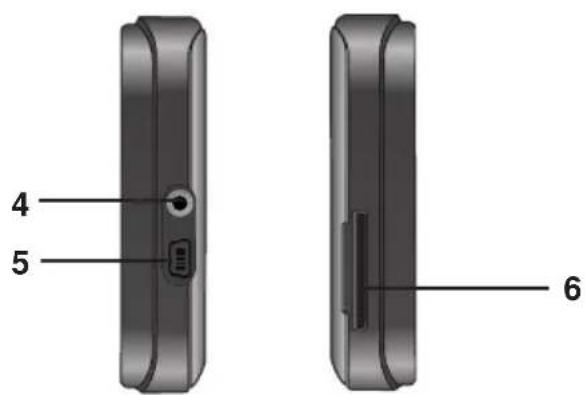
- External GPS Antenna Port
- Speaker
- Docking connector
- Earphone jack
- USB port/ Power supply connector (DC 5V)
- Memory Card Slot
Insert a SD Memory Card.
Caution
Deleting or altering the map data in the built-in memory may cause problems in the navigating operation.
Connecting devices
Installation sequence for the windscreen mount
-
Select the most suitable position on the windscreen.
-
Clean the surface of the windscreen, to remove any dust and grease.
-
Place the windscreen mount on the windscreen.

- Push back the lever to the left until you hear a click, fixing the windscreen mount in position.

- Align the docking connector at the wind-screen mount then push the unit down until you hear a click.


Note
Standard operation temperature of the suction mount is between -10°C and 60°C . The suction mount may disengage under a temperature outside of what is specified.
- Plug the small end of the car charger into the power supply connector at the side of the unit.

-
Plug the other end into your vehicle's 12V-24V (cigarette lighter) socket.
-
To adjust the angle of the mount, slacken the adjustable knobs at the suction-cup and then turn it gently. In addition to tilting the mount up and down and from side to side, you can also rotate the mount, from the left, -45° to 45°.
-
When you finish, tighten up the knobs again.

Note
- This unit and its car charger are designed for use in vehicles that have 5.0 + / - 0.2V , negative ground electrical systems.
(This is a standard for most vehicles.) If your vehicle has a different type of electrical system, the DC power system cannot be used.
- The unit is automatically charged when connecting the USB port of the unit and your vehicle's 12V-24V (cigarette lighter) socket with the car charger.
Connecting devices
Detaching the windscreen
mount
- To seprate the windscreen mount, pull the lever to the right.
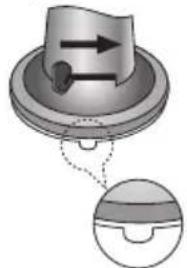
- If the windscreen mount still doesn't detach from the windscreen, pull the tab by on the suction cup.
Installing the external GPS antenna (Optional)
This unit has a built-in GPS antenna to receive the satellite signals.
The external GPS antenna is sold separately and will improve the reception from the satellites for cars with a heat reflective windscreen. To install the antenna: condition of satellite signals when the signals are poor.
-
Select the place to attach the external GPS antenna.
-
Plug the jack of the GPS antenna into the socket on the rear of the navigation unit.

Installation of the external antenna inside the vehicle
Attached the external antenna onto a surface which is as level as possible, has line of sight with the sky and can be secured safely with the double sided tape.

Note
- Make sure the surface is free of moisture, dust, grime, oil, etc., before affixing the double sided tape.
- The double-sided tape contains a strong adhesive and may leave a mark on the dashboard if removed.
- Some vehicles use window glass that does not allow signals from GPS satellites to pass through. On such vehicles, install the GPS antenna on the outside of the vehicle.
Installation of the external antenna outside the vehicle
Place the external GPS antenna in a position as level as possible, such as on the roof or boot. (The GPS antenna is attached with a magnet.)
When routing the lead in from the top of the door
Make a U-shaped loop in the lead on the outside to prevent rainwater from flowing along the lead into the interior of the vehicle. (The GPS antenna is attached with a magnet.)
Connecting devices
Connecting the USB cable
- Connect one end to the USB port on your PC and then plug the other end into your unit's USB port.

- The unit is automatically charged when connecting the USB port of the unit and your PC with the USB cable.
With the SD card inserted

Without the SD card


Note
You can not operate it when the unit is connected in PC with USB cable.
Disconnecting the USB lead from the navigation device
Wait until you get a message that you can safely unplug the device before disconnecting the USB device.
- The safe remove icon is displayed in the system tray.

-
Click on the icon to eject the unit from the PC and select the 'Safely remove' message.
-
A message will appear indicating that it is now safe to disconnect the unit.
-
You can now go ahead and remove the USB cable from the PC.
Downloading files: Mass storage
-
Activate Windows Explorer on your PC. A mass storage device is displayed in window explorer.
-
Create a folder you want to use.
-
Select files you want to download, then drag and drop them to the folder you created.

Note
- When the SD card is inserted, you can download the data on the SD card.
- When the SD card is not inserted, you can download the data on the built-in memory.
- Don't remove the USB cable while uploading or downloading files.
Basic operation
Initial setting
When you turn the unit on at the first time after purchasing the unit, you must follow the steps as shown below.
If you turn the unit on after turning the unit off, the "Attention" screen appears.
Follow the steps 6-7 as shown above.
- Press and hold POWER ( ).
The "Language Settings" screen appears. (Page 27)

- Set "Language text" and "voice guidance" by touching / and then touch . OK The "Display" screen appears. (Page 26)

- Set "Dimension", "Day&Night", and "Map Display" by touching the items you want and then touch OK The "Route Options" screen appears. (Page 23)
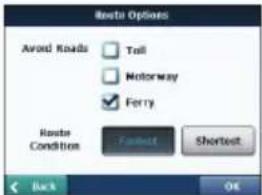
- Set "Avoid Roads" and "Route Condition" by touching the items you want and then touch OK The "Units & Time" screen appears. (Page 27)

- Set "Distance Unit" and "Adjust Hour" by touching the items you want and then touch OK. The "Warning" screen appears.

- Touch "Agree". The "Attention" screen appears.

- Touch "Agree". The "Information" screen appears.

- Touch "No". The map screen appears.


If you touch the "YES", the screen moves to the "Introduction" menu of "Tutorial" item. For detail, refer to the "Tutorial" on the page 29.

Touch in order not to display information screen again.
Basic operation
Turning the unit on/off
Press and hold POWER ( φ ) to turn the unit on. Press and hold POWER for about 2 seconds to until the unit is turned off.

Note
If you connect the unit to a power source, it will automatically turn on.
Adjusting the Volume/ Brightness
- Turn the unit on.
- Press POWER ( ) briefly when the map screen appears.
The "Handy Setup" screen appears.
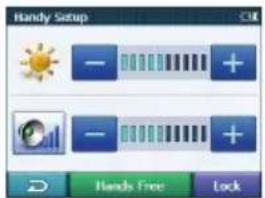
Map/Photo mode
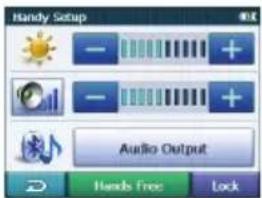
Music mode

Note
When you have the unit with Bluetooth wireless technology, and is free

appear on the screen.
- Set the volume ( ) and brightness ( )
by touching / and then touch .


Note
If there is no touch input for about 5 seconds, the screen moves to the previous screen.
Mute
Touch on the "Handy Setup" screen to mute the sound. To cancel it, touch again.
Lock feature
This feature locks the unit to prevent it from operating when you accidentally touch an item.
Touch on the "Handy Setup" screen.

To cancel it, touch POWER (☐).
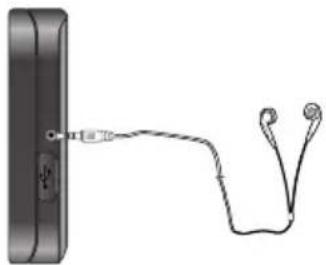
Using a earphone
Connect stereo earphones plug ( 3.5 mm) to earphone jack for private listening.

Note
• Always turn down the volume before connecting your earphone.
- The speakers are turned off while the earphone plug is inserted in the earphone jack.
Getting started with navigation
General opreation
Finding and storing a destination on the map
- Turn the unit on.
The map screen appears.

- Select a destination by simply touching and dragging the map on the screen.


- Touch to find a destination.
Drive in accordance with the screen and voice prompts.
The destination is stored in the “Recent Places” menu automatically. (Page 18)


Touch if you want to store the destination.
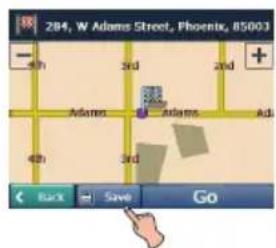

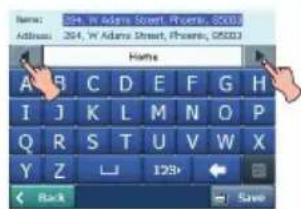
- Set the group you want to store by
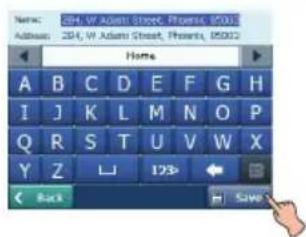
touching / and then touch . Save
The destination is stored in the "My Places" menu. (Page 18)

Note
- If you don't want to store a destination, touch on the screen.
- Touch on the screen to move to the previous screen.
Finding the stored destination
- Touch on the map screen and then touch My Places.


- Touch group that the destination is stored. and then touch OK

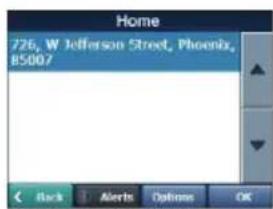
- Touch the destination you want and then touch OK.


- Touch to find the destination. Drive in accordance with the screen and voice prompts.
Getting started with navigation
Map screen

-
- : Touch to zoom out.
- / 📄 🎥 📋: Touch to view the 2D/3D map.
- : Touch to view the navigation menu.
- Displays next turn direction and distance to the next turn.
Touch to view the "Turn by Turn" menu (Page 22).
-
Displays the remaining distance and time that will take. If remaining time gets touched, it will display estimated time of arrival. Bottom of the bar displays the name of the current street you are on.
-
Receivies the latest traffic information using FM multiplex broadcast.
-
A: Indicates that the unit is receiving GPS signal and found your current location.
A: Indicates that the unit has not received GPS signal and found your current location.
- Battery indicator
- On the screen of the unit, the charging status will be displayed as follows:
- If the battery level is low, the following message will be will be displayed and then the device will be turned off a few seconds later.

-
+: Touch to zoom in.
-
Displays the name of the next turn street.
Navigation menu
Navigation menu list General operations of
![graph TD A["MENU"] --> B["Address"] A --> C["Recent Places"] A --> D["My Places"] A --> E["POI"] A --> F["Route Manager"] A --> G["Traffic Info"] A --> H["Setup"] A --> I["Media Player Map"] B --> J["Town-Street"] B --> K["Street-Town"] B --> L["Side streets"] B --> M["Postcode"] B --> N["In Other M…](/content/2026/06/1343005/images/f0153c861a504f09d1414d68688a6e054c87648ee03fe7faea1796e02a7f7ad0.jpg)
navigation menu
- Turn the unit on.
- Touch to view the navigation menu on the map screen.


-
Touchs Recent Places, My Places, POI Route Manager, Traffic Info, Setup, or Media Player to select the desired option, and the menu moves to the second level.
-
Touch the desired option and the menu moves to the third level.
-
Touch the desired setting. Some items require additional steps.
Note
- Touch on the screen to move to the previous screen.
- Touch on the screen to move to the map screen.
Navigation menu
Address
You can find a destination using the address search.
- Touch on the map screen and then
touch Address.


- Touch the desired items.


Town-Street
Selects the address in town, street, house number order using the keyboard.
Street-Town
Selects the address in street, town, house number order.
Side streets :
Selects the address in town, street, side streets order.
Postcode
Selects the address in postcode, street, house number order.
In Other Maps
Selects the address of other country. After selecting a map, select the address in town, street, house number order using the keyboard
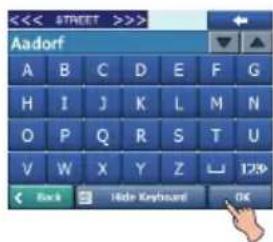
- Enter characters of address using keyboard provided as shown. The characters entered in the address field in highlighted in red

Deletes the last character in the address such as town or street names.

Extends or shortens the address list by hiding or displaying the keyboard.

Moves up or down the list of address items.

Displays uppercase, numeric, umlaut and special characters.
The operating system installed on the device must be able to support these characters.
- When the address search is completed, touch OK.

- Touch to find the destination.

Navigation menu
Recent Places
Your device can store up to total of 64 recent findings in the "Recent Places" list.
You can search the recent finds in the "Recent Places" list.
Finding and storing the destination in the "Recent Places"
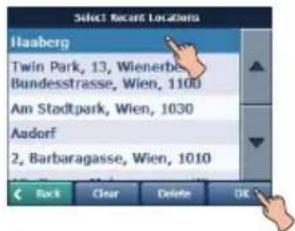
- Touch on the map screen and then touch Recent Places.


- Touch an recent places you want to find and then touch OK


Note
If you want to delete all entries in the "Recent Places" list, touch and then touch .Yes you want to delete only the selected destination, touch Delete and then touch .Yes
- Touch to find the destination.
Drive in accordance with the screen and voice prompts.
Touch if you want to store the destination.
- Set the group you want to store by touching and then touch. Save The destination is stored in the "My Places" menu. (Page 18)

My Places
You can search the places stored in the "My Places" list.
Finding the destination in the "My Places"
- Touch on the map screen and then touch My Places .


- Touch the group you want and then touch OK.


- Touch the place you want and then touch OK.


- Touch to find the destination.
Drive in accordance with the screen and voice prompts.
Setting a group
You can add, delete or edit the group in the "My Places" list.

Note
You can not delete or edit the "Home" folder.
Navigation menu
Adding a group
1. Touch


By Places
Edit
Ad
d Group


- Enter the new group name and an icon to identify the group, as shown as the below and then touch Save
The new group is added as shown on the below.


Note
The icon identifies all places located in this group, as displayed on the map.
Deleting the group
1. Touch


My Places
- Touch a group you want to delete and then touch Edit Delete Group


3. Touch
Yes
The selected group is deleted.


Changing the group name
1. Touch


My Places
- Touch the group you want to edit and then touch Edit > Edit Group


- Change the group name or the group icon.


4. Touch
日
Save
The selected group is changed.


Alerting
The unit can sound the alert when the distance you set is closer than destination.
1. Touch


My Places
- Touch >eChange the "Set Alert distances" using the /> OK


OK

Note
The distance of "2nd Alert" is set closer than that of "1st Alert".
Navigation menu
Setting the destination
You can show, edit or delete the place in the "My Places" list.
- Touch


My Places
- Touch a group you want and then touch
OK


- Touch and then touch the desired items.


Show on Map
You can search the selected place on the map.
Touch on the screen. And then drive in accordance with the screen and voice prompts.

Edit Fav. Location
You can change the name, comment, or the group of selected destination.

Delete Fav. Location
You can delete selected place.
If you touch Yes, the selected place is deleted.
Points Of Interest (POI)
The POI list is a collection of hundreds of interesting or useful places organized by easy-to-find categories. For example, you can use the unit to guide you to a shopping center, hotel, restaurant, or gas station.
Finding a place in the "POI" list
- Touch on the map screen and then
touch

POI


- Touch one of "POI" list you want.


Note
You can view additional "POI" list, if you touch More.
-
Select the "POI CATEGORY", "SUBCATEGORY" and "LOCATION" you want to search and then touch OK
-
Touch to find the destination. Drive in accordance with the screen and voice prompts.

Note
The "POI" list may not be shown on the "POI CATEGORY" and "SUBCATEGORY" menu.
Navigation menu
Setting the destination
You can show and add the place in the "POI" list. And you can sort the place in alphabetical and distance order. You can store in "My places" menu the places in the "POI" list.
- Touch in the "LOCATION" list.


- Touch the desired items.

Show on Map
You can search the selected place on the map.
Touch on the screen. And then drive in accordance with the screen and voice prompts.
Add to Favorites :
You can store the place in the "My Place" menu.
Set the group you want to store by
touching / and then touch . Save
The place is stored in the "My Places" menu. (Page 18)
Sort by ABC
You can sort the place in alphabetical order.
Finding a destination with near place
You can find a place you want by searching a near place.
- Touch in the "POI CATEGORY" or "SUBCATEGORY" list.


- Touch the desired items.

Current location :
You can search the place near the current location.
Destination
You can search the place near the destination when you set the destination.
Other Address :
You can search the POI near the address when you set the address.
Follow the steps 3-6 of "Address" on the page 17.
Radius

You can search the POI within the radius of position you set.
Navigation menu
Route Manager
You can set the route you search when you navigate a destination.
Route Playback
You can record your route while you're driving and view the recorded route.
- Touch


- Touch


- Select the data file to play the recording and then touch Play
The navigator plays the recorded route on the main map screen.
- Touch


Route Playback Options
Touch on the "Route Playback" menu and then touch the desired items.

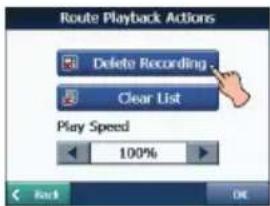


Deletes a selected recording.


Deletes all recordings.


Adjust the playback speed. The range is from 100% to 300%.
Turn by Turn
- Touch


then touch the list you want.

- Touch the desired items.


You can view the entire route on the screen.


You can only view the turn you select.
You can also view the previous or next turn by touching Prev. Next


You can avoid the selected turn in the turn-by-turn list. The new route is recalculated automatically.
Route Summary
You can view an overview of your complete route on the map screen, the total driving distance to your destination, the estimated travel time, and the complete destination address.
- Touch


Note
Touch on the screen to move to the previous screen.
Navigation menu
Multistop planner
You can plan a route with up to 5 stops. When you touch the "Go" button, the route is calculated in each stage, from the departure point to the first stop. When you reach the first stop, the next route is calculated to the second stop, and so on.

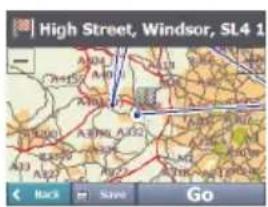
Setting stops along the route
- From the "Select/Add Multistop Route" screen, touch the "Add" button to add a stop by Address, POI, My Favorites, or Recent Locations.

- Select one of these options, specify a location, and touch the "OK" button.
(If you touch From an Address steps 3-6 of "Address" on the page 17.)
- The "Select/Add Multistop Route" screen appears with the selected location.

Use the "Up" or "Down" buttons to change the order of your itinerary.

Use the "Edit" button to show or delete a highlighted entry.

Use the "Distance" button to organize your entries from closest to farthest distance from your current location.
Cancel route
If you no longer need to travel to your destination or if you want to change your destination.
Touch > Route Manager. Cancel
Route options
You can use Route options to determine what road categories to avoid or allow and to set the default route type when navigation calculates your selected destination.
- Touch > Route Manager. And then touch the desired items.

Avoid roads
Toll, Motorway, and Ferry route sections are avoided or allowed as determined by whether they are selected, when navigator calculates a route.
You cannot allow or avoid specific toll roads or ferry routes.
Route condition
Fastest:
This option selects the route that takes the least amount of time.
Fastest is the default value.
Shortest:
This option selects the route that is the shortest distance. Remember, the shortest route may not always be the quickest, as you are able to travel faster on some roads than on others.
- Touch OK.
Note
Route generation excludes any detours, stops or delays along the route.
Navigation menu
TMC (Traffic Information)
What is Traffic Message Channel (TMC)
The Traffic Message Channel (TMC) is a specific application of the FM Radio Data System (RDS) used for broadcasting real-time traffic and weather information. Data messages are received silently, decoded, and delivered to a TMC enabled navigation system that can offer dynamic route guidance alerting the driver of a problem on the planned route and calculating an alternative route to avoid the incident.
Connect your TMC antenna
The car charger plays the part of the TMC antenna.
Connect the car charger on the unit.
Disclaimer
The developer is not responsible for any damage caused by an accident due to unreliable TMC radio transmissions by national, regional, or local broadcasters caused by TMC service restrictions, or by natural and man-made conditions that prevent real-time traffic and weather information from being delivered to the TMC-enabled navigation system.
The developer is not responsible for the quality or accuracy of the events broadcasted and the method they are displayed.
Service Information
When you are in an FM TMC service area, your Navigator receives traffic signals as soon as you connect the TMC module to your Navigator. You need to be in range of an FM station transmitting TMC (Traffic Message Channel) data to receive traffic information.
Traffic Message Alerts
Traffic (TMC) messages are national and regional public radio FM transmissions that are used to inform drivers of traffic, weather, and other driving conditions.
The traffic messages are displayed in the TMC Inbox screen, which can be opened by tapping the traffic info. button in menu
- From the Navigation menu, select the "Traffic Info" button, which opens the TMC inbox, and displays traffic reports.

- You can select a traffic report and touch "OK" to show a map of the affected road. If you click the "Avoid" button, the Navigation recalculates your route.


Note
- If the event was avoided, the Show Map screen displays the "Allow" button to recalculate to that previously avoided route section.
- All TMC messages are delivered to the TMC Inbox, but only messages relating the direct route and 200 meter radius are displayed. The radius is set to 160 kilometers when no route has been selected.
Navigation menu
Traffic Info Options
You can touch the "Options" button, the "Options" dialog box is displayed, as shown below.
These options have already been preconfigured for the best performance. It's not advisable to change them. However, you can change the Traffic Info. Option configurations by selecting the following settings:

Dynamic Rerouting
ON - The navigation device automatically recalculates the route to avoid a road with adverse traffic conditions – traffic jam or accident only.
OFF - You can manually select the TMC event from the inbox and tap the "Avoid" button from the Show Map screen.
Test TMC
When you tap this button, The Navigation expands the search radius for to the "whole map" for one minute and switches automatically to the TMC Inbox screen and displays one test message called "Testing TMC Service". After one minute, navigation device reverts to the route and the 200 meter radius."
If you do not receive any message after touching this button, please check in the following order:
- If you see the tuner scanning but not locking on a TMC station, try to change your position and check that you have put your antenna vertically upright.
- Depending on your location, you may not have TMC coverage.
- Check that you are using the map of the country that you are currently traveling in.

Note
Please make sure your navigation unit acquires the GPS signal before starting Traffic service free trial or subscription.
(Current position icon will turn green when GPS signal is acquired)
If you complete traffic service free trial without acquiring GPS signal, the unit may not display the accurate expiration date.
However, if the unit acquires GPS signal after completing traffic service free trial or subscription, the expiration date will be automatically adjusted and displayed correctly on the screen.
Navigation menu
Setup
You can make various adjustments to items by using the setup menu.
![graph TD A["Setup"] --> B["Display"] A --> C["Units & Time"] A --> D["Language"] A --> E["Guidance"] A --> F["GPS Status"] A --> G["Map Setup"] A --> H["Tutorial"] A --> I["Help"] A --> J["Start Demo"] A --> K["Select Map"] A --> L["Initialise"] A --> M["Speed"] A --> N["Cameras"]](/content/2026/06/1343005/images/f0a34c08d0336a55c3856361ee606692e7fd62f6e31adea1b6d161a64bfb360c.jpg)
- Touch > . Setup


- Touch the desired items. For details, refer to the pages 26-30.
Note
- Touch on the screen to move to the previous screen.
- Touch on the screen to move to the map screen.
Display

- Touch the desired items.

The 2D and 3D Mode buttons lets you display the map view in 2-dimensional or 3-dimensional views for either day or night driving.

The Day and Night Mode buttons lets you display the map view for either day or night driving.
The Auto button automatically adjusts the map view for day or night driving by GPS time.

The Pedestrian Mode button lets you toggle between traveling as a pedestrian or in a vehicle.
When in Pedestrian Mode, you can generate a route up to ten kilometers and you are not limited by vehicle constraints, such as one way streets.
When creating a pedestrian route, the navigator avoids motorways or other roads where pedestrians would not travel.
Voice prompts are deactivated in this mode.
- Touch OK.
Navigation menu
Units & Time
You can specify units of measure system and adjust the time as displayed on your Navigator.
-
Touch > Setup Units & Time
-
Touch the desired items.

Distance Unit :
KN : Displays and announces in kilometers.
Miles : Displays and announces in miles.
Adjust Hour :
You will see the current values of GMT, and use one time zone, Greenwich Mean Time (GMT).
Language
-
Touch > Setup Language
-
Touch the desired items.

Select Language Text :
You can select the language text.
Select Voice Guidance :
You can select voice travel messages and driving directions. You can hear the voice of language through speakers while driving.
- Touch OK.
Guidance
You can select the types of voice and visual notifications that you would like to use while navigating as follows.
-
Touch > Setup Guidance
-
Touch the desired items.

Speed Warning :
Warns you when your car exceeds the speed limit. This prompt is not active by default.
Route Recalculation :
Activated when the Navigator recalculates a new route.
This prompt is not active by default.
Note
Languages noted with (TTS) are text-to-speeches, which have an extensive vocabulary and pronuncethe street names as you approach turns, the prerecorded voices have a limited vocabulary.
Unreliable GPS Signal :
Warns that the GPS signal is too low and unreliable for navigation.
This prompt is active by default.
Travelling to... :
Reminder at the start of each journey. This prompt is active by default.
Say Road:
You can set the type of the guidance name that you will use to navigate the route.
- Touch OK.
Navigation menu
GPS Status
The Navigator uses the GPS receiver to pinpoint your location. GPS signals are automatically acquired and your vehicle's location and position are constantly updated. The GPS receiver may take a few minutes to find its initial location.
For best results, ensure that the GPS receiver has a clear vertical view of the sky.
1. Touch


The following GPS information is displayed:
Longitude: The angular distance east or west on the earth's surface.
Latitude: The location of a place north or south of the earth's surface.
Speed: The rate of movement, as expressed by kilometers or miles per hour.
Altitude: The height above sea level.
Number of Satellites: You can check reception signals from the GPS satellite.
Note
If GPS signal can not be acquired for long, please restart whole navigation system by pressing Reset.
GPS not found
When you first start the navigator you will hear the message "Signal too low". This message means that your navigation device hasn't yet located a reliable GPS signal. Check that your device is connected to the cigarette lighter and has a clear view of the sky.
The "GPS not found" message means that there is not GPS antenna or the antenna is not properly installed.
Please check that:
- The GPS antenna has a clear view of the sky for uninterrupted GPS reception. The navigator cannot calculate the route if there is no GPS reception (for example, in a tunnel).
- The navigation device is charged or connected to the cigarette lighter.
Map Setup
You can tap the "Map Setup" button to customize your map display.
1. Touch

- Touch the desired items.

Use Automatic Zoom:
When this option is selected, the zoom is speed dependent. The map zooms out at higher speeds, displaying a larger map area, and zooms in at slower speeds, displaying a smaller map area.
If you manually change the zoom, the Automatic Zoom returns to a system defined zoom level after several seconds of inactivity.
Use Larger Labels :
This option increases the size of street names to make the text easier to read.
3. Touch OK.
Navigation menu
Tutorial
When you first start the Navigator, a message box appears prompting you to open the Navigator Guided Tour program.
The Guided Tour is an excellent way of becoming familiar with the different navigation features available. You can also start the Navigator Guided Tour any time, by touching the "Tutorial" button from the "Extras" menu.
- Touch



- Touch the desired items.

Help
You can display Navigator technical support information.
Touch


Start Demo
This lets the Navigator display a simulated route. Many of the navigation features are disabled when the Demo is running.
Touch


Touch

to end the Demo.

Note
The demo route is set, and depending on the current map data, the demo function may differ somewhat from the map data.
Select Map
This feature lets you change the currently selected map to another map saved on built-in memory.
- Touch


You can touch the "Select Map" button to display the maps saved on your built-in memory. The Select Map screen displays map details and version numbers. The map currently used appears at the top of the list.
Refresh
Lets you refresh the screen when a new memory card is inserted into the device.
Delete
Lets you permanently remove a selected map.

Note
You cannot delete the current map.
Select lets you designate a selected map as the current map.
Initialise
- Touch


Clear Memory :
You can delete all list from the memory.
Factory Settings :
You can set all the function to their factory settings.
- Touch OK.
Navigation menu/Music player
Speed Cameras
You should agree with developer's policy to use the speed camera warning function. If you agree with the provider's policy, you can be informed on the location and also the type of camera.

Dynamic database of the speed cameras
You are offered support for Dynamic updates. The content in this database may not be fully accurate or up-to-date. It is provided as an indication only. The software and/or data providers will bear no responsibility in your acting on this content. This software does not incite you or anyone to break any laws. The operating of speed cameras are permitted in some countries. The operation is at one's own risk.
Condition for operating is a PC with internet-connection. For daily updates of your Cameras database please visit www.safety-camsam.com (additional charges apply)." LG does not guarantee the accuracy of the data which offered on updating website (www.safetycamsam.com), and users are all responsible for use and update of the speed camera data.
Easy updates using PC Portal
PC Portal makes the update, supports mass storage device & SD card reader. For more information, see “Import Speed Camera Alerts” on page 41 and “Importing Favorite Locations” on page 42.
Playing music
Playing the files in "All Music" folder
1.


The "Music List" screen appears. There are two kinds of music list: All Music, My Music

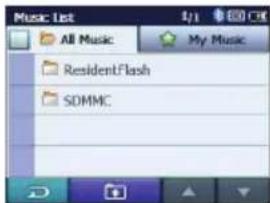
2. Touch the folder or file you want to play.


Playing the files in "My Music" folder
1.

during
playback.
The mark is playing music file.


2. Touch in the left position of the screen. The mark appears and the file you touch is stored in "My Music" folder.
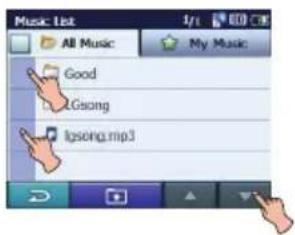

To cancel it, touch

Music player
- Touch and then touch the desired file to play music in "My Music" folder.


- Touch /on the screen to move to the previous/next page.
- Touch on the screen to move to the upper folder.
- Touch on the screen to move to the previous screen.

Note
If there is not supported file, error message is displayed on the screen and next music will be played.
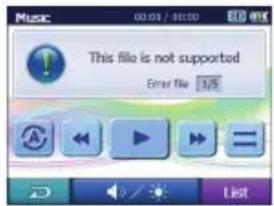
Pause
- Touch during playback.
- To return to playback, touch again.
Skip the next music
Touch briefly to move to the next music.
Skip the previous music
Touch briefly to move to the previous music.
Search
Touch and hold the or during play-back and then release at the point you want. You can use slide bar to search the music.
Repeat
You can set the repeat playback mode by touching Ⓐ or Ⓑ.
①: Plays repeatedly the current selected file.
A: Plays repeatedly all music files in your device.
Shuffle
You can set the random playback mode by touching = or ≈.
二: Returns to the normal playback.
: Plays randomly all the files in your device.
Viewig the information of music file
- Touch during playback. The information of music file appears. (If you touch the information screen, it moves to the previous screen.)


If there is no information of music file, 📄 appears.
Adjusting the Volume/Brightness
-
Touch during playb The "Handy Setup" screen appears.
-
Set the volume (☐) and brightness (☑) by touching ☐ and then touch .
Mute
Touch 📄 on the "Handy Setup" screen to mute the sound. To cancel it, touch 📋 again.
Photo viewer
Viewing photo
- Turn the unit on.
The map screen appears.
- Touch Media Player . The "Photo List" screen appears.


- Touch the folder or file you want to play and then touch ▶
The slide show starts automatically.


Browse an image
- Touch the screen during slide show and
then touch List


- Touch the folder icon to display its sub-folders and thumbnail images.


- Touch /on the screen to move to the previous/next page.
- Touch on the screen to move to the upper folder.
- Touch on the screen to move to the previous screen.
Pause
- Touch the screen during slide show.
- Touch to pause slide show.
- To return to slide show, touch again.
Skip the next photo
Touch to move to the next photo in the selected folder.
Skip the previous photo
Touch move to the previous photo in the selected folder.
Repeat
You can set the repeat playback mode by touching Ⓐ or Ⓔ.
: Plays repeatedly all photo files in your device.
: Plays repeatedly all the photos within folder.
Rotation
Press repeatedly to rotate the photo clockwise.
Adjusting the Volume/Brightness
-
Touch during playback. The "Handy Setup" screen appears.
-
Set the volume ( ) and brightness ( ) by touching ≠ and then touch .
Bluetooth
Bluetooth wireless technology
If you have a phone with Bluetooth wireless technology and it is compatible with your device (Please refer to the list of available phones on the page 46-47), you can use the following features in your device: Hands-free Calling, Audio streaming for mp3, and Phonebook sync and edit.
Hands free feature is to make or receive a phone call using microphone and speaker built in your device. Audio streaming feature is to enable to listen to music (especially, mp3 file) in your stereo headset and to enable to handle playing music such as play, pause, or skip. Lastly, phonebook sync and edit feature is to transfer your phonebook in your phone to your device, and to add and edit new phone numbers on your device. These features on your device are only available if your phone supports these features using Bluetooth wireless technology. To use these features, you must connect your phone with your device. You may initiate this connection from your phone or from your device. Please refer to phone's guidebook for more information.
Connecting your unit and blue-tooth phone
To connect using the unit settings
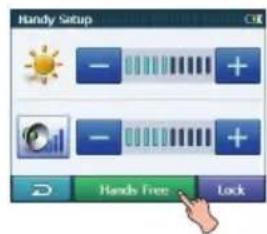
- Press POWER ( ) briefly in power on status. The "Handy Setup" screen appears.

Map/Photo mode

Music mode
2.
3.
Hands Free Touch
Touch

4.
Touch
The "Searching for available devices." pop-up screen appears on the screen.


It will take about 30-60 seconds, to continue the process.
To cancel, touch Stop
- Touch a bluetooth phone you desire from the "Search Results" screen.
The "Please enter the below PIN code in your phone" pop-up screen appears.


- Input the PIN code (0000) in your phone when the pop-up screen is displayed on the screen.
When it is successfully connected, the mark is displayed in the "Handsfree - available devices" screen.

When it is not connected, the connection failure message appears.

Note
Before connecting, check the PIN code settings. Refer to "Setting the Bluetooth" on the page 34.
Bluetooth
To connect using the phone settings
Your phone's Bluetooth feature may be set to off by default. To use the Bluetooth feature, Bluetooth must be turned on in your phone. Refer to your phone's user guide.
- Enable the phone's Bluetooth component. This might be in a menu called Settings, Bluetooth, Connections, or Hands-free.
- Initiate a search for Bluetooth devices. These settings might be located in a menu called Bluetooth, Connections, or Hands-free.
- Select the your device from the list of phone.
- Input the PIN code (0000) in your phone. When it is successfully connected, the mark is displayed in the "Handsfree - available devices" screen.
Setting the Bluetooth
You must select to connect successfully your unit and bluetooth phone.
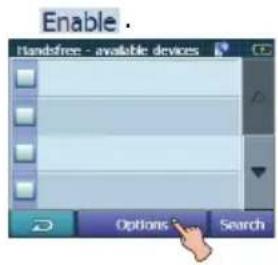
- Touch in the "Handsfree - available devices" screen. And then touch
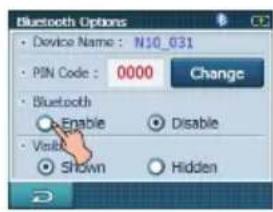
- Check the PIN code. Change the PIN code using the number buttons if you want to change the PIN code. And then touch OK.
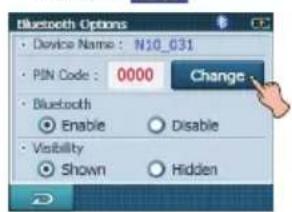

- If the visibility option has set as . Hidden Other Bluetooth devices can't find your device.
Disconnecting/Deleting/Connecting again the bluetooth phone
- Touch the connected phone. And then touch Disconnect.
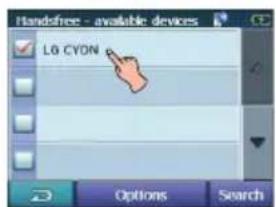

Touch OR Your phone is disconnected and the mark disappears.


- Touch the disconnected phone again to connect again or delete your phone.


When you touch the disconnected phone is connected again to the unit. The mark appears again.

When you touch the disconnected phone is deleted.

Bluetooth
Making a call with phone number
Connect your unit and bluetooth phone before you make a call.
- Press POWER ( ) briefly. And then touch



- Input the phone number you want to call, by touching the number buttons. And then touch 📊 Send.


Note
- If you make a mistake while dialing, touch to erase one digit at a time.
-
Touch if you want to store the phone number. It is stored in the phone book.
-
Touch to finish the telephone conversations.
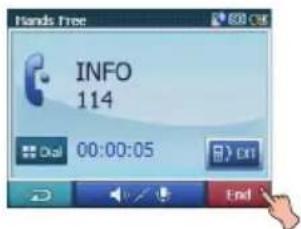

If you want to store the phone number, touch Save then input the name using key board. And then touch and it is stored in the phone book.
Touch revo! want to make a call again.
If there is not any touch for about 10 seconds, the screen moves to the "MENU" screen.
Storing the phone number
- Input the phone number in the "Dial" screen. And then touch Save .

- Input the name. And then touch . OK It is stored in the phone book.

Adjusting the Volume/Microphone level
-
Touch during a call. The "Volume & Microphone" screen appears.
-
Set the volume ( ) and microphone level ( ) by touching / and then touch ▶.
Note
- Touch to cut the microphone sound. To cancel it, touch again.
- If there is not any touch for about 5 seconds, the screen moves to the previous screen.
Switching the sound path during a call
You can hear sound through the speaker of unit or phone by touching

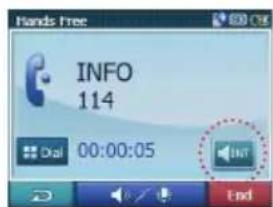
Note
If you want to send the DTMF (Dual Tone Multi-Frequency), touch 📄Dual .
Bluetooth
Call History
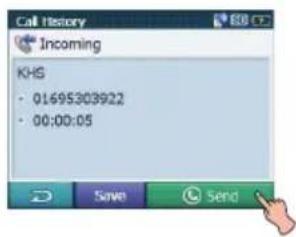
Your unit keeps a record of your recently received and dialed calls.
- Press POWER ( ) briefly. And then touch


- Touch the list you want to call. And then touch 📊 Send.

Using your phone book
- Press POWER ( ) briefly. And then touch


- Touch the list you want to call. And then touch 📄 Send.


Adding the phone number
- Touch in the "Phone Book" screen. And then Touch after inputting the number buttons.


- Touch after changing the name.


Receiving all list in your phone
Touch in the "Phone Book" screen. And then touch Receive.


- Your device will receive the contact(s) via Bluetooth in your phone. If your phone is not connected, it needs to enter the PIN code in the phone.
- With receiving phone book from your phone, and the data will be stored in the resident memory of your device.
![Phone Book Receiving Phone Book Janine derke [1] 0167021055](/content/2026/06/1343005/images/a39c57b145a2fc64d20518c826dc84bec26bee462b72721e7323cbc9e9b667ee.jpg)
Bluetooth
Getting all list from you phone
If your phone supports the synchronization of phone book, you can get all list from the phone.
* If the phone hasn't been registered to available list on your device, you will meet the below pop-up, "Do you want to get the phonebook from your phone?", after connecting your phone with the your device.

Touch in the "Phone Book" screen. And then touch Get.

![Phone Book Retrieving Phone Books Ohjunjee [1] 630973789](/content/2026/06/1343005/images/f058e4acc097432e4551c9d9bd9548c03ae38ec57026314d1ee4b0bed5ec16aa.jpg)
The synchronisation with your phone book will begin automatically, the data will be stored in the resident memory of your device. (It will takes a few minutes according to the number of phone book in your phone.)
Deleting all list in the phone book
- Touch in the "Phone Book" screen. And then touch Delete All.

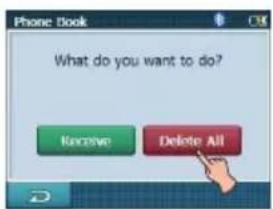
- Touch . OK


Deleting the phone number
Touch the list to delete in the "Phone Book" screen. And then touch DEL.

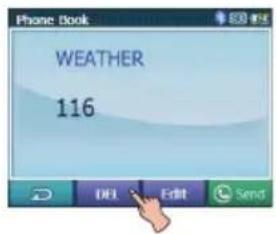
Editing the phone number
- Touch the list to edit in the "Phone Book" screen. And then touch Edit.


- Touch after changing the number. And then touch after changing the name.


Using voice Dial
You can make a call by speaking the contact's name.
- Press POWER ( ) briefly. And then touch



Bluetooth
- Speak the contact name from your phone. And then follow up the instruction from your phone.


- Touch to finish the telephone conversations.
Incoming calls
-
If there is an incoming call, your phone rings and the "Call from" pop-up screen is displayed on the screen.
-
Touch to answer the call.


If you want to reject a call, touch Reject
Ending calls
When you are calling on the map, music, or photo mode, appears in the screen.
Touch ☑ finish the telephone conversations.


Map modeMusic mode

Photo mode
Listening to music files
You can control and hear the music (especially, mp3) files saved on your device via the your stereo headset with Bluetooth wireless technology.
Touch in the "Handy Setup" screen.


Notes
- You can hear the sound through the speaker of unit or Bluetooth stereo headsets by touching 📄/ 📋.
- The sound quality depends on Radio Frequency (RF) conditions and the sampling rate of audio.
- Sampling rate of MP3 file that can hear the music using Bluetooth stereo headset
- 16 KHz, 32 KHz, 44.1 KHz, and 48 KHz
- The sound quality may be poor on the sampling rate of 16 KHz, 32 KHz.
Installation
Installing the Navigator "PC Portal"
Installation the Microsoft .Net Framework 2.0 for computer can be done by following instruction.
- Insert the Navigator CD into the PC's CD-ROM drive. The "PC Portal" Installation wizard prompts you to select the language used for the installation process. When you have selected a language, click "OK".
- Read the Welcome message and click "Next".
- From the Select Directory screen, either accept the recommended default directory or browse to a different directory to install the "PC Portal". Click "Next".
- If you want to change the directory location before installing, click "Back". When you are ready to install the "PC Portal", click "Next". The installation status box displays the progress of the installation process.
- When the installation is complete, click the "Finish" button.
- After finish installing PC Portal, install the "Maps installer" program. This procedures are similar to PC Portal install.
- When the installation is complete, click the "Finish" button, The Select Language box appears.
- From the Select Language dialog box, you can select the display language for the "PC Portal". Select the Launch "PC Portal" checkbox for "PC Portal" to immediately start and click "OK". Alternatively, you can start the "PC Portal" from the Microsoft® Windows® Programs menu.
- Select from up to two connected devices. (N10)

Note
Please pay close attention to all the programs before installing the CD to your personal computer.
Please pay close attention especially for anti-virus programs like spyware.
Recommended PC System Requirements
Please review the following system requirements before installing "PC Portal":
- CPU: AMD/Intel® Processor 300 MHz or faster
- Operating System: Windows® 2000/XP/Vista
• Memory: 128 MB RAM (minimum) - Hard drive free space: 500 MB (minimum)
• CD-ROM: 4x drive or higher
• ActiveSync Version 3.8 to 4.2 supported under Windows 2000 and XP - USB Version 1.1 or 2.0 connection (compatible 2.0)
- Microsoft .Net Framework 2.0
Installation/Using software
Starting the "PC Portal" Wizard
The first time you start the “PC Portal”, the “PC Portal” Wizard automatically starts, letting you install navigator software, supported languages and voice prompts, and maps.
For a complete description of the "PC Portal", see Using the "PC Portal" on the page 40-41.
- Click the Microsoft® Windows® Start button.
- Click the Programs > LGE > "PC Portal". The "LGE PC Portal for N10" appears.
- If this is your first time using "PC Portal", the "PC Portal" wizard automatically starts and displays the Welcome screen.
- Make sure that your device is connected by USB cable to a port on your PC. You will see Connected on the "PC Portal" screen.
- Click the buttons to move to the previous or next screen.
- Select software components to install to your device.
Note
- If you want to start the wizard, click
Wizard from the "PC Portal" Main screen.
- If you want to stop the wizard, click
Skip Wizard
The "PC Portal" Main screen is displayed.
- If after selecting component, software, and voice options, you want to return to the original selections, click Restore Defaults
Using the "PC Portal"


Click "Install Software" and select from the following components to install to your device:
• LGE: GPS navigation software
- Tutorial: Tutorial guide
To install navigator components:
- From the Install Software screen, select from the list of components, as described above.
- Click the Install button.
- Navigator "PC Portal" installs the selected components to the device's main memory.

Click "Manage Maps" to install or remove a map.
For more information, see "Installing Maps" on the page 42.

Click the "User Manual" button to see a user manual.

Click the "Select Language" button to show a list of languages that you can choose from to display the "PC Portal".

Click the "About" button to check software version.
Using software

Click "Import Speed Camera Alerts" to update the Speed Cam. You can visit the Speed Cam Update site.

Click the "Backup/Restore" button to backup the following Navigator items:
- Favorites: All locations that are displayed in Navigator's Favorites screens.
- Trips: All locations that appear in Navigator's Multistops screens.
- LGE Settings: Setting configurations, such as map views (2D/3D and Day/Night), prompts, units of measurement, and map and route setting preferences.
When you select Backup, "PC Portal" makes a copy and stores the information to your computer.
To backup Navigator data to your PC:
- From the Backup/Restore screen, select Backup.
- Select the items that you want to make a copy of and save to your computer.
- Click the "Backup" button.
- "PC Portal" saves the selected items to your computer.
Click the Backup/Restore button to restore Favorites, Multistops, and My Navigator data to a navigation device. When you select Restore, “PC Portal” recovers the information stored on your computer.
To restore stored Navigator data to a navigation device:
- From the Backup/Restore screen, select Restore.
- Select the items that you want to restore.
- Click the "Restore" button.
- "PC Portal" restores the selected items.

Click to import favorite locations from your PC to the selected My Places group on your device.
For more information, see "Importing Favorite Locations" on page 42.

Click Install Languages to install a language to your device.
To install languages:
- From the Install Languages screen, select the languages to be installed to the device.
- Click the Install button.
- Navigator PC Portal installs the selected languages to the device's main memory.
- You can display the Navigator interface in the language of your choice by opening tapping the Language Settings button on the Setup menu and selecting the language in Navigator.
Using software
Installing Maps

-
From the Desktop Maps pane, select a map.
-
From the "Target" context box, select the main memory.
-
When you select a Target option (Storage Card, Main Memory) the "PC Portal" displays the following information:
-
Required: The amount of free space necessary to install the map on the selected Target option.
• Available: The amount of free space available for the selected Target option.
Note: If the free space required is equal or greater than the free space available, "PC Portal" will not install the selected map.
- Select a map to add or remove.
- Click the "Add/Remove" button.
- The selected map is installed and displayed in the Device Maps pane.
Removing Maps
You can remove a map by selecting a map in the Device Maps pane and clicking the "Add/Remove" button.
Importing Favorite Locations
Import Favorites lets you import content created externally as a new Favorites category.
You can download a category of favorite destinations from your PC to your device.
Destination data must be contained in a comma-separated values (.csv) file. You can import favorites to your device by following the procedure as displayed on the Import Favorites screen.

The .csv file contains the following fields:
| Fav. Name | Notes Longitude | Latitude | |
| Fav.place 1 | Comm. 1 39 | 21370 38.78 | 903 |
| Altitude City | Street Address | ||
| 8033 Munich | Adaloweg 173 | ||
- The longitude, latitude, and altitude are numerical values. All other fields contain string values.
- Even if the .csv file does not contain longitude, latitude, and altitude values, the separating commas must still be included.
- The .csv file contains the values in a table as a series of ASCII text lines, organized so that each column value is separated by a comma from the next column's value and each row starts a new line.
Using software
General Warning Messages
The following warning messages can appear when you're working with navigator "PC Portal".
Lost connection transfer
If at any point during the installation or data transfer, the connection to the device is lost, the following message is displayed:
"Connection to the device has been lost."
Please check your connection."
Uninstalling Navigator Console
When a version of navigator programme (versions prior to the "PC Portal") is located on your computer, the following message is displayed:
"A previous version of "PC Portal" was found. Do you wish to uninstall?"
It is recommended to uninstall the previous programme before installing "PC Portal".
Uninstalling "PC Portal"
When an earlier version of navigator "PC Portal" is located on your computer, the following message is displayed:
"A previous version of "PC Portal" was found. Do you wish to uninstall?"
It is recommended to uninstall a previous version of "PC Portal" before installing the current version.
Updates to "PC Portal"
If there are updates in navigator, you are prompted to download them in the following message:
"There are updates to "PC Portal", do you wish to download and install them?"
Previous maps
If maps from a previous version is located on your computer, the following message is displayed:
"Existing maps data found. Do you want to keep it?"
Clicking "Yes" lets you install maps from previous versions.
Remove maps
The following message appears when you have selected an installed map and clicked the Actions
button:
"Selected maps shall be removed from your device. Are you sure you wish to continue?"
Data Transfer
If you close the PC Portal while install navigator software, a map, importing or exporting a Favorite location, or backing up data. the following message appears: "if you will close the PC Portal now, the [process] shall not be completed. Are you sure you wish to close?".
Backup Data
If stored data is located on your computer, the following message appears:
"Navigator Backup data found. Do you want to keep it?" It is recommended to keep backup data.
Troubleshooting
Navigation program and map data protection
- If you want to operate this product properly, navigation program and map data provided by LGE should be in LGE folder on your navigation device.
- Don't erase or modify any contents in the LGE folder using USB mass storage connection. (All contents are important to operate navigation. Deleting these data may cause navigation to lead to malfunction.)
Audio streaming
To enjoy high quality music using Bluetooth stereo headsets, we recommend over 16-bit audio with sampling rates of 48 KHz and 44.1 KHz. (The sound quality depends on sampling rates of audio and your headset.)
Picture format
JPG: Image file size should be less than 1600 MP (megapixels).
Cannot identify the current location. (GPS not receiving)
GPS cannot be used indoors and must be connected to the power with ACC to a vehicle in a location where the sky can be seen well. When initially connecting the GPS, it usually takes about 10 minutes to operate normally, but the connection speed can differ depending on the weather condition, and surrounding obstacles.
If the GPS connection is unstable for a long period of time, try the following.
- Check if the power is connected to the product.
- Check if the back of the GPS product is in a location where the sky can be seen well.
- If there are high buildings or if you are under a tree, move to a location where there aren't any obstacles.
- Check the GPS receiving condition from the GPS menu.
Cannot hear the voice guide.
You can hear the voice guide when you select
"Guidance" in "Setup".
But during actual driving, the voice guide is provided.
If the volume is too low, adjust the volume on the right unit.
Cannot see the map.
This is when you cannot see the map even when you have executed the navigation menu.
This happens when the data within the memory is damaged. Delete all the data within the memory and reinstall the data. If the problem persists after the installation, contact the Customer Service Center.
Map data and dangerous area information are not updated.
You must periodically update the map data. Refer to the homepage for details on how to update the data.
The path guide can be different from the actual path. (Path guide error)
- When the road is closely parallel.
- When the splitting road angle is very small.
- When there is an adjacent road when turning.
- When driving on a road that is narrowing fast.
- When driving through the mountain or where the road is too curvy.
- When the starting, passing and arriving locations are too close within 10 km.
- When you have set the starting, passing or arriving location more than 1 km away from the road.
- When driving through the tunnel.
- When driving through high buildings.
Troubleshooting
There is a difference between the driving road and the road on the map in the product.
Even though GPS is usually very accurate, it has an error range.
When GPS receiver is installed, there can be an error of about 5 to 15m. But for newly constructed roads, the problem could be from the data update to the map.
What is GPS?
The Global Positioning System (GPS) is a satellite-based navigation system made up of a network of 24 satellites placed into orbit by the U.S.
Department of Defense. GPS was originally intended for military applications, but in the 1980s, the government made the system available for civilian use.
GPS works in any weather conditions, anywhere in the world, 24 hours a day.
There are no subscription fees or setup charges to use GPS.

Map matching
The GPS used by this Mobile Navigation System is susceptible to certain errors. Their calculations may on occasion place you in a location on the map where no road exists. In this situation, the processing system understands that vehicles travel only on roads, and is able to correct your position by adjusting it to a near road. This is called map matching.

With map matching.

With no map matching.
Basic operation tips
- After charging or connecting to a power source, turn the unit on.
- Make sure you are stopped (not moving) in a location with a clear view of the sky.
- You will see your current location within a few minutes and then you can start navigating.
- If the correct location is not found within 6 minutes, restart the unit using the ON/OFF button on the side of the unit.
Bluetooth phone compatibility list
- If even a phone as described in this list meets requirements of Bluetooth Hand-free Profile 1.5 and Object Push Profile 1.1, it can operate. However, it is noted that we cannot assure for operation by function.
- As difference in functional operation by model is mainly resulted from feature of a hand-free phone, consult manufacturer of a phone if you have any question.
- There may be restrictions on using Bluetooth technology depending on some locations or wireless environment. Due to the variety of Bluetooth phones and their firmware version, your device may respond differently when performing over Bluetooth.
| Manufacturer | Model | Year | Hansfree Calling | Display Caller ID | Voice Dial | Phone Book Sync | Object Push (vCard) |
| BLACK BERRY | 8100 | 2007 | YES | YES | YES | NO | NO |
| BLACK BERRY | 8800 | 2007 | YES | YES | YES | NO | NO |
| HP | H6315 | 2005 | YES | YES | NO | NO | YES |
| HP | HW6915 | 2007 | YES | YES | NO | YES | YES |
| LG | CU500 | 2007 | YES | YES | NO | NO | YES |
| LG | CU575 | 2007 | YES | YES | YES | NO | YES |
| LG | KE500 | 2007 | YES | YES | NO | NO | YES |
| LG | KE850 | 2007 | YES | NO | NO | YES | NO |
| LG | KE970 | 2007 | YES | YES | NO | NO | YES |
| LG | KG245 | 2006 | YES | YES | NO | NO | YES |
| LG | KG290 | 2007 | YES | YES | NO | NO | YES |
| LG | KG800 | 2006 | YES | YES | NO | NO | YES |
| LG | KU380 | 2007 | YES | YES | NO | NO | YES |
| LG | KU580 | 2007 | YES | YES | NO | NO | YES |
| LG | KU970 | 2007 | YES | YES | NO | NO | NO |
| LG | M4410 | 2006 | YES | YES | NO | NO | YES |
| LG | ME970 | 2007 | YES | YES | NO | YES | NO |
| LG | MG280 | 2007 | YES | NO | NO | NO | YES |
| LG | MG320 | 2007 | YES | YES | NO | NO | YES |
| LG | U890 | 2006 | YES | YES | NO | NO | NO |
| MOTOROLA | A1000 | 2004 | YES | YES | YES | NO | YES |
| MOTOROLA | E1000 | 2005 | YES | YES | YES | YES | YES |
| MOTOROLA | E550 | 2004 | YES | YES | YES | YES | YES |
| MOTOROLA | KRZR K1 | 2006 | YES | YES | YES | YES | YES |
| MOTOROLA | RAZR V3i | 2006 | YES | YES | YES | YES | YES |
| MOTOROLA | RIZR Z80 | 2007 | YES | YES | NO | NO | YES |
| MOTOROLA | ROKR E2 | 2006 | YES | YES | YES | NO | YES |
| MOTOROLA | ROKR E6 | 2007 | YES | YES | NO | NO | YES |
| MOTOROLA | SLVR L7 | 2006 | YES | YES | YES | YES | YES |
| MOTOROLA | U6 | 2006 | YES | YES | YES | YES | NO |
| MOTOROLA | V195 | 2006 | YES | YES | YES | YES | YES |
| MOTOROLA | V360 | 2006 | YES | YES | YES | YES | YES |
| MOTOROLA | V525 | 2004 | YES | YES | YES | YES | YES |
| MOTOROLA | V600 | 2006 | YES | YES | YES | YES | YES |
| MOTOROLA | V600 | 2004 | YES | YES | YES | YES | YES |
| NOKIA | 3230 | 2005 | YES | YES | YES | NO | YES |
| NOKIA | 3650 | 2004 | YES | NO | YES | NO | YES |
| NOKIA | 5300 | 2006 | YES | YES | YES | YES | YES |
| NOKIA | 5500 | 2006 | YES | YES | YES | NO | YES |
Bluetooth phone compatibility list
| Manufacturer | Model | Year | Hansfree Calling | Display Caller ID | Voice Dial | Phone Book Sync | Object Push (vCard) |
| NOKIA | 6103 | 2006 | YES | YES | YES | YES | YES |
| NOKIA | 6131 | 2006 | YES | YES | YES | YES | YES |
| NOKIA | 6230 | 2004 | YES | YES | YES | NO | YES |
| NOKIA | 6280 | 2006 | YES | YES | YES | YES | YES |
| NOKIA | 6600 | 2004 | YES | YES | YES | NO | YES |
| NOKIA | 6670 | 2006 | YES | YES | YES | NO | YES |
| NOKIA | 6670 | 2005 | YES | YES | YES | NO | YES |
| NOKIA | 6680 | 2005 | YES | YES | YES | NO | YES |
| NOKIA | 7370 | 2006 | YES | YES | YES | YES | YES |
| NOKIA | 7380 | 2006 | YES | YES | YES | YES | YES |
| NOKIA | 7610 | 2004 | YES | YES | YES | NO | YES |
| NOKIA | 8600 | 2007 | YES | YES | YES | YES | YES |
| NOKIA | 9500 | 2004 | YES | YES | NO | NO | NO |
| NOKIA | 6230i | 2005 | YES | YES | YES | YES | YES |
| NOKIA | 6820a | 2004 | YES | YES | YES | NO | YES |
| NOKIA | 8910i | 2004 | YES | YES | NO | YES | YES |
| NOKIA | E50 | 2006 | YES | YES | YES | NO | YES |
| NOKIA | E60 | 2006 | YES | YES | YES | NO | YES |
| NOKIA | E61 | 2006 | YES | YES | YES | NO | YES |
| NOKIA | E62 | 2006 | YES | YES | YES | NO | YES |
| NOKIA | E70 | 2006 | YES | YES | YES | NO | YES |
| NOKIA | N70 | 2006 | YES | YES | YES | NO | YES |
| NOKIA | N73 | 2006 | YES | YES | YES | NO | YES |
| NOKIA | N77 | 2007 | YES | YES | YES | NO | YES |
| NOKIA | N80 | 2006 | YES | YES | YES | NO | YES |
| NOKIA | N91 | 2007 | YES | YES | YES | NO | YES |
| NOKIA | N91 | 2007 | YES | YES | YES | NO | YES |
| NOKIA | N92 | 2006 | YES | YES | YES | NO | YES |
| NOKIA | N95 | 2007 | YES | YES | YES | NO | YES |
| NOKIA | N-GAGE | 2004 | YES | YES | YES | NO | YES |
| PALM | TREO750V | 2007 | YES | YES | NO | NO | YES |
| SAMSUNG | A707 | 2007 | YES | YES | NO | NO | NO |
| SAMSUNG | D600 | 2006 | YES | YES | NO | NO | YES |
| SAMSUNG | D820 | 2006 | YES | YES | NO | NO | YES |
| SAMSUNG | D900 | 2007 | YES | YES | NO | YES | YES |
| SAMSUNG | i600 | 2007 | YES | YES | YES | NO | NO |
| SAMSUNG | T509 | 2006 | YES | YES | NO | NO | YES |
| SAMSUNG | Z540V | 2006 | YES | YES | NO | NO | NO |
| SHARP | GX15 | 2004 | YES | NO | NO | NO | YES |
| SIEMENS | S65 | 2004 | YES | YES | NO | YES | YES |
| SIEMENS | SK65 | 2004 | YES | YES | NO | YES | YES |
| SIEMENS | SX1 | 2004 | YES | YES | YES | NO | YES |
| SONY | K700i | 2005 | YES | YES | YES | YES | YES |
| SONY | K750i | 2006 | YES | YES | YES | YES | YES |
| SONY | S700i | 2005 | YES | YES | YES | YES | YES |
| SONY | T610 | 2004 | YES | YES | YES | YES | YES |
| SONY | V800 | 2005 | YES | YES | YES | YES | YES |
| SONY | W710i | 2006 | YES | YES | YES | YES | YES |
| SONY | Z600 | 2004 | YES | YES | YES | YES | YES |
Specifications
| ITEM SPECIFICATION | REMARK | |
| OSCPUMEMORY | Win CE 5.0ARM9 400 MHz512MB/1GB/2GB (It depends on models.) | Built-in Memory |
| DISPLAY 3.5 inch TFT LCDResolution 320 X 240LED type BacklightTouch Screen | Analog resistitive type | |
| AUDIO Mono, Internal Speaker | Typical 1.0W (1EA) | |
| GPS SiRF star III,Internal Antenna | ||
| NAVI EU (It depends on models.)(TMC : FM Traffic Receiver) | Voice Guidance | |
| MAP Navteq | ||
| POWER DC 5V/1A Vehicle Power | Cigar-jack Input(12-24V) | |
| TEMPERATURE | Operating : -10 °C to 60 °CStoring : -30 °C to 80 °C | |
| Built-in BATTERY DC 3.7 V (Li-Ion), 1100mAh- MP3:5 hours [Brightness: Minimum, Volume: 5 (Center)]- Navigation:4.5 hours [Brightness: 5 (Center) , Volume: 5 (Center)]- Photo:5 hours [Brightness: 5 (Center) , Volume: 5 (Center)] | ||
| INTERFACE Mini-USB PortExternal GPS Jack | USB 2.0 | |
| Multimedia ImageAudio | JPGMP3 | |
Support-Hotline
If you have other questions about the Navigation Device, please contact your supplier or Technical Support:
www.lge.com/support/software.jsp
For questions on products please visit our site or contact the Support Team.
Monday-Fridays : 09 : 00 am - 6 : 00 pm
| LG Subsidiary Country Service Number | ||
| LG Electronics ESPANA S.A. SPAIN | 902 500 234 | |
| LG Electronics U.K. Ltd U.K. / IRELAND | 0870 873 5454 | |
| LG Electronics France FRANCE | 0825 825 592 | |
| LG Electronics Deutschland GmbH GERMANY | 01805 4737 84 | |
| LG Electronics Italia S.p.A ITALY | 199600099 | |
| LG Electronics Hellas S.A GREECE | 801 11 200 900 | |
| LG Electronics Benelux B.V BELGIUM | LUXEMBOURGNetherlands | 015 200 2550032 15 200 2550900 543 5454 |
| LG ELECTRONICS MAGYAR KFT | HUNGARYBulgaria | 06 40 5454540700 1 5454 |
| LG Electronics Polska Sp. z.o.o | POLAND | 0801 54 54 54 |
| LG Electronics Portugal, S,A PORTUGAL | 808 78 5454 | |
| LG Electronics Nordic AB SWEDEN | DENMARKFINLANDNORWAY | 0771 41 43798088 57580800 116 587800 18 740 |
| Austria | AUSTRIASWITZERLAND | 08101441310848 543 543 |
| RUMANIA | RUMANIA | 031 228 3542 |
| CZECH REPUBLIC | CZECHSLOVAKIA | 810 555 8100850 111 154 |


Bluetooth
"The Bluetooth word mark and logos are owned by the Bluetooth SIG, Inc. and any use of such marks by LG Electronics is under license. Other trademarks and trade names are those of their respective owners."
P/N: AFN32793967


- PERSONAL NAVIGATION DEVICE
- OWNER'S MANUAL
- N10
- CAUTION
- RISK OF ELECTRIC SHOCK DO NOT OPEN
- SAFETY NOTES
- DISPOSAL OF YOUR OLD APPLIANCE
- WINTER PRECAUTION
- SUMMER PRECAUTIONS
- TABLE OF CONTENTS
- GENERAL INFORMATION ....7
- NAME OF EACH COMPONENT 8
- CONNECTING DEVICES 9-11
- BASIC OPERATION ....12-13
- GETTING STARTED WITH NAVIGATION .....14-15
- NAVIGATION MENU 16-30
- MUSIC PLAYER ....30-31
- PHOTO VIEWER ....32
- BLUETOOTH ....33-38
- INSTALLATION 39-40
- USING SOFTWARE .....40-43
- TROUBLESHOOTING ....44-45
- BLUETOOTH PHONE COMPATIBILITY LIST .....46-47
- SPECIFICATIONS 48
- SPPORT-HOTLINE ....49
- GENERAL INFORMATION
- PACKAGE CONTENTS
- OPTION TABLE BY MODELS
- NOTE
- NAME OF EACH COMPONENT
- FRONT PANEL
- REAR / SIDE PANEL
- CONNECTING DEVICES
- INSTALLATION SEQUENCE FOR THE WINDSCREEN MOUNT
- DETACHING THE WINDSCREEN
- MOUNT
- INSTALLING THE EXTERNAL GPS ANTENNA (OPTIONAL)
- INSTALLATION OF THE EXTERNAL ANTENNA INSIDE THE VEHICLE
- INSTALLATION OF THE EXTERNAL ANTENNA OUTSIDE THE VEHICLE
- WHEN ROUTING THE LEAD IN FROM THE TOP OF THE DOOR
- CONNECTING THE USB CABLE
- DISCONNECTING THE USB LEAD FROM THE NAVIGATION DEVICE
- DOWNLOADING FILES: MASS STORAGE
- BASIC OPERATION
- INITIAL SETTING
- TURNING THE UNIT ON/OFF
- ADJUSTING THE VOLUME/ BRIGHTNESS
- MUTE
- LOCK FEATURE
- USING A EARPHONE
- GETTING STARTED WITH NAVIGATION
- GENERAL OPREATION
- FINDING AND STORING A DESTINATION ON THE MAP
- FINDING THE STORED DESTINATION
- MAP SCREEN
- NAVIGATION MENU
- NAVIGATION MENU LIST GENERAL OPERATIONS OF
- ADDRESS
- RECENT PLACES
- FINDING AND STORING THE DESTINATION IN THE "RECENT PLACES
- MY PLACES
- FINDING THE DESTINATION IN THE "MY PLACES
- SETTING A GROUP
- ADDING A GROUP
- TOUCH
- DELETING THE GROUP
- CHANGING THE GROUP NAME
- ALERTING
- SETTING THE DESTINATION
- POINTS OF INTEREST (POI)
- FINDING A PLACE IN THE "POI" LIST
- SHOW ON MAP
- ADD TO FAVORITES
- SORT BY ABC
- FINDING A DESTINATION WITH NEAR PLACE
- CURRENT LOCATION
- DESTINATION
- OTHER ADDRESS
- RADIUS
- ROUTE MANAGER
- ROUTE PLAYBACK
- ROUTE PLAYBACK OPTIONS
- TURN BY TURN
- ROUTE SUMMARY
- MULTISTOP PLANNER
- SETTING STOPS ALONG THE ROUTE
- CANCEL ROUTE
- ROUTE OPTIONS
- AVOID ROADS
- ROUTE CONDITION
- TMC (TRAFFIC INFORMATION)
- WHAT IS TRAFFIC MESSAGE CHANNEL (TMC)
- CONNECT YOUR TMC ANTENNA
- DISCLAIMER
- SERVICE INFORMATION
- TRAFFIC MESSAGE ALERTS
- TRAFFIC INFO OPTIONS
- DYNAMIC REROUTING
- TEST TMC
- SETUP
- DISPLAY
- UNITS & TIME
- LANGUAGE
- GUIDANCE
- GPS STATUS
- GPS NOT FOUND
- MAP SETUP
- USE AUTOMATIC ZOOM
- USE LARGER LABELS
- TOUCH OK
- TUTORIAL
- HELP
- START DEMO
- SELECT MAP
- INITIALISE
- CLEAR MEMORY
- FACTORY SETTINGS
- NAVIGATION MENU/MUSIC PLAYER
- SPEED CAMERAS
- DYNAMIC DATABASE OF THE SPEED CAMERAS
- EASY UPDATES USING PC PORTAL
- PLAYING MUSIC
- PLAYING THE FILES IN "ALL MUSIC" FOLDER
- 1
- TOUCH THE FOLDER OR FILE YOU WANT TO PLAY
- PLAYING THE FILES IN "MY MUSIC" FOLDER
- TOUCH IN THE LEFT POSITION OF THE SCREEN. THE MARK APPEARS AND THE FILE YOU TOUCH IS STORED IN "MY MUSIC" FOLDER
- MUSIC PLAYER
- PAUSE
- SKIP THE NEXT MUSIC
- SKIP THE PREVIOUS MUSIC
- SEARCH
- REPEAT
- SHUFFLE
- VIEWIG THE INFORMATION OF MUSIC FILE
- ADJUSTING THE VOLUME/BRIGHTNESS
- PHOTO VIEWER
- VIEWING PHOTO
- BROWSE AN IMAGE
- SKIP THE NEXT PHOTO
- SKIP THE PREVIOUS PHOTO
- ROTATION
- BLUETOOTH
- BLUETOOTH WIRELESS TECHNOLOGY
- CONNECTING YOUR UNIT AND BLUE-TOOTH PHONE
- TO CONNECT USING THE UNIT SETTINGS
- HANDS FREE TOUCH
- TO CONNECT USING THE PHONE SETTINGS
- SETTING THE BLUETOOTH
- DISCONNECTING/DELETING/CONNECTING AGAIN THE BLUETOOTH PHONE
- MAKING A CALL WITH PHONE NUMBER
- STORING THE PHONE NUMBER
- ADJUSTING THE VOLUME/MICROPHONE LEVEL
- SWITCHING THE SOUND PATH DURING A CALL
- CALL HISTORY
- USING YOUR PHONE BOOK
- ADDING THE PHONE NUMBER
- RECEIVING ALL LIST IN YOUR PHONE
- GETTING ALL LIST FROM YOU PHONE
- DELETING ALL LIST IN THE PHONE BOOK
- DELETING THE PHONE NUMBER
- EDITING THE PHONE NUMBER
- USING VOICE DIAL
- INCOMING CALLS
- ENDING CALLS
- LISTENING TO MUSIC FILES
- NOTES
- INSTALLATION
- INSTALLING THE NAVIGATOR "PC PORTAL
- RECOMMENDED PC SYSTEM REQUIREMENTS
- INSTALLATION/USING SOFTWARE
- STARTING THE "PC PORTAL" WIZARD
- USING THE "PC PORTAL
- USING SOFTWARE
- INSTALLING MAPS
- REMOVING MAPS
- IMPORTING FAVORITE LOCATIONS
- GENERAL WARNING MESSAGES
- LOST CONNECTION TRANSFER
- UNINSTALLING NAVIGATOR CONSOLE
- UNINSTALLING "PC PORTAL
- UPDATES TO "PC PORTAL
- PREVIOUS MAPS
- REMOVE MAPS
- DATA TRANSFER
- BACKUP DATA
- TROUBLESHOOTING
- NAVIGATION PROGRAM AND MAP DATA PROTECTION
- AUDIO STREAMING
- PICTURE FORMAT
- CANNOT IDENTIFY THE CURRENT LOCATION. (GPS NOT RECEIVING)
- CANNOT HEAR THE VOICE GUIDE
- CANNOT SEE THE MAP
- MAP DATA AND DANGEROUS AREA INFORMATION ARE NOT UPDATED
- THE PATH GUIDE CAN BE DIFFERENT FROM THE ACTUAL PATH. (PATH GUIDE ERROR)
- THERE IS A DIFFERENCE BETWEEN THE DRIVING ROAD AND THE ROAD ON THE MAP IN THE PRODUCT
- WHAT IS GPS
- MAP MATCHING
- BASIC OPERATION TIPS
- BLUETOOTH PHONE COMPATIBILITY LIST
- SUPPORT-HOTLINE
- WWW.LGE.COM/SUPPORT/SOFTWARE.JSP
Brand : LG
Model : N10EB00
Category : Car radio