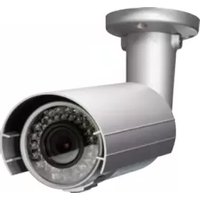
TV-IP343PI - Security Camera TRENDNET - Free user manual and instructions
Find the device manual for free TV-IP343PI TRENDNET in PDF.


| Product Type | Outdoor 2MP Full HD PoE Day/Night Network Camera |
| Resolution | 1920 x 1080 (Full HD 1080p) at 30 fps |
| Video Compression | H.264, M-JPEG, MPEG4 (3GPP) |
| Night Vision Distance | Up to 25 meters (82 ft) with IR LEDs |
| Weather Rating | IP66 |
| Lens | Vari-focal, 3.5x manual optical zoom, manual focus |
| Power Supply | PoE (802.3af) or 12V DC, 1A adapter (included) |
| Mounting | Wall or ceiling mount with included bracket |
| Operating Temperature | -30°C to 60°C (-22°F to 140°F) |
| Dimensions (Approx.) | 200 × 80 × 80 mm (7.9 × 3.1 × 3.1 in) |
| Weight (Approx.) | 500 g (1.1 lb) |
| Network Interface | 10/100 Mbps Ethernet with PoE |
| Audio | 2-way audio with external microphone and speaker connections |
| Storage | Micro SD card slot (up to 128GB), network storage (Samba), FTP |
| Security | Password protection, IP address filter, HTTPS, SNMPv3, IEEE 802.1x |
| ONVIF Compliance | ONVIF v2.20 and v1.01 |
| Warranty | 3 years limited warranty |
| Included Accessories | Multi-language quick installation guide, CD-ROM (utility, software, user guide), power adapter, network cable, RJ-45 coupler, mounting hardware, reset wire |
Frequently Asked Questions - TV-IP343PI TRENDNET
User questions about TV-IP343PI TRENDNET
0 question about this device. Answer the ones you know or ask your own.
Ask a new question about this device
Download the instructions for your Security Camera in PDF format for free! Find your manual TV-IP343PI - TRENDNET and take your electronic device back in hand. On this page are published all the documents necessary for the use of your device. TV-IP343PI by TRENDNET.
USER MANUAL TV-IP343PI TRENDNET
natural_image
Close-up of a metallic security camera with visible lens and sensor array (no text or symbols)Outdoor 2MP Full HD PoE Day/Night Network Camera
TV-IP343PI
TRENDnet User's Guide
Table of Contents
Contents
Product Overview....1
Package Contents....1
Features....1
Product Hardware Features 2
Installaon 3
Hardware Installaon....3
Camera Installaon 4
Conguraon....7
Viewing Camera Basic Funcon ....7
Conguring the Camera Seng 9
SYSTEM....10
NETWORK....12
AUDIO/VIDEO SETTING 23
EVENT CONFIGURATION ....28
Logout....33
How to Access the IP camera via IP Installer 34
Troubleshoong 35
Product Overview

natural_image
Exterior view of a silver security camera with multiple cables and connectors (no visible text or symbols)TV-IP343PI
Package Contents
• TV-IP343PI
• Mul-Language Quick Installaon Guide
• CD-ROM (Ulity, Soware & User's guide)
• Power adapter (12V DC. 1A) (1.5M / 5.)
• Network cable (1.5 M/5.)
- RJ-45 coupler
• Camera Mounng hardware
Features
The Outdoor 2MP Full HD PoE Day/Night Network Camera, model TV-IP343PI, oers 25 meters (82.) night vision, an IP66 weather rang, tamper detecon, and 3.5x manual opcal zoom for installaon exibility. Record full 1080p HD video (1920 x 1080) at 30 fps in a space saving H.264 compression format. Manage up to 32 TRENDnet cameras with included complimentary soware and mobile apps.
Resoluon
Record 2 Megapixel Full 1080p HD, 1920 x 1080 at 30 fps, in the space saving H.264 compression format
Mul-Language Interface
Support for English, French, Spanish, German, and Russian
Time and Text Stamp
Enable me and additional identifying text stamp overlays
IPv6
IPv6 support
ONVIF
ONVIF v2.20 and v1.01 compliant
Dynamic DNS Support
Support for dyn.com, no-ip.com, and iptecno.com
Samba Support
Record video to a dened network storage device
Tamper Detecon
TRENDnet User's Guide
TV-IP343PI
Receive tamper detecon video clips via email, p, or save to network storage device or Micro-SD card
D-WDR
Improved image quality in high contrast light environments with Digital Wide Dynamic Range technology
Moon Detecon
Create up to 3 moon detecon windows with separate sensitivity sengs and event triggers
Privacy Masks
Create up to three privacy masks to conceal sensitive areas
Product Hardware Features
Camera Overview

- Shield: It is used to protect the camera for the inclement weather.
- IR Lens: IR lens for the camera.
• Camera Stand: the moung stand to hold the camera.
Camera Connectors

- Power Connector: Connects the power adapter to supply power to the camera if using non-PoE conncon
• BNC Video Out: Connect a CRT monitor or handheld monitor. - Microphone In: Connects an external microphone to receive the on-the-spot sound where the camera is installed.
- Ethernet/PoE Port: Plugs the network cable to connect to your local area network (LAN). If you are using the PoE, you must have the network cable connect to your PoE switch or PoE Injector.
- GPIO Port: Connect external device. Please refer to I/O seng paragraph. It's also used for IP camera reset. Please refer to Factory Default paragraph.
- Speaker Out: Connects an external audio device (such as the acve speaker) to deliver sound via the camera.
Installaon
Hardware Installaon
Viewing Angle
Choose the locaon where has good angle to shoot the image you expect to see. The moon detecon area should also be considered when installing the camera.
Bracket Installaon
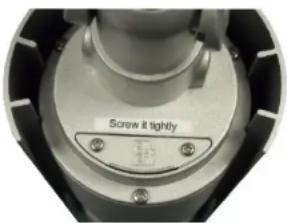
Turn and lock the bracket into the moung hole of IP camera. Use screws to x the bracket to ceiling or wall, and turn the knob ghtly to x the angle of camera.

Vari-Focal Lens
The camera equipped with external vari-focus lens control. Using athead screwdriver or paper clip to adjust zoom/focus buon.

TRENDnet User's Guide
TV-IP343PI
LED Indicator
The green LED will be ash when power on the camera and if there is the data transmission.

Waterproong
The camera is designed featuring waterproof. However, you need to protect the cable connectors from water soaking. For example, you can tape the juncon points of the connectors while you connect the cables or purchase a weatherproof cable/power cord protector.
SD Card Slot
Aer installed a Micro SD Card, please ensure the cover was screw ghtly to protect water soaking.
Camera Installaon
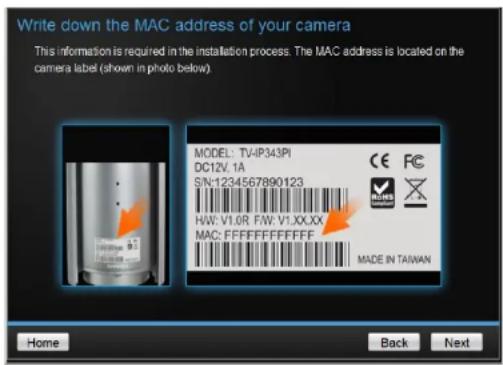
- Insert the Installaon CD-ROM into your computer's CD-ROM drive to initiate the Auto-Run program. Click the Install Camera.

- Write down the MAC ID of the camera.
TRENDnet User's Guide
TV-IP343PI
- Plug in and connect the power adapter to the camera. If you are using the PoE to supply power to the camera, please skip to the next step. Click Next when you are done.

- Connect a network cable to the camera's network port and then to your router. If you are using PoE, please ensure the cable is connected to a PoE switch or PoE injector.

- Wait while camera is searching.

- The founded cameras will show on the screen. The camera already selected by default if you have only one camera installed. If you have more than one camera in the same Network, you will need to identify the camera by the MAC ID. Click Next.

TRENDnet User's Guide
TV-IP343PI
- Select "DHCP" upon to assign an IP by DHCP server or Select "Fixed IP" to set IP address manually. Click Next.
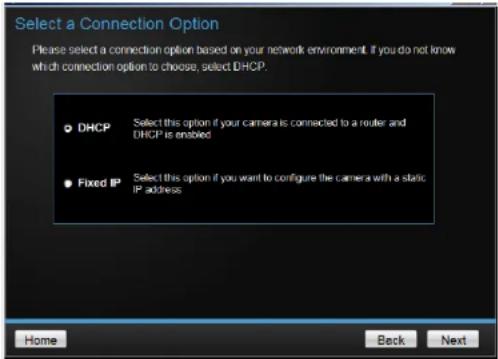
- If you select "Fixed IP", II out the IP address, subnet mask, default gateway, DNS server. Please ensure that the IP address of the camera and the computer must within the same network. Click Next.

- Type in the Password. The default password is "admin". You must change the default password of the camera. Enter the default password: admin and enter the new password. The password must be between 8 and 32 characters. (Alphanumeric: a-z, A-Z, 0-9), and entering the password two to conrm password.

- Click the hyperlink to access to the camera's web page or click Next. It is recommended that you access the IP camera now if it was using a DHCP conncon.

TRENDnet User's Guide
TV-IP343PI
- Click Finish to exit the program or click Home to return to the main screen. This device also supports the Mobile App. Using your mobile device to scan the QR code to install the App.

Conguraon
Viewing Camera Basic Funcon
Open the Web browser on your computer (example showed in this User's Guide is based on the Internet Explorer). In the Address bar, type the IP address you got from "Camera Installaon" chapter or found by IP Installer, and then press [Enter].

When the login window appears, enter the User name (admin) and Password and press OK to access to the main screen of the camera's Web Conguraon.
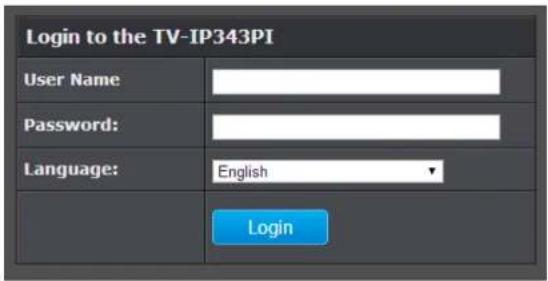
Note: if you are initially access to the camera, you will be prompted to install a new plug-in for the camera. Permission request depends on the Internet security sengs of your computer. Click Allow and Install to process.

TRENDnet User's Guide
TV-IP343PI
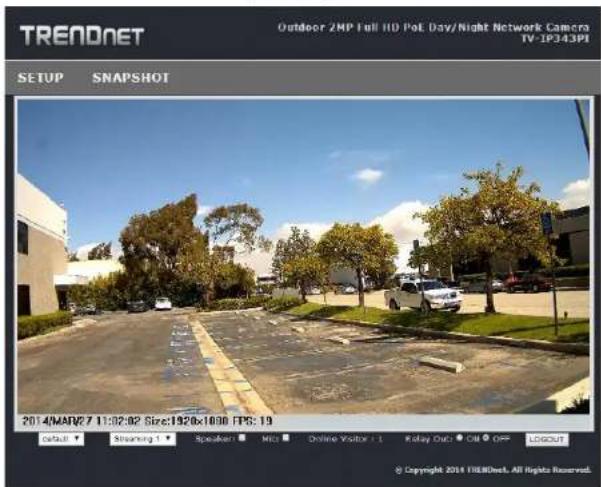
Aer you login into the live screen of the camera, the main page will appear as below:

The live screen of the IP camera conguraon provides you with many useful informaon and funcons, including:
① SETUP : Click the buon to congure the camera.
② SNAPSHOT: Click the buon to take a snapshot. The snapshot will pop up another window for your review rst. Right click the mouse to save the snapshot at the desire desnaon.
③ System Informaon: It shows current system Date, Time, Video Resoluon, and Video Refreshing Rate.
④ Digital Zoom: The drop down menu has 3 images size available, 1/2x, 1x and 2x. The default is 1/2x.
⑤ Streaming Prole: Use the drop down menu to select Streaming 1 & Streaming 2 video. (If the streaming 2 seng is closed on "AUDIO/VIDEO SETTING >> Video", this opon will not appear)
⑥ Speaker/Microphone: Click the "Mic" to speak out through the camera. Click the "Speaker" to receive the on-side sound and voice from the camera.
⑦ Online Visitor: It shows how many people connect to this IP camera.
⑧ Relay On: Click the Relay out "ON" to trigger the relay output for tesng. click "Off" to stop triggering. To switch between these two types of relay out, please refer to Event Conguraon >> GPIO Seng session for detail.
⑨ Logout: Click to logout the camera. Please note: Closing the browser does not logout the camera. It will remain in the same session. If camera in the idle me for 3 minutes, it will automat logout the session.
One the live view video, right click the mouse for the additional menu opons.
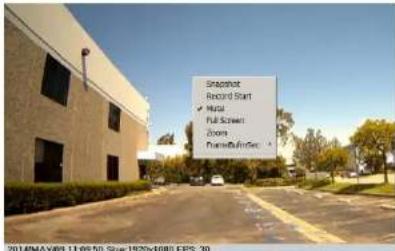
- Snapshot: Save a JPEG picture
- Record Start: Record the video in the local PC. It will ask you where to save the video. To stop recording, right-click the mouse again. Select "Record Stop". The video format is AVI. Use Microso Media Player to play the recorded le.
- Mute: Turn o the audio. Click again to turn on it.
The "mute" buon does not act the playback recording video. As long as the "2-Way Audio" opon in the audio seng is enabled, all the audio will be recorded into the playback video even you click "mute" in the live page.
• Full Screen: Full-screen mode.
TRENDnet User's Guide
TV-IP343PI
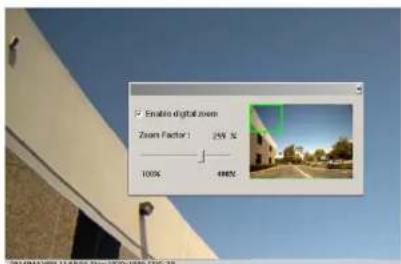
- Zoom: Enable zoom-in and zoom-out funcons. Select "Enable digital zoom" option rst within the pop-up dialogue box and then drag and drop the bar to adjust the zoom factors.
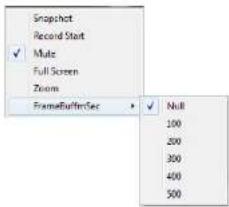
- Frame Buer mSec: This funcon is to build a temporary buer to accumulate several video frames. This funcon can make video smooth-going when the Network speed is slow and lag. If you select "100", then it plays video aer 100 mSec when starng receiving images from camera. The slower of the Network is, the bigger value should be selected. The default value is null.
Conguring the Camera Seng
To congregate the camera, click
on the live screen.
The Web Conguraon contains the sengs that are required for the camera in the le menu bar, including System, Network, Audio/Video Seng, Event Seng and Logout.
To return to the live screen, please click the
BTS VIEW
TRENDnet User's Guide
TV-IP343PI
SYSTEM

System >> System Informaon >> Server Informaon

• MAC Address: It indicates the IP Camera's MAC address.
• Server Name: The Camera name.
• LED Indicator: Turn the LED light on or o by click the ON/OFF buon.
- Language: There are 5 languages opons. When changing the language, it will prompt dialogue box for conrmaon. Click "Yes" to proceed.
System >> System Informaon >> OSD Seng
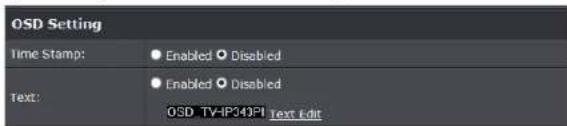
• Time Stamp: Enable or disable the me that will show on the live screen.
- Posion: Aer enabling me stamp, you can select the posion of me stamp on the live screen.

• Text: Enable the Text opon to have the desire text show on the camera live screen.
- Text Edit: Click it to call out "text edit" window:
- Text: Key in the words you want to show on the live screen.
- Opaque: Set the background transparency of the text.

TRENDnet User's Guide
TV-IP343PI
System >> System Informaon >> Time Seng
![Time Setting Server Time: 2014/04/04 09:59:31 Date Format: ○ yyyy/mm/dd ● mm/dd/yyyy ● dd/mm/yyyy Time Zone: GMT-08.00 Pacific Time (US & Canada) ■ Enable Daylight Saving: ● NTP NTP Server: pool.ntp.org Update: 6 Hour Time Shift: 0 Minutes[-1440..1440] ● Synchronize with PC's time Date: 2014/04/04 Time: 10:59:33 ● Manual Date: 2014/04/04 Time: 10:53:16](/content/2026/05/1049788/images/b1bb82b97f1ae50b3e062f8d9df6bce8f8e513d0d2ef0c50e4fd5961f4508adb.jpg)
• Server Time: It shows current IP camera server me.
• Date Format: Select the date display format.
• Time Zone: Select your me zone. It aect server me when you use "NTP" me.
- Enable Daylight Saving: select the start and end daylight saving me.
- NTP: Type in the IP address of the NTP server and interval me. The me of the IP camera will be synchronized with NTP server me. To use this opon, if the NTP Server is under WAN, the IP camera must be set to access WAN (Using the WAN IP that provide by your ISP provider, or setup by UPnP Port Forwarding (page 18)
- Synchronize with PC's me: In "Date" and "Time" column it shows your current PC me. Click "Apply" to make the IP camera me the same with PC me. Note that IP camera will not check with PC at every moment automatically. Every me when you want to synchronize the IP camera me with PC me again, please select this opon and click "Apply".
- Manual: Type in the date and me, and click "Apply".
System >> User Management

• Direct Video Stream Authencaon:
To stream the video directly without going through the conguraon page, you can access it via Internet.
Stream 1 Video: hp://camera_ip_address:port/stream1view.htm
Stream 1 Video: hp://camera_ip_address:port/stream2 view.htm
- Enable Password Protecon:
- Yes: User needs to enter user name and password to stream the camera.
- No: User can stream the camera without entering the username and password.
Add user: Enter the username and password to add guest users to access the camera. The guest user can only view the live view video and is not allowed to do any conguraon.
TRENDnet User's Guide
TV-IP343PI
- User List: List all users that were added into the camera. Click "Edit" to modify the user informaon. Click "Remove" to remove the users from the list.
System >> Tools

- Firmware Upgrade:
To update the rmware, click "Browse" to select the rmware, then click "Upgrade" to proceed. Please do not disconnect power or Network cable during rmware upgrading.
• System Reboot: Click Reboot to reboot the IP camera.
• Factory Reset: Click Reset to reset all the sengs back to factory default value
• Conguraon:
- Backup: Click Backup to save the conguraon to your computer.
- Restore: Click "Browse..." to select the configure le from your computer then click Restore to restore all seng
NETWORK
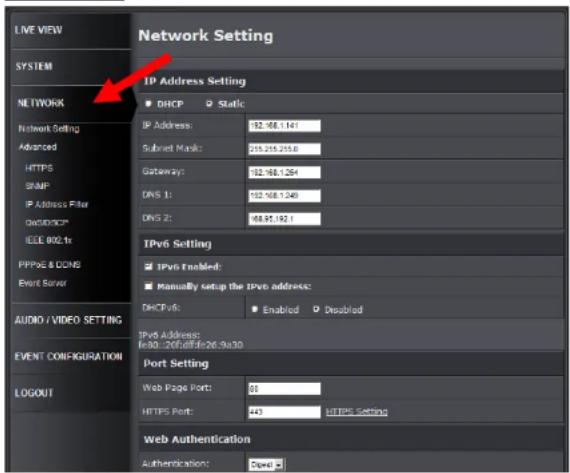
TRENDnet User's Guide
TV-IP343PI
Network >> Network Seng >> IP Address Seng
| IP Address Setting | |
| DHCP Static | |
| IP Address: | 192.168.10.30 |
| Subnet Mask: | 255.255.255.0 |
| Gateway: | 192.168.1.254 |
| DNS 1: | 192.168.1.249 |
| DNS 2: | 168.95.192.1 |
- DHCP: Select this opon when your network uses the DHCP server. When the camera starts up, it will be assigned an IP address from the DHCP server automacally.
- Stac IP: Select this opon to type in IP address, subnet mask, gateway, and DNS manually. Default IP address is 192.168.10.30 if the camera doesn't connect with DHCP server. DNS (Domain Name System) translates domain names into IP addresses. Enter the Primary DNS and Secondary DNS that are provided by the ISP.
Network >> Network Seng >> IPv6 Seng

IPv6 is a newer numbering system that provides a much larger address pool than IPv4, which accounts for most of today's Internet trac. You can manually enter IPv6 address, enable DHCPv6 to get IPv6 address automacally.
- Manually setup the IPv6 address: You can set up IPv6 manually by enter IP Address, Gateway, and DNS.
- DHCPv6: If you have a DHCPv6 server, enable this opon to assign the IPv6 from server. The assigned IP address will be displayed
- IPv6 Address: A virtual IPv6 address generated by the IP camera. This virtual IPv6 address cannot use on WAN. To access the IP camera via IPv6 address, open a web browser and type in hp://[IPv6 Address] in the address bar. The [ ] parentheses mark is necessary for IPv6 address.
Network >> Network Seng >> Port Seng

- Web Page Port: Setup HTTP web page connecting port which is also video transming port (Default: 80)
- HTTPS Port: Setup HTTPS connecng port (Default:443)
Network >> Network Seng >> Web Authencaon

The camera supports two levels of authencaon, Basic and Digest. The Basic opon having the username and password transmied as plain text. The digest opon encrypted username and password during data transmission. The default authencaon is set to Digest.
Network >> Network Seng >> UPnP

TRENDnet User's Guide
TV-IP343PI
• UPnP:
This IP camera supports UPnP (Universal Plug and Play) which is a set of computer network protocols that enable the device to device interoperability
• UPnP Port Forwarding:
When the camera is installed under a router, enable UPnP Port Forwarding to let the router open ports so that the video streams can be sent out from a LAN. Set Web Port, Hps Port, and RTSP port, and make sure your router supports UPnP and the funcon has been acvated.
Aer type in the port number and click "Apply", the port forwarding status will display beside the port column. There are three status will show.
- Registered successfully: UPnP port forwarding seng succeeds.
- The router doesn't support UPnP Port Forwarding: The camera can detect the router, but router return a message that it does not support UPnP Port Forwarding.
- The router is with some problems. Please reboot it: The camera cannot detect the router. Please check your router.
If this router has a WAN IP, this funcon allows the camera to do WAN access. In the address bar of browser, key in: "hps:// (router WAN IP) : (external web port) /" to access the IP camera.
Network >> Network Seng >> RTSP Seng
| RTSP Setting | ||
| RTSP Server: | Enabled | Disabled |
| RTSP Authentication: | Digest | |
| RTSP Port: | 554 | |
| RTP Start Port: | 5000 | [1024..9997] |
| RTP End port: | 9000 | [1027..10000] |
• RTSP Server:
Enable it, then you can access camera and get image via RTSP protocol.
If you have a media player that supports RTSP protocol, you can use it to receive the video streaming from IP camera. The RTSP address can be set for two streamings respectively.
• RTSP Authencaon:
"Disable" means everyone who knows your camera IP Address can link to your camera via RTSP. No username and password are required.
Under "Basic" and "Digest" authencaon mode, the camera asks the user to give username and password before allows accessing. The password is transmied as plain text under basic mode, which provides a lower level of security than under digest mode. Make sure your media player supports the authencaon schemes.
- RTSP Port: It's used for TCP conncon. Setup port for RTSP transming (Default: 554)
- RTSP Start and End Port: It's used for UDP conncon. Setup port for RTSP transming (Default: 5000, 9000)
Network >> Network Seng >> Mulcast Seng (Based on the RTSP Server)
| Multicast Setting (Based on the RTSP Server) | ||
| Stream 1: | ||
| IP Address: | 234.56.78 | [224.3.1.0 ~ 239.255.255,255] |
| Port: | 6000 | [1 ~ 65535] |
| TTL: | 15 | [1 ~ 255] |
| Stream 2: | ||
| IP Address: | 234.56.79 | [224.3.1.0 ~ 239.255.255,255] |
| Port: | 6001 | [1 ~ 65535] |
| TTL: | 15 | [1 ~ 255] |
Mulcast is a bandwidth conservaon technology. This funcon allows several users to share the same packet sent from IP camera. To use Mulcast, appoint IP Address and
TRENDnet User's Guide
TV-IP343PI
port here. TTL means the life me of packet. The larger the value is, the more user can receive the packet.
To use Mulcast, be sure to enable the funcon "Force Mulcast RTP via RTSP" in your media player. Then key in the RTSP path of your camera: "rtsp://(IP address)/" to receive the mulcast.
Network >> Network Seng >> ONVIF
| ONVIF | |||
| ONVIF: | ○v2.20 | ●v1.01 | ●Disabled |
| Security: | ●Enabled | ●Disabled | |
| RTSP Keepalive: | ●Enabled | ●Disabled | |
Under ONVIF conncon, the video will be transmied by RTSP. Be sure to enable the RTSP server in IP seng, or you're not able to receive the video via ONVIF.
• ONVIF:
Choose your ONVIF version. The two devices that use ONVIF to communicate should be set to the same version.
• Security:
Select "Disable", then the username and password are not required when accessing the camera via ONVIF. Select "Enable", then username and password are necessary.
• RTSP Keepalive:
When the funcon is enabled, the camera checks once in a while if the user who links to the camera via ONVIF sll keeps connecng. If the conneccon had been broken, the camera stops transming video to user.
Network >> Network Seng >> Bonjour
| Bonjour | ||
| Bonjour: | ●Enabled | ○Disabled |
| Bonjour Name: | TV-IP343PI | @00:0F:0D, 26:41:40 |
This funcon enable Safari browser's bookmark to link to this IP camera. The Bonjour name is the name that display in the bookmark. Please note the Bonjour funcon on Safari browser does not support hps protocol. If you selected "hps" mode, you will see the camera appears on Safari's bookmarks but will not be able to access the camera.
Network >> Network Seng >> LLTD
| LLTD (Link Layer Topology Discovery) | |
| LLTD: | ○Enabled ●Disabled |
If your PC supports LLTD, enable this funcon then you can check the conneccon status, properes, and device posion(like IP address) of this IP Camera in the network map. In Windows Vista or Windows 7, you can nd LLTD through the path: Call out the Control Panel → Network and Internet → Network and Sharing Center → Click "See full map".
Network >> Advanced >> HTTPS
When the users access cameras via Hps protocol, the transmied informaon will be encrypted so that the security level is arisen.
You can select the conncon type.
• Hp: user can access the camera via Hp path.
• Hps: user can access the camera via Hps path but cannot via Hp path.
- Hp & Hps: Both the Hp and Hps path can be used to access the camera. When you change the seng of conncon type, it may cause conncon error or disconncon error if you switch the protocol directly. Therefore, Hp & Hps mode is necessary. If you want to change from Hp to Hps, please switch to "Hp & Hps" mode rst, and then switch to "Hps" mode. Same method when you change from Hps to Hp.
The Hps protocol has cercate verifying mechanism. When the user access a website via Hps, the browser will check the cercate of that domain and verify its trusness and secure.
TRENDnet User's Guide
TV-IP343PI
Cercate generaon process:
- Remove the exisng cercate: Before you generate a new cercate, please remove exisng one. Select "Hp" conncon type and click "Remove". If a dialog box pops up to ask you to conrm, click "Yes".
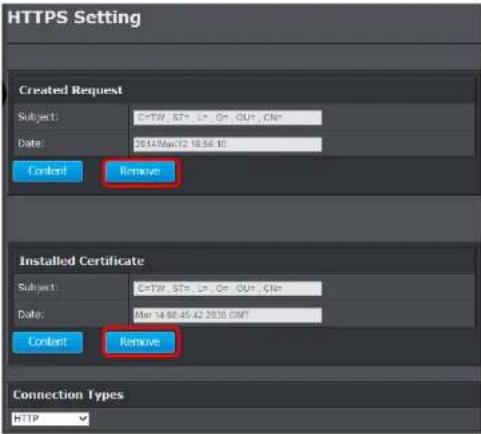
- Created Request: Fill in the following form and click "apply".

- Aer you generate a cercate request, if you choose to turn it to the trusted third-party to verify, please click "Content" and copy all the request content.

-
According to the cercate source, there are two ways to install the cercate.
-
If you had sent the cercate request to do sign and received a signed cercate, please click "browse" and nd the cercate le in your computer. Click "Apply" to install it.
- If you choose to generate a self-signed cercate, ll in the following forms and set validity day, click "Apply" to nish installed it.

Aer nishing installaon, you can click "Content" to call out and check the cercate content.

TRENDnet User's Guide
TV-IP343PI
- To use Hps to access camera, open your browser, and key in "hps://(IP address)/" in the address bar. Now your data will be transmied via encrypted communicaons, and the browser will check your cercate status. If it shows you a warning message. The warning message meant that the cercate is self-signed or signed by distrusted instuon. Click Connue to this website to view the view the camera.

There is a problem with this website's security certificate.
The security certificate presented by this website was not issued by a trusted certificate authority. The security certificate presented by this website has expired or is not yet valid.
The security certificate presented by this website was issued for a different website's address.
Security certificate problems may indicate an attempt to fool you or intercept any data you send to the server.
We recommend that you close this webpage and do not continue to this website.
Click here to close this webpage.
Continue to this website (not recommended).
More information
Network >> Advanced >> SNMP
SNMP (Simple Network Management Protocol) provides a simple framework for administering networked hardware. To manage the IP camera, you have to prepare a MIB browser or similar tools rst. SNMPv1, SNMPv2c, and SNMPv3 can be enabled simultaneously.
The following examples are based on MG-SOFT MIB Browser. Depending on your MIS Browser, you may see dierent interface and opons. Please refer to the user manual of your MIB Browser.
• SNMPv1 and SNMPv2:

The term "Community name" in SNMPv1 and SNMPv2c can be roughly regarded as key. The person who has the community name has the authority to read or edit the informaon of IP camera via SNMP.
Click the box to enable SNMPv1 or SNMPv2c protocol, and specify the community name for write (read and write) and read (read-only). The user who use read community name to access the IP camera cannot modify any data of the camera. The community name can be any English characters and numbers, and must be shorter than 31 bits.
SNMPv3:
| SNMPv3 | |
| Write Security Name: | write |
| Authentication Type: | MD5 SHA |
| Authentication Password: | |
| Encryption Type: | DES AES |
| Encryption Password: | |
| Read Security Name: | public |
| Authentication Type: | MD5 SHA |
| Authentication Password: | |
| Encryption Type: | DES AES |
| Encryption Password: | |
For data security reason, the authencaon and encrypon assurances are added when developing SNMPv3. The user has to give not only the security name (similar with "community name" in v1&v2c) but the password in order to access the IP camera. Please set security name, authencaon type, authencaon password, encrypon type, encrypon password of write and read respectively. The security
TRENDnet User's Guide
TV-IP343PI
name can be any English characters and numbers, and must be shorter than 31 leers. The password must be 8\~64 leers in length.
Dierent from in SNMPv1 and v2c, the user have to create an account when using SNMPv3. In the account parameters, key in the security name and password you set in the camera to get accessing.
• SNMPv1/SNMPv2 Trap:
| SNMPv1/v2c Trap | |
| Trap Address: | |
| Trap Community: | public |
| Trap Event: | Cold Start Setting Changed Network Disconnected V3 Authentication Failed SD Insert/Remove |
Trap is a mechanism that allows a managed device to send messages to the manager instead of waiing passively for polling from the manager. Specify the trap event. When those events occur, the camera will send the ring message to the Trap Address, which is usually the manager's IP address. Trap Community means the community that can receive the trap message.
Note: Trap Address must be under the same LAN with IP camera.
- Cold Start: The camera starts up or reboots.
- Seng changed: The SNMP seng is changed.
- Network Disconnected: The network conncon was broken down. (The camera will send trap messages aer the network being connected again)
- V3 Authencaon Failed: A SNMPv3 user account tries to get authencaon but failed. (Due to incorrect password or community)
Network >> Advanced >> IP Address Filter


You can allow or
deny an IP address or even a range of the IP address to access the IP camera. If you would like to deny a range of IP address but would allow an IP within that range can access the camera, please setup the allow IP address in the 1 st priority and set the deny range of IP address as 2 nd priority as example below.
| IPv4 List: | |||
| No. | IP Address | Filter | Action |
| 1 | 192.168.1.23 | allow | remove |
| 2 | 192.168.1.1-192.168.1.254 | deny | remove |
TRENDnet User's Guide
TV-IP343PI
Network >> Advanced >> QoS/DSCP

DSCP species a simple mechanism for classifying and managing network trac and provide QoS on IP networks. DSCP is a 6-bit in the IP header for packet classicaon purpose.
The number 0\~63 for Live Stream, Event / Alarm, and Management represent the rao that the bandwidth is divided. For example, if you set 5, 10, and 20 for these three items, then the bandwidth of these items is 5:10:20. The item geng more bandwidth has lower probability to be delayed. There is no dience between seng "0, 0, 0" or "63, 63, 63" because under these two seng the three items will get equal bandwidth (1/3).
The three stream control the protocols respectively:
• Live Stream (Video and audio) : RTP / RTSP
• Event/Alarm : FTP / SMTP / SAMBA / SIP
• Management : HTTPS / HTTP / SNMP
Note: The "Management" stream handles both the live view and the seng area of the web page on which the data is transferred via hp/hps protocol. If you prefer to distribute more bandwidth when using the web browser to watch the live video, please adjust the Management Stream instead of Live Stream.
Network >> Advanced >> IEEE 802.1x

IEEE 802.1x is an IEEE standard for port-based Network Access Control. It provides an authencaon mechanism to device wishing to each to a LAN or WLAN. To use this funcon, you need a device to build IEEE 802.1x LAN at rst.
The EAPOL protocol support service idencaon and oponal point to point encrypon over the local LAN segment.
Please check what version of the authencator and authencaon server support. This camera supports EAP-TLS method. Please enter ID, password issued by the CA, then upload related cercates.
TRENDnet User's Guide
TV-IP343PI
Network >> PPPoE & DDNS
PPPoE & DDNS
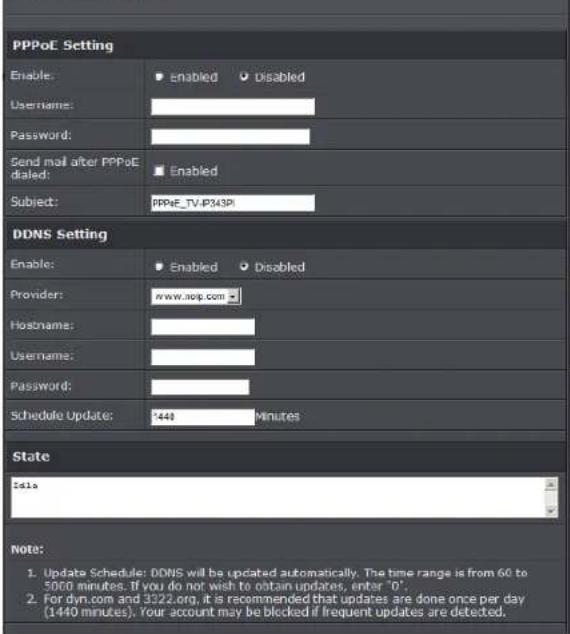
- PPPoE

Select "Enabled" to use PPPoE. Type in the username and password for the ADSL conncon.
Send mail aer dialed: When successfully connecng to the internet, it sends a mail to a specic mail account. As for the mail account seng, please refer to Server seng page.
- DDNS

This camera supports following Dynamic DNS server: Dyndns.com, 3322.org, no-ip.com and IPTECNO DDNS.
Enable DDNS, and select a DDNS provider. Some providers will ask you to register and get an account before you use their service. Fill in the user name, hostname, and password (if need). If seng up IP schedule update too frequently, the IP may be blocked. In general, we suggest set schedule update to once a day (1440 minutes). Aer click "Apply" the seng.
TRENDnet User's Guide
TV-IP343PI
DDNS Status:
- Updang: Informaon update
- Idle: Stop service
- DDNS registraon successful, can now log by hp://
.no-cp.com: Register successfully. - Update Failed, the name is already registered: The user name has already been used. Please change it.
- Update Failed, please check your internet conncon: Network conncon failed.
- Update Failed, please check the account informaon you provided: The server, user name, and password may be wrong.
Network >> Event Server
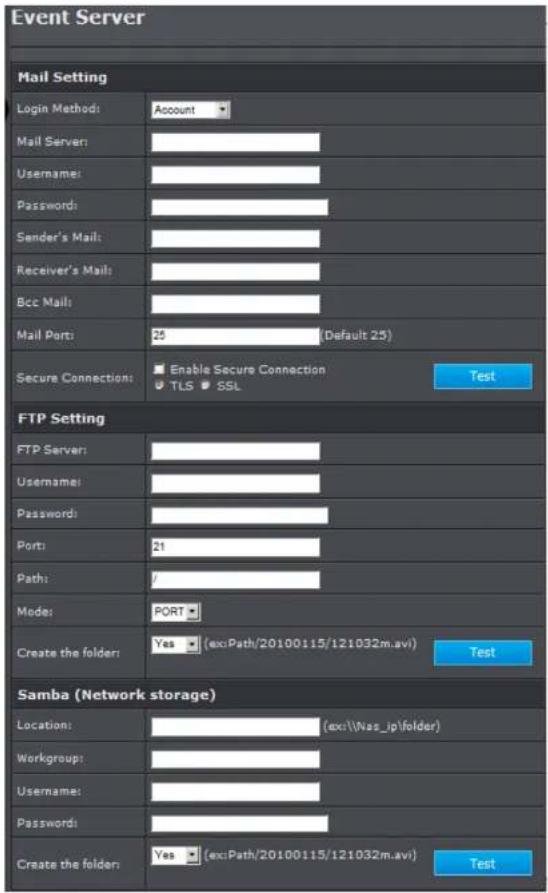
TRENDnet User's Guide
TV-IP343PI
The sengs of Email, FTP and SAMBA are used when the event occurs, schedule snapshot executes, or the alarm input is triggered. Select the item to display the detailed conguraon opons. You can congure either one or all of them.
- Mail Seng

- Login Method: Select "Anonymous" to disable the authencaon feature, or select "Account" and then enter the Username and Password according to the mail server conguraon.
- Mail Server: Enter the mail server address. For example, myserver.com. If you are using a free mail service (e.g. Google gmail.com®, Yahoo®, Hotmail®), please enter the SMTP server address from the service provider.
- Username & Password: Enter the sender's username and password to login the mail server. For free mail server, please the email address as the username.
- Sender's Mail: Enter the email address of the user who will send the email.
- Receiver's Mail: Enter the mail address of the user who will receive the email. Use semicolon to separate each address. It can contain up to 64 characters in the column.
- Bcc Mail: Enter the mail address of the blind carbon copy receiver.
- Mail Port: Assign the SMTP port in the text box. The default SMPT port is 25. For the free mail service, please enter the correct port number from the service provider.
- Secure Connecon: If the mail server requires an encrypted conncon, you should select the SSL opon. TTLS is an extension to plain text communicaon protocols. It oers a way to upgrade a plain text conncon to an encrypted (TLS or SSL) conncon.
Click Apply to save the seng, then use Test buon to test the server conncon. A message box will tell you "OK!" if it works, and a test e-mail will be sent to receiver's mail address.
- FTP Seng:
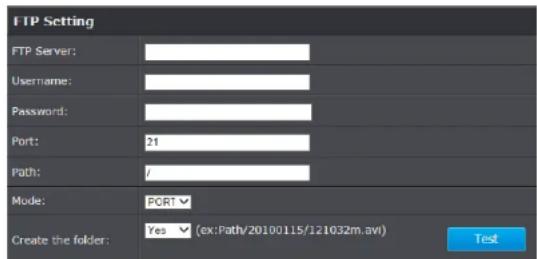
- FTP Server: Enter the IP address of the target FTP server.
- Username & Password: Enter the username and password to login into the FTP server.
- Port: Enter the port number used for the FTP server.
- Path: Enter the desnaon folder for uploading the images. For example, /343PI.
- Mode: In PORT mode, the FTP server builds the conneccon to the user's data port acvely. However, from the user-side rewall's standpoint, the acon of connecng from FTP server is oen considered to be dangerous and should be blocked. In PASV mode, the problem is solved: The FTP server waits for the data transmission conneccon built by the user. Make sure that the server supports the mode you select.
TRENDnet User's Guide
TV-IP343PI
- Create the folder: Select Yes, then folders will be created folder by date under your FTP path.
Click Apply to save the sengs, then click Test buon to test the server conncon. A message box will tell you "OK!" if it works, and a test le will be uploaded to FTP server.
- Samba Seng:

- Locaon: Enter the path of the shared folder.
- Workgroup: Type in the workgroup name of the computer.
- Username & Password: Enter the username and password to login into the Samba.
- Create the folder: Select Yes, then folders will be created by date under your Samba Server.
Click Apply to save the seng, then use Test buon to test the server conncon.
A message box will tell you "OK!" if it works, and a test le will be created in the locaon.
AUDIO/VIDEO SETTING

TRENDnet User's Guide
TV-IP343PI
Audio/Video Seng >> Image Seng

- Privacy Mask: For the security and privacy purpose, there are three areas can be setup for privacy mask. Click Area buon rst and drag an area on the above image, and remember to save your seng. The masked area will not show on both the live view and recording.
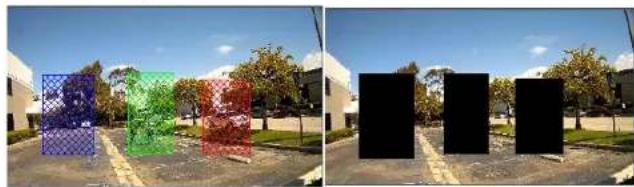
natural_image
Two-panel image showing a color-coded 3D block structure on a paved area with trees and buildings in the background (no text or symbols visible)• Brightness, Contrast, Hue, Saturaon, Sharpness can be adjusted here.
- AGC: Automac gain control. The sensitivity of camera can be adjusted with the environmental light. Enable this function and the brighter image can be got under dim light, but the level of noise may also increase.
- Shuer Time: Choose as the locaon of your camera or xed shuer me. The shorter the shuer me is, the less light the camera receives and the image becomes darker.
- Sense-Up: This funcon increases the sensitivity of camera to get brighter image at night. The smaller the value you select, the slower the shuer speed becomes so that the image will get brighter, and moving subjects might be blurred.
Sense-Up opon is only enabled when users select "outdoor" or "indoor" in shuer me opon.
- D-WDR: Digital Wide dynamic range. This function enables the camera to reduce the contrast in the view to avoid the dark zones resulting from over and under exposure.
• Video Orientaon: Flip, mirror, or rotate the image.
- Day & Night: The camera can detect the light level of environment. If you choose "Light Sensor Mode", the image will be turned to black and white at night in order to keep clear. To set light sensor mode, appoint a lux standard of switching D/N here. Current lux value is provided for reference. Under "Times Mode" the switch
TRENDnet User's Guide
TV-IP343PI
me of Color / Black and white is according to the given me. If you select "Synchronize with DI input", the image turns to black and white when digital input is triggered. You can also control it by choosing "Color" or "B/W".
• White Balance: Adjust the Red / Blue gain values.
- Denoise: This funcon is able to liter the noise and blur from the image and show a clearer view. 3D and 2D ler values can be adjusted.
Note: When you select a number in "Shuer Time", actually the shuer me varies in a range and controlled by camera automacally. Following table shows the shuer me opon and corresponding range.
| Opon | Shuer Time Range (sec.) |
| Outdoor | 1/10000 ~ Selected number in "Sense-up" |
| Indoor | NTSC: 1/125 ~ Selected number in "Sense-up"PAL: 1/100 ~ Selected number in "Sense-up" |
| 1/30 | 1/10000 ~ 1/30 |
| 1/50 | 1/10000 ~ 1/50 |
| 1/60 | 1/10000 ~ 1/60 |
| 1/100 | 1/10000 ~ 1/100 |
| 1/125 | 1/10000 ~ 1/125 |
| 1/250 | 1/10000 ~ 1/250 |
| 1/500 | 1/10000 ~ 1/500 |
| 1/1000 | 1/10000 ~ 1/1000 |
| * Sense-up opons: 1/30, 1/15, 1/10, 1/5 | |
Audio/Video Seng >> Video Seng
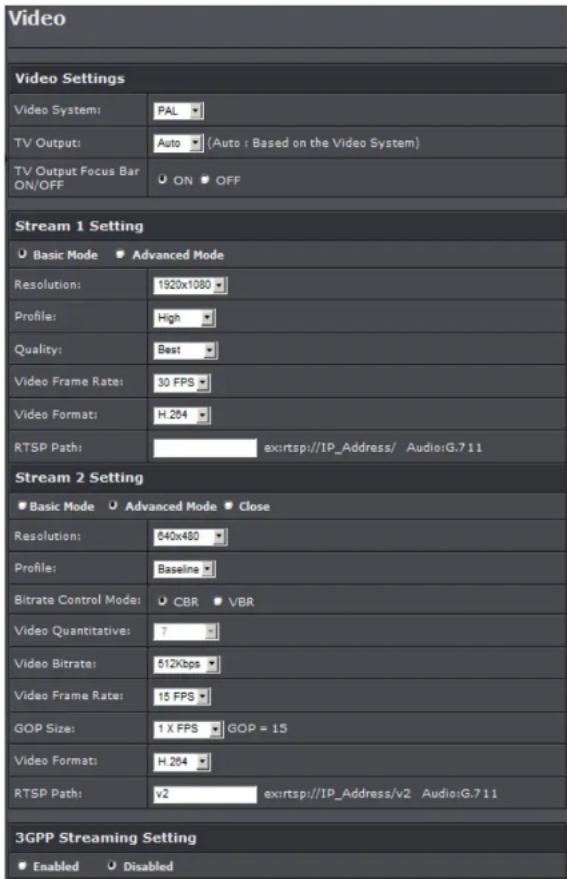
TRENDnet User's Guide
TV-IP343PI
- Video Sengs
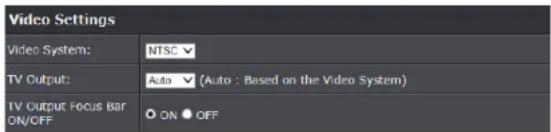
Select the Video System (digital signal) and TV Output (analog signal).
• Basic Mode of Streaming 1 and Streaming 2:
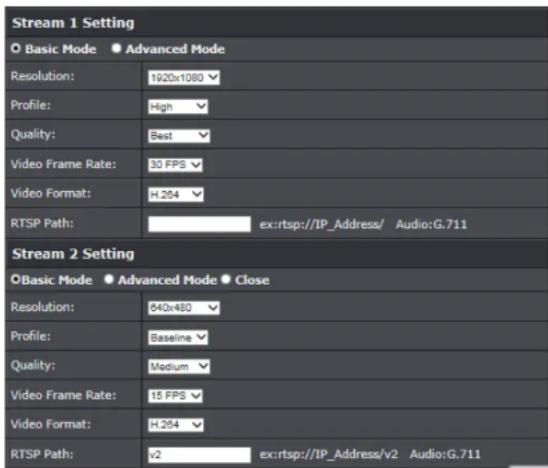
- Resoluon: 1280x800, 1280x720, 640x480, 320x240, or 176x144
- Quality: The higher the quality is, the bigger the le size is. It might aect Internet transming speed if the le gets too large.
- Video Frame Rate: The video refreshing rate per second. The max value is aected by the input resoluon you choose.
- Video Format: H.264 or M-JPEG.
- RTSP Path: Set the RTSP output connecng route. You can use the RTSP address displaying beside the column to access this IP camera.
• Advanced Mode of Streaming 1 and Streaming 2:

- Resoluon: 1280x800, 1280x720, 640x480, 320x240, or 176x144
- Bitrate Control Mode: In CBR(Constant Bit Rate) mode, the bitrate keeps consistent all over the video. In VBR(Variable Bit Rate) mode, the bitrate changes with the complexity extent of the video data. VBR provides a beer compression way and the le may be smaller. However, the VBR le size cannot be predicted. The image may become broken or lagged when your bandwidth is not enough for the data quantity you selected.
TRENDnet User's Guide
TV-IP343PI
- Video Quantave: The quality parameter of VBR. You can choose 1\~10 compression rate. The higher the value is, the higher the image quality is.
- Video Bitrate: The quality parameter of CBR. You can choose 32kbps \~8Mbps. The higher the value is, the higher the image quality is.
- Video Frame Rate: The video refreshing rate per second. The max value is aected by the input resoluon you choose.
- GOP Size: It means "Group of Pictures". The higher the GOP is, the beer the quality is.
- Video Format: H.264 or M-JPEG
- RTSP Path: RTSP output connecng route. You can use the RTSP address displaying beside the column to access this IP camera.
• 3GPP Streaming mode:
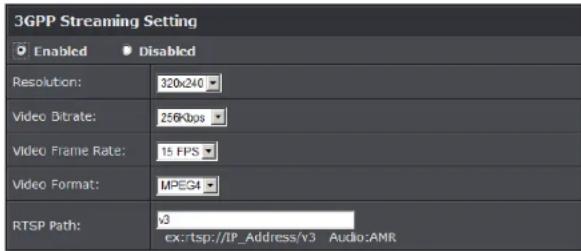
3GPP Streaming is designed for specic mobile viewing. To receive video via 3gpp, please remember to enable rtsp server in the "Network Seng" page.
- Resoluon: 640x480, 320x240, or 176x144
- Quality: The higher the quality is, the bigger the le size is. It might aect Internet transming speed if the le gets too large.
- Video Bitrate: You can choose 32kbps \~1Mbps. The higher the value is, the higher the image quality is.
-
Video Frame Rate: The video refreshing rate per second. The max value is aected by the input resoluon you choose.
-
Video Format: H.264 or MPEG4.
- RTSP Path: 3GPP output connecng route. If the IP address of your camera is 192.168.1.160 and you type in "3g" in the column, the 3GPP path will be rtsp://192.168.1.160/3g.
Audio/Video Seng >> Audio Seng
IP Camera supports 2-way audio. Audio can be received by the microphone connected with IP camera and transmied to remote PC. User can also send audio from remote computer's microphone to IP Camera's external speaker.
- Two-Way Audio
Select "Enable", then you can see "Mic" and "Speaker" opons on the live page. The Audio compression format can be chosen from 3 opons. You can also adjust the volume of 2-way audio.

• Receive sound from IP Camera or speak to IP Camera
Click "Mic" check box to receive sound from IP Camera and click "Speaker" to talk to IP camera side. Please ensure both IP camera and the computer sides have the microphone and speaker installed to have this funcon work properly.

EVENT CONFIGURATION
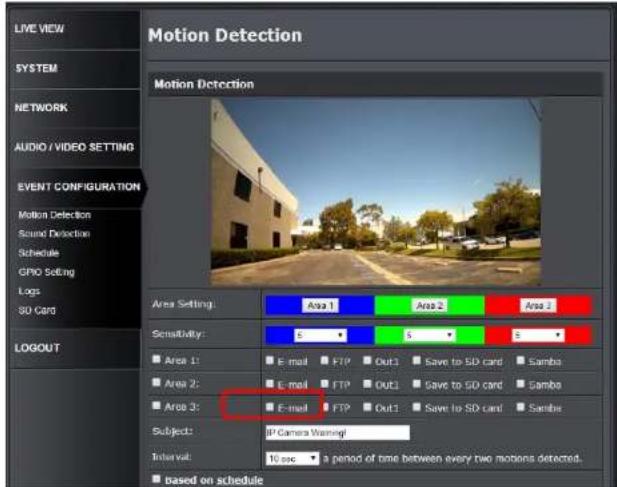
Event Conguraon >> Moon Detecon

- Area Seng: Click Area 1 /Area 2/Area 3 icon then draw the moon detecon area on the live screen. If there is any moon detected in these areas, the "Moon!" wording will show on the live screen. To clean the moon detecon area, click Area 1 /Area 2/Area 3 icon again.
• Sensitivity: Select moon detecon sensitivity from 1 to 10. - Trigger Acon (Area 1, Area 2, Area 3): When moon is detected, the camera can send video or snapshot to Email, FTP, Output device and Samba.
Note: Due to network/Internet bandwidth constraint, the IP camera may not transfer video to selected desnaons simultaneously. Keep the number of desnaons as few as possible to avoid possible data loss.
- Subject: This subject will appear as the subject when sending the moon detected video or snapshot to email.
- Interval: Each moon triggered in dened interval me. If you select "10 sec" here, once the moon is detected and acon is triggered, the next moon will be trigger aer 10 seconds..
TRENDnet User's Guide
TV-IP343PI
- Based on the schedule: The moon detecon will be triggered based on the schedule you dene.
Event Conguraon >> Moon Detecon >> Tampering Detecon

- Tampering: Enable / Disable Tampering. When enabled and tampering is detected, the camera will send video or snapshot to Email, FTP, Output device or Samba.
Event Conguraon >> Moon Detecon >> Record File

When an event occurs, the IP camera can record a video clip or take snapshot, and then send the le to mail/ FTP/ Samba. Select what format you want to save.
- AVI File (with Record Time Seng): Save AVI video le. The video length is according to the value you set in Record Time Seng.
- JPEG File (Single File with Interval Seng): Save single JPEG picture le when event occurs.
- JPEG Files (with Record Time Seng): Only when you select "JPEG" in streaming 1 video format of Video Seng, this opon can be enabled. Select this opon to save several JPEG picture les, and the successive picture les cover a period of me according to the value you set in Record Time Seng.
Event Conguraon >> Moon Detecon >> Record Time Seng
| Record Time Setting | |
| Pre Alarm: | 5 sec ✓ |
| Post Alarm: | 5 sec ✓ |
When an event occurs, the IP camera can record a video clip or take snapshot, and then
send to mail/ FTP/ Samba. Select the video recording length before and aer event occurs.
Event Conguraon >> Moon Detecon >> Network Disconnected

When enabled, the live view will be stored into the SD card if the IP Camera has no Internet Connecon (the SD card must be pre-installed).
Event Conguraon >> Moon Detecon >> Network IP Check

Enter the target IP address and interval. The camera will base on the interval me to check the target IP address. If PIN failed 4 mes, the camera itself will reboot.
Event Conguraon >> Sound Detecon >> Sound Detecon

TRENDnet User's Guide
TV-IP343PI
- When enabled and the camera detects sound, the IP camera can record a video clip or take snapshot, and then send the le to mail/ FTP/ Samba. Select what format you want to save.
- Detecon Level: Selects the decibels value (for the camera to trigger sound detecon).
Event Conguraon >> Schedule

Click on the week calendar to draw color. The acons will be performed during the colored me.
When Record is enabled:
- Enabled / Disabled
- Desnaon: Select between sending the record to Samba or saving it into the SD card
• Record Time: Select the video length (seconds)
When Snapshot is enabled:
![All 0 1 2 3 4 5 6 7 8 9 10 11 12 13 14 15 16 17 18 19 20 21 22 23 Mon. Tue. Wed. Thu. Fri. Sat. Sum. With schedule setup Snapshot & Record ● Record ○ Snapshot ● Close Snapshot ● Enabled ○ Disabled Snapshot: ▪ E-mail ▪ FTP ▪ Save to SD card ▪ Samba Interval: 10 Second(s) [1..50000] File Name: Snapshot](/content/2026/05/1049788/images/663b269d4711974afdc840803475a25c3b9ec302044fce7ab7f59ae71cd16f90.jpg)
- When enabling the snapshot funcon, the IP camera will take snapshot according to schedule. Select the snapshot saving way: E-mail, FTP, or Samba.
• Interval: The interval between two snapshots. - File Name: Give the snapshot le name. The saved le will be named as: "(le name) - (saving date) - (saving me)"
Event Conguraon >> GPIO Seng
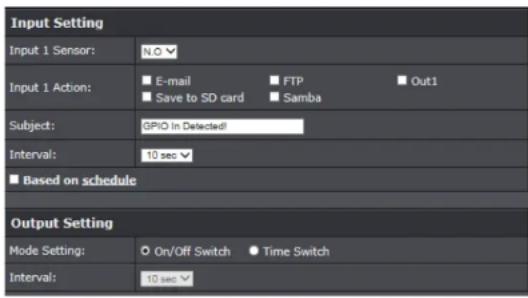
1. I/O Connecon
- Please connect the GND & DO pin to the external relay (buzzer) device.
When no event occurs, DO output is 5V (DO and GND are disconnected). When the camera detects event happening and triggers external alarm, DO output is 0V (DO and GND are connected).

- Please connect the GND & DI pin to the external trigger device.
If you select "N.O" in "Input sensor seng", when external devise or circuit makes DI and GND pin connected, the camera input alarm is triggered, and then camera will execute the acon user has set, for example, send snapshot to E-mail address.
If you select "N.C" in "Input sensor seng", when external devise or circuit makes DI and GND pin disconnected, the camera input alarm is triggered, and then camera will execute the acon user has set, for example, send snapshot to E-mail address.

flowchart
graph TD
    A["(N.O) Device"] -->|Normal 5V| B["DI"]
    A -->|Triggered 0V| C["DI"]
    D["(N.O) Device"] -->|5V Triggered 0V| E["DI"]
    D --> F["GND"]
GPIO PIN denion
GND (Ground): Inial state is LOW
DO (Digital Output): DC 5V
DI (Digital Input): Max. 50mA, DC 5V
2. GPIO Seng
Event Conguraon >> GPIO Seng >> Input Seng
- Input Sensor: According to your external device and circuit design, select N.O (normally open) or N.C (normally closed).
- Input Acon: When the camera input alarm is triggered, it can trigger the relay out, or send the video to E-mail/ FTP/ SAMBA.
- Interval: If you select "10 sec" here, once the input alarm is detected and acon is triggered, it cannot be triggered again within 10 seconds.
- Based on the schedule: When click the opon box, only during the selected schedule me the I/O is enabled. That is, for example, the 11th hour of Monday has not been colored in the schedule table, then no acon will be triggered even the camera detects input signal during 11:00\~12:00 on Monday.
Event Conguraon >> GPIO Seng >> Output Seng
- Mode Seng
- On/O Switch:
When event occurs, the camera triggers the external devise and lasts for certain of me according to the event "interval" seng. If it's triggered by moon detecon, the triggering me is according to "interval" seng of moon detecon. If it's triggered by external input alarm, the triggering me is according to input "interval" seng. It triggers the external devise and lasts for 10 seconds if you select "10" in interval seng. You can turn
TRENDnet User's Guide
TV-IP343PI
o the alarm manually by click "o" at the boom-right of the live screen page.
- Time Switch:
When event occurs, the camera triggers the external devise and lasts for certain of me according to the output "interval" seng, and the user is not allowed to break o the alarm manually.
3. Output Test
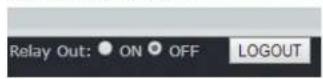
Aer the external output hardware is installed, you can use the "Relay Out" buon on the live video page to test if DO device works.
• On/O Switch mode:
Click "ON", the camera will trigger the external output devise. For example, your alarm buzzer will connuously ring. You can manually break o the output signal by clicking "OFF".
• Time Switch mode:
Click "Pulse", the camera will trigger the external output devise for several seconds. The duraon length is according to the "interval" seng in Output Seng.

Event Conguraon >> Logs

Click "Logs" to see System Logs, Moon Detecon Logs, GPIO Logs and All Logs. If you remove the power from IP camera, Moon Detecon Logs will be cleared away.
Event Conguraon >> SD Card

TRENDnet User's Guide
TV-IP343PI
- Playback: Event Record
| 2014/06/04 | Del | ||
| Time | Video | Event Type | |
| 02:34:25 | 023425m.eu | Motion Detection | |
| 03:56:02 | 032602m.eu | Motion Detection | |
| 03:56:13 | 035613m.eu | Motion Detection | |
| 16:58:04 | 16190cm.eu | Motion Detection | |
| 17:01:41 | 170141m.eu | Motion Detection | |
The record data that triggered by moon detecon, sound detecon, tampering detecon, or GPIO is listed here. Click the date listed on this page, and it shows the list of the video. Click the video to download and start your player to play the .avi le. To delete the video, check it, then click "Del".
• Playback: Schedule Record
| 2014/09/03 | Del | ||
| Time | Video | Event Type | |
| 02 o'clock | 02 o'clock | Schedule Snapshot | |
| 02 o'clock | 02 o'clock | Record | |
The scheduled record data or scheduled snapshot are listed here. Click the date listed on this page, and it shows the list of the snapshot and the video. Click the video to download and start your player to play the .avi le. Click the snapshot to watch the album. To delete the le, check it, then click "Del".
• SD Management

Delete aer the "1 st day" means the recorded les will be deleted aer 1 st day from the me you decided to delete. For example: if right now is 5 pm, when you choose Delete aer the 1st day, the SD card will keep the le from 5 pm yesterday to 5 pm today. The rest of recorded les will be deleted.
The oldest le will be deleted if the Micro SD card is full.
Note: The use of the SD card will act the operaon of the IP Camera slightly, such as aecng the frame rate of the video.
- Format SD Card

To format the SD card and delete all the les, click "Format SD Card".
Logout

Click "LOGOUT" buon to logout the camera. Note: Closing the browser does not logout the camera. It will remain in the same session. If camera in the idle me for 3 minutes, it will automat logout the session.
How to Access the IP camera via IP Installer
The IP Installer is an oponal ulity allow you to search the cameras in your network easily.
- Insert the Installaon CD-ROM into your computer's CD-ROM drive.
- Click Exit if the Autorun pop up.
- Go to Start >> type in D:(D: is the leer assigned to your CD-ROM Drive, and then press the ENTER.
- Click IP Installer Folder and click IP Installer.exe
- The main screen will pop up.

• Search : Search the IP Camera within the Network
- Access Camera: access the selected camera's web page.
- Change : change the selected camera's IP address via Stac IP or DHCP. If Stac is selected, you have to manual type in the IP address, Subnet Mask, Default gateway, DNS 1, DNS 2 and Hp Port and IP camera's password.

- Exit: Exit the IP Installer Utility.
Troubleshoong
1. I inserted the Utility CD-ROM into my computer's CD-ROM Drive but the installaon menu does not appear automatically. What should I do?
Windows 8/8.1
If the installaon menu does not appear automatically, press the windows icon and press "r" simultaneously. In the "run" box, type D:\autorun.exe, where "D" in "D:\autorun.exe" is the leer assigned to your CD-ROM Drive, and then press the ENTER key on your keyboard.
Windows 7
If the installaon menu does not appear automatically, click on the Windows icon on the boom le hand corner of the screen, click the "Search programs and les" box, and type D:\autorun.exe, where "D" in "D:\autorun.exe" is the leer assigned to your CD-ROM Drive, and then press the ENTER key on your keyboard.
Windows Vista
If the installaon menu does not appear automatically, click Start, click the Start Search box, and type D:\autorun.exe where "D" in "D:\autorun.exe" is the leer assigned to your CD-ROM Drive, and then press the ENTER key on your keyboard.
Windows XP
If the window does not appear automatically, click Start, click Run and type D:\autorun.exe where "D" in "D:\autorun.exe" is the leer assigned to your CD-ROM Drive, and then press the ENTER key on your keyboard.
2. The autorun program is unable to detect my camera. What should I do?
a. Verify that you have followed all the steps in Secon 2: Hardware Installaon.
b. Disable any soware rewall programs such as ZoneAlarm or Norton Internet Security. If you are using Windows 8, 7, Vista or XP, disable the built in rewall.
c. Reset the IP Camera
d. Run the Autorun program from the CD-ROM again.
3. I do not have a DHCP server or DHCP is disabled on my network and I am unable to congregate the TV-IP343PI. What should I do?
a. Go to the TCP/IP sengs on your computer and assign a stac IP address on your computer's network adapter in the subnet of 192.168.10.x. Since the default IP address of the TV-IP343PI is 192.168.10.30, do not assign a stac IP address of 192.168.10.30 on your computer's network adapter.
b. Open Internet Explorer and enter hp://192.168.10.30 into the address bar.
4. The image is blurry. How can I adjust the focus on the IP camera?
The unit equipped with supports vari-focal lens. Using a athead screwdriver or paper clip to adjust the focus/zoom.

TRENDnet User's Guide
Troubleshooting
5. When I click on Live View the image does not load, what should I do?
a. If you are using Internet Explorer, make sure that you install the AcveX control WEBWATCH.cab.
b. If you are using non-IE browser (Firefox, Chrome, Safari), make sure that you install the plug-in WebPlugin.exe.
6. How do I uninstall the browser's Acve X or Plug-in from my computer?
Click Computer Icon, type in "np_hoem_x.dll" on the top-right corner of the search bar, then click "Search".

Delete the file named "np_hoem_x.dll" from search result.

Search for the additional ActiveX or plug-in files listed below and delete them to completely uninstall the ActiveX control or plug-in from your computer.
- avcodec-53_v1.8.dll
- avutil-51_v1.8.dll
- swscale-2_v1.8.dll
- WEBWATCH2
• WEBWATCH2.ocx
7. I forgot my password. What should I do?
Please follow the steps below to reset to factory default seng
a. Remove the power and network cable
b. Take the included Reset Wire Cable, plug one side of the wire into "Default" and the other side into "GND" on the terminal block as shown below.

natural_image
Close-up of a green and black electronic component with orange leads, attached to a red wire loop (no visible text or symbols)c. Connect power to the camera again. It takes around 30 seconds to boot the camera.
d. Remove the wire and plug in the network cable aer the camera nishes boong.
e. Run the Install Camera wizard from the CD-ROM to login to the camera.
Limited Warranty
TRENDnet warrants its products against defects in material and workmanship, under normal use and service, for the following lengths of me from the date of purchase.
TV-IP343PI - 3 Years Limited Warranty
AC/DC Power Adapter, Cooling Fan, and Power Supply carry 1 year warranty.
If a product does not operate as warranted during the applicable warranty period, TRENDnet shall reserve the right, at its expense, to repair or replace the defective product or part and deliver an equivalent product or part to the customer. The repair/replacement unit's warranty connues from the original date of purchase. All products that are replaced become the property of TRENDnet. Replacement products may be new or reconditioned. TRENDnet does not issue refunds or credit. Please contact the point-of-purchase for their return policies.
TRENDnet shall not be responsible for any soware, rmware, informaon, or memory data of customer contained in, stored on, or integrated with any products returned to TRENDnet pursuant to any warranty.
There are no user serviceable parts inside the product. Do not remove or aempt to service the product by any unauthorized service center. This warranty is voided if (i) the product has been modified or repaired by any unauthorized service center, (ii) the product was subject to accident, abuse, or improper use (iii) the product was subject to conditions more severe than those specified in the manual.
Warranty service may be obtained by contacting TRENDnet within the applicable warranty period and providing a copy of the dated proof of the purchase. Upon proper submission of required documentaon a Return Material Authorizaon (RMA) number will be issued. An RMA number is required in order to initiate warranty service support for all TRENDnet products. Products that are sent to TRENDnet for RMA service must have the RMA number marked on the outside of return packages and sent to TRENDnet prepaid, insured and packaged appropriately for safe shipment. Customers shipping from outside of the USA and Canada are responsible for return shipping fees. Customers shipping from outside of the USA are responsible for custom charges, including but not limited to, duty, tax, and other fees.
WARRANTIES EXCLUSIVE: IF THE TRENDNET PRODUCT DOES NOT OPERATE AS WARRANTED ABOVE, THE CUSTOMER'S SOLE REMEDY SHALL BE, AT TRENDNET'S OPTION, REPAIR OR REPLACE. THE FOREGOING WARRANTIES AND REMEDIES ARE EXCLUSIVE AND ARE IN LIEU OF ALL OTHER WARRANTIES, EXPRESSED OR IMPLIED, EITHER IN FACT OR BY OPERATION OF LAW, STATUTORY OR OTHERWISE, INCLUDING WARRANTIES OF MERCHANTABILITY AND FITNESS FOR A PARTICULAR PURPOSE. TRENDNET NEITHER ASSUMES NOR AUTHORIZES ANY OTHER PERSON TO
ASSUME FOR IT ANY OTHER LIABILITY IN CONNECTION WITH THE SALE, INSTALLATION MAINTENANCE OR USE OF TRENDNET'S PRODUCTS.
TRENDNET SHALL NOT BE LIABLE UNDER THIS WARRANTY IF ITS TESTING AND EXAMINATION DISCLOSE THAT THE ALLEGED DEFECT IN THE PRODUCT DOES NOT EXIST OR WAS CAUSED BY CUSTOMER'S OR ANY THIRD PERSON'S MISUSE, NEGLECT, IMPROPER INSTALLATION OR TESTING, UNAUTHORIZED ATTEMPTS TO REPAIR OR MODIFY, OR ANY OTHER CAUSE BEYOND THE RANGE OF THE INTENDED USE, OR BY ACCIDENT, FIRE, LIGHTNING, OR OTHER HAZARD.
LIMITATION OF LIABILITY: TO THE FULL EXTENT ALLOWED BY LAW TRENDNET ALSO EXCLUDES FOR ITSELF AND ITS SUPPLIERS ANY LIABILITY, WHETHER BASED IN CONTRACT OR TORT (INCLUDING NEGLIGENCE), FOR INCIDENTAL, CONSEQUENTIAL, INDIRECT, SPECIAL, OR PUNITIVE DAMAGES OF ANY KIND, OR FOR LOSS OF REVENUE OR PROFITS, LOSS OF BUSINESS, LOSS OF INFORMATION OR DATE, OR OTHER FINANCIAL LOSS ARISING OUT OF OR IN CONNECTION WITH THE SALE, INSTALLATION, MAINTENANCE, USE, PERFORMANCE, FAILURE, OR INTERRUPTION OF THE POSSIBILITY OF SUCH DAMAGES, AND LIMITS ITS LIABILITY TO REPAIR, REPLACEMENT, OR REFUND OF THE PURCHASE PRICE PAID, AT TRENDNET'S OPTION. THIS DISCLAIMER OF LIABILITY FOR DAMAGES WILL NOT BE AFFECTED IF ANY REMEDY PROVIDED HEREIN SHALL FAIL OF ITS ESSENTIAL PURPOSE.
Governing Law: This Limited Warranty shall be governed by the laws of the state of California. Some TRENDnet products include soware code written by third party developers. These codes are subject to the GNU General Public License ("GPL") or GNU Lesser General Public License ("LGPL").
Go to hp://www.trendnet.com/gpl or hp://www.trendnet.com Download secon and look for the desired TRENDnet product to access to the GPL Code or LGPL Code. These codes are distributed WITHOUT WARRANTY and are subject to the copyrights of the developers. TRENDnet does not provide technical support for these codes. Please go to hp://www.gnu.org/licenses/gpl.txt or hp://www.gnu.org/licenses/lgpl.txt for specific terms of each license.
V1.0R /09.10.2014
TRENDNET®
Product Warranty Registration
Please take a moment to register your product online. Go to TRENDnet's website at http://www.trendnet.com/register
TRENDnet
20675 Manhattan Place
Torrance, CA 90501. USA
Copyright ©2014. All Rights Reserved. TRENDnet.
- TRENDnet User's Guide
- Table of Contents
- Contents
- Package Contents
- Features
- Resoluon
- Mul-Language Interface
- Time and Text Stamp
- IPv6
- ONVIF
- Dynamic DNS Support
- Samba Support
- Tamper Detecon
- D-WDR
- Moon Detecon
- Privacy Masks
- Installaon
- Hardware Installaon
- Viewing Angle
- Bracket Installaon
- Vari-Focal Lens
- TV-IP343PI
- LED Indicator
- Waterproong
- SD Card Slot
- Camera Installaon
- Conguraon
- Viewing Camera Basic Funcon
- Conguring the Camera Seng
- - Firmware Upgrade:
- • Conguraon:
- • UPnP:
- • UPnP Port Forwarding:
- • RTSP Server:
- • RTSP Authencaon:
- • ONVIF:
- • Security:
- • RTSP Keepalive:
- Network >> Advanced >> HTTPS
- Network >> Advanced >> SNMP
- • SNMPv1/SNMPv2 Trap:
- Network >> Advanced >> IP Address Filter
- DDNS Status:
- - Mail Seng
- - FTP Seng:
- - Samba Seng:
- Audio/Video Seng >> Audio Seng
- When Record is enabled:
- I/O Connecon
- GPIO Seng
- Event Conguraon >> GPIO Seng >> Output Seng
- Output Test
- - Playback: Event Record
- • Playback: Schedule Record
- • SD Management
- - Format SD Card
- Logout
- How to Access the IP camera via IP Installer
- Troubleshoong
- I inserted the Utility CD-ROM into my computer's CD-ROM Drive but the installaon menu does not appear automatically. What should I do?
- Windows 8/8.1
- Windows 7
- Windows Vista
- Windows XP
- The autorun program is unable to detect my camera. What should I do?
- I do not have a DHCP server or DHCP is disabled on my network and I am unable to congregate the TV-IP343PI. What should I do?
- The image is blurry. How can I adjust the focus on the IP camera?
- Troubleshooting
- When I click on Live View the image does not load, what should I do?
- How do I uninstall the browser's Acve X or Plug-in from my computer?
- I forgot my password. What should I do?
- Limited Warranty
- TV-IP343PI - 3 Years Limited Warranty
- TRENDNET®
- Product Warranty Registration
Brand : TRENDNET
Model : TV-IP343PI
Category : Security Camera