ST-EC7774 - Bread maker Saturn - Free user manual and instructions
Find the device manual for free ST-EC7774 Saturn in PDF.


| Product Type | Bread Maker |
| Brand | Saturn |
| Model | ST-EC7774 |
| Power | 650 W |
| Voltage | 230 V, 50 Hz |
| Number of Programs | 12 (Basic, French, Whole Wheat, Quick, Sweet, Gluten Free, Dessert, Ultra Fast, Dough, Jam, Cake, Bake) |
| Loaf Sizes | 1.5 LB (750 g) and 2.0 LB (900 g) |
| Crust Color Options | Light, Medium, Dark |
| Delay Timer | Up to 13 hours |
| Keep Warm Function | Automatic 1 hour after baking |
| Memory Function | Resumes program within 10 minutes of power loss |
| Display | LCD with program number and time |
| Bread Pan | Non-stick coating, removable |
| Kneading Blade | Removable, dishwasher safe |
| Viewing Window | Yes, in lid |
| Safety Features | Grounded plug, overheat protection, automatic shut-off |
| Included Accessories | Instruction manual, warranty card |
| Cleaning | Wipe exterior with damp cloth; pan and blade dishwasher safe |
| Special Programs | Gluten Free, Jam, Cake, Dough, Ultra Fast |
| Weight | Approx. 4.5 kg (estimated) |
Frequently Asked Questions - ST-EC7774 Saturn
User questions about ST-EC7774 Saturn
0 question about this device. Answer the ones you know or ask your own.
Ask a new question about this device
Download the instructions for your Bread maker in PDF format for free! Find your manual ST-EC7774 - Saturn and take your electronic device back in hand. On this page are published all the documents necessary for the use of your device. ST-EC7774 by Saturn.
USER MANUAL ST-EC7774 Saturn
natural_image
Exterior view of a modern kitchen appliance with a digital display and 'Miranda Saturn' branding (no additional text or symbols visible on the device itself)
BREAD MAKER
Dear Buyer!
We congratulate you on having bought the device under trade name «Saturn». We are sure that our devices will become faithful and reliable assistance in your housekeeping.
Avoid extreme temperature changes. Rapid temperature change (e.g. when the unit is moved from freezing temperature to a warm room) may cause condensation inside the unit and a malfunction when it is switched on. In this case leave the unit at room temperature for at least 1.5 hours before switching it on.
If the unit has been in transit, leave it indoors for at least 1.5 hours before starting operation.
IMPORTANT SAFEGUARDS
Before using the electrical appliance, the following basic precautions should always be followed:
- Read all instructions
- Before using check that the voltage of wall outlet corresponds to the one shown on the rating plate.
- Do not operate any appliance with a damaged cord or plug or after the appliance malfunctions, or is dropped or damaged in any manner. Return appliance to manufacturer or the nearest authorized service agent for examination, repair or electrical or mechanical adjustment.
- Do not press hot surfaces. Use handles or knobs.
- To protect against electric shock do not immerse cord, plugs, or housing in water or other liquid.
- Unplug from outlet when not in use, before putting on or taking off parts, and before cleaning.
- Do not let cord hang over edge of table or hot surface.
- The use of accessory not recommended by the appliance manufacturer may cause injuries.
- This appliance is not intended for used by persons (including children) with reduced physical, sensory or mental capabilities, or lack of experience and knowledge, unless they have been given supervision or instruction concerning use of the appliances by a person responsible for their safety. It is not advised to use this appliance by children under 14.
- Children should be supervised to ensure that they do not play with the appliance.
- Do not place on or near a hot gas or electric burner, or in a heated oven.
- Extreme caution must be used when moving an appliance containing hot oil or other hot liquids.
- Do not press any moving or spinning parts of the machine when baking..
- Never switch on the appliance without properly placed bread pan filled ingredients.
-
Never beat the bread pan on the top or edge to remove the pan, this may damage the bread pan.
-
Metal foils or other materials must not be inserted into the bread maker as this can give rise to the risk of a fire or short circuit.
-
Never cover the bread maker with a towel or any other material, heat and steam must be able to escape freely. A fire can be caused if it is covered by, or comes into contact with combustible material.
-
Turn any control to OFF, then remove plug from wall outlet.
-
Do not operate the appliance for other than its intended use.
-
This appliance has been incorporated with a grounded plug. Please ensure the wall outlet in your house is well earthed.
-
Do not use outdoors.
-
Do not take out the brad pan out of the bread maker during the whole preparation process.
-
Save these instructions.
KNOW YOUR BREAD MAKER
(Product may be subject to change without prior notice)

INTRODUCTION OF CONTROL PANEL
(The silkscreen may be subject to change without prior notice.)
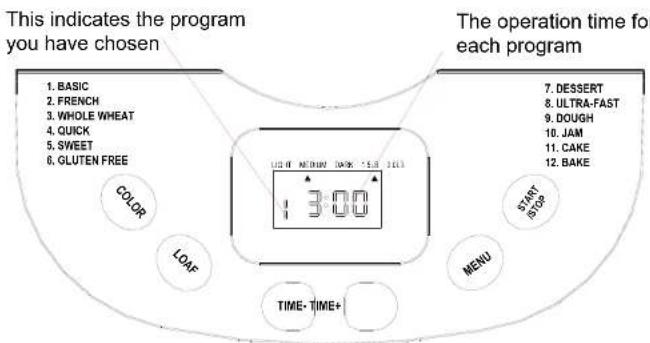
After start-up
As soon as the bread maker is plugged the power supply, a beep will be heard and "1 3:00" appears in the display. But the two dots between the "3" and "00" don't flash constantly. The "1" is the default program. The "2.0LB" (900 g) and "MEDIUM" are the default settings.
Start/stop
For starting, pausing and stopping the selected operation program.
To start a program, press the START/STOP button. A short beep will be heard and the two dots in the time display begin to flash and the program starts. Any other button is inactivated except the START/STOP button after a program has begun.
After procedure starts up, you can touch START/STOP button to interrupt at any time, the operation will be paused but the setting will be memorized, the outstanding time will be flashed on the LCD. Touch START/STOP button again, the program will continue.
To stop the program, press the START/STOP button for approx. 2 seconds, then a beep will be heard, it means that the program has been switched off.
Menu
It is used to set different programs. Each time it is pressed (accompanied by a short beep) the program will vary. Press the button discontinuously, the 12 menus will be cycled to show on the LCD display. Select your desired program. The functions of 12 menus will be explained below.
-
BASIC: kneading, rise and baking normal bread. You may also add ingredients to increase flavor.
-
FRENCH: kneading, rise and baking with a longer rise time. The bread baked in this menu will have a crisper crust and loose texture.
-
WHOLE WHEAT: kneading, rise and baking of whole wheat bread. It is not advised to use the delay function as this can produce poor results.
-
QUICK: kneading, rise and baking loaf within the time less than Basic bread. But the bread baked on this setting is usually smaller with a dense texture.
- SWEET: kneading, rise and baking sweet bread. You may also add ingredients to add flavor.
- GLUTEN FREE: kneading, rise and baking gluten-free bread. You may also add ingredients to add flavor.
- DESSERT: kncading, rise and baking dessert.
- ULTRA-FAST: kneading, rise and baking loaf in a short time, bread with a dense texture.
- DOUGH: kneading and rise, but without baking. Remove the dough and use for making bread rolls, pizza, steamed bread, etc.
- JAM: boiling jams and marmalades. Fruit or vegetables must be chopped before putting it into the bread pan.
- CAKE: kneading, rise and baking, but rise with soda or baking powder.
- BAKE: only baking, no kneading and rise. Also used for increasing the baking time on selected settings.
Color
With the button you can select LIGHT, MEDIUM or DARK color for the crust.
Loaf
Press this button to select the size of the bread: 1.5LB, 2.0LB (750g, 900g), when you select the desired size, the LCD will display the corresponding size. Please note the total operation time may vary with the different loaf size. This button is only applicable for the following program: BASIC, FRENCH, WHOLE WHEAT, SWEET, GLUTEN FREE and ULTRA-FAST.
Time
This bread maker has delay function. Use the "TIME+" and "TIME-" buttons to set your desired end time for baking. The maximum delayed time is up to 13 hours.
The steps of setting delay function are as follows:
1) Select a program including menu, color, loaf size.
2) Set the delay timer. Press the "TIME+" button once, the end time will be delayed 10 minutes. And if the "TIME+" button is pressed down continuously, the delayed time will increase rapidly. If you have overshot, you can correct it by pressing the "TIME-" button. Example: Now it is 8:30p.m, if you would like your bread to be ready in the next morning at 7 o'clock, i.e. in 10 hours and 30 minutes. Select your menu, color, loaf size then press the "TIME+" or "TIME-" to add the time until 10:30 appears on the LCD. Then press the STOP/START button to activate this delay program. LCD will count down to show the remaining time.
You will get fresh bread at 7:00 in the morning, if you don't want to take out the bread immediately, the keeping warm time of 1 hour starts.
Note: the ULTRA-FAST and 9JAM programs do not have delay function.
Note : Do not use the timer function when working with easy spoiling ingredients such as eggs, milk, cream or cheese.
KEEP WARM
Bread can be automatically kept warm for 1 hour after baking. During keeping warm, if you would like to take the bread out, switch the program off by pressing the START/STOP button.
MEMORY
If the power supply has been interrupted during the course of making bread, the process of making bread will be continued automatically within 10 minutes, even without pressing START/STOP button. If the interruption time exceeds 10 minutes, the memory cannot be kept, you must discard the ingredients in the bread pan and add the ingredients into bread pan again, and the bread maker must be restarted. But if the dough has not entered the rising phase when the power supply breaks off, you can press the START/STOP directly to continue the program from the beginning.
ENVIRONMENT
The machine may work well in a wide range of temperature, but there may be any difference in loaf size between a very warm room and a very cold room. We suggest that the room temperature should be within the temperature of 15 to 34.
WARNING DISPLAY
-
If the display shows "IIII" after you have pressed START/STOP button, it means that the temperature inside of baking mould is too high. You should stop the program and unplugged the power outlet immediately. Then open the lid and let the machine cool down completely before using again. If the display shows "LLL" after the program has been started, it means that the temperature inside of baking mould is too low. You should place the bread maker into environment of higher temperature for using.
-
If the display shows "EE0" after you have pressed START/STOP button, it means the temperature sensor open circuit, please check the sensor carefully by Authorized expert. If the display shows "EE1", it means the temperature sensor short circuit.
BEFORE THE FIRST USE
The appliance may emit a little smoke and a characteristic smell when you turn it on for the first time. This is normal and will soon stop. Make sure the appliance has sufficient ventilation.
- Please check whether all parts and accessories are complete and free of damage.
- Clean all the parts according to the section "Cleaning and Maintenance".
- Set the bread maker on BAKE mode and bake empty for about 10 minutes. Then let it cool down and clean all the detached parts again.
- Dry all parts thoroughly and assemble them, the appliance is ready for using.
HOW TO MAKE BREAD
- Place the bread pan in position, then turning it in clockwise until they click in correct position. Fix the kneading blade onto the drive shaft. It is recommended to fill hole with heat-resisting margarine prior to place the kneading blade to avoid the dough sticking the kneading blade, also this would make the kneading blade be removed from bread easily.
- Place ingredients into the bread pan. Please keep to the order mentioned in the recipe. Usually the water or liquid substance should be put firstly, then add sugar, salt and flour, always add yeast or baking powder as the last ingredient.
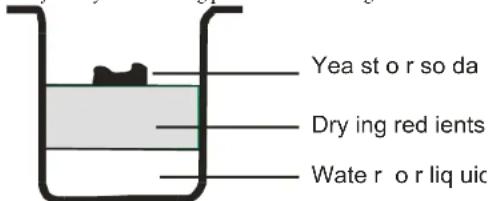
Note: the maximum quantities of the flour and yeast which may be used refer to the recipe.
-
Make a small indentation on the top of flour with finger, add yeast into the indentation, make sure it does not come into contact with the liquid or salt.
-
Close the lid gently and plug the power cord into a wall outlet.
-
Press the MENU button until your desired program is selected.
-
Press the COLOR button to select the desired crust color.
-
Press the LOAF button to select the desired size.
-
Set the delay time by pressing TIME+ or TIME- button. This step may be skipped if you want the bread maker to start working immediately.
-
Press the START/STOP button to start working.
-
For the program of BASIC, FRENCII, WIOLE WHEAT, QUICK, SWEET, GLUTEN FREE, ULTRA-FAST and CAKE beeps sound will be heard during operation. This is to prompt you to add ingredients. Open the Lid and put in some ingredients. It is possible that steam will escape through the vent in the lid during baking. This is normal.
-
Once the process has been completed, one beep will be heard. You can press START/STOP button for approx. 2 seconds to stop the process and take out the bread. Open the Lid and while using oven mitts, turn the bread pan in anti-clockwise and take out the bread pan.
Caution: the Bread pan and bread may be very hot! Always handle with care.
- Let the bread pan cool down before removing the bread. Then use non-stick spatula to gently loosen the sides of the bread from the pan.
- Turn bread pan upside down onto a wire cooling rack or clean cooking surface and gently shake until bread falls out.
- Let the bread cool for about 20 minutes before slicing. It is recommended slicing bread with electric cutter or dentate cutter, had better not with fruit knife or kitchen knife, otherwise the bread may be subject to deformation.
- If you are out of the room or have not pressed START/STOP button at the end of
operation, the bread will be kept warm automatically for 1 hour, when keep warm is finished, 10 beeps will be heard.
- When do not use or complete operation, unplug the power cord.
Note: Before slicing the loaf, use the hook to remove out the Kneading blade hidden on the bottom of loaf. The loaf is hot, never use the hand to remove the kneading blade.
Note: If bread has not been completely eaten up, advise you to store the remained bread in sealed plastic bag or vessel. Bread can be stored for about three days during room temperature, if you need more days storage, pack it with sealed plastic bag or vessel and then place it in the refrigerator, storage time is at most ten days. As bread made by ourselves does not add preservative, generally storage time is no longer than that for bread in market.
Quick breads are made with baking powder or baking soda that is activated by moisture and heat. For perfect quick breads, it is suggested that all liquid should be placed in the bottom of the bread pan, and dry ingredients should be placed on top. During the initial mixing of quick bread, dry ingredients may collect in the corners of the pan. It is necessary to help machine mixing to avoid flour clumps.
2. About Ultra fast program
The bread maker can bake loaf within 1 hour 28 minutes with rapid program. Please note that it should be hot water of 48–50, you must use a cooking thermometer to measure the temperature. The influence of temperature is very critical to the performance of baking. If the water temperature is too low, the bread will not be rise to expected size, if the water temperature is too high. The fungus in the yeast will be killed before rising, which also will affect the baking performance.
CLEANING AND MAINTENANCE
Disconnect the machine from the power outlet and let it cool down before cleaning.
- Bread pan: remove the bread pan by turning it in anti-clockwise, then pulling the handle to remove it, wipe inside and outside of pan with a damp clothes, do not use any sharp or abrasive agents for the consideration of protecting the non-stick coating. The pan must be dried completely before installing.
Note: Insert the bread pan and turning it in clockwise until it fixed in correct position. If it cannot be inserted, adjust the pan lightly to make it is on the correct position then press it down. - Kneading blade: If the kneading blade is difficult to remove from the bread, use the hook. Also wipe the blade carefully with a cotton damp cloth. Both the bread pan and kneading blade are dishwashing safe components.
- Housing: gently wipe the outer surface of housing with a wet cloth. Do not use any abrasive cleaner for cleaning, as this would degrade the high polish of the surface. Never immerse the housing into water for cleaning.
Note: It is suggested not disassembling the lid for cleaning. - Before the bread maker is packed for storage, ensure that it has completely cooled down,
clean and dry, and the lid is closed.
INTRODUCTION OF BREAD INGREDIENTS
- Bread flour
Bread flour has high content of high gluten (so it can be also called high-gluten flour which contains high protein), it has good elastic and can keep the size of the bread from collapsing after rise. As the gluten content is higher than the common flour, so it can be used for making bread with large size and better inner fiber. Bread flour is the most important ingredient of making bread.
- Plain flour
Flour that contains no baking powder, it is applicable for making express bread.
- Whole-wheat flour
Whole-wheat flour is ground from grain. It contains wheat skin and gluten. Whole-wheat flour is heavier and more nutrient than common flour. The bread made by whole-wheat flour is usually small in size. So many recipes usually combine the whole-wheat flour or bread flour to achieve the best result.
- Black wheat flour
Black wheat flour, also named as "rough flour", it is a kind of high fiber flour, and it is similar with whole-wheat flour. To obtain the large size after rising, it must be used in combination with high proportion of bread flour.
- Self-rising flour
A type of flour that contains baking powder, it is used for making cakes specially.
- Corn flour and oatmeal flour
Corn flour and oatmeal flour are ground from corn and oatmeal separately. They are the additive ingredients of making rough bread, which are used for enhancing the flavor and texture.
- Sugar
Sugar is very important ingredient to increase sweet taste and color of bread. And it is also considered as nourishment in the yeast bread. White sugar is largely used. Brown sugar, powder sugar or cotton sugar may be called by special requirement.
- Yeast
After yeasting process, the yeast will produce carbon dioxide. The carbon dioxide will expand bread and make the inner fiber soften. However, yeast fast breeding needs carbohydrate in sugar and flour as nourishment.
1 tsp. active dry yeast =3/4 tsp. instant yeast
1.5 tsp. active dry yeast = 1 tsp. instant yeast
2 tsp. active dry yeast =1.5 tsp. instant yeast
Yeast must be stored in the refrigerator, as the fungus in it will be killed at high temperature, before using, check the production date and storage life of your yeast. Store it back to the refrigerator as soon as possible after each use. Usually the failure of bread rising is caused by the bad yeast.
The ways described below will check whether your yeast is fresh and active.
(1) Pour 1/2 cup warm water (45-500C) into a measuring cup.
(2) Put 1 tsp. white sugar into the cup and stir, then sprinkle 2 tsp. yeast over the water.
(3) Place the measuring cup in a warm place for about 10min. Do not stir the water.
(4) The froth should be up to 1 cup. Otherwise the yeast is dead or inactive.
- Salt
Salt is necessary to improve bread flavor and crust color. But salt can also restrain yeast from rising. Never use too much salt in a recipe. But bread would be larger if without salt. 10. Egg
Eggs can improve bread texture, make the bread more nourish and large in size, the egg must be peeled and stirred evenly.
- Grease, butter and vegetable oil
Grease can make bread soften and delay storage life. Butter should be melted or chopped to small particles before using.
- Baking powder
Baking powder is used for rising the Ultra Fast bread and cake. As it does not need rise time, and it can produce the air, the air will form bubble to soften the texture of bread utilizing chemical principle.
- Soda
It is similar with baking powder. It can also used in combination with baking powder.
- Water and other liquid
Water is essential ingredient for making bread. Generally speaking, water temperature between 200C and 250C is the best. The water may be replaced with fresh milk or water mixed with 2% milk powder, which may enhance bread flavor and improve crust color. Some recipes may call for juice for the purpose of enhancing bread flavor, e.g. apple juice, orange juice, lemon juice and so on.
INGREDIENTS MEASUREMENT
One of important step for making good bread is proper amount of ingredients. It is strongly suggested that use measuring cup or measuring spoon to obtain accurate amount, otherwise the bread will be largely influenced.
- Weighing liquid ingredients
Water, fresh milk or milk powder solution should be measured with measuring cups. Observe the level of the measuring cup with your eyes horizontally. When you measure cooking oil or other ingredients, clean the measuring cup thoroughly without any other ingredients.
- Dry measurements
Dry measuring must be done by gently spooning ingredients into the measuring cup and then once filled, leveling off with a knife. Scooping or tapping a measuring cup with more than is required. This extra amount could affect the balance of the recipe. When measuring small amounts of dry ingredients, the measuring spoon must be used. Measurements must be level, not heaped as this small difference could throw out the critical balance of the recipe.
- Adding sequence
The sequence of adding ingredients should be abided, generally speaking, the sequence is: liquid ingredient, eggs, salt and milk powder etc. When adding the ingredient, the flour can't be wetted by liquid completely. The yeast can only be placed on the dry flour. And
yeast can't press with salt. After the flour has been kneaded for some time and a beep will prompt you to put fruit ingredients into the mixture. If the fruit ingredients are added too early, the flavor will be diminished after long time mixing. When you use the delay function for a long time, never add the perishable ingredients such as eggs, fruit ingredient.
TROUBLE SHOOTING GUIDE
| No. | Problem Cause Solution | ||
| 1 | Smoke from ventilation hole when baking | Some ingredients adhere to the heat element or nearby, for the first use, oil remained on the surface of heat element | Unplug the bread maker and clean the heat element, but be careful not to burn you, during the first use, dry operating and open the lid. |
| 2 | Bread bottom crust is too thick | Keep bread warm and leave bread in the bread pan for a long time so that water is losing too much | Take bread out soon without keeping it warm |
| 3 | It is very difficult to take bread out | Kneader adheres tightly to the shaft in bread pan | After taking bread out, put hot water into bread pan and immerge kneader for 10 minutes, then take it out and clean. |
| 4 | Stir ingredients not evenly and bake badly | 1.selected program menu is improper | Select the proper program menu |
| 2.after operating, open cover several times and bread is dry, no brown crust color | Don't open cover at the last rise | ||
| 3.Stir resistance is too large so that kneader almost can't rotate and stir adequately | Check kneader hole, then take bread pan out and operate without load, if not normal, contact with the authorized service facility. | ||
| 5 | Display “H:HH” after pressing “start/stop” button | The temperature in bread maker is too high to make bread. | Press “start/stop” button and unplug bread maker, then take bread pan out and open cover until the bread maker cools down |
| 6 | I hear the motor noises but dough isn't stirred | Bread pan is fixed improperly or dough is too large to be stirred | Check whether bread pan is fixed properly and dough is made according to recipe and the ingredients is weighed accurately |
| 7 | Bread size is so large as to push cover | Yeast is too much or flour is excessive or water is too much or environment temperature is too high | Check the above factors, reduce properly the amount according to the true reasons |
| 8 | Bread size is too small or bread has no rise | No yeast or the amount of yeast is not enough, moreover, yeast may have a poor activity as water temperature is too high or yeast is mixed together with salt, or the environment temperature is lower. | Check the amount and performance of yeast, increase the environment temperature properly. |
| 9 | Dough is so large to overflow bread pan | The amount of liquids is so much as to make dough soft and yeast is also excessive. | Reduce the amount of liquids and improve dough rigidity |
| 10 | Bread collapses in the middle parts when baking dough | 1. used flour is not strong powder and can't make dough risc | Use bread flour or strong powder. |
| 2. yeast rate is too rapid or yeast temperature is too high | Yeast is used under room temperature | ||
| 2. Excessive water makes dough too wet and soft. | According to the ability of absorbing water, adjust water on recipe | ||
| 11 | Bread weight is very large and organization construct is too dense | 1. too much flour or short of water | Reduce flour or increase water |
| 2. too many fruit ingredients or too much whole wheat flour | Reduce the amount of corresponding ingredients and increase yeast | ||
| 12 | Middle parts are hollow after cutting bread | 1. Excessive water or yeast or no salt | Reduce properly water or yeast and check salt |
| 2. water temperature is too high | Check water temperature | ||
| 13 | Bread surface is adhered to dry powder | 1. there is strong glutinosity ingredients in bread such as butter and bananas etc. | Do not add strong glutinosity ingredients into bread. |
| 2. stir not adequately for short of water | Check water and mechanical construct of bread maker | ||
| 14 | Crust is too thick and baking color is too dark when making cakes or food with excessive sugar | Different recipes or ingredients have great effect on making bread, baking color will become very dark because of much sugar | If baking color is too dark for the recipe with excessive sugar, press start/stop to interrupt the program ahead 5-10min of intended finishing time. Before removing out the bread you should keep the bread or cake in bread pan for about 20 minutes with cover closed |
Specification
Working voltage: 230 V
Working frequency: 50 Hz
Power: 650 W
Set
Bread maker ....1pc
Instruction manual ....1pc
Warranty book .....1pc
Package ....1pc
ENVIRONMENT FRIENDLY DISPOSAL

You can help protect the environment!
Please remember to respect the local regulations: hand in the non-working electrical equipments to an appropriate waste disposal center.
The manufacturer reserves the right to change the specification and design of goods.

ХЛЕБОПЕЧЬ
- BREAD MAKER
- Dear Buyer!
- IMPORTANT SAFEGUARDS
- Color
- Loaf
- Time
- KEEP WARM
- MEMORY
- ENVIRONMENT
- WARNING DISPLAY
- BEFORE THE FIRST USE
- HOW TO MAKE BREAD
- About Ultra fast program
- CLEANING AND MAINTENANCE
- INTRODUCTION OF BREAD INGREDIENTS
- INGREDIENTS MEASUREMENT
- Specification
- Set
- ENVIRONMENT FRIENDLY DISPOSAL
- ХЛЕБОПЕЧЬ
Brand : Saturn
Model : ST-EC7774
Category : Bread maker