TRH9-1-L - Range hood Tisira - Free user manual and instructions
Find the device manual for free TRH9-1-L Tisira in PDF.


| Product Type | Range Hood |
| Brand | Tisira |
| Model | TRH9-1-L |
| Width | 90 cm |
| Depth | 50 cm |
| Height | 60 cm |
| Weight | 15 kg |
| Power Supply | 220-240 V ~ 50 Hz |
| Maximum Extraction Rate | 650 m³/h |
| Noise Level (max) | 65 dB |
| Energy Class | A |
| Lighting | 2 x 1.5 W LED |
| Number of Speeds | 3 |
| Control Type | Push buttons |
| Grease Filter Material | Aluminum |
| Duct Diameter | 150 mm |
| Recirculation Possible | Yes (charcoal filter optional) |
| Installation | Wall-mounted |
| Certifications | CE, UKCA |
| Warranty | 2 years |
Frequently Asked Questions - TRH9-1-L Tisira
User questions about TRH9-1-L Tisira
0 question about this device. Answer the ones you know or ask your own.
Ask a new question about this device
Download the instructions for your Range hood in PDF format for free! Find your manual TRH9-1-L - Tisira and take your electronic device back in hand. On this page are published all the documents necessary for the use of your device. TRH9-1-L by Tisira.
USER MANUAL TRH9-1-L Tisira
IMPORTANT // Please ensure that you read through this user manual prior to installation and use. This manual contains important information to ensure optimal performance and keep you safe. Please retain your proof of purchase, as this will be required in the event that you require warranty service. Remember to retain this manual for future reference.
t tisira
HELLO
CONGRATULATIONS ON THE SELECTION OF THIS TISIRA APPLIANCE. TISIRA APPLIANCES HAVE BEEN SPECIFICALLY DESIGNED FOR AUSTRALIAN AND NEW ZEALAND KITCHENS.
Please read through this user manual carefully as it contains information that will ensure that your appliance is installed correctly, important operating & care instructions and also some advice of what you need to do if this appliance is not performing as intended.
CONTENTS
HELLO 2
CONTENTS 3
WARNING & SAFETY INFORMATION 4
PRODUCT OVERVIEW 5
ELECTRICAL CONNECTION 6
INSTALLATION 7-8
OPERATING INSTRUCTIONS 9
MAINTAINING YOUR RANGEHOOD 10
PRODUCT SPECIFICATIONS 11
PROOF OF PURCHASE 12
NOTES 13-15
CONTACT DETAILS 16
WARNING & SAFETY INFORMATION
This appliance is intended for indoor domestic use only. It is not suitable for outdoor kitchens.
This appliance complies with all of the relevant local and national standards. Inappropriate use can lead to personal injury and cause damage to property.
To avoid risk of injury or damage please read these instructions carefully before installing and operating this appliance.
It is important to keep these instructions in a safe place for future reference and to ensure that all users are familiar with the operations and safety precautions with this appliance.
This appliance is not intended for use by persons (including children) with reduced physical, sensory, or mental capabilities, or a lack of experience and knowledge, unless they have been given supervision or instruction concerning use of the appliance by a person responsible for their safety.
Young children should be supervised to ensure that they do not play with the appliance.
Please be aware on the cooker hood the halogen lamps may get very hot during use and the may retain their heat for some time after the unit is switched off.
There should be adequate ventilation of the room when the rangehood is used at the same time as appliances burning gas or other fuels.
IMPORTANT // Read the information provided about cleaning of your appliance, methods and frequency.
There is a fire risk if the cleaning procedures are not adhered to.
Do not flambé under the rangehood.
Exhaust air must not be discharged into an existing flue which is used for exhausting fumes from the appliance burning gas or other fuels.
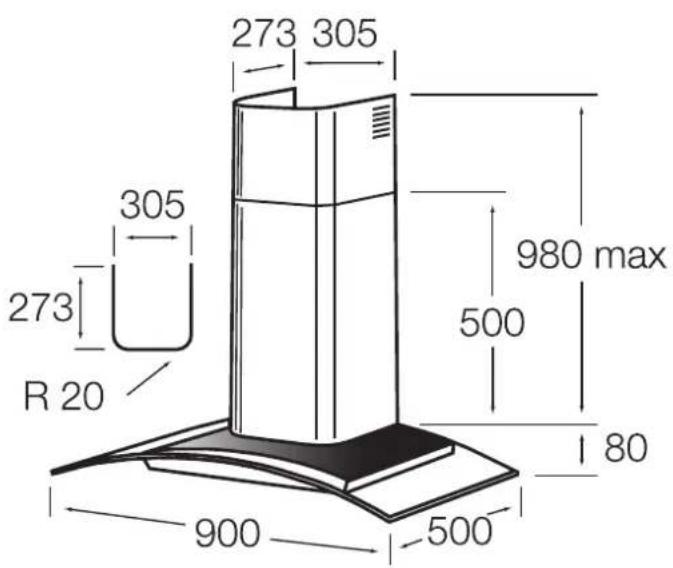
The minimum distance between the hob surface and the lowest part of the rangehood is 600mm. This distance shall be at least 650mm, if the rangehood is installed over a gas hob. If the instructions for the hob specify a greater distance this must taken into account.
Due attention should be given to ensure that any applicable regulations concerning the discharge of the exhaust are adhered to.
If the supply cord of this appliance is damaged, it must only be replaced by the manufacturer or it's service agent or a similarly qualified person in order to avoid a hazard.
PRODUCT OVERVIEW

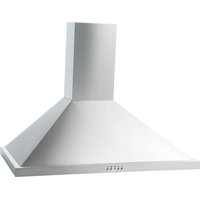
TRH6-1/TRH9-1
TRH6-1-L/TRH9-1-L

- ON/OFF
- SPEED 1
- SPEED 2
- SPEED 3
- LIGHT
TRH9CU-1
TRH9CU-1-L
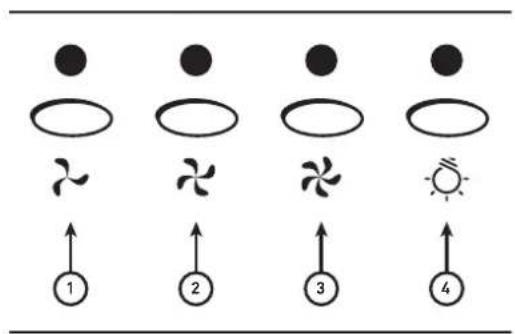
- SPEED 1
- SPEED 2
- SPEED 3
- LIGHT
ELECTRICAL CONNECTION
NOTICE // This appliance must be connected only by a licensed electrician and installed in accordance with the manufacturers instructions.
- Installation, repairs and other work by unqualified persons could be dangerous, for which the manufacturer cannot be held liable.
- Ensure power is not supplied to the appliance until after installation or repair work has been carried out.
- Do not connect the appliance to the mains electricity supply by an extension lead. These do not guarantee the required safety of the appliance.
- The connection data is given on the data plate. This is visible when the grease filters have been removed. Ensure that this data matches the household mains supply.
-
Connection of this appliance should be made via a suitable isolator or a double pole fused spur connection unit which complies with national and local safety regulations and the On-Off switch should be easily accessible after the appliance has been built in.
-
When switched off there must be an all-pole contact gap of 3 mm in the switch (including switch, fuses and relays according to EN 60335).
- If the switch is not accessible after installation (depending on country), an additional means of disconnection must be provided for all poles.
- For extra safety it is advisable to install a suitable residual current device (RCD). Contact a qualified electrician for advice.
IMPORTANT // This appliance is supplied for connection to a 230V\~50Hz supply.
The wires in the mains lead are coloured in accordance with the following code:
Green/Yellow = Earth
Blue = Neutral
Brown = Live
WARNING // THIS APPLIANCE MUST BE EARTHED
INSTALLATION
HEIGHT OF WALL CANOPY
The chimney is telescopic and is designed for hood installations between 650 to 750 mm above the cooking surface.
Select the desired installation height of the wall canopy.
Any installation above 750 mm will compromise the extraction performance.
For optimal efficiency, use smooth-wall, solid galvanized or plastic ducting for reduced noise and increased airflow.
Flexible ducting should only be used as a last resort (ie in difficult installations) and if used, ensure that it is pulled tight.
The smoother, straighter and shorter the ducting the quieter and more efficient the wall canopy will perform.
PREPARING THE WALL CANOPY FOR INSTALLATION
Please read all the instructions carefully before installing the wall canopy.
Remove the filters from the canopy to allow access to wall mounting holes.
To remove the filters, pull the relative catch, tilting it downwards until it disengages from the supports. Reverse these instructions when refitting the filters.
Prior to drilling any holes, check that the area behind the surface to be drilled is clear of any electrical cables or pipes etc.
Stainless Steel/Iridium is very easily damaged during installation if abraded or knocked by tools.
Whenever possible, protect the top of the cooktop with cardboard or the like to prevent damage on installation.
INSTALLATION

GLASS CANOPIES
-
Mounting to a stud is recommended. However if mounting to other wall types different fasteners will be required.
-
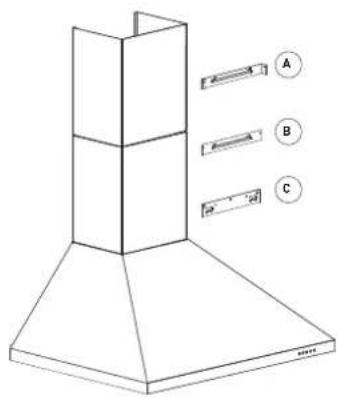
Position the canopy mounting bracket (C) in the required position. Mark and drill the pilot holes. Screw the bracket to the wall, ensuring that the bracket is level as this will determine the final level of the rangehood.
-
Carefully position the rangehood body on the bracket.
-
Position the flue cover mounting brackets (A-B) in the required position. Mark and drill the pilot holes. Screw the brackets to the wall.
-
Attach the ducting to the rangehood and duct according to your requirements (external ducting or recirculating).
-
Install the flue covers and secure the top flue cover to the flue bracket with the provided screws.
-
Carefully place the glass over the body of the rangehood. Fasten the glass to the body with the 4 provided screws.
-
Refit the filters and power the unit.
STANDARD CANOPIES
-
Mounting to a stud is recommended. However if mounting to other wall types different fasteners will be required.
-
Position the canopy mounting bracket (C) in the required position. Mark and drill the pilot holes. Screw the bracket to the wall, ensuring that the bracket is level as this will determine the final level of the rangehood.
-
Carefully position the rangehood body on the bracket.
-
Position the flue cover mounting brackets (A-B) in the required position. Mark and drill the pilot holes. Screw the brackets to the wall.
-
Attach the ducting to the rangehood and duct according to your requirements (external ducting or recirculating).
-
Install the flue covers and secure the top flue cover to the flue bracket with the provided screws.
-
Refit the filters and power the unit.
WARNING // Do not penetrate any screws into the rangehood as this may result in electrical hazards. Failure to install the screws or fixing device in accordance with these instructions may result in electrical hazards.
OPERATING INSTRUCTIONS
ELECTRONIC CONTROLS

natural_image
Four identical icons representing weather symbols: sun, wind turbine, flame, and moon (no text or labels)TO TURN THE FAN ON
Press the required speed button once, the fan will turn on and run at the required speed. The light above the button will illuminate to indicate the selected speed.
TO TURN THE FAN OFF
Press the fan speed button beneath the illuminated light. The same button used to turn the fan on, will turn the fan off.
TO USE THE LIGHT
The light can be used by pressing the button above light symbol once. The light is switched off by pressing the same button again.
PUSH BUTTON CONTROLS

natural_image
Six abstract symbols arranged in rows: five circles, one with a curved line, three with a fan-like shape, two with a sun icon, and one with a sun symbol (no text or labels)TO TURN THE FAN ON
Press the required speed button once, the fan will turn on and run at the required speed. The selected button will remain depressed to indicate that it has been selected.
TO TURN THE FAN OFF
Press the first button, the fan will then stop.
TO USE THE LIGHT
The light can be used by pressing the button above light symbol once. The light is switched off by pressing the same button again.
MAINTAINING YOUR RANGEHOOD
IMPORTANT // Switch off and unplug the rangehood at the powerpoint before undertaking any cleaning or maintenance on the unit.
LIGHT BULB REPLACEMENT
TRH6-1, TRH9-1, TRH9CU-1 Standard G4 Bi-Pin Halogen Globe 12V / 20W
TRH6-1-L, TRH9-1-L, TRH9CU-1-L LED lamp 220-240V / 2W, which can be purchased through Tisira Customer Care.
GENERAL MAINTENANCE
To prevent any surface damage never use any abrasive products or products that contain soda, acids, chlorides or solvents.
To clean the surface of the appliance use a mild detergent in warm water, with a soft non-abrasive cloth.
Only use a damp cloth as use of excessive water can penetrate the unit and cause damage.
Dry surface thoroughly after cleaning with a soft cloth to prevent marking of the surfaces.
FILTER MAINTENANCE
To ensure that the rangehood performs at it's best, filters need to be cleaned cleaned at least monthly or more frequently with heavy use
The filters can be cleaned using hot soapy water and a soft nylon brush or placed in a dishwasher.
NOTE // Cleaning the filters in the dishwasher may cause permanent discoloration of the surface. This does not in any way affect the performance of the filters.
Charcoal filters cannot be cleaned or reused. Replace filters every 3-6 months dependant on use and cooking style. Please dispose of used filters responsibly.
NOTE // Oversaturated filters are a fire hazard so regular cleaning/replacement is a must.
PRODUCT SPECIFICATIONS
TISIRA RANGEHOOD SPECIFICATIONS
MODEL: TRH6-1, TRH9-1, TRH9CU-1
| Voltage | 220 - 240V~ |
| Frequency | 50Hz |
| Rated motor input power | 190W |
| Rated input power - Halogen Lights | 230W |
| Illumination - Halogen | 20W + 20W |
| Suction capacity | 700m3/h |
| Plug rating | 10A |
MODEL: TRH6-1-L, TRH9-1-L, TRH9CU-1-L
| Voltage | 220 - 240V~ |
| Frequency | 50Hz |
| Rated motor input power | 190W |
| Rated input power - LED Lights | 194W |
| Illumination - LED | 2W + 2W |
| Suction capacity | 700m3/h |
| Plug rating | 10A |
PROOF OF PURCHASE
ATTACH YOUR PROOF OF PURCHASE FOR FUTURE REFERENCE
NOTES
NOTES
NOTES
CONTACT DETAILS
AUSTRALIA
ARISIT PTY LIMITED
40-44 Mark Anthony Drive, Dandenong South, VIC 3175, Australia
P // 1300 762 219
F // 03 9768 0838
consumer.care@arisit.com
NEW ZEALAND
ARISIT PTY LIMITED
PO Box 68-140
Newton, Auckland 1145, New Zealand
P // 09 306 1020
F // 09 302 0077
sales@aristonappliances.co.nz
TISIRA IS COMMITTED TO ONGOING RESEARCH AND DEVELOPMENT. EVERY EFFORT HAS BEEN MADE TO ENSURE ALL INFORMATION IN THIS USER MANUAL IS CORRECT AT TIME OF GOING TO PRINT. DIMENSIONS SHOULD BE USED AS A REFERENCE ONLY AND ACTUAL DIMENSIONS SHOULD BE TAKEN FROM THE PHYSICAL PRODUCT ONLY.
MANUFACTURER RESERVES THE RIGHT TO CHANGE SPECIFICATIONS WITHOUT NOTICE.
t tisira
- HELLO
- CONGRATULATIONS ON THE SELECTION OF THIS TISIRA APPLIANCE. TISIRA APPLIANCES HAVE BEEN SPECIFICALLY DESIGNED FOR AUSTRALIAN AND NEW ZEALAND KITCHENS.
- CONTENTS
- WARNING & SAFETY INFORMATION
- PRODUCT OVERVIEW
- ELECTRICAL CONNECTION
- INSTALLATION
- HEIGHT OF WALL CANOPY
- PREPARING THE WALL CANOPY FOR INSTALLATION
- GLASS CANOPIES
- STANDARD CANOPIES
- OPERATING INSTRUCTIONS
- ELECTRONIC CONTROLS
- TO TURN THE FAN ON
- TO TURN THE FAN OFF
- TO USE THE LIGHT
- PUSH BUTTON CONTROLS
- MAINTAINING YOUR RANGEHOOD
- LIGHT BULB REPLACEMENT
- GENERAL MAINTENANCE
- FILTER MAINTENANCE
- PRODUCT SPECIFICATIONS
- TISIRA RANGEHOOD SPECIFICATIONS
- PROOF OF PURCHASE
- NOTES
- CONTACT DETAILS
- ARISIT PTY LIMITED
Brand : Tisira
Model : TRH9-1-L
Category : Range hood