
QC 101 C - Processor Extron - Free user manual and instructions
Find the device manual for free QC 101 C Extron in PDF.


| Product Type | AV Processor |
| Brand | Extron |
| Model | QC 101 C |
| Dimensions (H x W x D) | 1.7 x 8.6 x 6.0 inches (4.3 x 21.8 x 15.2 cm) |
| Weight | 2.0 lbs (0.9 kg) |
| Power Supply | 12 VDC, 1 A (external) |
| Power Consumption | 6 watts |
| Video Inputs | 1x VGA, 1x composite video |
| Video Outputs | 1x VGA, 1x composite video |
| Audio Inputs | 1x stereo 3.5mm |
| Audio Outputs | 1x stereo 3.5mm |
| Control | RS-232, IR remote |
| Signal Processing | Video scaling, audio level control |
| Bandwidth | 300 MHz (-3dB) |
| Operating Temperature | 32 to 122°F (0 to 50°C) |
| Storage Temperature | -40 to 158°F (-40 to 70°C) |
| Humidity | 10% to 90% non-condensing |
| Mounting | Rack-mountable (1U), desk or wall |
| Compliance | FCC Class A, CE, RoHS |
| Maintenance | Clean with a dry cloth; no liquids |
| Safety | Follow all instructions in manual |
| Spare Parts | Contact Extron support |
| Repairability | No user-serviceable parts inside |
Frequently Asked Questions - QC 101 C Extron
User questions about QC 101 C Extron
0 question about this device. Answer the ones you know or ask your own.
Ask a new question about this device
Download the instructions for your Processor in PDF format for free! Find your manual QC 101 C - Extron and take your electronic device back in hand. On this page are published all the documents necessary for the use of your device. QC 101 C by Extron.
USER MANUAL QC 101 C Extron
QC 101 Controller • Setup Guide
This setup guide provides basic instructions for an experienced user to install the QC 101 Controller. For additional information and detailed procedures, see the Quantum User Guide and the Quantum Control Software User Guide, available at www.extron.com.
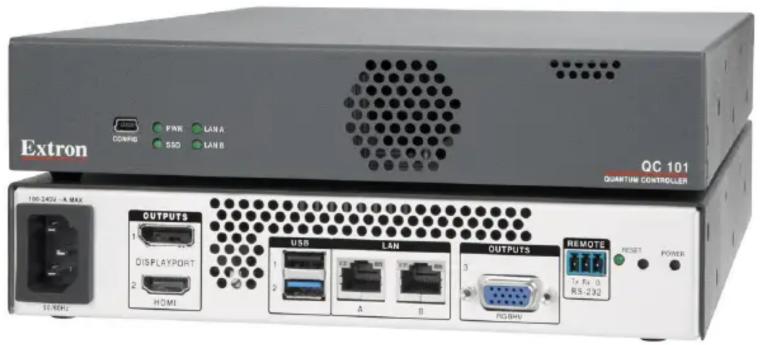
The Extron QC 101 E and QC 101 C are dedicated controllers for the Quantum® Elite and Quantum Connect videowall processors. They feature an embedded operating system and the Quantum Control Software preinstalled on the internal drive. The QC 101 provides an alternative to a traditional PC to program configurations and control the Quantum processors.
ATTENTION:
NOTE: For full installation, configuration, and operation details, see the Quantum User Guide, which is provided with the Quantum on the Extron Videowall Processing disc and is also available at www.extron.com.
Rear Panel Features and Connections
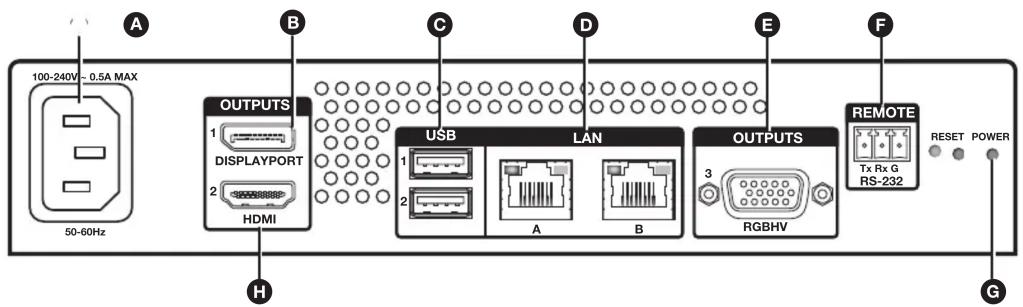
Figure 1. QC 101 Rear Panel
A AC power connector — Connect to an AC power source.
B DisplayPort output connector — (Optional)
USB connectors — Connect to a mouse, keyboard, or flash drive. Connector 1 (top) accepts USB 2.0 signals and connector 2 accepts USB 3.0.
D A and B LAN ports — Connect to a network or the Quantum processor. These two RJ-45 connectors support 10/100/1000 Base-T.
E RGBHV output connector — (Optional) 15-pin VGA
F Remote RS-232 connector — Connect to a control system for RS-232 communication.
G Power button — Using a small screwdriver or stylus, press this recessed button momentarily to safely shut down the controller. Pressing and holding the button for 4 seconds forces a hard shutdown of the QC 101.
H HDMI output connector — (Optional)
NOTE: The button and LED labeled RESET are not functional.
Installation Steps
- Disconnect power from all equipment.
- (Optional) Mount the unit to a rack or furniture, following the instructions provided with the mounting hardware. Rack and furniture mounting kits are available at www.extron.com.
-
Connect a display to the DisplayPort, VGA, or HDMI output connector (see figure 1, B, E, or H).
-
Connect the keyboard, mouse, and flash drive (if needed) to the rear panel USB ports (C) to create and save Quantum Elite or Connect configuration project files (see the Quantum Control Software User Guide, available at www.extron.com).
- Connect a straight-through Ethernet cable between QC 101 LAN port A or B (see figure 1, D, on the previous page) and the network or the Control connector on the rear panel of the Quantum chassis. If connecting through a LAN, ensure that the QC 101 is on the same subnet as the Quantum processor or processors.
- Connect a control device (such as an Extron IPCP or IPL Pro) to the Remote RS-232 port (F) for remote control of the Quantum system using R-type commands (see the Quantum Control Software User Guide, available at www.extron.com, for more about these commands).
- Connect AC power to the QC 101 rear panel IEC connector (see A). Connect power to all other devices in the system.
- Power on the Quantum chassis and all other connected devices.
![graph TD A["Display"] --> B["Extron QC 101 C Controller for Quantum Connect"] B --> C["Extron Quantum Connect HDCP-Compliant Videowall Processing System"] C --> D["Sources"] D --> E["Extron IPCP Pro 250 IP Link Pro Control Processor"] B --> F["Extron IPCP Pro 250"] F --> G["Extron"] B --> H["RS-232"…](/content/2026/05/1048628/images/bd58c43b58a45398ade1b4e7254b1f9d3d459f7f502e08d2bf87afbd06dedde8.jpg)
Figure 2. QC 101 Connection Example with a Quantum Connect
NOTE: The QC 101 front panel has no controls that are involved in setup. It contains four indicator LEDs that provide status for power and booting (Power), disk drive activity (SSD), and network activity (LAN A and LAN B). The USB Config port is reserved for future use.
Configuring the QC 101
After all rear panel connections have been made and all connected devices are powered on, you are ready to configure the QC 101 to manage the Quantum processors. To do this, set the IP address of the QC 101, then either create a project file using the Quantum Control Software (loaded on the QC 101 prior to delivery) or upload an existing project file that was configured using a computer.
Setting the IP Address of the QC 101
The QC 101 controller is a host device with an embedded operating system. To communicate with the Quantum processor, the QC 101 must be on the same network and subnet as all the Quantum processors in the system. To set the QC 101 IP address, you need a keyboard and mouse connected to one or both of the USB ports and a monitor connected to one of the output ports.
-
Do either of the following:
-
On the QC 101 Start screen, click the Network Connections icon (shown at right), or
- On the desktop screen, double-click the Network Connections shortcut icon on the desktop.
The Network Connections window opens.

- Right-click the name of the LAN port in use (highlighted and no red X) and select Properties from the pop-up menu.

Figure 3. Selecting a LAN Port
- On the LAN Properties window, scroll to locate and select the Internet Protocol Version 4 (TCP/IPv4) checkbox (see ① in the illustration at right), and click Properties (②).
- In the Internet Protocol Version 4 (TCP/IPv4) Properties window, enter the desired QC 101 IP address parameters and click OK. The IP address must be on the same subnet as those of the Quantum processors.
- In the QC 101 Shell window (which opened at the same time as the Network Connections window in step 1), click the Commit C Drive button (see figure 4, ①).


Figure 4. Click Commit C Drive on the QC 101 Shell Window
- On the confirmation prompt that opens, click OK to save the address changes to the hard drive and reboot the controller. A password prompt is displayed. Enter the password where indicated on the prompt and click OK.
ATTENTION:
To use the Quantum software to configure and control the processor, start by setting up a project (presentation), in which you define the processor, select or create a layout, set up video sources, and create multiple scenes.
NOTE: The C: drive on the QC 101 is write-protected. Therefore, files located on the C: drive that are created or changed are not saved when power is cycled to the QC 101. Save any new or changed projects on the controller to the QC 101 internal D: drive or to a flash drive attached to one of the USB ports on the QC 101 rear panel.
-
Create a new project or upload an existing one.
-
If creating a new project, see the Quantum Control Software User Guide for detailed instructions. Save the project to the QC 101 D: drive and double-click its filename to open the project.
-
If uploading an existing project that was created on a PC, copy the project file directly to the QC 101 D: drive and double-click its filename to open the project.
-
Test presets and input switching within the Quantum Software to ensure that the project is satisfactory.
- Set up the RS-232 connection to the control system as follows:
a. In the Quantum Control Software window, click Communications Setup on the left Taskbar panel.
b. On the Communications Setup screen, select COM1 in the Devices panel (see figure 5, ①).
c. In the Port Settings panel (2), enter the settings required by the control system being used.
d. In the Serial Commands panel (3), select the Input and Output checkboxes to make the RS-232 connection bidirectional. This allows for commands be sent and received.


Figure 5. Configuring RS-232 Communication
4. Re-save the project file to the D: drive.
5. In the QC 101 Shell window, click Commit C Drive to save the project settings to the C: drive and to reboot the QC 101. Confirm that the project file was loaded and connected to the Quantum processors automatically after the reboot.
R-Type Commands
R-Type commands are serial data strings that the Quantum Control Software can receive via the RS-232 port. They can consist of ASCII text, hexadecimal data, and control characters. The following table lists some commonly used R-Type commands.
| Command ASCII-Hexadecimal Description | |||||||
| Recall Scene | |||||||
| Recall by list position | [∅1] R X1 [∅2] ∅5 [17] [∅3] Recall scene number scene list. | X1 according to the | |||||
| Recall by scene name | [∅1] R X2 [∅2] ∅7 [17] [∅3] Recall the scene named | X2. | |||||
| Recall next scene | [∅1] R [∅2] ∅n [17] [∅3] | Recall the next scene in the list. | |||||
| Recall previous scene | [∅1] R [∅2] ∅p [17] [∅3] | Recall the previous scene in the list. | |||||
| Window Source | |||||||
| Select input | [∅1] R X3 X11 [∅2] 36 [17] [∅3] Select input | X11 to be shown in window X3. | |||||
| Window Visibility | |||||||
| Hide window | [∅1] R X3 ∅ [∅2] 33 [17] [∅3] Set window | X3 to be hidden. | |||||
| Example: | [∅1] R ∅0050 [∅2] 33 [17] [∅3] | Set window 6 to be hidden | |||||
| Show window | [∅1] R X3 1 [∅2] 33 [17] [∅3] Set window | X3 to be displayed. | |||||
| Extron Headquarters | Extron Europe | Extron Asia | Extron Japan | Extron China | Extron Middle East | Extron Australia | Extron India |
| 633.9876 Inside USA/Canada Only | +800.3987.6673 | +65.6383.4400 | +81.3.3511.7655 | +86.21.3760.1568 | +971.4.299.1800 | +61.8.8351.2188 | 1800.3070.3777 |
| USA - West Extron USA - East | Inside Europe Only | +65.6383.4664 FAX | +81.3.3511.7656 FAX | +86.21.3760.1566 FAX | +971.4.299.1880 FAX | +61.8.8351.2511 FAX | (Inside India Only) |
| 4.491.1500 +1.919.850.1000 | +31.33.453.4040 | +91.80.3055.3777 | |||||
| 4.491.1517 FAX +1.919.850.1001 FAX | +31.33.453.4050 FAX | +91.80.3055.3737 FAX | |||||


Brand : Extron
Model : QC 101 C
Category : Processor