9'' Laminator OL 250-L - Laminator Easy Home - Free user manual and instructions
Find the device manual for free 9'' Laminator OL 250-L Easy Home in PDF.


| Product Type | Laminator |
| Brand | Easy Home |
| Model | 9'' Laminator OL 250-L |
| Max Lamination Width | 9 inches (230 mm) |
| Lamination Speed | Approx. 300 mm/min |
| Warm-up Time | 3-5 minutes |
| Temperature Settings | Adjustable (2 settings: cold/hot) |
| Pouch Thickness | Up to 250 microns (10 mil) |
| Power Supply | AC 220-240V, 50/60Hz |
| Power Consumption | Approx. 200 W |
| Dimensions (L x W x H) | Approx. 340 x 110 x 60 mm |
| Weight | Approx. 1.2 kg |
| Functions | Hot & Cold lamination |
| Jam Release | Release lever for clearing film jams |
| Auto Shut-off | Yes, after 30 minutes of inactivity |
| Indicators | Power and Ready LED lights |
| Maintenance | Clean rollers with a damp cloth; avoid solvents |
| Safety Certifications | CE, RoHS compliant |
| Spare Parts Availability | Replacement pouches and power cord available via manufacturer |
| Repairability | Designed for service by qualified technician; user replaceable parts: none |
| Package Contents | Laminator, user manual, sample pouch |
Frequently Asked Questions - 9'' Laminator OL 250-L Easy Home
User questions about 9'' Laminator OL 250-L Easy Home
0 question about this device. Answer the ones you know or ask your own.
Ask a new question about this device
Download the instructions for your Laminator in PDF format for free! Find your manual 9'' Laminator OL 250-L - Easy Home and take your electronic device back in hand. On this page are published all the documents necessary for the use of your device. 9'' Laminator OL 250-L by Easy Home.
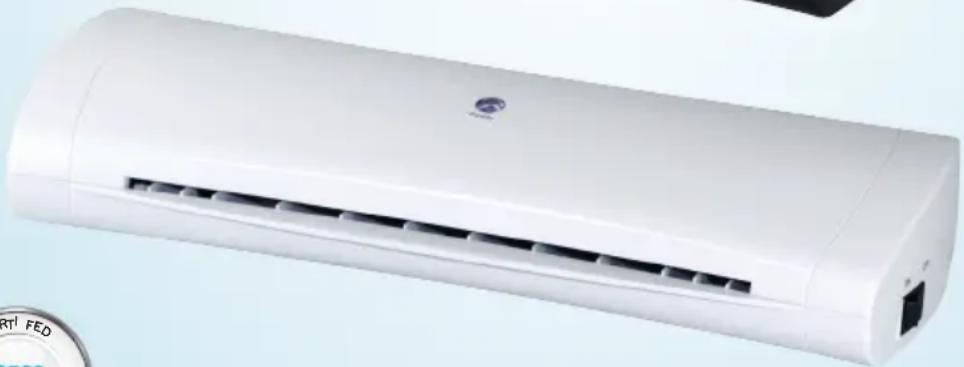
USER MANUAL 9'' Laminator OL 250-L Easy Home
English......06
Español .....17

Product Info
QR codes take you where you want to go quickly and easily
Whether you require product information, spare parts or accessories, details on warranties or aftersales services, or if you want to watch a product demonstration video or 360° product view, our QR codes will take you there in no time at all.
What is a QR code?
A QR code (QR = Quick Response) is a type of matrix that can be read with a smartphone camera and that contains a link to a website or contact details, for example.
Advantage: You do not need to manually enter a website address or contact details.
How it works
To scan the QR code, all you need is a smartphone with QR code reader software and an internet connection. This type of software can be downloaded for free from your smartphone's app store.
Try it out now
Just scan the QR code with your smartphone and find out more about the Aldi product you have purchased.
Your Aldi Service Portal
All details mentioned above can also be found in the Aldi Service Portal at www.aldi.us.

Contents
Overview 4
Use....5
Product contents / device parts......6
General information....7
Reading and storing the user manual .....7
Explanation of symbols ......7
Safety 8
Proper use....8
Safety notes 8
First use....12
Checking the laminator and product contents...... 12
Setting up the laminator 12
Activating / deactivating the laminator 12
Operation....13
Laminating....13
Removing a jammed laminating pouch 14
Cleaning 14
Cleaning the heating rollers 15
Storage 15
Technical data 16
Disposal....16
Disposing of the packaging 16
Disposing of old appliances 16
A

Product contents / device parts
1 Ready indicator
2 Laminating pouch infeed slot
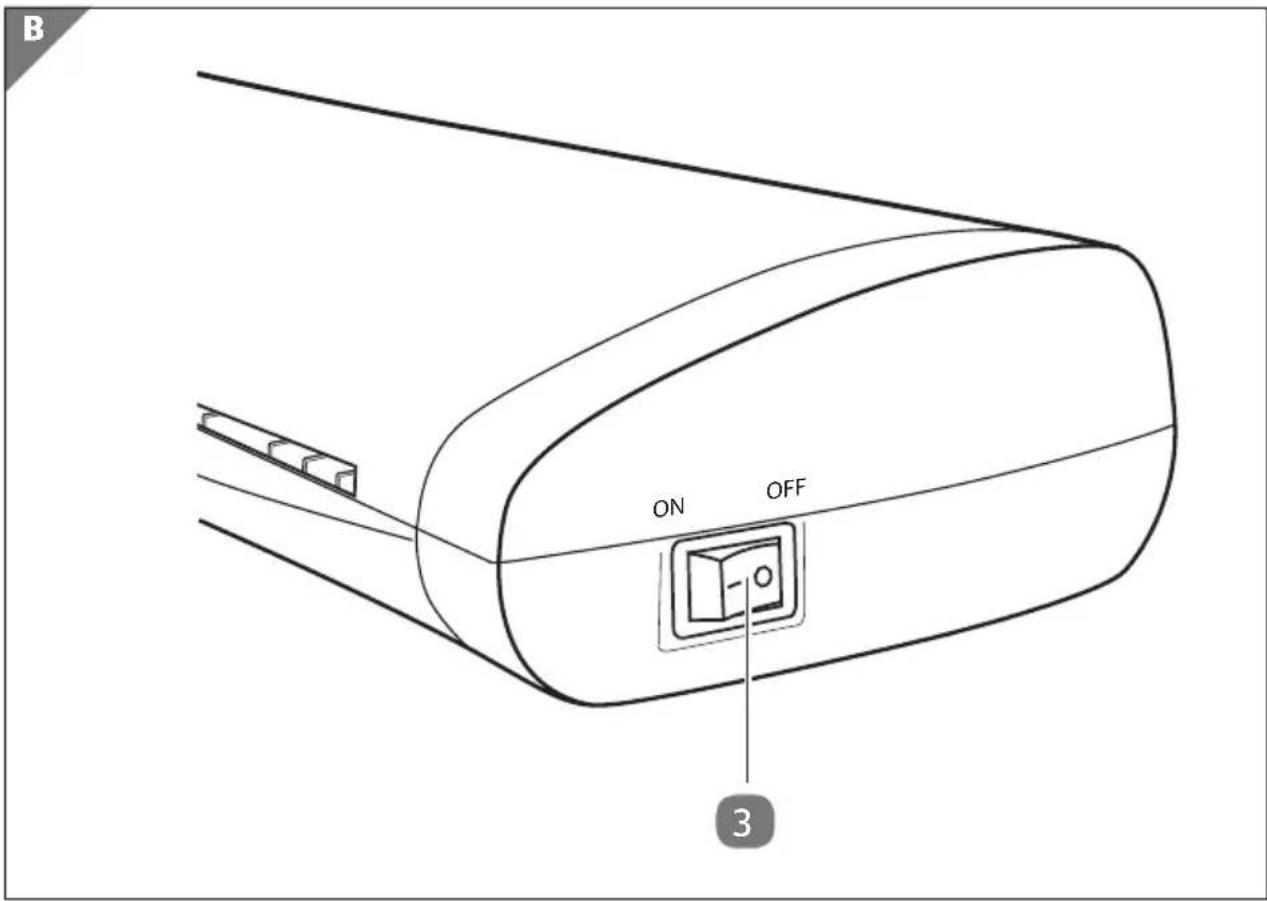
3 ON/OFF switch
4 Laminating pouch output slot
5 Laminating pouch
Laminating pouch in the format 1.97" × 3.23" (8.2 × 5 cm) (3 mil), 10× Laminating pouch in the format 5" × 7" (12.7 × 17.8 cm) (3 mil), 10× Laminating pouch in the format 8.5" × 11" (21.6 × 27.9 cm) (3 mil), 10×
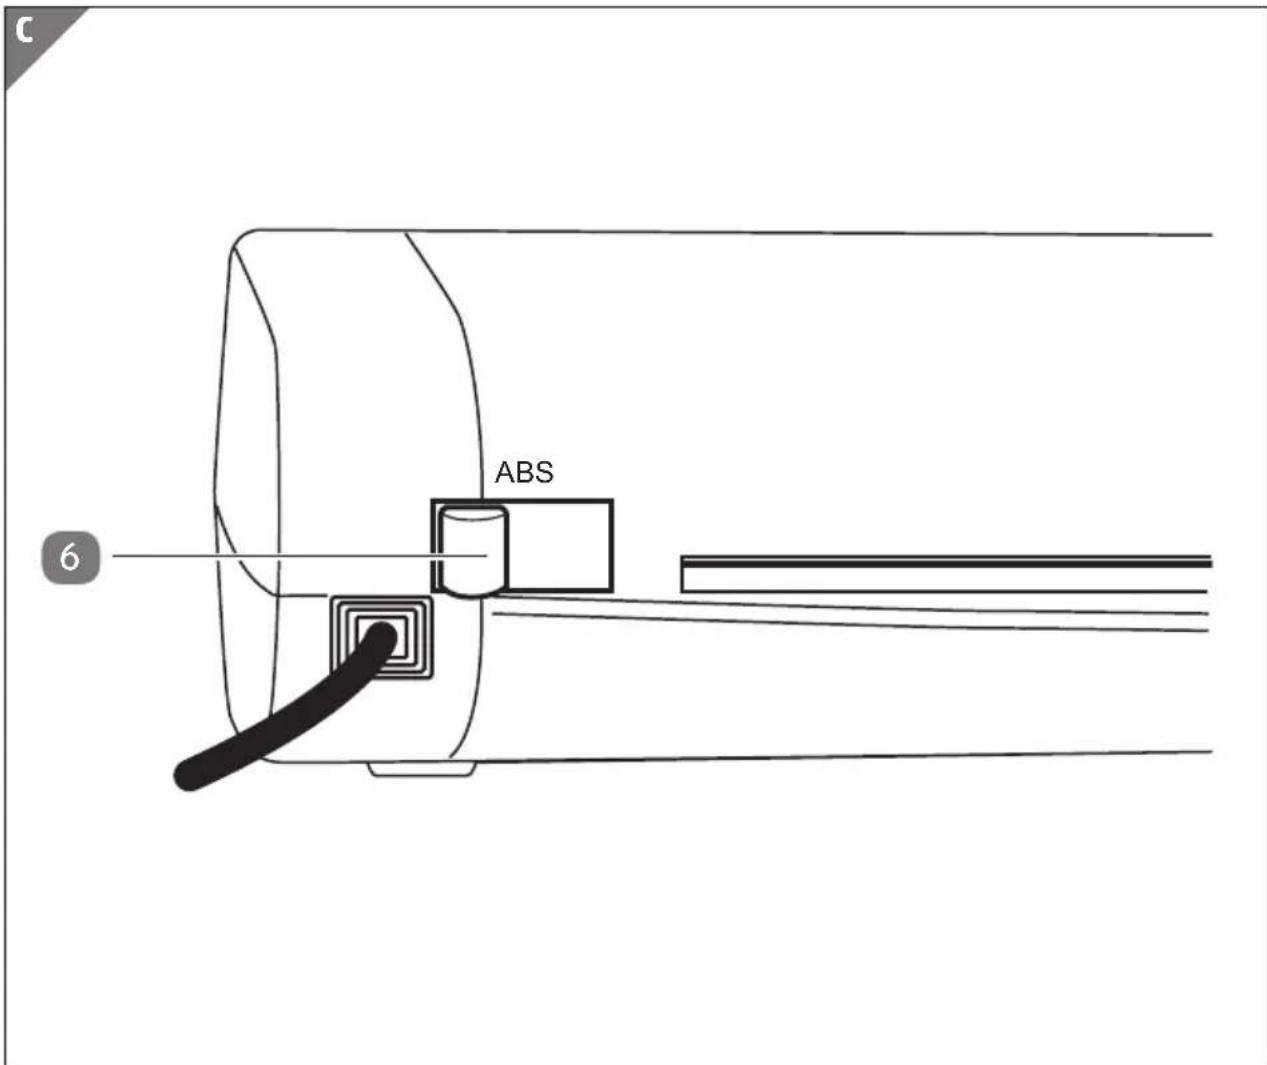
6 ABS switch (antiblocking system)
General information
Reading and storing the user manual

This user manual accompanies this 9" laminator (hereafter referred to as "laminator"), and contains important information on setup and handling.
Before using the laminator, read the user manual carefully. This
particularly applies to the safety instructions. Failure to do so may result in personal injury or damage to the laminator.
Store the user manual for further use. Make sure to include this user manual when passing the laminator on to third parties.
Explanation of symbols
The following symbols and signal words are used in this user manual, on the laminator or on the packaging.
WARNING!
This signal symbol/word designates a hazard with moderate risk, which may result in death or severe injury if not avoided.
NOTICE!
This signal word warns of possible damage to property.

This symbol provides you with useful additional information on handling and use.

If a product carries this mark, it means UL found that representative product samples met UL's safety requirements.

Read the user manual.

The symbol indicates that the product is of CLASS II (double insulated) construction. It does not require a safety connection to electrical earth (ground).

Only use the laminator in indoor areas.
Safety
Proper use
The laminator is only designed for laminating. It is only intended for private use and not suitable for commercial purposes.
Only use the laminator as described in this user manual. Using it in any other way is deemed improper and may result in damage to property or even personal injury. The laminator is not a children's toy.
The manufacturer or vendor cannot be held liable for damages incurred through improper or incorrect use.
Safety notes
IMPORTANT SAFEGUARDS
When using electrical appliances, basic safety precautions should always be followed including the following. Read all instructions.

WARNING!
Risk of electric shock!
A faulty electrical installation, excessive line voltage or incorrect operation may result in an electric shock.
- Only connect the laminator in indoor areas and only to a properly installed 120 V socket with a protective conductor.
- Only connect the laminator to an easily accessible socket so that you can quickly disconnect it from the grid in case of a failure.
- Do not operate the laminator if it is visibly damaged or if the power cable or power plug is defective.
- If the power cable of the laminator is damaged, the manufacturer, its customer service team or a person with similar qualifications must replace it.
- Do not open the housing; instead, have a qualified professional perform repairs. To do so, contact the service address indicated on the warranty card. Liability and warranty claims are waived in the event of repairs or conversions performed by the user, improper connection of the device or incorrect operation.
- Only parts that comply with the original device data may be used for repairs. Electrical and mechanical parts, which are essential for providing protection against sources of danger, are located in this laminator.
- Do not operate the laminator with an external timer or separate telecontrol system.
- Do not immerse the laminator or the power cable or power plug in water or other liquids.
- Never touch the power plug with damp hands.
- Do not perform any other work (such as cleaning) on the laminator while it is operating.
- Never pull the power plug out of the socket by the power cable; instead, always do so by taking hold of the power plug.
- Never use the power cable as a carrying strap.
- Keep the laminator, power plug and power cable away from open flames and hot surfaces.
- Lay the power cable so that it does not pose a tripping hazard.
- Do not kink the power cable and do not lay it over sharp edges.
- Only use the laminator in indoor areas. Do not use it in wet rooms or in the rain.
- Never store the laminator so that it is at risk of falling into a bath tub or washbasin.
- Never reach to retrieve the laminator if it has fallen in water. In such a case, immediately disconnect the power plug.
- Make sure that children do not insert any objects into the laminator.
- Always switch the laminator off and pull the power plug out of the socket when you are not using the laminator, cleaning it or in the event of a fault.
- Do not modify the plug in any way. The laminator has a polarized plug (one blade is wider than the other). To reduce the risk of electric shock, this plug will fit in a polarized outlet only one way. If the plug does not fit fully in the outlet, reverse the plug. If it still does not fit, contact a qualified electrician.
WARNING!
Danger for children and persons with impaired physical, sensory or mental capacities (e.g. partially disabled persons, older persons with reduced physical and mental capacities) or lack of experience and knowledge (e.g. older children).
- This laminator may be used by children from the age of eight as well as persons with impaired physical, sensory or mental capacities or those lacking experience and knowledge if they are supervised or have been instructed in how to safely use the laminator and have understood the risks associated with operating it. Children must not play with the laminator. Cleaning and user maintenance must not be performed by unsupervised children.
- Keep children under eight years of age away from the laminator and connector cable.
- Do not leave the laminator unattended while it is operating and do not perform any other activities during operation.
- Make sure that children do not play with the packaging wrapper. Children may get caught in it when playing and suffocate.
- Keep the laminator away from pets.
– Clearly advise other users of the risks.
NOTICE!
Risk of damage!
Improper handling of the laminator may damage the laminator.
- Place the laminator on an easily accessible, level, dry, heat-resistant and sufficiently stable work surface. Do not place the laminator on the edge of the work surface.
- Avoid the build-up of heat by not placing the laminator directly up against a wall or under cupboards or similar.
-
Protect the laminator from direct sunlight.
-
Never place the laminator on or near hot surfaces (e.g. stovetops, heaters etc.).
- Ensure that the power cable does not come into contact with hot parts.
- Never expose the laminator to high temperatures (heaters etc.) or to the effects of the weather (rain etc.).
- Never fill the laminator with liquid.
- Never laminate damp documents or organic objects (e.g. flowers, leaves etc.).
- Do not cut the laminating pouches into pieces before laminating and do not in any case cut off the sealed edges from the laminating sheets.
- Stop using the laminator if its plastic parts exhibit cracks or breaks or are deformed. Only replace damaged parts with corresponding original spare parts.
- Only laminate at room temperature (approx. 50–77 °F / 10–25 °C).
- Never insert metallic objects (e. g. paper clips, staples etc.) or objects other than laminating pouches which are intended for this laminator into the laminating pouch infeed slot.
- The laminator has vents. Never cover them with other objects such as magazines, blankets or similar.
SAVE THESE INSTRUCTIONS
Keep the user manual for future reference.
First use
Checking the laminator and product contents
NOTICE!
Risk of damage!
If you are not cautious when opening the packaging with a sharp knife or other pointy object, you may quickly damage the laminator.
- Be very careful when opening the packaging.
- Take the laminator out of the packaging.
- Check whether the laminator or the individual parts exhibit damage. If this is the case, do not use the laminator. Contact the manufacturer at the service address specified on the warranty card.
- Check to make sure that the delivery is complete (see fig. A).
Setting up the laminator
- Position the laminator so that there is enough space to insert a laminating pouch 5. Do not position the laminator directly in front of a wall or other objects.
- Connect the power plug to a properly installed socket with a protective conductor (120 V = house connection).
Activating / deactivating the laminator
- Move the ON / OFF switch 3 to "ON" (—) to switch the laminator on.

The ready indicator 1 will turn from dark blue to red once the laminator has reached the correct temperature for lamination. The preheating time may vary depending on the ambient tempera ture and air humidity.
- Move the ON / OFF switch to "OFF" (○) to switch the laminator off.
Operation
WARNING!
Risk of injury!
Handling the laminator improperly may result in injury.
- If an object (sleeves, tie etc.) is unintentionally taken into the laminating pouch infeed slot, immediately disconnect the power plug.
NOTICE!
Risk of damage!
Improper handling of the laminator may lead to damage to the laminator or documents.
- Do not in any case laminate documents with a treated surface (e.g. fax or thermopaper, Polaroid pictures etc.) and papers with surfaces that may be altered through heat (tickets, ultrasonic scans etc.).
- Only use one laminating pouch per lamination, as laminating pouches may stick tightly together.
- Do not leave any laminating pouches in or next to the laminator after lamination.

When using the laminator, a slight odour may be produced. Ensure there is sufficient ventilation in the room, e.g. by opening windows.
Laminating
- Move the ON / OFF switch 3 to "ON" (—) (see fig. B).
The ready indicator will turn from dark blue to red within the next 1½–2 minutes.
- Once the ready indicator 1 is red, place the document between the two sides of the laminating pouch 5.
Make sure that the document is flush with and aligned as close as possible to the sealed edge of the laminating pouch.
- Insert the laminating pouch so that it is centered and with the closed-edge first into the laminating pouch infeed slot 2 on the back of the laminator.
The heating rollers will automatically pull the laminating pouch in and move it to the laminating pouch output slot 4 on the front of the laminator. Don't use force to pull out the laminating pouch.
- Remove the laminating pouch and let it cool off briefly on a flat surface.

- If necessary, you can cut off excessive material after it has cooled off.
-
Repeat the process if the laminating pouch has not adequately adhered to the document.
-
Move the ON / OFF switch to "OFF" (○) to switch the laminator off.
Removing a jammed laminating pouch
The laminator is equipped with an antiblocking system. If the laminating pouch was not inserted straight or it becomes jammed in the laminator, proceed as follows:
-
Move the ABS switch 6 towards the laminating pouch infeed slot 2 and hold it down (see fig. C).
-
Pull the laminating pouch 5 out of the laminator.

It is recommended you pull the laminating pouch out in the direction of its larger end.
You can place the document in a new laminating pouch and laminate it again.
Cleaning
WARNING!
Burn hazard!
The laminator will become hot during operation. You may burn yourself.
- Always let the laminator cool off completely before you clean it.
NOTICE!
Risk of short circuit!
Water that has penetrated the housing may cause a short circuit.
- Never submerge the laminator in water.
- Make sure that no water penetrates the housing.
NOTICE!
Risk of damage!
Improper handling of the laminator may result in damage to the laminator.
- Do not use any aggressive cleaners, brushes with metal or nylon bristles, sharp or metallic cleaning utensils such as knives, metal sponges and the like. They could damage the surfaces.
-
Do not in any case place the laminator in the dishwasher. It would be destroyed as a result.
-
Disconnect the power plug before cleaning.
- Let the laminator cool off completely.
- Use a damp cloth to wipe off the laminator. Let all parts dry completely afterwards.
Cleaning the heating rollers
- Switch the laminator on by moving the ON / OFF switch 3 to "ON" (—).
- Once the ready indicator 1 turns red, fold a sheet of paper and insert it, folded-edge first, into the laminating pouch infeed slot 2.
- Keep repeating this process until no more glue deposits cling to the paper.
- Switch the laminator off by moving the ON/OFF switch to "OFF" (○).
Storage
NOTICE!
Risk of damage!
Improper storage of the laminator may result in damage to the laminator.
- Never store the laminator next to a heat source.
-
Do not fold or crush the power cable.
-
Only stow the laminator if it is dry.
- Always store the laminator in a clean, dry area that it is protected from direct sunlight and is not accessible for children.
- Use the original packaging for storage.
Technical data
Model: OL 250-L
Product code: 93917
Model colors: glossy white, glossy black
Line voltage: AC 120 V/60 Hz
Power consumption: 550 W; 4.6 A / 60 W; 0.5 A
Protection class: II

Weight: approx. 2.2 lbs (1.09 kg)
Dimensions (W × D × H): 13.94" × 5.59" × 2.32" (354 mm × 142 mm × 59 mm)
Preheating time: 1 1/2 -2 min.
Pouch thickness: 3 mil to 5 mil (80 mic to 125 mic)
Operating speed: 15.75" / min. (400 mm / min.)
Laminating temperature: approx. 275 °F (135 °C)
Maximum film width: letter size
Rolling mechanism: 2 rollers
Lamination: hot lamination
Ready indicator: indicator with thermo-transfer technology
ABS function: yes
Technical changes reserved.
Disposal
Disposing of the packaging
- Sort the packaging before you dispose of it. Dispose of paperboard and cardboard with the recycled paper service and wrappings with appropriate collection service.
Disposing of old appliances
- Should the laminator no longer be capable of being used at some point in time dispose of it in accordance with the regulations in force in your state or country.
- Please ensure your recycling information applies to the local regulations and the EPA recommendations (www.epa.gov).
Contenido
Conjunto ....4
Uso 5
www.monolith-support.com
MODEL/MODELO: OL 250-L
03/2017
3
YEARS WARRANTY
AÑOS DE GARANTÍA
- QR CODES TAKE YOU WHERE YOU WANT TO GO QUICKLY AND EASILY
- WHAT IS A QR CODE
- HOW IT WORKS
- TRY IT OUT NOW
- YOUR ALDI SERVICE PORTAL
- CONTENTS
- PRODUCT CONTENTS / DEVICE PARTS
- GENERAL INFORMATION
- READING AND STORING THE USER MANUAL
- EXPLANATION OF SYMBOLS
- WARNING
- NOTICE
- SAFETY
- PROPER USE
- SAFETY NOTES
- IMPORTANT SAFEGUARDS
- RISK OF ELECTRIC SHOCK
- RISK OF DAMAGE
- SAVE THESE INSTRUCTIONS
- FIRST USE
- CHECKING THE LAMINATOR AND PRODUCT CONTENTS
- SETTING UP THE LAMINATOR
- ACTIVATING / DEACTIVATING THE LAMINATOR
- OPERATION
- RISK OF INJURY
- LAMINATING
- REMOVING A JAMMED LAMINATING POUCH
- CLEANING
- BURN HAZARD
- RISK OF SHORT CIRCUIT
- CLEANING THE HEATING ROLLERS
- STORAGE
- TECHNICAL DATA
- DISPOSAL
- DISPOSING OF THE PACKAGING
- DISPOSING OF OLD APPLIANCES
- CONTENIDO
Brand : Easy Home
Model : 9'' Laminator OL 250-L
Category : Laminator