
H-CDM8055 - Car stereo HYUNDAI - Free user manual and instructions
Find the device manual for free H-CDM8055 HYUNDAI in PDF.

| Product Type | Car Stereo / Receiver |
| Brand | Hyundai |
| Model | H-CDM8055 |
| Form Factor | Single DIN (approx. 178 x 50 mm) |
| Weight | Approx. 1.2 kg (2.6 lbs) |
| Power Supply | 12V DC (negative ground) |
| Maximum Power Output | 4 x 50 Watts (peak) |
| Playback Media | CD, CD-R/RW, MP3, WMA |
| Radio Tuner | FM/AM with 30 presets (18 FM, 12 AM) |
| Input Connections | USB (front), 3.5 mm Aux (front), CD slot |
| Audio Features | Built-in equalizer (Rock, Pop, Classic, Flat), volume, bass, treble, balance, fader |
| Display | LCD with white illumination, dimmable |
| Remote Control | Included (wired or IR depending on variant) |
| Clock Function | Yes, with 12/24 hour format |
| Detachable Faceplate | Yes (for theft prevention) |
| Maintenance | Clean faceplate with soft dry cloth; do not use solvents or water |
| Safety Notes | Use only specified fuse (e.g., 10A); ensure professional installation to avoid short circuits |
| Spare Parts / Repairability | Contact Hyundai service centers or authorized dealers for replacement parts and repairs |
| Included Accessories | Mounting sleeve, trim ring, wiring harness, remote control, screws |
Frequently Asked Questions - H-CDM8055 HYUNDAI
User questions about H-CDM8055 HYUNDAI
0 question about this device. Answer the ones you know or ask your own.
Ask a new question about this device
Download the instructions for your Car stereo in PDF format for free! Find your manual H-CDM8055 - HYUNDAI and take your electronic device back in hand. On this page are published all the documents necessary for the use of your device. H-CDM8055 by HYUNDAI.
USER MANUAL H-CDM8055 HYUNDAI
Thank you for purchasing our product. For safety, it is strongly recommended to read this manual carefully before connecting, operating and/or adjusting the product and keep the manual for reference in the future.
Table of contents
Table of contents....2
Important safeguards....3
Accessories....4
Installation/Connections....5
Connection diagram 9
Controllers....10
General operations 11
Radio operations 14
CD/MP3/WMA disc operations....16
SD/MMC card/USB operations 18
MP3 overview....19
Bluetooth operators 21
Handling compact discs....26
Cleaning 26
Troubleshooting guide....27
Specification 28
Important safeguards
- Read carefully through this manual to familiarize yourself with this high-quality sound system.
- Disconnect the vehicle's negative battery terminal while mounting and connecting the unit.
- When replacing the fuse, be sure to use one with an identical amperage rating. Using a fuse with a higher amperage rating may cause serious damage to the unit.
- Do not use the unit in places where it can be exposed to water, moisture and dust.
- Do not attempt to disassemble the unit. Laser beams from the optical pickup are dangerous to the eyes.
- Make sure that pins or other foreign objects do not get inside the unit; they may cause malfunctions, or create safety hazards such as electrical shock or laser beam exposure.
- If you have parked the car for a long time in hot or cold weather, wait until the temperature in the car becomes normal before operating the unit.
- Do not open covers and do not repair yourself. Consult the dealer or an experienced technician for help.
- Make sure you disconnect the power supply and aerial if you will not be using the system for a long period or during a thunderstorm.
- Make sure you disconnect the power supply if the system appears to be working incorrectly, is making an unusual sound, has a strange smell, has smoke emitting from it or liquids have got inside it. Have a qualified technician check the system.
- The unit is designed for negative terminal of the battery, which is connected to the vehicle metal. Please confirm it before installation.
- Do not allow the speaker wires to be shorted together when the unit is switched on. Otherwise it may overload or burn out the power amplifier.
- Do not install the detachable panel before connecting the wire.
Accessories
- Receiver 1 pc
- Carrying case 1 pc
-
Mounting parts:
Hexagon nut M5 1 pc
Spring washer M5 1 pc
Plain washer M5 1 pc
Metal bar 1 pc
Release Keys 2 pcs
M5 x 25 screw 1 pc
Mounting box 1 pc -
Customer information 1 pc
-
Warranty card
-
Instruction manual
1 pc
1 pc
Installation/Connections
Notes:
- Choose the mounting location where the unit will not interfere with the normal driving function of the driver.
- Before finally installing the unit, connect the wiring temporarily and make sure it is all connected up properly and the unit and the system work properly.
• Use only the parts included with the unit to ensure proper installation. The use of unauthorized parts can cause malfunctions. - Consult with your nearest dealer if installation requires the drilling of holes or other modifications of the vehicle.
- Install the unit where it does not get in the driver's way and cannot injure the passenger if there is a sudden stop, like an emergency stop.
- If installation angel exceeds 30^ from horizontal, the unit might not give its optimum performance.
- Avoid installing the unit where it would be subject to high temperature, such as from direct sunlight, or from hot air, from the heater, or where it would be subject to dust, dirt or excessive vibration.
Din Front/Rear-Mount
This unit can be properly installed either from 'Front' (conventional DIN Front-mount) or 'Rear' (DIN Rear-mount installation, utilizing threaded screw Holes at the sides of the unit chassis). For details, refer to the following illustrated installation methods.
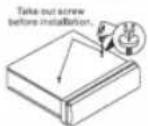
Remove the mechanism transit screw before installation
Before install the unit, must remove the two screws with label "Remove screw".
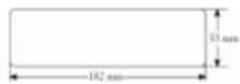
DIN FRONT-MOUNT (Method A) Installation Opening
This unit can be installed in any dashboard having an opening as shown below:
Installing the unit
Be sure you test all connections first, and then follow these steps to install the unit.
-
Make sure the ignition is turned off, and then disconnect the cable from the vehicle battery's negative (-) terminal.
-
Disconnect the wire harness and the antenna.
-
Press RELEASE button on the front panel and remove the front panel (see "removing the front panel").
-
Lift the top of the outer trim ring then pull it out to remove it.
-
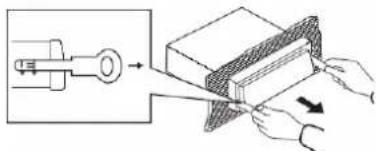
The two supplied keys release tabs inside the unit's sleeve so you can remove it. Insert the keys as far as they will go (with the notches facing up) into the appropriate slots at the middle left and right sides of the unit. Then slide the sleeve off the back of the unit.
-
Mount the sleeve by inserting the sleeve into the opening of the dashboard and bend open the tabs located around the sleeve with a screwdriver. Not all tabs will be able to make contact, so examine which ones will be most effective. Bending open the appropriate tabs behind the dashboard to secure the sleeve in place.
-
Reconnect the wire harness and the antenna and be careful not to pinch any wires or cables.
-
Slide the unit into the sleeve until it locks into place.
-
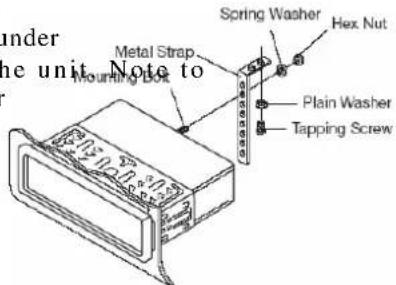
To further secure the unit, use the supplied metal strap to secure the back of the uni place. Use the supplied hardware (Hex Nut (M5mm) and Spring Washer) to attach one end of the strap to the mounting bolt on the back of the unit. If necessary, bend the metal strap to fit
your vehicle's mounting area. Then use the supplied hardware (Tapping Screw (5x25mm) and Plain Washer) to attach the other end of metal strap to a solid metal part of the vehicle under
the dashboard. This strap also helps ensure proper electrical grounding of the unit. Note to install the short threading terminal of the mounting bolt to the back of the unit and the other long threading terminal to the dashboard.
- Reconnect the cable to the vehicle battery's negative (-) terminal. Then replace the outer trim ring and install the unit's front panel (see the steps of "installing the front panel").


Removing the unit
-
Make sure the ignition is turned off, then disconnect the cable from the vehicle battery's negative (-) terminal.
-
Remove the metal strap attached the back of the unit (if attached).
-
Press RELEASE button to remove the front panel.
-
Lift the top of the outer trim ring then pull it out to remove it.
-
Insert both of the supplied keys into the slots at the middle left and right sides of the unit, then pull the unit out of the dashboard.
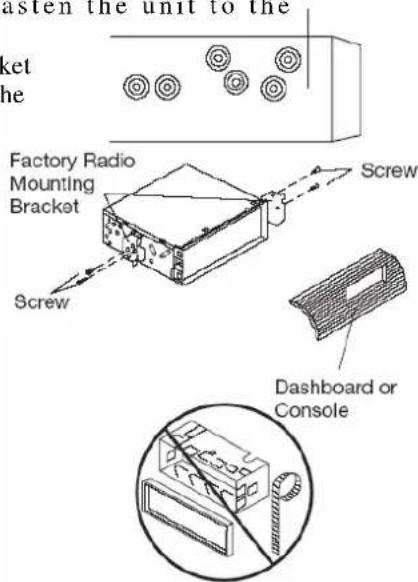
DIN REAR-MOUNT (Method B)
If your vehicle is a Nissan, Toyota, follow these mounting instructions. Use the screw holes marked T (Toyota), N (Nissan) located on both sides of the unit to fasten factory radio mounting brackets supplied with your vehicle.
To fasten the unit to the factory radio mounting brackets. Align the screw holes on the bracket with the screw holes on the unit, and then tighten the screws (5x5mm) on each side. Note: the outer trim ring, sleeve and the metal strap are not used for method B installation.
Side view showing
Screw Holes marked T, N the unit to the
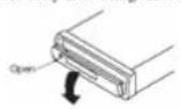
To Detach the Front Panel
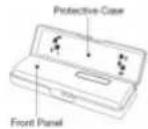
Press RELEASE button, then the front panel will be folded down. To remove the front panel, lift it up at a little angle from horizontal position, then first pull out the right side and then pull out the left side. For safekeeping, store the front panel in the supplied protective case immediately after being removed.
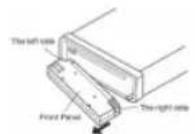
To Install the Front Panel
To install the front panel, first insert the left side into proper position then insert the right side into place. When the two sides fixed into place, push the front panel into main unit. Note that if the front panel fails to lock in position properly, pressing control button may not function and the display may be missing some segments. Press the release button and then reinstall the front panel again.
Precautions when handling
• Do not drop the front panel.
- Do not put pressure on the display or control buttons when detaching or reinstalling the front panel.
- Do not touch the contacts on the front panel or on the main unit body. It may result in poor electrical contact.
• If any dirt or foreign substances adhered on the contacts, they can be removed with a clean and dry cloth.
- Do not expose the front panel to high temperatures or direct sunlight in anywhere.
- Keep away any volatile agents (e.g. benzene, thinner, or insecticides) from touching the surface of the front panel
• Do not attempt to disassemble the front panel.
Connection diagram

Notes:
- In spite of having any kinds of speaker system, must use 4 ohms impedance of speaker to reduce the distortion during high volume level.
• Prohibited to make the conductors of auto antenna and ground touch with each other.
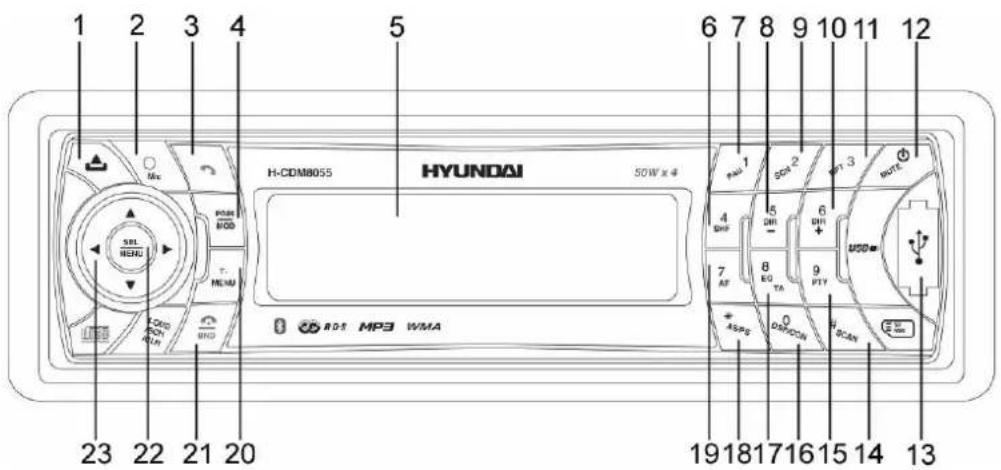
Controllers
Front panel
- RELEASE button
- Microphone
- CALL button
- PAIR/MODE button
- LCD display
- 4/SHF button
- 1/PAU button
- 5/DIR-button
- 2/SCN button
- 6/DIR+ button
- 3/RPT button
- POWER/MUTE button
- USB port
-
/SCAN button
- 9/PTY button
- 0/DSP/CON button
- 8/EQ/TA button
- */AS/PS button 22. SEL/MENU button
- 7/AF button 23. Cursor buttons
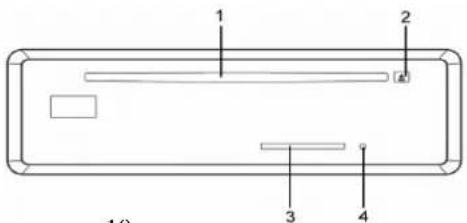
Back of the front panel
- Disc slot
- EJECT button
- SD/MMC card slot
- RESET button
- T-MENU button
- BAND/HANG UP/LOUD/SCH/CLR button
10
General operations
Resetting the unit
Operating the unit for the first time or after replacing the car battery, you must reset the unit. Press RELEASE button on the panel to open the front panel and press RESET button with a thin hard object to restore the unit to the original factory settings.
Power ON/OFF
Press MUTE/POWER button to switch the unit on. The display will show a greeting message. Press and hold this button to switch the unit off. The display will show a message "Have a nice day!".
Note: After the unit is off, volume level and radio current settings will be memorized, and when you turn the unit on it will resume the stored status you set.
Volume control
Press UP/DOWN cursor buttons. The larger the number shown on the display is, the higher the volume level is.
Sound settings
Press SEL/MENU button shortly to enter the audio setting mode. Press SEL/MENU button repeatedly or press LEFT/RIGHT cursor buttons to select a parameter: Bass => Treble => Balance => Fader. Press UP/DOWN cursor buttons to adjust each parameter.
Mute function
Press MUTE/POWER button to cancel the sound. Press it again or change the volume level to resume.
Mode selection
Press PAIR/MODE button to cycle through the play modes: RADIO => CD => USB => CARD => AUX => BT.
Note: USB, CARD, CD modes will only show on the display when a USB flash, SD/MMC card or a disc is connected to the unit.
LOUD function
Press and hold BAND/HANG UP/LOUD/SCH/CLR button to enable LOUD function; "LOUD" will appear on the screen. Press and hold this button again to cancel the function.
Display mode
Press 0/DISP/CON button to change the display mode.
Equalizer
Press 8/EQ/TA button to turn on equalizer function and to select an equalizer mode as following: FLAT => CLAS => POP M => ROCK => OFF.
System setting
Press and hold SEL/MENU button to enter the system setting mode.
Press repeatedly SEL/MENU button to select the item you want to change, and press UP/DOWN cursor buttons to change the corresponding setting.
-
BEEP: ON/OFF To turn the beep sound on/off when pressing the buttons.
-
VOL select: Last/AdjustWhen select Last, every time you turn on the unit, the volume level will be the same as when you turn off the unit at last time. When select Adjust, "VOL PGM" will appear, and you can adjust the volume level from 0 to 46. When you save and exit this menu, every time you turn on the unit, the volume level will be the same as you have set in "VOL PGM" menu.
-
Area: OIRT/USASelect the radio frequency area.
-
Hour mode: 24 hour/12 hour To change the time display mode between 24 hour or 12 hour.
-
CLK ADJ (clock adjust) Use SEL/MENU button to select the Hour/Minute; use UP/DOWN cursor bu corresponding value.
-
Date setup- Use SEL/MENU button to select the Year/Month/Day; use UP/DOWN cursor buttons to change the corresponding value.
-
Dimmer: Middle/High/LowTo change the brightness of the backlight among: High, Middle and Low.
-
SUB WOOF: OFF/ON To change the subwoofer on or off.
-
Disp mode: Normal/Reverse To change the display mode between Normal or Reverse.
-
LCD Contrast: LEVEL (-6 - +6) To adjust the display contrast from -6 to +6
-
Stand by LCD: Off/Timer/Running car/Fish kiss/Dolphin - You can set what will be displayed after turning off the unit. The different items has the different define, please refer to the following instruction:
Off: Nothing will be displayed.
Timer: Time will be displayed.
Running car/Fish kiss/Dolphin: will play the corresponding cartoon.
- Screen Save: Off/Timer/Running car/Fish kiss/DolphinThe unit has screen save function. You can set screen save mode in this menu. If there is no operation for about 10 seconds, the unit will enter screen save mode automatically.
Off: Close screen save.
Timer: when screen save, time will be displayed on display.
Running car/Fish kiss/Dolphin: when screen save, the corresponding cartoon will be played on display.
Radio operations
BAND selection
Press BAND/HANG UP/LOUD/SCH/CLR button repeatedly to select your desired radio band in RADIO mode: FM1, FM2, FM3, MW1 (AM1), MW2 (AM2). Each band can store 6 preset stations, for a total of 30 preset memory stations.
Tuning
Press LEFT/RIGHT cursor buttons to enable automatic search of a radio frequency. Press and hold the buttons to enable manual seeking mode. “Manual seeking” will appear on the display. Now press LEFT/RIGHT cursor buttons repeatedly to change the frequency step by step. If both buttons have not been pressed for several seconds, the unit will return to auto seek mode and “Auto seeking” appears on the display.
Automatic store/scanning
Automatic memory storing
Press and hold */AS/PS button; “Auto storing” will appear on the display. The radio will search from the current frequency and checks the signal strength until one cycle search is finished. And then 6 strongest stations are stored into the corresponding preset number button.
Program scanning
Press */AS/PS button to scan preset stations. And the corresponding station number P1-P6 will flash on the display.
Station storing
Press any of number buttons (1-6) to select a station, which had been stored in the memory. Press and hold this button for several seconds, current station is stored into the number button.
RDS (Radio Data System) function
Note: RDS (Radio Data System) service availability varies with areas. Please understand if RDS service is not available in you area, the following service is not available, either.
RDS mode ON/OFF
Press 7/AF button to switch on or off the RDS mode. Whenever RDS is switch on, "RDS" will flash on the display.
PTY function
Press 9/PTY button to enter PTY Select mode; the program name will be displayed on the display. You can use UP/DOWN cursor buttons to select the items and press LEFT/RIGHT cursor buttons to begin searching the corresponding program.
RDS menu
Press and hold 9/PTY button to enter the RDS Menu; in the menu, press UP/DOWN cursor buttons to select the items and press LEFT/RIGHT cursor buttons to adjust corresponding item. After choosing, please leave the unit idle to activate.
TA SEEK/TA ALARM
In TA SEEK mode the unit will seek for traffic announcement program when TA is pressed; in TA ALARM mode the alarm is set off. MASK DPI/MASK ALL
During MASK DPI mode, the unit will mask only the AF which has different PI, this is the default mode; during MASK ALL mode, the unit will mask the AF which has different PI and no RDS signal with high field strength.
RETUNE SHORT/LONG
“RETUNE” refers to the time period the unit allows for radio scan when reception is interrupted. SHORT represents a time period of 30 seconds; LONG represents a time period of 90 seconds.
REGION: OFF/ON
In Region ON mode, AF switching or PI SEEK is implemented to the station which have all PI codes are the same as current station. In Region OFF mode, the regional code in the format of PI code is ignored when AF switching or PI SEEK is implemented.
TA-VOLUME:
The default TA volume value is 18; you can adjust it from 0 to 40.
TA (Traffic Announcement) function
Press and hold 8/EQ/TA button to switch TA mode on or off. When TA mode is on and a traffic announcement is transmitted, if the unit was in CD or AUX IN mode, it will switch to Radio mode. If the volume level was under the threshold point, it will be raised to the threshold point. But if the user changed the volume level, which was more than the threshold point (min. TA volume level), it will be set to the last level. When TA mode is on, TA of individual segment is turned on. When a TP station is received, TP of individual segment is turned on. The current traffic announcement is cancelled by pressing 8/EQ/TA button. But the TA mode will not be off.
CD/MP3/WMA disc operations
Discs for playback
This unit can play disc types: CD/CD-R/-RW. Compatible with formats: MP3/WMA.
Loading/Ejecting a disc
- Press RELEASE button to open the front panel. Insert a disc with the printed side facing upward into the slot. The disc will play automatically. Or press PAIR/MODE button repeatedly to switch the unit to CD mode.
- Open the front panel. Press EJECT button to eject the disc. If the disc is not removed from the slot within several seconds, it will automatically be loaded into the slot again.
Pausing playback
To ensure good system performance, wait until the unit finishes reading the disc information before proceeding. Press 1/PAU button to pause the playback. Press again to resume the playback.
Playing the previous/next track
During playback press LEFT/RIGHT cursor buttons to play the previous/next track. Track numbers will be shown on the display.
Fast forward and backward playback
Press and hold press LEFT/RIGHT cursor buttons to fast forward or reverse. Release the button when the desired location is found.
Intro playback
For CD disc: You can play the beginning of every track in the disc for several seconds in sequence. Press 2/SCN button to start intro playback. The display will show "Scan". Press again to cancel. For MP3/WMA disc: You can play the beginning of every track in the current folder for several seconds in sequence. Press 2/SCN button to start intro playback. The display will show "F-Scan". Press again to cancel.
Repeat playback
During CD playback, press 3/RPT button to repeat the current track playback. The display will show "Repeat". Press again to cancel.
During MP3/WMA playback, press 3/RPT button to repeat all tracks in the current folder. The display will show “F-repeat”. Press again to cancel.
Random playback
During CD playback, press 4/SHF button to start random playback of all tracks in the disc. "Shuffle" will appear on the display. Press again to cancel.
During MP3/WMA playback, press 4/SHF button to start random playback of tracks in the current folder. "F-shuffle" will appear on the display. Press again to cancel.
Selecting directory (for MP3, WMA modes)
Press 5/DIR- button or 6/DIR+ button to select directory downward or upward. If the MP3/WMA disc does not contain any directory, this function is not available.
Selecting tracks (for MP3, WMA modes)
Shortly press BAND/HANG UP/LOUD/SCH/CLR button to enter track searching mode, and the root menu will be displayed on the display. Press UP/DOWN cursor buttons to choose the root name and press SEL/MENU button to confirm. Then the tracks in the root folder you selected will be displayed on the display. Press UP/DOWN cursor buttons to choose the track and press SEL/MENU button to confirm.
SD/MMC card/USB operations
Notes:
USB format supports 2.0. Capacity: 8 MB - 2 GB.
SD cards brands: Canon, Fuji film, Palm, Motorola, Microsoft, IBM, HP, Compaq, Sharp, Samsung, etc. Capacity: 8 MB - 2 GB.
MMC cards brands: Ericsson, Nokia, Motorola, HP, Palm, Sanyo, Microsystems, etc. Capacity: 16 MB - 2 GB.
Inserting the USB/SD/MMC device
Insert the MMC/SD card or USB device into MMC/SD slot or USB socket. Then the playing mode will be changed into CARD or USB mode automatically. When you connect an USB driver or MMC/SD card, the unit will search the MP3 files or WMA files in the USB driver or MMC/SD card and start to play them automatically.
If in another mode, you can also press PAIR/MODE button to select USB or CARD mode. When playing the MP3 files or WMA files in the device, the operation is the same with the MP3/WMA disc operation described above.
Notes:
- When MMC/SD card and USB device are both inserted into their compartment or socket, the playing mode will be changed into the mode of the later one.
- USB MP3 player is not a standard which means different brand name or different models have their own standard. So our product cannot support every MP3 player.
- When connecting an MP3 player and there has normal battery in the player (non rechargeable battery), you should remove the battery from the MP3 player then connect it to the USB interface. Otherwise, it may cause battery burst.
- When in USB play mode, be sure not to remove the USB driver from the USB interface.
MP3 overview
Notes on MP3 and WMA
• MP3 is short for MPEG Audio Layer 3 and refers to an audio compression technology standard.
• This product allows playback of MP3 files on CD-ROM, CD-R or CD-RW discs.
- The unit can read MP3 files written in the format compliant with ISO 9660. However it does not support the MP3 data written by the method of packet write.
- The unit can not read an MP3 file that has a file extension other than “.mp3”.
- If you play a non-MP3 file that has the ".mp3" extension, you may hear some noise.
- In this manual, we refer to what are called "MP3 file" and "folder" in PC terminology as "track" and "album", respectively.
• Maximum number of directory level is 8, including the root directory. Maximum number of files and folders per disc is 256.
• The unit may not play tracks in the order of Track numbers.
• The unit plays only the audio tracks if a disc contains both audio tracks and MP3 files.
- When playing a disc of 8 kbps or "VBR", the elapsed playing time in the display window will not be correct and also the intro play may not function properly. "VBR": Variable Bit Rate.
- The unit supports the playback of WMA files. The playback of ID3 tags for WMA format is not guaranteed, it depends on versions and availability of Cyrillic alphabet.
- WMA (Windows Media Audio) – music data compression format, created by Microsoft Corporation. This format uses coding algorithm for compression of initial audio-record, greatly decreasing the file size, but, saving the good sound quality even when the bit rate is low (for example, 64 Kbit/s).
- Remember that the unit may not play the tracks in order they are written on disc.
Notes on creating your own CD-Rs or CD-RWs containing MP3 files
- To enjoy high quality sound, we recommend converting to MP3 files with a sampling frequency of 44.1 kHz and a fixed bit rate of 128 kbps.
• Do not store more than 2.56 MP3 files per disc. - For ISO 9660 - compliant format, the maximum allowable depth of nested folders is 8, including the root directory (folder).
-
When CD-R disc is used, playback is possible only for discs, which have been finalized.
-
Make sure that when MP3 CD-R or CD-RW is burned that it is formatted as a data disc and NOT as an audio disc. You should not write non-MP3 files or unneeded folders along with MP3 files on the disc otherwise it takes a long time until the unit starts to play MP3 files.
- With some CD-R or CD-RW media, data may not be properly written depending on their manufacturing quality. In this case, data may not be reproduced correctly. High quality CD-R or CD-RW disc is recommended. Up to 16 characters are displayed for the name of an Album or a Track, ID3TAG version 1.x is required.
• Note that the unit may not play Tracks in the order that you wrote them to the disc.
Bluetooth operatons
Pairing
- In any mode, press and hold PAIR/MODE button; "Pairing..." will appear on the display.
- On the mobile phone, select the Bluetooth set up.
- “H-CDM8055” should appear in the list on your mobile phone, please select “H-CDM8055” and then input password “1234”.
- When successful paired, "Pairing OK" will be displayed on the display.
- When pairing failed, "Pairing Failed" will be displayed on the display. You can press and hold PAIR/MODE button again to try the pairing again within several seconds. If there is no operation after several seconds, the display will return to the previous mode automatically.
Note: During pairing, only RELEASE button, UP/DOWN cursor buttons and POWER/MUTE button are functional, other buttons are disabled during pairing mode. When pairing, you can press BAND/HANG UP/LOUD/SCH/CLR button to terminate the pairing.
Connect
This unit has a built-in auto-reconnection function. Every time you press CALL button, the unit will auto reconnect with the mobile phone (Note: the mobile phone must have been paired with the unit before.). In the following conditions you can reconnect manually by pressing and holding 0/DSP/CON button, and “Connect...” will appear on the display; when reconnect is successful “Connected! OK!” will be displayed. And you can hear beep tone. When reconnect is failed “Connecting Failed!” will be displayed on the display for several seconds. And you can hear beep tone.
- If the mobile phone is out of range, the connection will be lost, when you come back to the unit, reconnection is necessary.
- When the mobile phone is out of range from the unit, and there is an incoming call, when you come back to the unit, and you want to transfer the audio to the unit, you need to reconnection.
- When you press RELEASE button, the connection will break off. When you install the front panel, you need to reconnect.
- If you turn off the mobile phone that was paired with the unit, when you turn on the mobile phone, you need to reconnect.
T-Menu
When successful paired, shortly press T-MENU button to enter the telephone menu; keep pressing this button or press LEFT/RIGHT cursor buttons to change the items in the menu. The items will be displayed in the following sequence: Speed dial/Received list/Dialed list/Missed list/Phone book (Mobile Phone)/Phone book (SIM Card)/Auto answering/Ring volume.
Notes:
- When you use LEFT/RIGHT cursor buttons to change the items, if you press LEFT cursor button in Speed dial interface, or press RIGHT cursor button or T-MENU button in Ring volume interface, it will exit the current menu and the unit will return to the previous mode.
- Phone Book direct searching through the unit is only available for the mobile phone supporting Phone Book Download. Some models of mobile phones don't support Phone Book Download, if you try to download Phone Book from a mobile phone not supporting this feature, "Reading..." will be displayed on the display for several seconds, then "Empty" will be displayed on the display for several seconds. If there is no operation for several seconds, it will return to the previous mode automatically.
- In Received list, Dialed list, Missed list, Phone book (Mobile Phone) and Phone book (SIM Card) menu, before the unit finishes downloading the data from the mobile phone, "Reading..." will be displayed on the LCD. Once the download is completed, "Reading..." will disappear and the phone number will be displayed.
- Anytime pressing BAND/HANG UP/LOUD/SCH/CLR button you will exit T-MENU, and the unit will return to the previous mode.
Speed dial
Display the speed dial phone number you have stored in the preset memory. The system can store maximum 10 numbers. Note: At every system reset operation by pressing RESET button, the setup of Speed dial will be cleared.
- Store speed dial numbers
There are two methods to storing the speed dial number into the memory.
a. Store from the Dialed list. Received list or Phone book.
b. Once found the number you want to save, press and hold number buttons (0-9); the unit will store the selected number into the preset memory automatically. And you can hear a beep tone.
- Store by manual input
a. Press T-MENU button and select Speed dial item.
b. Use UP/DOWN cursor buttons to scan memory available for store.
c. If any memory is available for input, the phone item is empty, and you can see the Memory No. (00-09) blinking on the LCD.
d. Press SEL/MENU button to enter the input interface. You can see “_” blinking on the display.
e. Use number buttons (0-9), */AS/PS button, #SCAN button or UP/DOWN cursor buttons to input the number and press SEL/MENU button to confirm the input. The cursor “_” will skip to the name you want to store, press SEL/MENU button to confirm.
Note: When you input a wrong number, press BAND/HANG UP/LOUD/SCH/CLR button to clear it. Press and hold BAND/HANG UP/LOUD/SCH/CLR button to clear all numbers, and “_” will blink at the first character place.
f. When you finish input, press SEL/MENU button to store the number into the preset memory. And you can hear a beep tone, then the unit will return to the previous mode.
3. Make a speed dial call
Press CALL button, then press and hold number buttons (0-9) to call the phone number stored in the memory. And the name you stored in it will be displayed on the LCD.
4. Preview the speed list
Press T-MENU button and enter Speed dial menu; the speed dial list will be displayed on LCD. If you want to call any number in the dial list, use UP/DOWN cursor buttons to select the speed dial number, and press CALL button to confirm the dialing.
5. Clear the speed dial list
Select the number from the speed dial list, then press and hold BAND/HANG UP/LOUD/SCH/CLR button to delete the number you selected.
6. Edit the speed dial list
Select the number you want to edit from the speed dial list, then shortly press SEL/MENU button to enter the edit interface.
Received list
Display the last call you have received. “Received list” is displayed on the LCD and starting with the last received number on the list, you can use UP/DOWN cursor buttons to scan the last received numbers. You can press CALL button to confirm the dialing.
Dialed list
Display the last 10 dialed number. “Dialed list” is displayed on the LCD and starting with the very last dialed number. You can use UP/DOWN cursor buttons to scan the numbers. And you can press CALL button to confirm the dialing.
Missed list
Display the call you have missed. "Missed list" is displayed on the LCD and starting with the very last missed number. You can use UP/DOWN to scan the numbers. And you can press CALL button to confirm the dialing.
Phone book (Mobile Phone)
Display the phone number you stored in your mobile phone. You can use UP/DOWN cursor to scan the phone number phone book. And you can press CALL button to confirm the dialing.
Phone book (SIM)
Display the phone number you stored in your SIM card. The operation is the same as Pone book for mobile phone.
Auto answer: ON/OFF
In auto answer on mode, when a call coming “Answer?+ Phone Number” will appear on the LCD. The unit will answer the call automatically. In auto answer off mode, when a call coming, “Answer?+ Phone Number” will appear on the LCD. You can press CALL button to answer the call, or press button BAND/HANG UP/LOUD/SCH/CLR to reject the incoming call.
Ring volume
Display the current ring volume level, you can use LEFT/RIGHT cursor buttons to adjust the ring volume level from 0 to 46. (The default volume level is 25.) To avoid echo and get a best performance, it is highly recommended to set the Ring volume value to 25.
Answering/Rejecting an incoming call
Please refer to the Auto transfer: ON/OFF paragraph above.
Making an outgoing call
- Making an outgoing call from Speed dial, Received list, Dialed list, Missed list, Phone book (Mobile Phone) and Phone book (SIM Card) please refer to the T-MENU section.
- Making an outgoing call by inputting the phone number manually. Press CALL button "Call_" will appear on the display. Use number buttons 0-9, */AS/PS button and #/SCAN button to input the phone number you want to dial. (Note: shortly press #/SCAN button to input # character, press and hold it to input + character). Then press CALL button again to call the number.
Note: if you input a wrong number, press BAND/HANG UP/LOUD/SCH/CLR button to clear it. Press and hold BAND/HANG UP/LOUD/SCH/CLR button to clear all numeric. - Making a voice dialing (the pairing mobile phone must support voice dialing feature.). Press and hold CALL button to activate the voice dialing function, "Voice Dialing..." will appear, then "Voice Speaking..." will be displayed, and you can hear a beep
sound to hint input the voice information. You have several seconds time to speak out the name as recorded in the mobile phone Voice Dial list. Then the unit will dial the number automatically. If the voice is not recognized, after several seconds, “Voice No Match!” will be displayed, and the unit will return to the previous mode automatically.
Transfer the call between mobile phone and the unit
During the talking mode, you can press and hold T-MENU button to transfer the phone call between the mobile phone and the unit. And “Call Transfer!” will be displayed on the LCD for several seconds.
Note: If you transfer the call to mobile phone, the mute of the present mode will be released at the same time. When making an outgoing call, it's not possible to transfer if the call is not being answered yet.
Bluetooth audio (A2DP function)
The unit supports Bluetooth audio function. If your mobile phone can play stereo audio, when the paring is OK, you can choose the unit you have paired to play the stereo music. 1/PAU, 2/SCN, 3/RPT buttons on the unit serve as PAU buttons. (It is up to the mobile phone, the different mobile phone has the different define.). Use LEFT/RIGHT cursor buttons to choose the previous/next track. (It is up to the mobile phone, the different mobile phone has the different define.).
Note: When playing music, you cannot make any phone call. When there is an incoming call, you can choose to answer it or not.
Special operation for Bluetooth
- In power off mode, shortly press CALL button or press and hold CALL button; the unit will be turned on automatically. Shortly press it to enter dialing mode, "Call..." will appear on LCD; press and hold CALL button to enter voice dialing mode. You can see "Voice Speaking..." displayed on the LCD. Then you can make a dialing. When talking mode finishes or you press BAND/HANG UP/LOUD/SCH/CLR button to end the dialing or talking, the unit will be turned off automatically.
- In power off mode, press T-MENU button, the unit will be turned on automatically and enter T-MENU interface. You can scan the phone number and make a phone call. Anytime, press BAND/HANG UP/LOUD/SCH/CLR button to exit this mode, and the unit will be turned off automatically.
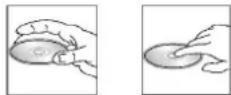
Handling compact discs
Dirty, scratched or warped discs may cause skip ping or noise.
Handle the disc only by the edges. To keep clean do not touch its surface.
Discs should be stored in their cases after use to avoid scratches.
Do not expose discs to direct sunlight, high humidity, high temperature or dust.
Prolonged exposure to extreme temperature can wrap the disc (such as leaving the discs in your car during summertime).
Do not stick or write anything on either side of disc. Sharp writing instruments, or the inks used in some felt-tip pens, may damage its surface.
Do not touch the unlabeled side. DO NOT attach any seal, label or data protection sheet to either side of a disc.
This unit cannot play 3-inch (8cm) CDs.
Never insert a 3-inch CD contained in the adapter or an irregularly shaped CD. The unit may not be able to eject it, resulting in a malfunction.
Cleaning
Cleaning the cabinet
Wipe with a soft cloth. If the cabinet is very dampen (not dropping wet) the cloth with a weak solution of soapy water, and then wipe clean.
Cleaning discs
Fingerprints should be carefully wiped from the surface of disc with a soft cloth. Unlike conventional records, compact discs have no grooves to collect dust and macroscopic dirt, so gently wiping them with a soft should remove must panicles. Wipe in a straight motion from the center to the edge. Never use thinner benzine, record cleaner or anti static spray on a compact disc. Such chemicals can damage its plastic surface.

Troubleshooting guide
| Symptom Cause Solution | ||
| No power The car ignition is not on. | The fuse is blown. | If the power supply is properly connected to the car accessory switch the ignition key to “ACC”.Replace the fuse. |
| Disc cannot be loaded. | Presence of disc inside the player. | Remove the disc in the player then put a new upward. |
| Disc cannot be read. Inserting the disc in upside down. | Compact disc is extremely dirty or defective.Temperature inside the car is too high. | Insert the compact disc with the label facing upward.Clean the disc or try to play a new one.Cool off until the ambient temperature returns to normal. |
| No sound Volume is in minimum. | Wiring is not properly connected. | Adjust volume to a desired level.Check wiring connection. |
| The buttons do not work. The built-in microcomputer is not operating properly due to noise.Front panel is not properly fix into its place. | Press POWER/MUTE button for about 10 seconds to reset the unit | |
| Sound skips. The installation angle is more than 30 degrees.The disc is extremely dirty or defective. | Adjust the installation angle to less than 30 degrees.Clean the compact disc/try to play a new one. | |
| The radio does not work, the radio station automatic selection does not work. | The antenna cable is not connected the signals are too weak. | Insert the antenna cable firmly select a station manually. |
Specification
| General | |
| Power supply | 12 V DC |
| Maximum power output | 50W x 4 |
| Fuse | 15A |
| Dimensions (L x W x H) | 178 x 50 x 160 mm |
| ESP | 40 sec. ESP for Audio-CD, 120 sec. ESP for MP3, 300 sec. for WMA |
| FM stereo radio | |
| Frequency range | 65.0 - 74.0/87.5 - 108.0 MHz |
| Preset memory (stations) | 18 |
| Usable sensitivity | 4 uV |
| LF. Frequency | 10.7 MHz |
| MW Section | |
| Frequency range | 522 kHz-1620 kHz |
| Preset memory (stations) | 12 |
| Usable sensitivity | 36 dBu |
| LF. Frequency: | 450 kHz |
| Disc player | |
| Usable disc: | CD/CD-R/CD-RW/USB/SD/MMC |
| Frequency response | 40 Hz -18 KHz |
| Signal to noise CD: | 55 dB |
| Line out | |
| Output: | 2 channel RCA line-out (2 V) |
| Bluetooth (option) | |
| Operation distance | 5 meters |
| Profiles supported | HFP, A2DP, OPP, AVRCP |
| Version | Bluetooth V2.0 |
Specifications are subject to change without notice. Dimensions are approximate.
- Table of contents
- Important safeguards
- Accessories
- Installation/Connections
- Notes:
- Din Front/Rear-Mount
- Remove the mechanism transit screw before installation
- DIN FRONT-MOUNT (Method A) Installation Opening
- Installing the unit
- Removing the unit
- DIN REAR-MOUNT (Method B)
- To Detach the Front Panel
- To Install the Front Panel
- Precautions when handling
- Controllers
- Front panel
- /SCAN button
- Back of the front panel
- General operations
- Resetting the unit
- Power ON/OFF
- Volume control
- Sound settings
- Mute function
- Mode selection
- LOUD function
- Display mode
- Equalizer
- System setting
- Radio operations
- BAND selection
- Tuning
- Automatic store/scanning
- Automatic memory storing
- Program scanning
- Station storing
- RDS (Radio Data System) function
- RDS mode ON/OFF
- PTY function
- RDS menu
- TA SEEK/TA ALARM
- RETUNE SHORT/LONG
- REGION: OFF/ON
- TA-VOLUME:
- TA (Traffic Announcement) function
- CD/MP3/WMA disc operations
- Discs for playback
- Loading/Ejecting a disc
- Pausing playback
- Playing the previous/next track
- Fast forward and backward playback
- Intro playback
- Repeat playback
- Random playback
- Selecting directory (for MP3, WMA modes)
- Selecting tracks (for MP3, WMA modes)
- SD/MMC card/USB operations
- Inserting the USB/SD/MMC device
- MP3 overview
- Notes on MP3 and WMA
- Notes on creating your own CD-Rs or CD-RWs containing MP3 files
- Bluetooth operatons
- Pairing
- Connect
- T-Menu
- Speed dial
- Make a speed dial call
- Preview the speed list
- Clear the speed dial list
- Edit the speed dial list
- Received list
- Dialed list
- Missed list
- Phone book (Mobile Phone)
- Phone book (SIM)
- Auto answer: ON/OFF
- Ring volume
- Answering/Rejecting an incoming call
- Making an outgoing call
- Transfer the call between mobile phone and the unit
- Bluetooth audio (A2DP function)
- Special operation for Bluetooth
- Handling compact discs
- Cleaning
- Cleaning the cabinet
- Cleaning discs
Brand : HYUNDAI
Model : H-CDM8055
Category : Car stereo