
H-CMD4002 - Car stereo HYUNDAI - Free user manual and instructions
Find the device manual for free H-CMD4002 HYUNDAI in PDF.

| Product Type | Car Stereo |
| Brand | Hyundai |
| Model | H-CMD4002 |
| Dimensions (W x H x D) | 188 x 58 x 160 mm (1 DIN) |
| Weight | 0.9 kg |
| Power Supply | 12V DC (negative ground) |
| Max Power Output | 4 x 50 Watts |
| Supported Disc Formats | CD, CD-R/RW, MP3, WMA |
| USB Playback | Yes (front USB port) |
| Auxiliary Input | Yes (3.5 mm front jack) |
| Radio Bands | FM/AM with RDS |
| Display Type | LCD with white illumination |
| Equalizer | Preset equalizer (Rock, Pop, Classic, etc.) |
| Remote Control | Included (wired or IR) |
| Detachable Faceplate | Yes (anti-theft) |
| Maintenance | Clean with soft dry cloth; avoid solvents |
| Spare Parts Availability | Contact Hyundai customer service |
| Repairs | Authorized service center only |
Frequently Asked Questions - H-CMD4002 HYUNDAI
User questions about H-CMD4002 HYUNDAI
0 question about this device. Answer the ones you know or ask your own.
Ask a new question about this device
Download the instructions for your Car stereo in PDF format for free! Find your manual H-CMD4002 - HYUNDAI and take your electronic device back in hand. On this page are published all the documents necessary for the use of your device. H-CMD4002 by HYUNDAI.
USER MANUAL H-CMD4002 HYUNDAI
MULTIMEDIA DVD/CD/MP3 RECEIVER WITH BUILT-IN 3.6" TFT DISPLAY AND TV TUNER
Instruction manual
Thank you for purchasing our product. For safety, it is strongly recommended to read this manual carefully before connecting, operating and/or adjusting the product and keep the manual for reference in the future.
Table of contents
Table of contents ......2
Important safeguards ....3
Accessories....4
Installation/Connection....5
Panel controls....10
General operation ...... 13
Radio operation....16
Disc operations....19
SD/USB operations 23
MP3 overview 24
iPod operations....26
AV in operations 27
Rear view camera operations 27
TV tuner operations....28
System setup menu....29
Handling discs....32
Cleaning 32
Troubleshooting guide ....33
Specification....34
Important safeguards
- Using the device at temperature below -10^ may cause the breakage of the device. Before using please heat up the passenger compartment to the recommended temperature!
- Disconnect the vehicle's negative battery terminal while mounting and connecting the unit.
- When replacing the fuse, be sure to use one with an identical amperage rating. Using a fuse with a higher amperage rating may cause serious damage to the unit.
- Do not attempt to disassemble the unit. Laser beams from the optical pickup are dangerous to the eyes.
- Do not use the unit in places where it can be exposed to water, moisture and dust.
- Make sure that pins or other foreign objects do not get inside the unit; they may cause malfunctions, or create safety hazards such as electrical shock or laser beam exposure.
- If you have parked the car for a long time in hot or cold weather, wait until the temperature in the car becomes normal before operating the unit.
• Do not open covers and do not repair yourself. Consult the dealer or an experienced technician for help. - Make sure you disconnect the power supply and aerial if you will not be using the system for a long period or during a thunderstorm.
- Make sure you disconnect the power supply if the system appears to be working incorrectly, is making an unusual sound, has a strange smell, has smoke emitting from it or liquids have got inside it. Have a qualified technician check the system.
- The unit is designed for negative terminal of the battery, which is connected to the vehicle metal. Please confirm it before installation.
- Do not allow the speaker wires to be shorted together when the unit is switched on. Otherwise it may overload or burn out the power amplifier.
Accessories
Receiver 1 pc
Remote controller 1 pc
USB cable 1 pc
Front panel protective case 1 pc
ISO connector 1 pc
iPod cable (option) 1 pc
Mounting parts:
Screw 5X5 4 pcs
Key 2 pcs
Mounting sleeve 1 pc
Back strap 1 pc
Rear mounting bolt 1 pc
Trim frame 1 pc
Instruction manual 1 pc
Consumer information 1 pc
Warranty card 1 pc
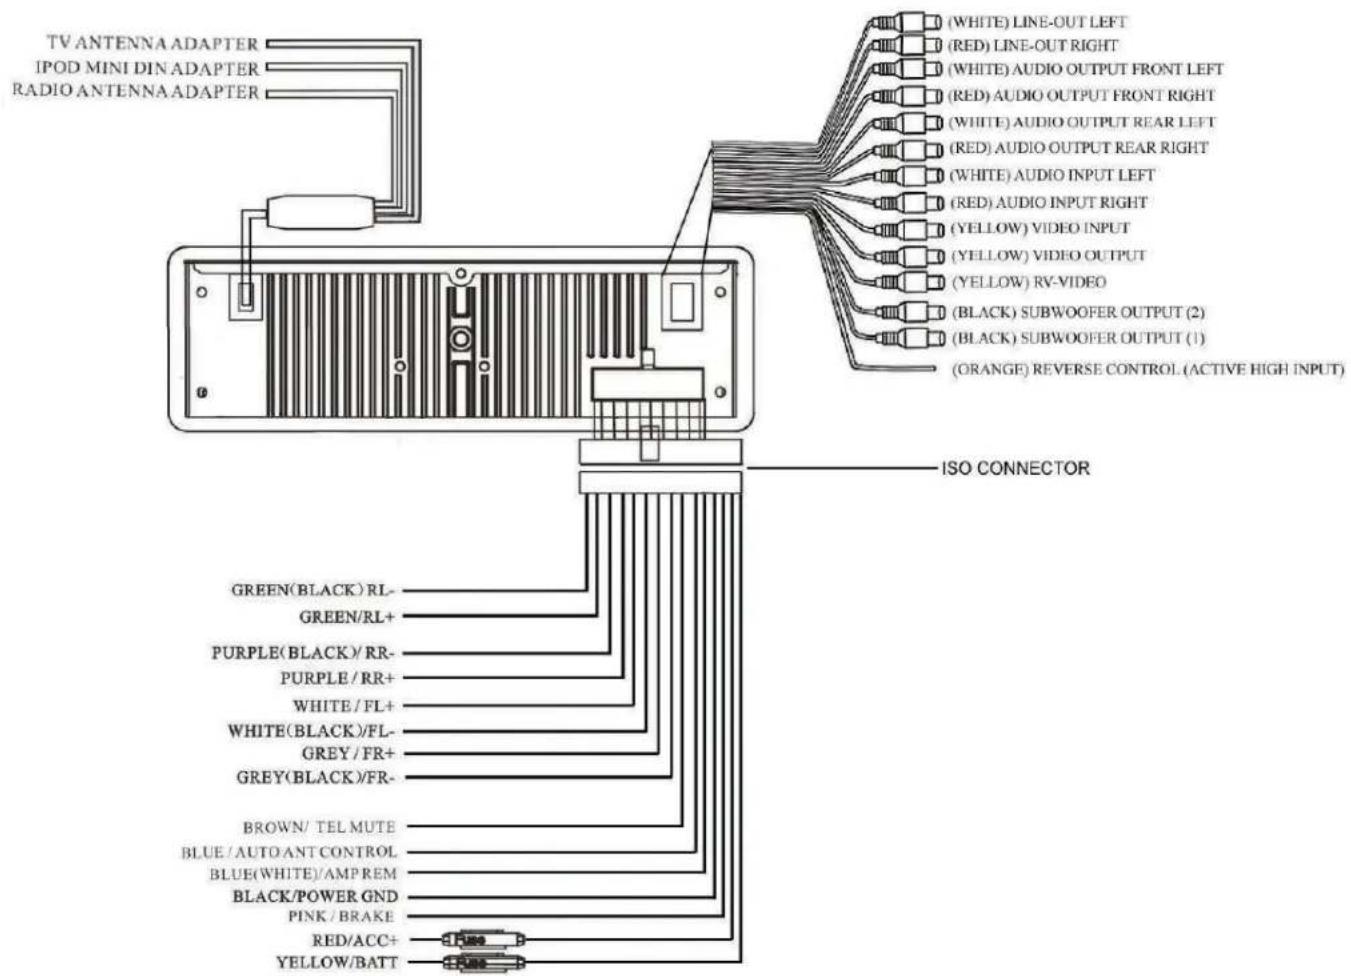
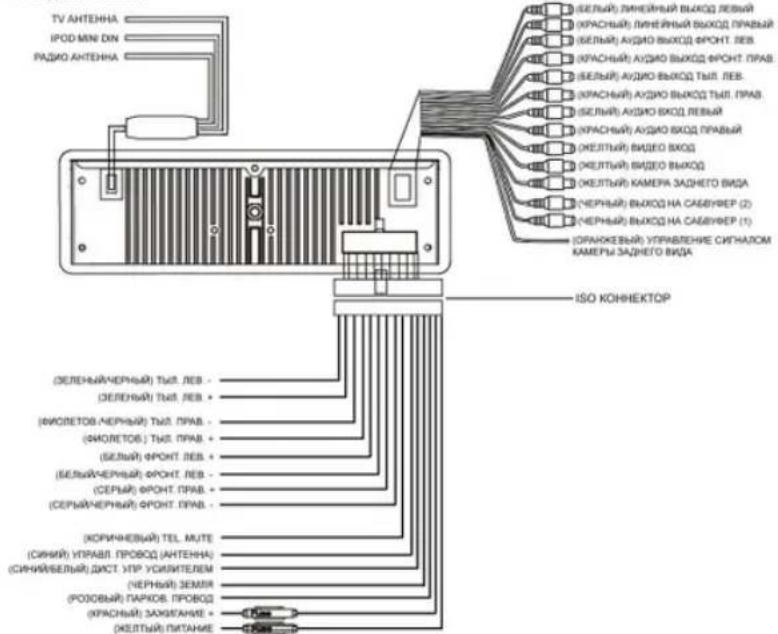
Installation/Connection
Installation method 1: DIN front mounting
flowchart
graph TD
    A["Input Process"] --> B{Transformation}
    B --> C["Output"]
    C --> D["Action: Press Bubble"]
    D --> E["Final Output"]
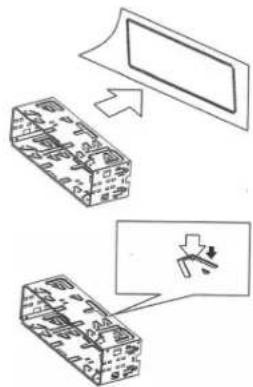
Install the mounting sleeve into the dashboard.
Bend as many claws outward for tight fit, to lock the sleeve into the place.
Install the trim frame to the unit.
natural_image
Exploded view diagram of an electronic device showing internal components and connection (no text or labels)Use the rear mounting bolt to support the unit.
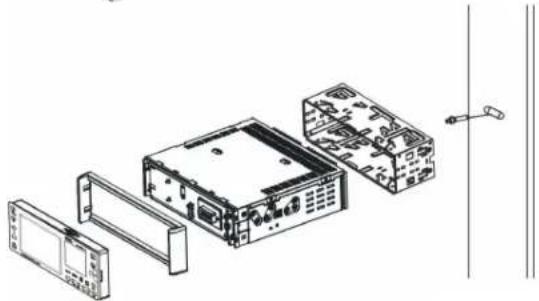
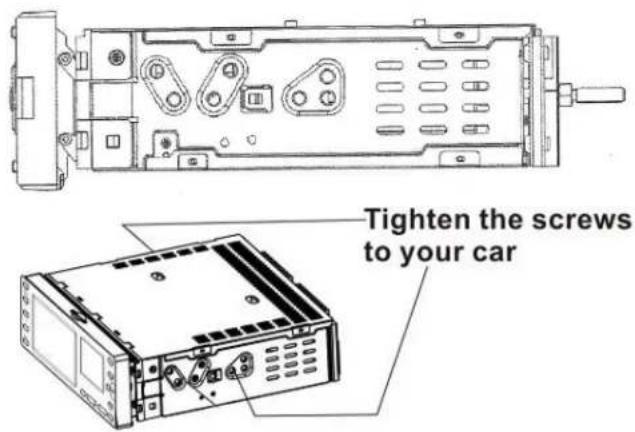
Installation method 2:
Using the screw holes at the sides of the unit.
Select a position where the screw holes of the mounting bracket supplied with the car and the screw holes of the main unit become aligned, tighten the screws on each side, and remount the brackets with the factory hardware in the original location.
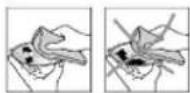
Unit removal
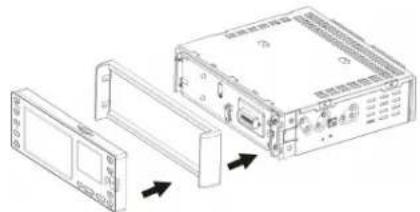
- Detach the front panel.
- Insert the keys supplied with the unit on both sides (as illustrated) as this will release the internal locks so you can slide the unit out.

flowchart
graph TD
    A["Device 1"] --> B["Server Rack"]
    B --> C["Internal Control Unit"]
    C --> D["External Control Unit"]
    D --> E["Back to Panel 1"]
    style A fill:#f9f,stroke:#333
    style B fill:#ccf,stroke:#333
    style C fill:#cfc,stroke:#333
    style D fill:#fcc,stroke:#333
Electrical connection
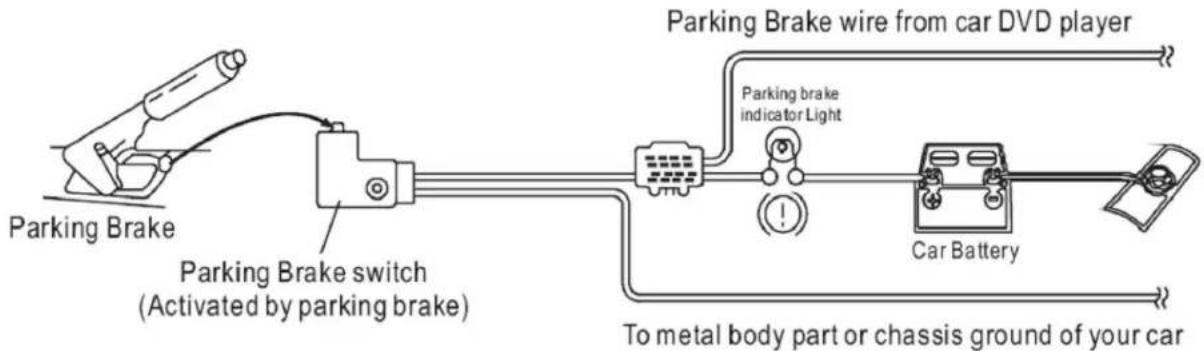
Brake wire
Note: The brake wire is connected with brake signal; for safety, the programs can be seen on the monitor after braking the car.
Connecting the reversing line to taillight on the car
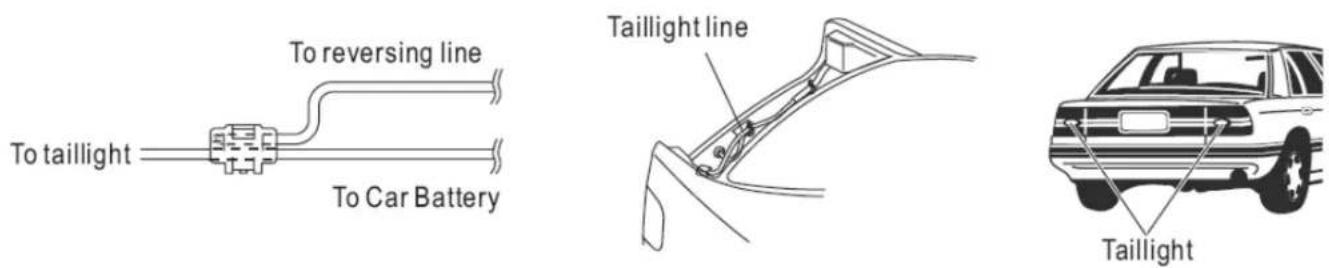
After connecting, when you start up the reverse gear, the unit will receive the picture from car rear view camera.
Telephone Mute Control
Connect the telephone mute control wire TEL_MUTE (see Wiring Diagram). If there is a vehicle call comes in, the sound volume will mute off automatically, and TFT monitor shows: PHONE...; when call finished, the sound volume will recover to former volume, and the words PHONE... disappear.
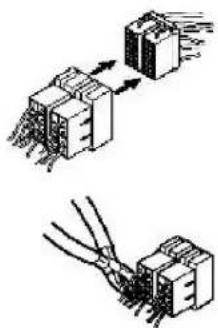
Using the ISO Connector
natural_image
Diagram showing three stages of connector assembly: wire connection, disassembly, and final assembly (no text or labels)-
If your car is equipped with the ISO connector, then connect the ISO connectors as illustrated.
-
For connections without the ISO connectors, check the wiring in the vehicle carefully before connecting, incorrect connection may cause serious damage to this unit.
Panel controls
Front panel
- POWER/SOURCE button
- PTY/SEL button
- VOL+ button
- VOL-button
- MUTE/TA button
- LCD display
- 1/PLAY/PAUSE button
- 2/3/PREV/NEXT buttons
- 4/5/FR/FF buttons 13. BAND/AST button
- 6/STOP button 14. EJECT/P.ANGLE button
- USB port 15. IR sensor
- OPEN button 16. Auxiliary display
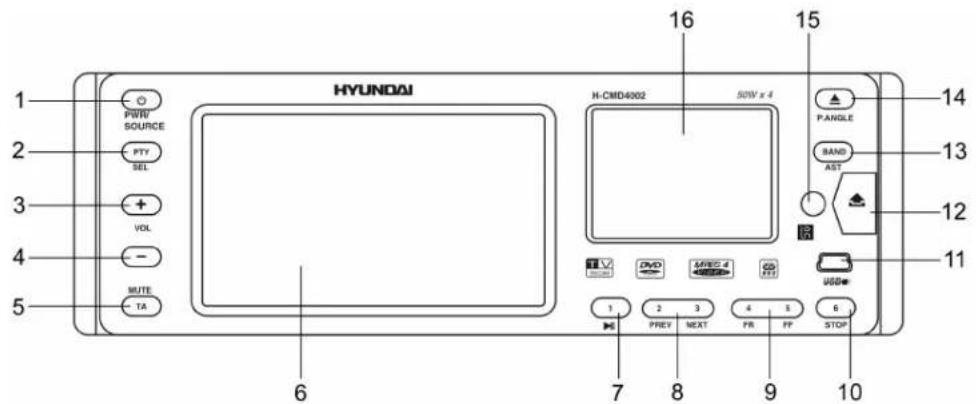
Inner panel
- Disc slot
- RESET button
10
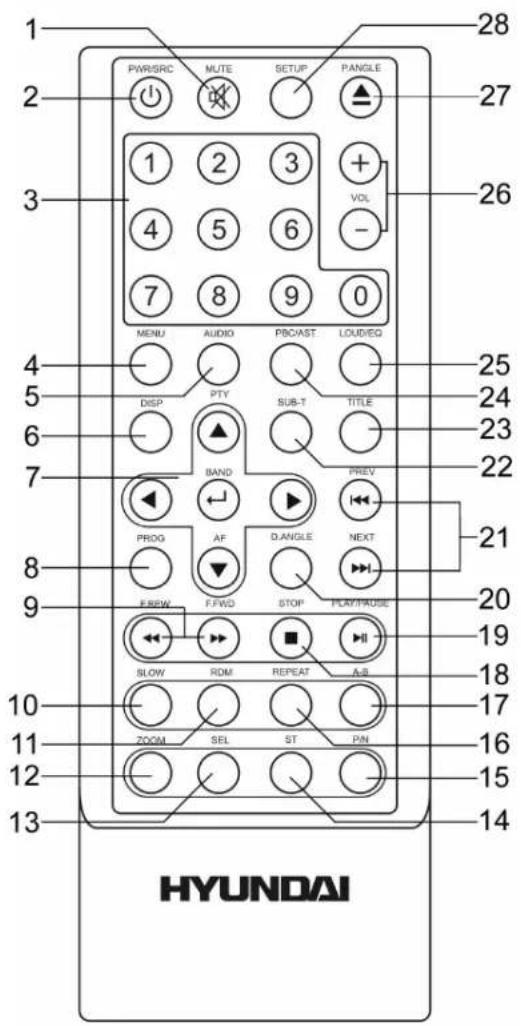
Remote control
- MUTE button
- POWER/SOURCE button
- Number buttons
- MENU button
- AUDIO button
- DISPLAY button
- Cursor buttons/BAND/ENTER/AF/PTY buttons
- PROGRAM button
-
F.REV/F.FWD buttons
-
SLOW button
-
RANDOM button
-
ZOOM button
-
SEL button
-
ST button
-
P/N button
-
REPEAT button
-
A-B button
-
STOP button
-
PLAY/PAUSE button
-
D.ANGLE button
-
NEXT/PREV buttons
-
SUBTITLE button
-
TITLE button 26. VOL+/- buttons
-
PBC/AST button 27. P.ANGLE/EJECT button
-
LOUD/EQ button 28. SETUP button
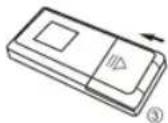
Changing the battery
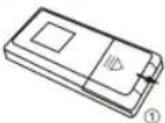
- Remove the battery cover. Follow the arrow (1) slide the tab to the right while pulling the cover away at the same time.
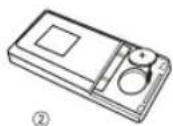
- Place the new battery in the tray and slide the cover back into place.
- Make sure the cover is locked into place.
Warning:
- Store the battery where children cannot reach. If a child accidentally swallows the battery, consult a doctor immediately.
- Do not recharge, short, disassemble or heat the battery or dispose it in a fire.
- Do not expose or bring into contact the battery with other metallic materials. Doing this may cause the battery to give off heat, crack or start a fire.
- When throwing away or saving the battery, wrap it in tape and insulate; otherwise, the battery may give off heat, crack or start a fire.
General operation
Reset the unit
Operating the unit for the first time or after replacing the car battery, you must press OPEN button to remove the front panel. Press and hold RESET button with a pointed object to restore the unit to the original factory settings.
Note: When some errors occur in the display, you can also press RESET button to resume to normal. It will erase the clock setting and some memorized functions.
Power on/off
Press POWER/SOURCE button on the panel or on the RC to turn the unit on. Press and hold POWER/SOURCE button to turn the unit off.
Note: After the unit is off, the volume level and radio current settings will be memorized, and when you turn the unit on it will resume the stored status, which you set.
Volume control
Press VOL+/- buttons on the RC or on the panel to adjust the volume level.
Mute function
Press MUTE button on the RC or MUTE/TA button on the panel to disable the sound. Press these buttons again or press VOL+/- buttons to resume the volume.
Mode control
Press repeatedly POWER/SOURCE button to select different source modes: RADIO => DVD inside) => SD (if a SD/MMC card is inserted) => USB (if a USB device is inserted) => TV => IPOD (if iPod is connected) => AV IN.
Clock setting
- Press any button except PWR/SRC, EJECT/P.ANGLE and OPEN buttons only under in power off mode, the current time will be displayed and disappear automatically 5 seconds later if no operation is done.
- Adjust time only in power off mode. Press PTY/SEL button to select items as following: PM/AM - HOUR - MINUTE. Press VOL+/- buttons to adjust the item selected.
- Under ASIA radio area, press MUTE button on the RC or MUTE/TA button on the panel to change the 12 hours or 24 hours format. Under USA radio area, the default hours format is 12 hours. Under EUROPE radio area, the default hours format is 24 hours.
The unit will display the time on the monitor in RADIO mode only. The time will be displayed on the additional screen.
LOUD function
Press and hold LOUD/EQ button on the RC to turn on/off LOUD function and to select one of the 3 available loudness levels. When turning on LOUD mode, it will enhance bass level when the bass is not enough.
Equalizer mode
Press LOUD/EQ button on the RC to select the preset music equalizer modes.
Setting the sound, picture and tuner characteristics
Press repeatedly SEL button on the RC to enter the Sound Parameter Setup, Picture Parameter Setup or Tuner Parameter Setup pages. Press UP/DOWN cursor buttons to move the cursor onto the adjustable items. Press LEFT/RIGHT cursor buttons to adjust the parameter value.
Sound Parameter Setup page:
FADER: F07 - CENT - R07 SUB VOL: 00 - 15
BALANCE: L07 - CENT - R07 SUB FREQ: 80Hz - 120Hz - 160 Hz
BASS: -07-00-+07
LCD: ON/OFF
TREBLE: -07 - 00 - +07
LOUDNESS: ON/OFF
EQ: USER - POP - CLASSIC - ROCK - USER
Picture Parameter Setup:
NTSC/PAL: AUTO - PAL - NTSC - ATUO
COLOR: 00 - 30
BRIGHT: 00 - 30
CONTRAST: 00 - 30
TINT: 00 - 30
RESET: press RIGHT/LEFT cursor buttons to restore the default parameters of picture.
Tuner Parameter Setup:
LOCAL: ON/OFF. When you are using the local searching function of LOCAL, you can only receive the radio station with strong signals.
STEREO: ON/OFF
AREA: EUROPE - ASIA - USA - JAPAN - OIRT-EUROPE. This tuner can be switched to work in different countries. Choose the area that works best for you.
TA VOLUME: 12 - 42
Viewing Angle Adjustment
Press and hold EJECT/P.ANGLE button to adjust the tilt angle of the front panel: Angle 1 => Angle 2 => Angle 3 => Angle 4 => Angle 1.
Radio operation
Band selection
Press BAND/ENTER button on the RC or BAND/AST button on the panel repeatedly to select FM1, FM2, FM3, MW1 (AM1), MW2 (AM2). Display will show the wave band, frequency and preset station number if already stored.
Manual/Automatic tuning
- Manual tuning: Press cursor LEFT/RIGHT buttons to adjust a frequency upward or downward step-by-step.
- Automatic tuning: Press and hold cursor LEFT/RIGHT buttons, the automatic search will start. It will play when finds the station. Press any button to stop searching.
Store function
You can store up to a total of 30 radio stations in the memory (18 FM, 12 AM).
• To store a station:
- Select a band (if needed)
- Select a station with cursor LEFT/RIGHT buttons.
- Press and hold for a number button (1-6), under which you want to store the station.
• To recall a station:
- Select a band (if needed)
- Press a number button (1-6) briefly to recall the stored station.
Auto memory store function
Press and hold BAND/AST button on the panel or PBC/AST button on the RC to enter auto store mode. The radio will automatically store the 6 strongest available stations to the 6 preset memories of the current band. To stop auto store, press any button.
Mono/Stereo selection
Press ST button to select the channel mode: MONO or STEREO. When Stereo reception is activated, "STEREO ON" appears on the display.
RDS function
RDS (Radio Data System) service availability varies with areas. Please understand if RDS service is not available in you area, the following service is not available, either.
AF (Alternative Frequencies) function
Press AF button on the RC to switch on/off AF function. When searching an RDS station, the letters “AF” will flicker on the display; when receiving an RDS station, “AF” will be displayed without flickering on the display.
If the reception becomes poor, the same station will be searched automatically for 60 seconds and “PI SEARCH” will be displayed on the display. In AF mode, during the station search, press DISPLAY button to display following information: program, program name, type, frequency, time.
TA (Traffic Announcement) function
Press and hold MUTE/TA button to activate the Traffic Announcement mode, the letters “TP” will flicker on the display; when receiving the TP signal, “TA TP” will be displayed without flickering on the display.
In any mode, the unit will automatically switch to radio mode and broadcast the traffic announcement when the traffic announcement begins.
Press MENU button to set up the initialization volume of TP, no matter how loud the volume is mode, it will broadcast the traffic announcement at the same sound level; to increase the volume level of the TA, press EQ/SEL button on the unit until TAVOL is displayed on the LCD, then use VOL+/- buttons to adjust the level.
When listening to the traffic announcement, use the volume button to adjust the level, but if the volume is louder than the TA initialization volume level, it will not be possible to adjust the volume.
When the signal of the Traffic-Program identification (TP) is bad, there will be a beep sound. The volume setup of the beep sound is the same as the TA initialization volume.
PTY (Program Type) function
Press PTY/SEL button on the panel or PTY button on the RC to activate the PTY mode. During search the letters "PTY" will flicker on the display; when the station is found, "PTY" will be displayed without flickering. In the PTY mode, press PBC/AST button on the RC or BAND/AST button on the unit to scan and store stations under the 1-6 number buttons. Press and hold this button to set up the program, using VOL+/-buttons make your selection and press BAND/ENTER button to confirm.
Following options are available: NEWS, AFFAIRS, INFO, SPORT, EDUCATE, DRAMA, CULTURE, SCIENCE, VARIED, POP M, ROCK M, D.RMUSIC, LIGHT M, CLASSICS, OTHER M, WEATHER, FINANCE, CHILDREN, SOCIAL, RELIGION, PHONE IN, TRAVEL, LEISURE, JAZZ, COUNTRY, NATION M, OLDIES, FOLK M, DOCUMENT, TEST, ALARM. The default program is NEWS.
Disc operations
Disc glossary
PBC (Play Back Control)
PBC is a menu recorded on the disc with SVCD or VCD2.0 format. For the discs contained PBC, it can playback interactive software with the menu displayed on TV. And if the disc contains still images, it can playback high definition of still image.
Title
The title is the important part of DVD disc. The memory volume of the disc is rather big, that makes possible to record several films on one disc. For example, if a disc contains three films, they may be divided into Title 1, Title 2 and Title 3. You can easy use the functions of looking-for.
Chapter
A title can be divided into several blocks, so that every block can be operated as a unit, the unit is called chapter. The chapter contains a unit at least.
Track
It is the biggest component of VCD. Generally, every song of karaoke disc is a track.
Loading a disc
Press EJECT/P.ANGLE button to flip the front panel down. Insert the disc with the printed side facing upward into the slot. The panel will slide back automatically. The disc will be loaded and played automatically.
Ejecting Disc
Press EJECT button, the front panel will slide down to position 1; then eject the disc; the panel will slide back automatically after 30 seconds if no action is taken.
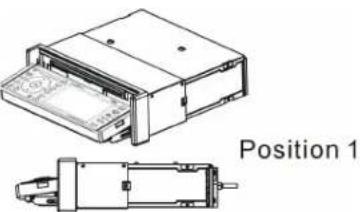
natural_image
Technical line drawing of a device with two views: top shows internal components, bottom shows a close-up view labeled 'Position 1' (no text or symbols on the diagram itself)Play/Pause
Press PLAY/PAUSE button to play or pause the disc.
Stop
During disc playback, press STOP button once; the DVD player memorizes the location where you stopped (press PLAY/PAUSE button to resume playing from the memorized location).
If you press STOP button twice for complete stop, the playback will start from the beginning of the disc when you press again PLAY/PAUSE button.
F.FWD/F.REV
Press F.FWD/F.REV buttons to select fast forward/reverse search. Pressing the buttons on the RC performs the same operation. Press PLAY/PAUSE button to resume to normal playback.
Previous/Next
Press NEXT/PREV buttons to go to the next or pervious chapter, track or song.
Display
Press DISPLAY button to display the current playback information on the screen.
Zoom
Press ZOOM button during normal playback to zoom the picture. Press it repeatedly to switch between the
zoom levels.
Repeat
Press REPEAT button to repeat the same track; press it twice to repeat all tracks. When playing a DVD disc, pressing once will repeat the same chapter but pressing twice will repeat the entire title.
Angle
Press D.ANGLE button during playback to select different viewing angles with interactive DVD media.
PBC
PBC is available in VCD mode as playback control switch.
Menu
Menu is available in DVD mode as playback control panel.
Audio
When playing a DVD disc, press AUDIO button to select one of the available audio languages.
Subtitle
For DVD disc, press SUBTITLE button to select one of the available subtitle languages.
Program
When playing a DVD/VCD disc (PCB off) or a CD disc, press PROGRAM button to enter the program status; press number buttons to enter the number of the track you want to play. To exit, press PROGRAM button again.
Slow
Press SLOW button to activate the slow playback (DVD discs only).
P/N
Press P/N button to select the video output format (PAL/NTSC).
Random
Press RANDOM button to shuffle all tracks. Press it again to return to the normal playback mode from the f track (CD mode only.)
Note: This unit only supports ID3 tags in Latin letters. No Russian ID3 tags are supported.
SD/USB operations
- Press POWER/SOURCE button to switch to SD or USB mode if SD/MMC card or mini USB connected.
- The unit will switch to SD or USB mode automatically if SD/MMC card or mini USB connected.
- The unit will switch to RADIO mode automatically when SD/MMC card or mini USB disconnected if there is no disc in the unit; the unit will switch to DVD mode automatically when SD/MMC card or USB disconnected if there is a disc in the unit.
- Under the SD or USB mode, all operations are same as DVD mode.
MP3 overview
Notes on MP3:
• MP3 is short for MPEG Audio Layer 3 and refers to an audio compression technology standard.
• This product allows playback of MP3 files on CD-ROM, CD-R or CD-RW discs.
- The unit can read MP3 files written in the format compliant with ISO 9660. However it does not support the MP3 data written by the method of packet write.
- The unit can not read an MP3 file that has a file extension other than ".mp3".
- If you play a non-MP3 file that has the ".mp3" extension, you may hear some noise.
- In this manual, we refer to what are called "MP3 file" and "folder" in PC terminology as "track" and "album", respectively.
- Maximum number of directory level is 8, including the root directory. Maximum number of files and folders per disc is 256.
• The unit may not play tracks in the order of Track numbers.
• The unit plays only the audio tracks if a disc contains both audio tracks and MP3 files.
- When playing a disc of 8 kbps or "VBR", the elapsed playing time in the display window will not be correct and also the intro play may not function properly. "VBR": Variable Bit Rate.
- The unit supports the playback of WMA files. The playback of ID3 tags for WMA format is not guaranteed, it depends on versions and availability of Cyrillic alphabet.
- WMA (Windows Media Audio) – music data compression format, created by Microsoft Corporation. This format uses coding algorithm for compression of initial audio-record, greatly decreasing the file size, but, saving the good sound quality even when the bit rate is low (for example, 64 Kbit/s).
- Remember that the unit may not play the tracks in order they are written on disc.
Notes on creating your own CD-R or CD-RW containing MP3 files:
- To enjoy high quality sound, we recommend converting to MP3 files with a sampling frequency of 44.1 kHz and a fixed bit rate of 128 kbps.
• Do not store more than 448 MP3 files per disc.
- For ISO 9660 - compliant format, the maximum allowable depth of nested folders is 8, including the root directory (folder).
- When CD-R disc is used, playback is possible only for discs, which have been finalized.
- Make sure that when MP3 CD-R or CD-RW is burned that it is formatted as a data disc and NOT as an audio disc.
- You should not write non-MP3 files or unneeded folders along with MP3 files on the disc otherwise it takes a long time until the unit starts to play MP3 files.
- With some CD-R or CD-RW media, data may not be properly written depending on its manufacturing quality. In this case, data may not be reproduced correctly. High quality CD-R or CD-RW disc is recommended.
- Up to 16 characters are displayed for the name of an Album or a Track. ID3TAG version 1.x is required.
• Note that the unit may not play Tracks in the order that you wrote them to the disc.
iPod operations
Note: It is available for iPod operations with an additional iPod cable, which is an optional accessory.
- The number of current track 4. The total time of current track
- The total tracks in the list 5. Playback Time.
- The name of current track

The unit will switch to IPOD mode automatically if an iPod connected. Or press POWER/SOURCE button to switch to IPOD Mode if an iPod is connected. The unit will switch to RADIO mode automatically when the iPod is disconnected.
Music: Under the IPOD Mode, using the controllers of the iPod is not effective; use the controllers of this unit to control the operation. All operations are the same as for DVD Mode.
Picture and video: Press and hold STOP button to switch the operation control to iPod itself. It is necessary for using the controller of the iPod to control all operations of the iPod when watching videos and pictures. Pres and hold STOP button again to switch to operate music playback of the iPod by controllers of this unit.
Note: The TV output in the iPod setup should be effective to enable pictures and videos display on the monitor of the unit.
AV in operations
Press POWER/SOURCE button to switch to AV IN mode. There are 2 RCA audio inputs and input for unit.
Rear view camera operations
When you are backing the car, the unit will switch to Rear View mode automatically if a rear view camera is connected. The monitor will display the picture taken by the back view camera. The unit will return to the previous operation mode when you stop backing the car.
When the car ACC is on and the unit power is off, the unit will power on automatically and switch to Rear view mode when you are backing the car. The unit will power off automatically when you stop backing the car.
Note: Under the Rear View mode, power off, monitor angle adjustment, telephone mute and volume adjustment functions are working only.
TV tuner operations
Press POWER/SOURCE button to switch to TV mode.
Select the station directly
Press number buttons on the RC to select the station directly. For example, press 2 to select station 2; press 1 and 2 to select station 12.
Automatic tuning
Press and hold PREV/NEXT buttons to seek the next available channel by increasing/decreasing the tuning frequency. Automatic tuning will stop automatically when find an available channel, then play this channel. Press any button to stop seeking. The unit will stop on the initial frequency if no available channel after seeking through one cycle is found.
AST
Press BAND/AST button on the unit or PBC/AST button on the RC to seek all available stations from the lowest frequency. After seeking, press UP/DOWN cursor buttons to select the stations upward/downward. Press any button to stop seeking. The unit will stop on the initial frequency if no available channel after seeking through one cycle is found.
Preset stations
Press and hold number buttons 1-6 on the panel to store the current channel under corresponding number.
Recall a preset station
Press the number buttons 1 to 6 on the panel to recall the corresponding stored station in 1\~6 channels.
System setup menu
- Press SETUP button on the RC to display the system setup menu.
- Use LEFT/RIGHT cursor buttons on RC to select the desired menu: System setup, Language setup, Video setup, Speaker setup, Digital setup.
- Press DOWN cursor button to enter it.
- Use UP/DOWN cursor buttons to select the desired setting.
- Press RIGHT to enter the setting adjustment subwindow.
- Press UP/DOWN cursor buttons to select the option of the setting and press BAND/ENTER button to confirm it.
System setup
• TV system
This unit is suitable for all kinds of TV systems. You can select:
NTSC: this system is used in USA, Taiwan, Japan etc.
PAL: this system is used in China, Europe, Hong Kong etc.
PAL60: this system is used in Brazil etc.
Auto: the TV system is auto switched according to the disc system.
- Screen saver
The screen saver appears if disc stops for several minutes.
• TV type
4:3 PS: When the unit connects to the normal TV set, the wide-screen image shows on the full screen, but some part is cut off.
4:3 LB: When the unit connects to the normal TV set, the wide-screen image shows and black bars appear on the top and bottom of screen.
16:9: Use this item when the unit is connected with the wide screen TV set.
| System Setup |
| TV system |
| Screen saver |
| TV type |
| Password |
| Rating |
| Default |
| Exit setup |
- Password
Here you can change the password. Insert your old password or 0000 (the general one). Insert the new password. Insert it again. Press OK to save the new password.
- Rating
The rating level is for parents to control playing content and protect your children from violence and erotic. The disc, the level of which is higher than the setting level cannot be played.
To change the parental control level you should enter the password (yours or the general one: 0000).
- Default
Reset to the initial factory setups.
Language setup
- OSD language
Select the OSD language.
- Audio language
Select the audio language (if DVD disc supports several audio languages).
- Subtitle language
Select the subtitle language (if DVD disc supports several subtitle languages).
- Menu language
Select the DISC menu language (if DVD disc supports several menu languages).
- DivX language
Select DIVX language (if DivX disc supports several languages).
• DivX [R] vod
Registration code of DivX.
Language Setup
OSD language
Audio lang
Subtitle lang
Menu lang
DivX lang
DivX [R] vod
Exit setup
Video setup
• Brightness, Contrast, Hue, Saturation
You can set the Brightness, Contrast, Hue, Saturation according to your preference.
Video Setup
Brightness
Contrast
Hue
Saturation
Speaker setup
- DOWNMIX
LT/RT: The audio out is Left and Right channels format even if the original sound is 5.1CH format.
Stereo: The audio out format is stereo even if the original sound is 5.1CH format.
VSS: The audio format Advanced Virtual Surround Sound.
Speaker Setup
Downmix
Exit setup
Digital setup
• DYNAMIC RANGE
If watching large dynamic scope movie program at night, to select this mode you can reduce the volume to a very low level, at the same time, to keep the fine details sounds. In this case, this doesn't disturb the family and keep the quality sounds.
• DUAL MONO
Stereo: stereo output signal.
Mono L: left output signal.
Mono R: right output signal.
Mix Mono: left and right output average signal.
Digital Setup
Dynamic range
Dual mono
Exit setup
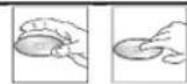
Handling discs
- Dirty, scratched or warped discs may cause skip ping or noise.
- Handle the disc only by the edges. To keep clean do not touch its surface.
• Discs should be stored in their cases after use to avoid scratches. - Do not expose discs to direct sunlight, high humidity, high temperature or dust.
- Prolonged exposure to extreme temperature can wrap the disc (such as leaving the discs in your car during summertime).
- Do not stick or write anything on either side of disc. Sharp writing instruments, or the inks used in some felt-tip pens, may damage its surface.
- Do not touch the unlabeled side. Do not attach any seal, label or data protection sheet to either side of a disc.
Cleaning
Cleaning the cabinet
Wipe with a soft cloth. If the cabinet is very dampen (not dropping wet) the cloth with a weak solution of soapy water, and then wipe clean.
Cleaning discs
Fingerprints should be carefully wiped from the surface of disc with a soft cloth. Unlike conventional records, compact discs have no grooves to collect dust and macroscopic dirt, so gently wiping them with a soft cloth
should remove must panicles. Wipe in a straight motion from the center to the edge. Never use thinner benzine, record cleaner or anti static spray on a compact disc. Such chemicals can damage its plastic surface.
Troubleshooting guide
| Symptom Cause Solution | ||
| No power | The car ignition is not on.The fuse is blown. | If the power supply is properly connected to the car accessory switch the ignition key to “ACC”.Replace the fuse. |
| Disc cannot be loaded. Presence of disc inside the player. | Remove the disc in the player then put a new upward. | |
| Disc cannot be read. Inserting the disc in upside down.Compact disc is extremely dirty or defective.Temperature inside the car is not within the admissible range. | Insert the compact disc with the label facing upward.Clean the disc or try to play a new one.Ensure that the ambient temperature returned to normal. | |
| No sound Volume is in minimum.Wiring is not properly connected. | Adjust volume to a desired level.Check wiring connection. | |
| The operation keys do not work. | The built-in microcomputer is not operating properly due to noise.Front panel is not properly fix into its place. | Press RESET button.Reinstall the front panel. |
| Sound skips. The installation angle is more than 30 degrees.The disc is extremely dirty or defective. | Adjust the installation angle to less than 30 degrees.Clean the compact disc/try to play a new one. | |
| The radio does not work, the radio station automatic selection does not work. | The antenna cable is not connected the signals are too weak. | Insert the antenna cable firmly select a station manually. |
Specification
| General | |
| Power supply: | 14.4 V DC |
| Maximum power output: | 50 W x 4 channels |
| Compatible formats: | DVD/SVCD/DVCD/VCD/MPEG4 (DivX)/XviD/DVD audio/Super Audio CD/CDDA/MP3/WMA/HDCD/ Picture-CD/Photo-CD/JPEG |
| Supported disc types: | DVD/DVD±R/DVD±RW/CD/CD-R/CD-RW/USB/SD/MMC |
| Dimensions (D x W x H) | 187 x 188 x 60 mm |
| ESP function: | 40 sec. for Audio CD, 120 sec. for MP3 |
| TFT display | |
| Screen size: | 3.6" TFT |
| Resolution: | 480 x 272 |
| Aspect ratio: | 16:9 |
| Contrast: | 450:1 |
| Brightness: | 400 cd/m² |
| View angle: | V: 120°, H: 120° |
| FM Stereo Radio | |
| Frequency range: | 65.0 – 74.0/87.5 – 108.0 MHz |
| Preset memory stations: | 18 |
| AM section | |
| Frequency range: | 522 kHz - 1620 kHz |
| Preset memory stations: | 12 |
| Audio specification | |
| S/N ratio: | ≥80dB (1 KHz) |
| Separation | ≤0.5% |
| Line out | |
| Output: | 4 channel RCA line-out (2V) |
Specifications are subject to change without notice. Dimensions are approximate.
natural_image
Exploded view diagram of a computer interface showing internal components and connection (no text or labels)natural_image
Technical line drawing of a mechanical or electronic component with ports and connectors (no text or symbols)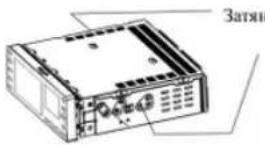
Снятие устройства
natural_image
Exploded view diagram of an electronic device showing internal components and casing (no text or labels)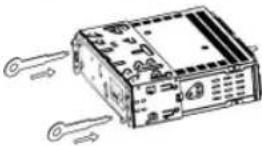
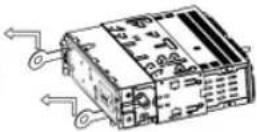
Схема подключений
- Table of contents
- Important safeguards
- Accessories
- Installation/Connection
- Installation method 2:
- Unit removal
- Brake wire
- Connecting the reversing line to taillight on the car
- Telephone Mute Control
- Using the ISO Connector
- Panel controls
- Front panel
- Inner panel
- Remote control
- Changing the battery
- Warning:
- General operation
- Reset the unit
- Power on/off
- Volume control
- Mute function
- Mode control
- Clock setting
- LOUD function
- Equalizer mode
- Setting the sound, picture and tuner characteristics
- Viewing Angle Adjustment
- Radio operation
- Band selection
- Manual/Automatic tuning
- Store function
- Auto memory store function
- Mono/Stereo selection
- RDS function
- AF (Alternative Frequencies) function
- TA (Traffic Announcement) function
- PTY (Program Type) function
- Disc operations
- Disc glossary
- PBC (Play Back Control)
- Title
- Chapter
- Track
- Loading a disc
- Ejecting Disc
- Play/Pause
- Stop
- F.FWD/F.REV
- Previous/Next
- Display
- Zoom
- Repeat
- Angle
- PBC
- Menu
- Audio
- Subtitle
- Program
- Slow
- P/N
- Random
- SD/USB operations
- MP3 overview
- Notes on MP3:
- Notes on creating your own CD-R or CD-RW containing MP3 files:
- iPod operations
- AV in operations
- Rear view camera operations
- TV tuner operations
- Select the station directly
- Automatic tuning
- AST
- Preset stations
- Recall a preset station
- System setup menu
- System setup
- - Password
- - Rating
- - Default
- Language setup
- - OSD language
- - Audio language
- - Subtitle language
- - Menu language
- - DivX language
- • DivX [R] vod
- Video setup
- Speaker setup
- Digital setup
- Handling discs
- Cleaning
- Cleaning the cabinet
- Cleaning discs
- Снятие устройства
Brand : HYUNDAI
Model : H-CMD4002
Category : Car stereo