
BFD63SS - Dishwasher BAUMATIC - Free user manual and instructions
Find the device manual for free BFD63SS BAUMATIC in PDF.


| Product Type | Built-in Dishwasher |
| Brand | Baumatic |
| Model | BFD63SS |
| Capacity (Place Settings) | 12 |
| Energy Efficiency Class | A+ |
| Noise Level | 49 dB(A) |
| Number of Programs | 6 |
| Dimensions (H x W x D) | 820 x 598 x 570 mm |
| Weight | 45 kg |
| Power Consumption (per cycle) | 1.05 kWh |
| Water Consumption (per cycle) | 11 L |
| Drying Performance Class | A |
| Control Panel Type | Electronic with LED Display |
| Salt and Rinse Aid Indicator | Yes |
| Delay Start | Yes (up to 9 hours) |
| Safety Features | Child Lock, Anti-Flood System, Water Stop |
| Tub Material | Stainless Steel |
| Cutlery Basket | Yes, Removable |
| Adjustable Upper Basket | Yes |
| Half Load Option | Yes |
| Self-Cleaning Filter | Yes |
| Warranty | 2 Years |
Frequently Asked Questions - BFD63SS BAUMATIC
User questions about BFD63SS BAUMATIC
0 question about this device. Answer the ones you know or ask your own.
Ask a new question about this device
Download the instructions for your Dishwasher in PDF format for free! Find your manual BFD63SS - BAUMATIC and take your electronic device back in hand. On this page are published all the documents necessary for the use of your device. BFD63SS by BAUMATIC.
USER MANUAL BFD63SS BAUMATIC
PLEASE READ THIS MANUAL AND KEEP IT FOR FUTURE REFERENCE! THIS MANUAL CONTAINS SECTIONS OF SAFETY INSTRUCTIONS, OPERATING INSTRUCTIONS & TROUBLESHOOTING TIPS, ETC.
BAUMATIC
natural_image
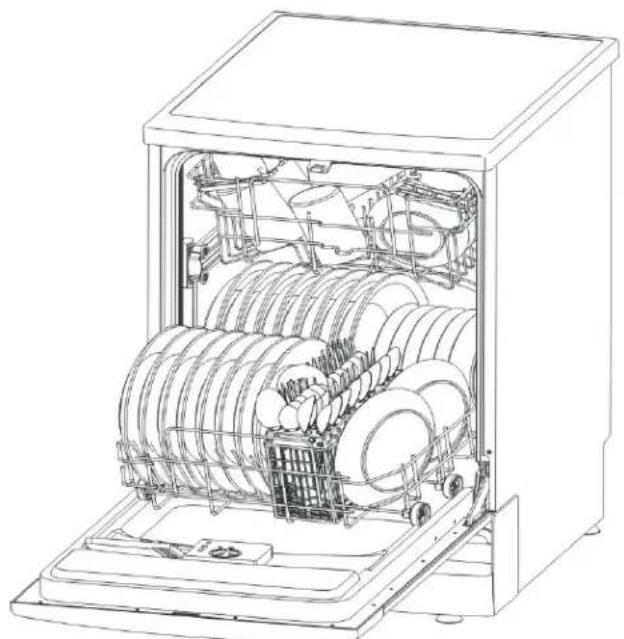
Line drawing of an open kitchen appliance with multiple dish units and a basket (no text or symbols)BFD63SS - DISHWASHER
60CM FULL HEIGHT DISHWASHER
INSTRUCTION MANUAL
CAREFULLY READING IT BEFORE USING THE DISHWASHER WILL HELP YOU USE AND MAINTAIN THE DISHWASHER PROPERLY.
09/01/06

natural_image
Gray magnifying glass icon with a question mark inside, no text or symbols presentBEFORE CALLING FOR SERVICE
REVIEWING THE SECTION ON TROUBLESHOOTING TIPS WILL HELP YOU SOLVE SOME COMMON PROBLEMS WITHOUT THE NEED TO ASK FOR HELP FROM PROFESSIONAL TECHNICIANS.

PLEASE NOTE:
THE MANUFACTURER RESERVES THE RIGHT TO MAKE MODIFICATIONS TO PRODUCTS WITHOUT GIVING PRIOR NOTICE.
CONTENTS
• SAFETY FIRST!
SAFETY INFORMATION ....3
* Please read this before using your dishwasher!
• KNOWING YOUR DISHWASHER
CONTROL PANEL 4
DI SHW ASHER FEATURES ....4
• USING YOUR DI SHWASHER
WATER SOFTENER 5-6
DETERGENT 6
RINSE AID 7
LOADING YOUR DISHWASHER......8-11
STARTING A WASH CYCLE 12-14
UNLOADING AT THE END OF A CYCLE.....14
FILTERING SYSTEM 15
CLEANING AND MAINTAINING
YOUR DISHWASHER 15-17
• BEFORE YOU CALL FOR SERVICE...
TROUBLESHOOTING 18-21
ERROR CODES 22
• MISCELLANEOUS
CHARACTERISTICS ......23
HOW TO INSTALL 24-29
FINAL CHECKLIST BEFORE STARTING.....29
CONDITIONS OF GUARANTEE....30
CONTACT DETAILS....31
IMPORTANT SAFETY INFORMATION
WARNING!
READ BEFORE USING!

ELECTRICAL SAFETY
CE This appliance complies with Directives 89/S36/EEC, 73/23/EEC and following changes.
- NOTE - This appliance must be grounded. In the event of a malfunction or breakdown, grounding will reduce the risk of electric shock by providing a path of least resistance of electrical current. You will be able to tell if it is because a non-grounded appliance will give off an electrical discharge.
- Manufacturer declines all responsibility for any damage due to non-grounding of appliance.
• DURING THE GUARANTEE PERIOD ONLY BAUMATIC SERVICE ENGINEERS OR AN AUTHORISED AGENT OF BAUMATIC SHOULD CARRY OUT REPAIRS ON THIS UNIT.
• DO NOT USE IF THE SUPPLY CORD IS DAMAGED. - FOR INSTALLATION PROCEDURE PLEASE CONSULT PAGES 24 - 29.
BEFORE USING
SOME ITEMS ARE UNSUITABLE FOR WASHING IN YOUR DISHWASHER. PLEASE SEE PAGE 8 FOR A LIST OF THESE ITEMS.
DO NOT TAMPER WITH THE CONTROLS. WHEN LOADING ITEMS TO BE WASHED:
1) Keep sharp items like knives away from the door seal.
2) Load sharp knives with the handles up to prevent injuries.
ONLY USE AUTOMATIC DISHWASHER
DETERGENT, NOT SOAP OR LAUNDRY DETERGENT. NEVER USE SOLVENTS AS THIS COULD RESULT IN AN EXPLOSION!
CHILD SAFETY
- DO NOT ABUSE OR FORCE THE DISHWASHER. DO NOT SIT ON OR STAND ON ITS DOOR OR DISH RACKS - TIPPING HAZARD.
- KEEP CHILDREN AWAY FROM DETERGENT, RINSE AID AND THE OPEN DOOR OF THE DISHWASHER AS THERE COULD BE DETERGENT LEFT INSIDE.
• SUPERVISE YOUNG CHILDREN TO ENSURE THEY DO NOT PLAY WITH THE APPLIANCE. - SUPERVISE INFIRM PERSONS IF THEY MUST USE THE APPLIANCE.
- REMOVE THE DOOR TO WASHING COMPARTMENT OF YOUR OLD APPLIANCE BEFORE DISCARDING IT.
DURING USE
• DO NOT TOUCH THE HEATING ELEMENT DURING OR IMMEDIATELY AFTER USE.
- DO NOT USE YOUR DISHWASHER UNLESS ALL ENCLOSURE PANELS ARE PROPERLY IN PLACE. OPEN THE DOOR VERY CAREFULLY IF THE DISHWASHER IS OPERATING. THERE IS A RISK OF WATER SQUIRTING OUT.
AFTER USE
- ALWAYS KEEP THE DOOR CLOSED TO AVOID DANGER OF TRIPPING.
- CHECK THAT THE DETERGENT DISPENSER IS EMPTY AFTER COMPLETION OF WASH CYCLE.
- IF LEAVING UNUSED FOR A LONG TIME, DISCONNECT THE WATER SUPPLY (SEE PP. 17, 26).
READ AND FOLLOW THIS SAFETY INFORMATION CAREFULLY BEFORE USING YOUR DISHWASHER FOR THE FIRST TIME!
CONTROL PANEL

flowchart
graph TD
    A["ON/OFF"] -->|1| B["BFD055"]
    B --> C["1"]
    C --> D["2"]
    D --> E["3"]
    E --> F["4"]
    F --> G["5"]
    G --> H["6"]
    H --> I["7"]
    I --> J["8"]
    J --> K["9"]
    K --> L["10"]
1 Power Switch: Turns YOUR DISHWASHER ON/OFF. NOTE: THE SWITCH SHUTS OFF AUTOMATICALLY APPROXIMATELY 3 MINUTE AFTER WASHING CYCLE HAS ENDED.
2 Language Button: Selects English, Italian, French, German, Spanish or Portuguese languages. Press this button at any time to select the language you want to read from the display.
3 Rinse Aid Warning Light: Add more rinse aid as the indicator on the front panel lights up.
4 Display Window: Shows Program remaining time; delay time; running indicator; water temperature; fault codes, etc.
5 Program Button: Select different program according to the soiled level, such as INTENSIVE, NORMAL, and RINSE.
6 Delayed Start Button: Press this button to set the delayed hours for washing. You can delay up to 9 ½ hours.
7 Temperature Button: Selects different temperature of washing by pressing the button.
8 Start / Pause: Press this button to start or pause the dishwasher.
9 Salt Warning Light: Add more salt as the indicator on the front panel lights up.
10 Door Handle: Pull it to open the door. The machine will stop when the door is opening.
WARNING - BEWARE OF HOT WATER & STEAM AS YOU OPEN THE DOOR!
DI SHW ASHER FEATURES
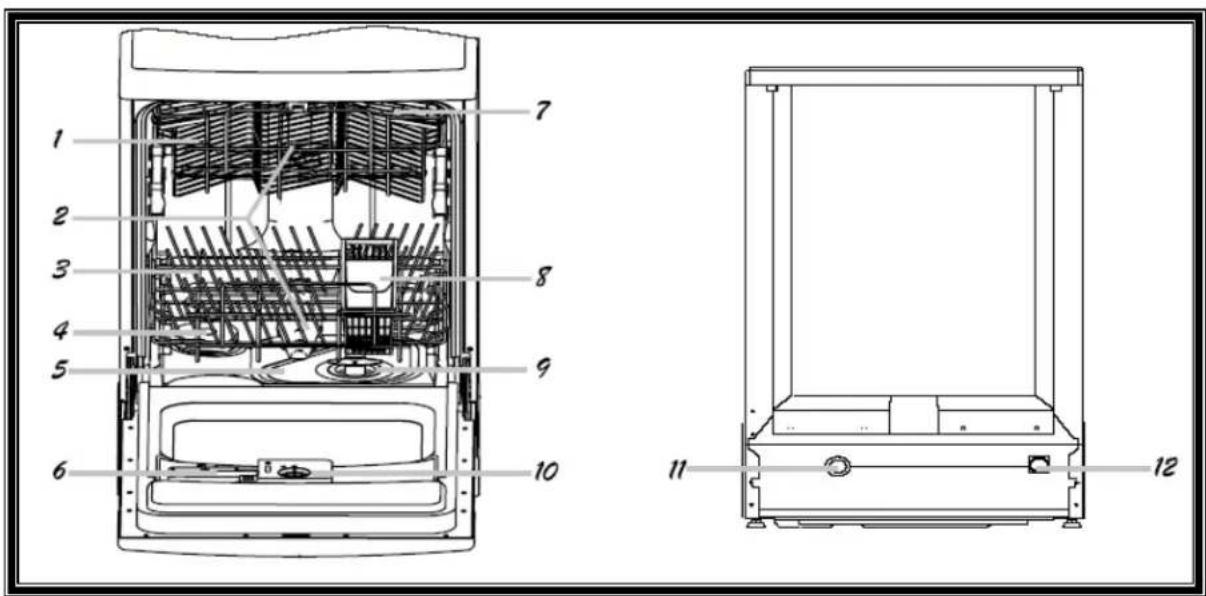
1 Adjustable Upper Basket
2 Spray Arms
3 Lower Basket
4 Water Softener
5 Main Filter
6 Detergent Dispenser
7 Cup Shelf
8 Silverware Basket
9 Coarse Filter
10 Rinse Aid Dispenser
11 Drain Pipe Connector
12 Inlet Pipe Connector
Note on chemicals used by the dishwasher
- Your dishwasher is equipped with an adjustable rinse aid and salt container. Using individual detergents, rinse aid and salt will give the best possible results as this will give the correct dosage of each chemical to suit your needs. Using Two-in-One or Three-in-One tablets may not give the best results when used in your appliance, and may not be suitable for the type of water supply in your home, as they contain predetermined quantities of salt, rinse aid and detergent and cannot be adjusted to the individual requirements.
If you are going to use 3-in-1 (or 2-in-1) tablets, we suggest that you contact the manufacturer before use or if you experience poor results in the wash performance and ask for assistance from them.
WATER SOFTENING FEATURE
THE LIME IN HARD WATER MAKES DEPOSITS FORM ON DISHES AND UTENSILS. YOUR DISHWASHER HAS A SPECIAL SOFTENING FEATURE THAT USES SALT SPECIFICALLY DESIGNED TO ELIMINATE LIME AND MINERALS FROM THE WATER.
WARNING!
ONLY USE DISHWASHER SALT IN YOUR DISHWASHER.
NOTE:
IF YOU USE 3-IN-1 OR 2-IN-1 TABLETS, BE SURE NOT TO ADD SALT AND/OR RINSE AID TO THE APPLIANCE AS THESE TABLET TYPES ALREADY CONTAIN SALT AND/OR RINSE AID. ADDING SALT AND RINSE AID TO YOUR DISHWASHER'S COMPARTMENTS IN A CYCLE INVOLVING A 3-IN-1 OR 2-IN-1 TABLET WILL RESULT IN OVERDOSING OF INDIVIDUAL CHEMICALS AND MAY CAUSE OVERFLOWING OF WATER AND SUDS.
LOADING SALT INTO THE SALT CONTAINER
- REMOVE THE LOWER BASKET & THEN UNSCREW AND REMOVE THE CAP FROM THE SALT CONTAINER.
- IF YOU ARE FILLING THE CONTAINER FOR THE FIRST TIME, FILL WITH APPROX. 1 LITRE OF WATER.
- PLACE THE END OF THE SUPPLIED FUNNEL INTO THE HOLE & ADD 1.2 Kg OF SALT. NOTE: IT IS NORMAL FOR A SMALL AMOUNT OF WATER TO COME OUT OF THE CONTAINER.

natural_image
Line drawing of a hand pouring granular material into a container with a side sink (no text or symbols)SETTING THE WATER SOFTENER LEVEL
YOU CAN ADJUST THE AMOUNT OF SALT USED BY THE DISHWASHER TO SOFTEN WATER TO GET THE BEST WASHING RESULTS, BASED ON THE HARDNESS OF WATER IN YOUR AREA.

natural_image
Technical line drawing of a mechanical component with concentric rings and central shaft (no text or symbols)1 UNSCREW THE CAP FROM THE SALT CONTAINER.
2 THERE IS A RING ON THE NECK OF THE CONTAINER. ROTATE THE RING IN AN ANTICLOCKWISE DIRECTION FROM THE "-" SETTING TOWARDS THE "+" SETTING ACCORDING TO THE HARDNESS OF WATER IN USE. SEE TABLE BELOW.
NOTE
- THE SALT CONTAINER MUST BE REFILLED WHEN THE SALT WARNING LIGHT COMES ON. ALTHOUGH THE SALT CONTAINER MAY BE FULL, THE INDICATOR LIGHT MAY NOT GO OUT UNTIL THE SALT HAS DISSOLVED.
- IF THERE ARE SALT SPILLS, A SOAK PROGRAM CAN BE RUN TO WASH AWAY SPILLAGE BEFORE USING THE MACHINE.
- CLEAR ANY SALT GRANULES AWAY FROM THE CONTAINER OPENING.
ADJUSTMENTS SHOULD BE MADE ACCORDING TO THE TABLE BELOW:
| WATER H ARDNESS | Selector Position | Salt consumption (gra m/cycle) | Auto n o m y (cycles/1.2kgs) | ||
| Clarke Degrees | ^ dH | mmol /l | |||
| 0~14 0~18 | 0~1.8 | / | 0 | / | |
| 14~36 | 18~44 | 1.8~4.4 | - | 20 | 60 |
| 36~71 | 44~89 | 4.4~8.9 | MED | 40 | 30 |
| 71 | 89 | 8.9 | + | 60 | 20 |
Contact your local water board for information on the hardness of your water supply.
DETERGENT
"How much do I use?"
To OPEN the DETERGENT DISPENSER DOOR, use the CATCH on its LOWER SIDE. *NOTE: SEE P.13 - WASH CYCLE TABLE for AMOUNT of DETERGENT to use.
NOTE:
- ALWAYS CHECK THE WASH CYCLE TABLE FOR DOSAGE ADVICE. NEVER OVERFILL THE DISPENSER.
- DO NOT OVERDOSE TO PREVENT THE FORMATION OF DEPOSITS (THE WATER SOFTENING FEATURE ALREADY TAKES CARE OF THIS!).
THE HARDER YOUR WATER, THE MORE DETERGENT YOU MAY NEED. ADJUST THE DOSE JUST BY SMALL AMOUNTS UNTIL YOU FIND THE CORRECT AMOUNT OF DETERGENT TO USE.
natural_image
Line drawing of a kitchen appliance with a handle and control panel (no text or symbols)▲WARNING!
Dishwasher detergent is corrosive! Take care to keep it out of reach of children.
RINSE AID

natural_image
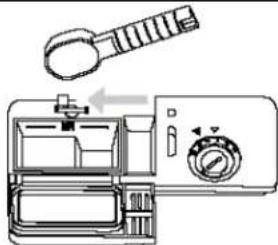
Line drawing of a washing machine with control panel and rotary knob (no text or symbols)• TO OPEN THE DISPENSER, TURN THE CAP TO THE 'OPEN' (LEFT) ARROW AND LIFT IT OUT.
- POUR THE RINSE AID INTO THE DISPENSER. BE CAREFUL NOT TO OVERFILL.
- REPLACE CAP BY INSERTING IT ALIGNED WITH 'OPEN' ARROW & TURN IT TO THE CLOSED (RIGHT) ARROW.
- THE RINSE AID IS RELEASED DURING THE FINAL RINSE TO PREVENT WATER FROM FORMING DROPLETS ON YOUR DISHES THAT CAN CAUSE SPOTS AND STREAKS. IT ALSO IMPROVES DRYING BY ALLOWING WATER TO FALL OFF THE DISHES.
- YOUR DISHWASHER IS DESIGNED TO USE LIQUID RINSE AIDS. THE RINSE AID DISPENSER CAN BE FOUND INSIDE THE DOOR NEXT TO THE DETERGENT DISPENSER. TO FILL THE DISPENSER, OPEN THE CAP AND POUR THE RINSE AID INTO THE DISPENSER UNTIL THE LEVEL INDICATOR TURNS COMPLETELY BLACK. THE DISPENSER HOLDS ABOUT 100ML OF LIQUID RINSE AID.
- BE CAREFUL NOT TO OVERFILL THE DISPENSER – THIS COULD CAUSE FROTHING. WIPE AWAY SPILLS WITH A DAMP CLOTH. DON'T FORGET TO REPLACE THE CAP BEFORE YOU CLOSE THE DISHWASHER DOOR.
NOTE: IF YOU HAVE SOFT WATER, YOU MAY NOT NEED RINSE AID FOR IT MAY CAUSE A WHITE FILM TO DEVELOP ON YOUR DISHES.
ADJUSTING THE RINSE AID DISPENSER
- As with detergent, the amount of rinse aid needed for your dishes depends on the hardness of the water in your area. Too much rinse aid can result in foaming and cause cloudiness or streaks on your dishes. If your water is very soft, you may not need rinse aid. You can always dilute the rinse aid with an equal amount of water.
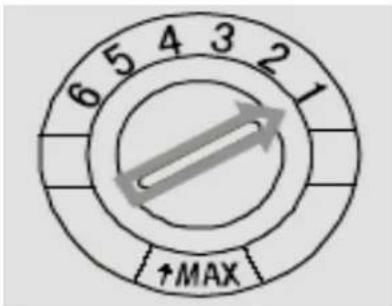
The rinse aid dispenser has six settings. ALWAYS START WITH THE DISPENSER SET ON "1". IF SPOTS & POOR DRYING ARE A PROBLEM, INCREASE THE AMOUNT OF RINSE AID DISPENSED BY REMOVING THE DISPENSER LID AND ROTATING THE DIAL TO "2". IF THE DISHES ARE STILL NOT DRYING PROPERLY OR ARE SPOTTED, ADJUST THE DIAL TO THE NEXT HIGHER NUMBER UNTIL YOUR DISHES ARE SPOT-FREE.
***NOTE: Please read the notes for detergent use on p. 13.
WHEN TO REFILL THE RINSE
AID DISPENSER - If the rinse aid warning light (SEE control panel) is not on, you can judge the rinse aid level by looking at the black dot on the rinse aid dispenser. As the rinse aid level decreases, the black dot shrinks. Never let the rinse aid get below 1/4 full.
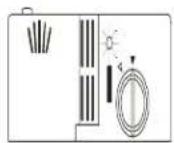
As the rinse aid diminishes, the size of the black dot on the rinse aid level indicator changes, as illustrated below.
Full
3/4 full
1/2 full
1/4 full - Should refill to eliminate spotting
Empty
LOADING YOUR DISHWASHER
NOTE: FOR BEST PERFORMANCE, FOLLOW THESE LOADING GUIDELINES. FEATURES AND APPEARANCE OF RACKS & CUTLERY BASKETS MAY VARY FROM YOUR MODEL.
BEFORE LOADING!
- REMOVE ALL SCRAPS OF FOOD. - EMPTY DRINKS & LIQUIDS FROM CUPS. - SOFTEN BURNT-ON FOOD IN PANS BY SOAKING.
DO NOT PUT THESE ITEMS IN YOUR DISHWASHER:
• BRONZE CUTLERY
• SAUCEPANS WITH WOODEN HANDLES
• CUTLERY
WITH
WOODEN,
HORN, CHINA
OR MOTHER
OF PEARL
HANDLES
• PLASTIC ITEMS THAT ARE NOT HEAT RESISTANT
• OLDER
CUTLERY
WITH GLUED
PARTS
• BONDED
CUTLERY
ITEMS OR
DISHES
• PEWTER OR COPPER ITEMS
- LEAD CRYSTAL GLASS
• STEEL ITEMS
SUBJECT TO
RUSTING
• WOODEN PLATTERS
• ITEMS MADE FROM SYNTHETIC FIBRES (eg. SPONGES)
• DELICATE,
REPAIRED OR
PAINT /
PATTERN
OVERLAID
CHINA
Note:
Do not wash stainless steel and silver cutlery together. Iron objects can rust and stain other items. Aluminium tends to go black. Copper, pewter & brass stain.
HOW TO USE THE UPPER RACK
THE UPPER RACK IS FOR MORE DELICATE AND LIGHTER DISHWARE SUCH AS GLASSES, COFFEE & TEA CUPS, SAUCERS, PLATES, BOWLS, AND SHALLOW PANS (PROVIDED THESE ARE NOT TOO DIRTY).
POSITION THE DISHES AND COOKWARE SO THAT THEY DO NOT GET MOVED BY THE SPRAY OF WATER. ALWAYS PLACE GLASSES, CUPS & BOWLS UPSIDE DOWN.
NOTE:
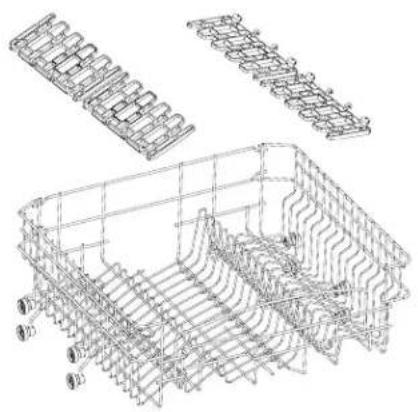
YOUR DISHWASHER COMES WITH AN ADJUSTABLE TOP RACK (BASKET) - PICTURED AT RIGHT. ITS HEIGHT CAN BE ADJUSTED BY UNDOING THE FRONT RAIL CLIPS, REMOVING THE RACK COMPLETELY AND LATCHING THE WHEELS OF THE LOWER LEVEL (POSITION '1' IN THE FIGURE ON THE RIGHT) OR THE HIGHER LEVEL (POSITION '2' IN THE FIGURE ON THE RIGHT) IN THE GROOVE OF THE RAIL.

natural_image
Technical line drawing of a mechanical assembly with grid lines and labeled components (no readable text or symbols)LOADING GUIDE (UPPER RACK):

1 Cups
2 Small serving bowl
3 Large serving bowl
4 Glasses
5 Saucers
6 Dish
7 Dessert dishes
natural_image
Technical line drawing of a mechanical assembly with multiple views and grid lines (no text or symbols)THERE ARE 4 (2 ON EACH SIDE). THESE CAN BE ADJUSTED INTO 2 POSITIONS = POSITION 1 (HIGH) AND POSITION 2 (LOW).
TO MOVE THE FLAPS BETWEEN THESE POSITIONS, FIND THE LARGE HINGES CLASPING EACH FLAP TO THE UPPER RACK. THERE ARE TWO OF THESE AT EITHER END OF EACH FLAP. GENTLY PULL BOTH CLASPS OFF THE WIRE RACK AND MOVE THE FLAP TO THE DESIRED POSITION. BE CAREFUL IF YOU HAVE LONG FINGERNAILS!
*** NOTE*** : THE UPPER RACK HAS SIDE FLAPS (PICTURED AT LEFT ABOVE BASKET). POSITION 1
THE UPPER POSITION WILL ACCOMMODATE ITEMS SUCH AS GLASS TUMBLERS (PLACED BENEATH FLAP) AND WINE GLASSES. WINE GLASSES CAN BE PLACED UPSIDE DOWN SO THAT THE NECK NESTLES SNUGLY IN THE GROOVES AT SIDE OF FLAP WITH THE BASE OF THE GLASS FACING UPWARD.
POSITION 2
WHEN THE FLAPS ARE MOVED TO THE LOWER POSITION, THEY CAN BE USED TO HOLD ADDITIONAL TUMBLERS, CUPS AND MUGS. ALWAYS CHECK THAT YOU ARE ONLY PLACING ITEMS ON THE FLAPS THAT WILL CLEAR THE CEILING HEIGHT OF YOUR DISHWASHER WHEN YOU PUSH THE RACK BACK IN. BE PARTICULARLY CAREFUL WITH LONG-STEMMED GLASSWARE SUCH AS CHAMPAGNE GLASSES - BREAKAGE HAZARD!
HOW TO LOAD THE LOWER RACK:
PLACE LARGE ITEMS THAT ARE HARD TO CLEAN IN THE LOWER RACK: eg. POTS, PANS, LIDS, SERVING DISHES, BOWLS.

7 Dessert dishes
8 Oval platter
9 Dinner plates
10 Soup plates
11 Silverware basket
- POTS, SERVING BOWLS, ETC. MUST ALWAYS BE PLACED UPSIDE DOWN.
- DEEP POTS SHOULD BE SLANTED TO LET WATER FLOW OUT.
- THE BOTTOM RACK FEATURES FOLD DOWN BASKETS SO THAT LARGER OR MORE POTS & PANS CAN BE LOADED.
CUTLERY BASKET
CUTLERY SHOULD BE PLACED IN THE CUTLERY BASKET WITH HANDLES ALWAYS POINTING DOWNWARD (AT THE BOTTOM). VERY LONG UTENSILS (LADLES, etc.) SHOULD BE PLACED HORIZONTALLY AT THE FRONT OF THE UPPER RACK.

natural_image
Technical line drawing of a multi-chamber electrical enclosure with cooling fins (no text or symbols)
1 Forks
2 Soup Spoons
3 Dessert Spoons
4 Teaspoons
5 Knives
6 Serving Spoons
7 Gravy Ladle
8 Serving Fork

▲ WARNING!
Do not let any item extend through bottom.
NOTE:
- WHEN YOU ARE SATISFIED YOU HAVE LOADED ALL THE UTENSILS AND DISHES YOU WANT TO WASH AND HAVE ADDED THE PROPER AMOUNT OF DETERGENT TO THE DISPENSER (REMEMBER TO CHECK THE TABLE ON PAGE 13 FOR THE DOSE THAT'S RIGHT FOR THE WASHING CYCLE YOU WANT), ENSURE THE RACKS ARE PUSHED ALL THE WAY BACK INTO YOUR DISHWASHER AND CLOSE THE DOOR.
- YOU ARE NOW READY TO START A WASH CYCLE (SEE NEXT PAGE).
STARTING A WASH CYCLE

flowchart
graph TD
    A["ON/OFF"] --> B["1"]
    C["BF DGS SS"] --> D["2"]
    E["Player Movement"] --> F["3"]
    F --> G["4"]
    G --> H["5"]
    G --> I["6"]
    G --> J["7"]
    G --> K["8"]
    L["Off Track"] --> M["Off Track"]
    N["Off Track"] --> O["Off Track"]
STARTING A WASH CYCLE
1) MAKE SURE THAT THE PLUG OF THE APPLIANCE IS INSERTED INTO THE WALL SOCKET.
2) MAKE SURE THAT THE WATER SUPPLY IS TURNED ON TO FULL PRESSURE.
3) LOAD THE DISHWASHER (SEE THE SECTION ENTITLED 'LOADING YOUR DISHWASHER').
4) POUR IN DETERGENT (SEE THE SECTION ENTITLED 'SALT, DETERGENT & RINSE AID').
5) ENSURE THE DOOR IS CLOSED (IT WILL MAKE A 'CLICKING' SOUND).
6) PRESS THE 'ON/OFF' BUTTON (1) IN - DISPLAY WILL LIGHT UP.
7) PRESS THE LANGUAGE SELECTOR BUTTON (2) UNTILIT SHOWS IN ENGLISH.
8) PRESS THE WASH CYCLE SELECTION KEY (5) TO CHOOSE THE WASH CYCLE PROGRAM (SEE THE SECTION ENTITLED 'WASH CYCLE TABLE').
9) YOU WILL BE PROMPTED TO SELECT A WASH TEMPERATURE. PRESS THE TEMPERATURE SELECTOR BUTTON (7) TO DO THIS. FOR EXAMPLE, ON A NORMAL WASH, YOU CAN SELECT A TEMPERATURE OF EITHER 50 OR 60 DEGREES.
10) PRESS THE START / PAUSE BUTTON TO START THE WASH.
Note:
The Delay Timer key (in above figure as mark number '6') will set the start of the washing cycle by 30mins into the future for every press. You can set it up to 9 12 hours ahead of time for your convenience.
Approximate Timing of Wash Cycles
| Intensive(strong) 134 mins. | Normal114 mins. | Economy111 mins. | Rinse50 mins. | Glass74 mins. | Rapid48 mins. | Soap8 mins. |
BAUMATIC BFD63SS dishwasher user manual
13
| Program | Cycle | Cycle Selection Information | Description of Cycle | Detergent pre/main | Rinse Aid |
| Intensive |  | For the heaviest soiled loads, such as pots, pans, casserole dishes and dishes that have been sitting with dried food on them for a while. | Pre-rinsePre-rinse(50°C)Wash (50/60/70°C)RinseRinse (65/70/75°C)Drying. | 5 grams (pre-wash) / 22 grams (main) |  |
| Normal |  (IEC-EN 50242) (IEC-EN 50242) | For normally soiled loads, such as pots, plates, glasses and lightly soiled pans.standard daily cycle. | Pre-rinsePre-rinseWash (50/60°C)RinseRinse (65/70°C)Drying. | 5 grams (pre-wash) / 22 grams (main) |  |
| Economic |  | For lightly soiled loads, such as plates, glasses, bowls and lightly soiled pans. | Pre-rinseWash (50/60°C)RinseRinse (65/70°C)Drying. | 22 grams |  |
| Rinse |  | For dishes that need rinsing and drying only | RinseRinse (65/70°C)Drying. |  | |
| Glass |  | A shorter wash for lightly soiled loads that do not need drying. | Pre-rinseWash (40/50°C)RinseRinse (60/70°C)Drying. | 15 grams |  |
| Rapid |  | For lightly soiled loads, such as glasses, crystal and fine china. | Pre-rinseWash (40/50°C)RinseRinse (55/60°C) | 15 grams |  |
| Prerinse |  | For softening heavy soiling prior to main washing - breaks down heavy residue. | Pre-rinse |
OVERFLOW PROTECTION
YOUR BAUMATIC DISHWASHER HAS AN OVERFILL PROTECTION DEVICE WHICH AUTOMATICALLY SHUTS OFF THE INLET VALVE AND STARTS THE DRAIN PUMP IF THE WATER OVERFLOWS. IF THIS OCCURS THEN TURN OFF THE MAINS WATER SUPPLY BEFORE CALLING THE SERVICE DEPARTMENT. IF THERE IS WATER IN THE BASE PAN BECAUSE OF AN OVERFILL OR SMALL LEAK, THE WATER SHOULD BE REMOVED BEFORE RESTARTING THE DISHWASHER.
WHAT YOU WILL SEE ON THE DISPLAY:
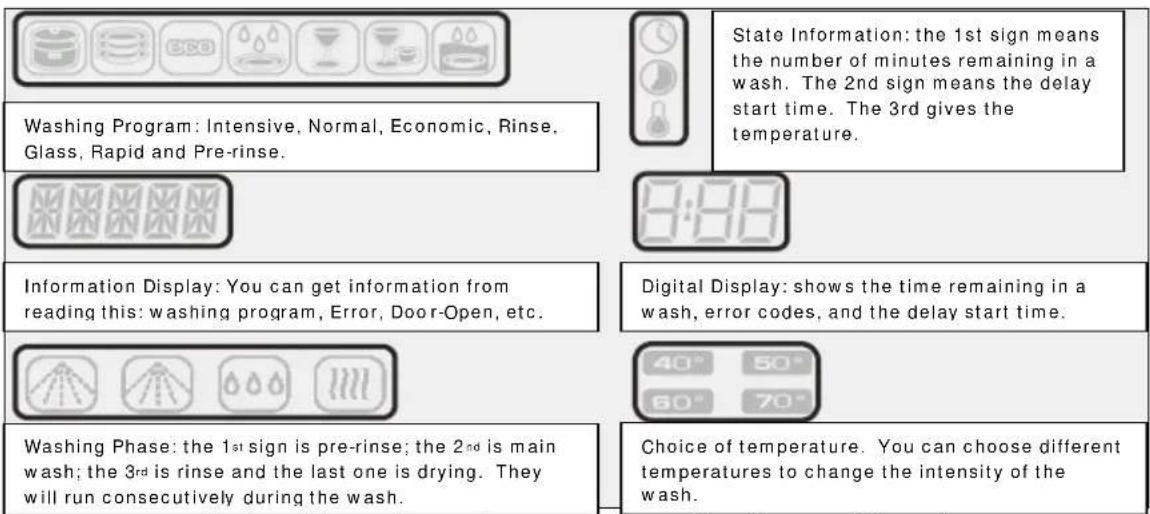
Note: there is no temperature display on Pre-rinse
FORGET TO ADD A DISH?
A FORGOTTEN DISH CAN BE ADDED AT ANY TIME BEFORE THE DETERGENT DISPENSER OPENS.
• OPEN THE DOOR A LITTLE TO STOP THE WASHING.
- AFTER THE SPRAY ARMS STOP WORKING, YOU CAN OPEN THE DOOR COMPLETELY.
- ADD FORGOTTEN DISHES.
- CLOSE THE DOOR, THE DISHWASHER WILL WORK AFTER TEN SECONDS.
Need to Change the Cycle?
- PRESS THE POWER SWITCH TO STOP WASHING
- PRESS THE 'PROG.' BUTTON TO SELECT THE NEW PROGRAM
- PRESS THE POWER SWITCH AGAIN TO START WASHING
* Note – You may have to start a new cycle by reloading the detergent if it has been a long time since the old cycle began. See page 12 to see how to do this.
At the End of the Wash Cycle
At end of washing, the time display will flash for 8 seconds while the ALARM sounds. The ALARM will not sound at the end of delayed washing, however. We recommend you leave about 12 hour before unloading to avoid injury and brittleness in dishware from heat.
FILTERING SYSTEM
FOR YOUR CONVENIENCE, WE HAVE PLACED THE FILTERING SYSTEM WITHIN EASY REACH INSIDE THE TUB. THE FILTER REMOVES BITS OF FOOD TRAPPED IN THE FILTER FROM THE WASH WATER SO IT CAN BE RECIRCULATED DURING THE CYCLE. THERE ARE THREE PARTS TO THE FILTERING SYSTEM: 1) The Main Filter, 2) The Coarse Filter & 3) The Fine Filter.
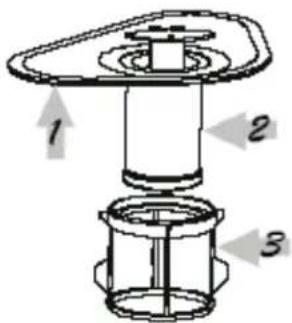
1 MAIN FILTER
Food and soil particles trapped by this filter are pulverized by a special jet on the lower spray arm and washed down the drain.
2 COARSE FILTER
Larger items, such as pieces of bone or glass that could clog the drain are trapped in the coarse filter. To remove an item caught in this filter, gently squeeze the tabs on top of this filter and lift it out.
3 FINE FILTER
This filter holds soil and food residue in the sump area and prevents it from being re-deposited on the dishes during a cycle.
Caring for your Dishwasher
CLEANING THE OUTSIDE SURFACES OF YOUR APPLIANCE
- TO CLEAN THE EXTERIOR OF YOUR DISHWASHER (INCLUDING THE CONTROL PANEL), USE A LIGHTLY DAMPENED CLOTH THEN DRY THOROUGHLY. NEVER USE SHARP OBJECTS, SCOURING PADS OR HARSH CLEANERS ON ANY PART OF THE APPLIANCE. SOME PAPER TOWELS CAN SCRATCH.

natural_image
Diagram of a vehicle rear view showing a rectangular container with a small internal component and an arrow indicating direction (no text or symbols)- TO CLEAN THE EDGE AROUND THE DOOR, ONLY EVER USE A SOFT WARM, DAMP RAG. DO NOT USE A SPRAY CLEANER HERE OR WHEN CLEANING THE DOOR PANEL AS THIS MAY HARM THE DOOR LOCK AND ELECTRICAL PARTS.
CLEANING THE SPRAY ARMS
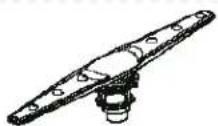
THE SPRAY ARMS NEED REGULAR CLEANING AS HARD WATER RESIDUES WILL CLOG THEIR JETS & BEARINGS. TO REMOVE THE SPRAY ARM, SCREW OFF THE NUT TO TAKE OUT THE WASHER ON TOP OF THE SPRAY ARM AND REMOVE THE ARM. WASH THE ARMS IN SOAPY WARM WATER & USE A SOFT BRUSH TO CLEAN THE JETS. REPLACE THE SPRAY ARM AFTER RINSING IT THOROUGHLY.

natural_image
Line drawing of a mechanical component with a central circular feature and curved sides (no text or symbols)CLEANING THE FILTERS
- THE FILTER ASSEMBLY MUST BE KEPT CLEAN FOR BEST PERFORMANCE. You should remove the larger bits of food trapped in the filter after each wash cycle by rinsing the semicircular filter and cup under running water. To remove the filter assembly, pull up on the cup handle.
- The entire filter assembly should be cleaned at least once a month.
- To clear the coarse filter and the fine filter, use a cleaning brush. Then, reassemble the filter parts as shown in the figure above and reinsert the entire assembly in the dishwasher in its seat & press downward to secure it.
-
Improper replacement of the filter may impair appliance performance and damage dishes and utensils.
-
Warning - never run the dishwasher without the filters in place!
- Warning - Before cleaning the inner cavity of the appliance always allow 30 minutes for the Element to cool down to avoid injury!
HOW TO KEEP YOUR DISHWASHER IN SHAPE
AFTER EVERY WASH, leave the door slightly ajar so that moisture and odours are not trapped inside.
REMOVE THE PLUG before cleaning or performing maintenance. Never run the risk of electric shocks.
Do NOT USE SOLVENTS OR ABRASIVE CLEANING AGENTS to clean the exterior and the rubber parts of the dishwasher. Only use a cloth and warm soapy water. To remove spots or stains from the surface of the interior, use a cloth dampened with water and a little white vinegar, or a cleaning product made specifically for dishwashers.
WHEN YOU GO ON HOLIDAY, run a wash cycle with the dishwasher empty. Then unplug it, turn off the water supply and leave the door slightly ajar to prevent odours and mould from developing.
MOVING THE APPLIANCE is possible but KEEP IT UPRIGHT.
SEALS can trap food, which in turn will cause odours. Periodic cleaning with a damp cloth or sponge will prevent this from becoming a problem.
PROTECTING YOUR DISHWASHER AGAINST FREEZING
If your dishwasher is left in an unheated place during the winter, ask a service technician to:
1) Cut off electrical power to the dishwasher. Remove fuses or trip circuit breaker.
2) Turn off the water supply and disconnect the water inlet pipe from the water valve & discharge hoses.
3) Drain water from the inlet pipe and water valve (Use a pan to catch the water).
4) Reconnect the water inlet pipe to the water valve.
5) Remove the plastic sump cover in the tub bottom and use a sponge to soak up water in the rubber boot.
BEFORE YOU CALL FOR SERVICE ...
CHECKING AGAINST THE CHARTS BELOW MAY FIX YOUR PROBLEM.
| PROBLEM POSSIBLE CAUSES WHAT TO DO | ||
| Dishwasher doesn't run! | Fuse blown, or the circuit breaker acted | Replace fuse or reset circuit breaker.Remove any other appliances feeding from the same socket as the dishwasher. |
| Power supply is not turned on | Make sure the dishwasher is turned on and the door is closed securely. | |
| Water pressure is low | Check that the water supply is connected properly and the water is turned on. | |
| Drain Pump doesn't stop! | Overflow | The system is designed to detect an overflow. When it does, it shuts off the circulation pump and turns on the drain pump. Call a Baumatic Ltd approved technician. |
| Noise! | Some audible sounds are normal | Sound from soft food shredding action and detergent cup opening. This is not a problem. |
| Utensils are not secure in the baskets or something small has dropped into the basket and is loose | Ensure everything is placed securely in the dishwasher. | |
| Motor Hums | Dishwasher has not been used regularly. If you do not use it often, remember to set it to fill and pump out every week. (See Wash Cycle table). This will help keep the seal moist. | |
| PROBLEM POS | SIBLE CAUSES WHAT TO DO | |
| Suds in the Tub! | Improper detergent | Use only special dishwasher detergent to avoid suds. |
| Stained tub Interior! | Spilled rinse agent | Always wipe up rinse agent spills immediately. |
| Detergent with colorant was used | Make sure you use detergent without colorant. | |
| Dishes are not dried! | Rinse agent dispenser is empty | Make sure that the rinse agent dispenser is filled. |
| Dishes and Flatware not Clean! | Improper program Select stronger program. | |
| Spots and Filming on Glasses and Flatware! | Improper rack loading | Make sure there are no large dishes blocking the action of the detergent dispenser and the spray arms. |
| Extremely hard waterLow inlet temperatureOverloading the dishwasherImproper loadingOld or damp powder detergentEmpty rinse agent dispenserIncorrect dosage of detergent | To remove spots from glassware:Take all metal utensils out of the dishwasher.Do not add detergent.Choose the longest cycle.Start the dishwasher and let it to run for 18 - 22 minutes, then it will be in the main wash.Open the door and pour 2 cups of white vinegar into the bottom of the dishwasher.Close the door and let the dishwasher complete the cycle.If the vinegar does not work, repeat as above, only use 1⁄4 cup (60ml) of citric acid crystals instead of vinegar. | |
| Cloudiness on glass! | Combination of soft water and too much detergent | Use less detergent if you have soft water and select a shorter cycle to clean the glassware. |
| Yellow or brown film on inside surfaces! | Tea or coffee stains | Use a solution of 1⁄2 cup of bleach and 3 cups warm water to remove the stains by hand. Rinse thoroughly. |
| White film on inside surface! | Iron deposits in water can cause an overall film | You have to call a water softener company for a special filter. |
| Detergent cup lid won't latch! | Hard water minerals | To clean the interior, use a damp sponge with dishwasher detergent and wear rubber gloves. Never use any other cleaner than dishwasher detergent for the risk of foaming or suds. |
| Button is not in the 'OFF' position | Turn the Button to 'OFF' position and slide the door latch to the left. | |
| Detergent left in dispenser cups! | Dishes block detergent cups | Reload the dishes properly. |
| Steam! | Normal phenomenon | There is some steam coming through the vent by the door latch during drying and water draining. |
| Black or grey marks on dishes! | Aluminium utensils have rubbed against dishes | Use a mild abrasive cleaner to eliminate those marks by hand. |
| Water standing in the bottom of the tub! | This is normal | A small amount of clean water around the outlet on the tub bottom at the back of the tub keeps the water seal lubricated. No action needed. |
| Dishwasher leaks! | Overfilled dispenser or rinse aid has spilled | Be careful not to overfill the rinse aid dispenser.Spilled rinse aid could cause oversuding and lead to overflowing.Wipe away any spills with a damp cloth. |
| Dishwasher isn't level | Make sure the dishwasher is level. | |
| 3-in-1 Tablets | Make sure if you're using 3-in-1 tablets that you do not put rinse aid and salt into the appliance as well. | |
| Door popping open! | Appliance not level | Level appliance & ensure top screws attaching appliance to work surface are not lifting the weight of the dishwasher. |
WARNING!
IF OVERFLOW OCCURS, TURN OFF THE MAIN WATER SUPPLY BEFORE CALLING A SERVICE TECHNICIAN. IF THERE IS WATER IN THE BASE OF THE TANK PAN BECAUSE OF AN OVERFILL OR SMALL LEAK, THE WATER SHOULD BE REMOVED BEFORE RESTARTING THE DISHWASHER.
ERROR CODES - WHAT THEY MEAN
* YOUR DISHWASHER MAY EXPERIENCE A FAULT. SHOULD THIS HAPPEN, A CODE CONSISTING OF 'E' & A NUMBER FROM 1-7 CAN BE DISPLAYED.
USE THIS TABLE TO UNDERSTAND WHAT IS WRONG.
| *NOTE*: ALWAYS CALL FOR A Baumatic Ltd ENDORSED / APPROVED SERVICE TECHNICIAN TO CARRY OUT REPAIRS. | |||
| CODE | SYMPTOM: CAUSE: | WHAT TO DO: | |
| ‘E1’ | LONGER FILL TIME. FAUCET IS NOT OPENED. | Ensure that inlet hose is not kinked or crushed. | |
| ‘E2’ | LONGER or EXTENDED DRAINING TIME | THE DRAIN PIPE WAS PLACED TOO HIGH WHEN IT WAS INSTALLED. | Ensure drainage system is as per manual and not extended. |
| ‘E3’ | LONGER HEATING TIME - NOT REACHING REQUIRED TEMPERATURE | MALFUNCTION OF TEMPERATURE SENSOR OR OF HEATING ELEMENT. | CALL FOR A QUALIFIED SERVICE TECHNICIAN. |
| ‘E4’ | OVERFILLED | TOO MUCH INLET WATER.* NOTE * - THERE ARE NUMEROUS CAUSES OF AN ‘E4’MESSAGE. REFER TO APPLIANCE USAGE SECTION OF THIS MANUAL FOR GUIDELINES ON HOW TO PREVENT AN OVERFILL. | Overdosing. 3-in-1 put in with salt and/ or rinse aid in the appliance = overdose.Could also be a Water Pressure problem. |
| ‘E5’* | SWITCH CANNOT SHUT OFF AUTOMATICALLY - PROGRAM NOT FINISHING ITS CYCLE. | LOW VOLTAGE OR POWER SWITCH FAILURE.*** NOTE - DEPENDING ON YOUR MODEL, YOU MAY NOT RUN INTO THIS ERROR **** | CALL FOR A QUALIFIED SERVICE TECHNICIAN. |
| ‘E6’ | OPEN CIRCUIT THERMISTOR. | CALL FOR A QUALIFIED SERVICE TECHNICIAN. | |
| ‘E7’ | SHORT CIRCUIT THERMISTOR. | CALL FOR A QUALIFIED SERVICE TECHNICIAN. | |
WARNING!
IF OVERFLOW OCCURS, TURN OFF THE MAIN WATER SUPPLY BEFORE CALLING A SERVICE TECHNICIAN. IF THERE IS WATER IN THE BASE OF THE TANK PAN BECAUSE OF AN OVERFILL OR SMALL LEAK, THE WATER SHOULD BE REMOVED BEFORE RESTARTING THE DISHWASHER.
DI SHW ASHER CHARACTERISTICS
The BAUMATIC BFD63 dishwasher model is based firmly on convenience. Apart from having the same general workings as other household dishwashers, it has several extra features.

Performance of
Dishwasher - Your dishwasher has a B rated wash performance, B rated drying performance and A rated energy efficiency.

Overflow protection - Your
dishwasher has an overfill protection program which could automatically shut off the inlet valve and start the drain pump if the water Overflows.

Stainless steel tub-
You need not worry about stains to the tub.

14 wash programs - You can
choose desired program according to the soiled level. Such as, intensive wash, normal wash, economy, rinse, glass, rapid and pre-wash, etc. Then you can change the temperature of the wash.

Error alarm— Fault codes
show on the display if there is a fault with your dishwasher.

Temperature display -
Displays the wash temperature at any moment. If you know the water temperature, you'll be less likely to be scalded when you open the door.

Broad applied
voltage - This appliance uses AC (alternating current) voltage. Please be aware that this will make its operation vulnerable to uneven current in your home and power surges.

4 Different wash eratures
The intensive, normal, economic, rinse, glass and rapid wash have different temperature options which you can set before you start a washing cycle.

12 place settings -
Normal wash load of 12 place settings.

Rinse aid Warning
Indicator - If the rinse aid is running low, this signal will light up on the control panel, alerting you to top the rinse aid level up so the machine can keep at its optimum performance level.

Automatically shuts the power off after washing.

Adjustable upper basket
Even if the dishware is large, you can load the dishes by adjusting the basket.

Salt Warning Indicator -
If the salt is running low, this signal will light up on the control panel to alert you to top the salt level up so the machine can keep at its optimum performance level.

Language display
Your dishwasher can display in 6 different languages – English, Spanish (Espanol), French (Francais), Italian (Italiano) & German (Deutsch), Portugal(Portugues).

Remaining time ator
The length of time left in the program will be clearly displayed in the text window, leaving you in no doubt as to when the program will end.

Time delay feature - This
allows the start of the program to be delayed between 1 and 9 12 hours for your convenience and for saving on energy!
INSTALLATION INSTRUCTIONS
NOTE: APPLIANCE SHOULD ONLY BE FITTED BY A TRAINED TECHNICIAN
INSTALLING YOUR DISHWASHER
Your dishwasher is with a freestanding feature, you only need to do following:
1 Levelling the Appliance(pls see the section "get your dishwasher level in page 24)
2 Connect the water inlet (pls see page 25)
3 Electrical connection (see page 26)
Also you can install it to a cabinet cavity according following:
a) PREPARATION
Before you install your appliance, make sure that the place you have chosen to fit it is:
- Near the existing power socket (marked 4 in figure).
- So that you can choose one side of the cabinet cavity to easily connect the dishwasher's drain hoses.
- Near your sink so you have easy access to the water inlet and drain hoses (marked 3 [inlet] & 2 [drain] in figure).
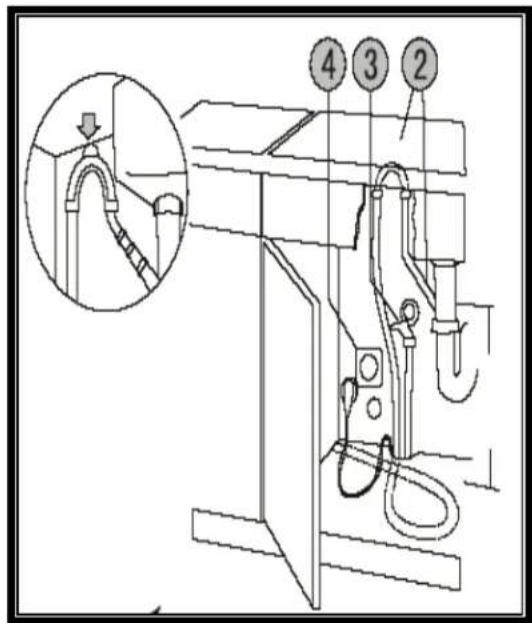
INSTALLING
YOUR
DI SHW ASHER
INTO A CABINET
AREA
- If dishwasher is to be installed at the corner of cabinet area, make sure you have enough space when the door is opened.
- Is structured so that you have less than 5 mm between the top of the dishwasher and cabinet. Also check that the outer door is aligned to cabinet.
- REMEMBER THE
DIMENSIONS OF YOUR
DISHWASHER! THESE
ARE (measured in figure in mm):

FIRSTLY, GET YOUR DISHWASHER LEVEL

* Note:


natural_image
Simple line drawing of a vertical structure with two horizontal supports and a curved base, no text or symbols present.Once the appliance is positioned, adjust the four feet (screwing them in or out) to adjust the height of the dishwasher, making it level. In any case, the appliance should not be inclined more than 2°.
b) NEXT, CONNECT THE WATER INLET (SEE FIGURE BELOW):
Connect the cold water supply hose to a threaded 34 inch connector and make sure that it is fastened tightly in place.
Attach tube C to the cold water supply A. If the water pipes are new or have not been used for a long time, let the water run to make sure that the water is clear and free of impurities. The water inlet may get blocked and damage the appliance.
Make sure the water pressure is the same as the range indicated on the data tag.
DO NOT CONNECT TO THE HOT WATER SYSTEM!
If your appliance is fitted with an aqua stop system then this must be fitted vertically (pointing upwards) not downwards or sideways.

c) THEN, CONNECT THE DRAIN HOSE (SEE FIGURE BELOW):
The curved end of the drainage hose should be hooked into the drainage stand pipe or, alternatively, over the edge of your sink.
During installation, make sure that:
• The drainage hose is not kinked or crushed.
- The hose end, relative to the top surface of the dishwasher (SEE FIGURE BELOW), must be placed at a height between 40cm and 100cm.
- The end of the hose must never be immersed in water.
- The drainage hose must not be extended to more that a maximum length of 1 metre. The extension must have the same internal diameter. Furthermore, the maximum height at which the hose end can be placed (in the case of an extended tube) must be reduced from 100cm to 40cm.
• The drainage stand pipe must have an internal diameter of no less than 4 cm.
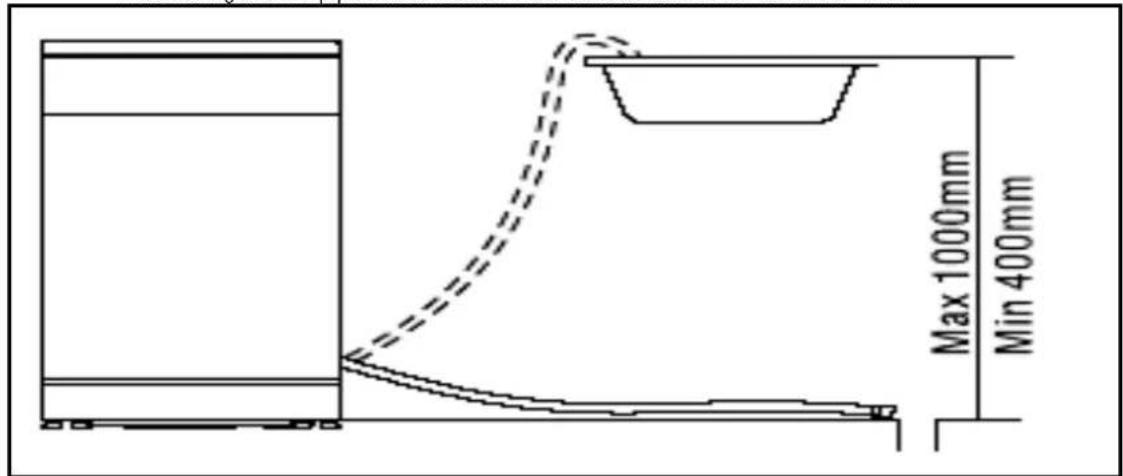
NOTE: DO NOT EXTEND THE DRAIN HOSE AS THIS CAN AFFECT THE PERFORMANCE OF THE DISHWASHER.
Ensure proper ground exists before use
ELECTRICAL CONNECTION
CAUTION, for personal safety:
DO NOT USE AN EXTENSION CORD OR AN ADAPTER PLUG WITH THIS APPLIANCE.
DO NOT, UNDER ANY CIRCUMSTANCES, CUT OR REMOVE THE THIRD GROUNDING PRONG FROM THE POWER CORD.
Electrical Requirements
The dishwasher is designed for operation on an adequately wired individual 220-240V AC, 50Hz system. The required fuse rating is 13amp. Fused electrical supply is required – copper wire only. Time delay fuse or circuit breaker is recommended. Make sure that this appliance runs off its own separate circuit. Outlet should be placed in adjacent cabinet.
WARNING – ENSURE PROPER GROUND EXISTS BEFORE USE.
After making sure that the voltage and the frequency values for the current in your home correspond to those on the rating plate and that the electrical system is sized for the maximum voltage on the rating plate, insert the plug into an electrical socket which is earthed properly. If the electrical socket to which the appliance must be connected is not right for the plug, replace the socket, rather than using adaptors of the like as they could cause overheating and fire.
e) THEN, APPLY THE CONDENSATION STRIP.
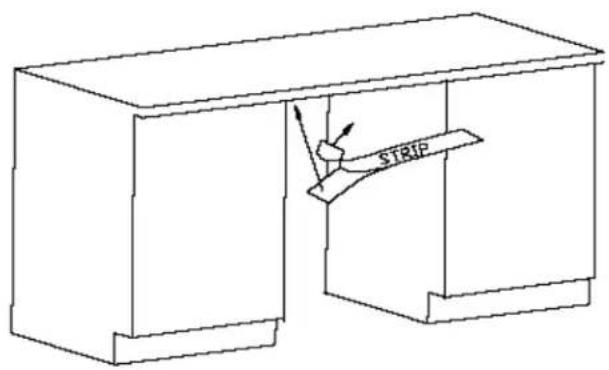
The Condensation Strip must be fitted to the underside of the worktop above your dishwasher to protect it against any moisture. Its purpose is to deflect steam rising from your appliance to protect your worktop's underside.
- The strip is located inside your dishwasher.
- Ensure the surface is clean prior to sticking to underside of the worktop.
- Separate the backing paper from the strip.
- Stick to the underside of the worktop. Note: Failure to attach strip could result in damage to the underside of your work surface!
natural_image
Line drawing of a cabinet with a handle and a labeled strip, no text or symbols present* Note * You can detach the top board (5) that comes as part of your dishwasher if you want to install your dishwasher in your cabinet.
THEN MOVE IT INTO THE CABINET RECESS (AS PICTURED ON RIGHT, 6-7), ENSURING THAT IT IS BACKED UP AGAINST THE WALL.

g) ENSURE THAT YOUR DISHWASHER IS LEVEL IN ITS NEW POSITION.
NOTE: YOUR DISHWASHER MUST BE LEVEL FOR PROPER DISH RACK
OPERATION AND WASH PERFORMANCE. (GO BACK AND LOOK
AT THE BOTTOM RIGHT DIAGRAM ON PAGE 24).
IT'S IMPORTANT TO MAKE SURE THAT YOUR DISHWASHER IS LEVEL AGAIN, BECAUSE THE FLOOR SURFACE MAY BE DIFFERENT TO WHERE YOU HAD ADJUSTED IT BEFORE YOU MOVED THE DISHWASHER INTO PLACE

natural_image
Technical line drawing of a structural frame assembly (no text or symbols)WARNING! BE CAREFUL WHILE YOU ARE LEVELLING YOUR DISHWASHER IN PLACE - IT COULD TIP OVER AND INJURE YOU!
PLEASE KEEP THIS MANUAL FOR FUTURE REFERENCE
BAUMATIC LTD. - CONDITIONS OF GUARANTEE.
Dear Customer,
BAUMATIC LTD. - CONDITIONS OF GUARANTEE.
Dear Customer,
The conditions of guarantee which apply to your Baumatic appliance are as follows: This product is guaranteed for 12 months from the date of original purchase.
Baumatic Ltd will repair any defect that arises due to faulty materials or workmanship free of charge during this period.
* In addition, your appliance is covered by a 5 year parts warranty. Baumatic Ltd will provide free of charge the parts required to repair the appliance, only if they are fitted by a Baumatic engineer, for any defect that arises due to faulty materials or workmanship within a period of 5 years from the original purchase date.
* An additional and annually renewable insurance scheme for labour is available should you wish to extend the warranty period.
Should any person other than an authorised representative of Baumatic Ltd interfere with the appliance, the policy is negated and Baumatic Ltd will be under no further liability.
The guarantee covers the appliance for normal domestic use only, unless otherwise stated.
Any claims made under the terms of the guarantee must be supported by the original invoice/bill of sale issued at the time of purchase.
This guarantee is transferable only with the written consent of Baumatic Ltd.
If the appliance fails and is considered either not repairable or uneconomical to repair between twelve months and five years from purchase date, a free of charge replacement will not be offered.
The guarantee for any replacement will only be for the remainder of the guarantee on the original product purchased.
This guarantee does not cover:
- Sinks and taps
- Failure to comply with the manufacturer's instructions for use.
• The replacement of cosmetic components or accessories.
• Accidental damage or wilful abuse. - Subsequent loss or damage owing to the failure of the appliance or electrical supply.
• Incorrect installation.
• Losses caused by Acts of God, civil war, failure to obtain spare parts, strikes or lockouts. - Filters, fuses, light bulbs, external hoses, damage to bodywork, paintwork, plastic items, covers, baskets, trays, shelves, burner bases, burner caps, decals, corrosion, rubber seals.
In the course of the work carried out it may be necessary to remove the appliance from its operating position. Whilst all reasonable care will be taken, Baumatic Ltd cannot accept responsibility for damage sustained to any property whatsoever in this process.
This guarantee is in addition to and does not diminish your statutory or legal rights.
Contacting Baumatic.
| SALES | SERVICE | SPARES | TECHNICAL / ADVICE | |||
| TEL: | 0118 933 6900 | TEL: | 0118 933 6911 | TEL: | 0118 933 6922 | TEL: 0118 9336933 |
| FAX: | 0118 931 0035 | FAX: | 0118 986 9124 | FAX: | 0118 933 6942 | FAX: 0118 9336942 |
For mainland UK and Northern Ireland, please contact one of the above numbers for further information or any other query you may have.
For ROI (Republic of Ireland), please contact one the numbers below:
TEL: 01 - 6266798 FAX: 01 - 6266634
Thank you for buying Baumatic.
* Applies to UK, Scotland, Wales & Northern Ireland only.(Republic of Ireland has 1 year labour and 1 year parts warranty only)
Baumatic Ltd
Make-up for your kitchen
Headquarters
Baumatic Ltd.
Baumatic Buildings,
6 Bennet Road,
Reading,
Berkshire
RG2 0QX, United Kingdom
Sales Telephone
+44 118 933 6900
Sales Fax
+44 118 931 0035
Service Telephone
+44 118 933 6911
Service Fax
+44 118 986 9124
Spares Telephone
+44 118 933 6922
Technical / Advice Telephone
+44 118 933 6933
E-mail:
sales@baumatic.co.ukT
technical@baumatic.co.uk
Http (Internet site):
www.baumatic.com
Baumatic UK/cod. 1230000666


This appliance is marked according to the European Directive 2002/96/EC on Waste Electrical and Electronic Equipment(WEEE).
This guideline is the frame of a Europeanwide validity of return and recycling on Waste Electrical and Electronic Equipment.
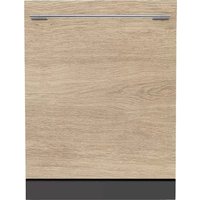
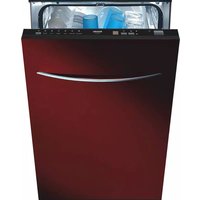
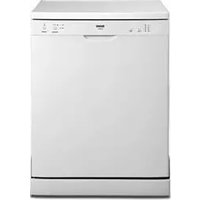
- BAUMATIC
- BFD63SS - DISHWASHER
- 60CM FULL HEIGHT DISHWASHER
- INSTRUCTION MANUAL
- BEFORE CALLING FOR SERVICE
- PLEASE NOTE:
- CONTENTS
- IMPORTANT SAFETY INFORMATION
- WARNING!
- ELECTRICAL SAFETY
- BEFORE USING
- CHILD SAFETY
- DURING USE
- AFTER USE
- CONTROL PANEL
- DI SHW ASHER FEATURES
- Note on chemicals used by the dishwasher
- WATER SOFTENING FEATURE
- NOTE:
- LOADING SALT INTO THE SALT CONTAINER
- SETTING THE WATER SOFTENER LEVEL
- NOTE
- DETERGENT
- "How much do I use?"
- ▲WARNING!
- RINSE AID
- ADJUSTING THE RINSE AID DISPENSER
- WHEN TO REFILL THE RINSE
- LOADING YOUR DISHWASHER
- BEFORE LOADING!
- DO NOT PUT THESE ITEMS IN YOUR DISHWASHER:
- HOW TO USE THE UPPER RACK
- LOADING GUIDE (UPPER RACK):
- POSITION 2
- HOW TO LOAD THE LOWER RACK:
- CUTLERY BASKET
- STARTING A WASH CYCLE
- OVERFLOW PROTECTION
- WHAT YOU WILL SEE ON THE DISPLAY:
- FORGET TO ADD A DISH?
- Need to Change the Cycle?
- At the End of the Wash Cycle
- FILTERING SYSTEM
- MAIN FILTER
- COARSE FILTER
- FINE FILTER
- Caring for your Dishwasher
- CLEANING THE SPRAY ARMS
- CLEANING THE FILTERS
- HOW TO KEEP YOUR DISHWASHER IN SHAPE
- PROTECTING YOUR DISHWASHER AGAINST FREEZING
- BEFORE YOU CALL FOR SERVICE ...
- ERROR CODES - WHAT THEY MEAN
- DI SHW ASHER CHARACTERISTICS
- Performance of
- Overflow protection - Your
- Stainless steel tub-
- wash programs - You can
- Error alarm— Fault codes
- Temperature display -
- Broad applied
- Different wash eratures
- place settings -
- Rinse aid Warning
- Adjustable upper basket
- Salt Warning Indicator -
- Language display
- Remaining time ator
- Time delay feature - This
- INSTALLATION INSTRUCTIONS
- INSTALLING YOUR DISHWASHER
- a) PREPARATION
- INSTALLING
- YOUR
- DI SHW ASHER
- INTO A CABINET
- AREA
- b) NEXT, CONNECT THE WATER INLET (SEE FIGURE BELOW):
- DO NOT CONNECT TO THE HOT WATER SYSTEM!
- c) THEN, CONNECT THE DRAIN HOSE (SEE FIGURE BELOW):
- During installation, make sure that:
- ELECTRICAL CONNECTION
- Electrical Requirements
- WARNING – ENSURE PROPER GROUND EXISTS BEFORE USE.
- e) THEN, APPLY THE CONDENSATION STRIP.
- g) ENSURE THAT YOUR DISHWASHER IS LEVEL IN ITS NEW POSITION.
- BAUMATIC LTD. - CONDITIONS OF GUARANTEE.
- Baumatic Ltd
- Headquarters
- E-mail:
Brand : BAUMATIC
Model : BFD63SS
Category : Dishwasher