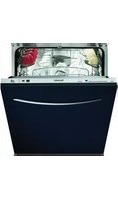
BDI652 - Dishwasher BAUMATIC - Free user manual and instructions
Find the device manual for free BDI652 BAUMATIC in PDF.


| Product Type | Built-in Dishwasher |
| Brand | Baumatic |
| Model | BDI652 |
| Dimensions (H x W x D) | 81.5 cm x 59.6 cm x 57.0 cm |
| Weight | Approximately 35 kg |
| Energy Efficiency Class | A+ |
| Annual Energy Consumption | 290 kWh |
| Water Consumption per Cycle | 10 L |
| Number of Place Settings | 13 |
| Noise Level | 49 dB(A) |
| Number of Programs | 6 |
| Programs | Eco, Intensive, Normal, Quick, Glass, Rinse |
| Special Features | Half Load, Delay Start (24h), Child Lock |
| Drying System | Static Condensation |
| Cutlery Basket | Yes, removable top tray |
| Adjustable Rack | Yes, height-adjustable upper basket |
| Safety Features | Anti-flood protection, child lock, door seal |
| Maintenance | Clean filters regularly, check spray arms, descale every 3 months |
| Spare Parts Availability | Knock-out plate, inlet/outlet hoses, detergent dispenser |
| Repairability Index | 7.5/10 |
| Power Supply | 220-240 V, 50 Hz |
| Current | 10 A |
| Installation Type | Fully integrated (door panel required) |
Frequently Asked Questions - BDI652 BAUMATIC
User questions about BDI652 BAUMATIC
0 question about this device. Answer the ones you know or ask your own.
Ask a new question about this device
Download the instructions for your Dishwasher in PDF format for free! Find your manual BDI652 - BAUMATIC and take your electronic device back in hand. On this page are published all the documents necessary for the use of your device. BDI652 by BAUMATIC.
USER MANUAL BDI652 BAUMATIC
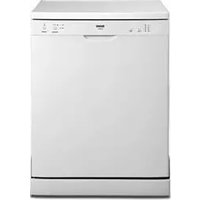
BDI652 60 cm Fully integrated full height dishwasher
INSTRUCTION MANUAL

natural_image
Simple line drawing of a fish with fins and tail, no text or symbols presentUSER MANUAL FOR YOUR BAUMATIC
BDI 652 60 cm Fully integrated full height dishwasher

natural_image
Technical line drawing of an open kitchen appliance with internal components (no text or symbols)
NOTE: This User Instruction Manual contains important information, including safety & installation points, which will enable you to get the most out of your appliance. Please keep it in a safe place so that it is easily available for future reference; for you or any person not familiar with the operation of the appliance.
DD 09/06/10
Contents
| E | n | v | i | r | o | n | m | e | n | t | a | l | |
| Important | safety | information | 5-7 | ||||||||||
| S | p | e | c | i | f | i | c | a | t | i | o | n | s |
| Product | and | aperture | dimensions | 8 | |||||||||
| P | r | o | d | u | c | t | s | p | e | c | i | f | |
| Energy | efficiency | details | 8 | ||||||||||
| E | l | e | c | t | r | i | c | a | l | d | e | t | |
| Description | of | the | appliance | 9-10 | |||||||||
| C | o | n | t | r | o | l | p | a | n | e | l | ||
| U | s | i | n | g | y | o | u | r | d | i | s | ||
| B | e | f | o | r | e | f | i | r | s | t | u | ||
| Filling | with | dishwasher | salt | 11 | |||||||||
| Setting the water softener level | 1 | 2 | |||||||||||
| F | i | l | l | i | n | g | w | i | t | h | r | ||
| Setting | the | rinse | aid | level | 13 | ||||||||
| Filling | with | dishwasher | detergent | 14 | |||||||||
| Loading | the | upper | basket | 15 | |||||||||
| Adjusting | the | upper | basket | 15 | |||||||||
| Loading | the | lower | basket | 17 | |||||||||
| The | cutlery | basket | 17 | - | |||||||||
| Loading | dishes | and | cutlery | 18 | |||||||||
| Program table | 2 | 0 | - | ||||||||||
| Setting | a | wash | program | 20 | |||||||||
| C | h | a | n | g | i | n | g | a | w | a | s | ||
| At the end of a wash program | 22 | ||||||||||||
| S | e | t | t | i | n | g | a | d | e | l | a | ||
| S | e | t | t | i | n | g | a | h | a | l | f | ||
| Rinse aid and salt indicator neons | 23-24 | ||||||||||||
| Cleaning and maintenance | 24-27 | ||||||||||||
| The | filter | system | 24 | ||||||||||
| Cleaning | the | filters | 25 | ||||||||||
| Cleaning | the | spray | arms | 26 | |||||||||
| Cleaning | the | control | panel | 26 | |||||||||
| C | l | e | a | n | i | n | g | t | h | e | d | ||
| Error | code | failure | system | 27-29 | |||||||||
| General | troubleshooting | 29 | - | 30 | |||||||||
| I | n | s | t | a | l | l | a | t | i | o | n | ||
| Aperture | requirements | 31 | |||||||||||
| Preparing and connecting the furniture door | 32-34 | ||||||||||||
| Adjusting the tension of the door spring | 34 | ||||||||||||
| Adjusting the position of the plinth | 35 | ||||||||||||
| Connecting | to | the | mains | water | supply | ||||||||
| Connecting | to | the | water | outlet | 37 | ||||||||
| Connecting to the power supply | 3 | 7 | |||||||||||
| Applying | the | condensation | strip | 38 | |||||||||
| Positioning | the | dishwasher | 39 | ||||||||||
| Levelling | the | appliance | 40 | ||||||||||
| Securing | the | dishwasher | 41 | ||||||||||
| B | e | f | o | r | e | f | i | r | s | t | u | ||
| C | o | n | t | a | c | t | d | e | t | a | i | l | |
ENVIRONMENTAL NOTE
Note: Before discarding an old appliance, switch off and disconnect it from the power supply. Cut off and render any plug useless. Cut the cable off directly behind the appliance to prevent misuse. This should be undertaken by a competent person. Disable the door lock to make sure that children cannot get stuck inside the appliance.
This appliance is marked according to the European directive 2002/96/EC on Waste electrical and Electronic Equipment (WEEE). By ensuring this product is disposed of correctly, you will help prevent potential negative consequences for the environment and human health, which could otherwise be caused by inappropriate waste handling of this product.
The symbol

on the product, or on the documents accompanying the product, indicates that this appliance may not be treated as household waste. Instead it shall be handed over to the applicable collection point for the recycling of electrical and electronic equipment.
Disposal must be carried out in accordance with local environmental regulations for waste disposal.
For more detailed information about treatment, recovery and recycling of this product, please contact your local city office, your household waste disposal service or the shop where you purchased the product.

natural_image
Symbol of a trash bin crossed with two crossed lines, no text or numbers present- The packaging materials that Baumatic uses are environmentally friendly and can be recycled.
- Please discard all packaging material with due regard for the environment.
IMPORTANT SAFETY INFORMATION

Your safety is of the utmost importance to Baumatic. Please make sure that you read this instruction booklet before attempting to install or use the appliance. If you are unsure of any of the information contained in this booklet, please contact the Baumatic Advice Line.
General Safety
o Repairs to your appliance must only be carried out by a Baumatic engineer or one of its authorised service agents. Any attempt by an inexperienced person to repair the appliance, could result in injury or damage to your dishwasher.
- If you notice that the mains cable is damaged. The appliance must not be used. The same applies if you notice that the worktop, control panel or base area is damaged. As this could allow access to the internal components of the machine.
- The appliance should be turned off and isolated from the mains supply, before either cleaning or maintenance work is attempted.
- The mains cable must not be used to pull the plug out of the electrical socket.
- The machine should not be sprayed with water.
- The external surface of the appliance may become hot whilst your dishwasher is in use.
- It is possible for small animals to chew either mains cables or water hoses, which could cause an electric shock hazard.
Installation
- The installation instructions contained within this user manual should be followed.
-
It is obligatory for the completed installation to comply with all relevant building regulations and local water authority requirements.
Before the first use of the appliance, you should follow the steps listed in the "Before first use" section on page 10 and page 41 of this manual. -
Care should be taken not to trap the power supply cable underneath the appliance whilst installing it.
o No attempt should be made to alter or modify the specifications of this appliance.
In daily use
- This appliance is only designed to wash normal domestic washloads. If you use your dishwasher in any other way or it is incorrectly used, then Baumatic accepts no liability for any damage that might be caused and any guarantee will be void.
- It is recommended that the appliance is unplugged and the water supply is turned off after the machine is used.
- The detergents, rinse aid and salt that you place in this appliance should be suitable for automatic dishwashers. With regards to dosage levels, the detergent manufacturer's recommendations should be followed.
- Sharp knives or ones with long blades are a potential safety hazard when placed in an upright position in the cutlery basket. We would recommend that these items are placed horizontally in the upper basket.
- You should not wash any items that have come into contact with corrosive, acidic or alkaline chemicals, paint, petrol, iron or steel debris.
- You should not open the door whilst the appliance is set on a wash program. Depending on which stage that the wash program is at, hot water could escape the machine.
- You should not leave the door of the appliance open, unless you are loading or unloading the dishwasher.
- You should not stand or sit on the door when it is open.
Child Safety
- Your dishwasher should only be used by adults. You should not allow children in the area of the machine unsupervised. You should not let them touch the controls or play with the appliance.
- It could be possible for a child or pet to gain access to the dishwasher if the door is left open. Therefore please check the inside of the appliance before setting it on a wash cycle.
- Any packaging that is removed from the machine should be kept away from children.
- All detergents should be kept out of children's reach in a safe place.
- Some water will remain inside the dishwasher when it has completed a wash cycle. This water is not suitable for drinking and may contain residues from the detergents that are used in the appliance.
Declaration of conformity
This appliance complies with the following European Directives:
-73/23 dated 19/02/1973 Low Voltage Directive and subsequent modifications.
-89/336 dated 03/05/1989 Electromagnetic Compatibility Directive and subsequent modifications.
For future reference please record the following information which can be found on the rating plate and the date of purchase which can be found on your sales invoice. The rating plate of your dishwasher is located on the right hand side of the drop down door.
Model Number
Serial Number
Date of Purchase ....
Specifications
Product dimensions
Height: 820 - 850 mm
Width: 595 mm
Depth: 560 mm
Aperture dimensions
Height: 820 mm (min)
Width: 600 mm
Depth: 590 mm (min)
Product specifications
- 14 Place settings
- 5 functions: Normal
Intensive
Economy
Rinse
Rapid - 4 Wash temperatures: 40°C, 45°C, 50°C, 60°C
- 2 Rinse temperatures: 60°C, 70°C
- Delay timer
- LED display
- Self-cleaning stainless steel microfilter
- Electronic aqua stop
- Anti-leak device
- Anti-flood device
o Height adjustable upper basket with easy adjust handles - Collapsible plate racks
- Concealed heating element
○ Adjustable feet - Residual drying
- Half load option
Energy efficiency details
Energy efficiency class: A
Washing performance class: A
Drying performance class: A
Electrical details
Rated voltage: 230 Vac 50 Hz
Supply connection: 13 A (double pole switched fused outlet with
3 m m c o n t
Optional extra
- DWD600SS- Stainless steel door with mark resistant coating
Description of the appliance
Front view
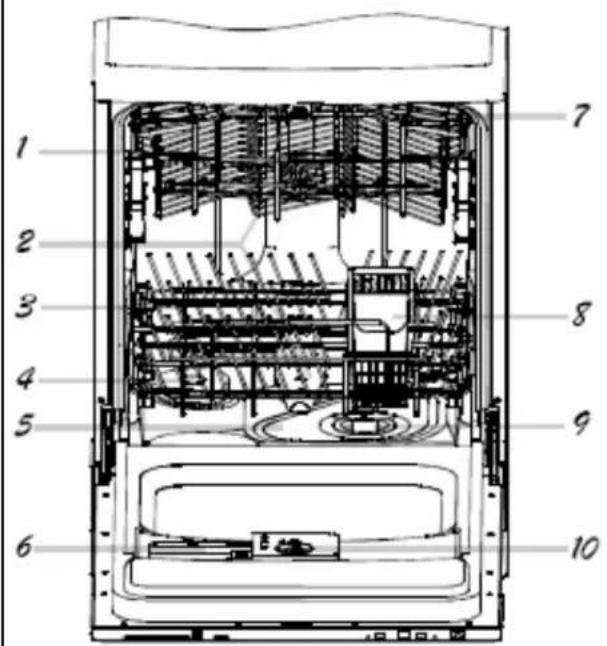
Rear view

natural_image
Technical line drawing of a mechanical device with labeled components (no text or symbols beyond labels 11 and 12)1) Upper basket
2) Spray arms
3) Lower basket
4) Water softener
5) Main filter
6) Detergent dispenser
7) Cup shelf
8) Cutlery basket
9) Coarse filter
10) Rinse aid dispenser
11) Drain pipe connector
12) Inlet pipe connector
Control panel

1) Program indicator neons
2) Program selection button
3) Rinse aid and salt indicator neons
4) 12 load indicator neon
5) 12 load button
6) LED display
7) Delay start button
8) ON/OFF indicator neon
9) ON/OFF button
Using your dishwasher
Before first use
○ Install the appliance as per the installation instructions contained within this booklet.
o Fill the water softener with 1 litre of tap water and then fill with specialist dishwasher salt. After this you should set the water softener level.
- Fill the rinse aid dispenser and then set the rinse aid dosage.
Filling with dishwasher salt

IMPORTANT: You should only use salt that is specially designed for use in a dishwasher. If any other type of salt is used in the appliance (in particular table salt), it will damage the water softener.
- Ideally you should fill the water softener with salt, just before you are about to run a wash program. This will help to clear any salt that may have overflowed from the water softener during the salt filling process.
- Open the door of the dishwasher and then remove the lower basket. The basket should be empty when you remove it.

- Turn the water softener cap anticlockwise and remove it.
- Pour 1 litre of water into the water softener.
IMPORTANT: It is only necessary to do this when you fill the container with salt for the first time.

natural_image
Line drawing of a hand holding a tool over an open mechanical device (no text or symbols)Pour salt into the water softener, using the funnel that is supplied with the appliance. You should add approximately 1.2 kg of salt into the water softener.
- It is perfectly normal for a small amount of water to come out of the water softener, whilst you are filling it with salt. This does not mean that the water softener is filled with the correct amount of salt.
o Refit and fully tighten the water softener cap.
- The salt required warning light will go out approximately 2-6 hours after you have filled the water softener with salt. When the salt indicator neon lights on the control panel, then you should follow the filling with dishwasher salt procedure again.
- IMPORTANT: You do not need to pour 1 litre of water into the container when you subsequently fill the water softener with salt.
Setting the water softener level
It is possible to regulate the amount of salt that the water softener will release during a wash cycle. The water softener should be set to a level that is appropriate for the hardness of your water (please refer to the table below).
| Water hardness | Selector position | Grams of salt used per cycle | Approximate number of cycle per 1.2kg of salt | |
| Clarke degrees | °TH french degrees | |||
| 0 - 14 | 0 - 18 | N/A | 0 | N/A |
| 14 - 36 | 18 - 44 | Minus symbol | 20 | 60 |
| 36 - 71 | 44 - 89 | Middle | 40 | 30 |
| 71 | 89 | Plus symbol | 60 | 20 |
To alter the amount of salt that is released by the water softener, you should:-
- Remove the lower basket and unscrew the cap from the water softener.

natural_image
Simple circular diagram with a central arrow and two curved arrows, no text or symbols present.○ Locate the ring with an arrow on it that is located on the water softener. (See figure opposite).
- When you first receive your appliance, the arrow will be pointing to the minus symbol. Using the water hardness chart, you should turn the arrow to the setting that is appropriate for your water hardness.
- The "middle" selector position is halfway between the minus and plus symbols.
- IMPORTANT: If you are using 3 in 1 dishwasher tablets and live in a medium or hard water area, then you should still fill the water softener with salt. The water softener arrow should be turned to the minus setting.
Filling with rinse aid

The rinse aid is released during the final rinse and it helps to prevent water from forming droplets on your dishes. These droplets will lead to spots and streaks being left on items after the wash program has completed.
- Your dishwasher is designed to utilise liquid rinse aid.
- The rinse aid dispenser is located inside the drop down door, next to the detergent dispenser.

natural_image
Technical line drawing of a digital camera with adjustment knobs and a dial (no text or symbols)To access the rinse aid dispenser, you should turn the cap anticlockwise and it will pop out of the hole. Then slowly pour in liquid rinse aid, the rinse aid dispenser will hold approximately 140 ml of rinse aid.
- You should continue to fill with rinse aid, until the level indicator turns completely black.
- Be careful not to overfill the dispenser, as this could cause oversudsing when a wash program is selected. Wipe away any rinse aid excess or spillages with a damp cloth.
- Replace the cap and turn it clockwise until it locks into position.
- You should refill the rinse aid dispenser when the rinse aid indicator neon lights on the control panel.
- IMPORTANT: If you are using 3 in 1 dishwasher tablets then you should still fill the rinse aid dispenser.
Setting the rinse aid level
The amount of rinse aid that the dishwasher requires also depends on the hardness of your water. You should experiment with the rinse aid setting, until you find a level that gives the best results.

- On the first wash cycle, we would recommend that the rinse aid level is set to number 2.
- If you get water spots and poor drying performance, then you should turn the arrow anticlockwise and increase the setting to the next number.
- You should continue to adjust the rinse aid level upwards until you get no water spots.
- If you get cloudiness or streaking on your dishes, the rinse aid level is set too high and it is causing foaming during the wash cycle. Turn the arrow clockwise and lower the setting to the next number.
Filling with dishwasher detergent
The detergent dispenser must be refilled at the start of each wash cycle (apart from the Rinse wash program).
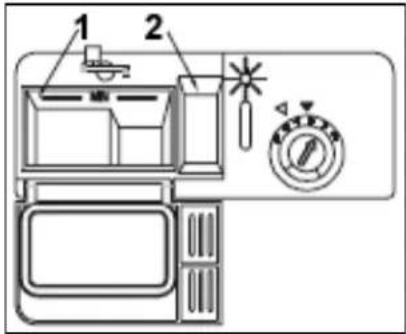
- Open the lid that closes over the detergent dispenser and place the detergent inside of the dispenser.
- The section marked 1 in the diagram is for the main wash cycle detergent. Only one detergent tablet should be placed in the dispenser at any one time. If you are using detergent powder or liquid, you should follow the detergent manufacturer's recommendations.
- The section marked 2 in the diagram can have separate detergent placed in it for any wash cycle that has a pre-wash element to it, however this is optional. This must be a liquid or powder detergent, not another detergent tablet.
- Shut the detergent dispenser lid and position the clip on the outer edge, so that it holds the lid shut.
- At the beginning of a wash cycle the clip will open and the tablet/powder/liquid will enter the dishwasher.
Loading the upper basket
The upper basket is most suited to washing delicate and light dishware, such as glasses, coffee & tea cups, saucers, plates, bowls and shallow pans (that are not heavily soiled).

- Cups
- Small serving bowl
- Large serving bowl
- Glasses
- Saucers
- Dish
- Dessert dishes
- You should position the dishes and cookware in such a way that they are not moved by the spray of water during the wash cycle.
- Use the diagram above as a guide to the most appropriate way to load the upper basket.
Adjusting the upper basket
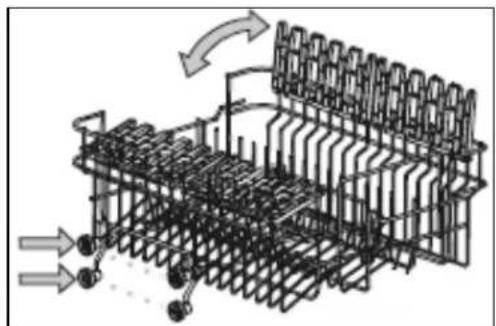
Your dishwasher has an adjustable upper basket which you can alter to the most suitable position for the items you are going to wash in the upper basket.
natural_image
Diagram of a multi-layered mechanical or structural assembly with directional arrows indicating flow or movement (no text or symbols present)- The height of the upper basket can be adjusted by removing the upper basket from the guide supports.
○ IMPORTANT: The upper basket must be empty when you are removing it from the guide supports.
| Maximum height of dishes (upper basket) | Maximum height of dishes (lower basket) | |
| With upper basket raised | 19 cm 30 cm | |
| With upper basket lowered | 24 cm 25 cm | |
IMPORTANT: Care should be taken to make sure that the spray arms can move freely when items have been loaded into the baskets.

IMPORTANT: Care should be taken when placing long stemmed glassware, such as champagne glasses in the upper basket. If they are not positioned correctly, then there is a risk that they may topple over when the upper basket is pushed in our pulled out.
Loading the lower basket
The lower basket is most suited to washing larger and more heavily soiled items, such as saucepans, saucepan lids and serving dishes. You can also load bowls and a variety of plates into the lower basket.

- Dessert dishes
- Serving plate
- Dinner plates
- Side plates
-
Cutlery basket
-
Saucepans and serving bowls must always be placed with their bases upwards.
- Deep saucepans should be slanted, to allow water to run off.
- The bottom rack has prongs at the rear of the basket that can be folded downwards, to allow for easier loading of larger saucepans and serving bowls.
The cutlery basket
Cutlery should be placed inside of the cutlery basket. The cutlery basket should then be placed in the appropriate position in the lower basket.

-
Forks
-
Soup spoons
-
Dessert spoons
-
Teaspoons
-
Knives
-
Serving spoon
-
Gravy ladle
-
Serving fork
- For the best washing performance, cutlery should be placed through the slots in the top of the cutlery basket.

IMPORTANT: Do not allow items of cutlery to fall through the bottom of the cutlery basket, as this may cause damage to the spray arm and/or the cutlery. If the bottom of the basket begins to deteriorate and allows items to fall through, you should replace the cutlery basket.
Loading dishes and cutlery

Household cloths, sponges or any other object that may absorb water SHOULD NOT be washed in a dishwasher.
- Remove leftovers and soften the remnants of burnt food in pans, prior to loading dishes in the appliance.
Once the dishwasher has been loaded, check that the spray arms can move freely. If the spray arm comes into contact with any item, then you should rearrange the wash load.
o Cups, glasses, pans etc should all be loaded with their bases upwards, so that water does not collect inside of them.
- Cutlery and dishes should not cover each other; otherwise you may get poor wash results.
- Do not allow glasses to touch inside the dishwasher, otherwise damage may occur.
o Small objects can be placed inside of the cutlery basket.

The following items are NOT suitable for washing inside a dishwasher:-
- Cutlery with a handle of mother-of-pearl, wood, horn or china.
- Plastic items that are not resistant to heat.
- Cutlery that consists of glued parts that are not resistant to heat.
- Cutlery items or crockery that are bonded.
- Copper or pewter items.
- Lead crystal glass.
- Wooden platters
- Synthetic fibre items.
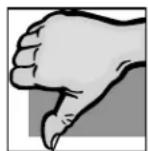
The following items are not always suitable for washing inside a dishwasher:-
- Stoneware should only be washed if the manufacturer of the item has marked it as dishwasher safe.
- Plastic items (such as lunchboxes) should only be washed if the manufacturer has marked it as dishwasher safe.
- Glazed crockery may fade with repeated washing inside of a dishwasher.
- Items made of silverware or aluminium can discolour when washed inside a dishwasher.
- Any food residue should be removed from silver items immediately, as this can also result in discolouration.
o Certain types of glass may become dull or cloudy after a large number of washes.
Program table
| Program | Wash program | Wash program information | Description of cycle | Detergent (pre/ main) | Program times |
| Normal (*) |  | For normally soiled loads, such as pots, plates, glasses and lightly soiled pans. Standard daily cycle. | Pre-wash Pre-wash Wash (50°C) Rinse (70°C) Drying | 5/25 g 150 | minutes |
| Intensive |  | For the heaviest soiled loads, such as pots, pans, casserole dishes and dishes that have been sitting with dried food on them for awhile. | Pre-wash Pre-wash (50°C) Wash (50°C) Rinse (70°C) Drying | 5/22 g 139 | minutes |
| Economy |  | For lightly soiled loads, such as plates, glasses, bowls and lightly soiled pans. | Pre-wash Wash (40°C) Rinse (60°C) Drying | 22 g 95 | minutes |
| Rinse |  | For dishes that need to be rinsed and dried only. | Wash (45°C) Rinse (70°C) Drying | N/A | 76 minutes |
| Rapid |  | For lightly soiled loads, such as glasses, crystal and fine china. | Pre-wash Wash (45°C) Rinse Rinse (70°C) | 15 g 28 | minutes |
* Normal is the testing program for EN 50242.
Setting a wash program

Make sure that the before first use section has been followed.
- Check whether the appliance needs rinse aid or salt adding to it.
o Pull out the top and bottom baskets, then load them in accordance with the loading instructions.
- Push the top and bottom baskets fully back into position.
- Add detergent
- Turn the appliance on by using the ON/OFF button.
- IMPORTANT: Wait for 5 seconds before pressing the program selection button, otherwise the appliance may not function correctly.
- Press the program selection button to choose an appropriate wash program for the load that you are washing. The relevant program indicator neon will light to show which program you have selected.
- Select any program options that you want to use (e.g. delay start or half load).
- Close the door firmly, so that you hear the door lock click shut.
- After a few seconds, you will hear the appliance begin to fill with water and the wash program will have started.
Changing the wash program
IMPORTANT: This should only be attempted when the cycle has only just started, otherwise the detergent tablet may have already released or you could have hot water escaping.
- Slightly open the door of the appliance and turn off the power using the ON/OFF button.
- Wait for a minute before fully opening the door of the appliance.
- Turn the appliance on by using the ON/OFF button and wait for 5 seconds before pressing the program selection button.
- Press and hold down the program selection button for 3 seconds to cancel the wash program. Then use the program selection button to choose the correct wash program.
- Select any program options that you want to use (e.g. delay start or half load).
- Close the door firmly, so that you hear the door lock click shut.
- After a few seconds, you will hear the appliance begin to fill with water and the wash program will have started.
At the end of a wash program
- The time display will flash for 8 seconds and a buzzer will sound.
- If you have used the delay start mode, the time display will flash for 8 seconds but the buzzer will not sound.
- Open the door of the appliance.
- Use the ON/OFF button to switch the dishwasher off and unload the dishwasher.
Setting a delay start
It is possible to delay the start of the wash program for up to a maximum of 24 hours.
- Check whether the appliance needs rinse aid or salt adding to it.
o Pull out the top and bottom baskets, then load them in accordance with the loading instructions. - Push the top and bottom baskets fully back into position.
- Add detergent
- Turn the appliance on by using the ON/OFF button.
- IMPORTANT: Wait for 5 seconds before pressing the program selection button, otherwise the appliance may not function correctly.
- Press the program selection button to choose an appropriate wash program for the load that you are washing. The relevant program indicator neon will light to show which program you have selected.
- Press the delay start button and you will see the amount of time that you are delaying the wash program by, appear in the LED display.
- Close the door firmly, so that you hear the door lock click shut.
Once the period of time that you set has passed, the dishwasher will start the wash program that you selected.
Setting a half load
The half load option means that the lower spray arm does not run.

IMPORTANT: You should only load items in the upper basket when using the half load option.
- Check whether the appliance needs rinse aid or salt adding to it.
o Pull out the top basket, and then load it in accordance with the loading instructions. - Push the top and bottom baskets fully back into position.
- Add detergent
- Turn the appliance on by using the ON/OFF button.
- IMPORTANT: Wait for 5 seconds before pressing the program selection button, otherwise the appliance may not function correctly.
- Press the program selection button to choose an appropriate wash program for the load that you are washing. The relevant program indicator neon will light to show which program you have selected.
o Press the half load button, the half load indicator neon will come on. - Close the door firmly, so that you hear the door lock click shut.
- After a few seconds, you will hear the appliance begin to fill with water and the wash program will have started.
Rinse aid and salt indicator neons

natural_image
Simple line drawing of a device with two rectangular buttons and a dot pattern, no text or symbols present.- The rinse aid and salt indicator neons on the control panel will let you know when the appliance needs rinse aid or salt adding to it.
- The neon indicates that you need to add rinse aid to the appliance. You should follow the procedure outlined on page 13.

The neon indicates that you need to add dishwasher salt to the appliance. You should follow the procedure outlined on page 11.
Cleaning and maintenance

IMPORTANT: The appliance should be disconnected from your mains supply before commencing any cleaning process.
The filter system
Your appliance is fitted with three levels of filtering; these are located in the base of the dishwasher for ease of access.

1) Main filter
2) Coarse filter
3) Fine filter
Main filter-
Food and soil particles are trapped by this filter and pulverised by a special jet on the lower spray arm. This debris is then washed down the drain.
Coarse filter-
Larger items such as pieces of bone or glass, which could clog the drain, are trapped in this filter.
Fine filter-
This filter holds soil and food residue in the sump area and prevents it from being redeposited on the dishes during a wash cycle.

IMPORTANT: Whilst the filtering system is efficient, your dishwasher is not a waste disposal unit. All items being washed inside of the dishwasher should have food scraps removed from them before being loaded into the appliance.
Cleaning the filters
For best performance and results, the entire filter assembly should be thoroughly cleaned regularly (ideally after each wash cycle).

-
Turn the coarse filter anti-clockwise and then lift it upwards. Rinse out this section under a tap to remove any food debris that remains in it.
-
Pull out the main filter and rinse this under the tap to remove any food debris that is trapped in it.
-
Pull out the fine filter and rinse this under the tap to remove any food debris that is trapped in it.
-
Place the fine filter back in its original position.
-
Place the main and coarse filter back into their original positions in the base of the dishwasher. You must turn the coarse filter clockwise to lock it back into position.
IMPORTANT: If a glass gets smashed inside of the appliance, you must check there is no glass in the filter before the machine is used again as this can cause a drainage failure.

IMPORTANT: THE DISHWASHER SHOULD NEVER BE SET ON A WASH CYCLE WITHOUT THE FILTERS BEING INSIDE OF THE APPLIANCE.
Cleaning the spray arms

natural_image
Technical diagram of a mechanical assembly with no visible text or symbolsThe spray arms should be cleaned regularly, to prevent hard water deposits from clogging the spray arm jets and bearings.
To remove the spray arm, unscrew the nut and take out the washer that sits on top of the spray arm.
- Gently pull upwards to remove the spray arm.
- Wash the spray arm in warm, soapy water and use a soft brush to clean the jets.
- Rinse the spray arm thoroughly and then reassemble the spray arm back in its original position.
Cleaning the control panel
IMPORTANT: Do not use any abrasive cleaner or household polish on either the control panel or operating parts.
- Wipe over the control panel using a brand new damp cloth with warm water.
Cleaning the door
natural_image
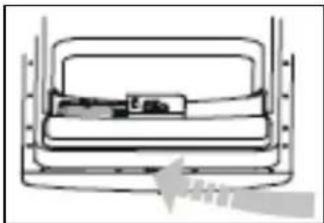
Diagram of a vehicle interior showing a rectangular frame with internal compartments and a directional arrow (no text or symbols)To clean the edge around the outside of the door, you should use a soft, damp cloth only.
To prevent water from penetrating the door lock or electrical components, DO NOT use a spray cleaner of any kind.
- DO NOT use any abrasive cleaner or scouring pads on the inner or outer surfaces, as they may cause damage to them.
Error code failure system
If your appliance senses that it is not operating correctly, then an error code may appear in the display window.
The following error codes can possibly be remedied by the customer and the steps outlined below should be followed.
BEFORE COMPLETING ANY MAINTAINEANCE ON THE APPLIANCE, IT SHOULD BE DISCONNECTED FROM YOUR MAINS POWER SUPPLY.
E1
o Longer than expected fill time or drain time.
√ Check the water pressure of your mains water supply.
√ Clean the mesh filter that sits in the inlet hose.
√ Ensure that the inlet hose is not kinked or crushed.
√ Make sure the water tap that the machine is connected to is turned on fully.
√ Check that the outlet hose is not kinked or crushed and that it's positioned correctly (as per the installation instructions).
E3
o Longer heating time- not reaching the required temperature.
√ Malfunction of the temperature sensor or heating element.
√ Call the Customer Care Department.
E4
- The machine has sensed water in the base.
√ Check that the outlet hose is not kinked or crushed.
√ Check that there are no blockages in the drain hose or the drainage system that the appliance is connected to.
√ The drain pipe may be placed in too high a position or incorrectly. Check the installation instructions and ensure that the installation is correct.
E6
- Open circuit
√ Thermistor
√ Call the Customer Care Department.
E7
- Short circuit
√ Thermistor
√ Call the Customer Care Department.
Once you have taken action to rectify the problem that has caused the fault code to appear, plug the machine back into your mains power supply.
- Turn the machine on using the ON/OFF button and wait for 5 seconds.
- Press and hold down the delay start button and the ON/OFF button, until the appliance switches off.
- Wait for 5 seconds, and then switch back on the appliance using the ON/OFF button.
- Wait for a further 5 seconds before attempting to set a wash program, using the program selection button.

IMPORTANT: If any other fault code appears in the display window, you should not attempt to clear it yourself and contact the Customer Care Department.

IF THE FAULT CODE REAPPEARS AFTER FOLLOWING THE ABOVE ADVICE AND CLEARING THE FAULT CODE. YOU SHOULD TURN OFF THE APPLIANCE; DISCONNECT THE APPLIANCE FROM YOUR MAINS SUPPLY. THEN ARRANGE FOR AN ENGINEER TO ATTEND THE APPLIANCE. YOU SHOU CONDACT T TH E CUSTOMER CARE DEPARTMENT ON TELEPHONE NUMBER (0118) 933 6911.

IF AN ENGINEER ATTENDS DURING THE GUARANTEE PERIOD AND FINDS THAT A FAULT HAS BEEN CAUSED BY AN ITEM ON THE ERROR CODE LIST, WHICH COULD HAVE BEEN CLEARED BY THE CUSTOMER. THEN YOU MAY BE LIABLE FOR THE COST OF THE SERVICE CALL.
General troubleshooting
| PROBLEM | POSSIBLE CAUSES | WHAT TO DO |
| Dishwasher Re doesn't run | Euse blowcu or t circu has it break trippedPower supply is switched onWater pressure is low | fuse or reset the breaker. Remove any other appliances that are sharing the same circuit with the dishwasher.Make sure that the dishwasher is rned on and that the door is closed securely.Make sure that the power cord is lly plugged into the wall socket.Check that the water supply is nected properly and that the co water is turned on. |
| Drain pump doesn't stop | an Overflow The system overflow. If it does, then it will run the drain pump continuously when there is power to the appliance. | |
| Noise Some audible sounds are normalUtensils are not secure in the baskets or something small has dropped into the basketMotor hums | You will get a level of operating noise during a wash cycle, in particular when food is being removed from items and when the detergent dispenser places the tablet into the tub.Ensure that everything is loaded as per Baumatic's loading instructions.If the dishwasher is not going to be used for a period of time, then you should make sure that the appliance is set on a wash program once a week. Otherwise the seal around motor may dry out and cause noise. | |
| Suds in the tub | Improper detergent useSpilled rinse aid | Ensure that you are not using 3 in 1 detergent tablets, in conjunction with rinse aid and salt.Always wipe up any excess rinse aid or rinse aid spillages immediately. |
| Stained tub interior colourant | Detergent with Use was used | a detergent without colourant. |
| Dishes are not fully dried | Rinse aid dispenser is empty | Make sure that the rinse aid dispenser is filled with rinse aid. |
| Dishes and pans are not clean | Improper program program.Improper loading | Select a more intense washMake sure that the spray arms and the detergent dispenser are not being impeded by large dishes. |
| Spots and filming on glasses and pans | Extremely hard waterLow inlet temperatureImproper loadingImproper detergentIncorrect salt/ rinse aid levels | Refer to the relevant sections of this booklet, to ensure that the detergent, salt and rinse aid levels are set correctly. Ensure that the appliance is loaded correctly. |
| Steam A normal | phenomenon | You may get a small amount of steam coming through the vent by the door latch, during drying and water draining. |
| Black or grey marks on dishes | Aluminium utensils have rubbed against dishes | Use a mild abrasive cleaner to eliminate the marks. Make sure that the appliance is loaded correctly in future. |
| Water standing in the bottom of the tub | This is normal A small amount of clean water in th e base of the appliance is not something to be concerned about. | |
| Dishwasher leaks | The rinse aid dispenser is overfilled or rinse aid has been spilt inside the applianceDishwasher isn't level | Take care not to overfill the rinse aid dispenser. Spilt rinse aid could cause oversuding and lead to overflowing. Wipe away any spills immediately with a damp cloth.Make sure that the dishwasher is level. |
nstallation I

IMPORTANT: THIS INSTALLATION MUST BE COMPLETED BY A SUITABLY QUALIFIED PERSON. BAUMATIC ONLY SANCTION THE INSTALLATION GIVEN IN THIS INSTRUCTION MANUAL. YOU SHOULD DISPOSE OF ALL PACKAGING IN AN ENVIRONMENTALLY FRIENDLY MANNER.
requirements Aperture

flowchart
graph TD
    A["Dishwasher"] --> B["Door of dishwasher"]
    B --> C["Cabinet"]
    D["Minimum space of 50 mm"] --> B
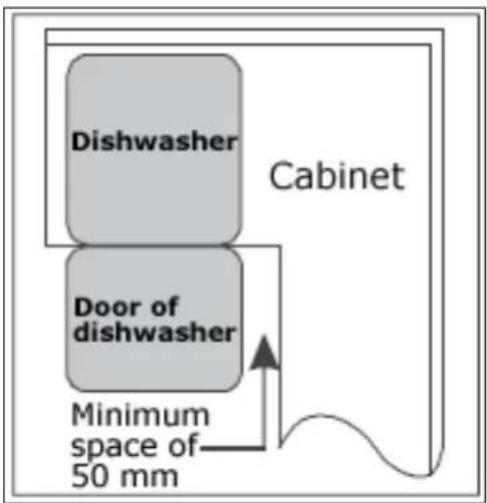
- The eaperture be that stabled dihowash should resemble the one in the drawings above.
There should be less than a 5 mm gap between the top of the dishwasher and the underneath of the worktop.
Installation stages
- Preparing and connecting the furniture door.
- Adjusting the tension of the door spring.
- Connecting to the mains water supply
- Connecting to the water outlet
- Connecting to the power supply
- Applying the condensation strip
- Positioning the dishwasher
- Levelling the dishwasher
- Securing the dishwasher
Preparing and connecting the furniture door

- IMPORTANT: The furniture door is not supplied with the appliance. You should purchase one to match with the rest of your kitchen cabinets.
The maximum weight of the furniture door should be 5.5 kilograms. The maximum thickness of the furniture door should be 15 mm. - Use the installation tem plate supplied with the appliance to mark up and then drill out the necessary holes in the furniture door.
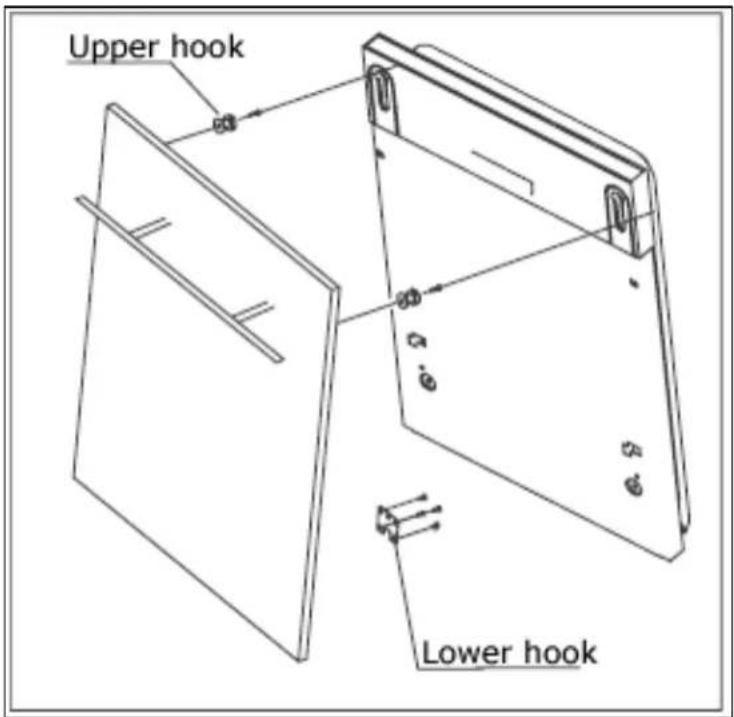
○ Attach the upper hooks onto the furniture door.
- Attach the lower hooks onto the furniture door.
- Lift the furniture door towards the dishwasher door, ensuring that the upper and lower hooks locate into the slots on the outside of the dishwasher door.
- Push the furniture door downwards so it locks into place on the dishwasher door.

- Open the dishwasher door and find the covers that are located on either side of the outer edge.
- Fully tighten the screws into the holes. Make sure that you screw them tightly into the furniture door.
○ IMPORTANT: You should make sure that the screws supplied are appropriate for the thickness of your furniture door.
- Replace the covers.
Adjusting the tension of the door spring
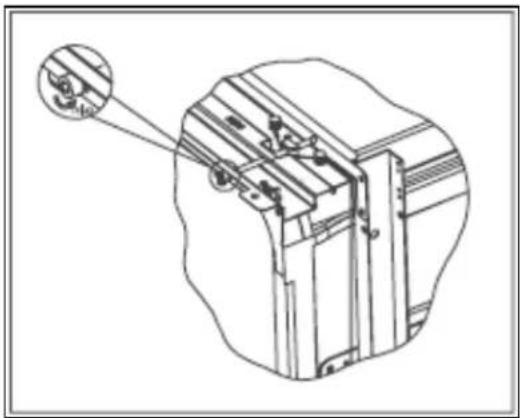
natural_image
Technical line drawing of a mechanical assembly with a magnified inset showing a detail (no text or symbols)- The door of the dishwasher is attached to springs. These are set at the factory to ensure that they are at the proper tension, so that the door can open and close smoothly.
○ After the furniture door has been adjusted, you will need to adjust the tension of the door spring.
○ Using an Allen key, rotate th Ⓞ adjusting screw to either tight or slacken the steel cable.
- The doors' spring tension is correct when:-
a) The door remains horizontal when in the fully opened position.
b) You are able to shut the door easily, by raising the door using your fingers.
○ WARNING: If you do not adjust the tension of the door spring, then it could cause damage to the appliance.
Adjusting the position of the plinth
You can make an adjustment to the position and height of the plinth if required, by following the process below:-

- Unscrew the two screws and remove the plinth from the dishwasher.
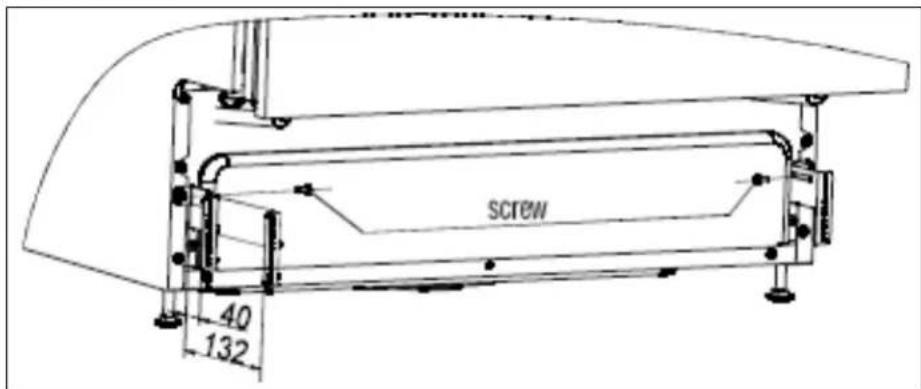
- Left and two screws to adjust the distance between the right hand plinth tabs. The gap can be adjusted between 39 mm and 134 mm.

- Fixighe plinth on the plinth tab and then adjust the plinth according to your needs. You can adjust the height of the plinth between 56 mm to 122 mm.
Connecting to the mains water supply

IMPORTANT: Do not connect the appliance to your mains water supply using an old or an existing water inlet hose. The inlet hose supplied with the dishwasher is the ONLY one that should be used.
DO NOT CONNECT THE WATER INLET HOSE TO A HOT WATER TAP.
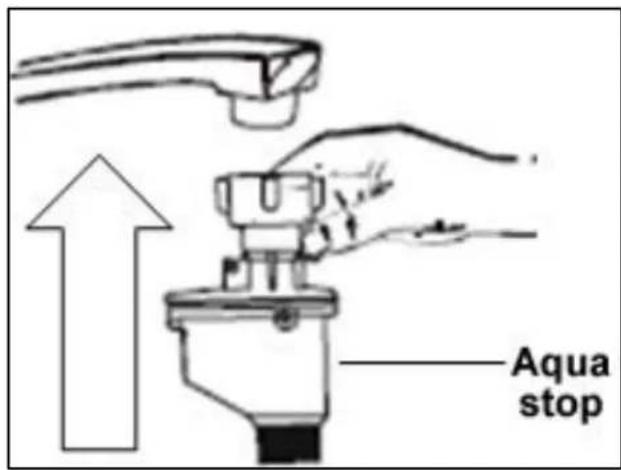
o The inlet hose will be located inside the cabinet of the dishwasher.
○ Connect the water inlet hose to a threaded water tap that has a 3/4" thread and to the inlet hose connector on the appliance.
o Fully tighten the inlet hose to the water tap and the dishwasher.

IMPORTANT: The inlet hose is fitted with an aqua stop. This MUST be fitted in the upright position, as shown in the above diagram.

IMPORTANT: If you ever have to disconnect the hose from your water tap, you must depress the pressure release button first. Otherwise you might get water leaking from the hose.
Connecting to the water outlet

√ Secure the drain hose, so that it cannot move whilst the dishwasher is in use.
√ Place the end of the drain hose on your drain pipe. Push it a short way down into your drain pipe.
√ IMPORTANT: Do not insert the drain hose too deeply into the pipe, as this may cause siphoning.
Connecting to the power supply
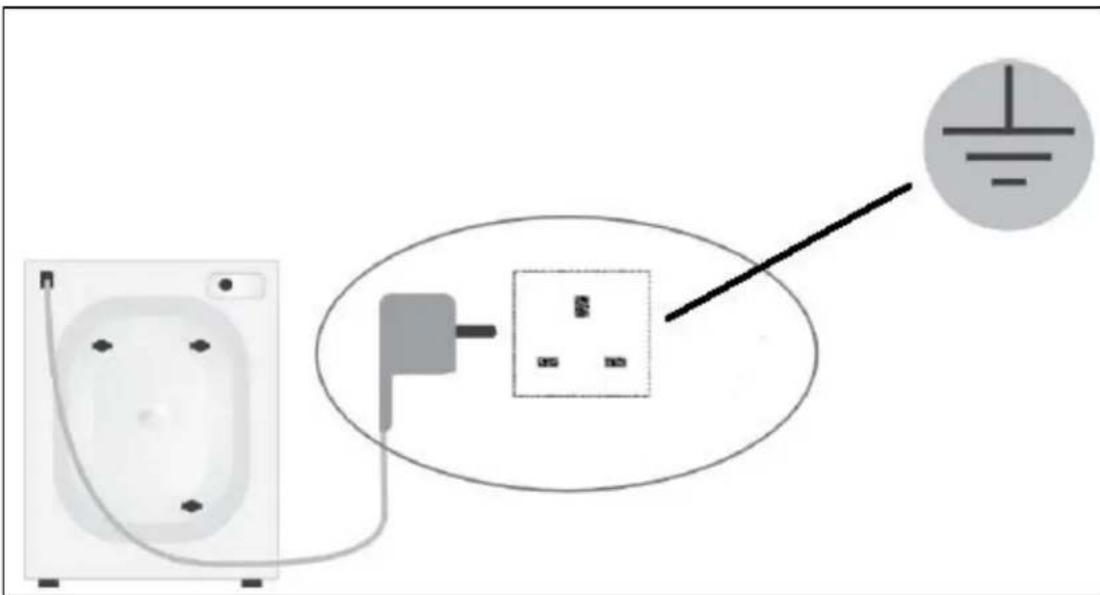
√ IMPORTANT: The electrical socket must still be accessible once the appliance is installed.

√ Consult the heating plate, located on the right hand si drop down door BEFORE making the electrical connections. Ensure that the voltage reaching the plug is the same as that on the rating plate.
√ DO NOT REMOVE THE RATING PLATE AS THE INFORMATION ON IT IS IMPORTANT.
√ The moulded plug that is supplied with the appliance must be placed into an earthed and insulated socket.
√ Broken or damaged power leads must only be replaced by a suitably qualified person. A power lead of a similar type must be used in replacement.
√ Power lead type - H 0 V V - F 3G 1.5.
√ IMPORTANT: We do not recommend that this appliance is connected to an extension lead.
Applying the condensation strip
natural_image
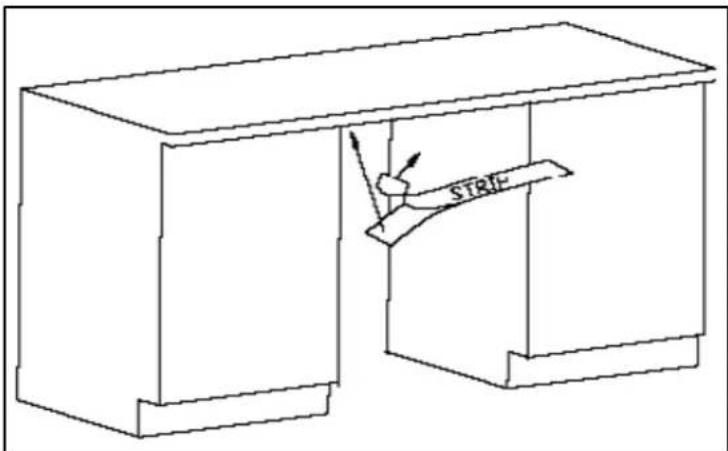
Line drawing of a cabinet with a labeled component 'STRIP' (no text or symbols beyond label)- The condensation strip must be fitted to the underside worktop to protect it against the ingress of moisture. The strip will deflect steam that rises from your appliance, away from the underneath of the worktop.
- The condensation strip will be located inside of your dishwasher.
- Ensure that the underneath of the worktop is clean before sticking the strip to it.
- Separate the backing paper away from the strip.
- Stick the condensation strip to the underneath of the worktop.
○ IMPORTANT: Failure to attach the condensation strip could result in damage to your worktop.
Positioning the dishwasher

- Place the feet of the dishwasher into the slide rails.
- Carefully slide the dishwasher back into position, underneath the worktop.
Levelling the appliance
○ IMPORTANT: Yourdishwasher must be level for it to operate properly.

○ Make sure that the dishwasher is supported whilst it is being levelled, otherwise it may tip over.

- The rear feet can be adjusted by using the adjusting screw at the front of the appliance.
- The front feet can be adjusted using a spanner.
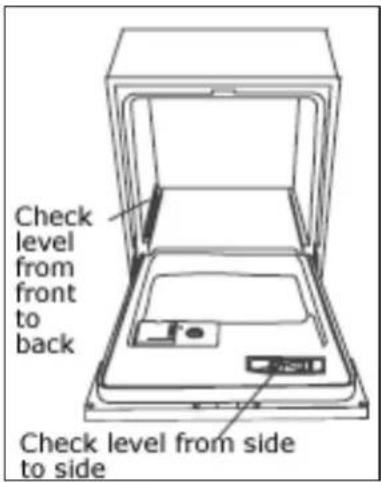
○ Use a spirit level to check that the appliance is level.
- Check that the ap pliance is level from side to side.
- Check that the appliance is level from front to back.
Securing the dishwasher
- The dishwasher must be secured to the worktop, this can be done in one of two ways:-
- Standard worktop - Secure the dishwasher to the underside of the worktop by using two wood screws.
- You should screw through the holes in the brackets at the top of the dishwasher cabinet.
- These screws should be fully tig htened.
- Marble/granite worktop- The material of the worktop will mean that it is impossible to put a screw through the underneath of the worktop.
On either side of the front edge of the dishwasher cabinet, there is a rubber stopper. You should remove the rubber stoppers, to reveal a pre-drilled hole on either side of the dishwasher.
- Secure the di shwasher to the cupboard either side of it, by screwing a wood screw through the pre-drilled holes into the cupboards. These screws should be fully tightened.
- The rubber stoppers should then be refitted into their original position.
Before first use
You should check the following before using the appliance for the first time:-
- That the dishwasher is level and fixed in position.
- That the water tap is fully open.
- That there are no leaks at either end of the drain or inlet hoses.
- That the inlet and outlet hose are fully tightened.
- That the inlet and outlet hoses are not kinked.
- That the power is switched on.
- That the water softener has been filled with 1 litre of water and salt.
- That the rinse aid dispenser has been filled.

IMPORTANT: If your appliance appears not to be operating correctly, then you should disconnect it from your mains supply and then contact Baumatic Customer Care on telephone number (0118) 933 6911.
DO NOT ATTEMPT TO REPAIR THE APPLIANCE YOURSELF.
Please note that if an engineer is asked to attend whilst the product is under guarantee and finds that the problem is not the result of an appliance fault, then you may be liable for the cost of the call out charge.
The appliance must be accessible for the engineer to perform any necessary repair. If your appliance is installed in such a way that an engineer is concerned that damage will be caused to the appliance or your kitchen, then he will not complete a repair.
This includes situations where appliances have been tiled in, sealed in with sealant, have wooden obstructions placed in front of the appliance, like plinths. Or any installation other than the one specified by Baumatic Ltd. has been completed.
Please refer to the conditions of guarantee that appear on the warranty card that you receive with the appliance.
IMPORTANT: Baumatic Ltd. operates a policy of continuous improvement and reserves the right to adjust and modify its products without prior notification.
Baumatic®
United Kingdom
Baumatic Ltd., Baumatic Buildings, 6 Bennet Road, Reading, Berkshire RG2 0QX United Kingdom
Sales Telephone
(0118) 933 6900
Sales Fax
(0118) 931 0035
Customer Care Telephone
(0118) 933 6911
Customer Care Fax
(0118) 986 9124
Spares Telephone
(01235) 437244
Advice Line Telephone
(0118) 933 6933
E-mail:
sales@baumatic.co.uk customercare@baumatic.co.uk spares@baumatic.co.uk technical@baumatic.co.uk
Website:
www.baumatic.co.uk
Republic of Ireland
Service Telephone
1-890 812 724
Spares Telephone
091 756 771
Czech Republic

- BDI652 60 cm Fully integrated full height dishwasher
- INSTRUCTION MANUAL
- USER MANUAL FOR YOUR BAUMATIC
- BDI 652 60 cm Fully integrated full height dishwasher
- ENVIRONMENTAL NOTE
- The symbol
- IMPORTANT SAFETY INFORMATION
- General Safety
- Installation
- In daily use
- Child Safety
- Declaration of conformity
- Specifications
- Product dimensions
- Aperture dimensions
- Product specifications
- Energy efficiency details
- Electrical details
- Optional extra
- Description of the appliance
- Control panel
- Using your dishwasher
- Before first use
- Filling with dishwasher salt
- Setting the water softener level
- Filling with rinse aid
- Setting the rinse aid level
- Filling with dishwasher detergent
- Loading the upper basket
- Adjusting the upper basket
- Loading the lower basket
- The cutlery basket
- Loading dishes and cutlery
- The following items are NOT suitable for washing inside a dishwasher:-
- The following items are not always suitable for washing inside a dishwasher:-
- Setting a wash program
- Make sure that the before first use section has been followed.
- Changing the wash program
- At the end of a wash program
- Setting a delay start
- Setting a half load
- Rinse aid and salt indicator neons
- Cleaning and maintenance
- The filter system
- Main filter-
- Coarse filter-
- Fine filter-
- Cleaning the filters
- Cleaning the spray arms
- Cleaning the control panel
- Cleaning the door
- Error code failure system
- E1
- E3
- E4
- E6
- E7
- nstallation I
- Installation stages
- Preparing and connecting the furniture door
- Adjusting the tension of the door spring
- Adjusting the position of the plinth
- Connecting to the mains water supply
- Connecting to the water outlet
- Connecting to the power supply
- Applying the condensation strip
- Positioning the dishwasher
- Levelling the appliance
- Securing the dishwasher
- Baumatic®
- United Kingdom
- Sales Telephone
- Sales Fax
- Customer Care Telephone
- Customer Care Fax
- Spares Telephone
- Advice Line Telephone
- E-mail:
- Website:
- Republic of Ireland
- Service Telephone
- Czech Republic
Brand : BAUMATIC
Model : BDI652
Category : Dishwasher