B5300 - Bread maker FUNAI - Free user manual and instructions
Find the device manual for free B5300 FUNAI in PDF.

| Product Type | Bread Maker |
| Brand | Funai |
| Model | B5300 |
| Loaf Capacity | Up to 1.5 lb (750 g) |
| Programs | 12 automatic programs (Basic, Whole Wheat, French, Sweet, Gluten-Free, Dough, Jam, Cake, etc.) |
| Crust Control | 3 settings (Light, Medium, Dark) |
| Timer | Up to 13 hours delayed start |
| Keep Warm Function | Up to 60 minutes after baking |
| Power | 600 W |
| Voltage | 220-240 V, 50 Hz |
| Dimensions (approx.) | 300 x 250 x 350 mm (12 x 10 x 14 in) |
| Weight (approx.) | 5.5 kg (12 lb) |
| Baking Pan | Non-stick coated, removable |
| Kneading Paddles | 2 paddles, removable |
| Display | LED with timer and program indicators |
| Viewing Window | Yes, transparent |
| Cooling System | Built-in fan |
| Safety Features | Automatic shut-off, overheat protection, cool-touch handle |
| Cleaning | Wipe with damp cloth; pan and paddles hand wash only (not dishwasher safe) |
| Spare Parts Available | Yes (pan, paddles, measuring cup, spoon); user-replaceable |
| Repairability | Modular design; spare parts available online |
| Materials | BPA-free plastic, stainless steel exterior |
| Accessories Included | Measuring cup, spoon, manual |
Frequently Asked Questions - B5300 FUNAI
User questions about B5300 FUNAI
0 question about this device. Answer the ones you know or ask your own.
Ask a new question about this device
Download the instructions for your Bread maker in PDF format for free! Find your manual B5300 - FUNAI and take your electronic device back in hand. On this page are published all the documents necessary for the use of your device. B5300 by FUNAI.
USER MANUAL B5300 FUNAI
natural_image
Line drawing of a kitchen setup with a bread roll, a milk carton, and a plate of bread (no text or symbols)TABLE OF CONTENTS
IMPORTANT SAFEGUARDS....2
PARTS AND INSTALLATION 3
CONTROL PANEL 3
PREPARATION FOR USE 4
MODE SELECTION 5
STANDARD BAKING, DOUGH ONLY AND
MUFFIN/QUICK BREAD MODE 5
WHOLE GRAIN MODE 5
MAKING BREAD 6
STANDARD BAKING MODE 6
WHOLE GRAIN BREAD MODE....7
MUFFIN/QUICK BREAD MODE....7
REMOVING THE BREAD 8
DOUGH ONLY MODE....8
THE TIMER TO MAKE BREAD OR DOUGH ..... 9
TO SET THE TIMER....9
TO CANCEL THE TIMER....9
SAFETY PRECAUTIONS....10
CARING FOR YOUR AUTO BREAD BAKER ..... 12
TIPS AND SUGGESTIONS FOR BETTER BREAD.. 13
BEFORE ASKING FOR SERVICE....14
SPECIFICATIONS 15
FCC INFORMATION....15
WARNING:
TO REDUCE THE RISK OF FIRE OR ELECTRIC SHOCK, DO NOT EXPOSE THIS APPLIANCE TO RAIN OR MOISTURE.

CAUTION
RISK OF ELECTRIC SHOCK DO NOT OPEN

CAUTION: TO REDUCE THE RISK OF ELECTRIC SHOCK, DO NOT REMOVE COVER (OR BACK) NO USER SERVICEABLE PARTS INSIDE. REFER SERVICING TO QUALIFIED SERVICE PERSONNEL.

THIS SYMBOL INDICATES THAT DANGEROUS VOLTAGE CONSTITUTING A RISK OF ELECTRIC SHOCK IS PRESENT WITHIN THIS UNIT.

THIS SYMBOL INDICATES THAT THERE ARE IMPORTANT OPERATING AND MAINTENANCE INSTRUCTIONS IN THE LITERATURE ACCOMPANYING THE APPLIANCE.
IMPORTANT SAFEGUARDS
HOUSEHOLD USE ONLY
When using electrical appliances, basic safety precautions should always be followed, including the following:
- Read all of the instructions before using the appliance.
- Do not touch hot surfaces.
- To protect against electrical shock, do not immerse power cord, plugs, or the appliance in water or other liquid.
- To prevent injuries or burns, do not insert your hand into the appliance when it is operating.
- Close supervision is necessary when any appliance is used by or near children.
- Unplug the appliance from the wall outlet after use and before cleaning. Allow the appliance to cool before attaching or removing parts.
- Do not operate any appliance with a damaged power cord or plug, or after the appliance malfunctions, or after the appliance has been damaged in any manner. Return appliance to the nearest authorized service facility for examination, repair, or adjustment.
- The use of accessory attachments not recommended by the appliance manufacturer may cause injuries.
-
Do not use the appliance outdoors.
-
Do not let the appliance's power cord hang over the edge of a table or counter.
- Do not place the appliance on or near a hot gas or electric burner, or in a heated oven.
- Extreme caution must be used when moving an appliance that contains hot liquids.
- When using an extension cord, always attach the plug to the appliance first, then plug the extension cord into the wall outlet. To disconnect, first turn any appliance controls to "OFF", then disconnect the plug from the wall outlet.
- Do not use any appliance for anything other than its intended use.
- Polarization- This appliance is equipped with a polarized alternating-current line plug (a plug having one blade wider than the other). This plug will fit into the power outlet only one way. This is a safety feature, if you are unable to insert the plug fully into the outlet, try reversing the plug, if the plug should still fail to fit, contact a qualified electrician to replace your obsolete outlet. Do not defect the safety purpose of the polarized plug.
SAVE THESE INSTRUCTIONS.
A short power-supply cord: This appliance has a short power supply cord to reduce the risk resulting from becoming entangled in or tripping over a longer cord. An extension cord may be used if you are careful in their use. If an extension cord is used, (1) the marked electrical rating of the extension cord should be at least as great as the electrical rating of the appliance, and (2) the cord should be arranged so that it will not drape over the counter-top or tabletop where it can be pulled on by children or tripped over unintentionally. If the appliance is of the grounded type, the extension cord should be a polarized 2-wire cord. The power cord must be kept dry and must not be bent or anything put on top of it.
The serial number of this product may be found on the back of the appliance. No others have the same serial number as yours. You should record the number and other vital information here and retain this book as a permanent record of your purchase to aid identification in case of theft.
| Date of Purchase | Dealer Phone No. | ||
| Dealer Purchase from | Model No. | ||
| Dealer Address | Serial No. |
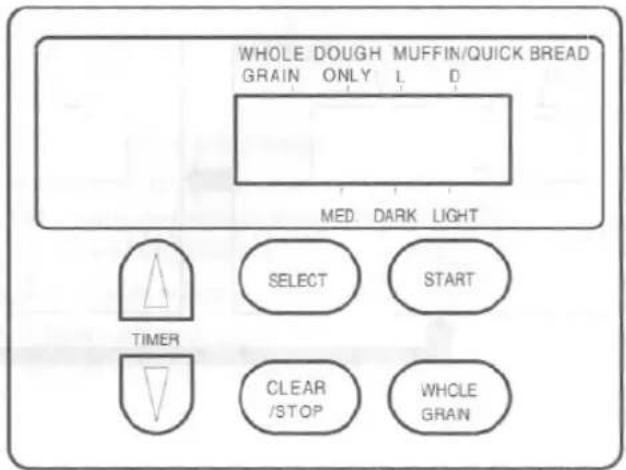
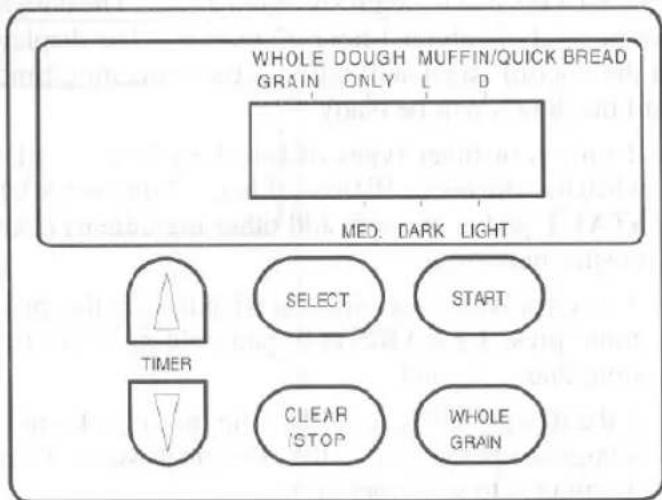
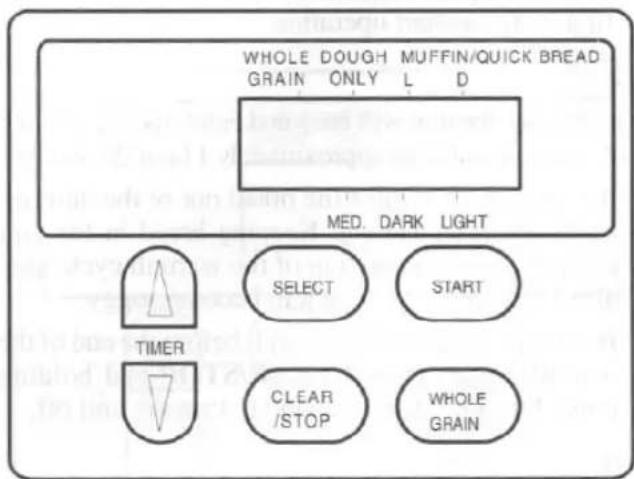
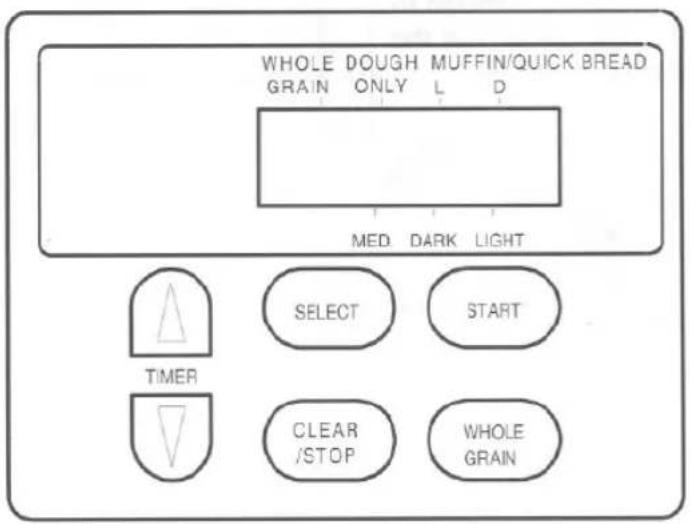
CONTROL PANEL
1 WHOLE GRAIN indicator—lights when setting for making whole grain bread.
2 DOUGH ONLY indicator – lights when setting for choosing the making dough only option.
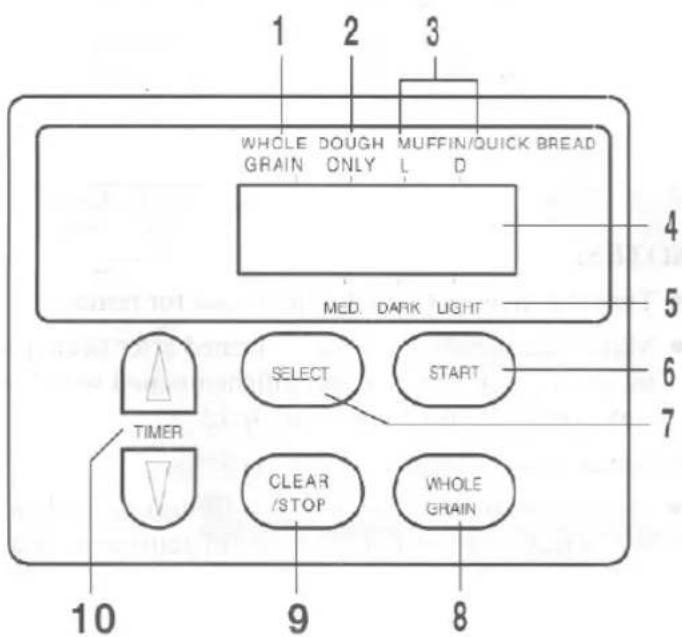
3 MUFFIN/QUICK BREAD L(Light), D(Dark) indicator—lights when setting for making bread that contain baking powder/soda rather than dry yeast.
4 Display – shows the current time, programmed time, etc.
5 MED. (Medium) indicator—lights when setting for making bread to be normal baked.
DARK indicator—lights when setting for making bread to be well baked for darker crust.
LIGHT indicator—lights when setting for making bread to be less baked for lighter crust.
6 START-Press to begin the bread making process.
7 SELECT-Press to select the desired mode: MED., DARK, LIGHT (crust), DOUGH ONLY, MUFFIN/QUICK BREAD L or D.
8 WHOLE GRAIN-Press to make whole grain bread.
9 CLEAR/STOP-Press to turn the unit off and for reprogramming.
10 TIMER-Press to set the timer for making bread or dough.
1
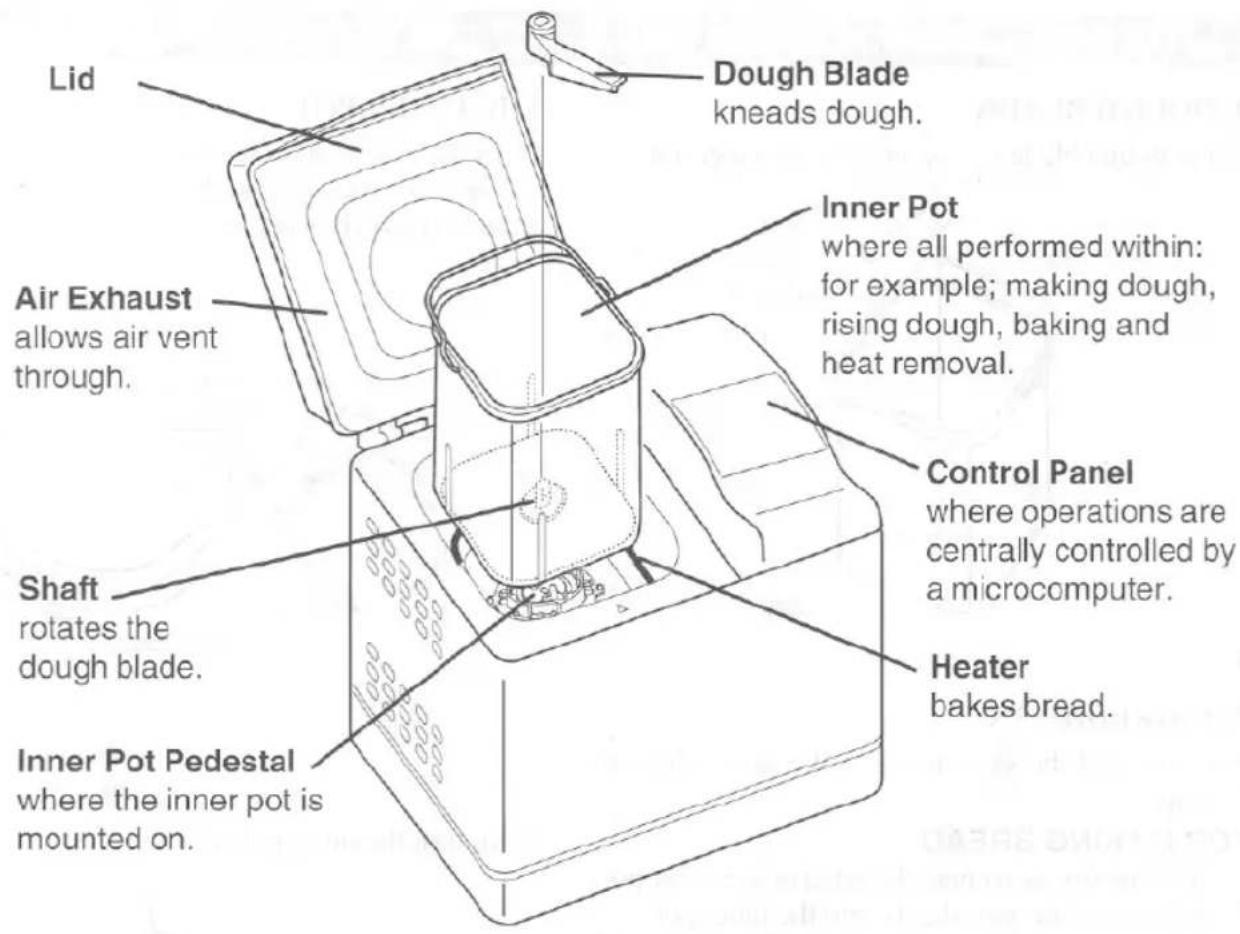
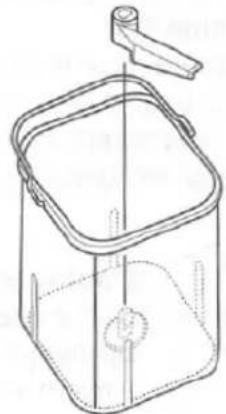
THE DOUGH BLADE
Place the dough blade on the shaft in the inner pot.
natural_image
Line drawing of a square container with a handle and central hole, no text or symbols present2
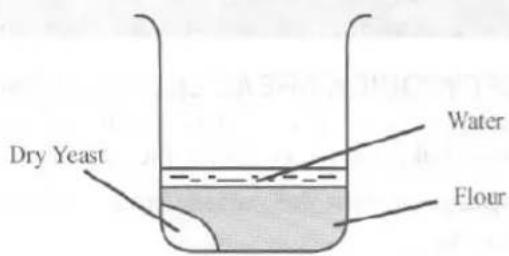
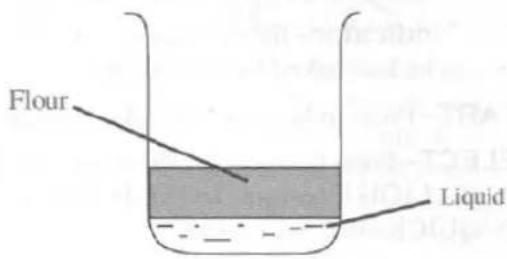
THE INGREDIENTS
Prepare and add the ingredients in the order given in your recipe.
• FOR MAKING BREAD
1) Add the dry yeast near the edge of the inner pot.
2) Add the other ingredients into the inner pot.
3) Add the specified quantity of water at 70^ F\~ 85^ F ( 20^ C\~ 30^ C).
• FOR MAKING MUFFIN/QUICK BREAD
1) Add the liquid ingredients like egg or milk.
2) Add the other ingredients into the inner pot.
NOTES:
- All ingredients, except water, must be at room temperature.
- Never add too many ingredients at the same time.
3
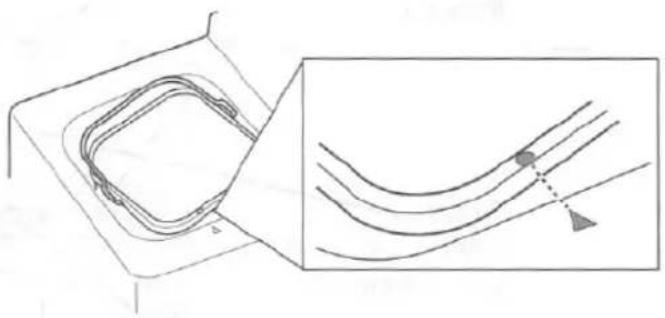
THE INNER POT
Place the inner pot on the inner pot pedestal so that the "△" mark on the unit and the "○" mark on the inner pot align each other as below.
natural_image
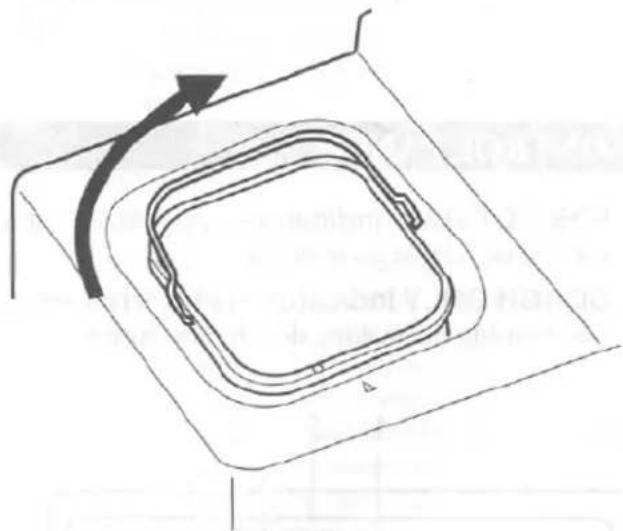
Technical line drawing showing a mechanical component with a close-up inset illustrating curved and linear features (no text or symbols)Next, turn the inner pot clockwise.
natural_image
Diagram of a square mechanical component with a curved arrow indicating direction, no text or symbols presentNOTES:
- Turn the inner pot counterclockwise for removal.
- Make sure the oven cavity is cleaned after each use by wiping out with a clean cloth dampened with hot water and mild dish-washing liquid.
- Never pour water into the oven cavity.
- Whenever touching the inner pot during or after baking, always use oven mitts to avoid getting burned.
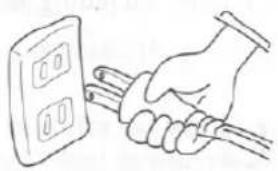
STANDARD BAKING, DOUGH ONLY AND MUFFIN/QUICK BREAD MODE

Plug the power cord into an AC outlet.
natural_image
Illustration of a hand holding a cable with three buttons, next to a wall-mounted device (no text or symbols)
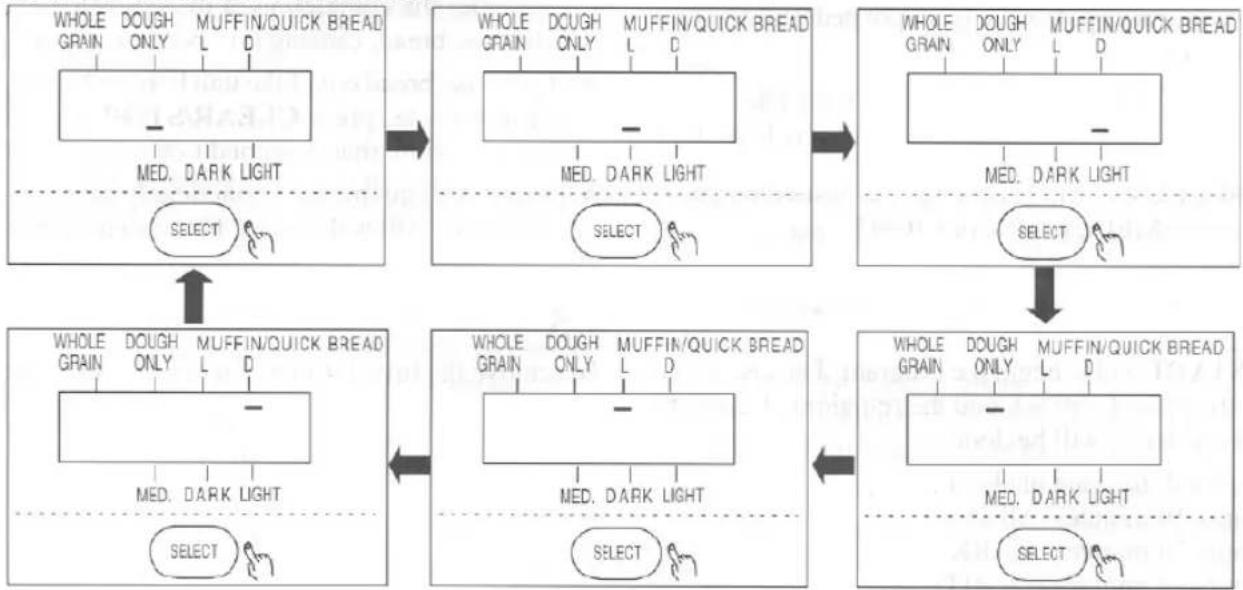
Press SELECT pad to choose desired mode. MED, DARK, LIGHT, DOUGH ONLY or MUFFIN/QUICK BREAD can be selected to make a bread.
- MED (Medium), DARK and LIGHT refer to the color of the crust or the "doneness" of the baked bread. (See page 6 and BAKING on page 13)
- L (Light) or D (Dark) can be selected when you use MUFFIN/QUICK BREAD mode. L and D refer to the color of the crust or the "doneness". (See page 7)
- DOUGH ONLY mode is used only for making dough, not proceeding to baking bread. For example; dinner rolls or bagels, etc. (See page 8)
flowchart
graph TD
    A["Whole Grain Only L D\nMED. DARK LIGHT"] --> B["Select"]
    C["Whole Grain Only L D\nMUFFIN/QUICK BREAD"] --> D["Select"]
    E["Whole Grain Only L D\nMED. DARK LIGHT"] --> F["SELECT"]
    G["Whole Grain Only L D\nMUFFIN/QUICK BREAD"] --> H["SELECT"]
    I["Whole Grain Only L D\nMED. DARK LIGHT"] --> J["SELECT"]
    K["Whole Grain Only L D\nMUFFIN/QUICK BREAD"] --> L["SELECT"]
    M["Whole Grain Only L D\nMED. DARK LIGHT"] --> N["SELECT"]
WHOLE GRAIN MODE
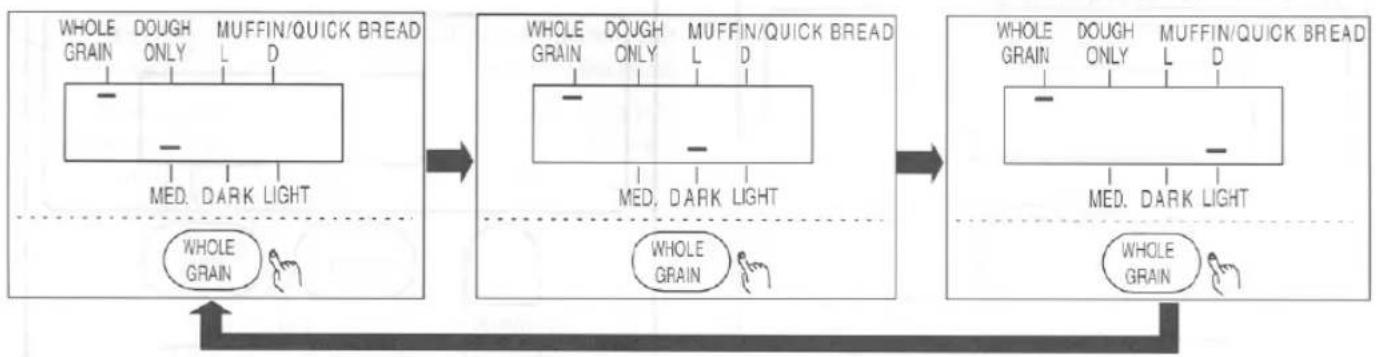
Press WHOLE GRAIN pad to make a whole grain bread.
- MED (Medium), DARK and LIGHT refer to the color of the crust or the "doneness" of the baked bread.
To change into the STANDARD BAKING, DOUGH ONLY and MUFFIN/QUICK BREAD mode, press SELECT pad or CLEAR/STOP pad.
flowchart
graph LR
    A["WHOLE GRAIN"] --> B["DOUGH ONLY"]
    B --> C["MUFFIN/QUICK BREAD"]
    C --> D["D"]
    D --> E["MED. DARK LIGHT"]
    E --> F["WHOLE GRAIN"]

    G["WHOLE GRAIN"] --> H["DOUGH ONLY"]
    H --> I["MUFFIN/QUICK BREAD"]
    I --> J["D"]
    J --> K["MED. DARK LIGHT"]
    K --> L["WHOLE GRAIN"]

    M["WHOLE GRAIN"] --> N["DOUGH ONLY"]
    N --> O["MUFFIN/QUICK BREAD"]
    O --> P["D"]
    P --> Q["MED. DARK LIGHT"]
    Q --> R["WHOLE GRAIN"]
STANDARD BAKING MODE
Use this program for automatically making bread from start to end, including the warmth cycle. The recipes included in the Recipe Booklet make it even easier.
1 (See page 4 for detail)
1) Make sure the dough blade is correctly positioned on the shaft in the inner pot.
2) Prepare and add the ingredients for a bread you are making as described in your recipe.
3) Place the inner pot on the inner pot pedestal and turn clockwise.
2
Press SELECT pad to choose for the desired darkness of the crust (MED., DARK or LIGHT)
3
Press START pad to begin the program. The display on the control panel will tell you the remaining time until the load of bread will be done.
The loaf will be done in about :
3 hours 19 minutes (MED.)
3 hours 26 minutes (DARK)
3 hours 12 minutes (LIGHT)
- If raisins or other types of bread are being made: when the unit beeps 10 times, 1 hour 17 minutes after START pad is pressed, add other ingredients (like raisins, nuts etc.).
- If an error was made and you wish to stop this program, press CLEAR/STOP pad holding down for more than 1 second.
- If the display indicates "PH", the unit is not warm enough to operate, it is at the "Pre-Heat" stage. Wait 10 minutes to start operation.
4
After baking, the unit will beep and enter into the warmth cycle automatically for approximately 1 hour 20 minutes.
- It is preferable to take the bread out of the unit immediately after baking. Keeping bread in the unit even after the completion of the warmth cycle may affect the bread, causing it to become soggy.
- If you take bread out of the unit before the end of the warmth cycle, press CLEAR/STOP pad holding down for more than 1 second to turn the unit off.
- Do not operate the unit immediately after baking is completed. Allow the unit to be at room temperature.
5
To remove the bread from the inner pot, see page 8.
WHOLE GRAIN BREAD MODE
1 (See page 4 for detail)
1) Make sure the dough blade is correctly positioned on the shaft in the inner pot.
2) Prepare and add the ingredients for the whole grain bread you are making as described in your recipe.
3) Place the inner pot on the inner pot pedestal and turn clockwise.
2
Press WHOLE GRAIN pad until the WHOLE GRAIN indicator lights.
3
Press WHOLE GRAIN pad again to choose for the desired darkness of the crust. (MED., DARK or LIGHT)
4
Press START pad to begin the Whole Grain program. The display on the control panel will tell you the remaining time until the loaf of bread will be done.
The loaf will be done in about :
3 hours 25 minutes (MED.)
3 hours 32 minutes (DARK)
3 hours 18 minutes (LIGHT)
- If raisins or other types of bread are being made: when the unit beeps 10 times, 1 hour 33 minutes after START pad is pressed, add other ingredients (like raisins, nuts etc.).
- If an error was made and you wish to stop this program, press CLEAR/STOP pad holding down for more than 1 second.
- If the display indicates "PH", the unit is not warm enough to operate, it is at the "Pre-Heat" stage. Wait 10 minutes to start operation.
5
After baking, the unit will beep and enter into the warmth cycle automatically for approximately 1 hour 20 minutes.
- It is preferable to take the bread out of the unit immediately after baking. Keeping bread in the unit even after the completion of the warmth cycle may affect the bread, causing it to become soggy.
- If you take bread out of the unit before the end of the warmth cycle, press CLEAR/STOP pad holding down for more than 1 second to turn the unit off.
6
To remove the bread from the inner pot, see page 8.
MUFFIN/QUICK BREAD MODE
You can make bread (like a muffin) that contain baking powder/soda rather than dry yeast.
1 (See page 4 for detail)
1) Make sure the dough blade is correctly positioned on the shaft in the inner pot.
2) Prepare and add the ingredients for the whole grain bread you are making as described in your recipe.
3) Place the inner pot on the inner pot pedestal and turn clockwise.
2
Press SELECT pad to choose MUFFIN/QUICK BREAD L(Light) or D(Dark).
3
Press START pad to begin the Muffin/Quick Bread program. The display on the control panel will tell you the remaining time until the loaf of quick bread will be done.
The loaf will be done in about :
1 hours 10 minutes (L: Light)
1 hours 25 minutes (D: Dark)
- If the display indicates "PH", the unit is not warm enough to operate, it is at the "Pre-Heat" stage. Wait 10 minutes to start operation.
4
After baking, the unit will beep and enter into the warmth cycle automatically for approximately 1 hour 20 minutes.
5
To remove the bread from the inner pot, see page 8.
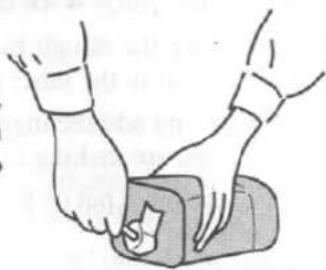
CAUTION: After baking, the unit is extremely hot. When handling metal parts (oven cavity, inner pot and dough blade) be sure to use an oven mitt.
1
First turn the inner pot counterclockwise, and then take it out.

natural_image
Illustration of hands pressing a block with curved arrows indicating motion (no text or symbols)3
Using a plastic utensil, gently remove the dough blade which is stuck into the bottom of the bread.
natural_image
Illustration of two hands performing a physical therapy or massage technique on a rectangular object (no text or symbols present)2
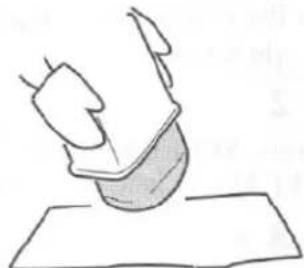
Place the inner pot upside down to carefully remove the baked bread.
natural_image
Simple line drawing of a hand holding a small object above a flat surface (no text or symbols)4
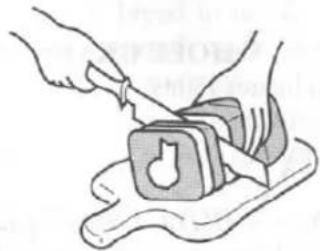
Cut the bread as desired.
natural_image
Illustration of hands cutting a small object into a block with a handle (no text or symbols)DOUGH ONLY MODE
The process of making dough only is performed with this mode. The DOUGH ONLY mode is used for only making dough which then can be used to make dinner rolls, bagels or other breads which will be hand shaped and baked in a oven.
1
(See page 4 for detail)
1) Make sure the dough blade is correctly positioned on the shaft in the inner pot.
2) Prepare and add the ingredients for the whole grain bread you are making as described in your recipe.
3) Place the inner pot on the inner pot pedestal and turn clockwise.
2
Press SELECT pad to choose DOUGH ONLY.
3
Press START pad to begin kneading dough. The dough will be ready in about 1 hour 42 minutes. The display on the control panel will tell you the remaining time until the dough will be ready.
- If raisins or other types of bread are being made: when the unit beeps 10 times, 1 hour 17 minutes after START pad is pressed, add other ingredients (like raisins, nuts etc.).
- If an error was made and you wish to stop this program, press CLEAR/STOP pad holding down for more than 1 second.
- If the display indicates "PH", the unit is not warm enough to operate, it is at the "Pre-Heat" stage. Wait 10 minutes to start operation.
4
The dough is made completely when the unit beeps for 5 minutes.
- If you wish to mute the beep sound, press CLEAR/STOP pad holding down for more than 1 second.
5
When the dough is ready, remove it from the inner pot, and proceed with the instructions given in your recipe.
You can set the timer for making bread or dough.
NOTE: Do not use the timer to avoid leaving perishable ingredients for hours in the unit.
TO SET THE TIMER
1 (See page 4 for detail)
1) Make sure the dough blade is correctly positioned on the shaft in the inner pot.
3) Prepare and add the ingredients for a bread you are making as described in your recipe.
2) Place the inner pot on the inner pot pedestal and turn clockwise.
2
Press SELECT pad to select the mode: MED., DARK, LIGHT, DOUGH ONLY, MUFFIN/QUICK BREAD L or D.
If you want to make whole grain bread, press WHOLE GRAIN pad.
NOTE: Do not use the timer to avoid leaving perishable ingredients for hours in the unit.
3
Determine the time you want your bread or dough to be done. Now count the number of hours remaining from the current time of day to the finished time you desire. Set the number of hours and minutes remaining using TIMER △ (or ▽) pad and START pad.
For example
In the case that it is presently 1:00 PM and you want the loaf of baked bread at 6:10 PM: it takes 5 hours and 10 minutes to be done.
1) Press TIMER △ (or ▽) pad until the display reads "5:10" (which means: 5 hours and 10 minutes). The timer can be adjusted at intervals of 10 minutes. The numbers will flash on and off.
2) Press START pad to set timer.
• Programmable time is as follows.
| MODE\TIME | Min. | Max. |
| STANDARD,WHOLE GRAIN mode | 3-1/2 hrs. | 12 hrs. |
| DOUGH ONLY mode | 2 hour | 10 hrs. |
| MUFFIN/QUICKBREAD mode | 1-1/2 hrs. | 12 hrs. |
TO CANCEL THE TIMER
Press CLEAR/STOP pad holding down for more than 1 second in order to deactivate the timer.
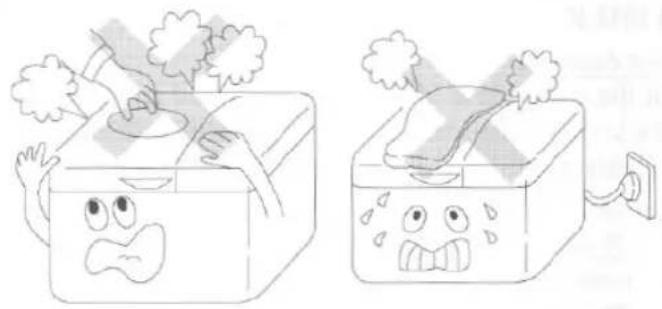
BAKING PROCESS
- Do not touch the lid since it becomes extremely hot when the unit is baking, and immediately after baking is done. Take special care if infants and children are nearby. Always use oven mitts when taking out fresh-baked bread. Especially be careful that flammable objects are never placed on the top of the unit as fire may be caused.
natural_image
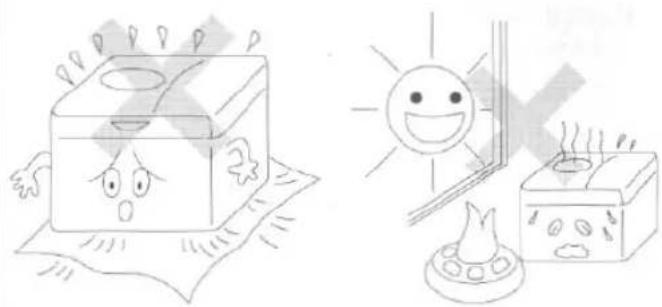
Illustration of two cartoon houses with angry faces and smoke, one emitting vapor while the other shows a steaming cup (no text or symbols)SUITABLE USE LOCATIONS
- Do not obstruct the air intake opening which is located on the bottom of the unit.
- Do not use the unit near any fire-causing objects, in places exposed to rain or direct sunlight, or other inappropriate places, as it may cause the unit to malfunction or be damaged.
natural_image
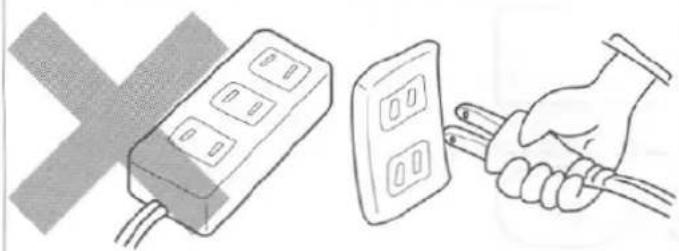
Illustration of a sun heating a box with a smiling face, next to a steaming cup on a blanket (no text or symbols)POWER SUPPLY
- Only use correctly wired power outlets.
- Never share the same outlet with other appliances.
- Remove the plug if the unit will not be used for an extended period of time.
- Your product is equipped with a polarized alternating current line plug (a plug having one blade wider than the other). This plug will fit into the power outlet only one way. This is a safety feature. If you are unable to insert the plug fully into the outlet, try reversing the plug. If the plug should still fail to fit, contact your electrician to replace your obsolete outlet. Do not defeat the safety purpose of the polarized plug.
natural_image
Illustration showing a power outlet connected to a hand holding a cable, with no text or symbols present.MAIN UNIT
- Do not wash the main unit with water, as this could lead to electrical shock, electrical shorts, or other malfunctions.
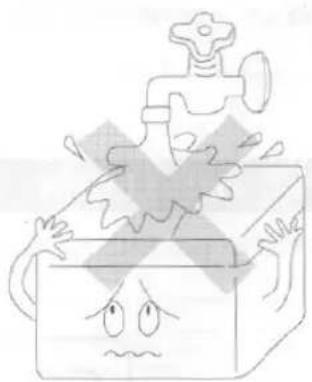
natural_image
Cartoon illustration of a distressed box with a faucet and sad face, no text or symbols presentHANDLING THE UNIT
- Do not drop or transmit strong shocks to the unit as malfunctions could result.
- This unit is exclusively designed for bread and dough making. Do not place any ingredients other than those used for bread making into the unit.

natural_image
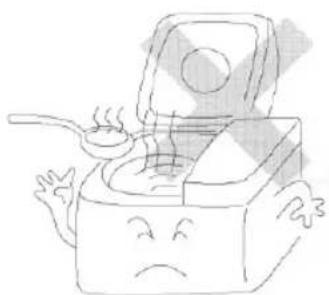
Cartoon illustration of a distressed object with falling snow and a wavy line, no text or symbols presentOVEN CAVITY
- Never pour water into the oven cavity.
- Flour, bread crumbs or any foreign matter accumulated in the oven cavity may make it impossible to insert the inner pot.
- Flour and other substances scattered on the heater may cause some smoke to be generated during baking.
natural_image
Cartoon illustration of a distressed open box with a steaming cup and waving hand (no text or symbols)IF POWER GOES OFF DURING USE
- If the power is cut during use, due to a power failure or unplugging the unit, the bread making process will end. In this case, remove the ingredients from the inner pot, replace them with fresh ingredients, and start over from the beginning.
- The same applies when using the programmable timer. If power is lost or the unit accidentally unplugged when using the timer, the program will automatically end and the unit will revert back to the standard baking mode. If the unit has already begun to make bread, remove all the ingredients from the inner pot, replace them with fresh ingredients and reset the timer. If the timer had not yet been activated and the bread making process not begun, you need only reset the timer.
CONSULT QUALIFIED SERVICE PERSONNEL:
- If damage or an abnormality is found in the power cord.
- If the unit operates improperly.
- If the temperature of the plug increases alarmingly during use.
- If unusual conditions occur.
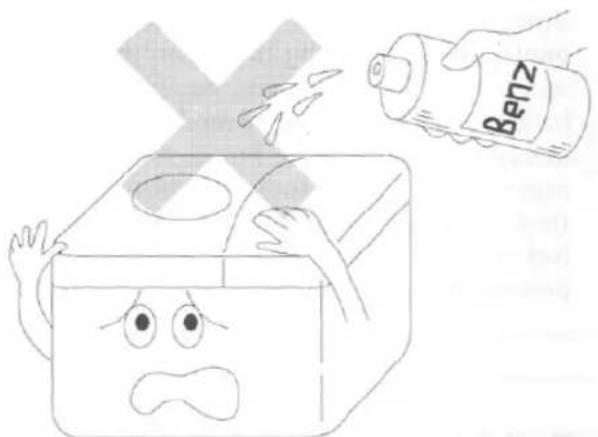
MAIN UNIT
- Unplug the power cord from the AC outlet before cleaning.
- Gently wipe off dirt with a damp sponge or soft cloth. Wipe dry with a clean cloth.
- Never use any chemical cleaners abrasive powders or scouring pads.
- Non-kitchen detergents or bleach should not be used.
INNER POT AND DOUGH BLADE
- Clean these parts thoroughly using a sponge or soft cloth dampened in lukewarm water and mild dish-washing liquid. After cleaning, dry them completely and store them inside the main unit.
NOTE:
The inner pot is coated with fluorine resin. Use only plastic utensils to avoid scratching or damaging this coating.

natural_image
Illustration of a hand holding a device with a lightning bolt and a cross symbol in the background (no text or symbols present)OVEN CAVITY
- Remove flour and bread crumbs and all foreign matter from the oven cavity with a damp cloth.
SHAFT
- Remove all crumbs after each use. Use a sponge or cloth to wipe clean.

natural_image
Simple line drawing of a hand placing a small object into a computer with a smiling face (no text or symbols)TIPS AND SUGGESTIONS FOR BETTER BREAD
The Recipe Booklet and the owner's manual of your Funai the unit can help you to make better dough and loaves, whether you are an expert or a beginner. We recommend that you to read both this Recipe Booklet and the owner's manual before your first use of the the unit. You are advised to follow the tips below:
INGREDIENTS
- All baking ingredients must be fresh, especially yeast.
- Check the expiration date on packages when purchasing yeast.
- Use only new and undamaged packages of yeast.
- As the rising strength of yeast is different for each brand and type, if the dough does not rise well try adding a little yeast, if the dough over-rises reduce the amount of yeast a little next time.
- Bread flour or hard flour is higher in protein than all-purpose flour and makes for a better loaf.
- The quality of bread flour will affect the quality of the bread. Bread flour may be different every time, even though you use the same brand, because it will vary from harvest to harvest, from year to year.
- The type/source of water used may affect the bread. If the water in your area is extremely hard or soft, we recommend that you use bottled spring water with a low mineral content.
● Always measure the ingredients carefully using US standard measuring cups and spoons.
- When measuring flour never scoop it out of the bag or the canister with the measuring cup. Always spoon the flour into the cup. Insert a clean table knife into the flour a couple of times to eliminate clumps or air pockets. Level off the top of the cup with the knife. Never pack the flour down.
CONDITIONS
- The suitable room temperature for making dough and bread is 60\~70°F (15\~20°C). The suitable humidity is 50\~60%.
- In high altitude areas, if the dough over-rises, next time reduce the amount of yeast and/or water so that the dough rises and bakes properly.
- Use the proper quantity of water at approximately 70\~85°F (20\~30°C) as specified in this Recipe Booklet.
- When the room temperature is more than about 85^ (30°C), use water that is approximately 40\~50°F (5\~10°C).
RISING
- If the humidity and/or the room temperature is too high, the dough may be very loose, sticky, moist and over-risen. In such a case, next time reduce water (approximately 1 to 2 tablespoons) and/or the yeast (approximately 1/4 1/2 teaspoon).
- If the humidity and/or the room temperature is too low, the dough may be stiff, lumpy, dry and not rise well. In such a case, add water (approximately 1 to 2 tablespoons) once the unit begins the second kneading.
BAKING
- You can adjust the darkness of the crust as you desire. If you want the bread crust to be darker, set to DARK with MODE SELECTION next time. If you want the bread crust to be lighter, set it to LIGHT. (In the MUFFIN/QUICK BREAD MODE, "D" means darker and "L" means lighter.)
- If the humidity and/or the room temperature is too high or low, the bread will be short, over-risen, collapsed or wrinkled during baking, and crumb texture will be coarse. Follow the instructions in RISING section.
OTHER TIPS
- You can make many kinds of dough and bread, not shown in this Recipe Booklet but found in general Recipe Books.
- When you adjust/arrange your own recipe, you can make an original recipe loaf.
- When cleaning this the unit refer to the owner's manual.
- In case the quality of the bread is not satisfactory although you followed the above tips and suggestions, add 1 to 2 tablespoons of lemon juice with the same amount of water, then try again.
ENJOY MAKING DOUGH AND BREAD WITH THIS UNIT!!
Concerning the items with * mark, refer to "TIPS AND SUGGESTIONS FOR BETTER BREAD" on the previous page for more details.
| PROBLEM | POSSIBLE CAUSE | SOLUTION |
| The unit does not start. | Is the power cord plugged in? | If not, plug the power cord in securely. |
| Does the display indicate "OE:02"? | If so, contact qualified service personnel. | |
| Does the display indicate "OE:01"? | The unit will not operate if the oven's interior temperature is above 131°F (55°C) – such as immediately after baking. Open the lid and let it cool down. | |
| Does the display indicate "PH"? | At present the unit is not warm enough to operate, it is at the "Pre-Heat" stage. After 10 minutes, it will start to operate. | |
| Dough does not knead or mix. | Is the dough blade attached correctly? | If not, remove the inner pot, take out ingredients, and attach the dough blade correctly. |
| Smoke is generated during baking. | Have flour or other ingredients spilled on the heating element? | If so, clean the inside of oven. If smoke results from any other cause, unplug the power cord and contact your qualified service personnel. |
| Bread cannot be baked with the program timer. | Does the display flash? | If so, you forgot to press START pad. Press START pad. |
| Is the program timer set correctly? | Carefully read "THE TIMER TO MAKE BREAD OR DOUGH". (See page 9) | |
| Dough does not rise enough. | Is the amount of water used correct? Is the temperature of the water correct? | Use the right amount of water. (Approximately 70°~85°F; 20~30°C) |
| Was bread flour used? Were all ingredients measured correctly and at room temperature with the exception of the water? | The use of bread flour is highly recommended. Measure all ingredients carefully and make sure they are at room temperature. | |
| Is the dry yeast you are using old or has it been left for a long time with the package open? Has it been stored incorrectly? | Use fresh dry yeast from an unopened package. | |
| Is the bread being baked where the temperature is excessively high or low? | Use the unit in locations where the temperature is 60°~70°F (15°~20°C). | |
| Bread cannot be baked. | Is the DOUGH ONLY mode being used? | The DOUGH ONLY mode is designed just for dough making and the unit will not enter the baking process. Remove the ingredients, replace with new ingredients, and start the unit in the correct mode. Be sure to press CLEAR/STOP pad first. |
| Is the dough blade properly attached? | If not, attach the dough blade correctly. | |
| Was the lid opened during baking? | Keep the lid closed during baking. | |
| Bread rises too much or collapses. | Is it very hot and/or humid? Are you using anything other than dry yeast? | Reduce dry yeast by 1/4 - 1/2 Tsp. Reduce water by 1 - 2 Tbsp. Add the same amount of water. If after kneading for three minutes the dough appears too dry, add additional water, 1 - 2 Tbsp. |
| Bread collapses or texture is coarse. | Have there been radical changes in the weather? Is the water warmer than 85°F (30°C) | Flour is very absorbent. During changes in weather flour will absorb excess humidity causing the dough to become too moist. Reduce water by 1 - 2 Tbsp. or add the same 1 - 2 Tbsp. amount of water. If after kneading for three minutes the dough appears too dry, add additional water, 1 - 2 Tbsp. Make sure the water is less than 85°F (30°C). |
| CPU | 4 Bit 6KB |
| POWER SUPPLY | 120V AC 60Hz |
| POWER CONSUMPTION | Heater 450W Motor 100W |
| SIZE OF THE UNIT | 13-9/16" (345mm) × 9-1/16" (230mm) × 13" (330mm) (W×D×H) |
| WEIGHT | 15.4 lbs. (7.0 kg) |
| WEIGHT OF BREAD | Approx. 2.12 lbs (960g) |
| SIZE OF BREAD | Approx. 5-5/16"(D) × 7-1/16"(H)(135 × 180mm) |
- Specifications are subject to change without notice.
FCC INFORMATION
This appliance has been tested and found to comply with the limits for a Class B digital device, pursuant to Part 15 of the FCC Rules. These limits are designed to provide reasonable protection against harmful interference in a residential installation. This equipment generates, uses, and can radiate radio frequency energy and, if not installed and used in accordance with the instructions, may cause harmful interference to radio communications. However, there is no guarantee that interference will not occur in a particular installation. If this equipment does cause harmful interference to radio or television reception, which can be determined by turning the equipment off and on, the user is encouraged to try to correct the interference by one or more of the following measures:
— Reorient or relocate the receiving antenna.
— Increase the separation distance between the equipment and receiver.
— Connect the equipment to an outlet on a circuit different from that to which the receiver is connected.
— Consult the dealer or an experienced radio/TV technician for help.
FCC Warning - This equipment may generate or use radio frequency energy. Changes or modifications to this equipment may cause harmful interference unless the modifications are expressly approved in the instruction manual. The user could lose the authority to operate this equipment if an unauthorized change or modification is made.
FUNAI CORPORATION LIMITED WARRANTY
FUNAI CORP. will repair or replace this product at our discretion, free of charge in the USA in the event of defect in materials or workmanship as follows:
DURATION:
PARTS: FUNAI CORP. will provide parts to replace defective parts without charge for one (1) year from the date of original retail purchase.
LABOR: FUNAI CORP. will provide the labor without charge for a period of one (1) year from the date of original retail purchase.
LIMITS AND EXCLUSIONS:
This warranty is extended only to the original retail purchaser. A purchase receipt or other proof of original retail purchase will be required together with the product to obtain service under this warranty.
This warranty shall not be extended to any other person or transferee.
This warranty is void and of no effect if any serial numbers on the product are altered, replaced, defaced or missing. This FUNAI CORP. Limited warranty does not apply to any the product not purchased and used in the United States.
This warranty only covers failures due to defects in material or workmanship which occur during normal use. It does not cover damage which occurs in shipment, or failures which are caused by repairs, alterations or product not supplied by FUNAI CORP., or damage which results from accident, misuse, abuse, mishandling, misapplication, alteration, faulty installation, improper maintenance, commercial use such as hotel, rental or office use of this product or damage which results from fire, flood, lightning or other acts of God.
THIS WARRANTY DOES NOT COVER PACKING MATERIALS, ANY ACCESSORIES, ANY COSMETIC PARTS OR COMPLETE ASSEMBLY PARTS.
FUNAI CORP. AND ITS REPRESENTATIVES OR AGENTS SHALL IN NO EVENT BE LIABLE FOR ANY GENERAL, INDIRECT OR CONSEQUENTIAL DAMAGES ARISING OUT OF OR OCCASIONED BY THE USE OF OR THE INABILITY TO USE THIS PRODUCT. THIS WARRANTY IS MADE IN LIEU OF ALL OTHER WARRANTIES, EXPRESS OR IMPLIED, AND OF ALL OTHER LIABILITIES ON THE PART OF FUNAI, ALL OTHER WARRANTIES INCLUDING THE WARRANTY OF MERCHANTABILITY, AND FITNESS FOR A PARTICULAR PURPOSE, ARE HEREBY DISCLAIMED BY FUNAI AND ITS REPRESENTATIVES IN THE UNITED STATES.
ALL WARRANTY INSPECTIONS AND REPAIRS MUST BE PERFORMED BY FUNAI AUTHORIZED SERVICE CENTER. THIS WARRANTY IS VALID WHEN THE UNIT IS CARRIED-IN TO FUNAI AUTHORIZED SERVICE FACILITY.
WHEN YOU ARE RETURNING THE PRODUCT FOR SERVICE TO THE FACTORY SERVICE CENTER, PLEASE CONTACT THE FUNAI SERVICE DEPARTMENT TO RECEIVE M.R.A. (MERCHANDISE RETURN AUTHORIZATION) NUMBER PRIOR TO SHIPPING. ANY POSTAGE, INSURANCE AND SHIPPING COST, INCURRED IN PRESENTING OR SENDING YOUR FUNAI PRODUCT FOR SERVICE ARE SHIPPER'S RESPONSIBILITY.
CAREFULLY PACK WITH PROPER PACKING MATERIALS, PREFERABLY IN THE ORIGINAL CARTON.
ATTACH WRITTEN DOCUMENTATION DETAILING THE COMPLAINT, TO THE OUTSIDE OR INSIDE OF THE CARTON.
THE PRODUCT MUST BE ACCOMPANIED BY A COPY OF THE ORIGINAL RETAIL PURCHASE RECEIPT. IF NO PROOF OF PURCHASE IS ATTACHED, THE WARRANTY WILL NOT BE HONORED AND REPAIRS COSTS WILL BE CHARGED.
IMPORTANT:
THIS LIMITED WARRANTY GIVES YOU SPECIFIC LEGAL RIGHTS, YOU MAY HAVE OTHER RIGHTS THAT VARY FROM STATE TO STATE, IF, AT ANY TIME DURING THE WARRANTY PERIOD, YOU ARE UNABLE TO OBTAIN SATISFACTION WITH THE REPAIR OF THIS PRODUCT, PLEASE CONTACT FUNAI CORP.
ATTENTION:
FUNAI CORP. RESERVES THE RIGHT TO MODIFY ANY DESIGN OF THIS PRODUCT WITHOUT PRIOR NOTICE.
For information of your nearest FUNAI Authorized Service Center or general service procedure, please call or write to the following
FUNAI CORPORATION.
Factory Service Center
100 North Street; Teterboro, NJ 07608
Tel:800-242-7158
(Eastern Time 9:00 AM - 4:30 PM)