OAP1506 - Humidifier ORION - Free user manual and instructions
Find the device manual for free OAP1506 ORION in PDF.

User questions about OAP1506 ORION
0 question about this device. Answer the ones you know or ask your own.
Ask a new question about this device
Download the instructions for your Humidifier in PDF format for free! Find your manual OAP1506 - ORION and take your electronic device back in hand. On this page are published all the documents necessary for the use of your device. OAP1506 by ORION.
USER MANUAL OAP1506 ORION
natural_image
Exterior view of a modern air purifier with digital display and control panel (no visible text or symbols on the device body)


Read the manual carefully before usage
Thank you for purchasing this product. The product is a unit of air purifier fitted with high efficiency filters. To get familiarized with your new product, please read the manual carefully and retain this booklet for future reference.
TABLE OF CONTENTS
Function and property 1.
Tech-data 1.
Safety rules 2.
Component 2.
Operation 3.
Placement 5.
Maintenance 6.
Filter equipment 6
Failure and solutions .... 7
Function and Property
HEPA filter with Vitamin C
Filter the air removing smoke and dust of 0.3 micron. The filtrating rate is as high as 99. Give out healthy and fresh Vitamin C which can beautify our skin preventing us from cold and flue .
- Activated carbon filter
Absorb smoke, formaldehyde, ethanethiol, ammonia and many other harmful and bad odor gases.
Photocatalyst filter with Catechin
Be capable of decomposing quickly formaldehyde, benzene, toluene xylene and many other harmful elements and bad odor gases, killing virus and bacterium in the air.
Cool plasma generating
With high voltage between the two poles a large amount of positive ions and negative ions are generated by alternating discharging .
UV light
UV light of 365nm capable of eliminating various kinds of bacteria.
Dust sensor
Sense the indoor dust, smoke and any polluting particles.
Odor sensor
Adjust air flow automatically according to the air pollution level Sense various odors produced by smoking or cooking
Tech-data
| Model | OAP1506 |
| Voltage | 220-240V~ 50Hz |
| Power (W) | 100 |
| Rated air flow (m3/h) | 150-300 |
| Applicable area (m2) | 50 |
| Net weight (kg) | 12.5 |
| Dimension (LXWXH) (mm) | 480X260X665 |
Safety Rules Safety Rul
- Please disconnect the power if the unit will not be used for a long time.
- Do not place/insert foreign objects into inlet and outlet ducts to avoid damage.
- Please unpack the filters before usage otherwise there will be no filtering effect.
- Please do not cover the outlet duct with anything.
● Never use the product in any area which may have water splashing on the unit - Please do not wash the unit with gasoline or pesticide or the plastic parts may crack and cause electric shock.
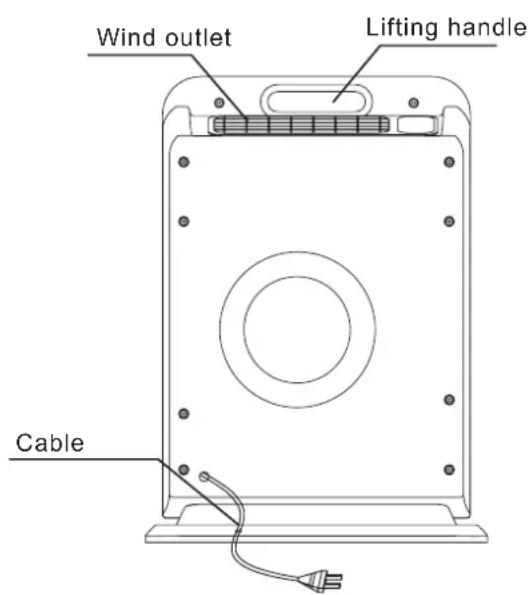
Component
comp
Front View & Back View
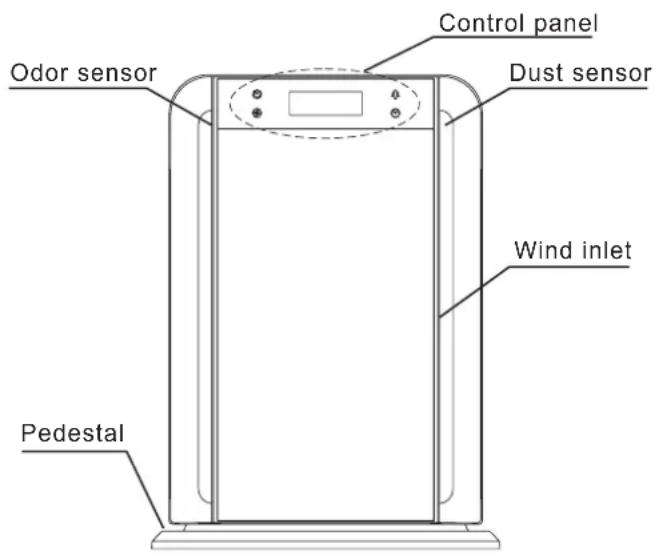
Control panel

Operation
To make the best use of the air purifier, please place and adjust it properly according to air pollution period and area. Automatic working and time setting functions are preferred for better effect.
Method of Operation
1. Connect the power
Connect the power, the sign of power light on the LED screen. Unit is ready for operation.
2. On/Off
Touch the sign of power ⏻ on the control panel, The signs of power, low speed, density of dust, VOC will light. The density of dust and VOC will be checked by the sensors automatically when the motor is running. Press the button again, the screen is dark with only the sign of power lighting.
3. Fan Speed adjustment
Touch the sign 📋 for selection of fan speed. The LED screen will indicate one sign for low speed, two for medium and three for high.
4. UV light and lonizer function
Touch the sign Ⓤ for UV light and lonizer, the indicator will be shown on the control panel, indicating the selection preferred.
5. Time setting
To enable the timer function, Touch the sign ☺ once to get the time flashing as 0:00 on the LED screen. With further tough the time will increase in an interval of 30 mins till 8 hours the longest. The unit will submit the setting in 3 seconds with the signs of clock and 0:00 will then light up steadily.
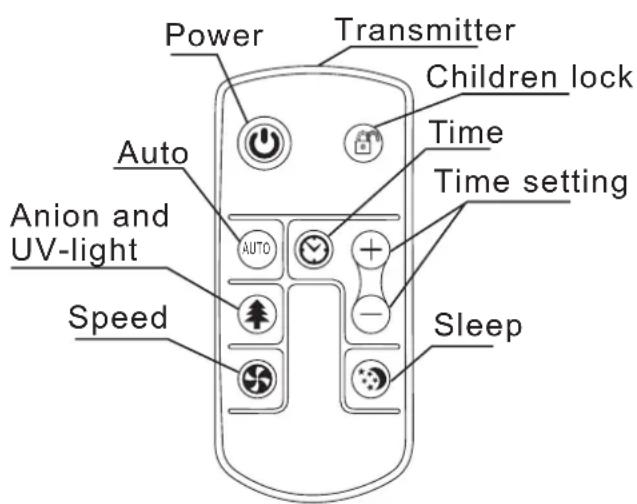
Operation of Remote Controller
1. Button of Child Lock
Child lock is a function of locking the whole unit including the switch to avoid operation by children. With reconnection of power the unit restores to Open Lock mode. The sign of lock lights when it is in locked mode.
Operation
2. Button of Auto function
Auto function button is on the remote controller. Press the button the signs of AUTO and will light. Sensors will check the density of dust and VOC, the unit will work automatically according to the density.
detected by the odor sensor in three degrees separately with sign of
VOC ■■ for low density, for mid
VOC ■■■■■■ for high. The sign of 📄L■■■■
indicates the density of dust detected by the dust sensor in three degrees separately with the sign of Fig. 1 density,
for middle and for high.
3. Button of time setting
Press the button of time setting, the signs of clock and will be shown on the LED screen. Press button of "+" or "-" each time, the time will increase from 30 minutes to 8 hours longest. The time set will be submitted with a further press of the button of time setting. The signs of clock and light in stability. Without the press of the time setting button for confirmation the time set will be given up. To give up the time set you may press the time setting button again.
4. Button of sleeping mode
Press the button of sleeping mode, the unit works in low speed with a sign of sleeping on and sign of speed dim.
- The buttons of Power, Speed, UV light and organize the remote control are all the same in function as those on the panel of the unit.
Notice
- Please take off the insolating plate of the battery before usage of remote control.
- Please direct the remote control to the receiver window on the unit.
- Be sure to take the battery out of the remote control if it is out of use for a long time.
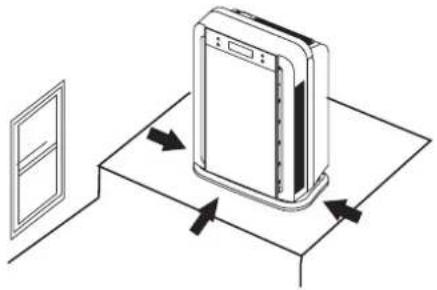
Placement
- Keep it at least 10cm away from the wall.
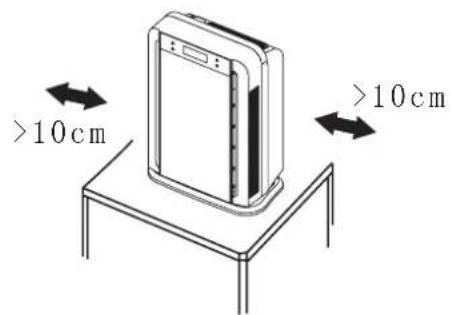
- For better performance of air purifying, please place the machine where the air circulation is good.
natural_image
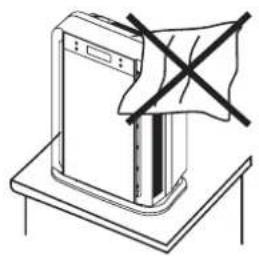
Diagram of a server rack with directional arrows indicating movement or flow (no text or symbols)Do not place it near the window where the curtain may cover the Intake and out flow of the air.
natural_image
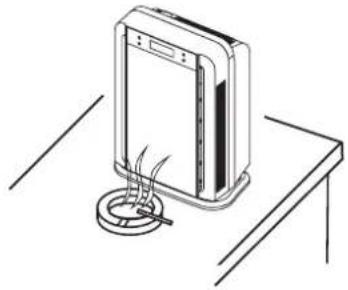
Line drawing of a washing machine with a black X mark on top, no text or symbols presentPlace the air purifier near the source of the polluted air for more effective results.
natural_image
Line drawing of a portable electronic device with a circular base and cable, placed on a table (no text or symbols)Filter Installation
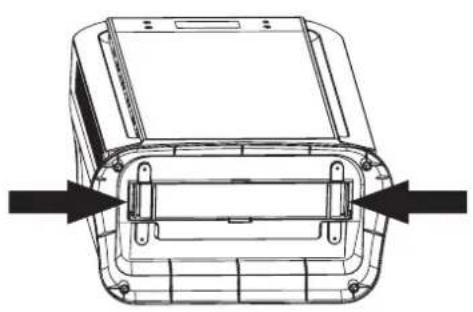
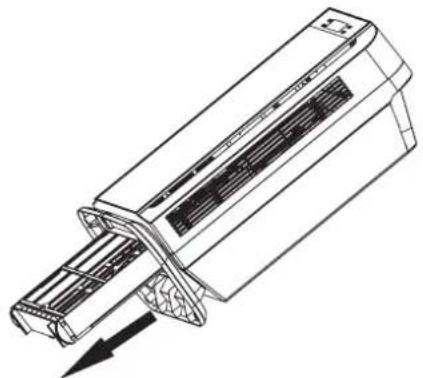
- Place the unit on its back lying down and hold the handles of the filter frame to release the frame from the unit.
natural_image
Technical line drawing of a vehicle front panel with mounting holes and structural ribs (no text or symbols)3. IMPORANTED
To be unpacked from its existing package before being used for the first time. Please note down the beginning operation date of the unit on the label placed at the side of the filter.
- Hold the handles of the filter frame and pull the filter out following the direction of the diagram below.
natural_image
Technical line drawing of a mechanical component with internal structure and directional arrow (no text or symbols)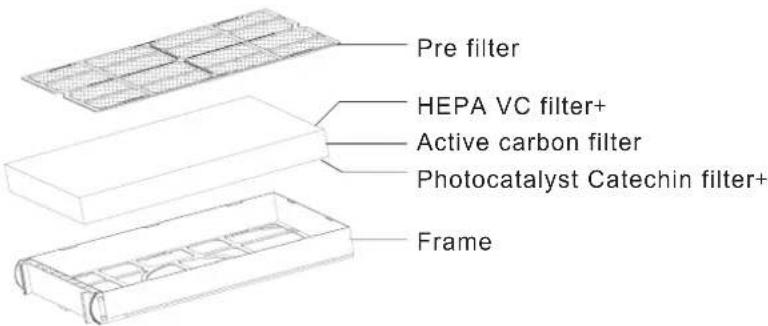
Maintenance

WARNING
1) The sign indicates that any wrongful usage of the unit may lead to electr shock, serious injuries and death.

NOTE
2) This sign indicates that any wrongful usage of the unit may lead to injury or damage to personal belongings.

NOTE
3) Never clean the filters with water to avoid changes to the shape of the filters.
Filter Replacement
- The standard service life of the filters is one year. However, the service life will also depend on the duration of usage and the surroundings air pollution level.
- The filters are recommended to be cleaned using a vacuum cleaner after 3 to 4 months of usage.
- The filters are also recommended to be changed after being used for no more than two years.
- Please contact the authorized retailers for purchase of replacement filters.
ower ableP C Replacement
For replacement of damaged power cable, please contact service center
Filter equipment Filter eq
| Structure | Function | |
| Standard equipments | Pre filter, HEPAfilter with Vitamin C, Activated carbon filter, Photocatalyst filter with Catechin UV light, cool plasma. | Removing formaldehyde odour, VOC, bacteria, findust and cool plasmagen erations. |
Failure and Solutions
Please refer to the following before contacting Customer Service Centre for a service / repair:
| Failure | Checklist |
| Out of operation | Please check whether the power plug is properly inserted into the socket. |
| Remote Control is not operational | Please check whether the batteries are still usable.The batteries are placed in the correct poles.The unit's receiver are facing the remote control line of sight. |
| Unable to remove odour Unable to remove the dirt in the air Loud operational noise level | The air intake may be blocked.Please clean both the air intake ductsIf the filters are too dirty, please clear each of the filters or replace with new ones if the unit is still not functioning properly. |