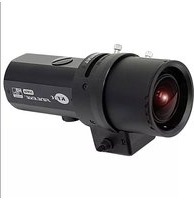
KPC-HDB650M - Surveillance Camera KT&C - Free user manual and instructions
Find the device manual for free KPC-HDB650M KT&C in PDF.


| Product Type | Surveillance Camera |
| Brand | KT&C |
| Model | KPC-HDB650M |
| Image Sensor | 1/2.8" Progressive Scan CMOS |
| Resolution | 1920 x 1080 (Full HD) |
| Lens | 2.8mm fixed lens (field of view: 90°) |
| IR Distance | Up to 20 meters |
| Day/Night | Auto switching with IR cut filter |
| Weatherproof Rating | IP66 (indoor/outdoor use) |
| Power Supply | 12V DC (power adapter included) |
| Power Consumption | Max 5W |
| Dimensions | 120mm (D) x 95mm (H) |
| Weight | 400g |
| Housing Material | Aluminum alloy |
| Mounting Type | Ceiling mount (bracket included) |
| Video Output | CVBS (1.0Vp-p, 75Ω) |
| Operating Temperature | -20°C to 50°C |
| Maintenance | Clean lens with soft cloth; check connections regularly |
| Safety | Use only recommended power supply; do not expose to extreme moisture |
| Spare Parts & Repairability | Contact KT&C support for genuine parts; repair by qualified technician recommended |
| General Information | Designed for indoor/outdoor surveillance with wide dynamic range |
Frequently Asked Questions - KPC-HDB650M KT&C
User questions about KPC-HDB650M KT&C
0 question about this device. Answer the ones you know or ask your own.
Ask a new question about this device
Download the instructions for your Surveillance Camera in PDF format for free! Find your manual KPC-HDB650M - KT&C and take your electronic device back in hand. On this page are published all the documents necessary for the use of your device. KPC-HDB650M by KT&C.
USER MANUAL KPC-HDB650M KT&C
natural_image
Two mechanical components with no visible text or symbolsThank you for choosing our high quality camera. Before attempting to connect or operate, please read and follow these instructions.
NAME AND FUNCTION
FRONT

BACK
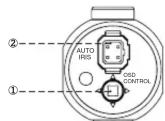
①. ■ MENU BUTTON
▲ UP BUTTON
▼ DOWON BUTTON
LEFT BUTTON
▶ RIGHT BUTTON
②. Auto IRIS Jack
CAUTIONS CAUTIONS
This device complies with Part 15 of the FCC Rules. Operation is subject to the following two conditions:
- This device may not cause harmful interference.
- This device must accept any interference received, including interference that may cause undesired operation.
Note
This equipment has been tested and found to comply with the limits for a Class A digital device, pursuant to part 15 of the FCC Rules. These limits are designed to provide reasonable protection against harmful interference when the equipment is operated in a commercial environment. This equipment generates, uses, and can radiate radio frequency energy and, if not installed and used in accordance with the instruction manual, may cause harmful interference to radio communications. Operation of this equipment in a residential area is likely to cause harmful interference in which case the user will be required to correct the interference at his own expense.
WARNING
This is a class A product. In a domestic environment this product may cause radio interference in which case the user may be required to take adequate measures.
Caution -
Any changes or modifications in construction of this devies which are not expressly approved by the party responsible for compliance could void the user's authority to operate the equipment.
CAUTION
- A regulated DC12V 300mA power supply is recommended for use with this camera for the boat picture and the remarkable operation
for the best picture and the most stable operation. An unregulated power supply can cause damage to the camera. When an unregulated power supply is applied, the product warranty will be void.
- It is recommended that the camera is used with a monitor that has a CCTV quality 750 video impedance level. If your monitor is switched to high impedance
quality 1022 video impedance level. If your monitor is switched to high impedance then please adjust accordingly.
- Do not attempt to disassemble the camera to gain access to the internal
componets. Refer servicing to your dealer.
- Never face the camera towards the sun of any bright or reflective light, which
May cause officials on the picture and possible damage to the
-
Do not expose the camera to rain or other types of liquid
-
The apparatus must be connected to a main socket-outlet with a protective earth
connection.
WEEE

(Waste Electrical & Electronic Equipment)
This marking shown on the product or its literature, indicates that it should not be disposed with other household wastes at the end of its working life. To prevent possible harm to the environment or human health from uncontrolled waste disposal, please separate this from other types of wastes and recycle it responsibly to promote the sustainable reuse of material resources. Household users should contact either the retailer where they purchased this product, or their local government office, for details of where and how they can take item for environmentally safe recycling.
Business users should contact their supplier and check the terms and conditions of the purchase contract. This product should not be mixed with other commercial wastes for disposal.

CAUTION RISK OF ELECTRIC SHOCK DO NOT OPEN
TO REDUCE THE RISK OF ELECTRIC SHOCK, DO NOT REMOVE COVER(OR BACK). NO USER. SERVICING TO QUALIFIED SERVICE PERSONNEL.

This symbol is intended to alert the user to the presence of uninsulated "dangerous voltage" within the product's enclosure that may be of sufficient magnitude to constitute a risk of electric shock.
This symbol is intended to alert the user to the presence of important operating and maintenance(servicing) instruction in the literature accompanying the appliance.
COMPONENTS
| HD CCTV Camera | |
| Auto Iris LensConnection Plug | |
| C-mount Adaptor Ring | |
| Spare Screw (Machine 2x2) - 2ea | |
| Operation Manual |
INSTALLATION
- LENS CONNECTION
Lenses are sold separate. Lenses such as an auto iris lens, CS-Mount lens and C-Mount lens can be used.

When using an auto iris lens
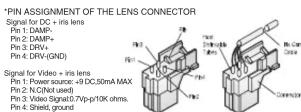
. Please peer off about 0mm of the outer skin of the auto iris lens cable

- Please peel off about 2mm of the outer skin of the insulated conductor inside the lens cable.

- Please remove the cover of the auto iris lens connection plug and solder the lens cable ti the connector pin in the plug.
-
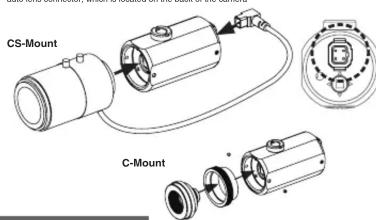
Please replace the auto iris lens connection plug cover and take off the CCD protection cap and than attach the auto iris lens to the camera by screwing it in clockwise.
-
Please insert the connection plug that is connected to the auto iris lens cable into the auto lens connector, which is located on the back of the camera
Back Focus Procedure
• MONITOR CONNECTION

flowchart
graph LR
    A["Device"] --> B["DC12V IN (Black)"]
    B --> C["BNC FEMALE HD-SDI (low)"]
    C --> D["Monitor"]
    D --> E["HD-SDI IN"]
    E --> F["DC12V Power Supply"]
    F --> G["BNC FEMALE (2nd Video / Yellow)"]
Step 1 - Remove Lens Cover.
Step 2 - If using a C-Mount lenses it can be applied to the camera at this time.
Step 3 - Most current lenses are CS-Mount and require removal of the C/CS ring.
Step 4 - To remove the C/CS ring loosen but do not
remove completely the two set screws and than remove the C/CS ring.
Step 5 - Screw on the CS-Mount lens until a good picture is obtained and tighten the set screw.
Step 6 - Use the focus ring on the lens to obtain a finer focusing
NOTE - if a C-Mount lens was applied and focus could not be obtained, please try the following • Ensure that the lens is in face a C-Mount and not a CS-Mount. • Check the focus adjust on the lens. • if need be loosen the set screws and adjust the position of the lens and C/CS ring as one unit until a good focus is obtained.
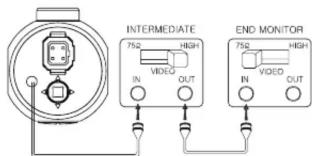
* As the connecting method varies with instruments, refer to the
Manual supplied with the instrument.
* Set the 75Ω / Hi-Z selection switch as shown below if you have an intermediate device.
OSD MANUAL
| MAIN MENU 1st Sub MENU 2nd Sub MENU 3rd Sub MENU 4th Sub MENU | ||||
| EXPOSURE | BRIGHTNESS 0 ~ 20 | |||
| LENS(IRIS) AUTO / | MANUAL | AE MODE | INDOOR / OUTDOOR / DEBLUR ( in Auto Mode ) | |
| NORMAL / DEBLUR ( in Manual Mode). | ||||
| RETURN BACK / EXIT | 1/30(25), 1/60(50), 1/120(100), 1/240, 1/500, 1/1K, 1/4K, 1/8K, 1/16K, 1/30K, 1/60K | |||
| SHUTTER AUTO / | MANUAL | LEVEL | 1/30(25), 1/60(50), 1/120(100), 1/240, 1/500, 1/1K, 1/4K, 1/8K, 1/16K, 1/30K, 1/60K | |
| RETURN BACK / EXIT | ||||
| DSS OFF / X2 / X3 / X4 / X5 / X6 / X7 / X8 | ||||
| AGC 0 ~ 20 | ||||
| RESET DATA BACK / DEF | ||||
| RETURN BACK / EXIT | ||||
| WHITE BALANCE | WB MODE | AUTO / AUTOext / PUSH / MANUAL | COLOR TEMP | LOW / MIDDLE / HIGH |
| R-GAIN | 0 ~ 20 | |||
| B-GAIN | 0 ~ 20 | |||
| RETURN | BACK / EXIT | |||
| SATURATION | 0 ~ 20 | |||
| RESET DATA BACK / DEF | ||||
| RETURN BACK / EXIT | ||||
| D-WDR / BLC | OFF / BLC / D-WDR | H-POS | 0 ~ 20 | |
| V-POS | 0 ~ 20 | |||
| H-SIZE | 0 ~ 20 | |||
| V-SIZE | 0 ~ 20 | |||
| RETURN BACK / EXIT | ||||
| DNR OFF / LOW / MIDDLE / HIGH | ||||
| DAY & NIGHT | AUTO/ COLOR / B&W | AGC THRES | 0 ~ 20 | |
| AGC MARGIN | 0 ~ 20 | |||
| DELAY | LOW / MIDDLE / HIGH | |||
| RESET DATA | BACK / DEF | |||
| RETURN BACK / EXIT | ||||
| IMAGE | SHARPNESS 0 ~ 20 | |||
| GAMMA 0.45 / 0.5 / 0.55 / 0.6 / 0.65 | ||||
| MIRROR OFF / ON | ||||
| FLIP OFF / ON | ||||
| DZOOM 1.0X / 1.1X / 1.2X / 1.3X ...... 7.7X / 7.8X / 7.9X / 8.0X | ||||
| DEFOG | OFF / ON | MODE | AUTO / MANUAL | |
| LEVEL | LOW / MIDDLE / HIGH | |||
| RETURN BACK / EXIT | ||||
| LENS SHADING | OFF / ON | WEIGHT | 0% ~ 100% | |
| RETURN BACK / EXIT | ||||
| RESET DATA BACK / DEF | ||||
| RETURN BACK / EXIT | ||||
| SPECIAL | FOCUS ASSIST | OFF / ON | ||
| ZONE NUM | 0 ~ 15 | |||
| ZONE OP | OFF / ON | |||
| H-POS | 0 ~ 60 | |||
| V-POS | 0 ~ 40 | |||
| H-SIZE | 0 ~ 40 | |||
| V-SIZE | 0 ~ 40 | |||
| Y-LEVEL | 0 ~ 10 | |||
| CR LEVEL | 0 ~ 10 | |||
| CB LEVEL | 0 ~ 10 | |||
| RETURN BACK / EXIT | ||||
| HLMASK OFF / ON | LEVEL | 0 ~ 20 | ||
| COLOR | BLK / WHI / YEL / CYN / GRN / MAG / RED / BLU | |||
| RETURN BACK / EXIT | ||||
| PATTERN OFF / ON | ||||
| RESET DATA BACK / DEF | ||||
| RETURN BACK / EXIT | ||||
| SYSTEM | SDI FORMAT | 1080P / 720P | ||
| FRAME RATE 30(6) / 25(50) | ||||
| CVBS FORMAT | NTSC / PAL | |||
| APPLY | OK / ON | |||
| LANGUAGE | ENG / CHN / CHN(S) | |||
| SYSTEM INFO | S/W VERSION | |||
| SET VERSION | ||||
| RETURN BACK / EXIT | ||||
| REBOOT | ||||
| RETURN BACK / EXIT | ||||
- Function Description
0. SETUP
- EXPOSURE: Go sub menu for camera exposure control
- WHITE BALANCE: Go sub menu for camera white balance control.
- WDR/BLC: Go sub menu for camera WDR or BLC action.
- DNR: Control noise reduction setting.
- DAY & NIGHT: Go sub menu for camera day & night control.
- IMAGE: Go sub menu for adjust image functions.
- SPECIAL: Go sub menu for special feature control.
- SYSTEM: Go sub menu for system control & information.
- Reset Data All: Reset camera's all feature data to default value.
. EXPOSURE
- BRIGHTNESS: Adjust image brightness value.
- LENS(IRIS): Select Lens control Type.
AE MODE: Adjust AE control Mode
- SHUTTER: Select shutter speed control type.
LEVEL Adjust shutter speed at manual shutter mode.
- DSS Adjust digital slow shutter control level.
- AGC: Adjust max gain level for brightness control.
. WHITE BALANCE
- WB MODE: Select white balance control mode.
AUTO: Full auto control mode in color temperature rage 2300K\~10000K
AUTOext: Extended auto mode for special illumination.
PUSH: Enable fix the control setting for specific environment. Push &
release, for fix WB control setting
MANUAL: Enable WB control setting by user's intention.
COLOR TEMP: Select color temperature range for WB control at
manual mode
R-GAIN: Adjust red color gain for WB control at maual mode.
B-GAIN: Adjust blue color gain for WB control at manual
mode
SATURATION: Adjust image brightness value.
3. WDR/BLC
- MODE: Select WDR for BLC mode.
BLC: Act in Backlight compensation mode
D-WDR: Digital wide dynamic range control
BLC H-POS: Select BLC control zone vertical position.
BLC V-POS: Select BLC control zone horizontal position.
BLC H-SIZE: Select BLC control zone vertical size.
BLC V-SIZE: Select BLC control zone horizontal size
. DNR: Reduce image's noise
5. DAY & NIGHT
- MODE: Select DN( Digital Day & Night control ) mode.
AUTO: Camera controlled automatically to decide day or night
environment using AGC calculation data.
COLOR:
Fix to mode at day environment setting. Make video image act in color.
B&W:
Fix to mode at night environment setting. Make video image act in B/W.
AGC THRES: Threshold level for Change Day to Night or Night to
Day mode
AGC MARGIN: Hysteresis Level for Change Day to Night or Night to
Day mode
DELAY: Delay Time for change day or Night Mode at Auto
mode
6. IMAGE
- SHARPNESS: Adjust image sharpness level.
- GAMMA: Gamma Curve Select.
- MIRROR: Vertical Mirror Setting.
- FLIP: Horizontal flip setting.
- DZOOM: Select digital zoom magnification
- DEFOG: Enable Defog compensation
LEVEL: Defog compensation Level change at Auto / Manual mode
-LENS SHADING: Enable lens shading compensation.
7. SPECIAL
- FOCUS ASSIST: Adjust image sharpness level.
-PRIVACY: Gamma Curve Select.
| ZONE NUM.: Select private mask zone number. | V-SIZE: Select zone vertical size. |
| ZONE DISP.: Select zone mask display on/off. | Y LEVEL: Select mask color ( Y Level ). |
| H-POS: Select zone horizontal position. | CR LEVEL: Select mask color ( CR Level ). |
| V-POS: Select zone vertical position. | CB LEVEL: Select mask color ( CB Level ). |
| H-SIZE: Select zone horizontal size. |
- HLMASK: Mask image high light area.
LEVEL : Select high light level
COLOR : Select mask color
- PATTERN: Color bar display Enable.
8. SYSTEM
- SDI FORMAT : 1080P / 720P
- SDI FPS: 30 or 25 fps in 1080p mode.
- APPLY : Apply all video setting changed at once. Use the Set button to apply.
- SYSTEM INFO
S/W VERSION: Camera's basic software version.
SET VERSION: Camera's feature control setting version.
SPECIFICATIONS
| Image Device | 2.1 Mega Pixel, 1/3" Exmor SONY CMOS |
| Video output mode | HD-SDI : 1080p@30, 1080p@25, 720p@60, 720p@50TV Out : NTSC / PAL selectable |
| Effective Pixels | 1984 (H) x 1105 (V) |
| Unit cell size | 2.8um (H) x 2.8um (V) |
| S/N Ratio | More than 50dB |
| Minimum Illumination | 0.1 Lux |
| Video Output | HD-SDI / 1.0 Vp-composite (75Ω). |
| Lens | C / CS Mount |
| Shutter speed | Auto / Manual selectable |
| D-WDR / BLC | Off / BLC / D-WDR |
| 3DNR | OFF / LOW / MIDDLE / HIGH |
| Controllable Max Gain | 23 dB |
| White Balance | AUTO / AUTOext / PUSH / MANUAL |
| Digital Zoom Ratio | 1X ~ 20X |
| Digital Slow Shutter | Off, X2 ~ X8 |
| Privacy Masking | Zone 16 ea., On / Off |
| Day & Night | Digital Day & Night |
| OSD | Built-in |
| Operating Temperature | 14°F~112°F (-10°C~+50°C) |
| Storage Temperature | -4°F~158°F (-20°C~+70°C) |
| Power Consumption | DC12V (±10%), Max. 120 mA |
| Dimensions (mm) | 31(W) x 31(H) x 55(D) |
| Weight | Approx.113 g |
Specifications and designs are subject to change for improving the functionality of this product without notice.
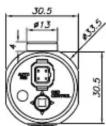
DIMENSIONS Unit(mm)
CS-Mount

C-Mount



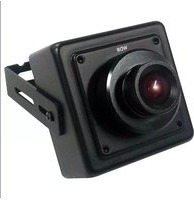
Brand : KT&C
Model : KPC-HDB650M
Category : Surveillance Camera