XL-LS703BHWH - Hi-Fi System SHARP - Free user manual and instructions
Find the device manual for free XL-LS703BHWH SHARP in PDF.

User questions about XL-LS703BHWH SHARP
0 question about this device. Answer the ones you know or ask your own.
Ask a new question about this device
Download the instructions for your Hi-Fi System in PDF format for free! Find your manual XL-LS703BHWH - SHARP and take your electronic device back in hand. On this page are published all the documents necessary for the use of your device. XL-LS703BHWH by SHARP.
USER MANUAL XL-LS703BHWH SHARP
natural_image
Simple line drawing of a rectangular box with a circular recess and two side supports (no text or symbols)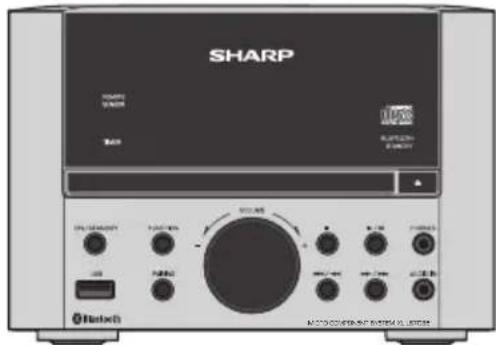
text_image
SHARP RANGE SINEMA COMPRESSOR RANGE RANGE RANGE RANGE RANGE RANGE RANGE RANGE RANGE RANGE RANGE RANGE RANGE RANGE RANGE RANGE RANGE RANGE RANGE RANGE RANGE RANGE RANGE RANGE RANGE RANGE RANGE RANGE RANGE RANGE RANGE RANGE RANGE RANGE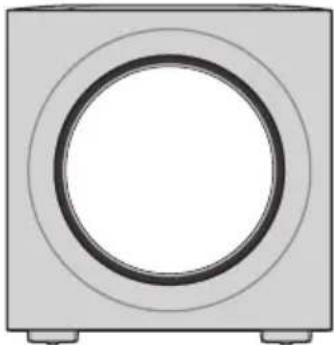
natural_image
Simple diagram of a washing machine with concentric rings and base legs (no text or symbols)
Bluetooth®


DIGITAL AUDIO


USB
PLAYBACK

with R·D·S

text_image
Low Power Standby SAVING ENERGY STAND-BY POWER CONSUMPTION 0.4wX-BASS
● This audio system supports devices with Android 4.1, Jelly Bean and higher.
- For device with a lower Android version, refer the operation manual of the device for recommended app (application).
DEUTSCH
FRANÇAIS
ESPAÑOL
SVENSKA
ITALIANO
NEDERLANDS
PORTUGUÊS
SUOMI
POLSKI
ČESKY
LIETUVIŠKAI
ENGLISH
... Please refer to pages i to x and E-1 to E-18.
●Hereby, SHARP Electronics declares that this SHARP micro component system XL-LS703BH is in compliance with the essential requirements and other relevant provisions of Directive 1999/5/EC. The declaration of conformity may be consulted at: http://www.sharp.de/doc/XL-LS703BH.pdf
- When the ON/STANDBY button is set at STANDBY position, mains voltage is still present inside the unit.
When the ON/STANDBY button is set at STANDBY position, the unit may be brought into operation by the timer mode or remote control.
Warning:
This unit contains no user serviceable parts. Never remove covers unless qualified to do so. This unit contains dangerous voltages, always remove mains plug from the socket before any service operation and when not in use for a long period.

The Ground Truth image displays a single, solid horizontal line. According to Rule 2 (UNDERSCORE & LINE RULES), this is a stylistic or background line, not a placeholder underscore. Therefore, the OCR result must ignore it and output nothing or only meaningful text. The provided OCR content is "____", which consists of four underscores. This is an incorrect interpretation of the line as a placeholder, violating the rule that stylistic lines must be ignored. The OCR has hallucinated underscores where none should exist based on the GT's visual context. Hence, the OCR result is inconsistent with the Ground Truth.

The Ground Truth image displays a single, solid horizontal line. According to Rule 2 (UNDERSCORE & LINE RULES), this is a stylistic or background line, not a placeholder underscore. Therefore, the OCR result must ignore it and output nothing or only meaningful text. The provided OCR content is "____", which consists of four underscores. This is an incorrect interpretation of the line as a placeholder, violating the rule that stylistic lines must be ignored. The OCR has hallucinated underscores where none should exist based on the GT's visual context. Hence, the OCR result is inconsistent with the Ground Truth.
Information on Proper Disposal

A. Information on Disposal for Users (private households) 1. In the European Union
Attention: If you want to dispose of this equipment, please do not use the ordinary dustbin!
Used electrical and electronic equipment must be treated separately and in accordance with legislation that requires proper treatment, recovery and recycling of used electrical and electronic equipment.
Following the implementation by member states, private households within the EU states may return their used electrical and electronic equipment to designated collection facilities free of charge*.
In some countries* your local retailer may also take back your old product free of charge if you purchase a similar new one.
*) Please contact your local authority for further details.
If your used electrical or electronic equipment has batteries or accumulators, please dispose of these separately beforehand according to local requirements.
By disposing of this product correctly you will help ensure that the waste undergoes the necessary treatment, recovery and recycling and thus prevent potential negative effects on the environment and human health which could otherwise arise due to inappropriate waste handling.
2. In other Countries outside the EU
If you wish to discard this product, please contact your local authorities and ask for the correct method of disposal.
For Switzerland: Used electrical or electronic equipment can be returned free of charge to the dealer, even if you don't purchase a new product. Further collection facilities are listed on the homepage of www.swico.ch or www.sens.ch.
B. Information on Disposal for Business Users 1. In the European Union
If the product is used for business purposes and you want to discard it:
Please contact your SHARP dealer who will inform you about the take-back of the product. You might be charged for the costs arising from take-back and recycling. Small products (and small amounts) might be taken back by your local collection facilities.
For Spain: Please contact the established collection system or your local authority for take-back of your used products.
2. In other Countries outside the EU
If you wish to discard of this product, please contact your local authorities and ask for the correct method of disposal.

Pb
Information on Battery Disposal
The battery supplied with this product contains traces of Lead.
For EU: The crossed-out wheeled bin implies that used batteries should not be put to the general household waste! There is a separate collection system for used batteries, to allow proper treatment and recycling in accordance with legislation. Please contact your local authority for details on the collection and recycling schemes.
For Switzerland: The used battery is to be returned to the selling point.
For other non-EU countries: Please contact your local authority for correct method of disposal of the used battery.
XL-LS703BH Micro Component System consisting of XL-LS703BH (main unit) and CP-LS703H (speaker system).
Introduction
Thank you for purchasing this SHARP product. To obtain the best performance from this product, please read this manual carefully. It will guide you in operating your SHARP product.
Special Note
Supply of this product does not convey a license nor imply any right to distribute content created with this product in revenue-generating broadcast systems (terrestrial, satellite, cable and/or other distribution channels), revenue-generating streaming applications (via Internet, intranets and/or other networks), other revenue-generating content distribution systems (pay-audio or audio-on-demand applications and the like) or on revenue-generating physical media (compact discs, digital versatile discs, semiconductor chips, hard drives, memory cards and the like). An independent license for such use is required. For details, please visit http://mp3licensing.com
MPEG Layer-3 audio coding technology licensed from Fraunhofer IIS and Thomson.
Accessories
The following accessories are included.
natural_image
Illustration of a rectangular remote control with buttons and ports (no text or symbols)Remote control x 1 (RRMCGA367AWSA)

FM aerial x 1 "AAA" size battery

(UM/SUM4, R3, HP-16 or similar) x 2
CONTENTS
Page
General Information
Precautions.... 2
Controls and indicators....2 - 3
Preparation for Use
System connections 4
Remote control 5
Basic Operation
General control 5
Setting the clock (Remote control only)....6
Bluetooth
Bluetooth one touch connection via NFC 6 - 7
Listening to Bluetooth enable devices....7 - 8
Open Accessory
Listening on Android™ devices 8 - 9
Page
CD or MP3/WMA disc Playback
Listening to a CD or MP3/WMA disc 9-10
USB
Listening to USB mass storage device/MP3 player.....11
Radio
Listening to the radio 12
Advanced Features
Using the Radio Data System (RDS) ......13 - 14
Timer and sleep operation (Remote control only) .. 14 - 15
Enhancing your system 16
References
Troubleshooting chart 16 - 17
Maintenance 17
Specifications 18
General
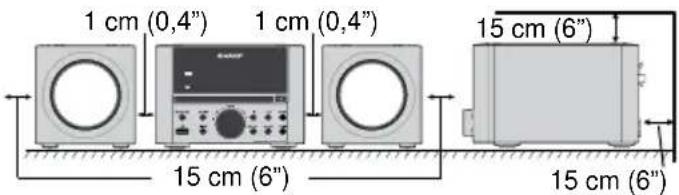
●Please ensure that the equipment is positioned in a well ventilated area and ensure that there is a free space along the sides, top and back of the equipment as below.
text_image
1 cm (0,4") 1 cm (0,4") 15 cm (6") 15 cm (6") 15 cm (6")●Use the unit on a firm, level surface free from vibration.
- Place the speakers at least 30 cm (12") away from any CRT TV to avoid colour variations across the TV screen. If the variations persist, move the speakers further away from the TV. LCD TV is not prone to such variation.
- Keep the unit away from direct sunlight, strong magnetic fields, excessive dust, humidity and electronic / electrical equipment (home computers, facsimiles, etc.) which generate electrical noise.
- Do not expose the unit to moisture, to temperatures higher than 60^ (140°F) or to extremely low temperatures.
- If the unit does not work properly, unplug and plug it in again. Then turn on the unit.
●In case of an electrical storm, unplug the unit for safety.
●Hold the AC power plug by the head when removing it from the wall socket, as pulling the lead can damage internal wires.
●Do not place anything on top of the unit.
●The AC power plug is used as a disconnect device and shall always remain readily operable.
●Do not remove the outer cover, as this may result in electric shock. Refer internal service to your local SHARP service facility.
●The ventilation should not be impeded by covering the ventilation openings with items, such as newspapers, tablecloths, curtains, etc.
● No naked flame sources, such as lighted candles, should be placed on the apparatus.
● Attention should be drawn to the environmental aspects of battery disposal.
●This unit should only be used within the range of 5^ C - 35^ C ( 41^ F - 95^ F).
● The apparatus is designed for use in moderate climates.
Warning:
The voltage used must be the same as that specified on this unit. Using a higher voltage is dangerous and may result in a fire or other type of accident causing damage. SHARP will not be held responsible for any damage resulting from such usage.
Volume control
The sound level at a given volume setting depends on speaker efficiency, location and various other factors. It is advisable to avoid exposure to high volume levels, which occurs while turning the unit on with the volume control setting up high, or while continually listening at high volumes. Excessive sound pressure from earphones and headphones can cause hearing loss.
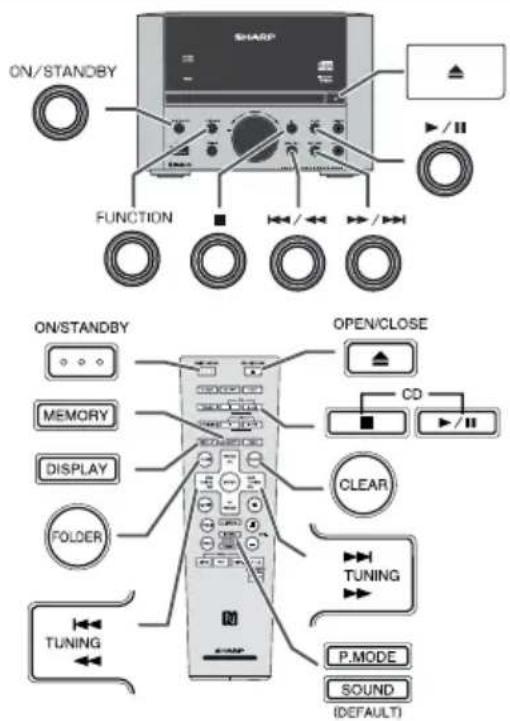
Controls and indicators

text_image
1 2 3 4 SHARP TAR 5 15 6 ON CHIKERY COUNTER VOLUME 7 ON CHIKING FLOOD 16 8 Bluetooth 9 10 11 12 13 14
text_image
Top view of main unit 17Front panel
Page
- Remote sensor....5
- Timer indicator....15
- Disc Tray....9
- Bluetooth Standby indicator.... 4
- Disc Tray Open/Close Button 9
- FUNCTION Button.... 5, 7, 9, 12
- ON/STANDBY Button....5, 7, 9, 17
- USB Terminal 8, 11
- PAIRING Button 8
- Volume Control .... 5
Page
- Disc/USB Stop Button....9, 11
- Tuner Preset Down, Tuning Down, Disk/USB/Bluetooth Skip Down Button 7, 9, 10, 12, 14
- Tuner Preset Up, Tuning Up, Disk/USB/Bluetooth Skip Up Button....7, 9, 10, 12, 14
- Audio In Socket.... 16
- Disk/USB/Bluetooth Play or Pause Button ..... 9, 11
- Headphone Socket 16
- N-Mark (NFC detection area) 7
text_image
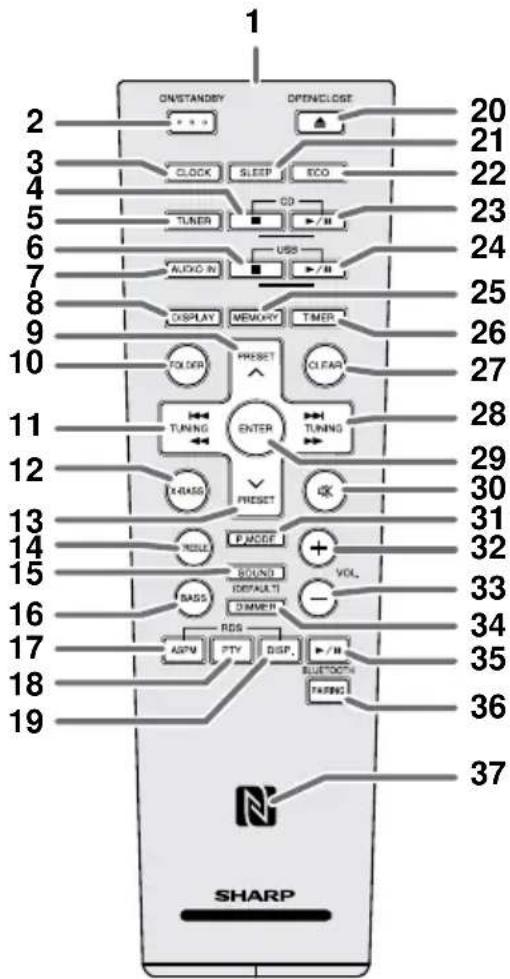
1 ONSTANDS BY OPENCLOSET 20 21 3 CLOCK SLEEP ECO 22 4 TUNER CO 23 5 AUDIO IN USB 24 7 DISPLAY MEMORY TIMER 25 9 POLDER PRESSET CLEAR 26 10 TUNING ENTER TUNING 27 28 RASSO PRESSET OK 29 30 11 ROUND PACIFIC + VOL. 31 12 BASS DIMMER 32 13 ASPM PTY DISP. BLUETOOTH 33 14 34 15 35 16 36 17 18 19 37 SHARP
text_image
13456 USB CD MUTING X-BASS 16 17 MP3 WMA TITLE ARTIST FOLD RDM MEM ALBUM G1 FILE TRACK DAILY II▶◀ FM ST ● RDS PTYITP TA DISC TOTAL SLEEP 8 910121113 14 15 MP3 WMA TITLE ARTIST FOLD RDM MEM ALBUM G1 FILE TRACK DAILY II▶◀ FM ST ● RDS PTYITP TA DISC TOTAL SLEEP USB CD MUTING X-BASS POWER ONSpeaker system
- Full range
- Bass Reflex Duct
- Speaker cable

natural_image
Two views of a mechanical component with labeled parts (1, 2, 3), no text or symbols present.Remote control
Page
- Remote Control Transmitter....5
- On/Standby Button 5,7,9,17
- Clock Button 6
- CD Stop Button....9
- Tuner Button 12
- USB Stop Button....11
- Audio In Button 16
- Display Button....10, 11
- Tuner Preset Up Button 10, 11, 12
- Folder Button....10, 11
- Tuning Down, Skip Down, Fast Reverse, Time Down Button....7, 9, 12, 14
- X-Bass Button....5
- Tuner Preset Down Button 10, 11, 12
- Treble Button....5
- Sound (Default) Button 5
- Bass Button 5
- RDS ASPM Button 13
- RDS PTY Button 14
- RDS Display Button 13
- Open/Close Button....9
- Sleep Button 15
- Eco Button....4
- CD Play / Pause Button....9
- USB Play / Pause Button ....11
- Memory Button 10, 12
- Timer Button 14, 15
- Clear Button.... 10, 12
- Tuning Up, Skip Up, Fast Forward, Time Up Button....7, 9, 12, 14
- Enter Button 14, 15
- Mute Button 5
- Play Mode Button 9, 10
- Volume Up Button 5
- Volume Down Button 5
- Dimmer Button 5
- Bluetooth Play / Pause Button 7,8
- Bluetooth Pairing Button 8
- N-Mark (NFC detection area) 7
■Display
Page
- USB Indicator....11
- CD Indicator 10
- MP3 Indicator....10
- WMA Indicator 10
- RDM (Random) Indicator 9
- MEM (Memory) Indicator.... 10
- Repeat Indicator 10
- Play/Pause Indicator 9
- Tuning FM / Bluetooth status Indicator 7, 12
- FM Stereo Mode Indicator 12
- Stereo Station Indicator.... 12
- RDS Indicator.... 13
- PTY Indicator 13
- TP Indicator.... 14
- TA Indicator.... 14
- Muting Indicator 5
- X-bass Indicator 5
- Title Indicator.... 10
- Artist Indicator.... 10
- Folder Indicator 10
- Album Indicator.... 10
- File Indicator 10
- Track Indicator.... 10
- Daily Timer Indicator 14
- Once Timer Indicator.... 14
- Disc Indicator.... 10
- Total Indicator....10
- Sleep Indicator.... 15
Make sure to unplug the AC power lead before making any connections.
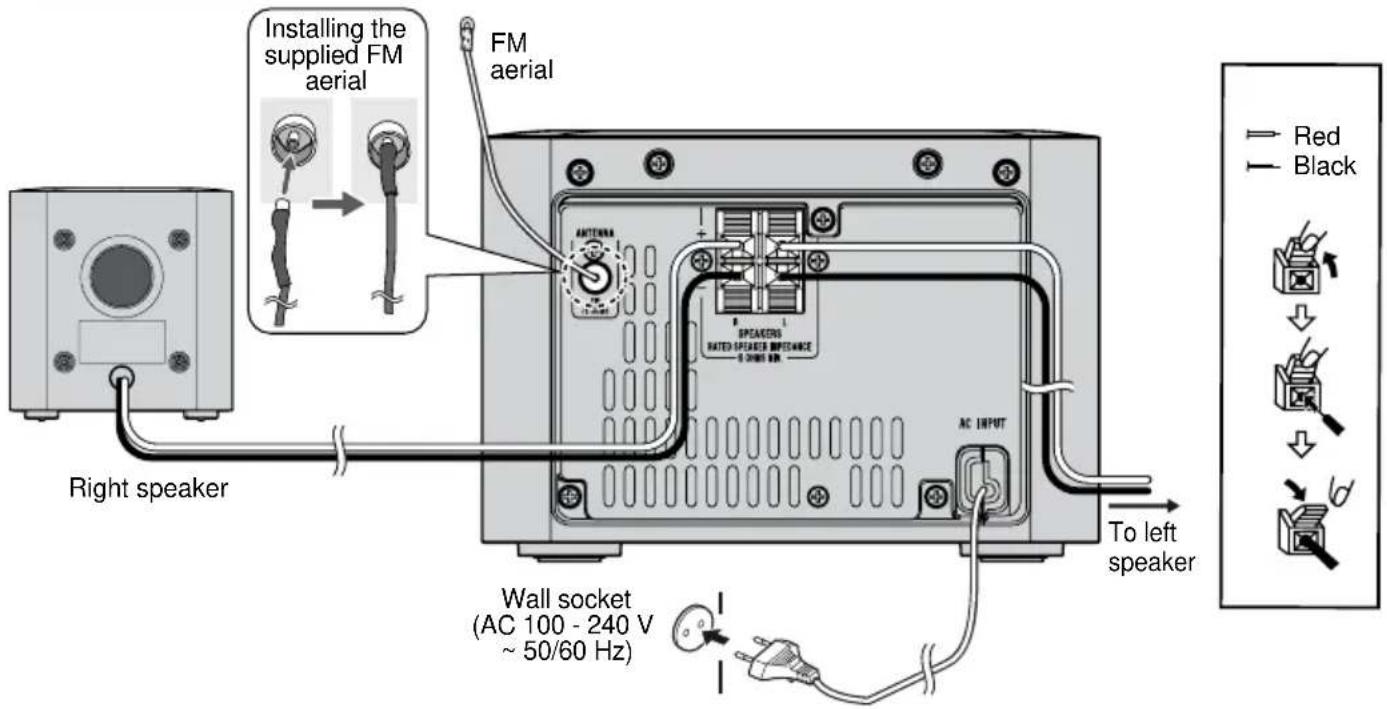
text_image
Installing the supplied FM aerial FM aerial Right speaker Wall socket (AC 100 - 240 V ~ 50/60 Hz) To left speaker Red BlackAerial connection
Supplied FM aerial:
Connect to the FM 75 ohms socket and position it where reception is best.
External FM aerial:
Use an external FM aerial (75 ohms coaxial cable) for better reception. Disconnect the supplied FM aerial wire before use.
Note:
Keep the aerial away from the unit or AC power lead to avoid noise pickup.
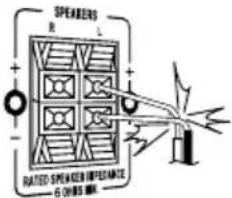
■Speaker connection
+ speaker terminal red wire
- speaker terminal black wire
●Use speakers with an impedance of 6 ohms or more, as lower impedance speakers can damage the unit.
●Do not mistake the right and the left channels. The right speaker is the one on the right side when you face the unit.
●Do not let the bare speaker wires touch each other.
●Do not allow any objects to fall into or to be placed in the bass reflex ducts.
●Do not stand or sit on the speakers. You may be injured.
●The first time the unit is plugged in, it will enter the Bluetooth standby mode. Bluetooth standby indicator lights up.
● To cancel the Bluetooth standby mode, press the ECO button (remote control) during power standby mode. The unit will enter the low power consumption mode.
● To return to the Bluetooth standby mode, press the ECO button again.
■AC power connection
After all connections have been made correctly, plug the AC power lead into the wall socket.
Note:
Unplug the AC power lead from the wall socket if the unit will not be in use for a prolonged period of time.
Battery installation
1 Open the battery cover.
2 Insert the batteries according to the terminal indicated in the battery compartment. When inserting or removing the batteries, push it toward the (−) battery terminals.
3 Close the cover.

natural_image
Three-step diagram showing a battery being moving in different directions (no text or symbols present)Caution:
- Replace all old batteries with new ones at the same time.
● Do not mix old and new batteries. - Remove the batteries if the unit will not be used for a long period of time. This will prevent potential damage due to battery leakage.
- Do not use rechargeable batteries (nickel-cadmium battery, etc.).
- Installing the batteries incorrectly may cause the unit to malfunction.
- Batteries (battery pack or batteries installed) shall not be exposed to excessive heat such as sunshine, fire or the like.
Notes concerning use:
- Replace the batteries if the operating distance is reduced or if the operation becomes erratic. Purchase 2 "AAA" size batteries (UM/SUM4, R3, HP-16 or similar).
● Periodically clean the transmitter on the remote control and the sensor on the unit with a soft cloth.
● Exposing the sensor on the unit to strong light may interfere with operation. Change the lighting or the direction of the unit. - Keep the remote control away from moisture, heat, shock, and vibrations.
■Test of the remote control
The remote control can be used within the range shown below:
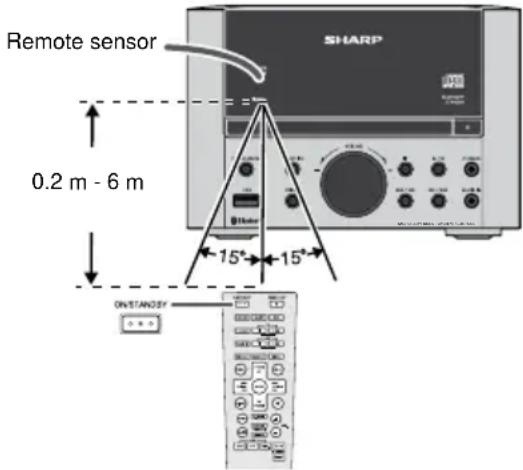
text_image
Remote sensor 0.2 m - 6 m 15° 15° ON STANOSYGeneral control
■To turn the power on
Press the ON/STANDBY button to turn the power on or off.
■Display brightness control
Press the DIMMER button (remote control).
Dimmer 1 (Display is dim). Dimmer 2 (Display gets dimmer). Dimmer off (Display is bright).
General control (continued)
Volume auto fade-in
If you turn off and on the main unit with the volume set to 27 or higher, the volume starts at 10 and fades in to the last set level.
Volume control
Turn the volume knob toward VOLUME +/- (main unit) or press VOL +/- (remote control) to increase or decrease the volume.
Muting
To mute the volume, press the button (remote control). Press again to restore the volume.
■Direct key power on function
When you press any of the following buttons, the unit turns on.
- CD ▶/□, USB ▶/□, BLUETOOTH ▶/□, AUDIO IN, TUNER, OPEN/CLOSE (remote control): Selected function is activated.
- ▶(main unit): The unit turns on and playback of the last function will start (CD, USB, BLUETOOTH, AUDIO IN, TUNER)
■Auto power off function
The main unit will enter the standby mode after approximately 15 minutes of inactivity during:
CD: In the stop mode or no disc.
USB: In the stop mode or no media.
Bluetooth: - No connection after approximately 15 minutes. - In the pause or stop mode and no incoming signal from device after approximately 15 minutes.
■X-Bass control
When the power is first turned on, the unit is in the extra bass mode. "X-BASS" indicator appears. To cancel this mode, press the X-BASS button (remote control).
■Bass or Treble control
1 Press the BASS or TREBLE button to select "Bass" or "Treble" respectively.
2 Within 5 seconds, press the VOL (+ or −) button to adjust the bass or treble.


Press SOUND (DEFAULT) button to return sound to default settings. "SOUND DEFAULT" appears on the display.
Sound default settings : Bass = 0, Treble = 0, X-Bass = off
Function
Press the FUNCTION button repeatedly to select desired function.

text_image
CD FM MONOFM STEREO ← ← USBAUNote:
The backup function will protect the memorised function mode for a few hours should there be a power failure or the AC power lead becomes disconnected.

flowchart
graph TD
    A["ON/STANDBY"] --> B["CLOCK"]
    B --> C["TUNING"]
    B --> D["ENTER"]
    B --> E["TUNING"]
    C --> F["OUTPUT"]
    D --> G["INPUT"]
    E --> H["Feedback to ON"]
    style A fill:#f9f,stroke:#333
    style B fill:#ccf,stroke:#333
    style C fill:#cfc,stroke:#333
    style D fill:#fcc,stroke:#333
    style E fill:#cff,stroke:#333
In this example, the clock is set for the 24-hour (0:00 - 23:59) display.
1 Press the ON/STANDBY button to turn the power on.
2 Press the CLOCK button.
3 Within 10 seconds, press the ENTER button. To adjust the day, press the ▶ or ▶ button and then press the ENTER button.
4 Press the or button to select 24-hour or 12-hour display and then press the ENTER button.

flowchart
graph TD
    A["0:00"] --> B["AM 12:00"]
    B --> C["AM 0:00"]
    D["The 24-hour display will appear. (0:00 - 23:59)"] --> E["The 12-hour display will appear. (AM 12:00 - PM 11:59)"]
    E --> F["The 12-hour display will appear. (AM 0:00 - PM 11:59)"]
5 To adjust the hour, press the / button / and then press the ENTER button. Press the / button once to advance the time by 1 hour. Hold it down to advance continuously.
6 To adjust the minutes, press the ☐/button and then press the ENTER button. Press the ▶/or ▶button once to advance the time by 1 minute.
Hold it down to advance the time by 5 minutes interval.
To confirm the time display:
Press the CLOCK button. The time display will appear for about 10 seconds.
Note:
When power supply is restored after unit is plugged in again or after a power failure, reset the clock.
To readjust the clock:
Perform "Setting the clock" from step 1.
To change the 24-hour or 12-hour display:
1 Clear all the programmed contents. [Refer to "Factory reset, clearing all memory" on page 17 for details.]
2 Perform "Setting the clock" from step 1 onward.
Bluetooth one touch connection via NFC
■About NFC technology
Near Field Communication (NFC) is a set of standards for devices (smartphones/tablets) to establish radio communication with each other by touching/tapping them together or bringing them into close proximity.
Using NFC in this product simplifies the pairing method of Bluetooth connectivity.
●This audio system supports NFC-enabled device with Android 4.1, Jelly Bean and higher.
●For device with a lower Android version, refer the operation manual of the device for recommended app (application).
Unlike other wireless technology, NFC requires no discovery or pairing.
Simply tap the source device to the N-Mark on remote control or main unit to instantly enjoy seamless connectivity between your smart device and the audio system.
■NFC detection area
NFC detection area location may vary depending on the device (smartphone / tablet). Refer operation manual of the device for detail.
flowchart
graph TD
    A["A Bluetooth audio source device (smartphone / tablet)."] --> B["Switch 'ON' Bluetooth"]
    B --> C["Search / scan"]
    C --> D["Pairing"]
    D --> E["Connect"]
    E --> F["(during Bluetooth standby mode)"]
    F --> G["Bluetooth one touch connection via NFC"]
    G --> A
    style A fill:#f9f,stroke:#333
    style F fill:#ccf,stroke:#333
Bluetooth one touch connection via NFC (continued)
■NFC connection for audio playback
Check that:
●Your device (smartphone / tablet) has an NFC function.
●NFC function on your device is turned on.
●Screen lock function of the device is off.
●This unit is not in Eco mode.
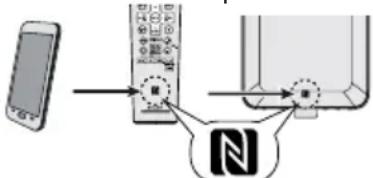
1 Touch your device to N-Mark on the remote control or main unit.
Top view of main unit
text_image
Diagram showing mobile phone connection with a device labeled 'N' and directional arrows indicating interaction2 A pop-up window asking whether to proceed with the Bluetooth connection appears on the device. Select
- The 'connected' message appears when the connection is complete.
3 Playback will start automatically. Otherwise, press play (on remote control or source device).
●Sound will be heard from the speakers of this unit via audio streaming.
●Your device must be within 10 meters from the unit.
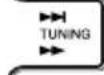
Bluetooth operation buttons
 | Press the button to play or pause. |
 | Press the button to skip up.Press and hold to fast forward. |
 | Press the button to skip down.Press and hold to fast reverse. |
Notes:
● To disconnect the Bluetooth connection, simply touch your device to any of the N-Marks again.
● This product switches to Bluetooth function automatically when NFC tagging is done by your device.
- If your device does not support NFC, or if you wish to listen to audio via Bluetooth connectivity without NFC; refer "Pairing with other Bluetooth source devices" on pages 7 - 8.
- Some Bluetooth devices will connect to this unit automatically when the device or its Bluetooth mode was turned on. In such case, it will also change the function selection of this product. If you do not want it to connect automatically, please disable Bluetooth on your device.
- It takes about a few seconds for a Bluetooth enabled device (eg. smartphone) to establish Bluetooth connection with this unit via NFC or manual connection.
- If "Empty tag" or similar message appears on your device, touch the device again to the NFC detection area on the main unit.
Listening to Bluetooth enabled devices
Bluetooth
Bluetooth wireless technology is a short-range radio technology that enables wireless communication between various types of digital devices, such as mobile phone or computer. It operates within a range of about 10 meters (30 feet) without the hassle of having to use cables to connect these devices.
This unit supports the following:
Communication System: Bluetooth Specification version 2.1 Bluetooth + Enhanced Data Rate (EDR).
Support Profile : A2DP (Advanced Audio Distribution Profile) and AVRCP (Audio/Video Remote Control Profile)
Listening to Bluetooth enabled devices (continued)
Notes when using unit with a mobile phone
● This unit cannot be used to talk over the telephone even when there is a Bluetooth connection made to a mobile phone.
- Please refer to the operating manual supplied with the mobile phone for details on operation of your mobile phone while transmitting the sound using a Bluetooth connection.
text_image
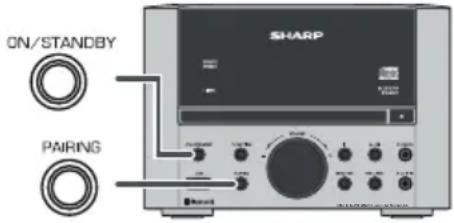
ON/STANDBY PAIRING SHARP
text_image
BLUETOOTH PAIRING■Pairing Bluetooth devices
Bluetooth devices need to be initially paired first before they can exchange data. This unit can memorise up to a maximum of 99 devices. Once paired, it is not necessary to pair them again unless:
- pairing is made with more than 99 devices. Pairing can only be made one device at a time. If subsequent device is paired, the oldest device paired will be deleted and replaced with the new one.
- this unit is reset. All pairing information is deleted when unit is reset.
● pairing information is deleted while re-pairing, etc.
Indicators:
| Indicator | Condition | Bluetooth status |
| ▶●◀ | Lights up | Connected |
| No indication | Unconnected | |
However, the indication status is not displayed during Bluetooth standby mode.
■ Pairing with other Bluetooth source devices
1 Press the ON/STANDBY button to turn the power on.
2 Press the FUNCTION button (main unit) repeatedly or Bluetooth button (remote control) to select Bluetooth function. "BLUETOOTH" appears on the display.
3 Perform pairing procedure on the source device to detect this unit. "LS703B SHARP" will appear in the detected devices list (if available) in the source device. (Refer the source device operating manual for details).
Notes:
- Place the devices to be paired within 1 meter of each other when pairing.
- Some source devices are unable to display lists of detected devices. To pair this unit with the source device, refer to the source device operating manual for details.
4 Select "LS703B SHARP" from the source list. If Passcode* is required, enter "0000".
* Passcode may be called PIN Code, Passkey, PIN number or Password.
5 "Connected" appears on the display once the unit is successfully paired with the source device. (Pairing information is now memorised in the unit.) Some audio source devices may connect with the unit automatically after pairing is completed, otherwise follow the instructions in the source device operating manual to start connection.
6 Press the play button on main unit, remote control or source device to start Bluetooth streaming playback.
Notes:
- If a device such as microwave oven, wireless LAN card, Bluetooth device or any other device that uses the same 2.4 GHz frequency is placed near the system some sound interruption may be heard.
- The transmission distance of the wireless signal between the device and the main unit is about 10 m, but may vary depending on your operating environment.
- If a steel concrete or metallic wall is between the device and the main unit, the system may not operate at all, because the wireless signal cannot penetrate metal.
- If this unit or the source device is turned off before Bluetooth connection is completed, pairing will not be completed and the pairing information will not be memorised. Repeat step 1 onward to start pairing again.
- To pair with other devices, repeat steps 1 - 5 for each device. This unit can memorise up to a maximum of 99 devices. If subsequent device is paired, the oldest device paired will be deleted.
- Once a device is ousted or deleted from the pairing list, the pairing information for the device is also deleted. To listen to the sound from the device again, it needs to be re-paired. Perform steps 1 - 5 to pair the device again.
- XL-LS703BH supports Bluetooth profile AVRCP 1.4. If your device supports the same profile (refer to device manufacturer's specification), XL-LS703BH is able to control the volume of the device and display the song information (title, album, artist).
Note:
Some music applications do not support this feature, hence there will be no volume synchronisation and no song information will be displayed even if your Bluetooth device supports such profile.
■Listening to the sound
Check that:
● The source device Bluetooth functionality is ON.
●Pairing of this unit and the source device is completed.
●Unit is in connected mode.
1 Press the ON/STANDBY button to turn the power on.
2 Press the FUNCTION button (main unit) repeatedly to select Bluetooth function.
3 Start the Bluetooth connection from the Bluetooth audio source device.
4 Press the BLUETOOTH ▶ button.
Notes:
- For various Bluetooth operations, refer "NFC connection for audio playback" on page 7.
- If the source device has an extra bass function or equalizer function, set them to off to avoid sound distortion.
Note:
● Make the Bluetooth connection again if the source device is not turned on, or its Bluetooth functionality is off or is in sleep mode.
- The volume of this unit may not be controlled as intended depending on the device.
■To disconnect the Bluetooth device
Perform any of the followings.
- Press PÁIRING button until "Disconnected" appears on the display.
- Disconnect or turn off the Bluetooth connection on the audio source device. Refer the operating manual supplied with the device.
- Turn off this unit.
■Auto power on
During Bluetooth standby mode, the unit will automatically power on when the Bluetooth connection is set up between the main unit and your device.
Note:
This function is not applicable during Bluetooth standby mode off.
Listening on Android™ devices
■Introduction : Open Accessory
Open Accessory support allows external USB hardware (an Android USB accessory) to interact with an Android-powered device in a special accessory mode. When an Android-powered device is in accessory mode, the connected accessory acts as the USB host (powers the bus and enumerates devices) and the Android-powered device acts in the USB accessory role. Android USB accessories are specifically designed to attach to Android-powered devices and adhere to the Open Accessory Protocol, that allows them to detect Android-powered devices that support accessory mode.
■Android device connection (USB)
1 Insert the connector to the device.

text_image
Device (Smartphone/Tablet) Connector2 Connect the device to the main unit via USB connector.

text_image
ON/STANDARD FUNCTION LED PARING USB connector (not supplied)■Android device playback
1 Press the ON/STANDBY button to turn the power on.
2 Press the FUNCTION button repeatedly (main unit) to select USB function.
3 Connect the device (Smartphone/Tablet) to the unit. "USB Media" will be displayed.
USB Media
4 Press the play button (on main unit, remote control or device).
Notes:
- If the source device has an extra bass or equalizer function, set them to off. If these functions are on, sound may be distorted.
●Incoming calls will pause the playback/application. - Once the calls are answered, the conversation can only be heard through the built-in speaker of the cellular device. Turn on the device speaker or disconnect the device to start conversation.
Listening on Android™ devices (continued)
■To disconnect the Android device
1 Quit the application (apps).
2 Disconnect the device from the USB terminal.
■Various functions
| Function | Remote control Operation | |
| Track up/down |  | Press in the playback or stop mode.If you press the button in the stop mode, press the ▶ lbutton to start the desired track. |
| Fast forward/reverse | Press and hold down in the playback mode.Release the button to resume playback. | |
Notes:
- If non-compatible device is detected, "Dev No Support" will be displayed.
● Controls (play / pause / skip up / skip down / fast forward / fast reverse) will function based on actual Applications (Apps) controls used on Android devices. - Stop ■ button is invalid during Android device playback.
Android is a trademark of Google Inc.
Listening to a CD or MP3/WMA disc
1 Press the ON/STANDBY button to turn the power on.
2 Press the FUNCTION button repeatedly on the main unit to select CD function.
3 Press the ▲OPEN/CLOSE button to open the disc compartment.
4 Place the disc on the disc compartment, label side up.
5 Press the OPEN/CLOSE button to close the disc tray.
6 Press the ▶/|| (CD ▶/||) button to start playback.
To stop playback:
Press the ■ button.
Listening to a CD or MP3/WMA disc (continued)
Caution:
●Do not place two discs in one-disc-tray.
- Do not play discs of special shapes (heart, octagon, etc). It may cause malfunctions.
●Do not push the disc tray while it is moving.
●If the power fails wait until the power is restored.
- If TV or radio interference occurs during CD operation, move the unit away from the TV or radio.
●Be sure to place 8 cm disc in the middle of the disc tray.
- Due to the structure of the disc information, it takes longer to read an MP3/WMA disc than a normal CD (approximately 20 to 90 seconds).
Note for CD or MP3/WMA disc:
●Rewritable multi-session discs with unfinished writing, can still be played.
■To resume playback after stopping (resume play) (MP3/WMA only)
You can resume playback from the track playback is stopped.
1 While a disc is playing, press the button once.
2 To resume play, press the CD▶// button. Playback resumes from the track you stopped.
To cancel the resume playback:
Press the ■ button twice.
■Various disc functions
| Function | Main unit | Remote control | Operation |
| Play |  |  | Press in the stop mode. |
| Pause | Press in the playback mode. Press the ▶/□ button to resume play-back from the paused point. | ||
| Stop |  |  | Press in the playback mode. |
| Track up/down |  |  | Press in the playback or stop mode.If you press the button in the stop mode, press the ▶/□ button to start the desired track. |
 |  | ||
| Fast forward/reverse | Press and hold down in the playback mode.Release the button to resume playback. |
Random play
To random play all tracks:
Press P.MODE button on the remote control repeatedly until "Random" appears. Press the▶/■(CD ▶)button.
To cancel random play:
Press the P.MODE button again. "RDM" indicator will disappear.

text_image
RDM CD 1· 001 RDM TRACKNotes:
- If you press the ▶▶/▶▶ button during random play, you can move to the track selected next by the random operation. However, the button does not allow you to move to the previous track. The beginning of the track being played will be located.
- In random play, the unit will select and play tracks automatically. (You cannot select the order of the tracks.)
●In folder mode on, only tracks in selected folder will be played randomly.
■ Repeat play
Repeat play can play one track, all tracks or a programmed sequence continuously.
To repeat one track:
Select desired track using the ◀◀/◀◀ or ▶▶/▶▶ button.
Press the P.MODE button repeatedly until "Repeat One" appears.
Press the ▶(CD ▶)button.
To repeat all tracks:
Press the P.MODE button repeatedly until "Repeat All" appears.
Press the ▶/□(CD ▶)button.
To repeat desired tracks:
Perform steps 1 - 5 in "Programmed play" section on this page and then press the P.MODE button repeatedly until "Memory Repeat" appears.
To repeat one folder:
While in Folder mode on (MP3/WMA), press PRESET (vor) to select desired folder. Press P.MODE button repeatedly until "Repeat Folder" appears. Press the ▶/■(CD ▶)button.
To cancel repeat play:
Press the P.MODE button repeatedly until "Normal" appears and "→" disappears.
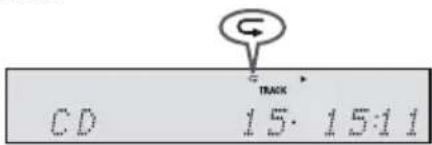
text_image
CD 15:15:11Caution:
After performing repeat play, be sure to press the ■ button.
Otherwise, the disc will play continuously.
■Programmed play (CD)
1 While in the stop mode, press the MEMORY button on the remote control to enter the programming save mode.
2 Press the /er button to select the desired track.
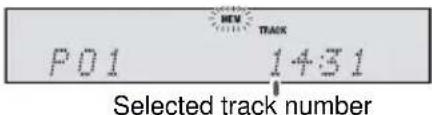
text_image
P01 1431 Selected track number3 Press the MEMORY button to save the track number.
4 Repeat steps 2 - 3 for other tracks. Up to 32 tracks can be programmed. If you want to check the programmed tracks, during stop mode, press the MEMORY button repeatedly. To clear the programmed tracks, press the CLEAR button.
5 Press the ▶/” (CD ▶/”) button to start playback.
■Programmed play (MP3/WMA)
1 While in the stop mode, press the MEMORY button to enter the programming save mode.
2 Press the PRESET (or) button on the remote control to select the desired folder.

Then press the or/ button (remote control) to select the desired tracks.

3 Press the MEMORY button to save the folder and track number.
4 Repeat steps 2 - 3 for other folder/tracks. Up to 32 tracks can be programmed.
5 Press the ▶(CD /) button to start playback.
To cancel the programmed play mode:
During programmed stop mode, press the ■ button. The display will show "Memory Clear" and all the programmed contents will be cleared.
Adding tracks to the program:
If a program has been previously stored, the "MEM" indicator will be displayed. During stop mode, press the MEMORY button once. Within 10 seconds, press and hold the MEMORY button again. Then follow steps 2 - 3 to add tracks.
Notes:
- When the disc compartment is opened, the program is automatically cancelled.
- If you press the ON/STANDBY button to enter the standby mode or change the function from CD to another, the programmed selections will be cleared.
■Procedure to playback MP3/WMA disc with folder mode on
To play back CD-R/RW.
1 In CD function, load an MP3/WMA disc. Press the FOLDER button and disc info will be displayed.
text_image
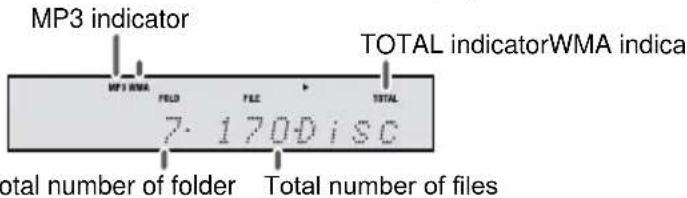
MP3 indicator TOTAL indicatorWMA indica MP3 WMA FOLD FILE TOTAL 7.170 disc total number of folder Total number of files2 Press the PRESET (vor) button to select desired playback folder. (Folder mode on)

text_image
FOLDER indicator MP3 WMA FOLD 1· FLA 1· 0:01 FOLDER number First track number in the folder3 Select desired file to be played back by pressing the / or button.
4 Press the ▶/□ (CD ▶/□) button. Playback will start and file name will be displayed.
- Title, Artist and Album name are displayed if they are recorded on the disc. - In case of playback with the folder mode on, press the PRESET (√ or ∧) button, and the folder can be selected even though it is in playback/pause mode. It will continue playback/pause mode in the 1st track of the selected folder.
●Display content can be changed by pressing the DISPLAY button.

flowchart
graph TD
    A["File name display"] --> B["Folder display"]
    C["Counter display"] --> D["Title display"]
    E["Album display"] <--_F["Artist display"]
    G["↓"] --> H["↓"]
Note:
If "Not Supported" is displayed, it means "Copyright protected WMA file" or "Not supported playback file" is selected.

text_image
FUNCTION USB SHARP DISPLAY FOLDER USB PRESET ENTER PRESETNote:
This product is not compatible with MTP and AAC file systems from USB mass storage device or MP3 player.
■To play back USB/MP3 player with folder mode on / off
1 Press the FUNCTION button (main unit) repeatedly to select USB function. Connect the USB memory device that has MP3/WMA format files on the unit. When the USB memory is connected to the main unit, the device information will be displayed.
To playback with folder mode on, follow step 2 below. To playback with folder mode off, skip to step 3 below.
2 Press the FOLDER button, and press the PRESET (or ^) button to select desired playback folder. To start play-back, go to step 4. To change the playback folder, press the PRESET (vor) button to select another folder.
3 Select desired file to be played back by pressing the / or button.
4 Press the ▶/II (USB ▶/II) button. Playback will start and the file name will be displayed.
●Title, Artist and Album name are displayed if they are recorded in the USB memory device.
●Display content can be changed by pressing the DISPLAY button.
Note:
To pause playback:
Press the ▶/''(USB ▶)button.
■To remove USB memory device
1 Press the ■button twice to stop playback.
2 Disconnect USB memory device from the USB terminal.
Notes:
● SHARP will not be held liable for the loss of data while the USB memory device is connected to the audio system.
●Files compressed in MP3 and/or WMA format can be played back when connected to the USB terminal.
●This USB memory's format supports FAT 16 or FAT 32.
● SHARP cannot guarantee that all USB memory devices will work on this audio system.
- USB cable is not recommended for use in this audio system to connect to USB memory device. Use of the USB cable will affect the performance of this audio system.
●This USB memory cannot be operated via USB hub.
●The USB terminal in this unit is not intended for a PC connection.
●External HDD-storage cannot be played back via USB terminal.
- If the data inside the USB memory is large, it may take longer time for the data to be read.
- This product can play WMA and MP3 files. It will automatically detect the file type being played. If unplayable file is played on this product, "Not Supported" is indicated and the file will be automatically skipped. This will take a few seconds. If abnormal indications appear on the display due to the unspecified file, turn off the unit and then turn it on again.
●This product relates to USB mass storage devices and MP3 players. It may however face some irregularities due to various unforeseen reasons from some devices. Should this happen, turn off the unit and then turn it on again.
The following functions are the same as CD operations:
Page
Various disc functions....9
Random play....9
Repeat play 10
Programmed play (MP3/WMA) 10
Notes:
- If USB memory device is not connected, "USB No Media" will be shown on the display.
●Fast forward/reverse is invalid when playing back a variable bitrate file.
Notes:
● This unit only supports "MPEG-1 Audio Layer-3" format. (Sampling Frequency is 32, 44.1, 48kHz)
●Playback order for MP3 files may differ depending on the writing software used during file download.
●Bitrate which is supported by MP3 is 32\~320 kbps, WMA is 64\~160 kbps.
●Files without MP3/WMA format cannot be played back.
●Playlists are not supported on this unit.
●This unit can display Folder Name or File Name up to 32 characters.
●Total number of folders read is 999 including folder with non-playable file. However, the display shows only folder with MP3/WMA files.
● The display playback time may not be displayed correctly when playing back a variable bitrate file.
●WMA meta tag also supports title, artist and album name which are recorded in WMA files. Copyright protected WMA files cannot be played back.

text_image
ON/STANDBY FUNCTION SHARP ON/STANDBY TUNER MEMORY CLEAR PRESET TUNING ENTER TUNING PRESETTuning
1 Press the ON/STANDBY button to turn the power on.
2 Press the TUNER button (remote control) or FUNCTION button (main unit) repeatedly to select FM Stereo or FM Mono.
3 ● Manual tuning:
Press the TUNING (◄◄/◄◄ or ►) button repeatedly to tune in to the desired station.
● Auto tuning:
Press and hold the TUNING (or/) button.
Scanning will start automatically and the tuner will stop at the first receivable broadcast station.
Notes:
- When radio interference occurs, auto scan tuning may stop automatically at that point.
● Auto scan tuning will skip weak signal stations.
● To stop the auto tuning, press the TUNING (◀◀ / ◀◀ or ▶▶ button again. - When an RDS (Radio Data System) station is tuned in, the frequency will be displayed first, and then the RDS indicator will light up. Finally, the station name will appear.
● Full auto tuning can be achieved for RDS stations "ASPM", see page 13.
To receive an FM stereo transmission:
- Press the TUNER button to select stereo mode. "ST" indicator will be displayed. "▶◀◀" and "●" will appear when an FM broadcast is in stereo.
- If the FM reception is weak, press the TUNER button to extinguish the "ST" indicator. The reception changes to monaural, and the sound becomes clearer.
■ Memorising a station
You can store 40 FM stations in memory and recall them at the push of a button. (Preset tuning)
1 Perform steps 2 - 3 in "Tuning".
2 Press the MEMORY button.

3 Within 30 seconds, press the PRESET (or) button to select the preset channel number. Store the stations in memory, in order, starting with preset channel 1.
4 Within 30 seconds, press the MEMORY button to store that station in memory. If the "MEM" and preset number indicators disappear before the station is memorised, repeat the operation from step 2.
5 Repeat steps 1 - 4 to set other stations, or to change a preset station. When a new station is stored in the memory, the station previously memorised for that preset channel number will be erased.
Note:
The backup function protects the memorised stations for a few hours should there be a power failure or the AC power lead become disconnected.
■ To recall a memorised station
Press the PRESET (vor) button to select the desired station.
■ To scan the preset stations
1 Press and hold the PRESET (vor) button until the preset number flashes. The programmed stations will be tuned in sequentially, for 5 seconds each.
2 Press the PRESET (vor) button again when the desired station is located.
■ To erase entire preset memory
1 Press the ON/STANDBY button to turn the power on.
2 Press the FUNCTION button (main unit) repeatedly or TUNER button (remote control) to select Tuner function.
3 In Tuner function, press and hold the CLEAR button (remote control) until "Tuner Clear" appears.


RDS is a broadcasting service which a growing number of FM stations provide. These FM stations send additional signals along with their regular programme signals. They send their station names, and information about the type of programme such as sport, music, etc.
When tuned to an RDS station, "RDS" and the station name will be displayed.
"TP" (Traffic Programme) will appear on the display when the received broadcast carries traffic information, and "TA" (Traffic Announcement) will appear while a traffic information is on air."
"PTYI" (Dynamic PTY Indicator) will appear while the Dynamic PTY station is received.

text_image
RDS PTYITPTA FM 8880MHzInformation provided by RDS
You can control the RDS by using the buttons on the remote control only.
Each time the RDS DISP button is pressed, the display will switch as follows:

text_image
BBC R1 → NEWSStation name (PS) Programme type (PTY)

text_image
FM 9880MHz UK WEATHRadio text (RT)Frequency
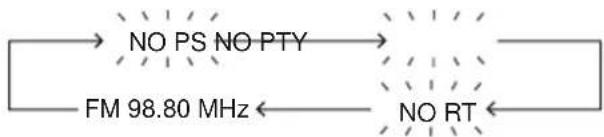
When tuning in to a station other than an RDS station or to an RDS station which sends weak signal, the display will change in the following order:
flowchart
graph LR
    A["NO PS NO PTY"] --> B["NO RT"]
    C["FM 98.80 MHz"] --> B
■Using the Auto Station Programme Memory (ASPM)
While in the ASPM operation mode, the tuner will automatically search for new RDS stations. Up to 40 stations can be stored.
1 Press the TUNER button (remote control) or FUNCTION button (main unit) repeatedly to select TUNER function.
2 Press and hold the RDS ASPM button.
1 After "ASPM" has flashed for about 4 seconds, scanning will start (87.50 - 108.00 MHz).

text_image
ASPH → FM 8750MHz2 When an RDS station is found, "RDS" will appear for a short time and the station will be stored in memory.

3 After scanning, the number of stations stored in memory will be displayed for 4 seconds, and then "END" will appear for 4 seconds.

text_image
08 Memory → ENDTo stop the ASPM operation before it is complete:
Press the RDS ASPM button while it is scanning for stations. The stations which are already stored in memory will be kept there.
Notes:
- If 40 stations have already been stored in memory, the scan will be aborted. If you want to redo the ASPM operation, erase the preset memory.
- If no station have been stored in memory, "END" will appear for about 4 seconds.
●If the RDS signals are very weak, station names may not be stored in memory.
●The same station name can be stored in different channels.
●In a certain area or during certain time periods, the station names may be different.
■Notes for RDS operation
If any of the following events occur, it does not mean that the unit is faulty:
●“PS”, “No PS” and a station name appear alternately, and the unit does not operate properly.
- If a particular station is not broadcasting properly or a station is conducting tests, the RDS reception function y may not work properly.
- When you receive an RDS station whose signal is too weak, information like the station name may not be displayed.
●“No PS”, “No PTY” or “No RT” will flash for about 5 seconds, and then the frequency will be displayed.
Notes for radio text:
●The first 14 characters of the radio text will appear for 4 seconds and then they will scroll across the display.
- If you tune in to an RDS station which is not broadcasting any radio text, "No RT" will be displayed when you switch to the radio text position.
● While radio text data is received or when the text contents change, "RT" will be displayed.
■To recall stations in memory
To specify programmed types (news, sports, traffic programme, etc.) and select stations (PTY search):
1 Press the TUNER button (remote control) or FUNCTION button (main unit) repeatedly to select TUNER function.
2 Press the RDS PTY button.

text_image
SELECT ⇔ PTY TI"SELECT" and "PTY TI" will appear alternately for about 6 seconds.
Using the Radio Data System (RDS) (continued)
3 Within 6 seconds, press the TUNING button to select the programme type.


Each time the button is pressed, the programme type will appear.
4 While the selected programme type is flashing (within 6 seconds), press the RDS PTY button again.

flowchart
graph LR
    A["NEWS"] --> B["SEARCH"]
After the selected programme type has been lit for 2 seconds, "SEARCH" will appear, and the search operation will start.
Notes:
- If the display has stopped flashing, start again from step 2. If the unit finds a desired programme type, the corresponding channel number will lit for about 8 seconds, and then the station name will remain lit.
- If you want to listen to the same programme type of another station, press the RDS PTY button while the channel number or station name is flashing. The unit will look for the next station.
- If no station can be found, "Not Found" will appear for 4 seconds.
If you select the traffic programme:
If you select the traffic programme (TP) in step 3, "TP" will appear.
(This does not mean that you can listen to the traffic information at that time.)
When the traffic information is broadcast, "TA" will appear.
Descriptions of the PTY (Programme Type) codes, TP (Traffic Programme) and TA (Traffic Announcement)
| NEWS POP M SOCIAL FOLK M | |||
| AFFAIRS ROCK M RELIGION DOCUMENT | |||
| INFO | EASY M | PHONE IN TEST | |
| SPORT | LIGHT M | TRAVEL | ALARM |
| EDUCATE | CLASSICS | LEISURE | NONE |
| DRAMA | OTHER M | JAZZ | TP |
| CULTURE | WEATHER | COUNTRY | TA |
| SCIENCE | FINANCE | NATION M | |
| VARIED | CHILDREN | OLDIES | |
Timer and sleep operation (Remote control only)
Timer playback:
The unit turns on and plays the desired source (CD, TUNER, USB, AUDIO IN) at a preset time.
This unit has 2 types of timer: ONCE TIMER and DAILY TIMER.
Once timer ("💡" indicator):
Once timer play works for one time only at a preset time.
Daily timer ("DAILY" indicator):
Daily timer play works at the same preset time every day that we set. For example, set the timer as a wake-up call every morning.
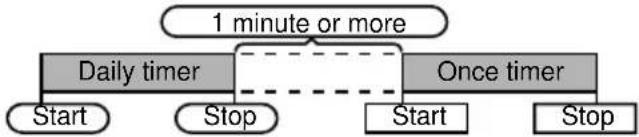
Using the once timer and daily timer in combination:
For example, use the once timer to listen to a radio program, and use the daily timer to wake up.
1 Set the daily and once timer (pages 14 - 15).
flowchart
graph TD
    A["Start"] --> B["Daily timer"]
    C["Stop"] --> B
    D["Start"] --> E["Once timer"]
    F["Stop"] --> E
    B -.-> G["1 minute or more"]
Timer playback
Before setting timer:
- Check that the clock is set to the correct time (refer to page 6). If it is not set, you cannot use the timer function.
●For timer playback: Plug in USB or load discs to be played.

1 Press the ON/STANDBY button to turn the power on.
2 Press the TIMER button.
3 Press the /on/ button to select "Once" or "Daily", and press the ENTER button.
4 Press the or/ button to select "Timer Set", and press the ENTER button.
5 To select the timer playback source (CD, TUNER, USB, AUDIO IN), press the /-button> /▶▶ Press the ENTER button.
When you select the tuner, select a station by pressing the ◀◀/◀◀ or ▶ button, and then press the ENTER button. If a station has not been programmed, "No Preset" will be displayed and timer setting will be cancelled. To memorise a station, refer 'Memorising a station' on page 12.
6 To adjust the day, press the ▶/button▶/▶▶ and then press the ENTER button.
7 Press the 10 / button to adjust the hour, and then press the ENTER button.
8 To adjust the minutes, press the ▶/▼/▼/▼ button and then press the ENTER button.
9 Set the time to finish as in steps 7 and 8 above.
10 To adjust the volume, press the ◀◀/◀◀ or ▶▶/▶▶ button and then press the ENTER button.
11 Press the ON/STANDBY button to enter the power standby mode. "TIMER" indicator lights up.

text_image
SHARP TIMER12 When the preset time is reached, playback will start. The volume will increase gradually until it reaches the preset volume. The timer indicator will blink during timer playback.
13 When the timer end time is reached, the system will enter the power standby mode automatically.
Once timer:
The timer will be cancelled.
Daily timer:
The timer operates at the same time every selected day. Cancel the daily timer when it is not in use.
Notes:
- When performing timer playback using another unit connected to the USB terminal or AUDIO IN socket, select "USB" or "AUDIO IN" in step 5. This unit will turn on or enter the power standby mode automatically. However, the connected unit will not turn on or off.
- To stop the timer playback, follow step "Cancelling the timer setting" of this page.
Checking the timer setting:
1 Turn the power on. Press the TIMER button.
2 Press the or button to select "Once" or "Daily", and press the ENTER button.
3 Press the /or/ button to select "Timer Call", and press the ENTER button.
Cancelling the timer setting:
1 Turn the power on. Press the TIMER button.
2 Press the ion/button to select "Once" or "Daily", and press the ENTER button.
3 Press the /or/ button to select "Timer Off", and press the ENTER button. Timer will be cancelled (the setting will not be cancelled).
Reusing the memorised timer setting:
The timer setting will be memorised once it is entered. To reuse the same setting, perform the following operations.
1 Turn the power on. Press the TIMER button.
2 Press the or button to select "Once" or "Daily", and press the ENTER button.
3 Press the /- button to select "Timer On", and press the ENTER button.
4 Press the ON/STANDBY button to enter the power standby mode.
Sleep operation
The radio, disc, USB, Audio In and Bluetooth can all be turned off automatically.
1 Play back the desired sound source.
2 Press the SLEEP button.
3 Within 5 seconds, press the SLEEP button repeatedly to select the time.
$$
\begin{array}{c} \text {Sleep 90'' \toSleep 80'' \ldots \to Sleep 10'' \to} \\ \text {\to ``Sleep Off''} \end{array}
$$
4 "SLEEP" indicator will appear.
5 The unit will enter the power standby mode automatically after the preset time has elapsed. The volume will be turned down 1 minute before the sleep operation finishes.
To confirm the remaining sleep time:
1 While "SLEEP" is indicated, press the SLEEP button.
To cancel the sleep operation:
Press the ON/STANDBY button while "SLEEP" is indicated. To cancel the sleep operation without setting the unit to the standby mode, proceed as follows.
1 While "SLEEP" is indicated, press the SLEEP button.
2 Within 5 seconds, press the SLEEP button repeatedly until "Sleep Off" appears.
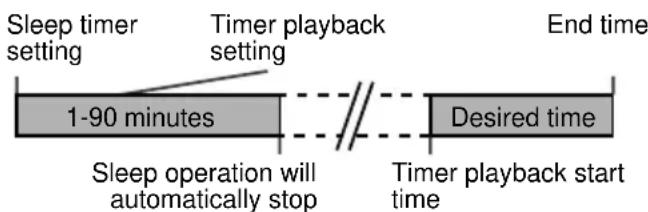
■To use timer and sleep operation together
Sleep and timer playback:
For example, you can fall asleep listening to the radio and wake up to CD the next morning.
1 Set the sleep time (see above, steps 1 - 5).
2 While the sleep timer is set, set the timer playback (steps 2 - 10, page 14).
flowchart
graph LR
    A["Sleep timer setting"] --> B["1-90 minutes"]
    C["Timer playback setting"] --> B
    D["Desired time"] --> E["Timer playback start time"]
    B --> F["Sleep operation will automatically stop"]
    E --> G["End time"]
Enhancing your system
The connection lead is not included. Purchase a commercially available lead as shown below.

text_image
SHARP PORTABLE AUDIO Player AUDIO Audiator Portable audio player, etc. Audio cable (not supplied)■Listening to the playback sounds of portable audio player, etc.
1 Use a connection lead to connect the portable audio player, etc. to the AUDIO IN socket.
2 Press the ON/STANDBY button to turn the power on.
3 Press the AUDIO IN button (remote control) or FUNCTION button repeatedly (main unit) to select AUDIO IN function.
4 Play the connected equipment. If volume level of the connected device is too high, sound distortion may occur. Should this happen, adjust the volume of the connected device.
Note:
To prevent noise interference, place the unit away from the television.
Headphones
- Do not set the volume on to maximum at switch on. Excessive sound pressure from earphones and headphones can cause hearing loss.
● Before plugging in or unplugging the headphone, reduce the volume. - Be sure your headphone has a 3.5 mm diameter plug and impedance between 16 and 50 ohms. The recommended impedance is 32 ohms.
- Plugging in the headphone disconnects the speakers automatically.
Troubleshooting chart
If something is wrong with this product, check the following before calling your authorised SHARP dealer or service centre.
General
| Symptom Possible cause | |
| ●The clock is not set to the correct time. | ●A power failure occurred. Reset the clock. (Refer page 6) |
| ●When a button is pressed, the unit does not respond. | ●Set the unit to the power standby mode and then turn it back on. ●If the unit still malfunctions, reset it. (Refer page 17) |
| ●No sound is heard. | ●The volume level set to “Min”. ●The headphones are connected. ●The speaker wires are no connected. |
Remote control
| Symptom Possible cause | |
| ●The remote control does not operate. | ●The AC power lead of the unit is not plugged in. ●The battery polarity is wrong. ●The batteries are dead. ●The distance or angle is incorrect. ●The remote control sensor receives strong light. |
Tuner
| Symptom Possible cause | |
| ●The radio makes unusual noises continuously. | ●The unit placed near a TV or computer. ●The FM aerial is not placed properly. Move the aerial away from the AC power lead if it is located nearby. |
Bluetooth
| Symptom Possible cause | |
| ● No sound is heard. | ● The unit is too far from the Bluetooth audio source device. ●The unit is not paired with the Bluetooth audio source device. |
| ●Bluetooth sound is interrupted or distorted. | ●The unit is too near to a device that generates electromagnetic radiation. ●There is an obstacle between the unit and the Bluetooth audio source device. |
NFC
| Symptom Possible cause | |
| ●NFC-enabled device cannot connect to Bluetooth when tapping on N-Mark. | ●The unit is in Eco mode. ●NFC mode is disabled on your device. ●Your device is in sleep mode. |
Open Accessory
| Symptom Possible cause | |
| ●No sound is produced. | ●The device is not playing. ●The device is not properly connected to the unit. ●The AC power lead of the unit is not plugged in. |
| ●Device is not charging. | ●The device is not making full contact with the USB terminal. |
CD player
| Symptom Possible cause | |
| ●Playback does not start. ●Playback stops in the middle or is not performed properly. | ●The disc is loaded upside down. ●The disc does not satisfy the standards. ●The disc is distorted or scratched. |
| ●Playback sounds are skipped, or stopped in the middle of a track. | ●The unit is located near excessive vibrations. ●Very dirty disc has been used. ●Condensation has formed inside the unit. |
USB
| Symptom Possible cause | |
| ●Device cannot be detected.●Playback does not start. | ●There is no MP3/WMA file inside the device.●The device is not properly connected.●A MTP device is connected.●The device contains AAC file only.●A copyright-protected WMA or false MP3 file is being played back. |
| ●Wrong time display.●Wrong file name display. | ●A Variable Bitrate files are being played back.●The File Name was written in other than English characters. |
Condensation
Sudden temperature changes, storage or operation in an extremely humid environment may cause condensation inside the cabinet (CD pickup, etc.) or on the transmitter on the remote control. Condensation can cause the unit to malfunction. If this happens, leave the power on with no disc in the unit until normal playback is possible (about 1 hour). Wipe off any condensation on the transmitter with a soft cloth before operating the unit.
If problem occurs
When this product is subject to strong external interference (mechanical shock, excessive static electricity, abnormal supply voltage due to lightning, etc.) or if it is operated incorrectly, it may malfunction.
If such a problem occurs, do the following:
1 Set the unit to the standby mode and turn the power on again.
2 If the unit is not restored in the previous operation, unplug and plug in the unit again, and then turn the power on.
Note:
If neither operation above restores the unit, clear all the memory by resetting it.
■Factory reset, clearing all memory
1 Press the ON/STANDBY button to turn the power on.
2 Press FUNCTION button (main unit) repeatedly or AUDIO IN button (remote control) to enter Audio In mode.
3 Press button(main unit) once.
4 Press and hold button (main unit) until "RESET" appears.

RESET
Caution:
This operation will erase all data stored in memory including clock, timer settings and tuner preset.
■Before transporting the unit
Remove all devices connected to the unit. Then, set the unit to the power standby mode. Carrying the unit with other devices left connected or discs left inside might damage the unit.
■Care of discs
Discs are fairly resistant to damage. However mistracking can occur due to accumulation of dirt on the surface.
- Do not mark on the non-label side of the disc from which signals are read.
- Keep your discs away from direct sunlight, heat, and excessive moisture.
●Always hold the discs by the edges. Fingerprints, dirt, or water on the CDs can cause noise or mistracking. Clean it with a soft, dry cloth, wiping straight out from the center, along the radius.

Maintenance
■Cleaning the cabinet
Periodically wipe the cabinet with a soft cloth and a diluted soap solution, then with a dry cloth.
Caution:
- Do not use chemicals for cleaning (petrol, paint thinner, etc.). It may damage the cabinet.
- Do not apply oil to the inside of the unit. It may cause malfunctions.
Specifications
As part of our policy of continuous improvement, SHARP reserves the right to make design and specification changes for product improvement without prior notice. The performance specification figures indicated are nominal values of production units. There may be some deviations from these values in individual unit.
General
| Power source AC | 100 - 240 V ~ 50/60 Hz |
| Power consumption | AC: Power on: 20 WPower standby: 0.4 W (*1)Power standby: < 2 W (*2) |
| Dimensions Width | 180 mm (7 - 1/16")Height: 125 mm (4 - 15/16")Depth: 220 mm (8 - 11/16") |
| Weight 1.8 kg (4.0 lbs.) | |
| Bluetooth frequency band | 2.400GHz - 2.480GHz |
| Compatible Bluetooth Profile | A2DP (Advanced Audio Distribution Profile), AVRCP (Audio/Video Remote Control Profile)Bluetooth 2.1 +EDR |
(*1) This power consumption value is obtained when the Bluetooth standby mode is cancelled in the power standby mode. Refer to page 4 to cancel the Bluetooth standby mode.
(*2) This power consumption value is obtained when at the Bluetooth standby mode.
Amplifier
| Output power PMPO: 100 WMPO: 50 W (25 W + 25 W)(10% T.H.D.)RMS: 50 W (25 W + 25 W)(10% T.H.D.)RMS: 40 W (20 W + 20 W)(1% T.H.D.) |
| Output terminals $peakers: 6 ohms20Hz - 20kHzHeadphones: 16 - 50 ohms(recommended: 32 ohms) |
| Input terminals Audio In (audio signal):500 mV/47 k ohms |
CD player
| Type Single disc multi-play compact disc player | |
| Signal readout Non-contact, 3-beam semiconductor laser pickup | |
| D/A converter Multi bit D/A converter | |
| Frequency response | 20 - 20,000 Hz |
| Dynamic range 90 | dB (1 kHz) |
USB (MP3 / WMA)
| USB host interface | ● Complies with USB 1.1 (Full Speed)/2.0 Mass Storage Class. ● Support Bulk only and CBI protocol. |
| Support file | ● MPEG 1 Layer 3 ● WMA (Non DRM) |
| Bitrate support | ● MP3 (32 ~ 320 kbps) ● WMA (64 ~ 160 kbps) |
| Other | ● Maximum total number of MP3/WMA files is 65025. ● Maximum total number of folders is 999 INCLUSIVE of root directory. ● The ID3TAG information supported are TITLE, ARTIST and ALBUM only. ● Supports ID3TAG version 1 and version 2. |
| File system support | ● FAT 16 / FAT 32 |
Tuner
| Frequency range | FM: 87.5 - 108.0 MHz |
| Preset | 40 (FM stations) |
Speaker
| Type 1-way type speaker system10 cm (4") Full Range | |
| Maximum input power | 50 W |
| Rated input power | 25 W |
| Impedance | 6 ohms |
| Dimensions Width: 120 mm (4 - 3/4")Height: 125 mm (4 - 15/16")Depth: 200 mm (7-7/8") | |
| Weight 0.9 kg (2.0 lbs.) / each | |
SHARP®
SHARP CORPORATION