
Wireless G Router 521666 - Router Intellinet - Free user manual and instructions
Find the device manual for free Wireless G Router 521666 Intellinet in PDF.


| Product Type | Wireless Router |
| Brand | Intellinet |
| Model | 521666 |
| Wireless Standard | 802.11g (Wi-Fi 3) |
| Frequency Band | 2.4 GHz |
| Maximum Data Rate | 54 Mbps |
| LAN Ports | 4 x 10/100 Fast Ethernet |
| WAN Port | 1 x 10/100 Fast Ethernet |
| Antenna | 2 external detachable (2 dBi) |
| Security | WEP 64/128-bit, WPA, WPA2, MAC Address Filtering |
| Firewall | NAT, SPI |
| Power Supply | DC 5V, 2.5A |
| Dimensions (W x D x H) | 7.5 x 5.5 x 1.2 in (19 x 14 x 3 cm) |
| Weight | 0.8 lb (360 g) |
| Operating Temperature | 0°C to 40°C |
| LED Indicators | Power, WAN, LAN (4), Wireless |
| Mounting | Desktop or wall-mountable |
| Configuration | Web-based interface (DHCP) |
| Compatibility | Windows, Mac, Linux |
| Warranty | 1 year limited |
Frequently Asked Questions - Wireless G Router 521666 Intellinet
User questions about Wireless G Router 521666 Intellinet
0 question about this device. Answer the ones you know or ask your own.
Ask a new question about this device
Download the instructions for your Router in PDF format for free! Find your manual Wireless G Router 521666 - Intellinet and take your electronic device back in hand. On this page are published all the documents necessary for the use of your device. Wireless G Router 521666 by Intellinet.
USER MANUAL Wireless G Router 521666 Intellinet
Wireless Broadband Router 521666
Manual
Introduction...... 4
Features.... 4
Minimum Requirements 4
Package Content 4
Note 4
Get to know the Broadband Router.... 5
Back Panel 5
Front Panel 6
Setup Diagram....7
Getting started....8
Chapter 1....16
Quick Setup 16
Step 1) Time Zone.... 16
Step 2) Broadband Type.... 17
1.1 Cable Modem 18
1.2 Fixed-IP xDSL.... 19
1.3 PPPoE 20
1.4 PPTP 22
1.5 L2TP 24
1.6 Telstra Big Pond.... 27
Chapter 2....28
General Settings 28
2.1 System 30
2.1.1 Time Zone.... 31
2.1.2 Password Settings 32
2.1.3 Remote Management.... 33
2.2 WAN....35
2.2.1 Dynamic IP 36
2.2.2 Static IP Address.... 36
2.2.3 PPPoE (PPP over Ethernet) 36
2.2.4 PPTP 36
2.2.5 L2TP 36
2.2.6 Telstra Big Pond.... 36
2.2.7 DNS 37
2.2.8 DDNS.... 38
2.3 LAN 39
2.4 Wireless.... 41
2.4.1 Basic Settings.... 42
2.4.2 Advanced Settings.... 49
2.4.3 Security 51
2.4.3.1 WEP only 51
2.4.3.2 802.1x only 52
2.4.3.3 802.1x WEP Static key....53
2.4.3.4 WPA Pre-shared key 54
2.4.3.5 WPA Radius 56
2.4.4 Access Control....58
2.5 QoS....60
2.6 NAT 64
2.6.1 Port Forwarding 66
2.6.2 Virtual Server.... 68
2.6.3 Special Applications.... 71
2.6.4 UPnP Settings....73
2.6.5 ALG Settings 74
2.6.6 Static Routing....75
2.7 Firewall 77
2.7.1 Access Control.... 78
2.7.2 URL Blocking....82
2.7.3 DoS (Denial of Service) 84
2.7.4 DMZ 85
Chapter 3....87
Status....87
3.1 Status and Information 88
3.2 Internet Connection....89
3.3 Device Status 89
3.4 System Log....91
3.5 Security Log....92
3.6 Active DHCP Client....93
3.7 Statistics 94
Chapter 4....95
Tool....95
4.1 Configuration Tools....96
4.2 Firmware Upgrade 97
4.3 Reset 98
Appendix A....99
Glossary 100
Introduction
Congratulations on purchasing this Wireless Broadband Router. This Wireless Broadband Router is a cost-effective IP Sharing Router that enables multiple users to share the Internet through an ADSL or cable modem. Simply configure your Internet connection settings in the Wireless Broadband Router and plug your PC to the LAN port and you're ready to share files and access the Internet. As your network grows, you can connect another hub or switch to the router's LAN ports, allowing you to easily expand your network. The Wireless Broadband Router is embedded with a IEEE 802.11g/b access point that allows you to build up a wireless LAN. The Wireless Broadband Router provides a total solution for the Small and Medium-sized Business (SMB) and the Small Office/Home Office (SOHO) markets, giving you an instant network today, and the flexibility to handle tomorrow's expansion and speed.
Features
• High Internet Access throughput (50M)
- Allow multiple users to share a single Internet line
• Supports up to 253 users
- Internet Access via Cable or xDSL modem
- Access Private LAN Servers from the Public Network
• Equipped with four LAN ports (10/100M) and one WAN port (10/100M)
- Provides IEEE 802.11g/b wireless LAN access point
• Support DHCP (Server/Client) for easy setup
- Support advance features such as: Special Applications, DMZ, Virtual Servers, Access Control, Firewall.
- Allow you to monitor the router's status such as: DHCP Client Log, System Log, Security Log and Device/Connection Status
- Easy to use Web-based GUI for configuration and management purposes
- Remote Management allows configuration and upgrades from a remote site (over the Internet)
Minimum Requirements
• One External xDSL (ADSL) or Cable modem with an Ethernet port (RJ-45)
• Network Interface Card (NIC) for each Personal Computer (PC)
- PCs with a Web-Browser (Internet Explorer 4.0 or higher, or Netscape Navigator 4.7 or higher)
Package Content
• One 4-port Broadband router unit
• One Quick Installation Guide
• One User Manual CD
- One Power Adapter
- Accessories
Note
The WAN “idle timeout” auto-disconnect function may not work due to abnormal activities of some network application software, computer virus or hacker attacks from the Internet. For example, some software sends network packets to the Internet in the background, even when you are not using the Internet. So please turn off your computer when you are not using it. This function also may not work with some ISP. So please make sure this function can work properly when you use this function in the first time, especially your ISP charge you by time used.
Get to know the Broadband Router
Back Panel
The diagram (fig1.0) below shows the broadband router's back panel. The router's back panel is divided into three sections, LAN, WAN and Reset:
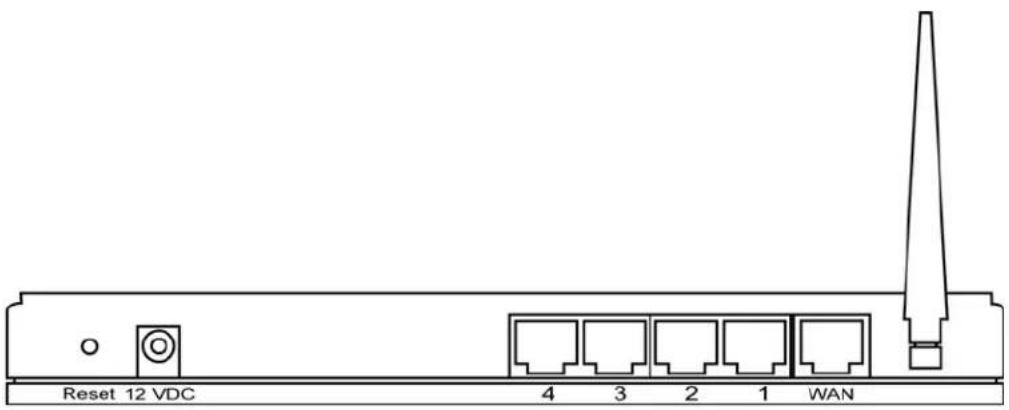
Figure 1.0
1) Local Area Network (LAN)
The Broadband router's 4 LAN ports are where you connect your LAN's PCs, printer servers, hubs and switches etc.
2) Wide Area Network (WAN)
The WAN port is the segment connected to your xDSL or Cable modem and is linked to the Internet.
3) Reset
The Reset button allows you to do one of two things.
1) If problems occur with your router, press the router's reset button with a pencil tip (for less than 4 seconds) and the router will re-boot itself, keeping your original configurations.
2) If problems persist or you experience extreme problems or you forgot your password, press the reset button for longer than 4 seconds and the router will reset itself to the factory default settings (warning: your original configurations will be replaced with the factory default settings)
Front Panel
On the router's front panel there are LED lights that inform you of the router's current status. Below is an explanation of each LED and its description.

| LED | Light Status | Description | |
| PWR | ON | Router's power supply is on | |
| WAN 10/100M Off WAN port 10Mbps is connected | ON | WAN port 100Mbps is connected | |
| WAN LNK/ACT | ON | WAN is connected | |
| Off | No WAN connection | ||
| Flashing | WAN port has Activity (ACT), data being sent | ||
| LAN 10/100M (Port 1-4) | ON | LAN port 100Mbps is connected | |
| Off | LAN port 10Mbps is connected | ||
| LAN LNK/ACT (Port 1-4) | ON | LAN is connected | |
| Off | No LAN connection | ||
| Flashing | LAN port has Activity (ACT), data being sent | ||
| WLAN-G | ON | Wireless LAN has been activated | |
| Off | Wireless LAN is disabled | ||
| Flashing | Wireless LAN has Activity (ACT) data being sent | ||
Setup Diagram
Figure 1.2 below shows a typical setup for a Local Area Network (LAN).

flowchart
graph TD
    A["AC Power"] --> B["Reset 12 VDC"]
    B --> C["4"]
    B --> D["3"]
    B --> E["2"]
    B --> F["1"]
    B --> G["WAN"]
    G --> H["ADSL or Cable Modem"]
    H --> I["Switch/ Hub"]
    H --> J["Computer"]
    H --> K["Computer"]
    H --> L["Computer"]
    H --> M["Computer"]
    H --> N["Internet"]
Figure 1.2
Getting started
This is a step-by-step instruction on how to start using the router and get connected to the Internet.
1) Setup your network as shown in the setup diagram above (fig 1.2).
2) You then need to set your LAN PC clients so that it can obtain an IP address automatically. All LAN clients require an IP address. Just like an address, it allows LAN clients to find one another. (If you have already configured your PC to obtain an IP automatically then proceed to step 3, page 11)
Configure your PC to obtain an IP address automatically
By default the broadband router's DHCP is on, this means that you can obtain an IP address automatically once you've configured your PC to obtain an IP address automatically. This section will show you how to configure your PC's so that it can obtain an IP address automatically for either Windows 95/98/Me, 2000 or NT operating systems. For other operating systems (Macintosh, Sun, etc.), follow the manufacturer's instructions. The following is a step-by-step illustration on how to configure your PC to obtain an IP address automatically for 2a) Windows 95/98/Me, 2b) Windows XP, 2c) Windows 2000 and 2d) Windows NT.
1: Click the Start button and select Settings, then click Control Panel. The Control Panel window will appear.
2: Double-click Network icon. The Network window will appear.
3: Check your list of Network Components. If TCP/IP is not installed, click the Add button to install it now. If TCP/IP is installed, go to step 6.
4: In the Network Component Type dialog box, select Protocol and click Add button.
5: In the Select Network Protocol dialog box, select Microsoft and TCP/IP and then click the OK button to start installing the TCP/IP protocol. You may need your Windows CD to complete the installation.
6: After installing TCP/IP, go back to the Network dialog box. Select TCP/IP from the list of Network Components and then click the Properties button.
7: Check each of the tabs and verify the following settings:
- Bindings: Check Client for Microsoft Networks and File and printer sharing for Microsoft Networks.
• Gateway: All fields are blank.
• DNS Configuration: Select Disable DNS.
• WINS Configuration: Select Disable WINS Resolution.
• IP Address: Select Obtain IP address automatically.

8: Reboot the PC. Your PC will now obtain an IP address automatically from your Broadband Router's DHCP server.
Note: Please make sure that the Broadband router's DHCP server is the only DHCP server available on your LAN.
Once you've configured your PC to obtain an IP address automatically, please proceed to Step 3
2b) Windows XP
1: Click the Start button and select Settings, then click Network Connections. The Network Connections window will appear.
2: Double-click Local Area Connection icon. The Local Area Connection window will appear.
3: Check your list of Network Components. You should see Internet Protocol [TCP/IP] on your list. Select it and click the Properties button.
4: In the Internet Protocol (TCP/IP) Properties window, select Obtain an IP address automatically and Obtain DNS server address automatically as shown on the following screen.

5: Click OK to confirm the setting. Your PC will now obtain an IP address automatically from your Broadband Router's DHCP server.
Note: Please make sure that the Broadband router's DHCP server is the only DHCP server available on your LAN.
Once you've configured your PC to obtain an IP address automatically, please proceed to Step 3.
2c) Windows 2000
1: Click the Start button and select Settings, then click Control Panel. The Control Panel window will appear.
2: Double-click Network and Dial-up Connections icon. In the Network and Dial-up Connection window, double-click Local Area Connection icon. The Local Area Connection window will appear.
3: In the Local Area Connection window, click the Properties button.
4: Check your list of Network Components. You should see Internet Protocol [TCP/IP] on your list. Select it and click the Properties button.
5: In the Internet Protocol (TCP/IP) Properties window, select Obtain an IP address
automatically and Obtain DNS server address automatically as shown on the following screen.
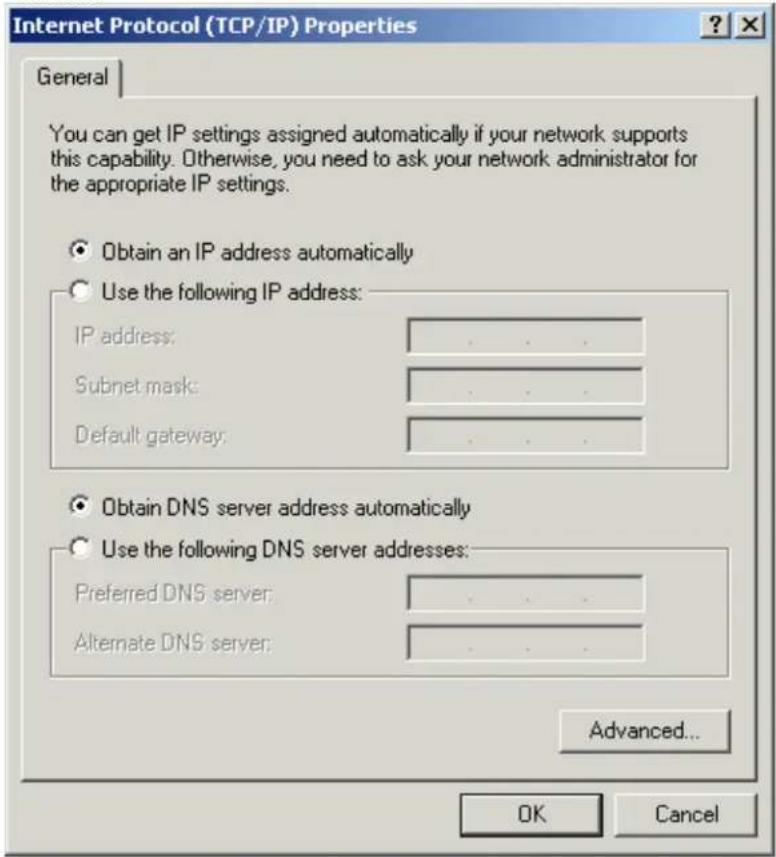
6: Click OK to confirm the setting. Your PC will now obtain an IP address automatically from your Broadband Router's DHCP server.
Note: Please make sure that the Broadband router's DHCP server is the only DHCP server available on your LAN.
Once you've configured your PC to obtain an IP address automatically, please proceed to Step 3.
2d) Windows NT
1: Click the Start button and select Settings, then click Control Panel. The Control Panel window will appear.
2: Double-click Network icon. The Network window will appear. Select the Protocol tab from the Network window.
3: Check if the TCP/IP Protocol is on your list of Network Protocols. If TCP/IP is not installed, click the Add button to install it now. If TCP/IP is installed, go to step 5.
4: In the Select Network Protocol window, select the TCP/IP Protocol and click the Ok
button to start installing the TCP/IP protocol. You may need your Windows CD to complete the installation.
5: After you install TCP/IP, go back to the Network window. Select TCP/IP from the list of Network Protocols and then click the Properties button.
6: Check each of the tabs and verify the following settings:
• IP Address: Select Obtain an IP address from a DHCP server.
• DNS: Let all fields are blank.
• WINS: Let all fields are blank.
- Routing: Let all fields are blank.
![Microsoft TCP/IP Properties IP Address DNS WINS Address Routing An IP address can be automatically assigned to this network card by a DHCP server. If your network does not have a DHCP server, ask your network administrator for an address, and then type it in the space below. Adapter: [1] Realtek RTL8139/810X Family PCI Fast Ethernet Adapter Obtain an IP address from a DHCP server Specify an IP address IP Address: . Subnet Mask: . Default Gateway: . Advanced... OK Cancel Apply](/content/2026/05/1046764/images/8915fe8d57b6b53df1ce4ac8e6c1c8c2e28bda70527d3d655dfae6f69654283f.jpg)
7: Click OK to confirm the setting. Your PC will now obtain an IP address automatically from your Broadband Router's DHCP server.
Note: Please make sure that the Broadband router's DHCP server is the only DHCP server available on your LAN.
Once you've configured your PC to obtain an IP address automatically, please proceed to Step 3.
3) Once you have configured your PCs to obtain an IP address automatically, the router's DHCP server will automatically give your LAN clients an IP address. By default the Broadband Router's DHCP server is enabled so that you can obtain an IP address automatically. To see if you have obtained an IP address, see Appendix A.
Note: Please make sure that the Broadband router's DHCP server is the only DHCP server available on your LAN. If there is another DHCP on your network, then you'll need to switch one of the DHCP servers off. (To disable the Broadband router's DHCP server see chapter 2 LAN Port)
4) Once your PC has obtained an IP address from your router, enter the default IP address 192.168.2.1 (broadband router's IP address) into your PC's web browser and press

5) The login screen below will appear. Enter the "User Name" and "Password" and then click
Note: By default the user name is "admin" and the password is "1234". For security reasons it is recommended that you change the password as soon as possible (in General setup/system/password, see chapter 2)

6) The HOME page screen below will appear. The Home Page is divided into four sections, Quick Setup Wizard, General Setup, Status Information and Tools.
Quick Setup Wizard (Chapter 1) If you only want to start using the broadband router as an Internet Access device then you ONLY need to configure the screens in the Quick Setup Wizard section.
General Setup (Chapter 2)
If you want to use more advanced features that the broadband router has to offer, then you'll need to configure the Quick Setup Wizard and the General Setup section. Alternatively, you can just configure the General Setup section, since the General Setup/WAN and the Quick Setup Wizard contain the same configurations.
Status Information (Chapter 3)
The Status Information section is for you to monitor the router's current status information only.
Tools (Chapter 4)
If you want to Reset the router (because of problems) or save your configurations or upgrade the firmware then the Tools section is the place to do this.

| M e n u | D e s c |
| Quick Setup Wizard (Chapter 1) | Select your Internet connection type and then input the configurations needed to connect to your Internet Service Provider (ISP). |
| General Setup (Chapter 2) | This section contains configurations for the Broadband router's advance functions such as: Address Mapping, Virtual Server, Access Control, Hacker Attack Prevention, DMZ, |
| Special applications and other functions to meet your LAN requirements. | |
| Status Information (Chapter 3) | In this section you can see the Broadband router's system information, Internet Connection, Device Status, System Log, Security Log and DHCP client information. |
| Tools (Chapter 4) | This section contains the broadband router's Tools - Tools include Configuration tools, Firmware upgrade and Reset. Configuration tools allow you to Backup (save), Restore, or Restore to Factory Default configuration for your Broadband router. The Firmware upgrade tool allows you to upgrade your Broadband router's firmware. The RESET tool allows you to reset your Broadband router. |
| Logout | Selecting logout will return you to the LOGIN page |
7) Click on Quick Setup Wizard (see chapter 1) to start configuring settings required by your ISP so that you can start accessing the Internet. The other sections (General Setup, Status Information and Tools) do not need to be configured unless you wish to implement/monitor more advance features/information.
Select the section (Quick Setup Wizard, General Setup, Status Information and Tools) you wish to configure and proceed to the corresponding chapter. Use the selections on the web management's top right hand page (see below) to navigate around the web-based management User Interface.

Chapter 1
Quick Setup
The Quick Setup section is designed to get you using the broadband router as quickly as possible. In the Quick Setup you are required to fill in only the information necessary to access the Internet. Once you click on the Quick Setup Wizard in the HOME page, you should see the screen below.
Step 1) Time Zone
The Time Zone allows your router to base its time on the settings configured here, this will affect functions such as Log entries and Firewall settings.

| Parameter | Description |
| Set Time Zone Select the time zone of the country you are currently in. The router will set its time based on your selection. | |
| Time Server Address | You can manually assign time server address if the default time server dose not work. |
| Enable Daylight Savings | The router can also take Daylight savings into account. If you wish to use this function, you must |
check/tick the enable box to enable your daylight saving configuration (below).
Start Daylight Savings Time Select the period in which you wish to start daylight Savings Time
End Daylight Savings Time
Select the period in which you wish to end daylight Savings Time
Click on NEXT to proceed to the next page (step 2) Broadband Type.
Step 2) Broadband Type
In this section you have to select one of four types of connections that you will be using to connect your broadband router's WAN port to your ISP (see screen below).
Note: Different ISP's require different methods of connecting to the Internet, please check with your ISP as to the type of connection it requires.

Menu
Description
1.1 Cable Modem
Your ISP will automatically give you an IP address
1.2 Fixed-IP xDSL
Your ISP has given you an IP address already
| 1.3 PPPoE | Your ISP requires you to use a Point-to-Point Protocol over Ethernet (PPPoE) connection. |
| 1.4 PPTP | Your ISP requires you to use a Point-to-Point Tunneling Protocol (PPTP) connection. |
| 1.5 L2TP | Your ISP requires you to use a Layer Two Tunneling Protocol (L2TP) connection. |
1.6 Telstra Big Pond This Protocol only used for Australia's ISP connection.
Click on one of the WAN type and then proceed to the manual's relevant sub-section (1.1, 1.2, 1.3, 1.4, 1.5 or 1.6). Click on Back to return to the previous screen.
1.1 Cable Modem
Choose Cable Modem if your ISP will automatically give you an IP address. Some ISP's may also require that you fill in additional information such as Host Name and MAC address (see screen below).
Note: The Host Name and MAC address section is optional and you can skip this section if your ISP does not require these settings for you to connect to the Internet.

| Parameters | Description |
| Host Name If your ISP requires a Host Name, type in the host name provided by your ISP, otherwise leave it blank if your ISP does not require a Host Name. | |
| MAC Address Your ISP may require a particular MAC address in order for you to connect to the Internet. This MAC address is the PC's MAC address that your ISP had originally connected your Internet connection to. Type in this MAC address in this section or use the “Clone MAC Address” button to replace the WAN MAC address with the MAC address of that PC (you have to be using that PC for the Clone MAC Address button to work). To find out the PC's MAC address see Appendix A. (see Glossary for an explanation on MAC address) | |
Click
1.2 Fixed-IP xDSL
Select Fixed-IP xDSL if your ISP has given you a specific IP address for you to use. Your ISP should provide all the information required in this section.

| Parameters | Description | |
| I | P | This is the IP address that your ISP has given you. |
| Gateway IP | This is the ISP's IP address gateway | |
| DNS This is the ISP's DNS server IP address | ||
| Subnet | Mask | Enter the Subnet Mask provided by your ISP (e.g. 255.255.255.0) |
Click
1.3 PPPoE
Select PPPoE if your ISP requires the PPPoE protocol to connect you to the Internet. Your ISP should provide all the information required in this section.

Parameter
Description
User Name Enter the User Name provided by your ISP for the PPPoE connection
Password Enter the Password provided by your ISP for the PPPoE connection
Service Name This is optional. Enter the Service name should your ISP requires it, otherwise leave it blank.
MTU This is optional. You can specify the maximum size of your transmission packet to the Internet. Leave it as it is if you to not wish to set a maximum packet size.
Connection Type If you select “Continuous”, the router will always connect to the ISP. If the WAN line breaks down and links again, the router will auto-reconnect to the ISP.
If you select “Connect On Demand”, the router will auto- connect to the ISP when someone want to use the Internet and keep connected until the WAN idle timeout. The router will close the WAN connection if the time period that no one is using the Internet exceeds the “Idle Time”.
If you select “Manual”, the router will connect to ISP only when you click “Connect” manually from the Web user interface. The WAN connection will not disconnected due to the idle timeout. If the WAN line breaks down and latter links again, the router will not auto-connect to the ISP.
Idle Time You can specify an idle time threshold (minutes) for the WAN port. This means if no packets have been sent (no one using the Internet) during this specified period, the router will automatically disconnect the connection with your ISP. Note: This “idle timeout” function may not work due to abnormal activities of some network application software, computer virus or hacker attacks from the Internet. For example, some software sends network packets to the Internet in the background, even when you are not using the Internet. So please turn off your computer when you are not using it. This function also may not work with some ISP. So please make sure this function can work properly when you use this function in the first time, especially your ISP charge you by time used.
Click
1.4 PPTP
Select PPTP if your ISP requires the PPTP protocol to connect you to the Internet. Your ISP should provide all the information required in this section.
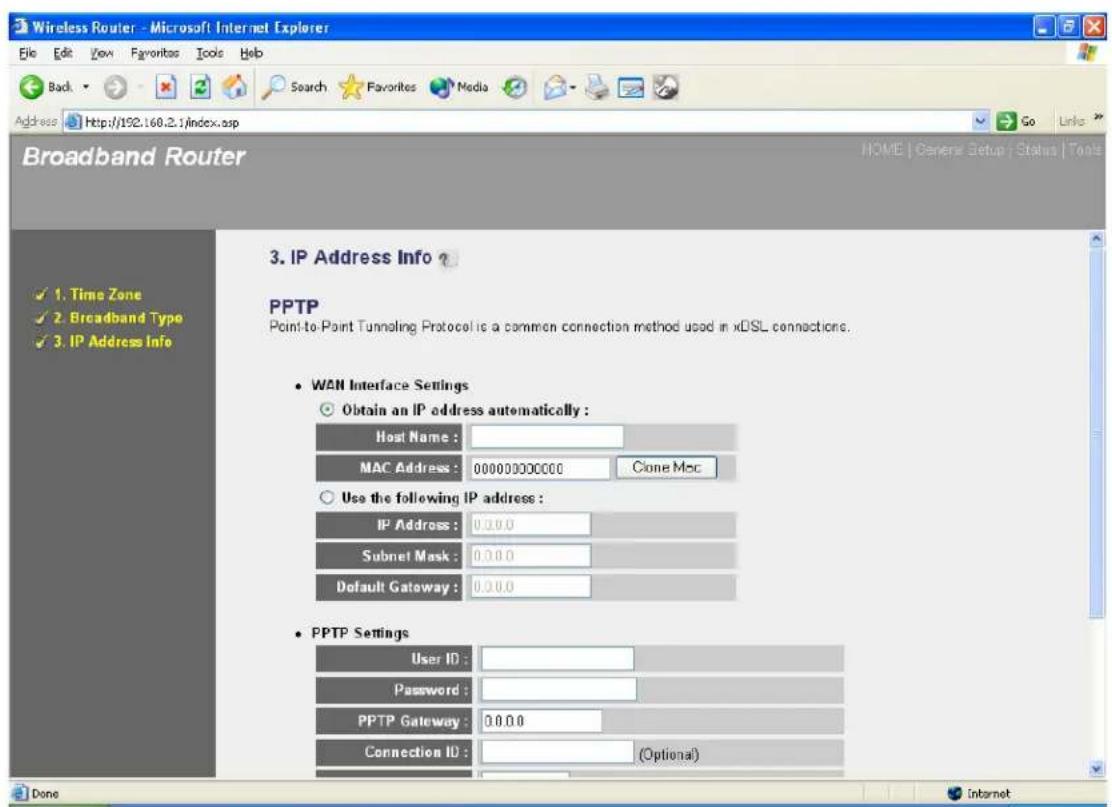
Parameter
Description
Obtain an IP address The ISP requires you to obtain an IP address by DHCP automatically before connecting to the PPTP server.
Use the following IP address The ISP give you a static IP to be used to connect to the PPTP server.
IP Address This is the IP address that your ISP has given you to establish a PPTP connection.
Subnet Mask Enter the Subnet Mask provided by your ISP (e.g. 255.255.255.0)
Gateway Enter the IP address of the ISP Gateway
User ID
Enter the User Name provided by your ISP for the PPTP connection. Sometimes called a Connection ID
Password Enter the Password provided by your ISP for the PPTP connection
PPTP Gateway If your LAN has a PPTP gateway, then enter that PPTP gateway IP address here. If you do not have a PPTP gateway then enter the ISP's Gateway IP address above
Connection ID This is the ID given by ISP. This is optional.
BEZEQ-ISRAEL Select this item if you are using the service provided by BEZEQ in Israel.
Connection Type If you select “Continuous”, the router will always connect to the ISP. If the WAN line breaks down and links again, the router will auto-reconnect to the ISP.
If you select “Connect On Demand”, the router will auto- connect to the ISP when someone want to use the Internet and keep connected until the WAN idle timeout. The router will close the WAN connection if the time period that no one is using the Internet exceeds the “Idle Time”.
If you select “Manual”, the router will connect to ISP only when you click “Connect” manually from the Web user interface. The WAN connection will not disconnected due to the idle timeout. If the WAN line breaks down and latter links again, the router will not auto-connect to the ISP.
Idle Time You can specify an idle time threshold (minutes) for the WAN port. This means if no packets have been sent (no one using the Internet) throughout this specified period, then the router will automatically disconnect the connection with your ISP. Note: This “idle timeout” function may not work due to abnormal activities of some network application software, computer virus or hacker attacks from the Internet. For example, some software sends network packets to the Internet in the background, even when you are not using the Internet. So please turn off your computer when you are not using it. This function also may not work with some ISP. So please make sure this function can work properly when you use this function in the first time, especially your ISP charge you by time used.
Click
1.5 L2TP
Select L2TP if your ISP requires the L2TP protocol to connect you to the Internet. Your ISP should provide all the information required in this section.
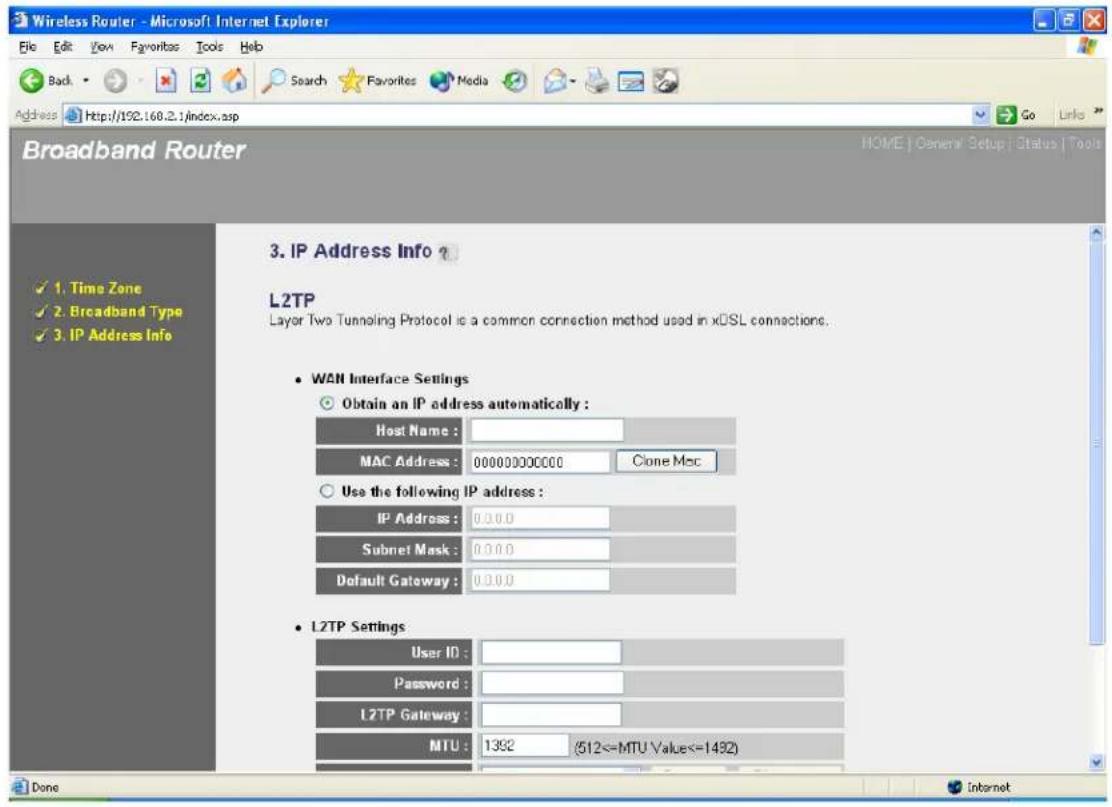
Parameter
Description
Obtain an IP address The ISP requires you to obtain an IP address by DHCP automatically before connecting to the L2TP server.
MAC Address Your ISP may require a particular MAC address in order
for you to connect to the Internet. This MAC address is the PC's MAC address that your ISP had originally connected your Internet connection to. Type in this MAC address in this section or use the "Clone MAC Address" button to replace the WAN MAC address with the MAC address of that PC (you have to be using that PC for the Clone MAC Address button to work). To find out the PC's MAC address see Appendix A. (see Glossary for an explanation on MAC address)
Use the following IP address The ISP gives you a static IP to be used to connect to the
L 2 T P s e r v e
IP Address This is the IP address that your ISP has given you to establish a L2TP connection.
Subnet Mask
Enter the Subnet Mask provided by your ISP (e.g. 255.255.255.0)
Gateway Enter the IP address of the ISP Gateway
User ID Enter the User Name provided by your ISP for the PPTP connection. Sometimes called a Connection ID
Password Enter the Password provided by your ISP for the PPTP connection
L2TP Gateway If your LAN has a L2TP gateway, then enter that L2TP gateway IP address here. If you do not have a L2TP gateway then enter the ISP's Gateway IP address above
MTU This is optional. You can specify the maximum size of your transmission packet to the Internet. Leave it as it is if you to not wish to set a maximum packet size.
Connection Type If you select “Continuous”, the router will always connect to the ISP. If the WAN line breaks down and links again, the router will auto-reconnect to the ISP.
If you select “Connect On Demand”, the router will auto- connect to the ISP when someone want to use the Internet and keep connected until the WAN idle timeout. The router will close the WAN connection if the time period that no one is using the Internet exceeds the “Idle Time”.
If you select “Manual”, the router will connect to ISP only when you click “Connect” manually from the Web user interface. The WAN connection will not be disconnected due to the idle timeout. If the WAN line breaks down and latter links again, the router will not auto-connect to the ISP.
Idle Time Out
The WAN "idle timeout" auto-disconnect function may not work due to abnormal activities of some network application software, computer virus or hacker attacks from the Internet. For example, some software sends network packets to the Internet in the background, even when you are not using the Internet. This function also may not work with some ISP. So please make sure this function can work properly when you use this function in the first time, especially your ISP charge you by time used. Due to the many uncontrollable issues, we do not guarantee the WAN "idle timeout" auto-disconnect function will always work. In order
to prevent from extra fee charged by ISP, please TURN OFF THE ROUTER WHEN YOU FINISHED USING THE INTERNET.
Click
1.6 Telstra Big Pond
Select Telstra Big Pond if your ISP requires the Telstra Big Pond protocol to connect you to the Internet. Your ISP should provide all the information required in this section. Telstra Big Pond protocol is used by the ISP in Australia.

Parameter
Description
User Name Enter the User Name provided by your ISP for the Telstra Big Pond connection
Password Enter the Password provided by your ISP for the Telstra Big Pond connection
User deside login server Select if you want to assign the IP of Telstra Big Pond's login manually server manually.
Login Server The IP of the Login Server.
Click
Chapter 2
General Settings
Once you click on the General Setup button at the Home Page, you should see the screen below.
If you have already configured the Quick Setup Wizard you do NOT need to configure anything thing in the General Setup screen for you to start using the Internet.
The General Setup contains advanced features that allow you to configure the router to meet your network's needs such as: Wireless, Address Mapping, Virtual Server, Access Control, Hacker Attack Prevention, Special Applications, DMZ and other functions.
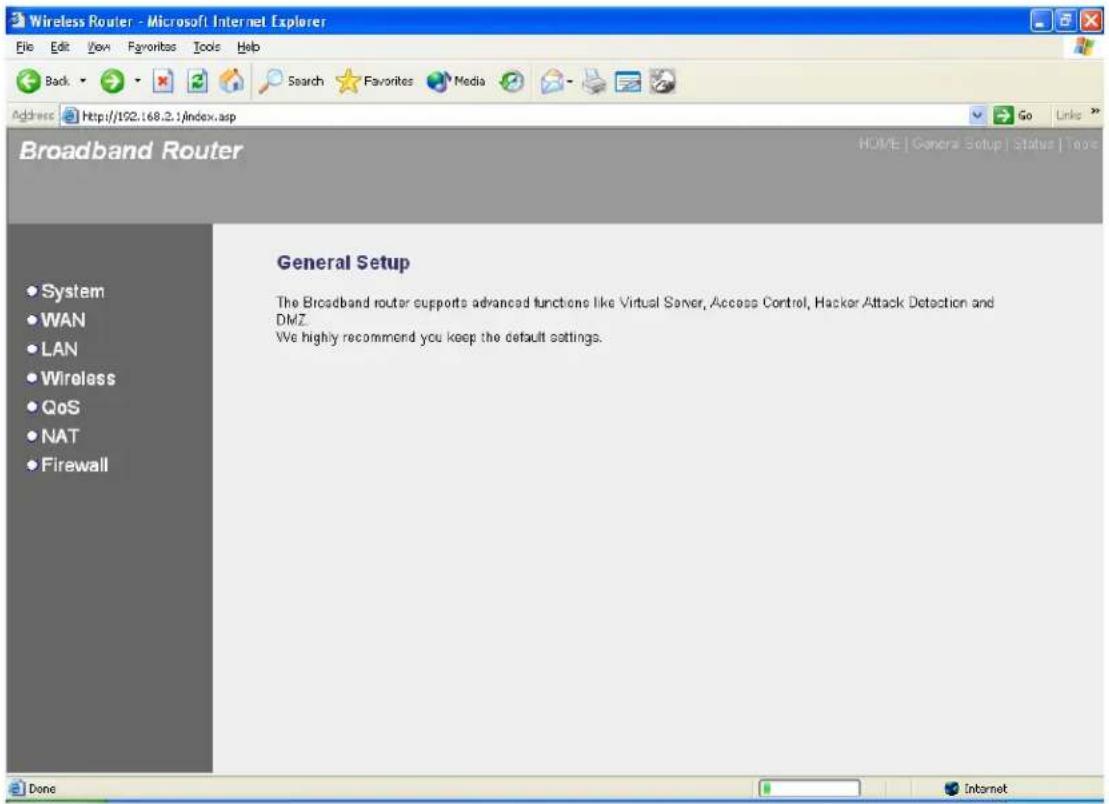
Below is a general description of what advance functions are available for this broadband router.
| Menu | Description |
| 2.1 System | This section allows you to set the Broadband router's system Time Zone, Password and Remote Management Administrator. |
| 2.2 WAN This section allows you to select the connection method in order to establish a connection with your ISP (same as the Quick Setup Wizard section) | |
| 2.3 LAN You can specify the LAN segment's IP address, subnet Mask, enable/disable DHCP and select an IP range for your LAN | |
| 2.4 Wireless You can setup the wireless LAN's SSID, WEP key, MAC filtering. | |
| 2.5 QoS You can setup the QoS bandwidth control policy. | |
| 2.6 NAT | You can configure the Address Mapping, Virtual Server and Special Applications functions in this section. This allows you to specify what user/packet can pass your router's NAT. |
| 2.7 Firewall The Firewall section allows you to configure Access Control, Hacker Prevention and DMZ. | |
Select one of the above five General Setup selections and proceed to the manual's relevant subsection
2.1 System
The system screen allows you to specify a time zone, to change the system password and to specify a remote management user for the broadband router.
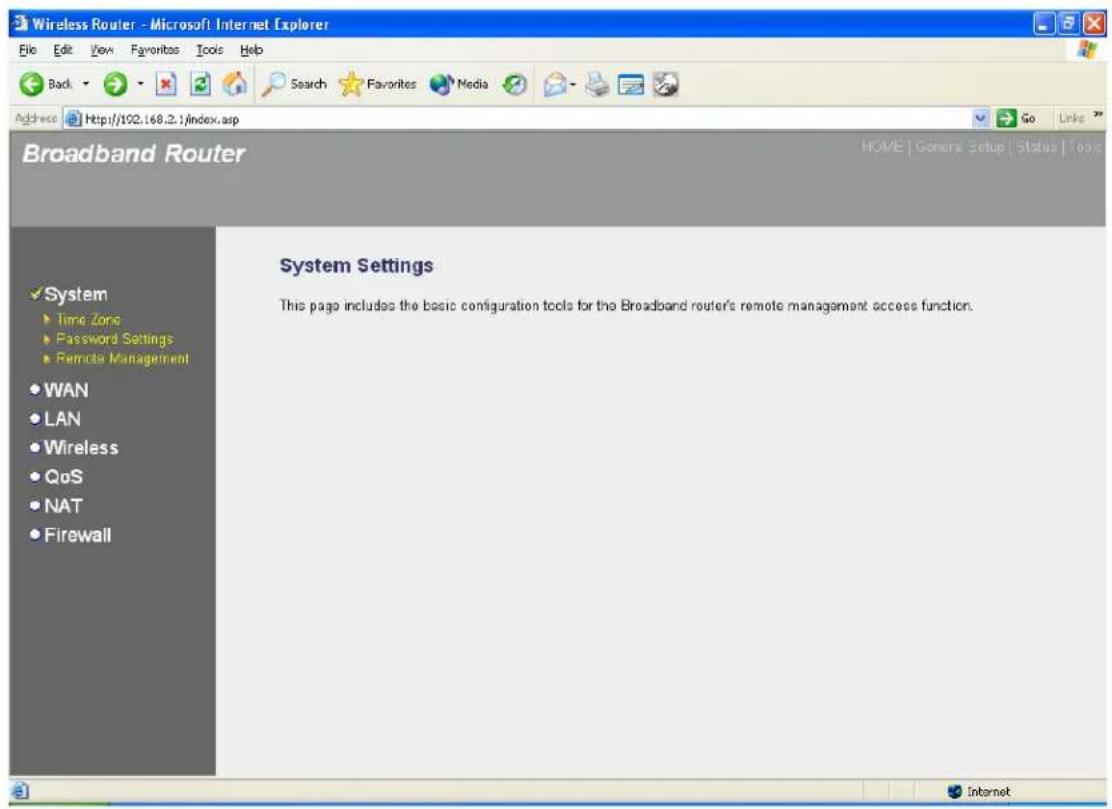
| Parameters | Description |
| System Settings | |
| 2.1.1 Time Zone | Select the time zone of the country you are currently in. The router will set its time based on your selection. |
| 2.1.2 Password Settings | Allows you to select a password in order to access the web-based management website. |
| 2.1.3 Remote Management | You can specify a Host IP address that can perform remote management functions. |
| Select one of the above three system settings selections and proceed to the manual's relevant sub-section | |
2.1.1 Time Zone
The Time Zone allows your router to reference or base its time on the settings configured here, which will affect functions such as Log entries and Firewall settings.

Parameter
Description
Set Time Zone Select the time zone of the country you are currently in.
The router will set its time based on your selection.
Time Server Address The router default the "Time Server Address" is
"192.43.244.18"
Enable Daylight Savings The router can also take Daylight savings into account. If
you wish to use this function, you must check/tick the enable box to enable your daylight saving configuration (below).
Start Daylight Savings Time
Select the period in which you wish to start daylight Savings Time
Click
2.1.2 Password Settings
You can change the password required to log into the broadband router's system web-based management. By default, there is no password. So please assign a password to the Administrator as soon as possible, and store it in a safe place. Passwords can contain 0 to 12 alphanumeric characters, and are case sensitive.

| Parameters | Description |
| Current Password Enter your current password for the remote management administrator to login to your Broadband router. Note: By default there is NO password | |
| New Password | Enter your new password |
| Confirmed Password | Enter your new password again for verification purposes Note: If you forget your password, you'll have to reset the router to the factory default (No password) with the reset button (see router's back panel) |
Click
2.1.3 Remote Management
The remote management function allows you to designate a host in the Internet the ability to configure the Broadband router from a remote site. Enter the designated host IP Address in the Host IP Address field.

| Parameters | Description |
| Host Address | This is the IP address of the host in the Internet that will have management/configuration access to the Broadband router from a remote site. This means if you are at home and your home IP address has been designated the Remote Management host IP address for this router (located in your company office), then you are able to configure this router from your home. If the Host Address is left 0.0.0.0 this means anyone can access the router's web-based configuration from a remote location, providing they know the password.Click the Enabled box to enable the Remote Management function.Note: When you want to access the web-based management from a remote site, you must enter the router's WAN IP address (e.g. 10.0.0.1) into your web-browser followed by port number 8080, e.g. 10.0.0.1:8080 |
(see below). You'll also need to know the password set in the Password Setting screen in order to access the router's web-based management.

Port The port number of remote management web interface.
Enabled Select "Enabled" to enable the remote management function.
Click
2.2 WAN
Use the WAN Settings screen if you have already configured the Quick Setup Wizard section and you would like to change your Internet connection type. The WAN Settings screen allows to specify the type of WAN port connect you want to establish with your ISP. The WAN settings offer the following selections for the router's WAN port, Dynamic IP, Static IP Address, PPPoE, PPTP, L2TP, Telstra Big Pond, DNS and DDNS.

| Parameters | Description |
| 2.2.1 Dynamic IP address | Your ISP will automatically give you an IP address |
| 2.2.2 Static IP address | Your ISP has given you an IP address already |
| 2.2.3 PPPoE | Your ISP requires PPPoE connection. |
| 2.2.4 PPTP | Your ISP requires you to use a Point-to-Point Tunneling Protocol (PPTP) connection. |
| 2.2.5 L2TP | Your ISP requires L2TP connection. |
| 2.2.6 Telstra Big Pond | Your ISP requires Telstra Big Pond connection. |
2.2.7 DNS
You can specify a DNS server that you wish to use
2.2.8 DDNS You can specify a DDNS server that you wish to use and configure the user name and password provided by you DDNS service provider.
Once you have made a selection, click
2.2.1 Dynamic IP
Choose the Dynamic IP selection if your ISP will automatically give you an IP address. Some ISP's may also require that you fill in additional information such as Host Name, Domain Name and MAC address (see chapter 1 "Cable Modem" for more detail)
2.2.2 Static IP Address
Select Static IP address if your ISP has given you a specific IP address for you to use. Your ISP should provide all the information required in this section. (See chapter 1 "Fixed IP" for more detail)
2.2.3 PPPoE (PPP over Ethernet)
Select PPPoE if your ISP requires the PPPoE protocol to connect you to the Internet. Your ISP should provide all the information required in this section. (See chapter 1 "PPPoE" for more detail)
2.2.4 PPTP
Select PPTP if your ISP requires the PPTP protocol to connect you to the Internet. Your ISP should provide all the information required in this section. (See chapter 1 "PPTP" for more detail)
2.2.5 L2TP
Select L2TP if your ISP requires the L2TP protocol to connect you to the Internet. Your ISP should provide all the information required in this section. (See chapter 1 "L2TP" for more detail)
2.2.6 Telstra Big Pond
Select Telstra Big Pond if your ISP requires the Telstra Big Pond protocol to connect you to the Internet. Your ISP should provide all the information required in this section. Telstra Big Pond protocol is used by the ISP in Australia. (See chapter 1 "Telstra Big Pond" for more detail)
2.2.7 DNS
A Domain Name System (DNS) server is like an index of IP addresses and Web addresses. If you type a Web address into your browser, such as www.router.com, a DNS server will find that name in its index and the matching IP address. Most ISPs provide a DNS server for speed and convenience. If your Service Provider connects you to the Internet with dynamic IP settings, it is likely that the DNS server IP address is provided automatically. However, if there is a DNS server that you would rather use, you need to specify the IP address of that DNS server here.

| Parameters | Description |
| Domain Name Server (DNS) Server | This is the ISP's DNS server IP address that they gave you; or you can specify your own preferred DNS server IP address |
| Secondary DNS Address (optional) | This is optional. You can enter another DNS server's IP address as a backup. The secondary DNS will be used should the above DNS fail. |
Click
2.2.8 DDNS
DDNS allows you to map the static domain name to a dynamic IP address. You must get an account, password and your static domain name from the DDNS service providers. This router supports DynDNS, TZO and other common DDNS service providers.
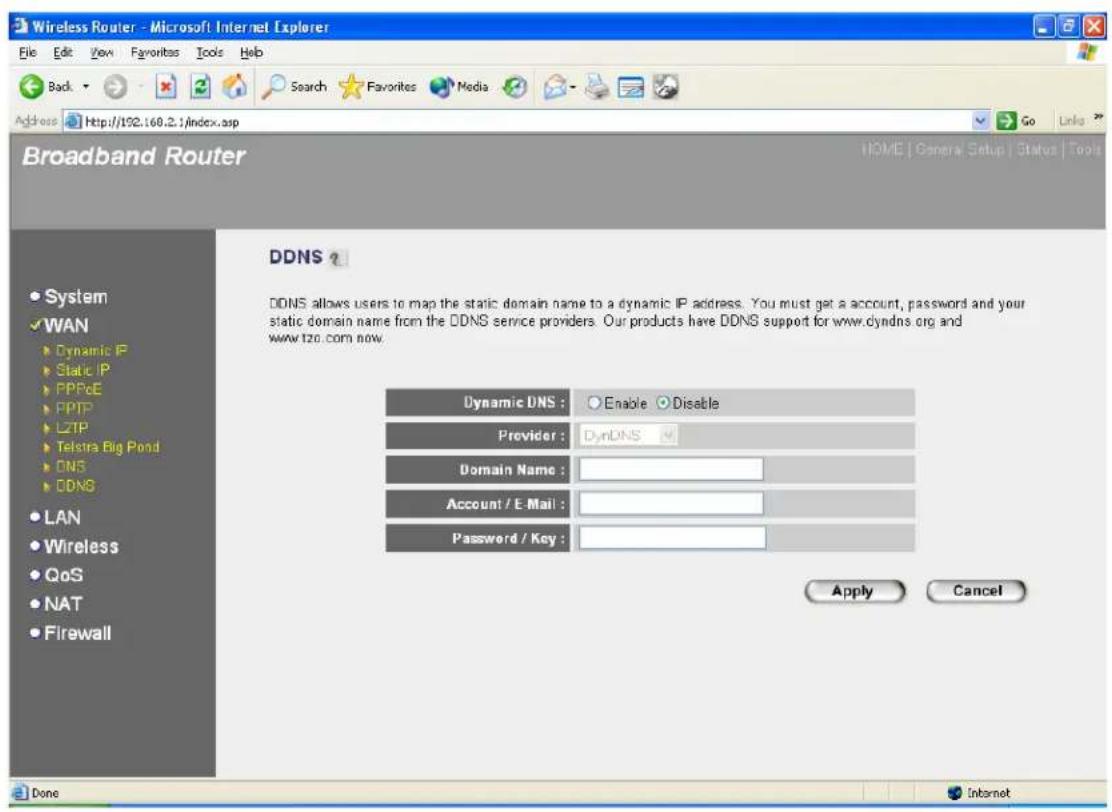
| Parameters | Default | Description |
| Enable/Disable | Disable | Enable/Disable the DDNS function of this router |
| Provider | Select a DDNS service provider | |
| Domain name | Your static domain name that use DDNS | |
| Account/E-mail | The account that your DDNS service provider assigned to you | |
| Password/Key | The password you set for the DDNS service account above | |
| Clickat the bottom of the screen to save the above configurations. You can now configure other advance sections or start using the router (with the advance settings in place) | ||
2.3 LAN
The LAN Port screen below allows you to specify a private IP address for your router's LAN ports as well as a subnet mask for your LAN segment.

| Parameters | Default | Description |
| LAN IP | ||
| IP address | 192.168.2.1 This is the router's LAN port IP address (Your LAN clients default gateway IP address) | |
| IP Subnet Mask | 255.255.255.0 | Specify a Subnet Mask for your LAN segment |
| 802.1d Spanning Tree | Disabled If 802.1d Spanning Tree function is enabled, this router will use the spanning tree protocol to prevent from network loop happened in the LAN ports. | |
| DHCP Server | Enabled | You can enable or disable the DHCP server. By enabling the DHCP server the router will automatically give your LAN clients an IP |
address. If the DHCP is not enabled then you'll have to manually set your LAN client's IP addresses; make sure the LAN Client is in the same subnet as this broadband router if you want the router to be your LAN client's default gateway
Lease Time The DHCP when enabled will temporarily give
your LAN clients an IP address. In the Lease Time setting you can specify the time period that the DHCP lends an IP address to your LAN clients. The DHCP will change your LAN client's IP address when this time threshold period is reached
IP Address Pool You can select a particular IP address range for
your DHCP server to issue IP addresses to your LAN Clients.
Note: By default the IP range is from: Start IP 192.168.2.100 to End IP 192.168.2.199. If you want your PC to have a static/fixed IP address then you'll have to choose an IP address outside this IP address Pool
Domain Name
You can specify a Domain Name for your LAN
Click
2.4 Wireless
Wireless Access Point builds a wireless LAN and can let all PCs equipped with IEEE 802.11b or 801.11g wireless network adaptor connect to your Intranet. It supports WEP and WPA2 encryption to enhance the security of your wireless network.

| Parameters | Default | Description |
| Enable or disable | Enable You can select to enable or disable the wireless access point module of this router. | |
| Wireless module function | ||
Click
2.4.1 Basic Settings
You can set parameters that are used for the wireless stations to connect to this router. The parameters include Mode, ESSID, Channel Number and Associated Client.
AP Mode setting Page

Station-Ad Hoc mode setting page:

Station-Infrastructure mode setting page:
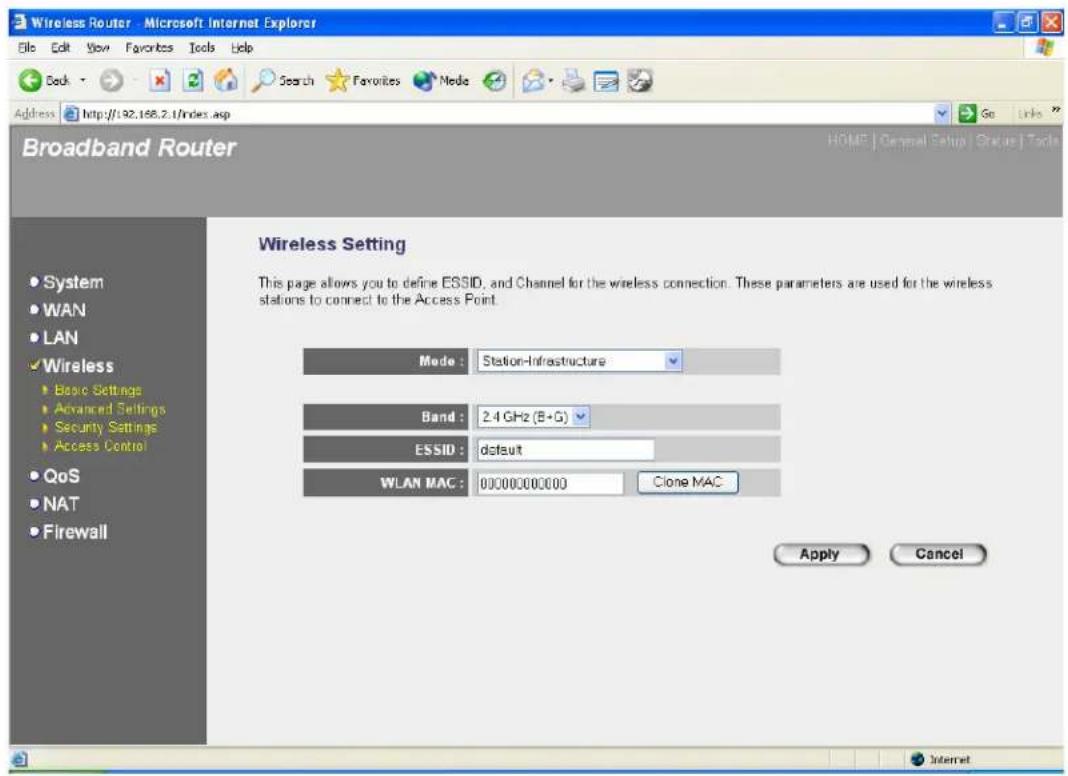
AP Bridge-Point to Point mode setting page

AP Bridge-Point to Multi-Point mode setting page
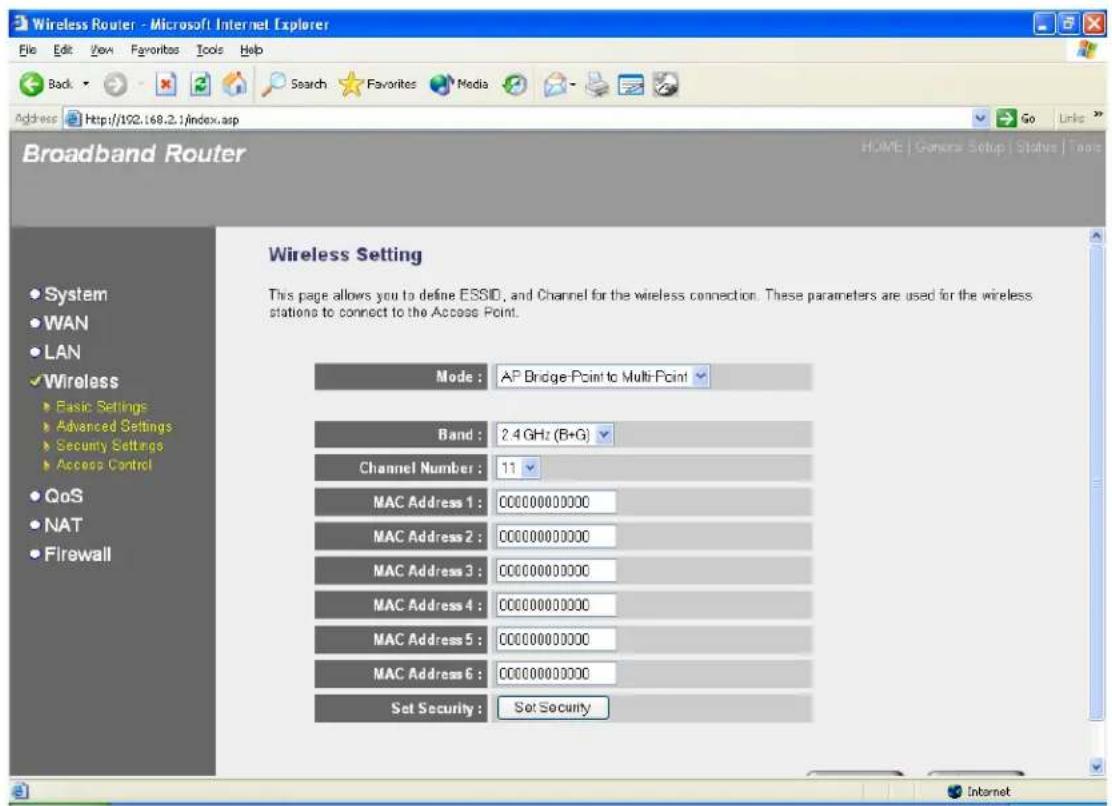
AP Bridge-WDS mode setting page

| Parameters | Default | Description |
| Mode | It allows you to set the AP to AP, Station, Bridge or WDS mode. | |
| Band | It allows you to set the AP fix at 802.11b or 802.11g mode. You also can select B+G mode to allow the AP select 802.11b and 802.11g connection automatically. | |
| ESSID | default This is the name of the wireless LAN. All the devices in the same wireless LAN should have the same ESSID. | |
| Channel Number | 11 The channel used by the wireless LAN. All devices in the same wireless LAN should use the same channel. | |
| Associated Clients | Click “Show Active Clients” button, then an “Active Wireless Client Table” will pop up. You can see the status of all active wireless stations that are connecting to the access point. | |
| WLAN MAC | This is the MAC address used by the Wireless interface of this AP when it is in the station modes. | |
| Clone MAC | Click the “Clone MAC” button will copy the MAC address of your PC, that you are using to configure the AP, to the WLAN MAC. | |
| MAC address | If you want to bridge more than one networks together with wireless LAN, you have to set this access point to “AP Bridge-Point to Point mode”, “AP Bridge-Point to Multi-Point mode” or “AP Bridge-WDS mode”. You have to enter the MAC addresses of other access points that join the bridging work. | |
| Set Security | Click the “Set Security” button, then a “WDS Security Settings” will pop up. You can set the security parameters used to bridge access points together here when your AP is in AP Bridge modes. You can refer to section 4.3 “Security Settings” for how to set the parameters. | |
Click
2.4.2 Advanced Settings
You can set advanced wireless LAN parameters of this router. The parameters include Authentication Type, Fragment Threshold, RTS Threshold, Beacon Interval, Preamble Type .... You should not change these parameters unless you know what effect the changes will have on this router.

| Parameters | Default | Description |
| Authentication Type | There are two authentication types: "Open System" and "Shared Key". When you select "Open System", wireless stations can associate with this wireless router without WEP encryption. When you select "Shared Key", you should also setup WEP key in the "Encryption" page and wireless stations should use WEP encryption in the authentication phase to associate with this wireless router. If you select "Auto", the wireless client can associate with this wireless router by using any one of these two authentication types. | |
| Fragment Threshold | "Fragment Threshold" specifies the maximum size of packet during the fragmentation of data | |
| to be transmitted. If you set this value too low, it will result in bad performance. | ||
| RTS Threshold | When the packet size is smaller the RTS threshold, the wireless router will not use the RTS/CTS mechanism to send this packet. | |
| Beacon Interval | The interval of time that this wireless router broadcast a beacon. Beacon is used to synchronize the wireless network. | |
| Data Rate | The “Data Rate” is the rate this access point uses to transmit data packets. The access point will use the highest possible selected transmission rate to transmit the data packets. | |
| Preamble Type | The “Long Preamble” can provide better wireless LAN compatibility while the “Short Preamble” can provide better wireless LAN performance. | |
| Broadcast ESSID | If you enable “Broadcast ESSID”, every wireless station located within the coverage of this access point can discover this access point easily. If you are building a public wireless network, enabling this feature is recommended. Disabling “Broadcast ESSID” can provide better security. | |
| IAPP | If you enable “IAPP”, it will allow wireless station roaming between IAPP enabled access points within the same wireless LAN. | |
| 802.11g Protection | This is also called CTS Protection. It is recommended to enable the protection mechanism. This mechanism can decrease the rate of data collision between 802.11b and 802.11g wireless stations. When the protection mode is enabled, the throughput of the AP will be a little lower due to many of frame traffic should be transmitted. | |
Click
2.4.3 Security
This Access Point provides complete wireless LAN security functions, include WEP, IEEE 802.11x, IEEE 802.11x with WEP, WPA with pre-shared key and WPA with RADIUS. With these security functions, you can prevent your wireless LAN from illegal access. Please make sure your wireless stations use the same security function.
2.4.3.1 WEP only
When you select 64-bit or 128-bit WEP key, you have to enter WEP keys to encrypt data. You can generate the key by yourself and enter it. You can enter four WEP keys and select one of them as default key. Then the router can receive any packets encrypted by one of the four keys

| Parameters | Default | Description |
| Key Length | 64-bit | You can select the WEP key length for |
encryption, 64-bit or 128-bit. Larger WEP key length will provide higher level of security, but the throughput will be lower.
Key Format
You may select to select ASCII Characters
(alphanumeric format) or Hexadecimal Digits (in the "A-F", "a-f" and "0-9" range) to be the WEP Key.
For example:
ASCII Characters: guest
Hexadecimal Digits: 12345abcde
Default Key Select one of the four keys to encrypt your data.
Only the key you select it in the "Default key" will take effect.
Key 1 - Key 4
The WEP keys are used to encrypt data
transmitted in the wireless network. Fill the text box by following the rules below.
64-bit WEP: input 10-digit Hex values (in the "A-F", "a-f" and "0-9" range) or 5-digit ASCII character as the encryption keys.
128-bit WEP: input 26-digit Hex values (in the "A-F", "a-f" and "0-9" range) or 13-digit ASCII characters as the encryption keys.
Click
2.4.3.2 802.1x only
IEEE 802.1x is an authentication protocol. Every user must use a valid account to login to this Access Point before accessing the wireless LAN. The authentication is processed by a RADIUS server. This mode only authenticates user by IEEE 802.1x, but it does not encryption the data during communication.

| Parameters | Default | Description |
| RADIUS Server IP address | The IP address of external RADIUS server. | |
| RADIUS Server Port | The service port of the external RADIUS server. | |
| RADIUS Server Password | The password used by external RADIUS server. | |
Click
2.4.3.3 802.1x WEP Static key
IEEE 802.1x is an authentication protocol. Every user must use a valid account to login to this Access Point before accessing the wireless LAN. The authentication is processed by a RADIUS server. This mode also uses WEP to encrypt the data during communication.

For the WEP settings, please refer to section 2.4.3.1 "WEP only". For the 802.1x settings, please refer to section 2.4.3.2 "802.1x only".
2.4.3.4 WPA Pre-shared key
Wi-Fi Protected Access (WPA) is an advanced security standard. You can use a pre-shared key to authenticate wireless stations and encrypt data during communication. It uses TKIP or CCMP(AES) to change the encryption key frequently. So the encryption key is not easy to be broken by hackers. This can improve security very much.

| Parameters | Default | Description |
WPA(TKIP) TKIP can change the encryption key frequently to enhance the wireless LAN security.
WPA2(AES) This use CCMP protocol to change encryption key frequently. AES can provide high level encryption to enhance the wireless LAN security.
WPA2 Mixed This will use TKIP or AES based on the other communication peer automatically.
Pre-shared Key Format You may select to select Passphrase (alphanumeric format) or Hexadecimal Digits (in the "A-F", "a-f" and "0-9" range) to be the Pre-shared Key. For example: Passphrase: iamguest Hexadecimal Digits: 12345abcde
Pre-shared Key The Pre-shared key is used to authenticate and encrypt data transmitted in the wireless network. Fill the text box by following the rules below. Hex WEP: input 64-digit Hex values (in the "A-F", "a-f" and "0-9" range) or at least 8 character pass phrase as the pre-shared keys.
Click
2.4.3.5 WPA Radius
Wi-Fi Protected Access (WPA) is an advanced security standard. You can use an external RADIUS server to authenticate wireless stations and provide the session key to encrypt data during communication. It uses TKIP or CCMP(AES) to change the encryption key frequently. This can improve security very much.

| Parameters | Default | Description |
| WPA(TKIP) | TKIP can change the encryption key frequently to enhance the wireless LAN security. | |
| WPA2(AES) | This use CCMP protocol to change encryption key frequently. AES can provide high level encryption to enhance the wireless LAN security. | |
| WPA2 Mixed | This will use TKIP or AES based on the other communication peer automatically. | |
RADIUS Server IP address
The IP address of external RADIUS server.
RADIUS Server Port The service port of the external RADIUS server.
RADIUS Server Password The password used by external RADIUS server.
Click
2.4.4 Access Control
This wireless router provides MAC Address Control, which prevents the unauthorized MAC Addresses from accessing your wireless network.

| Parameters | Description |
| Enable wireless access control | Enable wireless access control |
| Add MAC address into the list | Fill in the "MAC Address" and "Comment" of the wireless station to be added and then click "Add". Then this wireless station will be added into the "Current Access Control List" below. If you find any issues before adding it and want to retype again. Just click "Clear" and both "MAC Address" and "Comment" fields will be cleared. |
| Remove MAC address from the list | If you want to remove some MAC address from the "Current Access Control List", select the MAC addresses you want to remove in the list and then click "Delete Selected". If you want remove all MAC addresses from the table, just click "Delete All" button. Click "Reset" will clear your current selections. |
Click
2.5 QoS
The QoS can let you classify Internet application traffic by source/destination IP address and port number. You can assign priority for each type of application and reserve bandwidth for it. The packets of applications with higher priority will always go first. Lower priority applications will get bandwidth after higher priority applications get enough bandwidth. This can let you have a better experience in using critical real time services like Internet phone, video conference ...etc. All the applications not specified by you are classified as rule name “Others”. The rule with smaller priority number has higher priority; the rule with larger priority number has lower priority. You can adjust the priority of the rules by moving them up or down.
Note: If the total assigned bandwidth of higher priority applications is larger than the maximum bandwidth provided by the WAN port, the other applications will not get any bandwidth.
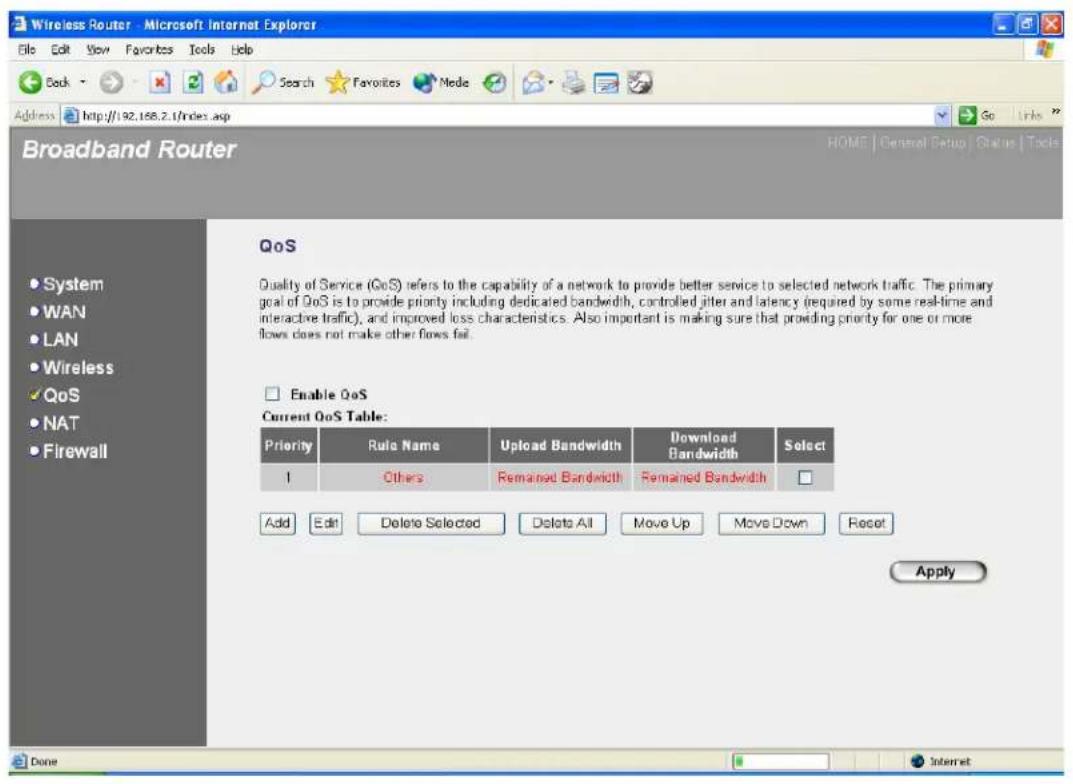
Parameters
Description
Enable/Disable QoS You can check "Enable QoS" to enable QoS function for the WAN port. You also can uncheck
"Enable QoS" to disable QoS function for the WAN port.
Add a QoS rule into the table Click "Add" then you will enter a form of the QoS rule. Click "Apply" after filling out the form and the rule will be added into the table.
Remove QoS rules from the table If you want to remove some QoS rules from the table, select the QoS rules you want to remove in the table and then click "Delete Selected". If you want remove all QoS rules from the table, just click "Delete All" button. Click "Reset" will clear your current selections.
Edit a QoS rule Select the rule you want to edit and click "Edit", then you will enter the detail form of the QoS rule. Click "Apply" after editing the form and the rule will be saved.
Adjust QoS rule priority You can select the rule and click "Move Up" to make its priority higher. You also can select the rule and click "Move Down" to make its priority lower.
Edit QoS Rule:
You can assign packet classification criteria by its local IP range, remote IP range, traffic type, protocol, local port range and remote port range parameters. The parameters that you leave as blank will be ignored. The priority of this rule will be applied to packets that match classification criteria of this rule. You can limit bandwidth consumed by packets that match this rule or guarantee bandwidth required by packets that match this rule.

Parameters
Description
Rule Name The name of this rule.
Bandwidth You can assign the download or upload
bandwidth by the unit of Kbps (1024 bit per second). You can limit the maximum bandwidth consumed by this rule by selecting "Maximum". You also can reserve enough bandwidth for this rule by selecting "Guarantee".
Local IP Address Enter the local IP address range of the packets
that this rule will apply to. If you assign 192.168.2.3 - 192.168.2.5, it means 3 IP addresses: 192.168.2.3, 192.168.2.4 and 192.168.2.5
Local Port Range
Enter the local port range of the packets that this rule will apply to. You can assign a single port number here or assign a range of port numbers by assigning the first port number and the last port number of the range. The two numbers are separated by a dash “-”, for example “101-150” means from port number 100 to port number 150 – the range of 50 port numbers.
Remote IP Address
Enter the remote IP address range of the packets that this rule will apply to. If you assign 192.168.2.3 – 192.168.2.5, it means 3 IP addresses: 192.168.2.3, 192.168.2.4 and 192.168.2.5
Remote Port Range Enter the remote port range of the packets that
this rule will apply to. You can assign a single port number here or assign a range of port numbers by assigning the first port number and the last port number of the range. The two numbers are separated by a dash “-”, for example “101-150” means from port number 100 to port number 150 – the range of 50 port numbers.
Traffic Type Select the traffic type of the packets that this rule
will apply to. We list some popular applications here to ease the configuration. You also can get the same result by using other parameters, for example source or destination port number, if you are familiar with the application protocol.
Protocol Select the protocol type of the packets that this
rule will apply to.
Apply Apply and exit the form.
Reset Clear the content of this form.
Click
2.6 NAT
Network Address Translation (NAT) allows multiple users at your local site to access the Internet through a single Public IP Address or multiple Public IP Addresses. NAT provides Firewall protection from hacker attacks and has the flexibility to allow you to map Private IP Addresses to Public IP Addresses for key services such as Websites and FTP.

| Parameter | Description |
| 2.6.1 Port Forwarding You can have different services (e.g. email, FTP, Web etc.) going to different service servers/clients in your LAN. The Port Forwarding allows you to re-direct a particular range of service port numbers (from the Internet/WAN Ports) to a particular LAN IP address. | |
| 2.6.2 Virtual Server | You can have different services (e.g. email, FTP, Web etc.) going to different service servers/clients in your LAN. The Virtual Server allows you to re-direct a particular service port number (from the Internet/WAN Port) to a particular LAN IP address and its service port number. |
| 2.6.3 Special Applications Some applications require multiple connections, such as Internet games, video conferencing, Internet telephony and others. In this section you can configure the router to support these types of applications. | |
2.6.4 UPnP Setting It allows to
Enable or Disable UPnP feature here. After you enable the UPnP feature, all client systems that support UPnP, like Windows XP, can discover this router automatically and access the Internet through this router without any configuration. The NAT Traversal function provided by UPnP can let applications that support UPnP smoothly connect to Internet sites without any incompatibility problem due to the NAPT port translation.
2.6.5 ALG Setting You can select special applications that need
"Application Layer Gateway" to support here.
2.6.6 Static Routing You can disable NAT function and setup the routing
rules manually.
Click on one of the three NAT selections and proceed to the manual's relevant subsection.
2.6.1 Port Forwarding
The Port Forwarding allows you to re-direct a particular range of service port numbers (from the Internet/WAN Ports) to a particular LAN IP address. It helps you to host some servers behind the router NAT firewall.

Parameter
Description
Enable Port Forwarding Enable Port Forwarding
Private IP This is the private IP of the server behind the
NAT firewall.
Note: You need to give your LAN PC clients a
fixed/static IP address for Port Forwarding to work properly.
Type This is the protocol type to be forwarded. You
can choose to forward "TCP" or "UDP" packets only or select "both" to forward both "TCP" and "UDP" packets.
Port Range The range of ports to be forward to the private IP.
Comment The description of this setting.
Add Port Forwarding into the table Fill in the "Private IP", "Type", "Port Range" and "Comment" of the setting to be added and then click "Add". Then this Port Forwarding setting will be added into the "Current Port Forwarding Table" below. If you find any typo before adding it and want to retype again, just click "Clear" and the fields will be cleared.
Remove Port Forwarding into the table If you want to remove some Port Forwarding settings from the "Current Port Forwarding Table", select the Port Forwarding settings you want to remove in the table and then click "Delete Selected". If you want remove all Port Forwarding settings from the table, just click "Delete All" button. Click "Reset" will clear your current selections.
Click
2.6.2 Virtual Server
Use the Virtual Server function when you want different servers/clients in your LAN to handle different service/Internet application type (e.g. Email, FTP, Web server etc.) from the Internet. Computers use numbers called port numbers to recognize a particular service/Internet application type. The Virtual Server allows you to re-direct a particular service port number (from the Internet/WAN Port) to a particular LAN private IP address and its service port number. (See Glossary for an explanation on Port number)

| Parameters | Description |
| Enable Virtual Server Enable Virtual Server. | |
| Private IP | This is the LAN client/host IP address that the Public Port number packet will be sent to.Note: You need to give your LAN PC clients a fixed/static IP address for Virtual Server to work properly. |
| Private Port | This is the port number (of the above Private IP host) that the below Public Port number will be changed to when the packet enters your LAN (to the LAN Server/Client IP) |
| Type | Select the port number protocol type (TCP, UDP or both). If you are unsure, then leave it to the default both protocol. |
Public Port Enter
the service (service/Internet application) port number from the Internet that will be re-directed to the above Private IP address host in your LAN
Note: Virtual Server function will have priority over the DMZ function if there is a conflict between the Virtual Server and the DMZ settings.
Comment The description of this setting.
Add Virtual Server
Fill in the "Private IP", "Private Port", "Type", "Public Port" and "Comment" of the setting to be added and then click "Add". Then this Virtual Server setting will be added into the "Current Virtual Server Table" below. If you find any typo before adding it and want to retype again, just click "Clear" and the fields will be cleared.
Remove Virtual Server If you want to remove some Virtual Server settings from the "Current Virtual Server Table", select the Virtual Server settings you want to remove in the table and then click "Delete Selected". If you want remove all Virtual Server settings from the table, just click "Delete All" button. Click "Reset" will clear your current selections.
Click
Example: Virtual Server
The diagram below demonstrates one of the ways you can use the Virtual Server function. Use the Virtual Server when you want the web server located in your private LAN to be accessible to Internet users. The configuration below means that any request coming from the Internet to access your web server will be translated to your LAN's web server (192.168.2.2). Note: For the virtual server to work properly Internet/remote users must know your global IP address. (For websites you will need to have a fixed/static global/public IP address)

flowchart
graph TD
    A["Configuration"] --> B["Private IP: 192.168.2.2"]
    A --> C["Private Port: 80"]
    A --> D["Type: TCP"]
    A --> E["Public Port: 80"]
    A --> F["Reset 12 VDC"]
    F --> G["4"]
    F --> H["3"]
    F --> I["2"]
    F --> J["1"]
    F --> K["WAN"]
    G --> L["LAN Website Server"]
    H --> M["ADSL or Cable Modem"]
    I --> N["Internet Request"]
    J --> O["Internet"]
    L --> P["192.168.2.2"]
2.6.3 Special Applications
Some applications require multiple connections, such as Internet games, video conferencing, Internet telephony and others. In this section you can configure the router to support multiple connections for these types of applications.

Parameters
Description
Enable Trigger Port Enable the Special Application function.
Trigger Port This is the out going (Outbound) range of port numbers for this particular application
Trigger Type Select whether the outbound port protocol is "TCP", "UDP" or both.
Public Port Enter the In-coming (Inbound) port or port range for this type of application (e.g. 2300-2400, 47624)
Note: Individual port numbers are separated by a comma (e.g. 47624, 5775, 6541 etc.). To input a port range use a "dash" to separate the two port number range (e.g. 2300-2400)
Public Type Select the Inbound port protocol type: "TCP", "UDP" or both
Comment The description of this setting.
| Popular applications This section lists the more popular applications that require multiple connections. Select an application from the Popular Applications selection. Once you have selected an application, select a location (1-10) in the Copy to selection box and then click the Copy to button. This will automatically list the Public Ports required for this popular application in the location (1-10) you'd specified. | |
| Add Special Application | Fill in the "Trigger Port", "Trigger Type", "Public Port", "Public Type", "Public Port" and "Comment" of the setting to be added and then click "Add". Then this Special Application setting will be added into the "Current Trigger-Port Table" below. If you find any typo before adding it and want to retype again, just click "Clear" and the fields will be cleared. |
| If you want to add a popular application, select one "Popular Application" and then click "Add". | |
| Remove Special Application | If you want to remove some Special Application settings from the " Current Trigger-Port Table", select the Special Application settings you want to remove in the table and then click "Delete Selected". If you want remove all Special Application settings from the table, just click "Delete All" button. Click "Reset" will clear your current selections. |
Click
Example: Special Applications
If you need to run applications that require multiple connections, then specify the port (outbound) normally associated with that application in the "Trigger Port" field. Then select the protocol type (TCP or UDP) and enter the public ports associated with the trigger port to open them up for inbound traffic.
Example:
| ID | Trigger Port | Trigger Type | Public Port | Public Type | Comment |
| 1 | 28800 | UDP | 2300-2400, 47624 | TCP | MSN Game Zone |
| 2 | 6112 | UDP | 6112 | UDP | Battle.net |
In the example above, when a user trigger's port 28800 (outbound) for MSN Game Zone then the router will allow incoming packets for ports 2300-2400 and 47624 to be directed to that user.
Note: Only one LAN client can use a particular special application at a time.
2.6.4 UPnP Settings
With UPnP, all PCs in you Intranet will discover this router automatically. So you do not have to do any configuration for your PC and can access the Internet through this router easily.

| Parameters | Default | Description |
| UPnP Feature | Disable You can Enable or Disable UPnP feature here. After you enable the UPnP feature, all client systems that support UPnP, like Windows XP, can discover this router automatically and access the Internet through this router without any configuration. The NAT Traversal function provided by UPnP can let applications that support UPnP smoothly connect to Internet sites without any incompatibility problem due to the NAPT port translation. | |
Click
2.6.5 ALG Settings
You can select applications that need “Application Layer Gateway” to support.

Parameters
Default
Description
Enable You can select to enable "Application Layer
Gateway", then the router will let that application correctly pass though the NAT gateway.
Click
2.6.6 Static Routing
This router provides Static Routing function when NAT is disabled. With Static Routing, the router can forward packets according to your routing rules. The IP sharing function will not work any more in Static Routing mode.
Note: The DMZ function of firewall will not work if static routing is enabled.

Parameter
Description
Enable Static Routing Static Routing function is default disabled. You have to enable the Static Routing function before your routing rules take effect.
Destination LAN IP The network address of destination LAN.
Subnet Mask The subnet mask of destination LAN.
Default Gateway The next stop gateway of the path toward the destination LAN. This is the IP of the neighbor router that this router should communicate with on the path to the destination LAN.
Hop Count The number of hops (routers) to pass through to reach the destination LAN.
Interface The interface that go to the next hop (router).
Add a Rule Fill in the "Destination LAN IP", "Subnet Mask",
"Default Gateway", "Hop Count" and "Interface" of the rule to be added and then click "Add". Then this rule of Static Routing will be added into the "Static Routing Table" below. If you find any typo before adding it and want to retype again, just click "Reset" and the fields will be cleared.
Remove a Rule If you want to remove some routing rules from the
"Static Routing Table", select the rules you want to remove in the table and then click "Delete Selected". If you want remove all rules from the table, just click "Delete All" button. Click "Reset" will clear your current selections.
Click
2.7 Firewall
The Broadband router provides extensive firewall protection by restricting connection parameters, thus limiting the risk of hacker attack, and defending against a wide array of common Internet attacks. However, for applications that require unrestricted access to the Internet, you can configure a specific client/server as a Demilitarized Zone (DMZ).
Note: To enable the Firewall settings select Enable and click Apply

| Parameters | Description |
| 2.6.1 Access Control | Access Control allows you to specify which hosts users can or cannot have access to certain Internet applications |
| 2.6.2 URL Blocking | URL Blocking allow you to specify which URLs can not be accessed by users. |
| 2.6.3 DoS | The Broadband router's firewall can block common hacker attacks and can log the attack activities. |
| 2.6.4 DMZ The DMZ function allows you to re-direct all packets going to your WAN port IP address to a particular IP address in your LAN. | |
| Click on one of the firewall selections and proceed to the manual's relevant sub-section | |
2.7.1 Access Control
If you want to restrict users from accessing certain Internet applications/services (e.g. Internet websites, email, FTP etc.), then this is the place to set that configuration. Access Control allows users to define the traffic type permitted in your LAN. You can control which PC client can have access to these services.

Parameters
Description
Deny If select “Deny” then all PCs will be allowed to access Internet accept for the PCs in the list below.
Allow If select “Allow” then all PCs will be denied to access Internet accept for the PCs in the list below.
Filter client PCs by IP Fill "IP Filtering Table" to filter PC clients by IP.
Add PC You can click Add PC to add an access control rule for users by IP addresses.
Remove PC If you want to remove some PC from the "IP Filtering Table", select the PC you want to remove in the table and then click "Delete Selected". If you
want remove all PCs from the table, just click "Delete All" button.
Filter client PC by MAC address Check "Enable MAC Filtering" to enable MAC Filtering.
Add PC Fill in "Client PC MAC Address" and "Comment"
of the PC that is allowed to access the Internet, and then click "Add". If you find any typo before adding it and want to retype again, just click "Reset" and the fields will be cleared.
Remove PC If you want to remove some PC from the "MAC
Filtering Table", select the PC you want to remove in the table and then click "Delete Selected". If you want remove all PCs from the table, just click "Delete All" button. If you want to clear the selection and re-select again, just click "Reset".
You can now configure other advance sections or start using the router (with the advance settings in place)

Add PC
| Parameters | Description |
| Client PC Description The description for this client PC rule. | |
| Client PC IP Addresses Enter the IP address range that you wish to apply this Access Control rule. This is the user's IP address(es) that you wish to setup an Access Control rule. | |
| Note: You need to give your LAN PC clients a fixed/static IP address for the Access Control rule to work properly. | |
| Client PC Service You can block the clients from accessing some Internet services by checking the services you want to block. | |
| Protocol This allows you to select UDP, TCP or both protocol type you want to block. | |
| Port Range It can be assign up to five port ranges. The router will block clients from accessing Internet services that use these ports. | |
| Apply Changes Click “Apply Changes” to save the setting. | |
| Reset Click “Reset” to clear all fields. | |
Click
Example: Access Control
In the example below, LAN client A can only access websites that use Port 80. However, LAN client B is able to access websites and any other service that uses ports between 80 and 999.

flowchart
graph TD
    A["Configuration"] --> B["IP: 192.168.2.2"]
    A --> C["Port: 80-80"]
    D["Configuration"] --> E["IP: 192.168.2.3"]
    D --> F["Port: 80-999"]
    G["Reset 12 VDC"] --> H["4"]
    G --> I["3"]
    G --> J["2"]
    G --> K["1"]
    G --> L["WAN"]
    M["ADSL or Cable Modem"] --> N["192.168.2.2"]
    O["Internet"] --> P["Website Server"]
    style A fill:#f9f,stroke:#333
    style D fill:#f9f,stroke:#333
    style G fill:#ccf,stroke:#333
    style M fill:#cfc,stroke:#333
    style O fill:#fcc,stroke:#333
2.7.2 URL Blocking
You can block access to some Web sites from particular PCs by entering a full URL address or just keyword of the Web site.

Parameters
Description
Enable URL Blocking Enable/disable URL Blocking
Add URL Keyword Fill in "URL/Keyword" and then click "Add". You can enter the full URL address or the keyword of the web site you want to block. If you find any typo before adding it and want to retype again, just click "Reset" and the field will be cleared.
Remove URL Keyword If you want to remove some URL keyword from the "Current URL Blocking Table", select the URL keyword you want to remove in the table and then click "Delete Selected". If you want remove all URL keyword from the table, just click "Delete All" button. If you want to clear the selection and re-select again, just click "Reset".
You can now configure other advance sections or start using the router (with the advance settings in place)
2.7.3 DoS (Denial of Service)
The Broadband router's firewall can block common hacker attacks, including Denial of Service, Ping of Death, Port Scan and Sync Flood. If Internet attacks occur the router can log the events.
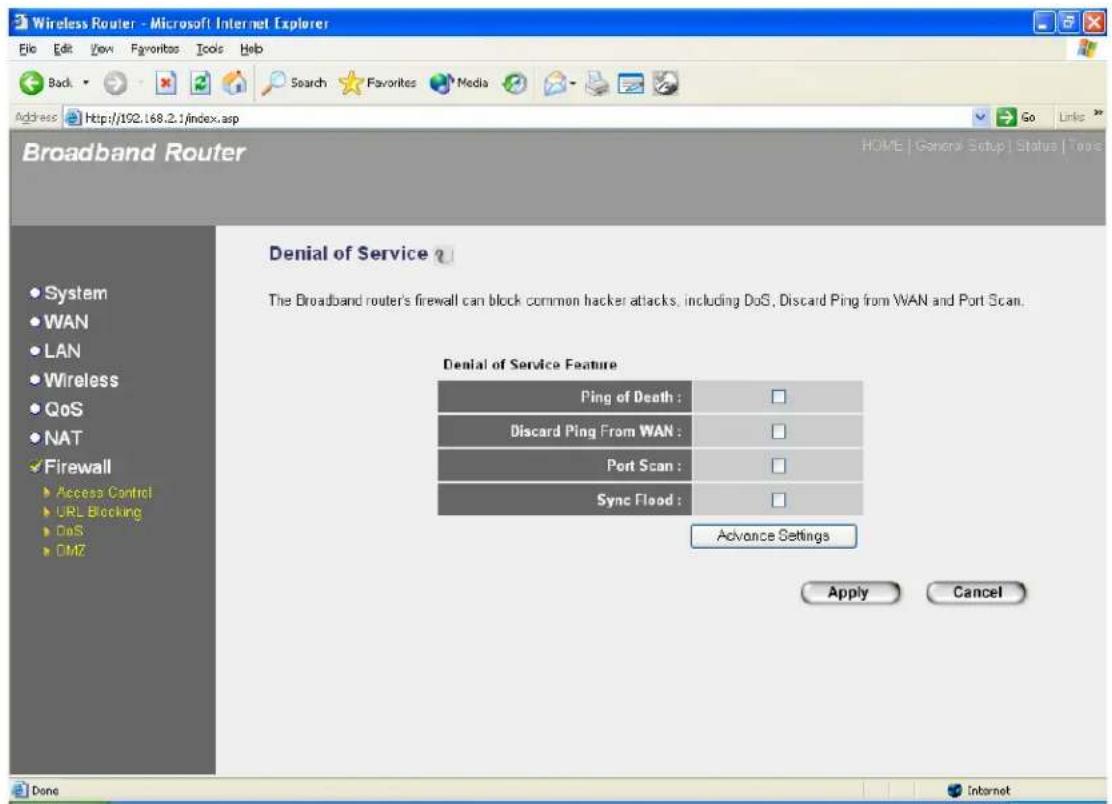
Parameters
Description
Intrusion Detection Feature
Ping of Death
Protections from Ping of Death attack
Discard Ping From WAN
The router's WAN port will not respond to any Ping requests
Port Scan
Protection the router from Port Scan.
Sync Flood
Protection the router from Sync Flood attack.
Click
2.7.4 DMZ
If you have a local client PC that cannot run an Internet application (e.g. Games) properly from behind the NAT firewall, then you can open the client up to unrestricted two-way Internet access by defining a DMZ Host. The DMZ function allows you to re-direct all packets going to your WAN port IP address to a particular IP address in your LAN. The difference between the virtual server and the DMZ function is that the virtual server re-directs a particular service/Internet application (e.g. FTP, websites) to a particular LAN client/server, whereas DMZ re-directs all packets (regardless of services) going to your WAN IP address to a particular LAN client/server.
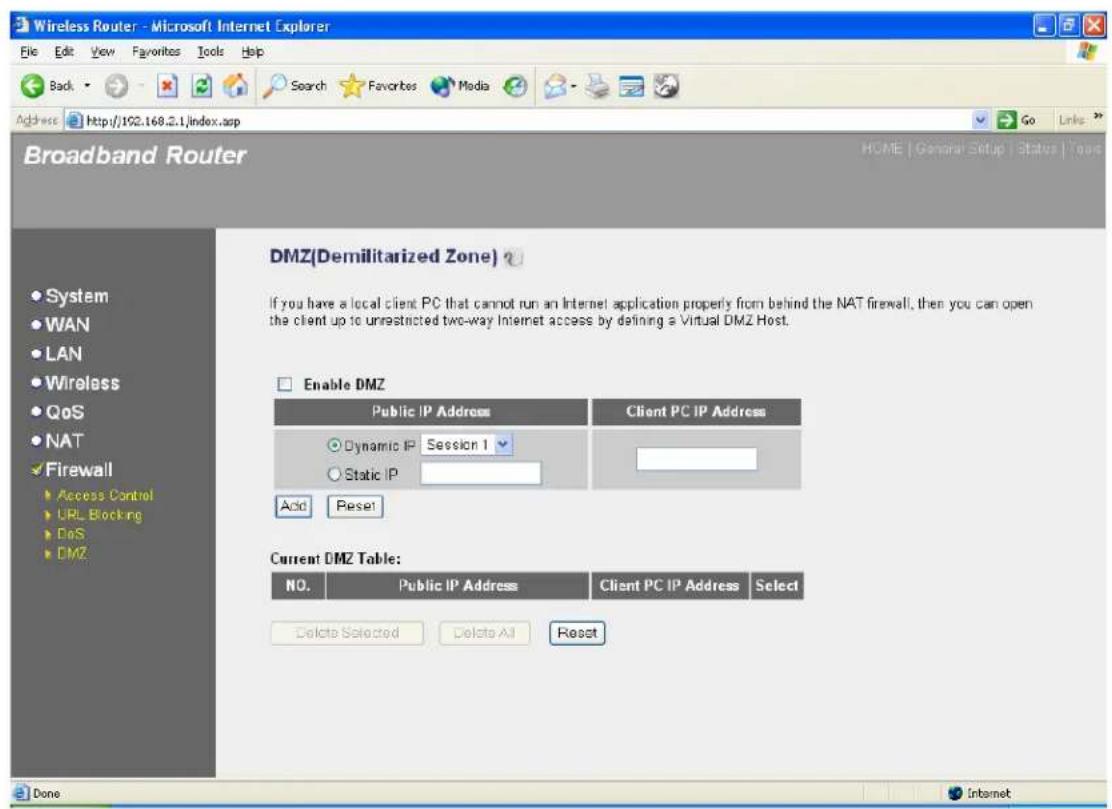
| Parameters | Description | ||
| Enable | DMZ | Enable/disable | DMZ |
| Note: If there is a conflict between the Virtual Server and the DMZ setting, then Virtual Server function will have priority over the DMZ function. | |||
| Public IP Address | The IP address of the WAN port or any other Public IP addresses given to you by your ISP | ||
| Client PC IP Address | Input the IP address of a particular host in your LAN that will receive all the packets originally going to the WAN port/Public IP address above | ||
Note: You need to give your LAN PC clients a fixed/static IP address for DMZ to work properly.
You can now configure other advance sections or start using the router (with the advance settings in place
Chapter 3
Status
The Status section allows you to monitor the current status of your router. You can use the Status page to monitor: the connection status of the Broadband router's WAN/LAN interfaces, the current firmware and hardware version numbers, any illegal attempts to access your network, and information on all DHCP client PCs currently connected to your network.
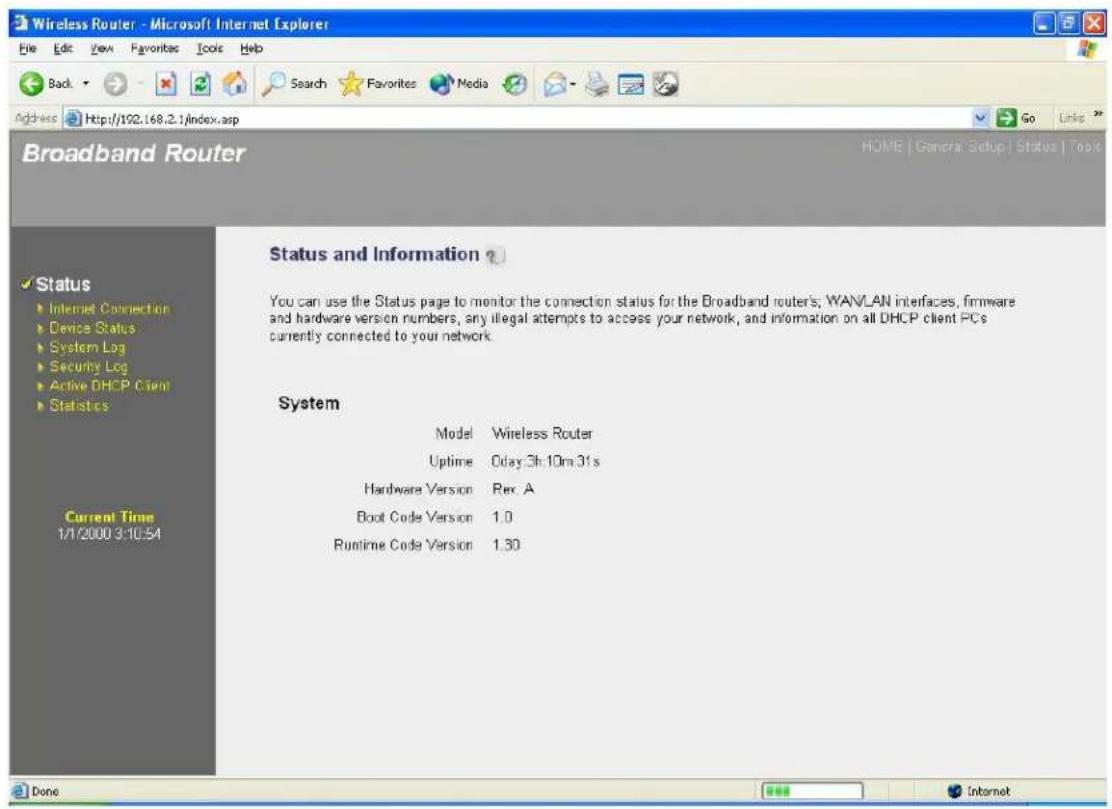
| Parameters | Description |
| 3.1 Status and Information | Shows the router's system information |
| 3.2 Internet Connection | View the Broadband router's current Internet connection status and other related information |
| 3.3 Device Status | View the Broadband router's current setting status |
| 3.4 System Log | View the Broadband router's system log |
| 3.5 Security Log | View any attempts that have been made to illegally gain access to your network. |
3.6 Active DHCP Client
View your LAN client's information that is currently linked to the Broadband router's DHCP server
3.7 Statistics Shows the statistics
Select one of the above five Status selections and proceed to the manual's relevant sub-section
3.1 Status and Information
The Status and Information section allows you to view the router's system information

Parameters
Description
Information You can see the router's system information such as the router's: LAN MAC Address, WAN MAC Address, Hardware version, Serial Number, Boot code Version, Runtime code Version
3.2 Internet Connection
View the Broadband router's current Internet connection status and other related information

| Parameters | Description |
| Internet Connection | This page displays whether the WAN port is connected to a Cable/DSL connection. It also displays the router's WAN port: WAN IP address, Subnet Mask, and ISP Gateway as well as the Primary DNS and Secondary DNS being used. |
3.3 Device Status
View the Broadband router's current configuration settings. The Device Status displays the configuration settings you've configured in the Quick Setup Wizard/General Setup section.

Parameters
Description
Device Status This page shows the Broadband router's current device settings.
This page displays the Broadband router LAN port's current LAN IP Address and Subnet Mask. It also shows whether the DHCP Server function is enabled/disabled..
3.4 System Log
View the operation log of the system.

| Parameters | Description |
| System Log | This page shows the current system log of the Broadband router. It displays any event occurred after system start up.At the bottom of the page, the system log can be savedto a local file for further processing or the system log can be clearedor it can be refreshedto get the most updated situation. When the system is powered down, the system log will disappear if not saved to a local file. |
3.5 Security Log
View any attempts that have been made to illegally gain access to your network.
![Wireless Router - Microsoft Internet Explorer File Edit View Favorites Tools Help Back Search Favorites Media Address http://192.168.2.1/index.asp Go Links Broadband Router HOME | General Setup | Status | Tools Security Log ? View any attempts that have been made to illegally gain access to your network. [2000-01-01 00:00:15]: start Dynamic IP [2000-01-01 00:07:16]: [SNTP]: connect to TimeServer 192.43.244.18 ... [2000-01-01 00:07:15]: [SNTP]: connect fail!! [2000-01-01 00:09:08]: start Dynamic IP [2000-01-01 00:11:28]: [SNTP]: connect to TimeServer 192.43.244.18 ... [2000-01-01 00:11:28]: [SNTP]: connect fail!! [2000-01-01 00:13:16]: start Static IP [2000-01-01 00:13:18]: [SNTP]: connect to TimeServer 192.43.244.18 ... [2000-01-01 00:13:28]: [SNTP]: connect fail!! Current Time 1/1/2000 2.2:38 Save Clear Refresh](/content/2026/05/1046764/images/4d60bffa9a76ba69d019f3082c6015523f905d4d3f459db03666ddc92ad53031.jpg)
| Parameters | Description |
| Security Log | This page shows the current security log of the Broadband router. It displays any illegal attempts to access your network. At the bottom of the page, the security log can be savedto a local file for further processing or the security log can be clearedor it can be refreshedto get the most updated situation. When the system is powered down, the security log will disappear if not saved to a local file. |
3.6 Active DHCP Client
View your LAN client's information that is currently linked to the Broadband router's DHCP server

| Parameters | Description |
| Active DHCP Client | This page shows all DHCP clients (LAN PCs) currently connected to your network. The “Active DHCP Client Table” displays the IP address and the MAC address and Time Expired of each LAN Client. Use the Refresh button to get the most updated situation |
3.7 Statistics
View the statistics of packets sent and received on WAN, LAN and Wireless LAN.
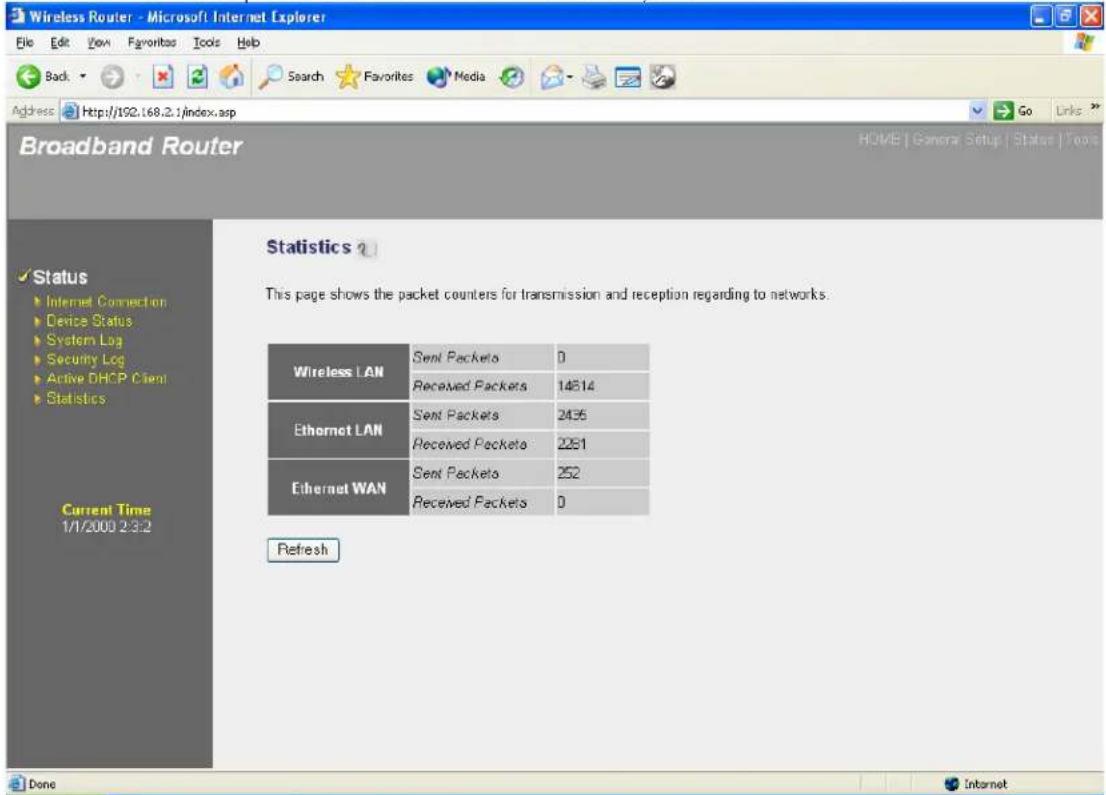
Parameters
Description
Statistics Shows the counters of packets sent and received on WAN, LAN and Wireless LAN.
Chapter 4
Tool
This page includes the basic configuration tools, such as Configuration Tools (save or restore configuration settings), Firmware Upgrade (upgrade system firmware) and Reset.
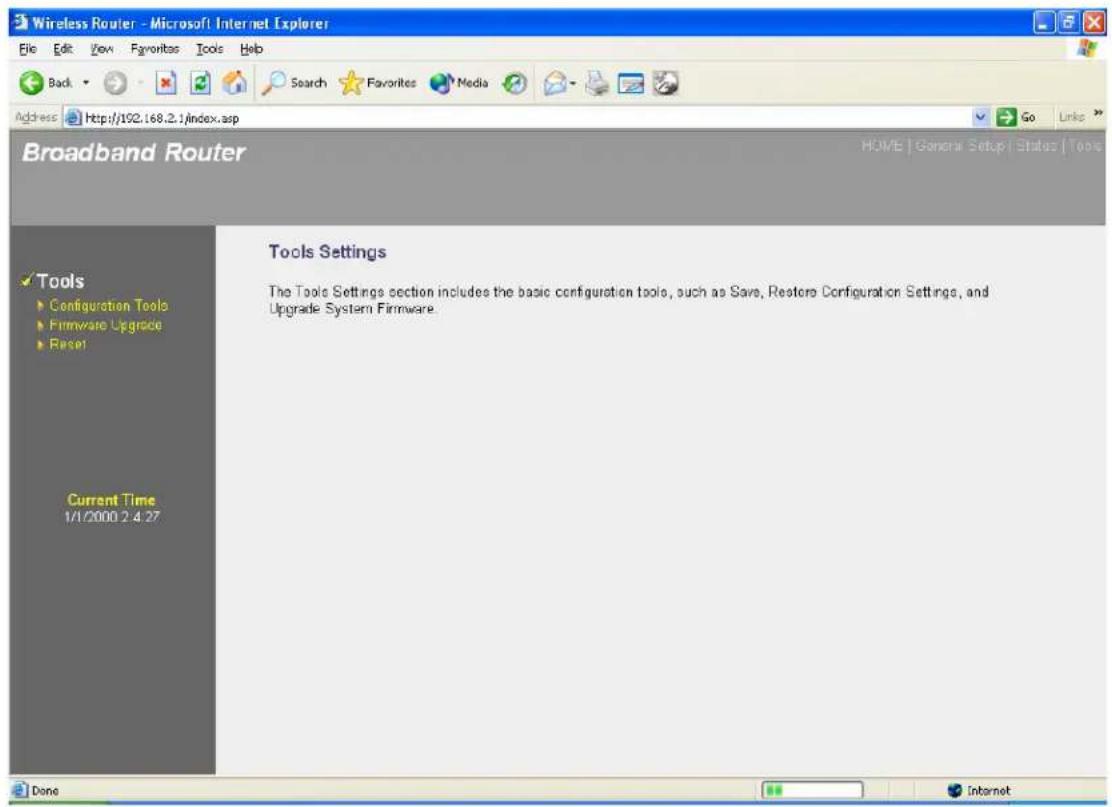
| Parameters | Description |
| 4.1 Configuration Tools | You can save the router's current configuration, restore the router's saved configuration files and restore the router's factory default settings |
| 4.2 Firmware Upgrade | This page allows you to upgrade the router's firmware |
| 4.3 Reset | You can reset the router's system should any problem exist |
Select one of the above three Tools Settings selection and proceed to the manual's relevant sub-section
4.1 Configuration Tools
The Configuration Tools screen allows you to save (Backup) the router's current configuration setting. Saving the configuration settings provides an added protection and convenience should problems occur with the router and you have to reset to factory default. When you save the configuration setting (Backup) you can re-load the saved configuration into the router through the Restore selection. If extreme problems occur you can use the Restore to Factory Defaults selection, this will set all configurations to its original default settings (e.g. when you first purchased the router).
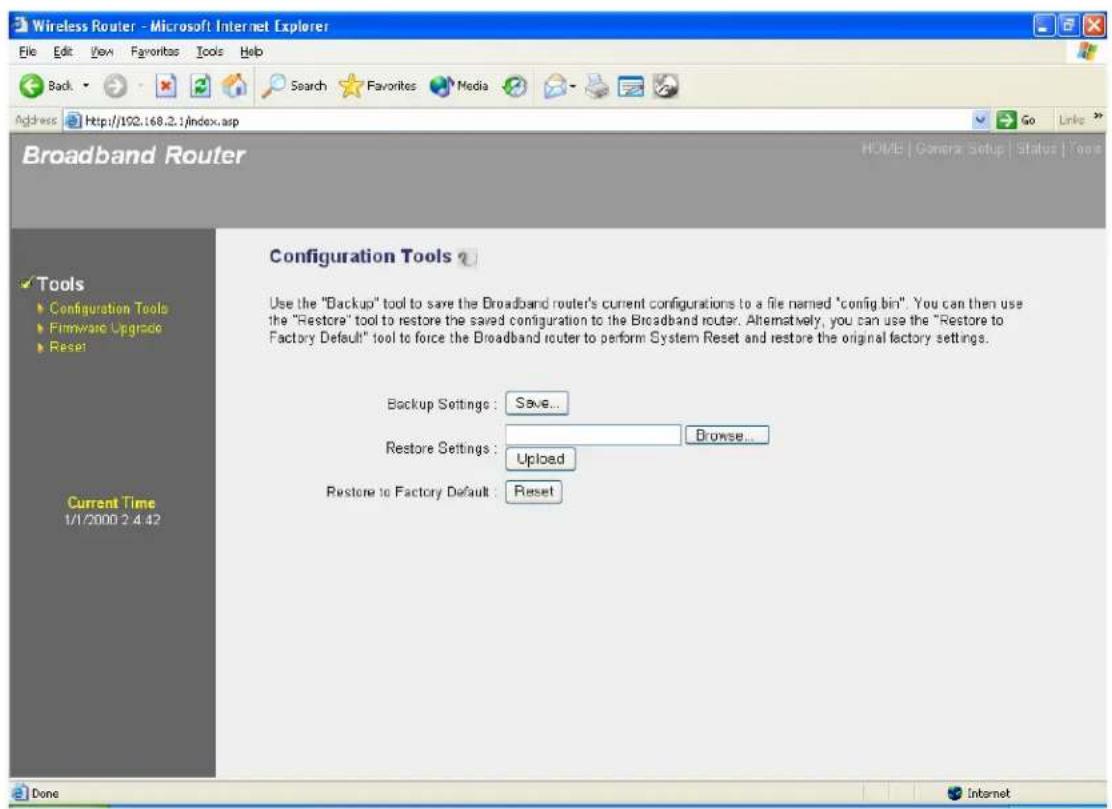
| Parameters | Description |
| Configuration Tools | Use the "Backup" tool to save the Broadband router current configuration to a file named "config.bin" on your PC. You can then use the "Restore" tool to restore the saved configuration to the Broadband router. Alternatively, you can use the "Restore to Factory Defaults" tool to force the Broadband router to perform a power reset and restore the original factory settings. |
4.2 Firmware Upgrade
This page allows you to upgrade the router's firmware
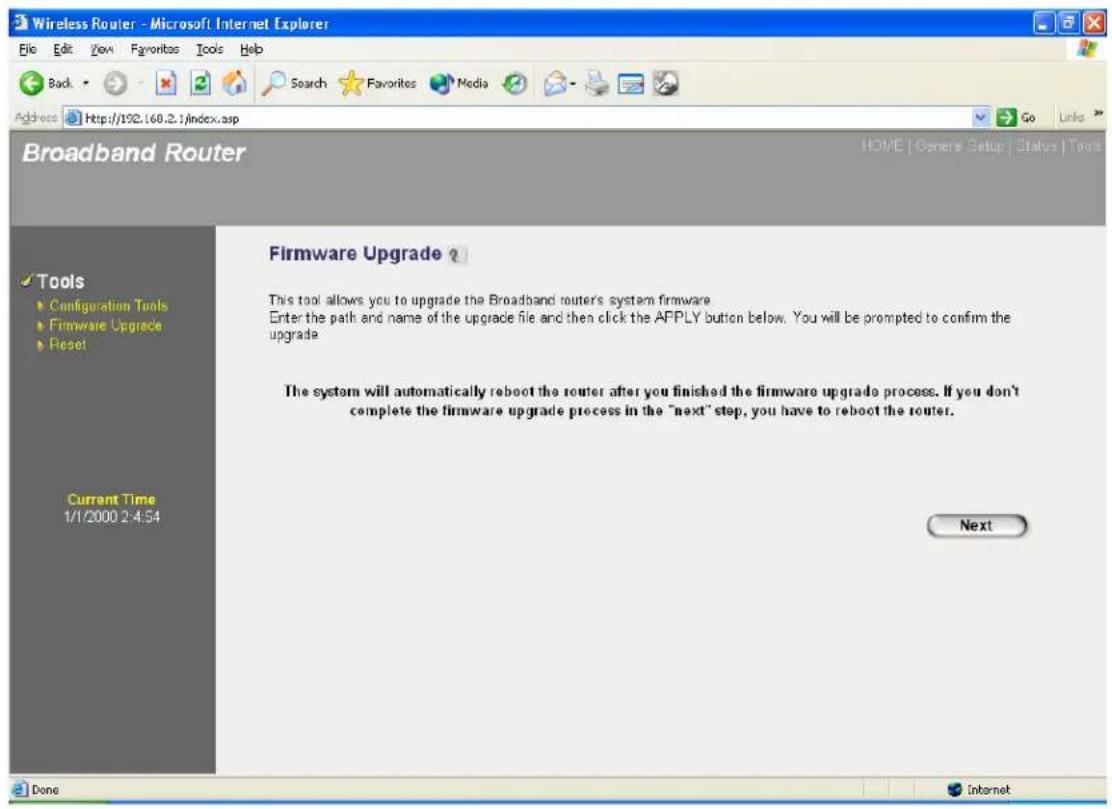
Parameters
Description
Firmware Upgrade This tool allows you to upgrade the Broadband router's system firmware. To upgrade the firmware of your Broadband router, you need to download the firmware file to your local hard disk, and enter that file name and path in the appropriate field on this page. You can also use the Browse button to find the firmware file on your PC.
Once you've selected the new firmware file, click
4.3 Reset
You can reset the router's system should any problem exist. The reset function essentially Re-boots your router's system

| Parameters | Description |
| Reset | In the event that the system stops responding correctly or in some way stops functioning, you can perform a reset. Your settings will not be changed. To perform the reset, click on thebutton. You will be asked to confirm your decision. The reset will be complete when the power light stops blinking.Once the reset process is complete you may start using the router again. |
Appendix A
How to Manually find your PC's IP and MAC address
1) In Window's open the Command Prompt program
![Microsoft Windows 2000 [Version 5.00.2195] (C) Copyright 1985-1999 Microsoft Corp. C:\>](/content/2026/05/1046764/images/633b167bffc538ebfab0294d96d51ea1142fe0a13dd169dfc527e6e3506e2450.jpg)
2) Type Ipconfig /all and
![Microsoft Windows 2000 [Version 5.00.2195] (C) Copyright 1985-1999 Microsoft Corp. C:\>ipconfig /all Windows 2000 IP Configuration Host Name . . . . . . . . . . . . . : pete Primary DNS Suffix . . . . . . . . . : Node Type . . . . . . . . . . . . : Broadcast IP Routing Enabled. . . . . . . . . : No WINS Proxy Enabled. . . . . . . . . : No Ethernet adapter Local Area Connection: Connection-specific DNS Suffix . : Description . . . . . . . . . . . . : Realtek RTL8139(A) PCI Fast Ethernet Adapter Physical Address. . . . . . . . . : 00-50-PC-FE-02-DB DHCP Enabled. . . . . . . . . : Yes Autoconfiguration Enabled. . . . : Yes IP Address. . . . . . . . . : 192.168.1.77 Subnet Mask. . . . . . . . . : 255.255.255.0 Default Gateway. . . . . . . . : 192.168.1.254 DHCP Server. . . . . . . . : 192.168.1.1 DNS Servers. . . . . . . : 192.168.1.1 Lease Obtained. . . . . . . : Sunday, December 09, 2001 9:18:45 PM Lease Expires. . . . . . : Friday, December 14, 2001 9:18:45 PM C:\>](/content/2026/05/1046764/images/046c4692b8609514e6fc1d8c3e8bfd56ed63c2b0192b8831fccccaee65a9479e.jpg)
- Your PC's IP address is the one entitled IP address (192.168.1.77)
- The router's IP address is the one entitled Default Gateway (192.168.1.254)
- Your PC's MAC Address is the one entitled Physical Address (00-50-FC-FE-02-DB)
Glossary
Default Gateway (Router): Every non-router IP device needs to configure a default gateway's IP address. When the device sends out an IP packet, if the destination is not on the same network, the device has to send the packet to its default gateway, which will then send it out towards the destination.
DHCP: Dynamic Host Configuration Protocol. This protocol automatically gives every computer on your home network an IP address.
DNS Server IP Address: DNS stands for Domain Name System, which allows Internet servers to have a domain name (such as www.Broadbandrouter.com) and one or more IP addresses (such as 192.34.45.8). A DNS server keeps a database of Internet servers and their respective domain names and IP addresses, so that when a domain name is requested (as in typing "Broadbandrouter.com" into your Internet browser), the user is sent to the proper IP address. The DNS server IP address used by the computers on your home network is the location of the DNS server your ISP has assigned to you.
DSL Modem: DSL stands for Digital Subscriber Line. A DSL modem uses your existing phone lines to transmit data at high speeds.
Ethernet: A standard for computer networks. Ethernet networks are connected by special cables and hubs, and move data around at up to 10/100 million bits per second (Mbps).
Idle Timeout: Idle Timeout is designed so that after there is no traffic to the Internet for a pre-configured amount of time, the connection will automatically be disconnected.
IP Address and Network (Subnet) Mask: IP stands for Internet Protocol. An IP address consists of a series of four numbers separated by periods, that identifies a single, unique Internet computer host in an IP network. Example: 192.168.2.1. It consists of 2 portions: the IP network address, and the host identifier.
The IP address is a 32-bit binary pattern, which can be represented as four cascaded decimal numbers separated by “.”: aaa.aaa.aaa.aaa, where each “aaa” can be anything from 000 to 255, or as four cascaded binary numbers separated by “.”: bbbbbbbb.bbbbbbbb.bbbbbbbb.bbbbbbbb, where each “b” can either be 0 or 1.
A network mask is also a 32-bit binary pattern, and consists of consecutive leading 1's followed by consecutive trailing 0's, such as 11111111.11111111.11111111.00000000. Therefore sometimes a network mask can also be described simply as "x" number of leading 1's. When both are represented side by side in their binary forms, all bits in the IP address that correspond to 1's in the network mask become part of the IP network address, and the remaining bits correspond to the host ID.
For example, if the IP address for a device is, in its binary form, 11011001.10110000.10010000.00000111, and if its network mask is, 11111111.11111111.11110000.00000000 It means the device's network address is 11011001.10110000.10010000.00000000, and its host ID is, 00000000.00000000.00000000.00000111. This is a convenient and efficient method for routers to route IP packets to their destination.
ISP Gateway Address: (see ISP for definition). The ISP Gateway Address is an IP address for the Internet router located at the ISP's office.
ISP: Internet Service Provider. An ISP is a business that provides connectivity to the Internet for individuals and other businesses or organizations.
LAN: Local Area Network. A LAN is a group of computers and devices connected together in a relatively small area (such as a house or an office). Your home network is considered a LAN.
MAC Address: MAC stands for Media Access Control. A MAC address is the hardware address of a device connected to a network. The MAC address is a unique identifier for a device with an Ethernet interface. It is comprised of two parts: 3 bytes of data that corresponds to the Manufacturer ID (unique for each manufacturer), plus 3 bytes that are often used as the product's serial number.
NAT: Network Address Translation. This process allows all of the computers on your home network to use one IP address. Using the broadband router's NAT capability, you can access the Internet from any computer on your home network without having to purchase more IP addresses from your ISP.
Port: Network Clients (LAN PC) uses port numbers to distinguish one network application/protocol over another. Below is a list of common applications and protocol/port numbers:
| Application | Protocol | Port Number |
| Telnet | TCP | 23 |
| FTP | TCP | 21 |
| SMTP | TCP | 25 |
| POP3 | TCP | 110 |
| H.323 | TCP | 1720 |
| SNMP | UCP | 161 |
| SNMP Trap UDP 162 | ||
| HTTP | TCP | 80 |
| PPTP | TCP | 1723 |
| PC Anywhere | TCP 5631 | |
| PC Anywhere | UDP 5632 | |
PPPoE: Point-to-Point Protocol over Ethernet. Point-to-Point Protocol is a secure data transmission method originally created for dial-up connections; PPPoE is for Ethernet connections. PPPoE relies on two widely accepted standards, Ethernet and the Point-to-Point Protocol. It is a communications protocol for transmitting information over Ethernet between different manufacturers
Protocol: A protocol is a set of rules for interaction agreed upon between multiple parties so that when they interface with each other based on such a protocol, the interpretation of their behavior is well defined and can be made objectively, without confusion or misunderstanding.
Router: A router is an intelligent network device that forwards packets between different networks based on network layer address information such as IP addresses.
Subnet Mask: A subnet mask, which may be a part of the TCP/IP information provided by your ISP, is a set of four numbers (e.g. 255.255.255.0) configured like an IP address. It is used to
create IP address numbers used only within a particular network (as opposed to valid IP address numbers recognized by the Internet, which must be assigned by InterNIC).
TCP/IP, UDP: Transmission Control Protocol/Internet Protocol (TCP/IP) and Unreliable Datagram Protocol (UDP). TCP/IP is the standard protocol for data transmission over the Internet. Both TCP and UDP are transport layer protocol. TCP performs proper error detection and error recovery, and thus is reliable. UDP on the other hand is not reliable. They both run on top of the IP (Internet Protocol), a network layer protocol.
WAN: Wide Area Network. A network that connects computers located in geographically separate areas (e.g. different buildings, cities, countries). The Internet is a wide area network.
Web-based management Graphical User Interface (GUI): Many devices support a graphical user interface that is based on the web browser. This means the user can use the familiar Netscape or Microsoft Internet Explorer to Control/configure or monitor the device being managed.


- Wireless Broadband Router 521666
- Introduction
- Features
- Minimum Requirements
- Package Content
- Note
- Get to know the Broadband Router
- Back Panel
- 1) Local Area Network (LAN)
- 2) Wide Area Network (WAN)
- 3) Reset
- Front Panel
- Setup Diagram
- Getting started
- Configure your PC to obtain an IP address automatically
- 2b) Windows XP
- 2c) Windows 2000
- 2d) Windows NT
- Status Information (Chapter 3)
- Tools (Chapter 4)
- Chapter 1
- Quick Setup
- Step 1) Time Zone
- Step 2) Broadband Type
- Menu
- Description
- Cable Modem
- Fixed-IP xDSL
- PPPoE
- Parameter
- PPTP
- L2TP
- to prevent from extra fee charged by ISP, please TURN OFF THE ROUTER WHEN YOU FINISHED USING THE INTERNET.
- Telstra Big Pond
- Chapter 2
- General Settings
- System
- Time Zone
- Password Settings
- Remote Management
- WAN
- DNS
- Dynamic IP
- Static IP Address
- PPPoE (PPP over Ethernet)
- PPTP
- L2TP
- Telstra Big Pond
- DDNS
- LAN
- Wireless
- Basic Settings
- AP Mode setting Page
- Station-Ad Hoc mode setting page:
- Station-Infrastructure mode setting page:
- Advanced Settings
- Security
- WEP only
- Key Format
- Key 1 - Key 4
- 802.1x only
- 802.1x WEP Static key
- WPA Pre-shared key
- WPA Radius
- Access Control
- QoS
- Parameters
- Edit QoS Rule:
- Local Port Range
- Remote IP Address
- Remote Port Range Enter the remote port range of the packets that
- Traffic Type Select the traffic type of the packets that this rule
- Protocol Select the protocol type of the packets that this
- NAT
- UPnP Setting It allows to
- Port Forwarding
- Virtual Server
- Public Port Enter
- Comment The description of this setting.
- Add Virtual Server
- Example: Virtual Server
- Special Applications
- Example: Special Applications
- UPnP Settings
- ALG Settings
- Static Routing
- Firewall
- Access Control
- Filter client PC by MAC address Check "Enable MAC Filtering" to enable MAC Filtering.
- Example: Access Control
- URL Blocking
- DoS (Denial of Service)
- Intrusion Detection Feature
- DMZ
- Chapter 3
- Status
- Active DHCP Client
- Statistics Shows the statistics
- Status and Information
- Internet Connection
- Device Status
- System Log
- Security Log
- Statistics
- Chapter 4
- Tool
- Configuration Tools
- Firmware Upgrade
- Reset
- Appendix A
- Glossary
Brand : Intellinet
Model : Wireless G Router 521666
Category : Router