
High Speed Broadband Router 523608 - Router Intellinet - Free user manual and instructions
Find the device manual for free High Speed Broadband Router 523608 Intellinet in PDF.


| Product Type | High Speed Broadband Router |
| Model Number | 523608 (4-port) / 523615 (8-port) |
| Dimensions | 164 x 108 x 30 mm (6.5 x 4.3 x 1.2 in) |
| Weight | 1.0 kg (2.2 lbs) |
| Power Supply | 5 V DC, 1.0 A via external adapter |
| LAN Ports | 4 (523608) or 8 (523615) RJ-45 10/100 Mbps with Auto MDI/MDI-X |
| WAN Connection Types | Dynamic IP (DHCP), Static IP, PPPoE (DSL) |
| NAT Features | Virtual server, port forwarding, port trigger, DMZ |
| Firewall | DoS prevention, MAC/IP/port filtering, URL filter, domain blocking |
| VPN Support | PPTP VPN server (up to 5 clients) and pass-through |
| QoS | IP, port, and application-based bandwidth control |
| Management | Web-based (HTTP), remote management, DDNS, scheduler |
| LED Indicators | Power, CPU/Run, WAN Link/Act, LAN 1-4/8 Link/Act |
| Standards | IEEE 802.3 (10Base-T), IEEE 802.3u (100Base-TX) |
| Certifications | FCC Class B, CE Mark, RoHS |
| Chipset | KS8695PX (ARM9 CPU) |
| Memory | 2 MB Flash, 16 MB SDRAM |
| Throughput | LAN to WAN up to 94 Mbps |
| DHCP Server | Built-in, configurable IP pool |
| Maintenance | Wipe with dry cloth; keep in dry place away from heat |
| Safety Warnings | Use only supplied adapter; do not drop or disassemble; avoid sunlight |
| Spare Parts / Repairability | Contact dealer for service; no user-replaceable parts |
Frequently Asked Questions - High Speed Broadband Router 523608 Intellinet
User questions about High Speed Broadband Router 523608 Intellinet
0 question about this device. Answer the ones you know or ask your own.
Ask a new question about this device
Download the instructions for your Router in PDF format for free! Find your manual High Speed Broadband Router 523608 - Intellinet and take your electronic device back in hand. On this page are published all the documents necessary for the use of your device. High Speed Broadband Router 523608 by Intellinet.
USER MANUAL High Speed Broadband Router 523608 Intellinet


INTELLINET
NETWORK SOLUTIONS
BRINGING NETWORKS TO LIFE
INT-523608/523615-UM-0307-02
TABLE OF CONTENTS
Section 1: Introduction.... 3
1.1Warnings 3
1.2 Package Contents.... 3
1.3 Features 3
Section 2: Installation 4
2.1 Before Installation 4
2.2 Installation 4
2.3 Indicators and Connections 5
2.3.1 Model 523608, 4-Port 5
2.3.2 Model 523615, 8-Port 6
2.3.1 Model 523608, 4-Port .... 5 2.3.2 Model 523615, 8-Port .... 6
Section 3: Local Computer Setup 6
3.1 Windows 2000 Setup 7
3.2 Windows XP Setup....11
3.1 Windows 2000 Setup .... 7 3.2 Windows XP Setup.... 11
Section 4: Router Setup ....15
4.1 Start Internet Explorer to Log In 15
4.2 PPPoE Configuration 16
4.3 Dynamic IP (Cable Modem) Configuration....20
4.4 Static IP Configuration 22
4.5 Status....24
4.5.1 WAN Status....24
4.5.2 LAN Status 25
4.5.1 WAN Status....24 4.5.2 LAN Status....25
4.6 Basic Setup 26
4.6.1 WAN Setup....26
4.6.2 LAN Setup 27
4.6.3 Link Setup/Info 29
4.6.4 Routing Table....31
4.6.5 Switch Configuration....32
4.6.1 WAN Setup....26 4.6.2 LAN Setup....27 4.6.3 Link Setup/Info....29 4.6.4 Routing Table....31 4.6.5 Switch Configuration....32
4.7 System....32
4.7.1 Administrator Setup ....32
4.7.2 Firmware Upgrade ....34
4.7.3 System Log 36
4.7.4 Access List 37
4.7.5 Miscellaneous Configurations....37
4.8 QoS....38
4.8.1 Basic Setup 39
4.8.2 IP QoS 40
4.8.3 Application QoS 41
4.8.4 Ports QoS....42
4.9 NAT....43
4.9.1 Applications....43
4.9.2 Internal Server....45
4.9.3 Port Forwarding....47
4.9.4 Port Trigger 48
4.9.1 Applications....43 4.9.2 Internal Server....45 4.9.3 Port Forwarding....47 4.9.4 Port Trigger....48
4.9.5 NAT On/Off....49
4.10 Advanced Setup....50
4.10.1 Firewall 50
4.10.2 DDNS 51
4.10.3 WOL (Wake-on LAN)....52
4.10.4 URL Filter 53
4.10.5 Remote Management ....54
4.10.6 Scheduler ....55
4.10.7 VPN 56
Section 5: Specifications ....57
1. INTRODUCTION
Thank you for purchasing the INTELLINET™ NETWORK SOLUTIONS High-Speed Broadband Router. This user manual includes hardware specifications, installation guidelines, configuration guidelines and directions for using the device.
1.1 Warnings
- Only use the power adapter provided by the manufacturer.
- Do not drop the router: It can damage the router's electronic components.
- Do not disassemble the router: Doing so voids the warranty.
- Avoid extended exposure to sunlight to prevent overheating.
- Keep the router in a dry place and away from heat.
1.2 Package Contents
• High-Speed Broadband Router
- Switching DC Power Adapter (5 V, 1.0 A)
• RJ-45 Ethernet Cable
- User manual
1.3 Features
This High-Speed Broadband Router is a highly integrated device with many functions, such as Gateway, Switch, DHCP server and Firewall.
Network Address Transform (NAT): With the provided Internet application, this device allows more than one user to connect with the Internet at the same time by sharing one public IP address. It supports many connection options: xDSL, cable modem LAN/leased line and so on.
4 Ports 10/100 M Switch: Four 10/100 Mbps ports with MDI/MDI-X support (Auto Uplink, which eliminates the need for using a crossover cable when connecting to a different switch port).
PPPoE (ADSL) Automatic Disconnection/Connection: Users have the option of choosing automatic disconnection based on idle time and re-connect on demand.
DHCP Server Supported: All of the networked computers can retrieve TCP/IP settings automatically from this device.
Static IP Address Binding: Authorizes users to manage and configure a PC in LAN in most cases by binding the MAC address and IP address together.
System Log: History of all activity.
UPnP: Supports Microsoft's UPNP (Universal Plug and Play Service).
Web-Based Management: The router is easily and conveniently configured by any standard Internet Web browser.
Internet Access Control: Different settings can be set up for different users.
Packet Filter: Port filter, IP address filter, MAC address filter, key word filter.
Virtual Server: Allows other users from the Internet to access WWW, the FTP server or other servers in the LAN.
QoS (Quality of Service): Allows control of your Internet bandwidth. Set a minimum bandwidth for a certain application, or limit the bandwidth an application can consume. The router features IP- and port-based bandwidth control, as well.
Scheduler: Manage and control the Internet access for individual users.
DMZ Host: Set up one computer to operate in the Demilitarized Zone without any firewall interference.
Remote Management: Remotely configure the router settings.
DDNS: Support for dynamic DNS services, such as www.dyndns.org.
Remote Wake-up: Remotely wake up PCs in the LAN.
Support VPN Pass-through: Supports VPN pass-through PPTP traffic. A user connected to the device can establish outgoing connections to remote VPN servers.
VPN server: An integrated VPN server allows five simultaneous client connections.
2. INSTALLATION
2.1 Before Installation
- First, confirm that your computer has a Java Script-capable Web browser installed.
- Make sure that your computer has a LAN card installed and correctly configured for TCP/IP.
- If using xDSL, you will need the username and password provided by your ISP.
NOTE: If your computer has ADSL PPPoE dial-up software installed, back up your installation software and uninstall your ADSL PPPoE dial-up software before proceeding with the installation.
2.2 Installation
- Set up the WAN connection: Connect the broadband RJ-45 cable (xDSL, Cable modem or LAN/leased cable) with the WAN port of the router.
- Set up the LAN connection: Connect your computer's LAN card port or your switch's UPLINK port with one LAN port of the router using a common network cable. NOTE: All LAN ports of the router can automatically sense cross cable, so
straight-through or cross cable can be used to connect the LAN card or switch.
-
Turn on the power by pressing the power button on the back of the router. The device will perform a self test. During the self test, the PWR LED, CPU/RUN LED and LAN port LEDs of connected ports are lit. After the self test, the CPU/RUN LED starts flashing (on-off-on-off).
-
Start the computer.
2.3 Indicators and Connections
2.3.1 Model 523608, 4-Port

LED Indication
PWR Continuously lit indicates power to the router.
RUN/CPU Slowly blinking indicates the system is operational after a proper startup.
WAN Blinking indicates data is being transmitted to/from the Wide Area Network.
1–4 Blinking indicates data is being transmitted to/from the Local Area Network.

Port/Jack Indication
DC 5 V Connects to the power adapter.
Reset This can be to restart the router, but all configurations that may have been entered will be restored to the original factory defaults.
WAN Connects xDSL/cable modem or special cable.
1-4 The LAN ports connect to PCs, hubs, switches and so on.
2.3.2 Model 523615, 8-Port
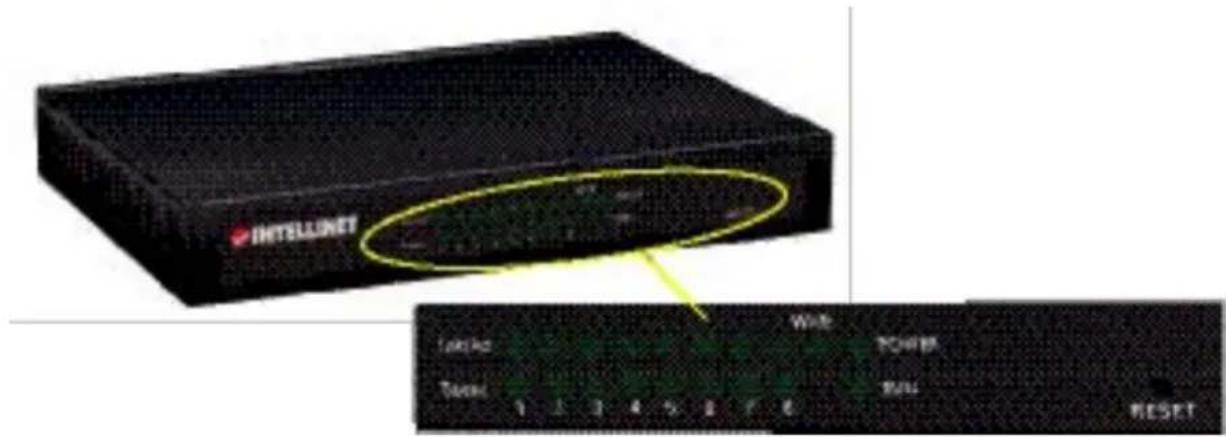
LED Indication
PWR Continuously lit indicates power to the router.
RUN/CPU Slowly blinking indicates the system is operational after a proper startup.
WAN Blinking indicates data is being transmitted to/from the Wide Area Network.
1–8 Blinking indicates data is being transmitted to/from the Local Area Network.
RESET Approx. 5 seconds after pressing to turn on the power, the RUN LED sill blink quickly. Release the RESET button. (After router Reset startup, all configurations will restore to defaults.)

Port/Jack Indication
DC 5 V Connects to the power adapter.
WAN Connects xDSL/cable modem or special cable.
1–8 The LAN ports connect to PCs, hubs, switches and so on.
The High-Speed Broadband Router acts as a DHCP server, which means that it provides IP addresses to all connected computers. By default, Windows, Linux and Mac OS systems will try to obtain an IP address from a DHCP server, if present and no configuration of the computer's IP settings are necessary. In order to test your IP settings, simply start your computer while connected to the router. Then open your Web browser and open http://192.168.10.1.
If the router's Web Admin screen appears, you can skip this section and proceed
directly to Section 4. If you are unable to open the router's Web Admin screen, follow whichever instructions below apply to the operating system you use.
3.1 Windows 2000 Setup
- Install the High-Speed Broadband Router.
- Start Windows 2000 and check whether the LAN LED is on or off. If off, confirm the connection between the computer and the router is correct.
- Click "Start" → "Setting" → "Control Panel."
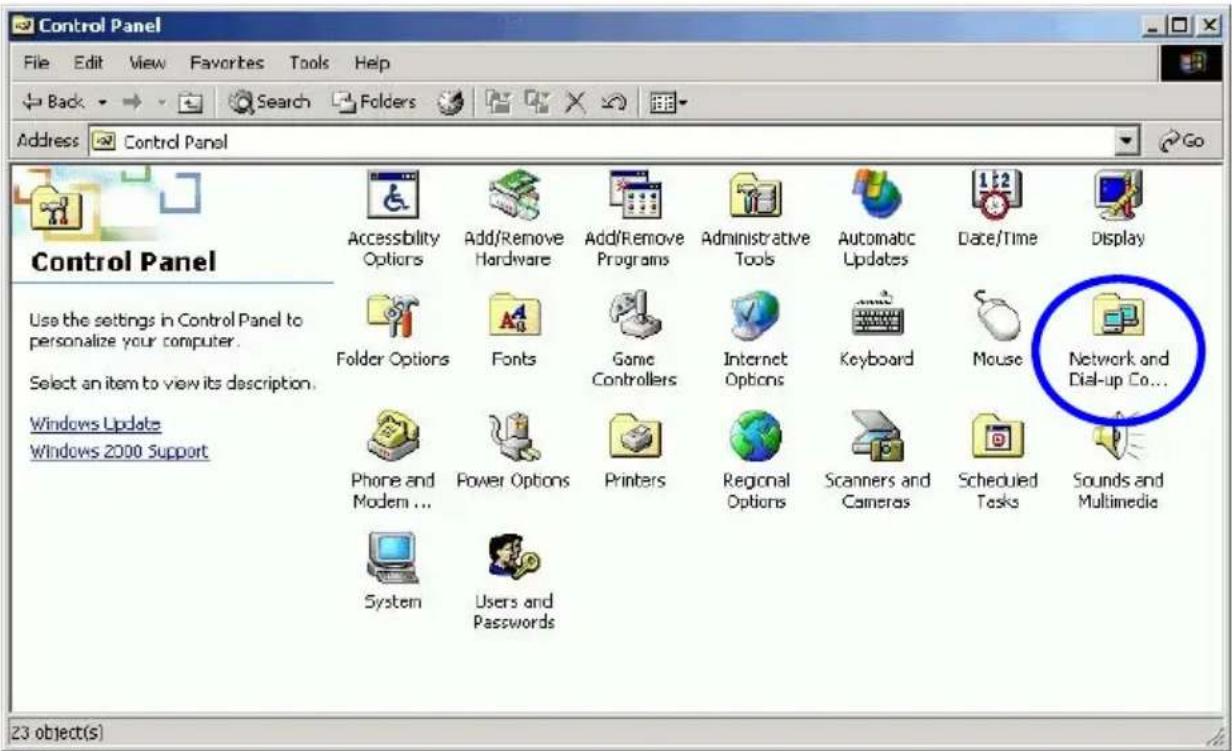
- Double-click "Network and Dial-up Connection" in "Control Panel."

- Click "Local Area Connection" → "Properties" → "Internet Protocol (TCP/IP)" and "Properties."


- Click the "General" tab; select "Obtain an IP address automatically" and "Obtain DNS server address automatically."
- Click "OK."

- Click "Start" → "Run."
- Input "cmd"; then click "OK."
- Input "ipconfig" in the pop-up command window.
NOTE: Make sure your IP is the same as that listed below. If it's the same, then your configuration is successful. If not, redo the above steps and restart your computer.
• The IP address is between 192.168.10.2 and 192.168.10.254
• The subnet mask is 255.255.255.0
- The default gateway is 192.168.10.1 (the router's default IP address)

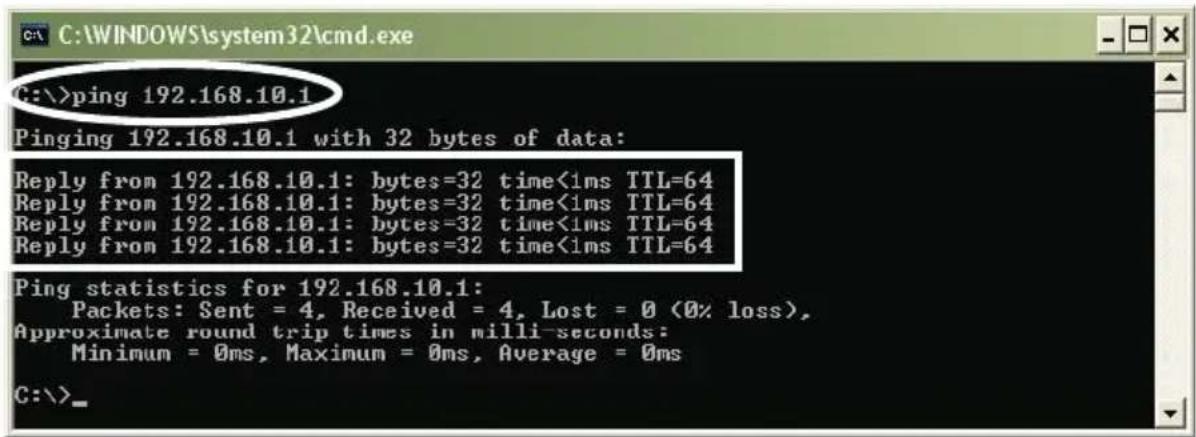
- Type "ping 192.168.10.1," then hit "Enter."
- If you can see "Reply from 192.168.10.1: bytes=32 time=2ms TTL=64," then the connection between your computer and Broadband Router is completed.
3.2 Windows XP Setup
- Install the High-Speed Broadband Router.
- Start Windows XP and check whether the LAN LED is on or off. If off, confirm that the connection between the computer and the router is correct.
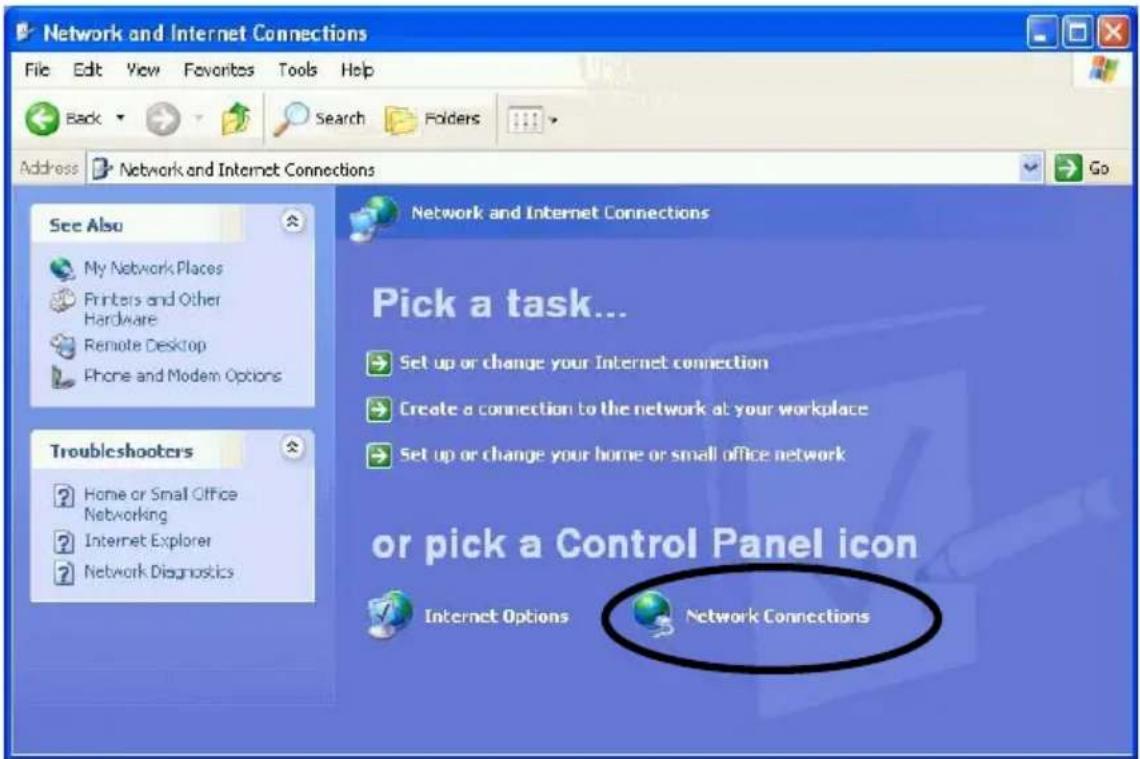
- Click "Start" → "Setting" → "Control Panel."
- Double-click "Network and Internet Connections" in "Control Panel."
- Click "Network Connection" → "Local Area Connection" → "Properties" → "Internet Protocol (TCP/IP)" and "Properties."
- Click "General"; select "Obtain an IP address automatically" and "Obtain DNS server address automatically."
- Click "OK."


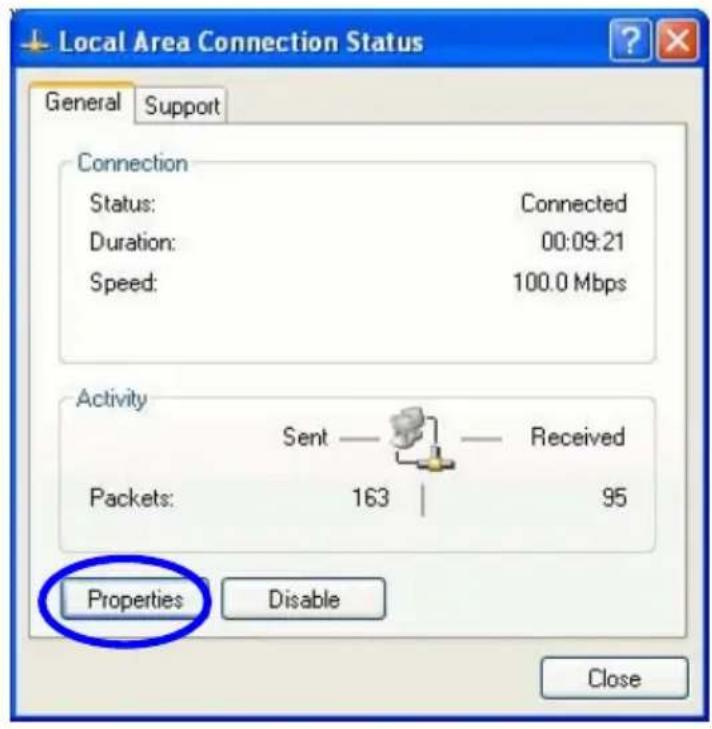

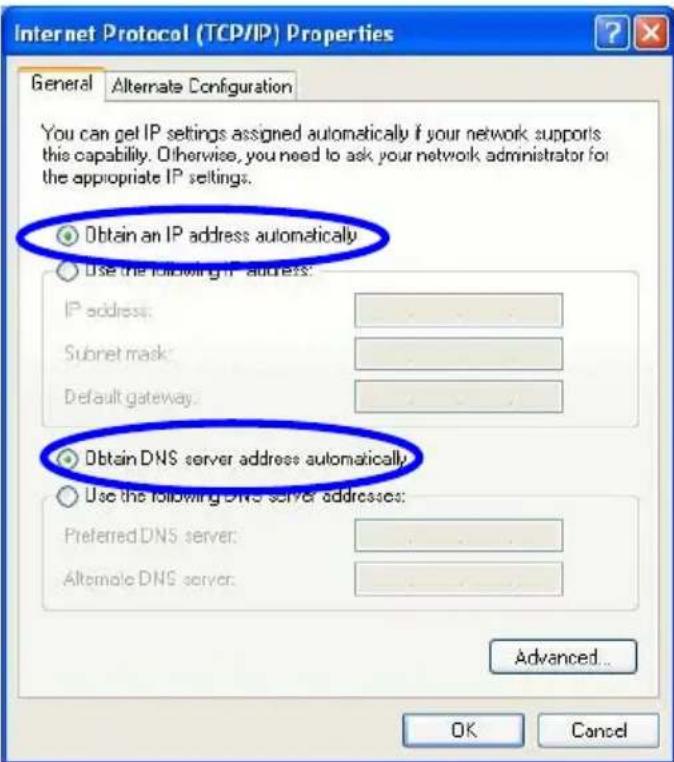
- Click "Start" → "Run"; enter "cmd"; click "OK."
- Type "ipconfig" in the pop-up command window.
NOTE: Make sure the IP information is the same as shown below.
• The IP address is between 192.168.10.2 and 192.168.10.254
• The subnet mask is 255.255.255.0
• The default gateway is 192.168.10.1

- Input "ping 192.168.10.1," then "Enter."
- If you can see "Reply from 192.168.10.1: bytes=32 time=2ms TTL=64," then the connection between your computer and the router is completed.

4. ROUTER SETUP
4.1 Start Internet Explorer to Log In
- Start your Web browser.
- Enter "http://192.168.10.1" in the Web browser's address bar. (192.168.10.1 is the default IP address of the router.)
Address http://192.168.10.1
- You will then see the following login Web page.
![Broadband SOHO Router INTELLINET NETWORK SOLUTIONS Broadband Router 523608 Internet Connection Information Conn. Type DHCP Conn. Status Disconnected LOGIN Internet Wizard The connected PC's IP address is [192.168.10.2]. VERSION 1.36 INTELLINET NETWORK SOLUTIONS](/content/2026/05/1067779/images/d7ce64255fd184e7770c43735d9c2f47edc444b2bfa93a5896a2a519842a6191.jpg)
Click the "Login" button to enter the configuration and configure the router manually. This may be required if the Internet Wizard fails to detect the settings automatically. The Internet Wizard lets you configure your Internet connection quickly and conveniently.
You can login directly without account and password confirmation because there is no account information required by default. It is recommended that a password is assigned immediately.
Conn. Type: The router's current connection type. Dynamic IP (DHCP) is the default value.
Conn. Status: The router's current connection status.
WAN IP: The router's current WAN (Internet) IP address.
Connected PC: The IP address of the computer that connects to the router.
4.2 PPPoE Configuration
This connection option is suitable for a virtual dial-up Internet connection.
-
Open the external ADSL modem and check the WAN LED of the router. If the WAN LED is off, check the network cable between the external modem's LAN/Ethernet port and the router's WAN port.
-
Click "Basic setup" → "WAN setup" as shown.

- Select the "PPPoE User (ADSL)" radio button.
- Key in the "User ID" and "Password" provided by your Internet service provider.
- Click the "Apply" button. You will then see the following pop-up window:
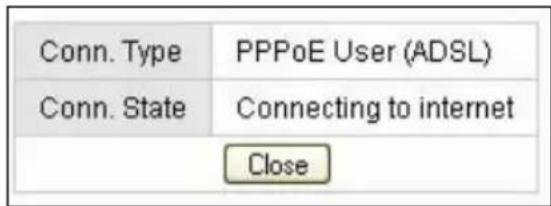
If "Conn. State" shows "Successfully connected," the configuration is correct.
- Click "Show Internet connection status" and proceed to section 4.5.1.
If "Conn. Status" shows "Invalid ID/password." the configuration is incorrect. Click the "Close" button and check your ID and password.

If "Conn. Status" is unchanged, check whether your service type is correct.

-
Confirm the WAN connection status: If the WAN connection is successfully established, then by clicking "Show Internet Information" you can enter the WAN status Web page; or click "Status" → "WAN status" and verify the following.
-
Connection Type should be PPPoE (ADSL)
- Connection Status should be "successfully connected"
- Physical Address shows the router's WAN port MAC address.
- WAN IP Address, Subnet Mask, Default Gateway, Primary DNS Server and Secondary DNS Server can be different from the following values. (These addresses are provided by your ISP.)

Click "Disconnect" to disconnect from the Internet.

"Connect" is a manual connection button. By clicking it, the system can be connected to the Internet again.
Click "Save" to save the current configuration.
Restart all PCs connected to the router.


NOTE: Save the router configuration after completion; otherwise, the figuration will be lost after the router is restarted.
Other configuration options of the PPPoE WAN setup screen:
MTU: Input the MTU value of the data package (the default value is 1454). Do not change it unless you are experiencing connection problems. Your ISP can give you the correct value in case the default value does not work.
Disconnect PPP session if idle time is longer than _ Min: If you choose this option and set up the time "T," then the router automatically disconnects from the Internet after "T" minutes of idle time.
Connect On Demand: The router can automatically connect with the Internet if there is Internet access after disconnection. Note: During usage, if there is disconnection due to external causes, then the router will try to connect with the Internet at once until a successful re-connection is made. This function is a router internal function and does not affect the Connect On Demand function. Connect
On Demand is only effective for Disconnect PPP session if idle time is longer than _ Min.
Connect Manually: With this option, users have to connect with the Internet manually after disconnection. This option is only effective with Disconnect PPP session if idle time is longer than _ Min.
Prevent reconnection although no response from PPP server: This option is for shutting off the router's internal automatic re-connection function. By choosing this option, the router will not try to re-connect at once if an external network (ISP) disconnects the connection.
4.3 Dynamic IP (Cable Modem) Configuration
With this connection option, the router can get IP addresses automatically from an ISP. It is suitable for connection options such as cable modem, LAN and so on.
- Turn on the external cable modem and check the WAN LED of the router. If the WAN LED is off, confirm that the network cable connection between the modem and the WAN port is correct.
- Click "Basic Setup" → "WAN Setup."
- Choose DHCP User (Cable modem, VDSL, LAN, ...)
- Click "Apply" to complete.
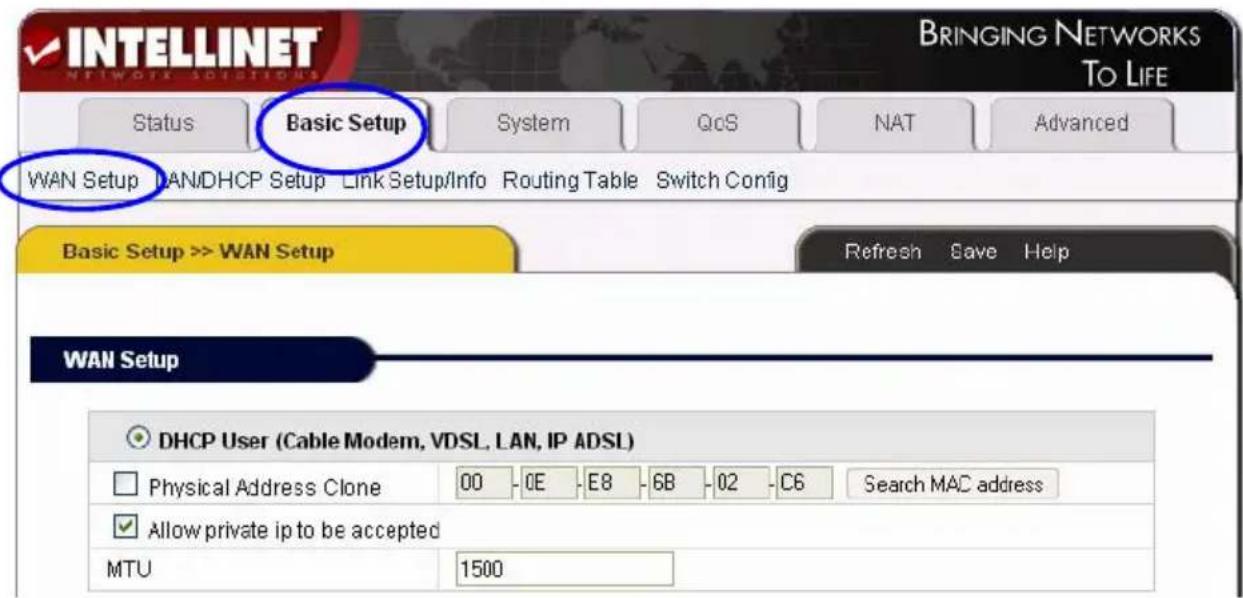
- You will see the following pop-up window:

If Conn. State shows "Successfully connected," the configuration is correct.
Click "Show Internet Information" and proceed to section 4.5.1.
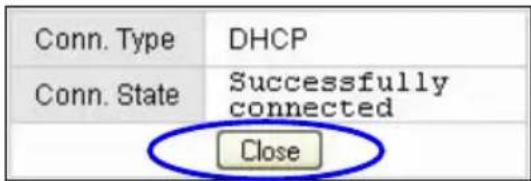
-
If Conn. State remains as "Connecting to Internet," do the following:
-
Close the pop-up window.
-
Turn the cable modem power off then on, and check the WAN LED status.
-
Re-click the "Apply" button.
-
Check the WAN Connection Status: If the status is "Successfully connected," click "Show Internet Information" to enter the WAN status page; or click Status → WAN Status, as shown.

If the WAN connection is successfully established, you can see the following:
- Connection Type should be "Cable Modem (DHCP)"
- Connection Status should be "Successful connected"
• Physical Address shows the router WAN port MAC address - WAN IP Address, Subnet Mask, Default Gateway, Primary DNS Server and Secondary DNS Server depend on your system configuration and information provided by the ISP.
The "Disconnect" button causes the router to release the WAN port IP address and disconnect from the Internet.

The “Connect” button is a manual WAN port IP address refresh function button. If clicked, the WAN port will re-obtain a dynamic IP address and connect with the Internet.
Click the "Save" button to save the current configuration, then restart all PCs connected with router.
Other configuration options:
Physical address Clone: If you want to change a WAN port MAC address, you can choose this option. If not selected, the WAN MAC address is the default value. If using this option, the displayed MAC address is your current MAC address. You can also manually add the WAN port MAC address; without the option, the WAN port MAC address will restore to its default value.
Allow private IP to be accepted: Allows a WAN port to be assigned a private IP address.
4.4 Static IP Configuration
If you have a static IP address provided by your ISP, you must choose this option.
-
Turn on the external modem and check the WAN LED of the router. If the WAN LED is off, check the network cable between the external modem and the WAN port.
-
Click "Basic Setup" → "WAN Setup" as shown:

- Input WAN IP Address, Subnet Mask, Default Gateway, Primary DNS Server and Secondary DNS Server as provided by your ISP.
- Click "Apply" to complete. You will see the following pop-up window:

- Check WAN Conn. State by clicking "Show Internet Information" or click on "Status" → "WAN status."

If the WAN connection is successfully established, you can see the following:
- Connection Type should be "Static IP"
- Connection Status should be "Successfully connected"
- Physical Address shows the router's WAN port MAC address (physical address).
-
WAN IP Address, Subnet Mask, Default Gateway, Primary and Secondary DNS server as entered.
-
Click the "Save" button to make the configuration permanent.

Note: Save the router configuration after completion; otherwise, the figuration will be lost after the router is restarted.
4.5 Status
4.5.1 WAN Status
Click "Status" → "WAN Status."

This page shows current Internet connection status (WAN port), including Connection Type, Connection Status, WAN IP Address, Subnet Mask, Default Gateway and DNS server. With dynamic IP or PPPoE DSL connections, the "Connect" or "Disconnect" button will be shown on this page. Click the "Connect" button to connect with the Internet; click the "Disconnect" button to disconnect from the Internet.
Refresh: Refreshes the current Web page. All of the following Web pages will have this button with the same function.
Save: Saves the configuration of the router whenever you make a change to the configuration on any screen. Failing to save the configuration will result in a loss of all parameter changes made since the last time the configuration was saved.
4.5.3 LAN Status
Click "Status" → "LAN Status."

LAN Information: Shows the router's current LAN connecting status, DHCP server settings, including MAC address (physical address) of the LAN port, and quantities of IP address handed out to other computers or LAN clients.
IP allocated: Overview of all connected computers with IP Address, Physical Address (MAC Address) and the connection type (wired, dynamic IP, etc.)
4.6 Basic Setup
4.6.1 WAN Setup
Click "Basic Setup" → "WAN Setup."

PPPoE (ADSL), Dynamic IP and Static IP setup procedures are illustrated in sections 4.2, 4.3 and 4.4, respectively.
4.6.2 LAN Setup
Click "Basic Setup" → "LAN/DHCP Setup."

This page lets you configure the LAN IP settings of the router, along with the DHCP server settings.
System IP Setup: This section is for changing the IP router LAN port address.
System IP address: The IP address of the router. Use this address to access the router's administrator menu.
Subnet Mask: The standard network mask is 255.255.255.0. It normally should not be changed.
DHCP Setup: TCP/IP protocol configuration includes IP address, subnet mask, Gateway and DNS server. The DHCP function automatically configures the TCP/IP protocol for all connected computers.
DHCP Server Status: The current status of the DHCP server.
DHCP Server Operation: Enable or disable the DHCP server.
DHCP IP Pool: The IP address range the router assigns to connected computers. It is 192.168.10.2 – 192.168.10.254 by default.
Manual DNS configuration: Manually configure the DNS server the DHCP server assigns to the connected computers. Normally, this option is not required.
If the router detects the external DHCP server in the LAN network, the DHCP server of the router will be suspended: Uncheck this option if you have other DHCP servers in your network but still wish to utilize the router's own DHCP server.
Enable Internet access only for PCs that are allocated by the DHCP server: If activated, no computer with a static IP address will be able to connect to the Internet through the router. This option forces client PCs to obtain an IP address from the router.
Static Lease Management: This function is often referred to as Static DHCP. With this function enabled, you can assign a "fixed" IP address to one or more computers in your network via DHCP, where you normally would not have control over which IP address is assigned to which computer.

Add hardware address & IP pair on the real network: This function lets you find all computers currently connected and allows you to make their IP address assignment permanent. Check the box in front of the IP address and click on "Add."
Add hardware address & IP pair manually: If this option is enabled, the IP address and physical address (MAC address) need to be entered manually.

NOTE: In order to use DHCP function of the router, the TCP/IP protocol of connected computers must be configured as “Obtain an IP Address automatically” (default setting). Also, save the router configuration after completion; otherwise, the configuration will be lost after the router is started.
Twin IP Setup: With Twin IP selected, the router can assign its WAN address to a specified PC.

Internet Access Restriction: You can define the maximum number of clients with access to the Internet at the same time. The default value "0" means that there is no limitation. Enter the value "15" if you wish to make sure that at no time more than 15 PCs connect to the Internet.

4.6.3 Link Setup/Info
Click "Basic setup" → "Link Setup/Info."

Picture showing 4 Port Version
Link information, port speed and port statistics are shown on this page.
Link Setup: This section is for changing the link settings.
Port: The router's WAN and LAN ports.
Mode: Automatic mode and manual mode on/off. In Manual mode, you can define the connection speed. Auto is the default and recommended mode.
Speed: When in Manual mode, you can define the port speed here: either 10 Mbps or 100 Mbps.
Apply: Apply current settings.
Link Information: This section displays link status.
Port: The router's WAN and LAN ports.
Link: Port is in use (on) or not connected (off).
Speed: Current port speed: 10 or 100 Mbps.
Duplex: Full or half duplex.
Link Statistics: Detailed traffic statistic for each port.

NOTE: Save the router configuration after completion; otherwise, the figuration will be lost after the router is restarted.
4.6.4 Routing Table (for advanced users only)
Click "Basic setup" → "Routing Table" to set up static routes:

Type: Routing Type NET or Host.
Target: Enter the IP address of the specified network or host you want to access using the static route.
Mask: Enter the subnet mask to be used for the specified network; e.g., 255.255.255.0 => 24.
Gateway: Enter in the gateway IP address for the specified network.
To save the new routing rule, click on the "Add" button. To delete a routing rule, check the selection box behind the entry and click on the "Del" button.

NOTE: Save the router configuration after completion; otherwise, the figuration will be lost after the router is restarted.
4.6.5 Switch Configuration
Click "Basic setup" → "Switch Config."

Port Mirror: Activate to mirror all Internet traffic to the sniffer port (LAN Port 1). Allow Unicast Packets: Activate this option to allow Unicast packets in your VLAN configuration.
PORT 1 – PORT4: Check the ports which should belong to the same VLAN and click "Add." You can create a maximum of 5 VLANs.
NAT Hardware Engine: Uncheck this option to turn the NAT hardware engine off.
4.7 System
4.7.1 Administrator Setup
Click "System" → "Admin Setup."
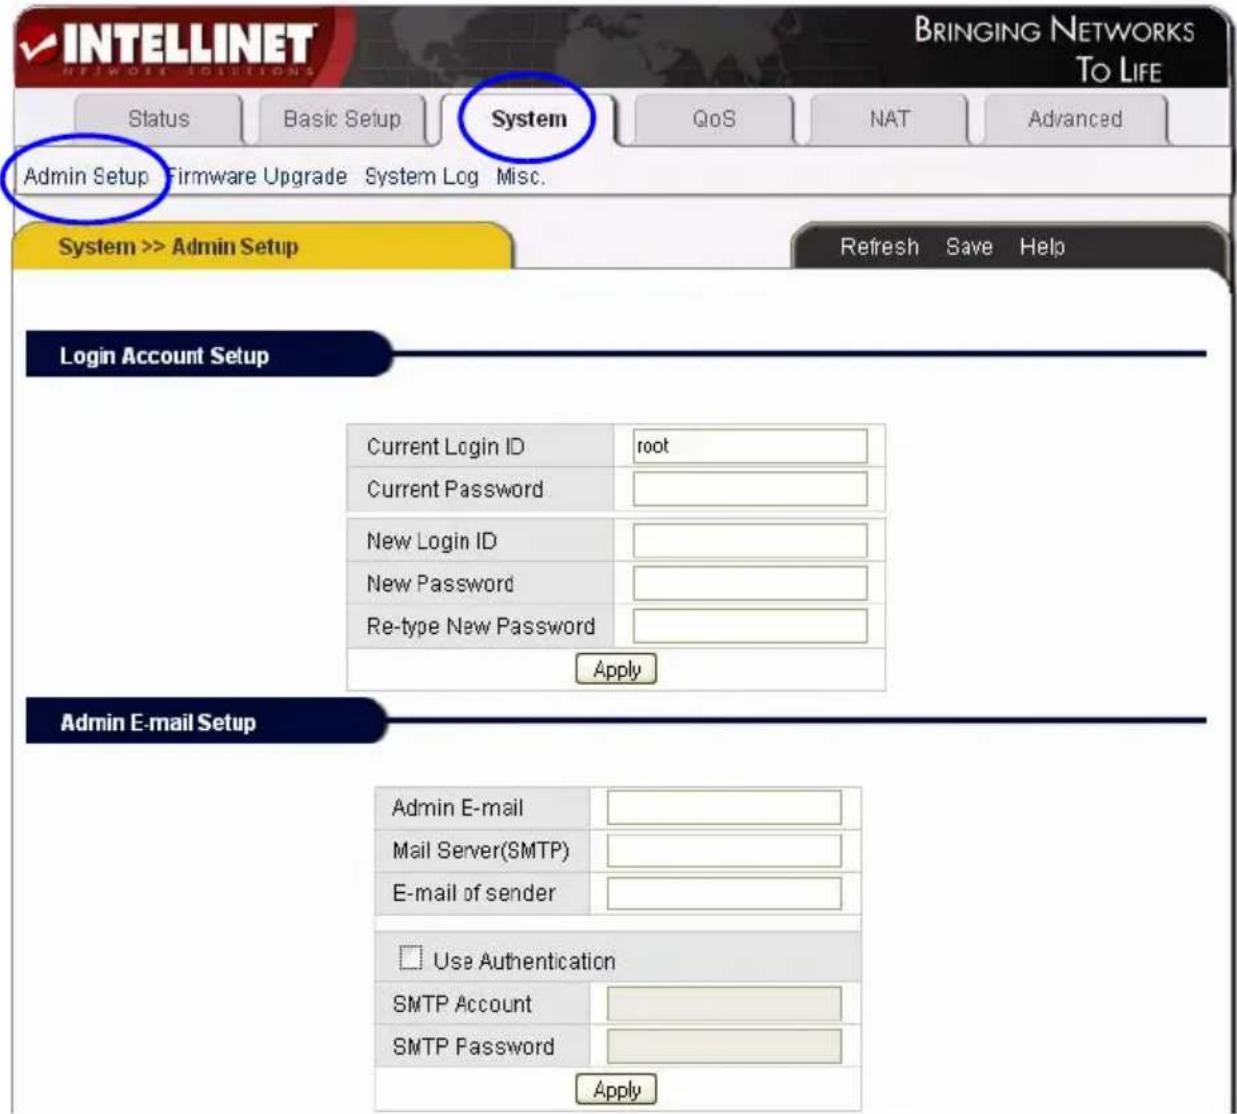
Login Account Setup: Enter your old ID and password and the new values. Click "Apply" to save the changes. The default Login ID is "root"; the default password is blank (no password).
Admin E-Mail Setup: If you want to receive router's the system log via e-mail, configure e-mail address, SMTP server and authentication information here. Click "Apply" to save the changes.

NOTE: It is strongly recommended that you change the administrator name and password during the initial setup. Failing to do so will allow user to access the router's administrator menu and change the configuration.
NOTE: If want to restore the factory default values, turn off the router, press the Reset button on the device, and turn on the router while keeping the Reset button press. About 5 seconds later, the RUN LED will flash rapidly and you can then release the button. Once the startup sequence is complete, all configuration data will be restored the default configuration.
4.7.2 Firmware Upgrade
Click "System" → "Firmware Upgrade."

Firmware updates may be available from time to time for the router. Before contacting technical support, make sure that you have the latest firmware version installed on the router.
Upgrade procedure:
- Download an updated firmware version from www.intellinet-network.com.
- Save the file on your local hard drive.
-
Uncompress the ZIP file.
-
Click on "Browse" and select the new firmware file. Click "Open."

- Click "Upgrade" to start the upgrade process.
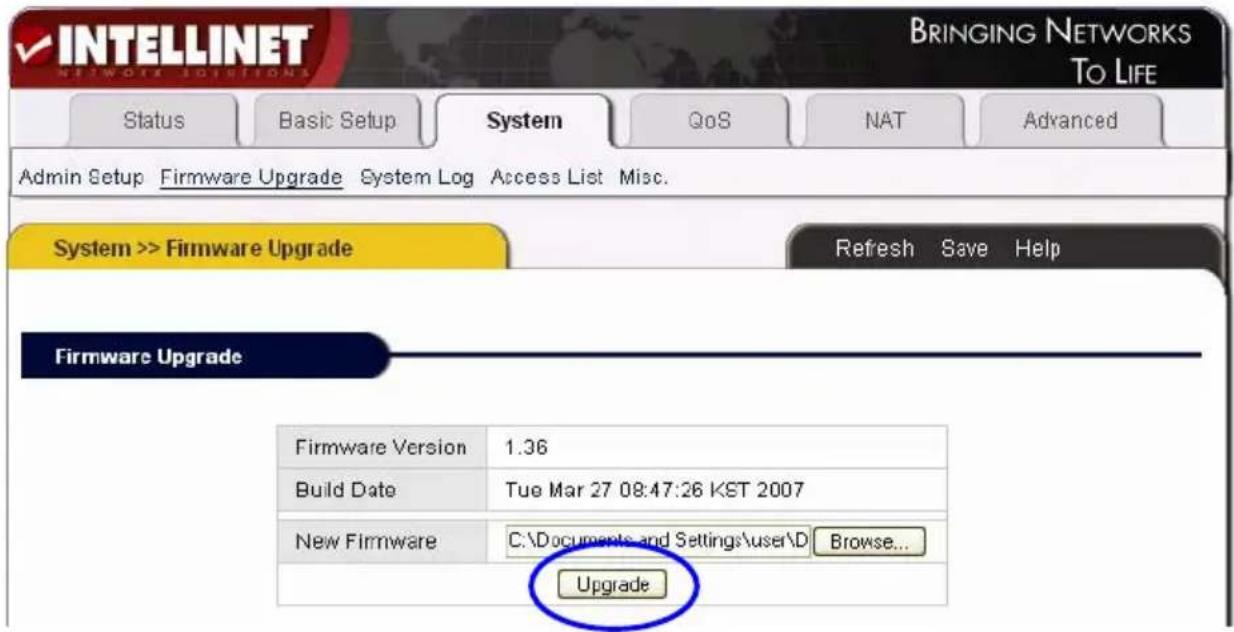
Firmware Upgrade
Upgrade process is completed.
When the system is restarted, configuration page will be opened automatically.
Please, wait a minute .....
The Router will restart automatically after the upgrade process is completed. After the upgrade, verify the firmware version.

NOTE: The upgrade process takes about 60 seconds. During this time, do turn off the power; otherwise, router will be damaged.
4.7.3 System Log
Click "System" → "System log."

System Log Setup
The router keeps track of system events. This screen allows you to activate or deactivate the service. You can also have the system log delivered to your e-mail (the E-Mail Setup in the Admin Configuration must be completed for this to work) and view the real-time system log of the router.
System Log History
View the system log entries in your web browser.
4.7.4 Access List
Click "System" → "Access List."

Access List
With this function you can limit access to the router based on the IP address of the computer. IMPORTANT: When you click "Start" to activate the service, you will see:

It is important to click "OK" here to make sure your computer still has access to the router. Otherwise, you lose connectivity to the router and a hardware reset may need to be performed in order to re-gain access. The option "Do you allow any connection from INTERNET?" can be activated if the Remote Management function is activated. It controls whether or not the client IP address is allowed to access the router's Web-based administration menu.
4.7.5 Miscellaneous Configurations
Click "System" → "Misc."
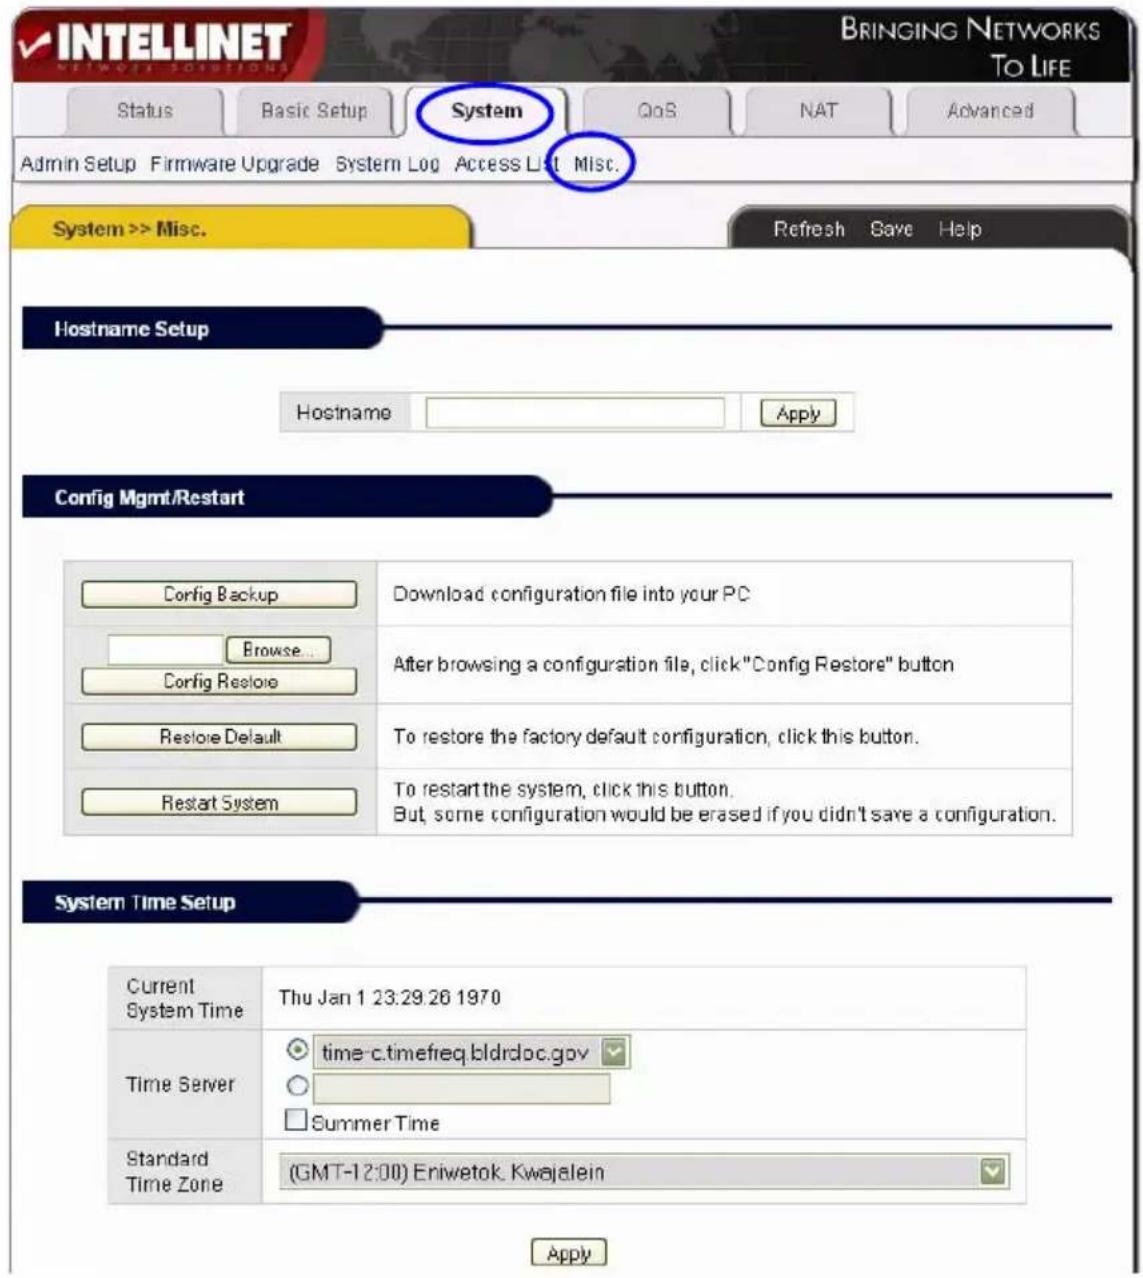
Hostname Setup: Configure the router's device name used in the network.
Config Mgmt/Restart:
Config Backup: Back up the configuration data.
Config Restore: Restore previously saved the configuration data.
Restore Default: Restore the factory default configuration.
Restart System: Reboot the router.
System Time Setup: For the scheduler. Configure an accurate time system.
Refresh the router's current time in the proper time zone, or choose another system server until the time to be refreshed.

UPNP Setup: UPnP allows devices to connect seamlessly and to simplify the implementation of networks in the home (data sharing, communications and entertainment) and corporate environments. UPnP achieves this by defining and publishing UPnP device control protocols built upon open, Internet-based communication standards. The term UPnP is derived from Plug and Play, a technology for dynamically attaching devices to a computer directly. This option is enabled by default, and normally there is no need to disable it.
Auto Connecting Setup-Page: Displays the router's admin menu login page automatically, if the Internet connection is lost for whatever reason.
4.8 QoS
4.8.1 Basic Setup
Click "QoS" → "Basic Setup."

QoS Basic Setup: QoS stands for "Quality of Service." It allows the control of Internet bandwidth based on different criteria such as IP address, port or application. Using QoS, you can limit the amount of bandwidth for a specific user, or you can guarantee a minimum amount of bandwidth for a specific application; for example, HTTP/WEB.
WAN Speed Setup: Define the speed of your Internet connection. You can either choose the type that is right for you from the list, or you can select "User Definition" and specify Download and Upload rate manually (2.5 Mbps should be entered as 2500 kbps). Changing these values will erase all QoS rules currently entered in the configuration.
4.8.2 IP QoS
Click "QoS" → "IP QoS."

Setup by IP Address: You can limit or guarantee bandwidth for a single IP address or an IP address range.
IP Address: IP address or range to which this rule should be applied.
Operation Mode: Either "Max. Limit" or "Min. Guarantee."
Download/Upload Rate: Specify individual values here.

NOTES: Save the router configuration after completion; otherwise, the configuration will be lost after the router is restarted. Also, the use of a static IP for the client PC is recommended (Basic Setup → LAN/DHCP).
4.8.3 Application QoS
Click "QoS" → "Application QoS."

Define the maximum bandwidth available, or the minimum guaranteed bandwidth for pre-defined applications.
Setup Method: Choose the application program; select the operation mode (Max. Limit or Min. Guarantee) and specify the bandwidth throughput value for download and upload. Click "Apply" to save the settings.

NOTE: Save the router configuration after completion; otherwise, the figuration will be lost after the router is restarted.
4.8.4 Ports QoS
Click "QoS" → "Port QoS."

Define the maximum bandwidth available, or the minimum guaranteed bandwidth for TCP or UDP ports and port ranges.
Setup Method: Enter the port or port range, select the protocol type, select the operation mode (Max. Limit or Min. Guarantee) and specify the bandwidth throughput value for download and upload. Click "Apply" to save the settings. If you want to delete current configuration, select the row to be deleted, and click "Del."

NOTE: Save the router configuration after completion; otherwise, the figuration will be lost after the router is restarted.
4.9 NAT
4.9.1 Applications
Click "NAT" → "Applications."

Some programs, such as Internet network games, filesharing programs and Internet phones, need more than one connection. Because of the NAT firewall, some of the programs do not work correctly. The “Applications” function can make those programs work well with the High-Speed Broadband Router.
Setup Method:
- Select the application program from the list.
- Specify the IP address of the computer in your network that runs this application.
- Click "Apply" to activate it.

NOTES: Save the router configuration after completion; otherwise, the figuration will be lost after the router is restarted. Also, the use of a static
lease IP for the client PC is recommended (Basic Setup → LAN/DHCP). The following list shows all applications and the ports they use:
| Application | Port |
| BuddyBuddy | TCP 812, TCP 987 |
| WinAmp Broadcasting | TCP 8000 |
| GuruGuru | TCP 9292TCP 9999 |
| NetMeeting | TCP 1720 |
| WinMX | TCP 6699UDP 6257 |
| Windows XP/2000Remote Desktop | TCP 3389UDP 3389 |
| Soribada2 | UDP22321 |
4.9.2 Internal Server
Click "NAT" → "Internal Server."
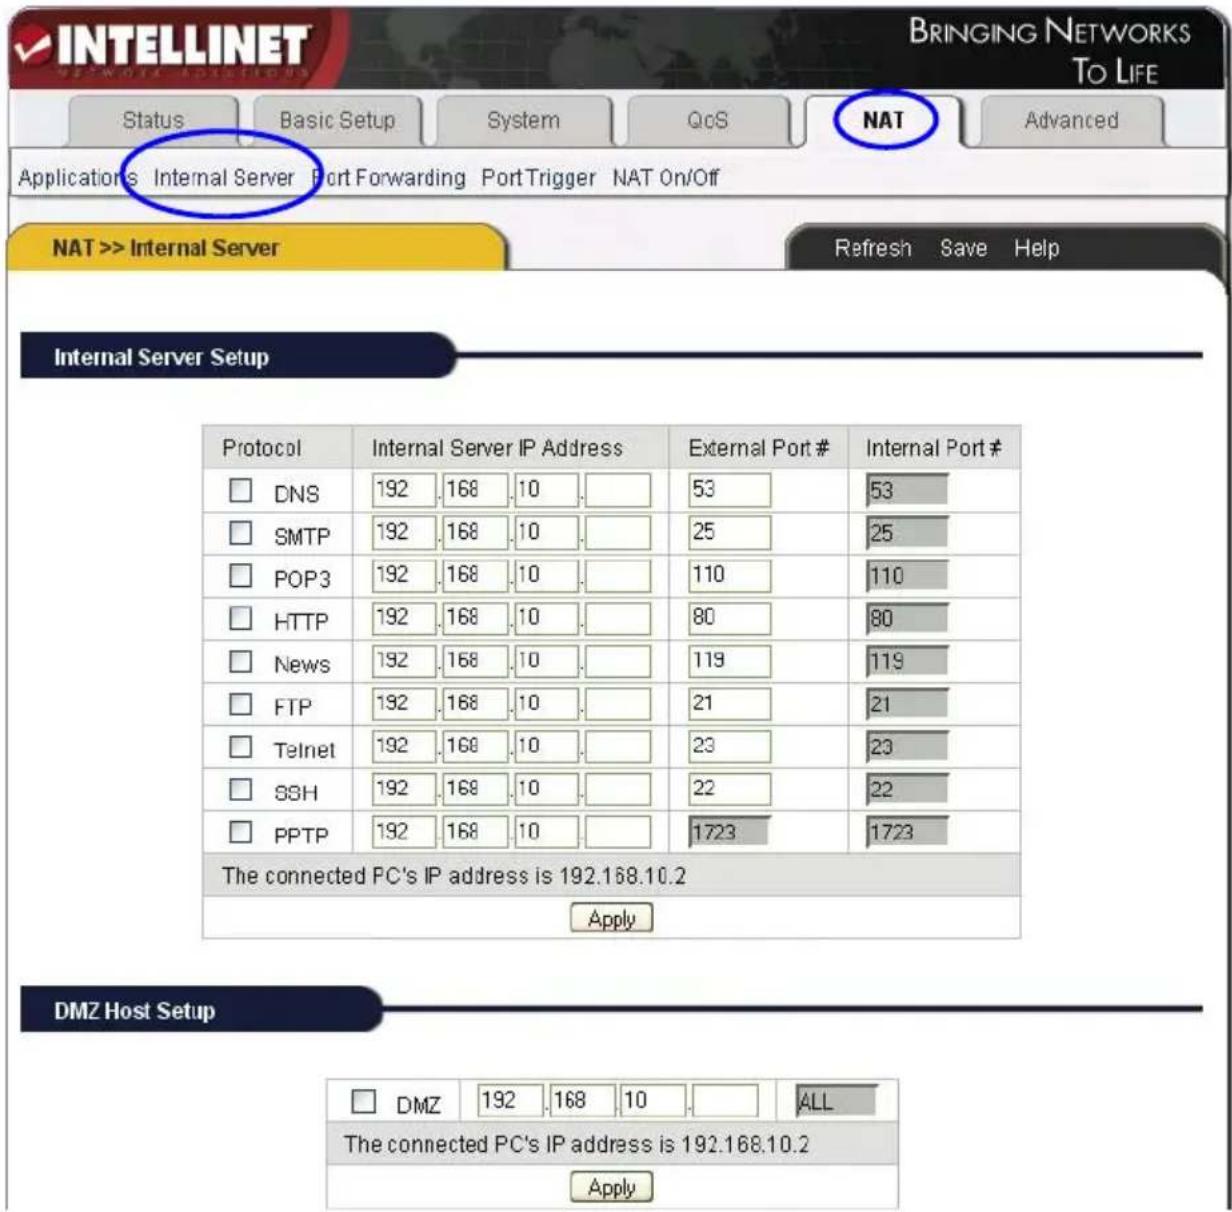
The NAT firewall protects the computers in the local network from unauthorized access from the Internet. Sometimes, however, it is required to allow access to a local computer; e.g., a local FTP server. The router's Internal Server function is designed to let you do that. Each internal server operates on one service port. All service requests to this port will be forwarded to the IP address specified.
Function: After setup, the router can allow some services, such as DNS, SMTP, POP3, HTTP, NEWS, FTP, Telnet, PPTP in LAN, to be accessed from the Internet. Or, by setting up a DMZ server you can have the router redirect all incoming requests to one local computer, bypassing the NAT firewall completely.
Setup Method:
- Select the LAN service from the list below:
| Protocol | Server |
| DNS | DNS (Domain Name Server) |
| SMTP | SMTP(Simple Message Transfer Protocol) |
| POP3 | POP3 (Post Office Protocol) |
| HTTP | Web Server |
| News | News Server |
| FTP | FTP File Transfer Server |
| Telnet | Telnet Server |
| PPTP | VPN (Virtual Private Network) |
- Input the server's local IP address. Click "Apply" to activate the settings.
- If you want to set up "DMZ Host," choose the "DMZ" option, then input the internal server's IP address you want to be opened to the Internet. The router transfers all received data packages except those that have been set up in "Internal Server" to the DMZ Host and allows the unlimited 2-way communication between the DMZ server and the Internet.
It is strongly recommend that a local firewall be enabled on the DMZ host computer, as it is no longer protected by the router's integrated NAT firewall.
Keep in mind: Placing a computer in the DMZ (demilitarized zone) is exposing the computer to potentially harmful attacks from the Internet.

NOTES: Save the router configuration after completion; otherwise, the figuration will be lost after the router is restarted. Also, the use of a static IP for the client PC is recommended (Basic Setup → LAN/DHCP).
4.9.3 Port Forwarding
Click "NAT" → "Port Forwarding."

Port Forwarding functions the same way as Internal Server, but it allows entering ranges of ports instead of single ports only. It also does not limit you to pre-defined services. Instead, you can control the entire TCP/IP port range.
Setup Method:
Rule Name: Enter a name which best describes the function of this rule.
Protocol: Port transfer protocol. There are two choices: TCP and UDP.
External Port Range: Port range that is open to the outside.
Internal PC IP Address: Where the router forwards traffic to the local computer.
Internal Port Range: Internal PC Port Range (in most cases this is identical to the External Port Range).
Example: You wish to run a “Silent Hunter III” server behind the router and want Internet users to be able to access the server remotely. Silent Hunter III requires ports (http://www.portforward.com/english/applications/port_forwarding/SilentHunterIII/SilentHunterIIindex.htm) 17997–18003 for both TCP and UDP to be opened and forwarded. Your local Silent Hunter Server has the IP address 192.168.10.150.
Rule Name: SHIII TCP
Protocol: TCP
External Port Range: 17997–18003
Internal PC IP Address: 192.168.10.150
Internal Port Range: 17997–18003
Click "Add." Repeat the same steps, but this time with UDP (as Silent Hunter requires both TCP and UDP). After completion, you should have two new rules:
| DP | Rule Name | Proto | External Port Range | Internal PC IP | Internal Port Range | Del |
| SHIII TCP | tcp | 17997~18003 | 192.168.10.150 | 17997~18003 | ||
| SHIII UDP | udp | 17997~18003 | 192.168.10.150 | 17997~18003 |

NOTES: Save the router configuration after completion; otherwise, the figuration will be lost after the router is restarted. Also, the use of a static IP for the client PC is recommended (Basic Setup → LAN/DHCP).
4.9.4 Port Trigger
Click "NAT" → "Port Trigger."

Some applications require a special port trigger setup. Simple port forwarding does not work.
Port Trigger Setup Method: Key in the rule name, define the protocol and range of the trigger port, then set up the protocol and range of the forward port. Click "Add" to add the rule.
Rule Name: The description of adding the trigger port.
Port Trigger: Set up the trigger port.
Protocol: Select the trigger port's protocol (TCP/UDP).
Port Range: Trigger port's range.
Port Forward: Set up the forward port.
Protocol: Select the forward port's protocol (TCP/UDP).
Port Range: Forward port's range.
4.9.5 NAT On/Off
Click "NAT" → "NAT On/Off."
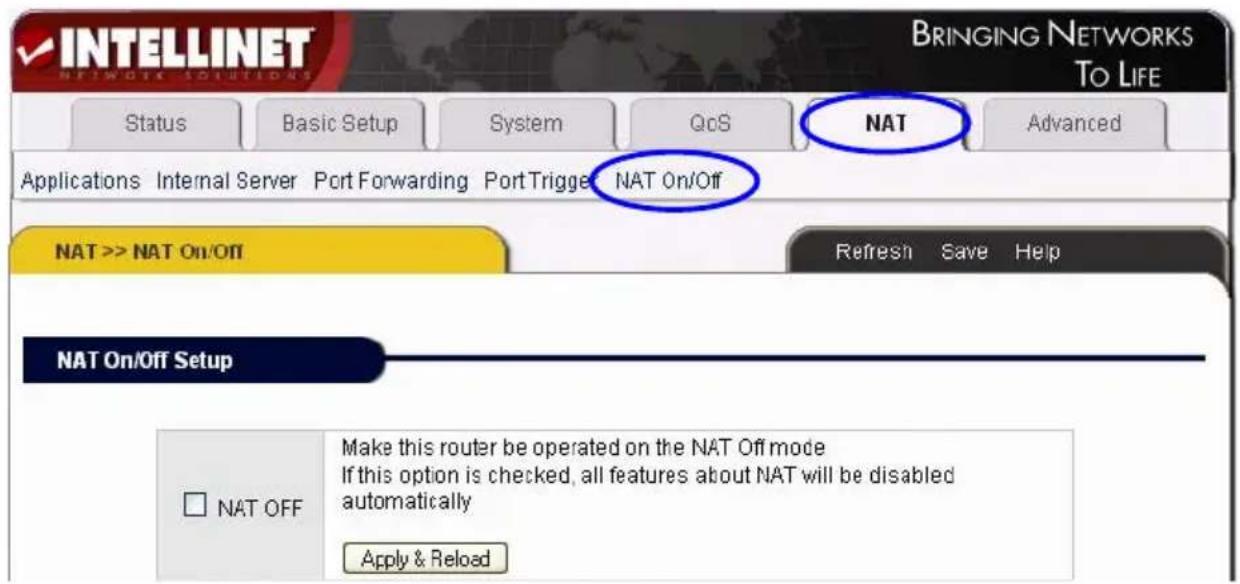
Use this function to completely disable the NAT function of the router.
4.10 Advanced Setup
4.10.1 Firewall
Click "Advanced" → "Firewall."

The router's firewall consists of two main functions.
- Blocking DoS: This function helps to prevent so-called denial-of-service attacks.
- Connection Filtering: Set of rules to accept or deny data traffic.
Blocking DoS:
SYN Flooding, Smurf, IP source routing, IP Spoofing: These are common attack types. These options should be enabled.
Blocking ICMP (ping) from Internet: A successful ping command is typically how
a hacking attempt starts, because the attacker first needs to know if a target is available or not. With this option activated, the router won't respond to any ping commands sent from the Internet.
Blocking ICMP (ping) from LAN to Internet: With this option activated, the router will not transport any outgoing ping command sent by a local station. It is for the protection against shock-wave attacks.
Connection Filtering Setup Method: Enter the parameters of connection filter. Click "Add" to apply the filter. If you want to delete a rule, then select the rule and click "Del."
Direction: Set up the orientation of the connection filter. There are two options: "WAN" → "LAN" and "LAN" → "WAN."
Source IP Address: IP address of the computer that sends the data.
Net Mask: Subnet mask of the computer that sends the data. For example, a network mask of 255.255.255.0 would be 24.
Destination IP Address: IP address of the computer that receives the data.
Protocol: There are four options: Any, TCP, UDP and ICMP. Any refers to all protocols.
Destination Port: Protocol port of destination computer (not available if protocol option Any is chosen.
Accept/Drop: Set up "Connection Filtering" to accept or drop data package.

NOTES: Save the router configuration after completion; otherwise, the configuration will be lost after the router is restarted. Also, the use of a static IP for the client PC is recommended (Basic Setup → LAN/DHCP).
4.10.2 DDNS
Click "Advanced" → "DDNS" as follows:

Dynamic DNS (DDNS) is a system that allows the domain name data held in a name server updated in real time. The most common use for this is in allowing an Internet domain name to be assigned to a computer (or router) with a dynamic IP address. This makes it possible for other on the Internet to establish connections to the machine without needing to track the IP address themselves. A common use is for running server software on a computer that has a dynamic IP address, as is the case with many consumer Internet service providers. The free DDNS provides DYNDNS.ORG is recommended. Before you can use the DDNS feature, you need to set up account with DYNDNS.ORG and create a domain name; e.g., myrouter.dyndns.org.
Host Name: Enter the domain/host name you have registered with DYNDNS.ORG. This must be the full domain name; e.g., mydomain.dyndns.org, and not mydomain.
DDNS Service Provider: Select "DynDns.org."
User ID: Enter the DYNDNS username.
Password: Enter the DYNDNS password.
Click "Add" to create the account.
Remember to first create an account and host name at http://www.dyndns.org. Once activated, the router will update the IP address automatically every time your ISP assigns a new address to you. That way, your DDNS domain name always points to your current public IP address.
4.10.3 WOL (Wake-on LAN)
Click "Advanced" → "WOL."

This function allows sending a wake-up signal to a connected computer in the LAN. Wake-on-LAN-capable computer systems reserve a minimum amount of power for the network adapter when turned off. The network card listens for a specific packet, called the Magic Packet. The router sends such a Magic Packet to a specific computer.
Setup Method:
- Enter the computer's name and the LAN card's MAC address. Then click "Add" to add new rule. You can search for the MAC addresses of all connected computers using the "Search MAC address" button.
- Clicking on the "Wake-up PC" button sends the Magic Packet to the computer, which causes the computer to start up.
- If you want to delete a rule, select the rule and click "Del."
NOTE: This function only works with WOL-enabled computers.
4.10.4 URL Filter
Click "Advanced" → "URL Filter."
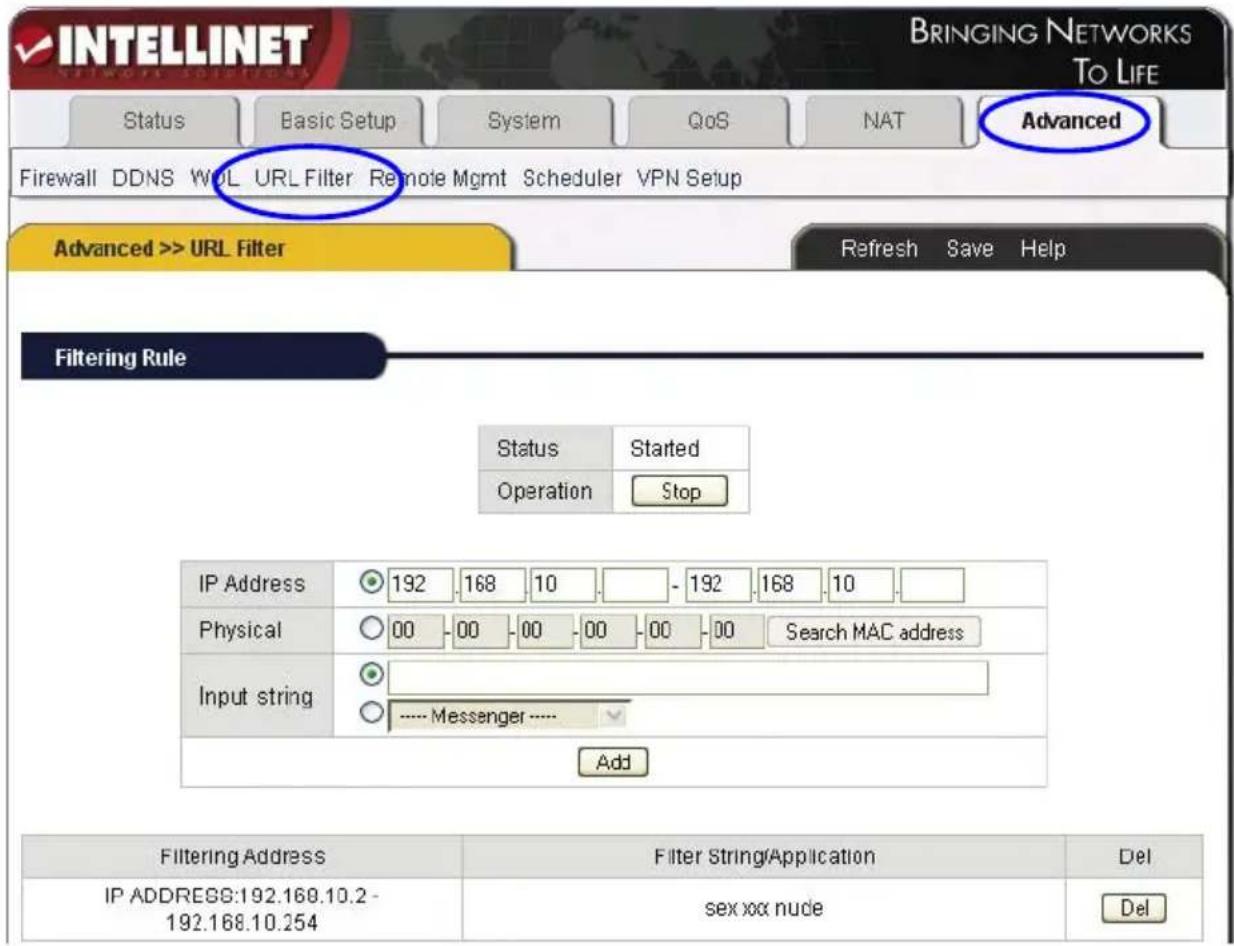
Control the content your LAN users access on the Internet through keywords that can be applied to all users, single IP addresses or single MAC addresses. If you want the filter to apply to all local IP addresses, you should enter the IP address range as defined by the DHCP server (default: 192.168.10.2 – 192.168.10.254). The input string holds the keywords to be blocked. Multiple keywords are entered with a space (e.g., keyword1 keyword2 keyword3). Alternatively, you can select an application from the drop-down list (e.g., eMule) to prevent local users from using those programs.
Setup Method:
Status: Current status of the URL filter: "Started" or "Stopped."
Operation: Click "Start" or "Stop" to activate or deactivate the URL filter.
IP Address: Enter a single IP address or an IP address range for which this filter should be applied.
Physical: Enter the MAC address of the client computer for which this filter should be applied. Using the MAC address as opposed to the IP address always makes sure that the filter is applied to the same computer, regardless of its IP address.
Input String: Enter the keywords that should be filtered.
- Input "http://www.xxx.com" to limit users to access http://www.xxx.com.
- Input Web sites' keywords, such as "sex xxx" (note the blank space) to forbid users to access www.sex.com and www.xxx.com.
- Or, select an application from the drop-down list to prevent usage.

NOTES: Save the router configuration after completion; otherwise, the figuration will be lost after the router is restarted. Also, the use of a static IP for the client PC is recommended (Basic Setup → LAN/DHCP).
4.10.5 Remote Management
Click "Advanced" → "Remote Mgmt."

This page is to set up the router's remote management. Remote Management allows configuration of the router from the Internet. By default, this function is turned off. On this page you can start or stop the remote management service and define the management port (default = 80). In order to access the remote management from the Internet, the user has to enter the following address in the Web browser: "http://public_ip_of_router:remote_management_port."
Example: http://123.456.789:8081 (remote management port set to 8081).
NOTE: Remote Management should be kept turned off, unless you are certain
you are going to need the functionality. Remote Management should never be enabled if the default administrator password has not been changed.
4.10.6 Scheduler
Click "Advanced" → "Scheduler" as follows:
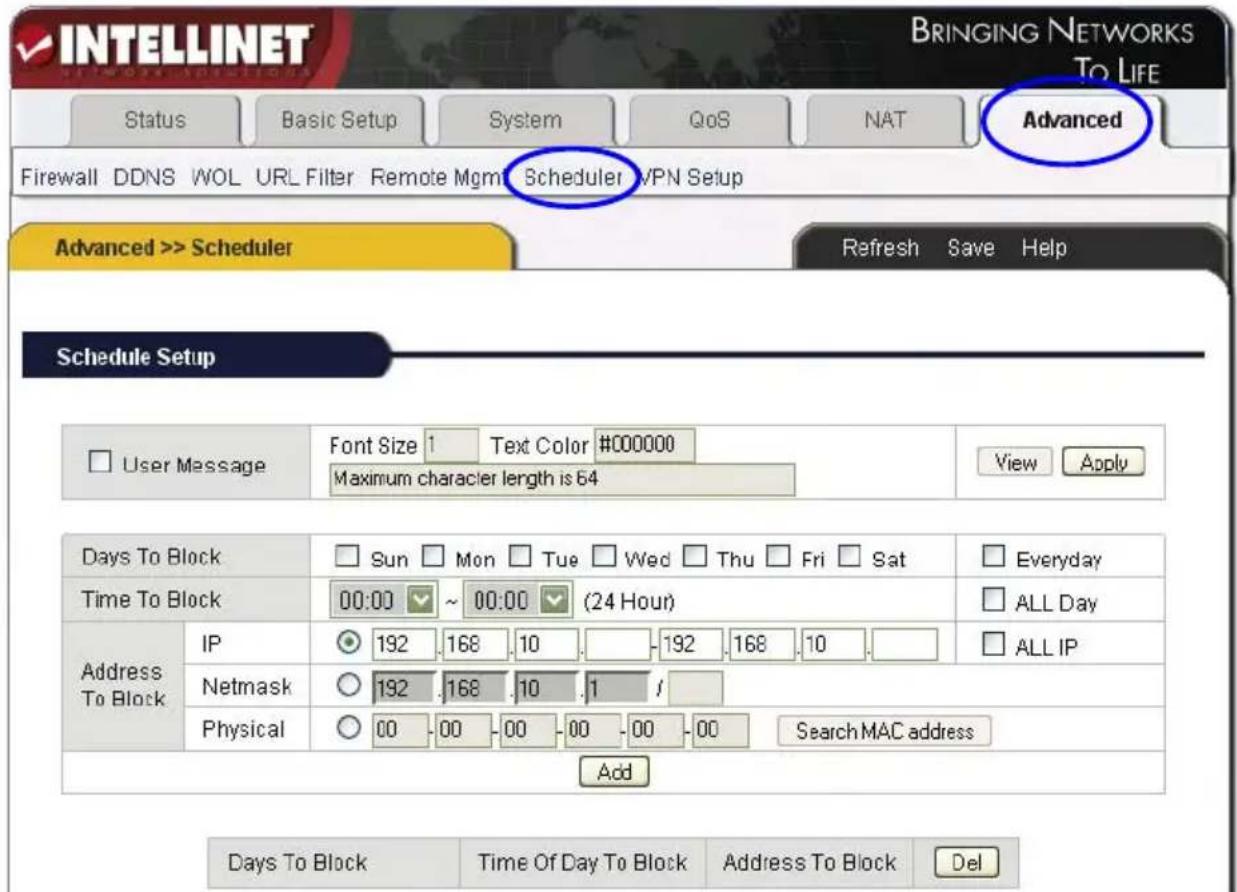
Using this function, you can disable Internet access for a specific computer or range of computers based on the time and day of week.
Setup Method:
- Specify the days on which the access should be limited. Or you can select "Everyday" if you wish the restriction to occur every day during the week.
- Specify the time window access should be restricted or select "ALL Day."
- Input the IP address, IP address range or MAC address of the computers you want to keep from accessing the Internet. Or select "ALL IP."
- Click "Add."
- If you want to delete a rule, select the rule and click "Del."
4.10.7 VPN Setup
Click "Advanced" → "VPN Setup."

The device allows five users to establish a VPN tunnel (PPTP) to the router. A VPN tunnel is a secure and encrypted connection between the client and the server. The router supports the PPTP (Point-to-Point Tunneling Protocol) implementation of VPN with optional Microsoft Point-to-Point Encryption (MPPE). You can set up five different users with different passwords. Each user gets its own IP address. The connection state of each user is shown on this page, as well.
Setup Method:
- Start the VPN Service: Select "Operation" → "Start" and click "Apply." The router performs a restart, after which the VPN server is active.
- Create VPN Users: Enter a VPN username and password. Assign an IP address to the username (e.g., 192.168.1 0.200). Click "Add." Repeat for additional users.
- Delete VPN Users: Select the user in the table shown under VPN (PPTP) Account and click "Del."

NOTE: Save the router configuration after completion; otherwise, the figuration will be lost after the router is restarted.
5. SPECIFICATIONS
Standards
• IEEE 802.3 (10Base-T Ethernet)
- IEEE 802.3u (100Base-TX Fast Ethernet)
General
• LAN ports:
- Model 523608: 4 RJ-45 10/100 Mbps data ports
- Model 523615: 8 RJ-45 10/100 Mbps data ports
• LAN ports with Auto MDI/MDI-X
• LAN to WAN throughput: 94 Mbps
- Flash: 2 MB
• Memory: 16 MB SDRAM
• Certifications: FCC Class B, CE Mark, RoHS
Router
- Chipset: KS8695PX (ARM9 CPU)
- Supported WAN connection types:
- Dynamic IP (DHCP for cable service)
- Static IP
- PPPoE (for DSL)
- Protocols:
- CSMA/CA
- CSMA/CD
- TCP/IP
- UDP
- ICMP
- PPPoE
- NTP
- NAT (network address translation)
- DHCP
- DNS
• NAT:
- Virtual server
- Port forwarding
- Special applications (port trigger)
- DMZ (demilitarized zone)
- Firewall:
- Access control based on MAC address
- Domain blocking
- URL filter
• Supports UPNP (Universal Plug and Play)
• Supports DHCP (client/server)
• Supports PPPoE (DSL), DHCP (cable) and static IP
• Supports VPN PPTP pass-through
• Certifications: FCC Class B, CE Mark, RoHS
LEDs
- Power
• OP (operational status) - Power Line Link/Act
- WAN Link/Act
• LAN 1-4/8 Link/Act
Environmental
- Dimensions: 164 (W) x 108 (L) x 30 (H) mm (6.5 x 4.3 x 1.2 in.)
• Weight: 1.0 kg (2.2 lbs.) - Operating temperature: 0 - 55°C (32 - 122°F)
- Operating humidity: 10 – 95% RH, non-condensing
- Storage temperature: 0 - 60°C (0 - 149°F)
Power
- External power adapter: 5 V DC, 1.0 A
Package Contents
• High Speed Broadband Router
- User manual
- Power cord
- Ethernet Cat5 RJ-45 cable, 1.5 m (5 ft.)

INTELLINET™
NETWORK SOLUTIONS
BRINGING NETWORKS TO LIFE
www.intellinet-network.com
Are you completely satisfied with this product?
Please contact your INTELLINET NETWORK SOLUTIONS™ dealer with comments or questions.
Copyright © INTELLINET NETWORK SOLUTIONS
All products mentioned are trademarks or registered trademarks of their respective owners.

- INTELLINET
- TABLE OF CONTENTS
- SECTION 1: INTRODUCTION.... 3
- SECTION 2: INSTALLATION 4
- SECTION 3: LOCAL COMPUTER SETUP 6
- SECTION 4: ROUTER SETUP ....15
- 4.6 BASIC SETUP 26
- 4.7 SYSTEM....32
- 4.8 QOS....38
- 4.9 NAT....43
- INTRODUCTION
- 1.1 WARNINGS
- 1.2 PACKAGE CONTENTS
- 1.3 FEATURES
- INSTALLATION
- 2.1 BEFORE INSTALLATION
- 2.2 INSTALLATION
- 2.3 INDICATORS AND CONNECTIONS
- 2.3.1 MODEL 523608, 4-PORT
- LED INDICATION
- PORT/JACK INDICATION
- 2.3.2 MODEL 523615, 8-PORT
- 3.1 WINDOWS 2000 SETUP
- 3.2 WINDOWS XP SETUP
- ROUTER SETUP
- 4.1 START INTERNET EXPLORER TO LOG IN
- 4.2 PPPOE CONFIGURATION
- OTHER CONFIGURATION OPTIONS OF THE PPPOE WAN SETUP SCREEN
- 4.3 DYNAMIC IP (CABLE MODEM) CONFIGURATION
- OTHER CONFIGURATION OPTIONS
- 4.4 STATIC IP CONFIGURATION
- 4.5 STATUS
- 4.5.1 WAN STATUS
- 4.5.3 LAN STATUS
- 4.6 BASIC SETUP
- 4.6.1 WAN SETUP
- 4.6.2 LAN SETUP
- 4.6.3 LINK SETUP/INFO
- 4.6.4 ROUTING TABLE (FOR ADVANCED USERS ONLY)
- 4.6.5 SWITCH CONFIGURATION
- 4.7 SYSTEM
- 4.7.1 ADMINISTRATOR SETUP
- 4.7.2 FIRMWARE UPGRADE
- UPGRADE PROCEDURE
- FIRMWARE UPGRADE
- 4.7.3 SYSTEM LOG
- SYSTEM LOG SETUP
- SYSTEM LOG HISTORY
- 4.7.4 ACCESS LIST
- ACCESS LIST
- 4.7.5 MISCELLANEOUS CONFIGURATIONS
- CONFIG MGMT/RESTART
- 4.8 QOS
- 4.8.1 BASIC SETUP
- 4.8.2 IP QOS
- 4.8.3 APPLICATION QOS
- 4.8.4 PORTS QOS
- 4.9 NAT
- 4.9.1 APPLICATIONS
- SETUP METHOD
- 4.9.2 INTERNAL SERVER
- 4.9.3 PORT FORWARDING
- 4.9.4 PORT TRIGGER
- 4.9.5 NAT ON/OFF
- 4.10 ADVANCED SETUP
- 4.10.1 FIREWALL
- BLOCKING DOS
- 4.10.2 DDNS
- 4.10.3 WOL (WAKE-ON LAN)
- 4.10.4 URL FILTER
- 4.10.5 REMOTE MANAGEMENT
- 4.10.6 SCHEDULER
- 4.10.7 VPN SETUP
- SPECIFICATIONS
- STANDARDS
- GENERAL
- ROUTER
- LEDS
- ENVIRONMENTAL
- POWER
- PACKAGE CONTENTS
- INTELLINET™
Brand : Intellinet
Model : High Speed Broadband Router 523608
Category : Router