VX0LE ThinOS - Software Wyse - Free user manual and instructions
Find the device manual for free VX0LE ThinOS Wyse in PDF.

| Product Type | Thin Client Operating System |
| Brand | Wyse (Dell) |
| Model | VX0LE ThinOS |
| Category | Software |
| Version | ThinOS (specific version may vary) |
| Platform | x86-based Wyse thin clients |
| License | Proprietary, per-device |
| Key Features | Secure, centralized management, zero footprint, support for Citrix, VMware, RDP |
| Management | Wyse Management Suite, WDM, or cloud |
| Security | Write filter, TPM support, secure boot, lockdown mode |
| Display Support | Up to 4K via DisplayPort/HDMI (depends on hardware) |
| Peripherals | USB, audio, serial, parallel (depends on hardware) |
| Networking | Ethernet, Wi-Fi (optional), Bluetooth (optional) |
| Update Mechanism | Automatic via Wyse servers or local file |
| Languages | Multiple languages supported |
| Manual Pages | 20 (PDF) |
| Warranty | Varies; software updates may require subscription |
Frequently Asked Questions - VX0LE ThinOS Wyse
User questions about VX0LE ThinOS Wyse
0 question about this device. Answer the ones you know or ask your own.
Ask a new question about this device
Download the instructions for your Software in PDF format for free! Find your manual VX0LE ThinOS - Wyse and take your electronic device back in hand. On this page are published all the documents necessary for the use of your device. VX0LE ThinOS by Wyse.
USER MANUAL VX0LE ThinOS Wyse
© 2011, Wyse Technology Inc. All rights reserved.
This manual and the software and firmware described in it are copyrighted. You may not reproduce, transmit, transcribe, store in a retrieval system, or translate into any language or computer language, in any form or by any means, electronic, mechanical, magnetic, optical, chemical, manual or otherwise, any part of this publication without express written permission.
End User License Agreement ("License")
A copy of the Wyse Technology End User License Agreement is included in the software and provided for your reference only. The License at http://www.wyse.com/license as of the purchase date is the controlling licensing agreement. By copying, using, or installing the software or the product, you agree to be bound by those terms.
Trademarks
The Wyse logo and Wyse are trademarks of Wyse Technology Inc. Other product names mentioned herein are for identification purposes only and may be trademarks and/or registered trademarks of their respective companies. Specifications subject to change without notice.
Restricted Rights Legend
You acknowledge that the Software is of U.S. origin. You agree to comply with all applicable international and national laws that apply to the Software, including the U.S. Export Administration Regulations, as well as end-user, end-use and country destination restrictions issued by U.S. and other governments. For additional information on exporting the Software, see http://www.microsoft.com/exporting.
Ordering Information
For availability, pricing, and ordering information in the United States and Canada, call 1-800-GET-WYSE (1-800-438-9973) or visit us at http://www.wyse.com. In all other countries, contact your sales representative.
Contents
1 Introduction 1
Kit Contents 1
Wyse Technical Support 2
Related Documentation and Services 2
Wyse Online Community 2
2 Converting Wyse VX0LE to ThinOS 3
Procedures: Using Wyse Simple Imager 3
Procedures: Using Wyse Device Manager 7
A Installing Wyse Simple Imager 2.0.2 9
Pre-Installation Checklist 9
Procedures 10
B Troubleshooting 13
iv Contents
This page intentionally blank.
1 Introduction
This guide provides the instructions you need to use Wyse® Simple Imager™ or Wyse Device Manager™ to convert the following Wyse VX0LE cloud clients to ThinOS:
• V30LE (part numbers include: 902134, 902142, 902179, and 902180)
• V50LE (part numbers include: 902135, 902143, 902181, and 902182)
• V90LE (part numbers include: 902136, 902144, 902183, and 902184)
• V90LEW (part number: 902188)
Kit Contents
The conversion kit includes:
- 1 Year ThinOS Maintenance (you will receive an email from Wyse or your reseller with full instructions)
- Conversion Software Assembly DVD-ROM
- Wyse Conversion Labels (you must attach a Wyse label to each converted cloud client)
Figure 1 Kit contents
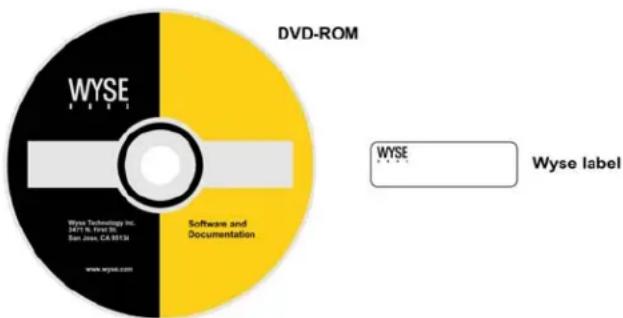
text_image
DVD-ROM WYSE WYSE Technology Inc. H411 B. Fire 50 San Jose, CA 95134 www.wyse.com Software and Documentation WYSE Wyse labelThe Conversion Software Assembly DVD-ROM contains:
• A PDF of this Reference Guide
- Wyse Simple Imager Release 2.0.2
- VX0LE 128MB ThinOS Conversion Images folder containing the following:
- WSI VX0LE 128MB ThinOS Conversion folder containing: 1V12 folder 1V12.i2d file
- WDM VX0LE 128MB ThinOS Conversion folder containing: ConvertVX0toV10 folder ConvertVX0toV10.rsp file
Wyse Technical Support
To access Wyse technical resources, visit http://www.wyse.com/support. If you still have questions, you can submit your questions using the Wyse Self-Service Center at http://support.wyse.com/selfservice.html or call Customer Support at 1-800-800-WYSE (toll free in U.S. and Canada). Hours of operation are from 6:00 A.M. to 5:00 P.M. Pacific Time, Monday through Friday.
To access international support, visit http://www.wyse.com/global.
Related Documentation and Services
Fact Sheets containing the features of hardware products are available on the Wyse Web site. Go to http://www.wyse.com/products/hardware, click the link for your hardware product, and then click the link for the Fact Sheet.
Administrator and other documentation for your cloud client model are available at: http://www.wyse.com/manuals.
Wyse Online Community
Wyse maintains an online community where users of our products can seek and exchange information on user forums. Visit the Wyse Online Community forums at: http://community.wyse.com/forum.
2 Converting Wyse VX0LE to ThinOS
This chapter provides the step-by-step instructions you need to convert supported Wyse VX0LE cloud clients to ThinOS.
Depending on the Wyse product you want to use, complete one of the following:
- "Procedures: Using Wyse Simple Imager"
- "Procedures: Using Wyse Device Manager"
Procedures: Using Wyse Simple Imager
Step 1: Install Wyse Simple Imager 2.0.2
Install Wyse Simple Imager 2.0.2 (contained on the Conversion Software Assembly DVD-ROM) using the instructions in "Installing Wyse Simple Imager 2.0.2."
Step 2: Copy the 1V12 Folder and 1V12.i2d File (on the DVD-ROM) to Correct Locations
- Open the VX0LE 128MB ThinOS Conversion Images folder on the Conversion Software Assembly DVD-ROM.
- Open the WSI VX0LE 128MB ThinOS Conversion folder (contained in the VX0LE 128MB ThinOS Conversion Images folder).
- Copy the 1V12 folder (contained in the WSI VX0LE 128MB ThinOS Conversion folder) to C:\Inetpub\ftproot\Rapport\Tools\sa (this is a folder created by WSI during installation when using the default installation settings; see "Step 3: Install Wyse Simple Imager"). Note that this 1V12 folder will overwrite the existing 1V12 folder created during the installation.
- Copy the 1V12.i2d file (contained in the WSI VX0LE 128MB ThinOS Conversion folder) to any folder on the machine to which you installed WSI (be sure the folder is accessible by WSI).
Step 3: Use Wyse Simple Imager to Convert Each Cloud Client
Use the following guidelines on each cloud client you want to convert:
- Connect the cloud client (to be imaged) to the router with DHCP running that is attached to the machine on which Wyse Simple Imager is installed. Be sure the cloud client is shut down.

Caution
Ensure all software firewalls and antivirus services are stopped.
- Launch the Wyse Simple Imager console (double-click the Wyse Simple Imager icon).
Figure 2 Wyse Simple Imager console

text_image
Wyse Simple Imager Select Product S10 S11 S12 S30 S32 S50 S52 S90 S92 V12 V30 V32 V50 V52 V50 Select Firmware Add Delete About Show Logs Delete Logs Close- Select V12 in the Select Product list, and then click Add to open the Add Image dialog box.
Figure 3 Add Image dialog box
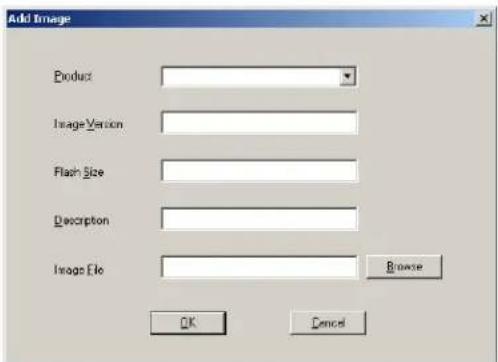
text_image
Add Image Product Image Version Flash Size Description Image File Browse OK Cancel- Use the following guidelines:
• Product - V12 is automatically entered (leave this value).
- Image Version - Enter Conversion for Image Version. This refers to the new Firmware version.
- Flash Size - This is the amount of flash memory installed in your cloud client. Flash Size can be 128, 256, 512, 1024, 2048.
NOTE: To determine the flash size of your cloud client (location of the flash size is as follows):
V30LE: Start > Control Panel > System > System Info tab
V50LE: Start > Control Panel > System > System Information > Identity tab
V90LE and V90LEW: Start > Control Panel > System > Client Information > General tab

Tip
See your cloud client documentation for help on viewing the flash size.
- Description - Enter what you want for your information. This information will help you identify the characteristics of the device for which you are using this image. IMPORTANT: Be sure to use only Alphanumeric characters (A through Z and 0 through 9), underscore (_), or spaces.
- Image File - Click Browse, navigate to the folder on your hard drive that contains the 1V12.i2d file (this is the location you selected in "Step 2: Copy the 1V12 Folder and 1V12.i2d File (on the DVD-ROM) to Correct Locations"), click on the 1V12.i2d
file to select it (you may need to select the All Files option from the Files of Type box to display the 1V12.i2d file for selection), and then click Open.

Caution
Do not use the 1V12.i2d file directly from the Conversion Software Assembly DVD-ROM.
Figure 4 Browse to select 1V12.i2d file
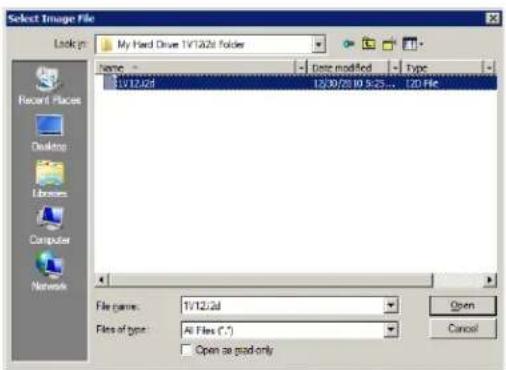
text_image
Select Image File Look in: My Hard Drive 1V12.2d Folder Name: Date modified Type 1/12.2d 12/30/28/10 5:25... 120 File Recent Places Desktop Libraries Computer Network File name: 1/12.2d File of type: All Files (*.) Open as pad-only Cancel- After you have completed configuring the Add Image dialog box, click OK. After the image file has been successfully added, the success message appears.
Figure 5 Image successfully added

-
Click OK. The firmware image now appears in the Wyse Simple Imager console and is ready to be submitted.
-
Select the firmware you added in the Select Firmware list and click Submit. After the image file has been successfully submitted, the Please start/restart the client to start imaging message appears.

Caution
Do not close the console until after the cloud client is successfully imaged with the new firmware.
Figure 6 Start/Restart the client to start imaging
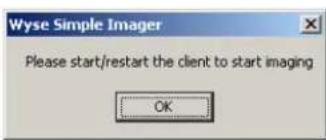
text_image
Wyse Simple Imager Please start/restart the client to start imaging OK-
Click OK.
-
After the Log window appears, start the cloud client. After the imaging process is complete, the Log window will display the log messages and the final status. If the imaging was successful, a Success message will be displayed. If it failed, it will display an error message (see "Troubleshooting").
Step 4: Attach a Wyse Conversion Label on Each Converted Cloud Client
The conversion kit is supplied with Wyse Conversion Labels that must be attached to each cloud client as shown in Figure 7. Be sure you have purchased the amount of labels you need.

Caution
Failure to install the label may cause delays in service and support. The serial number must be given to a Customer Support Technician to validate entitlement to support and service from Wyse. Failure to do so will result in the original operating system being loaded on the device and is in breach of your license agreement.
Figure 7 Placement of Wyse Conversion Label

text_image
WYSE WYSE MODEL ID: 100000000000000000000000000000000000000000000000000000000000000000000000000000000000000000000000Step 5: Obtain a Firmware Update
After converting your cloud clients, you must use your 1 Year ThinOS Maintenance (you should have received an email from Wyse or your reseller with full instructions) to obtain any available firmware update (if you did not receive this email, contact your reseller).

Tip
If you are unfamiliar with updating firmware on your Wyse ThinOS cloud client, refer to Wyse Knowledge Base Solution #10566 (go to the Wyse Knowledge Base at http://www.wyse.com/kb and search for 10566).

Warning
Wyse Cloud Client Software Maintenance is required to be eligible to receive new versions of cloud client software and subsequent releases of corresponding documentation and tools. Wyse announces new versions of software through the WyseView newsletter. To receive notification of available software updates, customers must subscribe to the free WyseView newsletter at http://www.wyse.com/wyseview. Use of the Software on more than one device requires that you first purchase from Wyse additional copies of, or licenses to, the Software. Contact your local Wyse distributor or Wyse Inside Sales at 1-800-800-9973 option 1 or 1-408-473-1200 option 1.
Procedures: Using Wyse Device Manager
Step 1: Access the DVD-ROM from the Correct WDM Server
Access the Conversion Software Assembly DVD-ROM from the machine to which you installed the WDM Administrator Console (MMC Snap-in).
Step 2: Copy the WDM VX0LE 128MB ThinOS Conversion Folder (on the DVD-ROM) to C:\WDM_Packages
- Open the VX0LE 128MB ThinOS Conversion Images folder on the Conversion Software Assembly DVD-ROM.
- Copy the WDM VX0LE 128MB ThinOS Conversion folder (contained in the VX0LE 128MB ThinOS Conversion Images folder) to C:\WDM_Packages.
Step 3: Register and Deploy the WDM Package
Use WDM to register and deploy the WDM package as you normally would. For more information on registering a package from a script file (.rsp), see Administrators Guide: Wyse Device Manager ^TM .
Step 4: Attach a Wyse Conversion Label on Each Converted Cloud Client
The conversion kit is supplied with Wyse Conversion Labels that must be attached to each cloud client as shown in Figure 8. Be sure you have purchased the amount of labels you need.

Caution
Failure to install the label may cause delays in service and support. The serial number must be given to a Customer Support Technician to validate entitlement to support and service from Wyse. Failure to do so will result in the original operating system being loaded on the device and is in breach of your license agreement.
Figure 8 Placement of Wyse Conversion Label

text_image
WYSE MIDEN NO. SIP PAPER RIP RAP WYSE MIDEN NO. SIP PAPER RIP RAP WYSEStep 5: Obtain a Firmware Update
After converting your cloud clients, you must use your 1 Year ThinOS Maintenance (you should have received an email from Wyse or your reseller with full instructions) to obtain any available firmware update (if you did not receive this email, contact your reseller).

Tip
If you are unfamiliar with updating firmware on your Wyse ThinOS cloud client, refer to Wyse Knowledge Base Solution #10566 (go to the Wyse Knowledge Base at http://www.wyse.com/kb and search for 10566).

Warning
Wyse Cloud Client Software Maintenance is required to be eligible to receive new versions of cloud client software and subsequent releases of corresponding documentation and tools. Wyse announces new versions of software through the WyseView newsletter. To receive notification of available software updates, customers must subscribe to the free WyseView newsletter at http://www.wyse.com/wyseview. Use of the Software on more than one device requires that you first purchase from Wyse additional copies of, or licenses to, the Software. Contact your local Wyse distributor or Wyse Inside Sales at 1-800-800-9973 option 1 or 1-408-473-1200 option 1.
A Installing Wyse Simple Imager 2.0.2
This appendix provides the detailed procedures you must complete to install Wyse Simple Imager 2.0.2.
Pre-Installation Checklist
Before you begin installing Wyse Simple Imager, make sure you have met the requirements on this checklist for the machine to which Wyse Simple Imager will be installed:

Caution
Do not install Wyse Simple Imager on any machine which has Wyse Device Manager software installed.
- One of the following 32-bit Windows operating systems must be installed (be sure that all systems are up-to-date with current Microsoft service packs, patches, and updates):
- Windows 2003 Server Standard/Enterprise with SP2 or later
- Windows XP Pro with SP3 or later

Caution
Virtual machine environments are not supported.
- IIS with FTP and HTTP (World Wide Web Service) must be installed, enabled, and running.
- Any inexpensive external router with DHCP enabled must be connected to the machine and both the machine and router must be isolated.

Caution
Wyse Simple Imager must be installed and used on a machine (with a connected router running DHCP) that is isolated. Do not install Wyse Simple Imager on any machine which is connected to a network.
- Any existing previous version of Wyse Simple Imager must be uninstalled.
- A single network adapter is supported. If you have two adapters, you must disable one (for example, for a laptop with a wireless adapter, you must disable the wireless adapter).
- All software firewalls and antivirus services must be stopped.
- Place the Wyse Simple Imager 2.0.2 software (found on the Conversion Software Assembly DVD-ROM) into a folder on the machine.
Procedures

Tip
Be sure you have completed all pre-installation requirements as described in "Pre-Installation Checklist" before you begin installing Wyse Simple Imager.
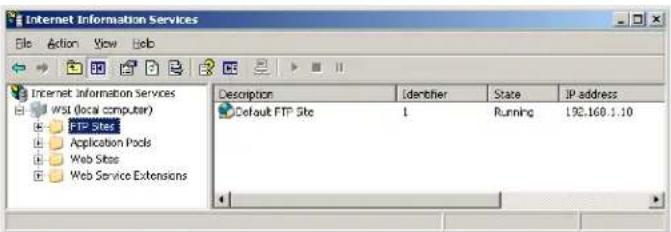
Step 1: Verify FTP Settings
- Launch IIS (click Settings > Control Panel > Administrative Tools > Internet Information Services (IIS) Manager).
Figure 9 Launch IIS
text_image
Internet Information Services File Action View Web Internet Information Services WST (local computer) FTP Sites Application Pools Web Sites Web Service Extensions Description Identifier State IP address Default FTP Site 1 Running 192.168.1.10- In the IIS Manager screen, right-click Default FTP Site in the details pane and select Properties to open the Default FTP Site Properties dialog box.

Tip
If you cannot find the Default FTP Site option, verify that FTP services are installed (see "Pre-Installation Checklist").
Figure 10 Default FTP Site Properties

text_image
Default FTP Site Properties FTP Site Security Accounts Messages Home Directory Directory Security The content for this resource should come from: A directory located on this computer A directory located on another computer FTP site directory Local path: c:\nrepub/ftprout Browse... Read Write Log splits Directory listing style LNTX® MS-DOS® OK Cancel Apply Help- Click the Home Directory tab and ensure the following:
• A directory located on this computer option is selected
- Local path is C:\Inetpub\ftproot (this is the default path)
- Read, Write, and Log visits check boxes are selected
• MS-DOS option is selected
Step 2: Verify DHCP is Running
You can verify DHCP is running by going to Start > Control Panel > Network Connections, double-click your LAN connection (for example, Local Area Connection) to open the Local Area Connection Status dialog box, click the Support tab and then ensure that your Address Type is Assigned by DHCP. If this is not the case, you must correct the problem before continuing. If DHCP is not running do not install Wyse Simple Imager until it is running.
Figure 11 Local Area Connection Status dialog box

text_image
Local Area Connection Status General Support Connection status Address Type: Assigned by DHCP IP Address: 10.100.100.100 Subset Mask: 100.100.100.0 Default Gateway: 10.100.100.1 Details... Windows did not detect problems with this connection. If you cannot connect, click Repair CloseStep 3: Install Wyse Simple Imager
Navigate to the Wyse Simple Imager Release 2.0.2 folder on your hard drive (this is the location you selected in "Pre-Installation Checklist"), double-click the WSISetup.exe file to open the installation wizard, and then follow the prompts. It is recommended that you use the default settings provided during installation.

Caution
Be sure that the installation path is the same as the default path of the IIS FTP root path (for example, C:\Inetpub\ftproot).
Figure 12 Default installation path

text_image
Wyne Simple Imager - InstallShield Wizard Fip Server has to be pre-installed. Please provide the absolute path of Fitproet folder. Please change the Fitproet folder if it is different C:\NewPub\Fitproet Change... < Back Next > CancelAfter Wyse Simple Imager installation is complete, a Wyse Simple Imager icon will be created on the desktop from which the application can be run.
This page intentionally blank.
B Troubleshooting
This appendix includes troubleshooting information.

Note
For Wyse Customer Support information, see "Wyse Technical Support."
| Problem Solution | |
| When attempting to image a cloud client you receive an ARP Timeout error. | This means that the cloud client was unable to obtain an IP address from your DHCP server on the router (ARP means Address Resolution Protocol). This indicates a problem with your DHCP server on the router (see your router documentation to fix the problem). |
| You are receiving Incompatible Firmware messages. | Be sure you have the correct information in the Add Image dialog box as described in "Step 3: Use Wyse Simple Imager to Convert Each Cloud Client." |
| The new image was sent to the cloud client but the cloud client boots normally to the old firmware. | Use the following:Verify the boot order. Turn on the cloud client power, press and hold the DELETE key to enter the BIOS setup. When prompted, enter the password Fireport (case sensitive). The first boot device should be set to PXE or LAN. If that is not the case, make the necessary changes.Verify that the FTP Server has the Write permission enabled (see "Step 1: Verify FTP Settings").Verify on the Wyse Simple Imager server: Go to Start > Run, enter cmd, and click OK. At the command prompt (c:> ) enter ipconfig and press the Enter key: If you see an IP address of 127.0.0.1 anywhere, you have a loopback network condition. To recover from this, uninstall Wyse Simple Imager ONLY, make sure you connect the Wyse Simple Imager server and the cloud client (with power applied to it, but NOT powered-on) to the router, and then re-install Wyse Simple Imager.Verify the directory structure is set to:c:\inetpub\ftproot\rapportc:\inetpub\ftproot\rapport\toolsc:\inetpub\ftproot\rapport\tools\saRemove any spaces in the firmware filename under C:\inetpub\ftproot\rapport<product>. FTP does not recognize spaces. |
| When attempting to image a cloud client you receive an Illegal TFTP operation error message. | Use the following:If this is the first you are attempting to image using Wyse Simple Imager, more than likely this is an installation problem. Review the Wyse Simple Imager installation section and verify the installation process.If Wyse Simple Imager worked correctly in the past, try re-imaging a different cloud client. If the issue is resolved, you have a hardware problem and will need to send the defective cloud client to the Wyse service department for repair (see "Wyse Technical Support"). |
| When attempting to image a cloud client you receive a Boot file not found message. | If you have a VPN client installed on the Wyse Simple Imager server, remove it and try again. |
| Obtaining File not found error messages. | Verify that your default FTP server address is set correctly using the IIS Administration utility (see Microsoft documentation). |
| You are not obtaining an IP Address. | In any case where you are not obtaining an IP Address, verify that the router DHCP server is up and running (see your router documentation to fix the problem). |
| You are obtaining a PXE-E78 error on the cloud client and cannot re-image. | PXE-E78 means Unable to locate boot server. The most common cause of this is when the Wyse Simple Imager server is installed by itself with no router running DHCP connected to the Wyse Simple Imager server. In such a case, you receive a loopback IP Address created for the proxy server in Wyse Simple Imager. Uninstall Wyse Simple Imager ONLY, make sure you connect the Wyse Simple Imager server and the router with DHCP running and then re-install Wyse Simple Imager. |
| When re-imaging a device, the cloud client reboots as normal to the original firmware. | When a device is imaged, two log files are created. These files will have the extensions of .log and either .fin or .end (these files are located in the following directory:C:\inetpub\ftproot\rapport\tools\sallogs)..fin - Indicates a Successful imaging of the device.end - Indicates a Failure to image a device.log - Contains the Transaction information of the imaging processTo correct this problem, go to the Wyse Simple Imager console (see Figure 3), click Delete Logs, and then try re-imaging. You can also manually delete these files and try re-imaging again. |
| You followed the usage instructions and still cannot image the cloud client. | Uninstall Wyse Simple Imager and then re-install according to the instructions in this guide. |
This page intentionally blank.
Installation Guide
Wyse® VX0LE Conversion to ThinOS Issue: 070111
Written and published by:
Wyse Technology Inc., July 2011
Created using FrameMaker ^® and Acrobat ^®