S10 - Monitor Feelworld - Free user manual and instructions
Find the device manual for free S10 Feelworld in PDF.

| Type of Product | Field Monitor |
| Model | S10 |
| Brand | Feelworld |
| Screen Size | 10.1 inches |
| Resolution | 1920 x 1200 (Full HD) |
| Aspect Ratio | 16:10 |
| Brightness | 1000 cd/m² |
| Contrast Ratio | 1000:1 |
| Viewing Angle | 178° (Horizontal / Vertical) |
| Input Signals | HDMI, 3G-SDI, AV |
| Output Signals | HDMI, 3G-SDI |
| Power Supply | DC 12V (via adapter or battery plate) |
| Battery Compatibility | Canon LP-E6 / Sony NP-F series (with optional plate) |
| Power Consumption | ~18W |
| Dimensions (W x H x D) | 10.2 x 6.7 x 1.2 inches |
| Weight | 1.65 lbs (750 g) |
| Mounting | 1/4"-20 thread, VESA 75mm |
| Key Features | Touchscreen, 3D LUT support, waveform, zebra, peaking, false color |
| Included Accessories | User manual, DC power adapter, HDMI cable, sun hood, stand |
| Operating Temperature | 32°F to 104°F (0°C to 40°C) |
| Storage Temperature | -4°F to 140°F (-20°C to 60°C) |
Frequently Asked Questions - S10 Feelworld
User questions about S10 Feelworld
0 question about this device. Answer the ones you know or ask your own.
Ask a new question about this device
Download the instructions for your Monitor in PDF format for free! Find your manual S10 - Feelworld and take your electronic device back in hand. On this page are published all the documents necessary for the use of your device. S10 by Feelworld.
USER MANUAL S10 Feelworld
10.1" 12G-SDI Field Monitor
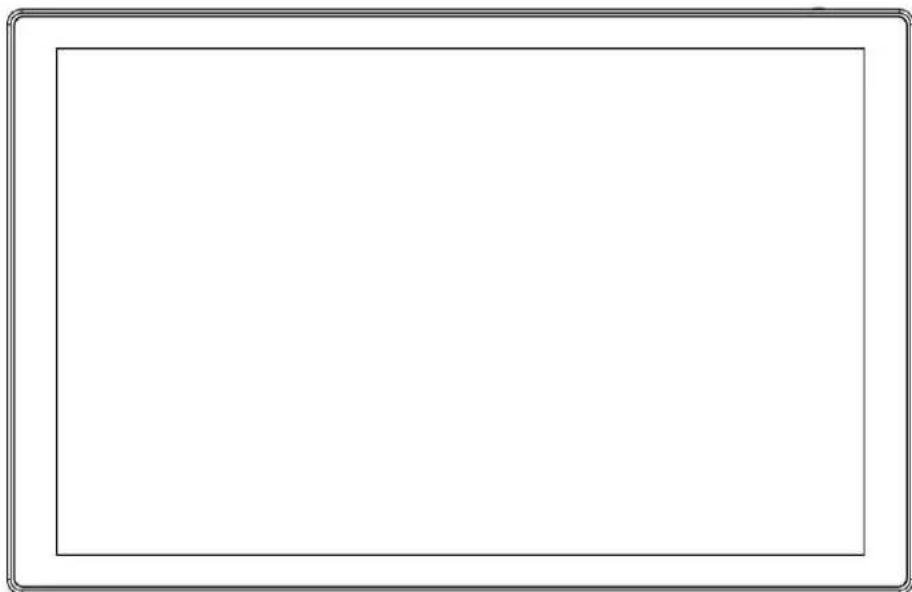
natural_image
Empty rectangular frame with rounded corners, no text or symbols presentUser Manual
Foreword
Thank you for purchasing our 10.1-inch 12G-SDI field monitor. Please read this manual carefully before using the unit. Have a great experience!
Caution
- Please avoid the heavy impact and drop onto the ground when move the product.
- The screen of this product is made of glass. Keep away from injury if the screen is broken.
- Keep the product away from the heat source, and avoid the prolonged exposures to the sun as the LCD screen will be damaged.
- Please do NOT use chemical solutions to clean this product. Please wipe the monitor with a clean soft cloth to maintain the brightness of the surface.
- No adjustable components are in the monitor. Please do not take apart or repair the unit by yourself, to avoid the damage of the product.
Key Features
●10.1-inch 1920x1200 full HD IPS screen
- Touch screen menu operation, improve shooting efficiency
• 1200nits daylight viewable
• Rugged aluminium housing
• 12G-SDI input and output, meet more professional production
- With SDI & HDMI cross conversion
• Support HDR monitoring, what you see is what you get
- Support 3D LUT Log to REC.709 and user 3D LUT upload(up to 32)
• 3G-SDI & HDMI support LUT loop out
- With Waveform, Vector scope, Histogram, Focus Assist, Monochrome etc. functions, can help you accurately exposure and focus every shot.
- Under HDMI signal the audio meter level can be display max 8 channels; under SDI signal can be display max.16 channels
• Tally Indicator, enhance team cooperation
- Stereo Earphone output
- Standard accessory F970 dual battery plates, long-lasting power for outdoor filming
CONTENTS
- Product Description ---- 4
1.1 Structure Instruction 4
1.2 Power Supply Ways 4
1.3 Battery Plate Mount Steps ---- 5
1.4 Mount Points 6
1.5 TALLY Indicator Connection 7
- Menu Operation Instruction 7
2.1 Touch Screen Menu Operation 7
2.2 MENU Wheel Menu Operation 8
2.3 MENU UI Instruction 9
2.4 Cross Conversion Instruction 9
-
Menu Function Instruction 9
-
How to Load LUT 17
-
Support Formats 18
-
Technical Parameters 19
-
Trouble Shooting 19
1. Product Description
1.1 Structure Instruction

1.2 Power Supply Ways
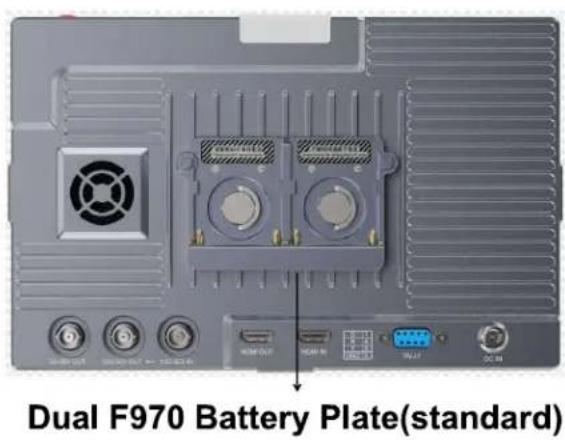
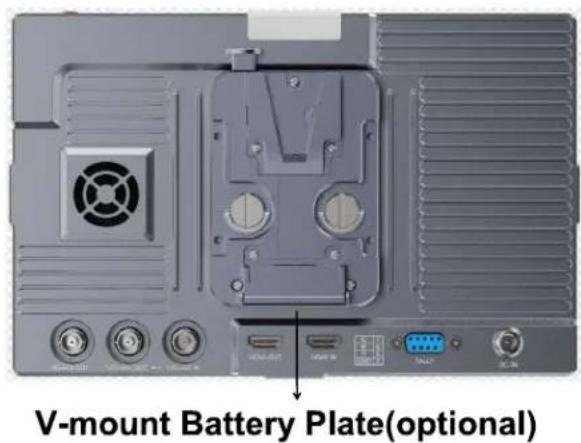
(1) The rear cover of the monitor is equipped with a dual F970 battery plate, which is applicable to F970 series of batteries. The battery level will be showed on the right upper corner of the monitor after the battery installation. The user also can select V-mount battery plate for option.
Sony F970 battery plate for battery of Sony DV:
Sony F970 F960 F950 F930 F770 F750 F730 F570 F550 F530 series
Remark: It is recommended to use standard original F970 batteries.
Different specifications of the battery have different capability. The working time for the monitor will be different. Higher capability (working time) will be longer. Please take off the battery from the monitor if you don't use the monitor in a long time.
✿ Battery Switching Instruction: When install two batteries at the same time, both battery level will be showed on the right upper corner of the monitor. Users can click on another battery to switch when one battery is running low, the white indicating working battery and the gray indicating non-working battery.
(2) DC IN 12V: DC power input, polarity as the input power - + , Barrel (5.5mm outer, 2.1mm inner) at the bottom of the monitor, DC 7\~24V Input. Suitable use for 12V/3A power adapter.
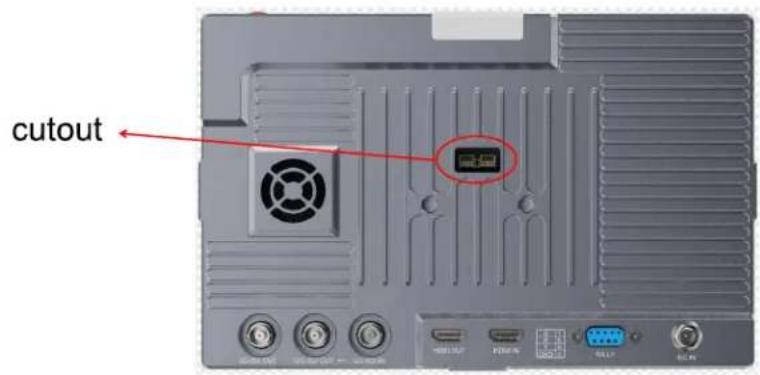
1.3 Battery Plate Mount Steps
(1) Install the 2P power cable to the cutout
(2) Align the screws with the screw holes and tighten them
✿ Picture after battery plate installation
1.4 Mount Points
There are (3) 14 -20 thread points (bottom, right, left) can be easily connected to the hot shoe mount, tripod fixed installation.

natural_image
Pure geometric diagram with nested rectangles and connecting lines, no text or symbols present(3) ¼-20 thread points
1.5 TALLY Indicator Connection
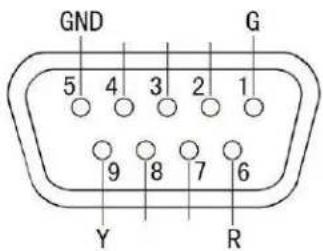
| Indicator Color | Pin connect |
| Green | 1-5 |
| Red | 6-5 |
| Yellow | 9-5 |
2. Menu Operation Instruction
After the monitor is properly connected to the power supply, the ⏻ button display(red indicating). Long press ⏻ button to turn on the monitor and turns yellow indicating. After the signal is connected, the ⏻ button turns green indicating.
2.1 Touch Screen Menu Operation (turn on the screen touch function)
①. The touch function can be set as a shortcut key via Menu - -User Option - -Shortcut Key - -F1, F2 or F3- -Touch Switch. When the menu is not
displayed, you can press it directly turn on or off the touch function. For example, you set it as F1, please press F1
②. Double-click on the screen to open the main menu (show on the left side of the screen) and click on the corresponding menu to display the secondary menu. You can enter the corresponding function option and click directly to select or set. Click the touch screen to exit the menu.
③. When the menu is not displayed, swipe up from the bottom of the screen to open the shortcut menu, swipe left or right select the needed function and click on the corresponding menu box to turn on or turn off the corresponding function. (remark: the shortcut menu can't set the detail function or parameters, you can set on main menu)
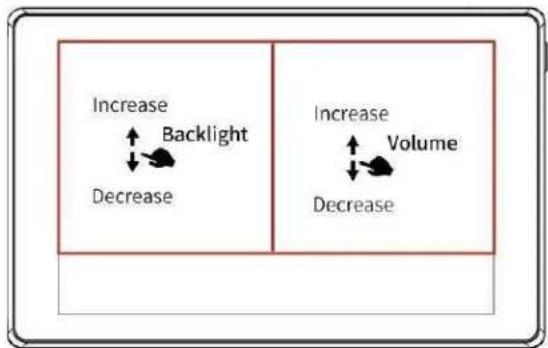
④. When the menu is not displayed, on the left side of the screen (1/2 split screen), you can directly adjust the brightness of the screen backlight; on the right side of the screen (1/2 split screen), you can directly adjust the volume.
Figure:

2.2 MENU Wheel Menu Operation
①. When the menu is not displayed, directly rotate the wheel to backlight or volume adjustment. The wheel option can be set to backlight or volume via menu --left right key
②. Short press the MENU wheel to open the main menu (on the left side of the screen), rotate the wheel to select menu. After selected, press the wheel to show the secondary menu, then rotate the wheel to select. After selected, press the wheel to enter function menu, rotate the wheel to select or set option function, press the wheel to confirm after selected or set, then the icon will show gray.
③. Long press the MENU wheel to open the shortcut menu (below the screen), rotate the wheel to select the shortcut menu option, press the wheel to directly turn on/off the function.
④. Press F3/EXIT key to return or return the menu
2.3 MENU UI Instruction
2.4 Cross Conversion Instruction
The monitor supports SDI and HDMI signal cross conversion, the output resolution support max.1920x1080
● HDMI input can output HDMI, 3G-SDI simultaneously
● 12G-SDI input can output HDMI, 3G-SDI, 12G-SDI simultaneously
Note: ① when use the cross conversion function, the HDMI output need to set as Display (enter main menu System--Source--HDMI OUT--Display)
② the support format of 12G-SDI output always same as 12G-SDI input
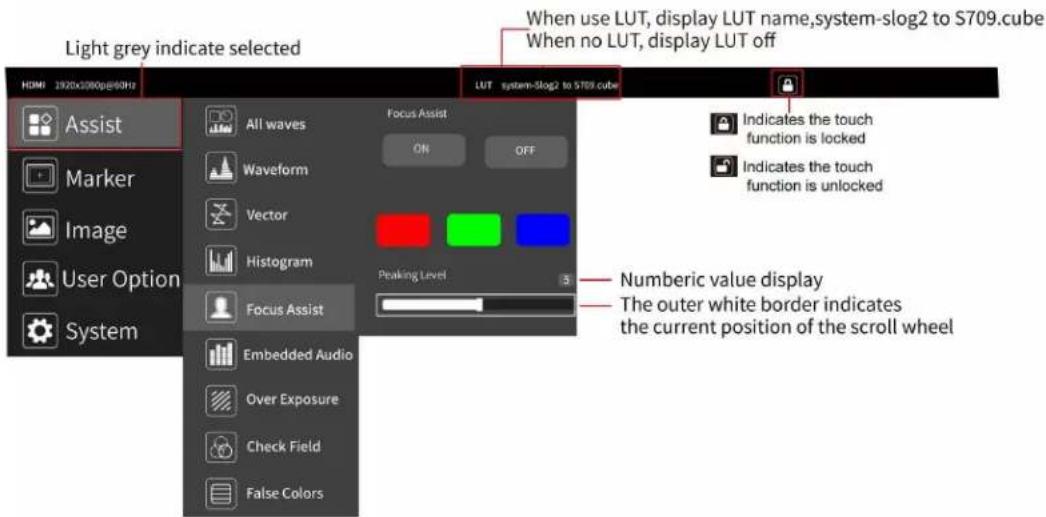
3. Menu Function Instruction

Assist
 All Waves All Waves | ON, OFFAfter turning on, waveform, vector, histogram and embedded audio will be shown. |
 Waveform Waveform | ON, OFFMode: RGB, YUV, YWaves Trans.:Off, 25%,50%,75%Position X: 0~100 (moving the waveform horizontally)Position Y: 0~100 (moving the waveform vertically )This essential feature assists with the calibration of professional video cameras. It shows the overall brightness of the image assisting the video professional in correcting exposure. The waveform feature also checks the evenness of the lighting when lighting a chromakey or background. |
 Vector Vector | ON, OFFPosition X: 0~100 (moving the Vector horizontally)Position Y: 0~100 (moving the Vector vertically )Shows how saturated the image is and where the pixels in theimage land on the color spectrum. |
 Histogram Histogram | ON, OFFMode: RGB1, RGB2, YPosition X: 0~100 (moving the histogram horizontally)Position Y: 0~100 (moving the histogram vertically )Y HistogramA quantitative tool to check the picture brightness, display different color for different brightnessRGB HistogramIt can display the graphic of color tone distribution, can intuitively display the exposure status of the image, and display overlapping histograms in red, green, and blue channels |
 Focus Assist Focus Assist | ON, OFFColor: Red, Green, BluePeaking Level: 1~10After turned on, the Focus Level (1~10) and Focus Color can be adjusted.It highlights the areas that are in focus so you are able to quickly focus the camera and not miss crucial shots. |
 Embedded Audio Embedded Audio | ON, OFFDisplay an audio diagram after enabled to help you understand the audio status being used.Under HDMI Signal, max display 8 channelsMode: pr1, gp1, gp2, gp12Audio Out: ch1-2, ch3-4, ch5-6, ch7-8pr1 display1-2 channel, gp1 display 1-4 channel, gp2 display 5-8 channel, gp12 display 1-8 channelUnder SDI Signal, max display 16 channelsMode: pr1, gp1, gp2, gp12, gp3, gp4, gp14Audio Out: ch1-2, ch3-4, ch5-6, ch7-8, ch9-10, ch11-12, ch13-14,ch15-16pr1 display1-2 channel, gp1 display 1-4 channel, gp2 display5-8 channel, gp12 display 1-8 channel, gp3 display 9-13 channel, gp4 display 14-16 channel, gp14 display 1-16 channel Display an audio diagram after enabled to help you understand the audio status being used.Position X: 0~100 (moving the audio level horizontally)Position Y: 0~100 (moving the audio level vertically ) |
 Over Exposure Over Exposure | ON, OFFAfter the exposure is turned on, the Exposure Level (10RE~100IRE),, can be adjusted. |
 Check Field Check Field | On, OffMode: red, green, blue, grayWhen enabled, hue and saturation adjusted quickly and accurately. |
 False Color False Color | ON, OFFMode: Normal, ARRIAn image that depicts an object in colors that differ from those a photograph (a true color image) would show. |
Marker
 Grids Grids | ON, OFFMode: 2x2, 3x3, 4x4, 5x5, 6x6, 7x7, 8x8, 9x9, CustomRows: 2~9Columns: 2~9When selectingCustom, you can custom the rows and columns of the gridColor: Red, Green, Blue, Black, White, Gray |
| The area of the picture can be divided into 4 ,9, 16, 25, 36, 49,64,81 equal grids or custom the grid. | |
 Safe Frames Safe Frames | OFF, ONMode: 80%, 85%, 90%, 93%, 96%, 2.35:1Marker Line Color: Red, Green, Blue, Black, White, Gray |
 Center Marker Center Marker | ON, OFFMarker Line Color: Red, Green, Blue, Black, White, Gray |
 Ratio Marker Ratio Marker | ON, OFFMode: 4:3, 13:9, 14:9, 15:9, 16:9, 1.85:1, 2.35:1Marker Line Color: Red, Green, Blue, Black, White, GrayModified Mark: 0~5 |

Image
 Scan Mode Scan Mode | Under Scan, Over Scan |
 Aspect Ratio Aspect Ratio | Auto, 16:9, 16:10, 4:3, 5:4, 1.85:1, 2.35:1, Full Screen |
 Anamorphic Anamorphic | ON, OFFMode: 1.33x, 1.6x, 2.0x, 2.0x mag, UserUnder User, you can custom adjust nx (1.20x~2.00x)Allows you to use anamorphic lenses or adapters and see the image unsqueezed, even if your camera does not de-squeeze in camera. |
 Image Flip Image Flip | ON, OFFMode: H Flip, V Flip, H_V Flip |
 Zoom Mode Zoom Mode | ON, OFFMode: 2X, 4X, 9X, 16X, UserUnder User, you can adjust 100%~200%It is HD signal in any part, an amplification for high quality close-up. |
 Image Freeze Image Freeze | ON, OFF |
 P2P(Pixel to Pixel) P2P(Pixel to Pixel) | ON, OFFEnable the filmmaker to check the image from the 1:1 signal source without scaling.This feature is essential for capturing optimum detail. |

User Option
 LUT LUT | ON, OFFLUT is a table for quickly looking up and output specific color data. By loading different 3D-LUT tables, it can quickly recombine color tone to form different color styles.LUT Import: ConfirmLUT Table: display built-in SLOG2, SLOG3, LOGC, VLOG and the custom LUTs |
 HDR HDR | HDR: ON, OFFMode: HLG1, HLG2, HLG3HDR can provide more dynamic range and the details of image, it is better to reflect the visual effects in the real environment. |
 | Backlight: 0~100Adjust the screen brightness |
| Display Adjustment | Brightness: 0~100Adjust the image brightnessContrast: 0~100Adjustment of the ratio between the brightest and darkest parts of the image. When adjusting, pay attention to the sense of hierarchy in the image. If the proportion is too large or too small, it can cause the image to lose its colorful appearance.Saturation: 0~100Adjustment of color concentrationTint: 0~100It is the most accurate standard for distinguishing various different colors. Determine what a certain color is actually color via the color appearance. |
 Color Adjustment Color Adjustment | Color Gamut: DCI-P3, REC709Display Range: Auto, Limit, FullThis feature allows for the selection of a grayscale range. The Limited grayscale range is 16-235, and the Full grayscale range is 0-255. (Grayscale represents changes in image brightness, using varying gray levels to depict brightness in different image areas. In grayscale, brightness increases from black to white, typically denoted by a numerical range from 0 to 255, where 0 signifies black and 255 indicates white, and intermediate numbers indicate varying grayscale levels.)1. If the dark part of the picture lost, the details cannot be seen clearly. For example, the input signal is in the range of 0-255, but the monitor is set Auto or Limit, the brightness of 0-15 and 236-255 is removed, resulting the dark part details unclear. You can set to Full.2. If the picture is gray, the black part turned gray. For example, the input signal is in the range of 16-235, but the monitor is set Full , resulting the black part turn gray. At this time,you can set to Auto or Limit.Color Temp.: 5600K, 6500K, 9300K, UserUnder the “user”, the red, green, and blue values of the image can be adjusted (0~255) |
 Shortcut Key Shortcut Key | F1~F3Shortcut List: All Waves, Waveform Vector, Histogram, Embedded Audio, Center Marker, Safe Frames,Grids, Focus Assist, False Colors , Over Exposure, Anamorphic, Image Freeze, Check Field, Zoom Mode, Image Flip, Aspect Ratio, Touch SwitchSet the shortcut functione.g.: Tap the Shortcut Key in User Option, and select F1 Function, then select one of function on Shortcut List, such as “Analysis”. So when you exit menu, you could press F1 directly on the front of panel to turn on “Analysis” function. Same setting for F2~F4 |
 Left Right Key Set Left Right Key Set | Backlight, Volume |

System
 Language Language | English, 简体中文, Español, Português, Français, Nederlands, Deutsch, 日本語, 繁體中文, 한국어로, русский язык |
 OSD Option OSD Option | OSD Time: off, 15s, 30s, 45sSelect the display time of the menu on the screenOSD Trans: OFF, 25%, 50%, 75%Adjust the transparency of the menu picture background on the screen.No Signal: Red, Green, Blue, Black, White, Gray |
 Volume Volume | Mute: ON, OFFVolume: 0~100Adjusting the speaker volume |
 Cooling Fan Cooling Fan | ON, OFFMode:1~5Note: the fan default to ON and with 3 mode |
 Source Source | Input Source: HDMI, SDIOutput SourceHDMI OUT: Loop Out, DisplayWhen selecting Loop Out, HDMI output supports up to 4K@60Hz;When selecting Display, it defaults to output with LUT effect and supports maximum resolution of 1920x1080. When you need to use cross conversion, please also select Display.3G-SDI LUT Out: LUT On, LUT Off |
 Reset Reset | After confirmed, the system back to original setting. |
 Firmware Update Firmware Update | Firmware Version (display the current firmware version)FTY CAL: On, ResetReset: If you import your own LUT calibration but encounter abnormalities or poor result, you can clear the calibration LUT by clicking "Reset" in FTY CAL and return to the factory calibration.ConfirmEach monitor has color calibration before ex-factory, the factory calibration button turn on by default. After turning off, the monitor will without has color calibration, suggest don'tturn it off.How to upgrade?1. SD card formatSupport FAT32 or NTFS. For MAC system, the SD card should be formatted in MS-DOS (FAT)2. After copying the update file to the SD card and inserting it into the SD card slot, click Confirm to update.3. The monitor will turn off automatically after finishing, please turn on manually4. Check the firmware version whether the latest oneNote: the chip should be faced up when inserting the SD card, and press it after inserting to ensure that the SD card is fully inserted. |
4. How to Load LUT
4.1 SD card format
Support FAT32 or NTFS. For MAC system, the SD card should be formatted in MS-DOS (FAT)
4.2 Max Files Limit Maximum 32 Lut files
4.3 File requirements
•The LUT file format suffix should be .cube
•Single file not exceeded to 7.9Mb
•Support LUT-3D-Size 16,17,32,33,64,65
Remark: LUT file name must be English or Arabic numerals
4.4 Steps for loading
4.4.1 Make sure the SD card correctly insert
4.4.2 Enter main menu "User Option"--LUT--Lut Import -- Confirm to load
the monitor will auto detect the SD card
A. There is no SD Card, the screen will show failed, can try once more, if not work, restart the monitor and try again
B. There is SD Card, the monitor will erase the exits user's lut fill and show "Initializing", If there is no valid lut file in SD card, the lut will not load. The monitor will show "clean up"
C. If there is valid lut file in SD card, the monitor will load lut files and show "[n] name. The [n] shows the quantity number. The "name" should in lut files' name. If load successful, the screen will show "complete[n]". [n] Stands for the quantity number for lut files should under 32.
5. Custom LUT Calibration Instruction
If you have professional equipment and instrument and want to calibrate the monitor by self. Please take note the following points:
5.1 SD card format
Support FAT32 or NTFS. For MAC system, the SD card should be formatted in MS-DOS(FAT)
5.2 File requirements
• The LUT file format suffix should be .cube
• Single file not exceeded to 7.9Mb
• Support LUT-3D-Size 16,17,32,33,64,65
- For P3 color calibration, file name should be @User_P3xxxx.cube, the red font can't be changed, the xxxx can be custom. For example, @User_P3_123456789.cube
- For 709 color calibration, file name should be @User_709xxxx. cube, the red font can't be changed, the xxxx can be custom. For example, @User_709 abcdefg cube.
5.3 Steps for loading
5.3.1 Make sure the SD card correctly insert
5.3.2 Enter main menu "User Option"--LUT--Lut Import -- Confirm to load
the monitor will auto detect the SD card
5.3.3 After loading, the file will show like below
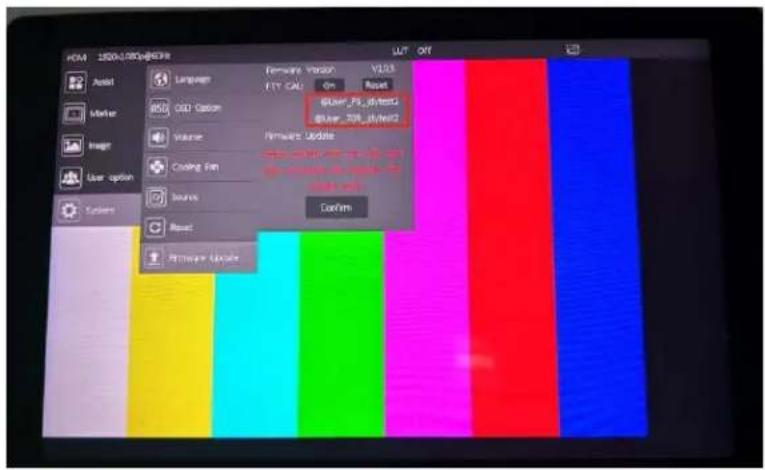
5.4 If you import your own LUT calibration but encounter abnormalities or poor result, you can clear the calibration LUT by clicking "Reset" in FTY CAL and return to the factory calibration.
6. Support Formats
| 12G-SDI Input & Output Support Format | 1080i (60/59.94/50)720p (60/59.94/50/30/29.97/25/24/23.98)1080p(60/59.94/50/30/29.97/25/24/24sF/23.98/23.98sF)2048×1080(30p/30PsF/29.97p/29.97PsF/25p/25PsF/24p/24PsF/23.98p/23.98PsF)4K 3840×2160p (60/59.94/50/48/47.95/30/29.97/25/24/23.98)4K 4096×2160p (60/59.94/50/48/47.95/30/29.97/25/24/23.98) |
| 3G-SDI OutputSupport Format | 720p (60/59.94/50/30/29.97/25/24/23.98)1080i (60/59.94/50)1080p(60/59.94/50/30/29.97/25/24/24sF/23.98/23.98sF) |
| HDMI InputSupport Format | 1080i (60/59.94/50)720p (60/59.94/50/30/29.97/25/24/23.98)1080p(60/59.94/50/30/29.97/25/24/24sF/23.98/23.98sF)4K 3840×2160p (60/50/30/29.97/25/24/23.98)4K 4096×2160p (60/50/30/29.97/25/24/23.98) |
| HDMI OutputSupport Format | When set Display1080i (60/59.94/50)720p (60/59.94/50/30/29.97/25/24/23.98)1080p(60/59.94/50/30/29.97/25/24/24sF/23.98 /23.98sF)When set Loop out (without set it will default to Loop out)1080i (60/59.94/50)720p (60/59.94/50/30/29.97/25/24/23.98)1080p(60/59.94/50/30/29.97/25/24/24sF/23.98 23.98sF)4K 3840×2160p (60/50/30/29.97/25/24/23.98)4K 4096×2160p (60/50/30/29.97/25/24/23.98) |
- Technical Parameters
| Panel Size | 10.1" touch screen |
| Resolution | 1920 × 1200 pixels |
| Dot Pitch | 0.1128(H) x 0.1128 (V) mm |
| Color Depth | 10bit (8+2bit) |
| Aspect Ratio | 16:10 |
| Brightness | 1200cd/m2 |
| Contrast | 1500:1 |
| Response Time | 25ms |
| Viewing Angle | 80°/80°(L/R) 80°/80°(U/D) |
| Backlight | LED |
| Backlight Adjustment Mode | Manual |
| Input | 12G-SDI, HDMI, Tally |
| Output | 12G-SDI, 3G-SDI, HDMI |
| Audio | 3.5mm Stereo Headphone |
| Power Input Voltage | 7~24V |
| Power Consumption | ≤25W |
| Unit Size | 244x157.25x26.4 (mm) |
| Unit Weight | 795g |
| Mount Points | (3) 1⁄4-20 thread points ( right, left, bottom) |
| Working Temperature | -10°C~60°C |
| Storage Temperature | -30°C~70°C |
7. Trouble Shooting
7.1 Only black and white or monochrome picture:
① please check saturation, brightness & contrast adjustment.
② Please check "Monochrome" is in black, white or monochrome image or other condition.
7.2 NO Image after put on the power
① Check if signal cable connecting is in good condition.
② Check signal cable connecting, and make sure to use the standard adapter to connect the monitor. If power is supplied by battery, please check if the battery is fully charged.
7.3 Earphone No sound
① Check if Volume control do not open, press the volume button, and try to increase the volume.
■ If there are still other problems, please contact with our related technologists.
★ As we are improving product features and product performance, so if there is any change on the specification without prior notice.
- 10.1" 12G-SDI Field Monitor
- User Manual
- Foreword
- Caution
- Key Features
- CONTENTS
- Product Description
- Structure Instruction
- Power Supply Ways
- Battery Plate Mount Steps
- ✿ Picture after battery plate installation
- Mount Points
- TALLY Indicator Connection
- Menu Operation Instruction
- Touch Screen Menu Operation (turn on the screen touch function)
- MENU Wheel Menu Operation
- MENU UI Instruction
- Cross Conversion Instruction
- Menu Function Instruction
- Marker
- How to Load LUT
- SD card format
- Max Files Limit Maximum 32 Lut files
- File requirements
- Steps for loading
- Make sure the SD card correctly insert
- Custom LUT Calibration Instruction
- SD card format
- File requirements
- Steps for loading
- Support Formats
- Trouble Shooting
- Only black and white or monochrome picture:
- NO Image after put on the power
- Earphone No sound
Brand : Feelworld
Model : S10
Category : Monitor