P133 PRO - Monitor Feelworld - Free user manual and instructions
Find the device manual for free P133 PRO Feelworld in PDF.


| Product Type | Portable Monitor |
| Brand | Feelworld |
| Model | P133 PRO |
| Screen Size | 13.3 inches |
| Resolution | 1920 x 1080 (Full HD) |
| Panel Type | IPS |
| Brightness | 300 cd/m² |
| Contrast Ratio | 1000:1 |
| Refresh Rate | 60 Hz |
| Connectivity | HDMI, USB-C (DP Alt Mode), 3.5mm Audio Out |
| Power Supply | USB-C (5V/2A or 12V/2A via adapter) |
| Power Consumption | ≤ 8W |
| Dimensions (with stand) | 320 x 205 x 15 mm |
| Weight | 620 g |
| Mounting | VESA 75x75 mm compatible |
| Speakers | Built-in dual speakers (1W each) |
| OSD Controls | Buttons for brightness, contrast, input selection |
| HDR Support | Yes (HDR10) |
| Color Gamut | sRGB 100% |
| Viewing Angle | 178° / 178° |
| Care and Cleaning | Use a soft, dry cloth. Avoid liquids and abrasive cleaners. |
| Safety | Do not expose to moisture or extreme temperatures. Use provided power adapter. |
| Spare Parts and Repairability | Contact Feelworld support for parts. Do not attempt self-repair. |
| General Information | Portable monitor for laptops, gaming consoles, and cameras. Comes with protective case and cables. |
Frequently Asked Questions - P133 PRO Feelworld
User questions about P133 PRO Feelworld
0 question about this device. Answer the ones you know or ask your own.
Ask a new question about this device
Download the instructions for your Monitor in PDF format for free! Find your manual P133 PRO - Feelworld and take your electronic device back in hand. On this page are published all the documents necessary for the use of your device. P133 PRO by Feelworld.
USER MANUAL P133 PRO Feelworld
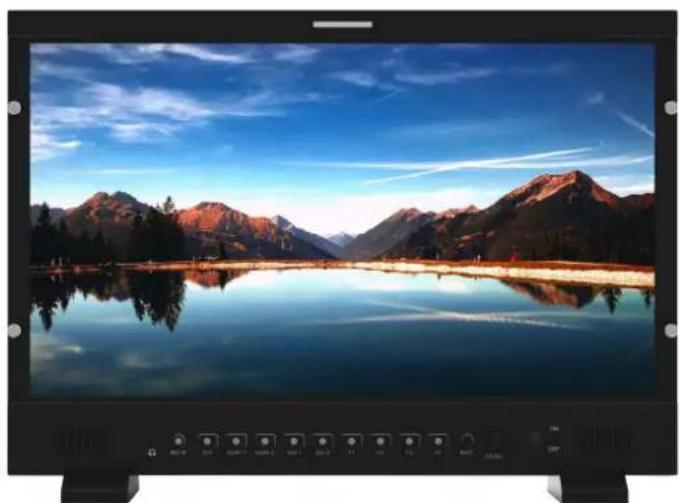
1000nit Broadcast Monitor
13.3"/21.5"
natural_image
Black-and-white display of a mountain lake with clear sky and forest reflections (no text or symbols visible)User Manual
Foreword
Thank you for purchasing our high bright broadcast monitor. Please read this manual carefully before using the unit. Have a great experience!
Caution
- Please use the adapter in the accessory, and use the qualified battery if need.
- Please do NOT expose this product directly in the sunlight, heat, and humid conditions.
- Please keeps the monitor away from the strong light while using this product to ensure the image effect and long-term use.
- Please avoid heavy impact or drop onto the ground.
- Please do NOT use chemical solutions to clean this product. Please wipe the monitor with a clean soft cloth to maintain the brightness of the surface.
- To avoid damaging the product, please do not take apart or repair the unit by yourself without adjustable component in the unit.
Product Feature
Full HD panel, viewing details with confidence
High bright 1000nit, visible in sunlight
Intuitive buttons operation, 4 custom function shortcut buttons to improve work efficient
← Support 4K@60 HDMI Input and Output
Under HDMI signal the audio meter level can be display max 8
channels; under SDI signal can be display max.16 channels
HDR monitoring, what you see is what you get
Custom 3D-LUT, preview film look
With Waveform, RGB Histogram, Focus Assist, Monochrome etc.
functions, help you accurately exposure and focus every shot
Dual speakers
Built-in front and rear Tally light, enhance team cooperation
Multiple power supply ways (DC IN, XLR, V-mount battery plate)
CONTENTS
- Product Description 3
1.1 Front Panel 3
1.2 Rear Panel 5
1.3 Power Input Way 6
1.4 TALLY Indicator Connection 7
2. Menu Operation Instruction 8
3. Menu Function Instruction 9
4. How to Import LUT 16
5. Support Signal Formats 16
6. Parameters 17
7. Trouble Shooting 18
1. Product Description (Take 21.5" as an example)
Note: Different sizes are slightly different in appearance, please refer to the actual product.
1.1 Front Panel
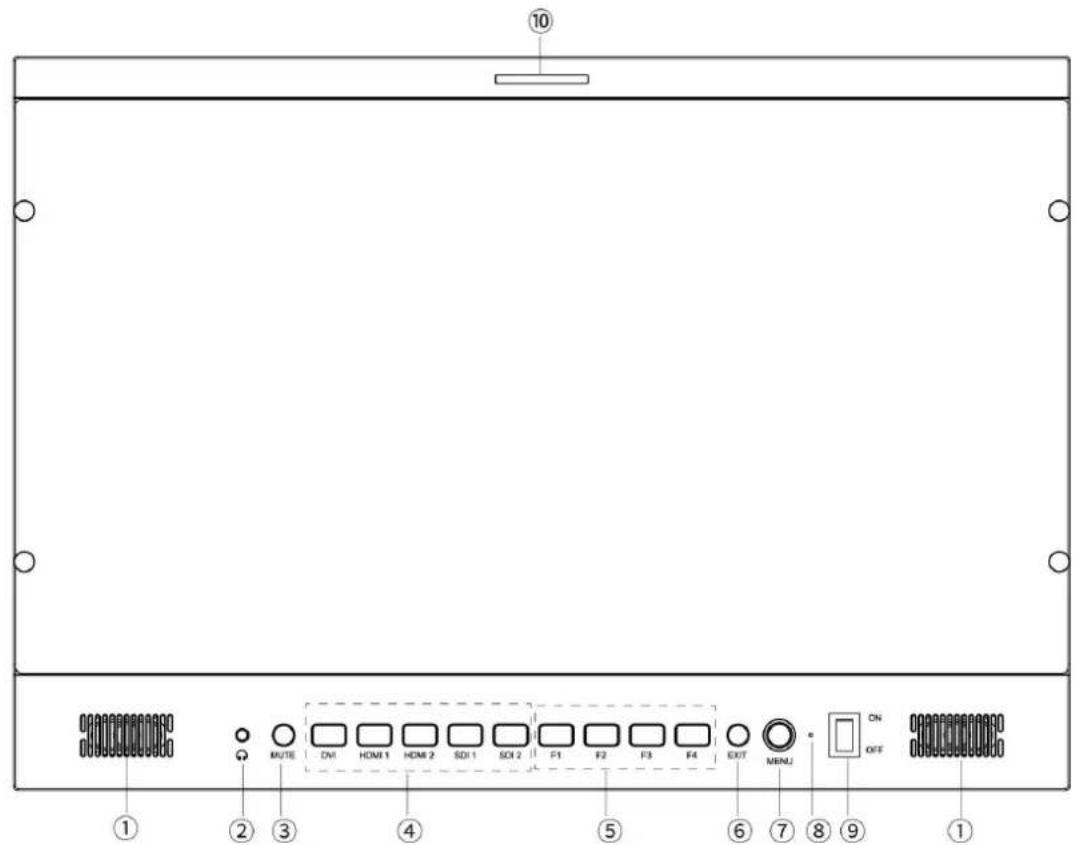
| Number | Instruction |
| 1 | Speaker |
| 2 | 3.5mm headphone jack |
| 3 | Mute KeyWhen the menu is not displayed, press it on mute. When turned on, the button will a green constant light; closed the mute fun the button light turn off |
| 4 | Signal Input SelectionWhen the menu is not displayed, the signa source can be selected. After selection, the button will display a green constant light. |
| 5 | Custom Function KeyUsers can enter the main menu User OptiShortcut Key to set F1~F4 as common furkeys. After setting and close menu, simply to turn on or off the function |
| 6 | Return/Exit menu |
| 7 | Function when OSD is displayedRotate to select the desired function or parameter, and press confirm after selectionFunction when OSD is not displayedRotate to adjust volume or backlight (can b to volume or backlight in the menu User (Left Right Key Set)Press to enter main menu |
| 8 | Power IndicatorAfter the monitor is properly connected to t power, turn on power switch the indicator c red, and display green after input signal |
| 9 | Power ON/OFF |
| 10 | Tally Indicator (Red、Green、Yellow) |
1.2 Rear Panel
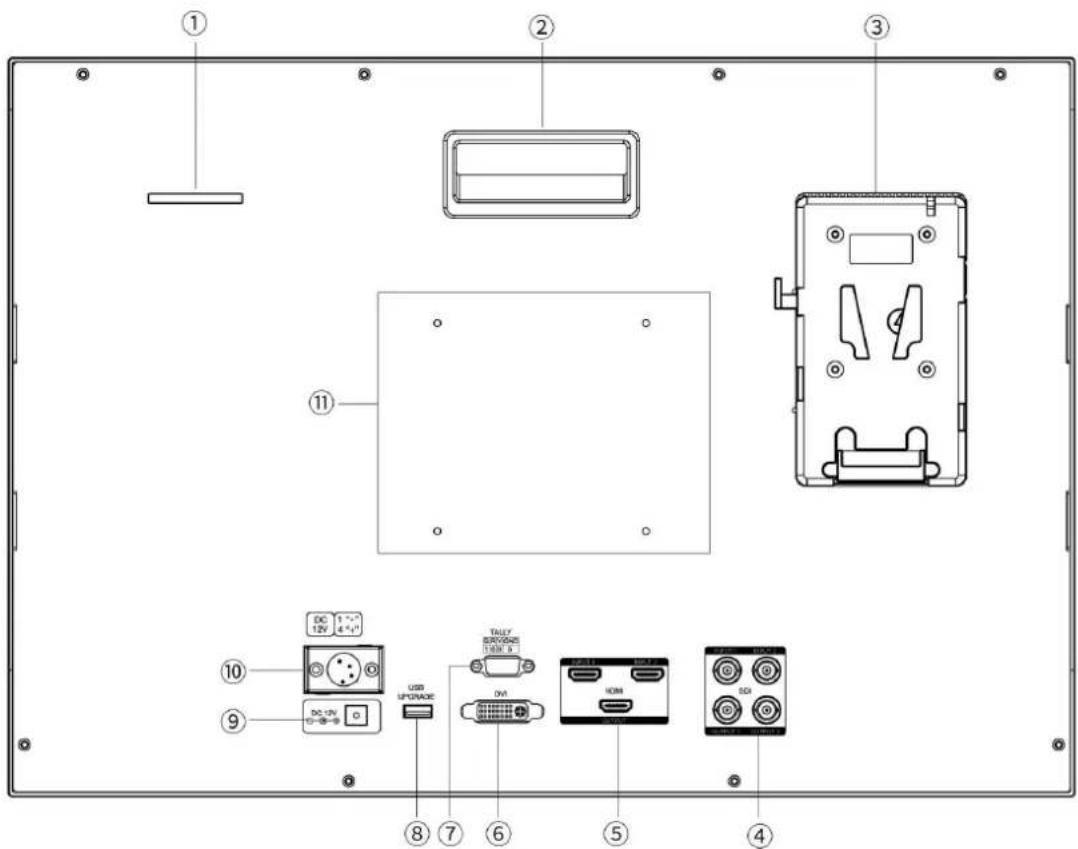
| Number | Instruction |
| 1 | Tally Indicator (Red、Green、Yellow) |
| 2 | Handle |
| 3 | V-mount Battery Plate |
| 4 | 2*3G-SDI Signal Inputs and Outputs |
| 5 | 2*HDMI Signal Inputs, 1*HDMI Signal Outp |
| 6 | DVI Signal Input (VGA input from this por conversion module signal conversion) |
| 7 | Tally (Indicator) Signal Input |
| 8 | LUT File/Upgrade File Importing port |
| 9 | The direct DC plug-in power input port su |
| 10 | 4-pin XLR DC power input |
| 11 | VESA Holes (100x100mm) |
1.3 Power Input Way
There are three ways of power supply to our monitor:
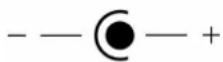
a. Powered by the direct plug-in power input port supply.
Please select DC power plug supply and the polarity is as image below:
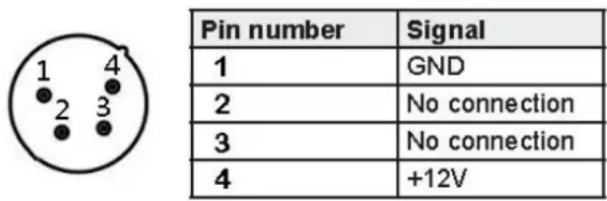
b. Via 4 pin XLR interface power supply, to share power with the camera or via power adapter input.
Polarity of the 4-pin XLR power input as below image, please note the polarity of the power input, otherwise it may damage monitor.
c. Add battery to the monitor battery plate to supply the power.
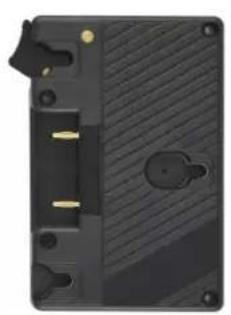
The product back case including battery plate is available for two types of batteries. Customers can choose different battery plates according to their needs. (If the customers have no requirement on the battery, the factory assembles Sony V-Mount Plate by default).
◆ Battery Plates
natural_image
Black plastic electronic device casing with ribbed top and mounting holes (no text or symbols visible)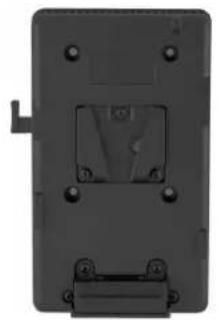
natural_image
Back view of a black rectangular electronic device with mounting holes and a central square component (no visible text or symbols)Panasonic Anton Plate Sony V-Mount Plate
We assemble the suitable battery plate for the customers according to the different requirements of the batteries. If the customers have no requirement on the battery, the factory assembles Sony V-Mount Plate by default.
Remark: According to the different specification of the battery, the capability is different, and the working time for the monitor will be different. Higher capability (working time) will be longer.
Without the charging circuit design for the monitor, please remove the battery to charge with the battery charger.
Suggestion: Better to remove the battery if don't use this product in a long time.
1.4 TALLY Indicator Connection
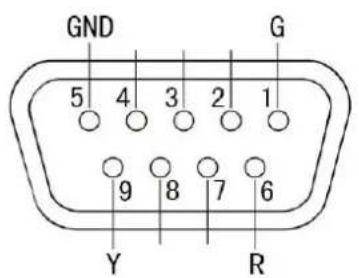
| Indicator colors | Pin connection |
| Green | 1-5 |
| Red | 6-5 |
| Yellow | 9-5 |
2. Menu Operation Instruction
After the monitor is properly connected to the power, turn on the monitor power switch.
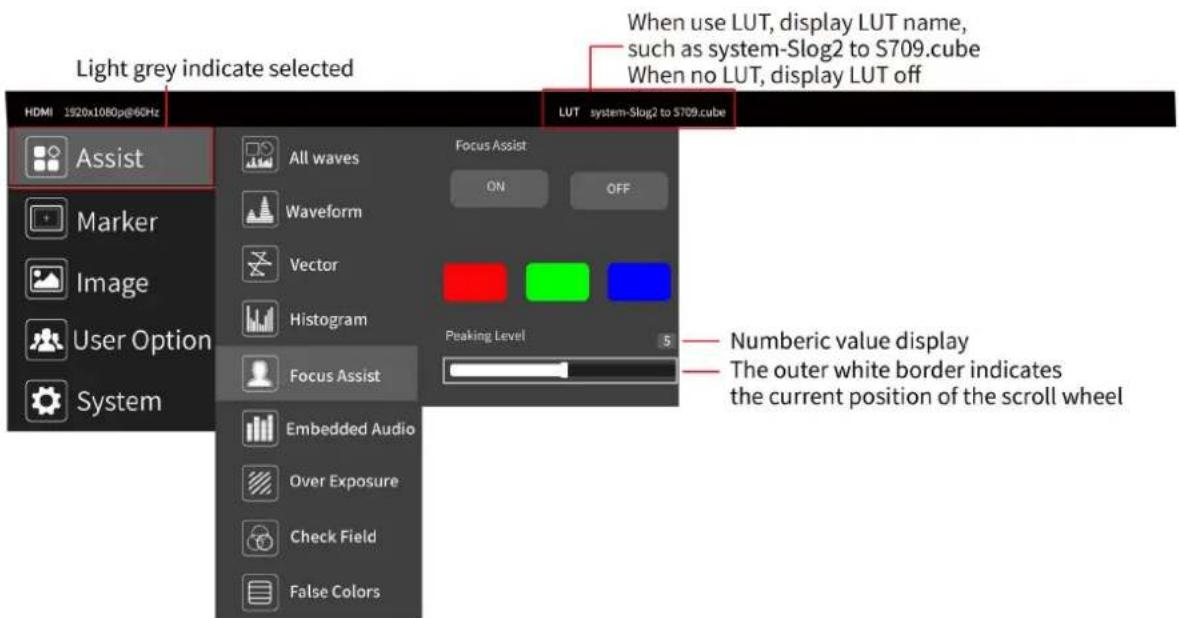
2.1 Press MENU knob to enter OSD main menu, and rotate it to select the first level menu, the icon will turn gray after selected, press MENU knob confirm to enter the secondary menu.
2.2 After enter the secondary menu, rotate MENU knob to select the function, and press it confirm to enter three level menu, then rotate MENU knob to select turn on/off the function or select the detail parameter, press MENU knob confirm after selected
2.3 Press EXIT button to exit the menu
3. Menu Function Instruction
Assist
 All Waves All Waves | ON, OFFAfter turning on, waveform, vector, histogram and embed audio will be shown. |
 Waveform Waveform | ON, OFFMode: RGB, YUV, YWaves Trans.: Off, 25%,50%,75%This essential feature assists with the calibration of professional video cameras. It shows the overall brightne the image assisting the video professional in correcting exposure. The waveform feature also checks the evenne the lighting when lighting a chromakey or background. |
 Vector scope Vector scope | ON, OFFShows how saturated the image is and where the pixe image land on the color spectrum. |
 Histogram Histogram | Histogram: ON, OFFMode: RGB1, RGB2, YY HistogramA quantitative tool to check the picture brightness, display different color for different brightnessRGB HistogramIt can display the graphic of color tone distribution, can intuitively display the exposure status of the image, and overlapping histograms in red, green, and blue channels |
 Focus Assist Focus Assist | ON, OFFFocus Color: Red, Green, BlueAfter turned on, the Focus Level~(10) and Focus Colo can be adjusted.It highlights the areas that are in focus so you are ab quickly focus the camera and not miss crucial shots. |
 Embedded Audio Embedded Audio | ON, OFFDisplay an audio diagram after enabled to help you un the audio status being used.Under HDMI Signal, max display 8 channelsMode: pr1, gp1, gp2, gp12Audio Out: ch1-2, ch3-4, ch5-6, ch7-8pr1 display1-2 channel, gp1 display 1-4 channel, gp2 di 5-8 channel, gp12 display 1-8 channelUnder SDI Signal, max display 16 channelsMode: pr1, gp1, gp2, gp12, gp3, gp4, gp14Audio Out: ch1-2, ch3-4, ch5-6, ch7-8, ch9-10, ch11-12 ch13-14,ch15-16pr1 display1-2 channel, gp1 display 1-4 channel, gp2 di 5-8 channel, gp12 display 1-8 channel, gp3 display 9-13 channel, gp4 display 14-16 channel, gp14 display 1-16 |
 Over Exposure Over Exposure | ON, OFFAfter the exposure is turned on, the Exposure Level (100IRE),, can be adjusted. |
 Check Field Check Field | On, OffMode: red, green, blue, grayWhen enabled, hue and saturation adjusted quickly and accurately. |
 False Color False Color | ON, OFFMode: Normal, ARRIAn image that depicts an object in colors that differ from a photograph (a true color image) would show. |
 Time Code(Only Under SDI Signal) Time Code(Only Under SDI Signal) | ON,OFFMode: LTC, VITCSame as camera time code consists of four groups of which respectively represent hours, minutes, seconds and frames. Through the time code, you can quickly find aframe in the video, so that in the later multi-camera e can use the time code function to quickly align the vid materials shot at different camera positions at the same saving post-production time. |
Marker
 Grids Grids | ON, OFFMode: 2x2, 3x3, 4x4, 5x5, 6x6, 7x7, 8x8, 9x9Color: Red, Green, Blue, Black, White, GrayThe area of the picture can be divided into 4 ,9, 1649,64,81 equal grids. |
 Safe Frames Safe Frames | ON, OFFMode: 80%, 85%, 90%, 93%, 96%, 2.35:1Marker Line Color: Red, Green, Blue, Black, White, |
 Center Marker Center Marker | ON, OFFMarker Line Color: Red, Green, Blue, Black, White, |
 Ratio Marker Ratio Marker | ON, OFFMode: 4:3, 13:9, 14:9, 15:9, 16:9, 1.85:1, 2.35:1Marker Line Color: Red, Green, Blue, Black, White,Modified Mark: 0~5 |
Image
 Scan Mode Scan Mode | Under Scan, Over Scan |
 | Auto, 16:9, 16:10, 4:3, 5:4, 1.85:1, 2.35:1, Full Screer |
| Aspect Ratio | |
 Anamorphic Anamorphic | ON, OFFMode: 1.33x, 1.6x, 2.0x, 2.0x mag, UserUnder User, you can custom adjust nx (1.20x~2.00x)Allows you to use anamorphic lenses or adapters and image unsqueezed, even if your camera does not de-so in camera. |
 Image Flip Image Flip | ON, OFFMode: H Flip, V Flip, H_V Flip |
 Zoom Mode Zoom Mode | ON, OFFMode: 2X, 4X, 9X, 16X, UserUnder User, you can adjust 100%~200%It is HD signal in any part, an amplification for high q close-up. |
 Image Freeze Image Freeze | ON, OFF |
 P2P(Pixel to Pixel) P2P(Pixel to Pixel) | ON, OFFEnable the filmmaker to check the image from the 1:1 source without scaling.This feature is essential for captu optimum detail. |

User Option
 LUT LUT | ON, OFFLUT is a table for quickly looking up and output speci data. By loading different 3D-LUT tables, it can quickly recombine color tone to form different color styles.LUT Import: ConfirmLUT Table: display the built in SLOG2, SLOG3, LOGVLOG and the custom LUTs |
 HDR HDR | HDR: ON, OFFMode: HLG1, HLG2, HLG3HDR can provide more dynamic range and the details image, it is better to reflect the visual effects in the re environment. |
 Display Adjustment Display Adjustment | Backlight: 0~100Adjust the screen brightnessBrightness: 0~100Adjust the image brightnessContrast: 0~100Adjustment of the ratio between the brightest and darke of the image . When adjusting, pay attention to the se hierarchy in the image. If the proportion is too large o small, it can cause the image to lose its colorful appeSaturation: 0~100Adjustment of color concentrationTint: 0~100It is the most accurate standard for distinguishing vario different colors. Determine what a certain color is actua via the color appearance. |
 Color Adjustment Color Adjustment | Color Temp.: 5600K, 6500K, 9300K, UserUnder the “user”, the red, green, and blue values of the image can be adjusted (0~255) |
 | F1~F4Shortcut List: All Waves, Waveform Vector, Histogram, |
| Shortcut Key | Embedded Audio, Center Marker, Safe Frames,Grids, Fo Assist, False Colors , Over Exposure, Anamorphic, Imag Aspect RatioSet the shortcut functione.g.: Using the MENU knob to select and confirm. Er menu --User Option--Shortcut Key--F1 select one of p functions, such as “All Waves”, press confirm after sele and the icon show light gray. Then when you exit me could press F1 directly on the front of panel to turn o waves” function.Same setting for F2~F4 |
 Left Right Key Set Left Right Key Set | Backlight, VolumeAfter selecting one of them, when the menu is not dis rotate the MENU knob can directly adjust |

System
 Language Language | English, 简体中文Español, Português, Français, Nederlands, Deutsch,日本,詰繁體中,歓국어 русский язык |
 OSD Option OSD Option | OSD Time: off, 15s, 30s, 45sSelect the display time of the menu on the screenOSD Trans: OFF, 25%, 50%, 75%Adjust the transparency of the menu picture backgro the screen.No Signal: Red, Green, Blue, Black, White, Gray |
 | Mute: ON, OFFVolume: 0~100 |
| Volume | Adjusting the speaker volume |
 Reset Reset | After confirmed, the system back to original setting. |
| [Firmware Update] | Firmware VersionFTY CAL: On/OffConfirmEach monitor has color calibration before ex-factory, factory calibration button turn on by default. After turn off, the monitor will without has color calibration, sug don't turn it off.How to upgrade?1. USB flash driver formatSupports FAT322. After copying the update file to USB flash driver inserting it into USB port of the monitor, use MENU select Confirm and press to update.3. The monitor will turn off automatically after finishi please turn on manually4. Check the firmware version whether the latest on |
4. How to Import Custom LUT
4.1 USB flash driver format
Supports FAT32
4.2 Max Files Limit Maximum 32 Lut files
4.3 File requirements
- The LUT file format suffix should be .cube
- Single file not exceeded to 7.9Mb
• Support LUT-3D-Size 16,17,32,33,64,65
Remark: LUT file name must be English or Arabic numerals
4.4 Steps for loading
4.4.1 Make sure the USB flash driver correctly insert
4.4.2 Enter main menu User Option--LUT-- Import -- Confirm to load
the monitor will auto detect the USB flash driver
If there is valid LUT file in USB flash driver, the monitor will load LUT files and show “[n] name. The [n] shows the quantity number. The “name” should in LUT files’ name. If load successful, the screen will show “complete[n]”. [n] Stands for the quantity number for LUT files should under 32.
PS: How to clear up the imported LUTs?
Insert a empty USB flash driver to the monitor, enter main menu User Option--LUT-- Import -- Confirm, the imported LUTs will be clear up.
5. Support Signal Format
| HDMI | 720p(60/59.94/50/30/29.97/25/24/23.98)1080i (60/59.94/50)1080p(60/59.94/50/30/29.97/25/24/24sF/23.98/23.98sF)4K UHD 3840×2160p (60/50/30/29.97/25/24/23.98Hz)4096×2160p (60/50/30/29.97/25/24/23.98Hz) |
| SDI | 720p(60/59.94/50/30/29/25/24/23.98)1080i(60/59.94/50)1080p (60/59.94/50/30/29.97/25/24/24sF/23.98/23.98sF) |
6. Parameters
| Panel Size | 13.3" | 21.5" |
| Resolution | 1920×1080 | 1920×1080 |
| Dot Pitch (mm) | 0.153 (H) X 0.153 (V) mm | 0.24795 (W) X 0.24795 (H) m |
| Aspect Ratio | 16:9 | 16:9 |
| Brightness | 1000cd/m2 | 1000cd/m2 |
| Contrast | 800:1 | 1000:1 |
| Viewing Angle | 85°/85°(L/R) 85°/85°(U/D) | 89°/89°(L/R) 89°/89°(U/D) |
| Backlight | LED | |
| Inputs | 2*3G-SDI, 2*HDMI 2.0, DVI-I, Tally | |
| Outputs | 2*3G-SDI, 1*HDMI 2.0 | |
| Upgrade/LUT | USB2.0 | |
| Audio | Speakers, 3.5mm Headphone Jack | |
| Input Voltage | DC 10~24V | |
| Power | ≤ 28W | ≤ 44W |
| Special Function | TALLY Indicators | |
| Working | 0°C ~ 50°C | |
| Storage | -20°C ~ 60°C | |
| Unit Size | 330.5x231x30.15mm | 511.5×355.5×34.8mm |
| Unit Weight | 2.07kg (w/o feet stand) | 4.16kg (w/o feet stand) |
7. Trouble Shooting
If there is any problem when using the unit, please try following ways to inspect and solve. Please contact us if you still cannot solve it or have other problems.
| • Without image display Trouble shooting | |
| ◆ Video cable off or connect incorrectly | Check the quality of the cable, make sure the correct input interface |
| ◆ Without video signal input | Check the signal source and output interface connect is corrected or not |
| ◆ Monitor cannot be powered o | Check whether the power is connected, put the power switch to “on” position |
| ◆ Supply voltage instability | The power adapter or battery is poor connect with battery plate |
| ◆ self-contained power supply, polarity connect inversely | Reference "Power input way" reconnect |
| • Image/color display abnormal Trouble shooting | |
| ◆ Video cable poor contact | Change video cable, try again |
| ◆ Video signal interfered by external environment | Move to another environment to try again |
| ◆ Video input signal amplitude t low | Check signal source video output, or change source and have a try. |
| ◆ Menu color saturation adjustment closing | Enter menu to check color, or reset to factor settings |
| ◆ Check Field set in mono or & white | Reset Check Field, back to the color |
| ◆ Image deformation | Reset the image ratio |
| • Speaker without sound Trouble shooting | |
| ◆ Audio cable off or improper connection | Confirm connected with the corresponding input port |
| ◆ Volume adjustment was closed | Reset the volume control and adjust to a pro position |
| ◆ HDMI cable poor Connected | Check the quality of cable, or change cable have a try |
| ◆ No sound after switch video signal | This monitor is with audio signal only in aud and HDMI state |
Remark:
★ If there are still other problems, please contact with our related technical persons.
★ If there are changes without prior notice.
- 1000nit Broadcast Monitor
- Foreword
- Caution
- Product Feature
- CONTENTS
- Product Description (Take 21.5" as an example)
- Front Panel
- Rear Panel
- Power Input Way
- Panasonic Anton Plate Sony V-Mount Plate
- TALLY Indicator Connection
- Menu Operation Instruction
- Press EXIT button to exit the menu
- Menu Function Instruction
- Assist
- User Option
- How to Import Custom LUT
- Steps for loading
- PS: How to clear up the imported LUTs?
- Support Signal Format
- Parameters
- Trouble Shooting
- Remark:
Brand : Feelworld
Model : P133 PRO
Category : Monitor