KA07HOAFRYA - Deep fryer Kogan - Free user manual and instructions
Find the device manual for free KA07HOAFRYA Kogan in PDF.


| Product Type | Deep Fryer |
| Brand | Kogan |
| Model | KA07HOAFRYA |
| Dimensions (approx.) | 30 x 20 x 25 cm |
| Weight | 2.5 kg |
| Power Consumption | 1500 W |
| Capacity | 2.5 L |
| Material | Stainless Steel |
| Temperature Control | Adjustable (150°C - 190°C) |
| Heating Element | Immersed, enclosed |
| Oil Filter | Removable, washable |
| Safety Features | Overheat protection, cool-touch handles, automatic shut-off |
| Accessories Included | Frying basket, lid, measuring spoon |
| Cleaning | Removable oil container, dishwasher safe parts |
| Warranty | 1 year |
Frequently Asked Questions - KA07HOAFRYA Kogan
User questions about KA07HOAFRYA Kogan
0 question about this device. Answer the ones you know or ask your own.
Ask a new question about this device
Download the instructions for your Deep fryer in PDF format for free! Find your manual KA07HOAFRYA - Kogan and take your electronic device back in hand. On this page are published all the documents necessary for the use of your device. KA07HOAFRYA by Kogan.
USER MANUAL KA07HOAFRYA Kogan
natural_image
Modern black and silver electric oven with digital display and control buttons (no visible text or symbols)SMART GRILL & AIR FRYER
KA07HOAFRYA
Safety & Warnings 3
Components 5
Overview 5
Before First Use 6
Operation 7
Cleaning & Care 17
Notes 18
SAFETY & WARNINGS
- Observe the following safety precautions before using this appliance. Save these instructions for future reference.
- Read this user guide carefully before operating the appliance.
- To prevent electric shock, do not immerse the power cord, plug, or appliance body in water.
- Before using the appliance, ensure the power cord is fully untied to avoid accidents.
- The external surface of the appliance becomes hot during and after use. Avoid touching it to prevent burns.
- Extra caution is required when children are present. Children should not use this appliance unsupervised and should be kept out of reach.
- When the appliance is on, avoid swinging the plug or cord to prevent strong currents and injuries from sparks.
- Never hang the power cord over the edge of a table or counter or place it on a hot surface.
- If the power cord or plug is damaged, or if the appliance fails to operate, cease use immediately and contact help.Kogan.com for support.
- Avoid damaging, bending, stretching, or twisting the power cord. Do not place heavy objects on it or pinch it.
- When the appliance is not in use, unplug it from the electrical outlet to prevent electric shock or fire caused by aging insulation.
- Use the matching accessories correctly to prevent fire or injury during operation.
- Place the appliance in a dry environment and do not use it outdoors.
- During use, ensure at least 15cm of space above and around the appliance for proper air circulation.
- Keep the appliance on a stable surface and away from flammable materials.
- Only cook consumable food in the grill. Do not place large pieces of food or metal objects inside to avoid fire or danger.
- Do not place items like paper, cardboard, plastic, cloth, or other flammable materials in the appliance.
- When moving the appliance, allow it to cool down and unplug the power cord.
- Do not open the lid or move the cooking tray or accessories while the appliance is operating to avoid burns from high temperatures or hot liquids.
- Do not place anything on top of the grill or obstruct its heat dissipation vents.
- This appliance is for home use only and should not be used for any other purpose.
- This appliance cannot be operated with an external timer or a separate remote control.
- This appliance is not intended for use by persons (including children) with reduced physical, sensory or mental capabilities or lack of experience and knowledge, unless they have been given supervision or instruction concerning use of the appliance by a person responsible for their safety.
- This appliance can be used by persons with reduced physical, sensory, or mental capabilities, or those lacking experience and knowledge, if they are supervised or instructed on safe use and understand the hazards involved.
- Do not use this appliance for deep-frying.
- This appliance is intended for household and similar applications, such as:
- Staff kitchen areas in shops, offices, and other work environments.
o Farmhouses.
- By clients in hotels, motels, and other residential-type environments.
- Bed and breakfast-type environments.
- This appliance is not intended for use by children under the age of 8.
• Children must not play with the appliance.
- Cleaning and maintenance must not be performed by children without supervision.
- Keep the appliance and its cord out of reach of children under 8 years old.
COMPONENTS
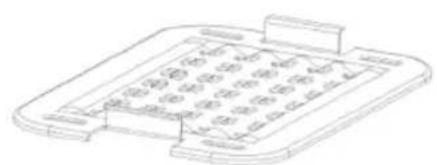
natural_image
Line drawing of a handheld electronic device with no visible text or symbolsNon-stick Grill Plate
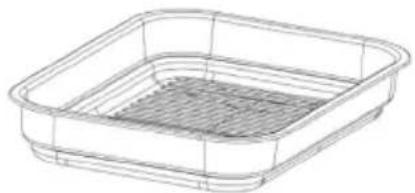
natural_image
Line drawing of a square container with a mesh inner layer (no text or symbols)Non-stick Cooking Pot
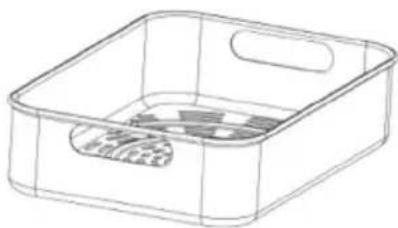
natural_image
Line drawing of a rectangular container with internal compartments and a handle (no text or symbols)Non-stick Crisper Basket
OVERVIEW
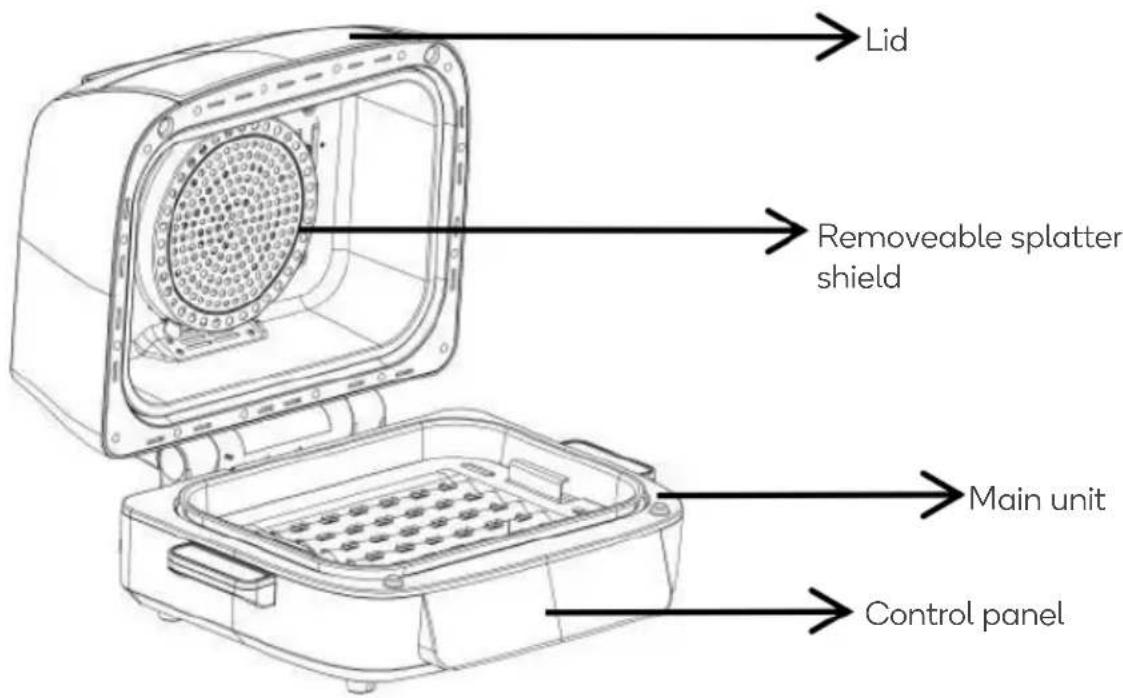
BEFORE FIRST USE
- Remove all packaging materials, promotional labels, and tape from the unit.
- Remove all accessories from the package and read this user guide carefully, paying particular attention to operational instructions, warnings, and important safeguards to avoid injury or product damage.
- The device should be used for the first time without any food inside, as it may produce some smoke or odours due to coating residues. Allow the device to heat up on the highest temperature setting for approximately 5 minutes without any food in it.
- Wash the grill grate, splatter shield, crisper basket, and cooking pot in warm, soapy water, then rinse and dry thoroughly. The grill grate, splatter shield, crisper basket, and cooking pot are also dishwasher safe. Never clean the main unit in the dishwasher.
Splatter Shield
- Located on the underside of the lid, the splatter shield keeps the heating element clean. Always ensure the splatter shield is installed when cooking.
- Failure to use the splatter shield will result in oil buildup on the heating element, which can cause smoking.
Installing the splatter shield:
- To install, gently push the splatter shield into the back of the lid. Align the back tab of the splatter shield with the slot on the back of the lid. Then push the splatter shield upward until it clicks into the clip on the front of the lid.
Removing the splatter shield:
Remove the splatter shield for cleaning after every use. First, allow the splatter shield to cool completely. Then, remove it by using your thumb to release the front clip by pushing the front clip upward and using your other hand to pull one of the tabs toward you. This will release the splatter shield, allowing you to pull it out of the slot along the back of the lid.
OPERATION
Control Panel
The control panel displays the time in an HH:MM format. The cooking temperature and cooking time alternate.
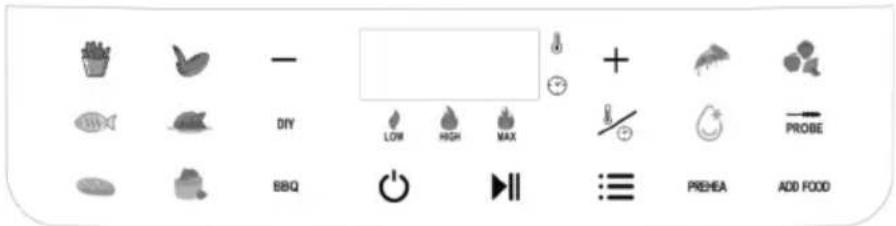
| Programs Icons | Time (default) | Temperature (default) | Time range | Temperature range | |
| Fries |  | 20min | 200°C | 1-60min | 50-205°C |
| Chicken wings |  | 20min | 205°C | 1-60min | 50-205°C |
| Fish |  | 15min | 180°C | 1-60min | 50-205°C |
| Chicken |  | 25min | 205°C | 1-60min | 50-205°C |
| Bake |  | 15min | 180°C | 1-120min | 50-205°C |
| Cake |  | 20min | 180°C | 1-30min | 50-205°C |
| Pizza |  | 15min | 195°C | 1-90min | 50-205°C |
| Dehydrate |  | 6h | 50°C | 1min-24h | 50-90°C |
| Defrost |  | 10min 120°C 1-60min 40-120°C | |||
| DIY | DIY | 15min | 205°C | 1-60min | 50-205°C |
| BBQ |  | 20min | 150°C | 1-30min | 150-205°C |
| [2T38] | 20min | 180°C | 1-30min | 150-205°C | |
| [306V] | 20min | 205°C | 1-30min | 150-205°C | |
| PROBE |  | Test the current food temperature. | |||
Power Button
- Once the unit is plugged in, press the 'Power' button to turn on the unit. It will enter standby mode, and the indicator on the 'Power' button will illuminate.
- Pressing the ‘Power’ button during cooking will stop the current cooking program and turn off the unit.
- Once the cooking process is finished, the display will show 'END', the heating element will stop working, and the motor will continue running for 1 minute before beeping 5 times and entering standby mode. If you need to stop the unit earlier, press the 'Power' button to switch the unit off.
Preheat
- Press the ‘START/STOP’ button to begin preheating after selecting the preset program (this applies to all program buttons except ‘Dehydrate’, ‘DIY’, and ‘Defrost’). The indicator on the ‘Preheat’ button will illuminate.
- If needed, you can adjust the time or temperature (these adjustments are specifically for the cooking process, and the preheat process cannot be adjusted).
- Preheating takes approximately 2 minutes, depending on the selected temperature setting.
Note:
The time and temperature settings for the preheat process are fixed and cannot be adjusted. If you do not require the preheat process, press the chosen function button again during preheating to cancel the preheat process. The ‘ADD FOOD’ indicator will illuminate.
Add Food
- When preheating is complete, the unit will beep three times, and the indicator on the 'ADD FOOD' button will turn on.
- Open the lid and place the ingredients on the cooking plate.
- Once the lid is closed, cooking will begin, and the timer will start counting down.
- If you need to open the lid during the cooking process, the unit will pause temporarily; closing the lid will resume the previous operation automatically, with no need to press the 'START/STOP' button again.
- If you press the 'START/STOP' button, the cooking process will pause. During cooking, the time and temperature can be adjusted by pressing the 'TIME & TEMP' button.
- If the lid does not open to add the food inside after the preheat process finished, unit will keep working as the preheat mode.
Notes:
- If the lid is not opened within 30 minutes, the unit will automatically enter standby mode.
- If food is not added within 30 seconds after opening the lid, the unit will automatically enter standby mode after 6 consecutive reminders (two beeps every 30 seconds).
TEMP/TIME Button
- Press the ‘TEMP/TIME’ button until the temperature indicator illuminates. Use the ‘+’ and ‘-’ buttons to adjust the cooking temperature in any program.
- After selecting a program, adjust the cooking temperature if needed, then press the 'START/STOP' button to start cooking. When using the BBQ program, toggle the 'BBQ' button to adjust the cooking temperature mode – 'LOW', 'HIGH', 'MAX'.
- To adjust the temperature, use the ‘+’ and ‘-’ buttons. Adjustments are made in 5°C increments. If you press and hold the ‘+’ or ‘-’ buttons for more than 2 seconds, the temperature settings will adjust quickly in 5°C increments.
- Press the ‘TEMP/TIME’ button until the time indicator illuminates. Use the ‘+’ and ‘-’ buttons to adjust the cooking time in any program. After selecting a program, adjust the cooking time if needed, then press the ‘START/STOP’ button to start cooking.
- To adjust the time, use the ‘+’ and ‘-’ buttons. Adjustments are made in 1 minute increments. If you press and hold the ‘+’ or ‘-’ buttons for more than 2 seconds, the time settings will adjust quickly in 5 minute increments within the first hour, and in 30 minute increments for times exceeding 1 hour.
Note:
To adjust the temperature or time during cooking, press the ‘+’ or ‘-’ buttons. The unit will then resume cooking at the new settings. All time or temperature adjustments made before preheating, during preheating, and during cooking refer specifically to the cooking process.
START/STOP Button
- After selecting the temperature and time, press the 'START/STOP' button to begin cooking.
- During the preheat process, pressing the 'START/STOP' button will pause the unit, displaying the temperature and time; pressing the 'START/STOP' button again will resume operation.
- During the cooking process, pressing the 'START/STOP' button will pause the unit, and the display showing the time will stop. Press the button again to continue cooking.
- If you need to re-select the program during the preheat or cooking process, press the 'START/STOP' button first, then re-select the program.
Shake Function
When the program reaches half of the set time, the selected program button will flash, and the display screen will illuminate 'SHA' and flash. The unit will emit 5 beeps to remind the user to turn the food over. If the drawer is not pulled out, the program will continue to run until the end of the countdown.
Note:
The Fish, Bake, Cake, Dehydrate, Defrost, and Pizza programs do not have the Shake function.
Standby Mode
If there is no operation on the control panel within 1 minute after pressing the 'Power' button, the machine will beep 5 times and then enter standby mode.
Cooking Programs
Fries:
- Place the cooking pot in the unit with the indent on the pot aligned with the bump on the main unit. Place the crisper basket in the pot, then close the lid.
- Press the 'Fries' button. The default temperature is 200^ C, and the default time is 20 minutes. Press the 'TEMP +/-' buttons to adjust the temperature setting from 50^ C to 205^ C and press the 'TIME +/-' buttons to adjust the cooking time from 1 minute to 60 minutes.
- Press the 'START/STOP' button to begin preheating. The indicator will illuminate.
- When preheating is complete, the indicator will turn off and beep 3 times and the 'ADD FOOD' indicator will illuminate.
- Open the lid and place ingredients in the crisper basket. Once the lid is closed, cooking will begin, and the timer will start counting down.
- For best results, it is recommended to shake ingredients frequently. When you open the lid, the unit will pause. Use silicone-tipped tongs to toss your food or oven mitts to shake the basket. When done, close the lid. Cooking will automatically resume after the lid is closed.
- When the cook time is complete, the display will illuminate 'END'. The motor will continue to work for 60 seconds, then beep 5 times to remind you and enter standby mode. Keep the lid open after removing your food so the unit will cool down more quickly.
Chicken wings:
- Place the cooking pot in the unit with the indent on the pot aligned with the bump on the main unit, then close the lid.
- Press the ‘Chicken Wings’ button. The default temperature is 205^ C, and the default time is 20 minutes. Use the ‘TEMP +/-’ buttons to adjust the cooking temperature from 50^ C to 205^ C and press the ‘TIME +/-’ buttons to adjust the cooking time from 1 minute to 60 minutes.
- Press the 'START/STOP' button to begin preheating. The indicator will illuminate.
- When preheating is complete, the indicator will turn off and beep 3 times and the 'ADD FOOD' indicator will illuminate.
- Open the lid and place ingredients in the pot. Once the lid is closed, cooking will begin, and the timer will start counting down.
- When the cook time is complete, the display will illuminate 'END'. The motor will continue to work for 60 seconds, then beep 5 times to remind you and enter standby mode. Keep the lid open after removing your food so the unit will cool down more quickly.
Fish:
- Place the cooking pot in the unit with the indent on the pot aligned with the bump on the main unit. Place ingredients in the pot, then close the lid.
- Press the 'Fish' button. The default temperature is 180^ C, and the default time is 15 minutes. Use the 'TEMP +/-' buttons to adjust the cooking temperature from 50^ C to 205^ C and press the 'TIME +/-' buttons to adjust the cooking time from 1 minute to 60 minutes.
- Press the 'START/STOP' button to begin preheating. The indicator will illuminate during preheating.
- When preheating is complete, the indicator will turn off and beep 3 times and the 'ADD FOOD' indicator will illuminate.
- Open the lid and place ingredients in the pot. Once the lid is closed, cooking will begin, and the timer will start counting down.
- When the cook time is complete, the display will illuminate 'END'. The motor will continue to work for 60 seconds, then beep 5 times to remind you and enter standby mode. Keep the lid open after removing your food so the unit will cool down more quickly.
Chicken:
- Place the cooking pot in the unit with the indent on the pot aligned with the bump on the main unit, then close the lid.
- Press the ‘Chicken’ button. The default temperature is 205^ C, and the default time is 25 minutes. Use the ‘TEMP +/-’ buttons to adjust the cooking temperature from 50^ C to 205^ C and press the ‘TIME +/-’ buttons to adjust the cooking time from 1 minute to 60 minutes.
- Press the 'START/STOP' button to begin preheating. The indicator will illuminate during preheating.
- When preheating is complete, the indicator will turn off and beep 3 times and the 'ADD FOOD' indicator will illuminate.
- Open the lid and place ingredients in the pot. Once the lid is closed, cooking will begin, and the timer will start counting down.
- When the cook time is complete, the display will illuminate 'END'. The motor will continue to work for 60 seconds, then beep 5 times to remind you and enter standby mode. Keep the lid open after removing your food so the unit will cool down more quickly.
Bake:
- Place the cooking pot in the unit with the indent on the pot aligned with the bump on the main unit, then close the lid.
- Press the 'Bake' button. The default temperature is 180^ C, and the default time is 15 minutes. Use the 'TEMP +/-' buttons to adjust the cooking temperature from 50^ C to 205^ C and press the 'TIME +/-' buttons to adjust the cooking time from 1 minute to 120 minutes.
- Press the 'START/STOP' button to begin preheating. The indicator will illuminate during preheating.
- When preheating is complete, the indicator will turn off and beep 3 times and the 'ADD FOOD' indicator will illuminate.
- Open the lid and place ingredients in the pot. Once the lid is closed, cooking will begin, and the timer will start counting down.
- When the cook time is complete, the display will illuminate 'END'. The motor will continue to work for 60 seconds, then beep 5 times to remind you and enter standby mode. Keep the lid open after removing your food so the unit will cool down more quickly.
Cake:
- Place the cooking pot in the unit with the indent on the pot aligned with the bump on the main unit, then close the lid.
- Press the 'Cake' button. The default temperature is 180°C, and the default time is 20 minutes. Use the 'TEMP +/-' buttons to adjust the cooking temperature from 50°C to 205°C and press the 'TIME +/-' buttons to adjust the cooking time from 1 minute to 30 minutes.
- Press the 'START/STOP' button to begin preheating. The indicator will illuminate during preheating.
- When preheating is complete, the indicator will turn off and beep 3 times and the 'ADD FOOD' indicator will illuminate.
- Open the lid and place ingredients in the pot. Once the lid is closed, cooking will begin, and the timer will start counting down.
- When the cook time is complete, the display will illuminate 'END'. The motor will continue to work for 60 seconds, then beep 5 times to remind you and enter standby mode. Keep the lid open after removing your food so the unit will cool down more quickly.
Pizza:
- Place the cooking pot in the unit with the indent on the pot aligned with the rear bump on the main unit. Then place the grill grate in the pot and close the lid.
- Press the 'Pizza' button. The default temperature is 195^ C, and the default time is 15 minutes. Use the 'TEMP +/-' buttons to adjust the cooking temperature from 50^ C to 205^ C and press the 'TIME +/-' buttons to adjust the cooking time from 1 minute to 90 minutes.
- Press the 'START/STOP' button to begin preheating. The indicator will illuminate during preheating.
- When preheating is complete, the indicator will turn off and beep 3 times and the 'ADD FOOD' indicator will illuminate.
- Open the lid and place ingredients on the grill grate. Once the lid is closed, cooking will begin, and the timer will start counting down.
- When the cook time is complete, the display will illuminate 'END'. The motor will continue to work for 60 seconds, then beep 5 times to remind you and enter standby mode. Keep the lid open after removing your food so the unit will cool down more quickly.
Dehydrate:
- Place the cooking pot in the unit with the indent on the pot aligned with the bump on the main unit, then add a single layer of ingredients to the bottom of the pot.
- Place the grill plate in the pot and add a layer of ingredients to the bottom of the grill plate. Close the lid.
- Press the 'Dehydrate' button. The default temperature is 50^ C, and the default time is 360 minutes. Use the 'TEMP +/-' buttons to adjust the cooking temperature from 50^ C to 90^ C and press the 'TIME' +/-' buttons to adjust the cooking time from 1 minute to 24 hours.
- Press the 'START/STOP' button to begin. The unit does not preheat in this program.
- When the time is complete, the display will illuminate 'END'. The motor will continue to work for 60 seconds, then beep 5 times to remind you and enter standby mode. Remove your food and close the lid.
Defrost:
- Place the cooking pot in the unit with the indent on the pot aligned with the bump on the main unit, then add the food to be defrosted to the bottom of the pot and close the lid.
- Press the 'Defrost' button. The default temperature is 120^ C, and the default time is 10 minutes. Use the 'TEMP +/-' buttons to adjust the cooking temperature from 40^ C to 120^ C and press the 'TIME +/-' buttons to adjust the cooking time from 1 minute to 60 minutes.
- Press the 'START/STOP' button to begin. The unit does not preheat in this mode.
- When the defrost time is complete, the display will illuminate 'END'. The motor will continue to work for 60 seconds, then beep 5 times to remind you and enter standby mode. Remove your food and close the lid.
BBQ:
- Place the cooking pot in the unit with the indent on the pot aligned with the rear bump on the main unit. Then place the grill grate in the pot and close the lid.
- Press the 'BBQ' button. The 'MAX' mode default temperature is 205^ C, and the default time is 20 minutes. Press 'BBQ' to adjust the temperature settings, including 'Low', 'High', and 'Max', and press the 'TIME +/-' buttons to adjust the cooking time from 1 minute to 30 minutes.
- Press the 'START/STOP' button to begin preheating. The indicator will illuminate during preheating.
- When preheating is complete, the indicator will turn off and beep 3 times and the 'ADD FOOD' indicator will illuminate.
- Open the lid and place ingredients on the grill grate. Once the lid is closed, cooking will begin, and the timer will start counting down.
Note:
During cooking, you can open the lid to check on or flip your food. The timer will pause when the lid is opened and then automatically resume after it is closed.
- When the cook time is complete, the display will illuminate 'END'. The motor will continue to work for 60 seconds, then beep 5 times to remind you and enter standby mode. Keep the lid open after removing your food so the unit will cool down more quickly.
DIY:
- Place the cooking pot in the unit with the indent on the pot aligned with the bump on the main unit, then add the food to be defrosted to the bottom of the pot and close the lid.
- Press the 'DIY' button. The default temperature is 205^ C, and the default time is 15 minutes. Use the 'TEMP +/-' buttons to adjust the cooking temperature from 50^ C to 205^ C and press the 'TIME +/-' buttons to adjust the cooking time from 1 minute to 60 minutes.
- Press the 'START/STOP' button to begin. The unit does not preheat in this mode.
- When the cook time is complete, the display will illuminate 'END'. The motor will continue to work for 60 seconds, then beep 5 times to remind you and enter standby mode. Keep the lid open after removing your food so the unit will cool down more quickly.
Probe:
The program of this procedure is to test the current food temperature when cooking.
CLEANING & CARE
- Unplug the power cord before cleaning and allow the appliance to cool down completely.
- The inner and outer surfaces of the appliance, grill plate, cooking pot, and crisper basket can be cleaned with a soft cotton cloth or sponge using a neutral detergent and water.
- Do not use hard brushes or abrasive materials for cleaning to avoid damaging the inner surface of the appliance and the protective layer of the accessories.
- Do not use toxic or corrosive cleaning agents such as gasoline, thinners, or polish.
- Ensure all cleaned parts are wiped dry before plugging in the appliance.
- Do not clean the heating tube.
- Do not immerse the appliance in any liquid, such as water.
NOTES
Need more information?
We hope that this user guide has given you the assistance needed for a simple set-up.
For the most up-to-date guide for your product, as well as any additional assistance you may require, head online to help.kogan.com
kogan.com
- SMART GRILL & AIR FRYER
- SAFETY & WARNINGS
- COMPONENTS
- OVERVIEW
- BEFORE FIRST USE
- Splatter Shield
- Installing the splatter shield:
- Removing the splatter shield:
- OPERATION
- Control Panel
- Power Button
- Preheat
- Note:
- Add Food
- Notes:
- TEMP/TIME Button
- START/STOP Button
- Shake Function
- Standby Mode
- Cooking Programs
- Fries:
- Chicken wings:
- Fish:
- Chicken:
- Bake:
- Cake:
- Pizza:
- Dehydrate:
- Defrost:
- BBQ:
- DIY:
- Probe:
- CLEANING & CARE
- NOTES
- Need more information?
Brand : Kogan
Model : KA07HOAFRYA
Category : Deep fryer