
Dia 353GB-36 - Faucets Symmons - Free user manual and instructions
Find the device manual for free Dia 353GB-36 Symmons in PDF.


| Brand | Symmons |
| Model | Dia 353GB-36 |
| Product Type | Kitchen Faucet |
| Mounting Type | Deck Mount |
| Number of Handles | Single Handle |
| Handle Type | Lever |
| Spout Type | High Arc |
| Spout Reach | 8.5 inches (216 mm) |
| Spout Height | 15.5 inches (394 mm) |
| Flow Rate | 1.5 GPM (5.7 L/min) max |
| Valve Type | Ceramic Disc |
| Finish | Polished Chrome |
| Construction Material | Brass |
| Number of Holes Required | 1 or 3 (with optional escutcheon) |
| Faucet Centers | Not applicable (single hole) |
| Included Accessories | Mounting hardware, supply lines, optional escutcheon |
| Installation | DIY-friendly, includes instruction manual |
| Warranty | Lifetime limited warranty |
| Weight (shipping) | 5.5 lbs (2.5 kg) |
| Dimensions (box) | 20 x 10 x 5 inches |
| Certifications | ASME A112.18.1, CSA B125.1, NSF 61 |
| Cartridge Type | Replaceable ceramic cartridge |
| Spout Swivel | 360-degree rotation |
| Spray Head | Pull-down with dual function (stream/spray) |
| Hose Length | 24 inches (610 mm) |
| Cleaning | Wipe with damp cloth, avoid abrasive cleaners |
Frequently Asked Questions - Dia 353GB-36 Symmons
User questions about Dia 353GB-36 Symmons
0 question about this device. Answer the ones you know or ask your own.
Ask a new question about this device
Download the instructions for your Faucets in PDF format for free! Find your manual Dia 353GB-36 - Symmons and take your electronic device back in hand. On this page are published all the documents necessary for the use of your device. Dia 353GB-36 by Symmons.
USER MANUAL Dia 353GB-36 Symmons
Operation & Maintenance Manual


| Model Numbers Specification | |
| ☐ 353GB-12 12" Grab Bar for ADA Applications☐ 353GB-18 18" Grab Bar for ADA Applications☐ 353GB-24 24" Grab Bar for ADA Applications☐ 353GB-36 36" Grab Bar for ADA Applications☐ 353GB-42 42" Grab Bar for ADA Applications | Supports up to 250 lbs.1-1/2" bar diameter3" flange diameterBar extends 1-1/2" from wallConcealed mounting for a clean lookMeets WW-P-541/8B Federal Specification for ManufacturingMeets ADA load requirements when properly installedStainless steel constructionGrab bar compatible with WingIts stainless steel grab bar fasteners (p/n GBW40) for drywall applications |
| Finish Options | Warranty |
| ☐ -STN Satin Nickel finishNote: Append appropriate -suffix to model number. | Limited Lifetime - to the original end purchaser in consumer/residential installations.5 Years - for industrial/commercial installations.Refer to www.symmons.com/warranty for complete warranty information. |
Dimensions

| Measurements | |
| A 1-1/2", 38 mm | |
| B | 15", 381 mm (353GB-12)21", 533 mm (353GB-18)27", 686 mm (353GB-24)39", 991 mm (353GB-36)45", 1143 mm (353GB-42) |
| C | 12", 305 mm (353GB-12)18", 457 mm (353GB-18)24", 610 mm (353GB-24)36", 914 mm (353GB-36)42", 1067 mm (353GB-42) |
| D ∅ 1-1/2", 38 mm | |
| E (2x) ∅ 3-1/16", 78 mm | |
| F 3-1/16", 78 mm | |
| G 1/2", 13 mm | |
Note: Dimensions subject to change without notice.
Parts Breakdown

Tools Required for Installation
| Drill:7/64" Drill Bit for Wall1/4" Carbide Tip DrillBit for Ceramic Tile |  | |
| Pencil |  | |
| Phillips HeadScrewdriver | 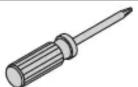 | |
| Safety Glasses |  | |
| Silicone |  | |
| Stud Finder |  |
IMPORTANT NOTES FOR PROPER INSTALLATION
DO NOT install this product without first reading and understanding the instructions. If you are unable to understand these warnings and instructions, contact professional or technical personnel for assistance - otherwise injury may occur. Grab Bar Location
- For proper mounting heights and location consult with your state and local code official having jurisdiction over the installation.
Solid Support
- Grab Bar ends must be mounted with both end positions over a wall stud. A stud finder can be used to locate wall studs. Contractor is responsible for installing Grab Bar to wall studs as instructed.
- Secure through wall board or tile to the wall stud so as to hold a minimum of 250 pounds of force.
- At least two (2) of the three (3) wood screws provided must be used on each end of the Grab Bar, top and bottom, to properly secure. Standard size wall stud limits using more than two (2) wood screws.
- If using a drill to install wood screws, a drill bit extension must be used to avoid damaging the Grab Bar.
Installation (Wall & Wall Studs)
1) Place Grab Bar at desired position. Remove covers from bar flanges and mark drill hole locations with pencil at each end on inner side of flanges.
2) Remove Grab Bar from wall. Use drill with 7/64" drill bit to drill holes into wall and wall studs at the marked positions.
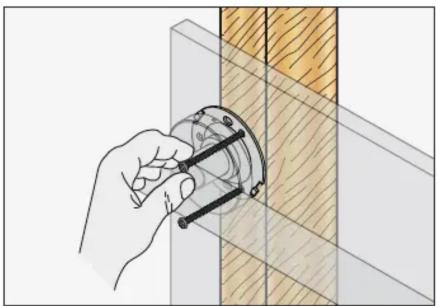
3) Align mounting holes on Grab Bar with drill holes. Insert wood screws into pilot holes for wall and wall studs. Hand tighten wood screws.


Installation (Wall & Wall Studs) Cont.
4) Tighten all wood screws using a phillips head screwdriver, securing Grab Bar to wall.
5) Place mounting covers over bar flanges so they sit flush with wall. Turn mounting covers to secure.
6) Apply a bead of silicone around the perimeter of the mounting covers to prevent water from bleeding through the mounting holes and potentially damaging the wall and wall studs.


Installation (Ceramic Tile)
1) Use drill with 1/4" carbide tip drill bit to drill holes into ceramic tile at the marked positions to prevent damage to the tiles.
2) Use drill with 7/64" drill bit to drill pilot holes into wall studs through ceramic tile.
3) Follow steps 3, 4, 5 and 6 for wall and wall studs to complete installation of Grab Bar onto ceramic tile.


Troubleshooting Chart
Problem Cause Solution
| Finish is spotting. | Elements in water supply may cause water staining on finish. | Clean finished trim area with a soft cloth using mild soap and water or a non-abrasive cleaner and then quickly rinse with water. |
For California Residents
WARNING: This product contains chemicals known to the State of California to cause cancer, birth defects, or other reproductive harm.

Brand : Symmons
Model : Dia 353GB-36
Category : Faucets