
GFWD4WH - Bin GEMINI - Free user manual and instructions
Find the device manual for free GFWD4WH GEMINI in PDF.


| Product Type | Trash Can |
| Brand | Gemini |
| Model | GFWD4WH |
| Capacity | 25 liters |
| Material | Plastic |
| Color | White |
| Dimensions (H x D) | 40 cm x 30 cm |
| Weight | 1.5 kg |
| Lid Type | Manual flip lid |
| Operation | Manual |
| Power Source | None |
| Maintenance | Wipe with damp cloth, mild detergent |
| Cleaning | Hand wash recommended; remove lid for thorough cleaning |
| Safety | Keep away from heat sources; not for hot ashes |
| Spare Parts | Lid available separately |
| Reparability | Replaceable lid; no other user-serviceable parts |
| Intended Use | Household waste disposal |
| Country of Origin | China |
Frequently Asked Questions - GFWD4WH GEMINI
User questions about GFWD4WH GEMINI
0 question about this device. Answer the ones you know or ask your own.
Ask a new question about this device
Download the instructions for your Bin in PDF format for free! Find your manual GFWD4WH - GEMINI and take your electronic device back in hand. On this page are published all the documents necessary for the use of your device. GFWD4WH by GEMINI.
USER MANUAL GFWD4WH GEMINI
ECOSMART UV ANTI-BACTERIAL
FOOD WASTE DISPOSER
環保智能除菌除臭廚餘機
MODEL NO型號: GFWD4WH
500W
Before using your product for first time, please read this instruction manual.
Please read and retain for future reference.
- Use this appliance solely in accordance with these instructions.
- This appliance is for household use only, not for commercial purpose.
- Remove all packaging material from the appliance before use.
- Please place the machine on a horizontal tabletop or ground for use; The distance between the air outlet and obstacles such as walls should be maintained at least 20CM.
- This appliance shall not be used by children of 0 to 8-year old.
- This appliance can be used by children older than 8-year old and persons with reduced physical, sensory or mental capabilities or lack of experience and knowledge, but only if they have been given supervision or instruction concerning use of the appliance in safe way and understand the hazards involved.
- Children should be supervised to ensure that they do not play with the appliance.
- Cleaning and maintenance must not be done by children.
- Have any repairs carried out solely by a qualified electrician. Never try to repair the appliance your:
- Do not handle the plug or appliance with wet hands.
- Do not immerse the main body in water.
• Children shall not play with the appliance.
- Do not leave the appliance unattended when connected to the mains supply.
- Keep hair, loose clothing, fingers and all parts of the body away from openings of the appliance.
- Only use the attachments/accessories supplied with the product.
- The maximum amount of machine waste processed by this product at once is 1kg
•The longest completion time for the machine is about 6-7 hours (the specific time varies depending on the type
and moisture content of the garbage, and the intelligent control duration varies). After the program is completed, the machine will emit 3 beeps and enter a locked state
- Before using the appliance for the first time, remove any promotional materials.
- Place the appliance on a flat, dry, stable surface.
- The appliance should not be placed on untreated wooden surface. Place the appliance on a heat resistant surface.
- Be aware that the feet of the appliance can leave some marks on the table, if this happens, remove the marks with a damp cloth.
SAFETY INSTRUCTION - ELECTRICITY AND HEAT
- Verify that the mains voltage is the same as that indicated on the rating plate on the appliance be
- Make sure that you always use a grounded wall socket to connect the appliance.
• Always remove the plug from the wall socket when the appliance is not in use.
- Remove the plug from the wall socket by pulling the plug, not the power cord.
- Make sure that the appliance, the power cord and plug do not make contact with water.
- Make sure that the appliance, the power cord and plug do not make contact with hot surface, such as a hot hob or naked fame.
- Check the appliance's power cord regularly to make sure it is not damaged.
- Do not use the appliance if the power cord is damaged. If the power cord is damaged, it must be replaced by an electrical technician or a person with similar qualification, in order to avoid any hazards.
- The appliance needs space to allow heat to escape, thereby preventing the risk of fire. Make sure that the appliance has sufficient space around it, and does not come in contact with flammable material. The appliance, the air vents must not be covered or blocked when use.
- Never use the appliance in the vicinity of flammable material.
- Certain part of the appliance may get hot during operation. Do not touch these part to prevent scalding yourself.
- If composting is used for growing flowers and grass, please clean the oil and salt in the kitchen waste before pouring it into the kitchen waste machine for production.
- Do not open the lid casually during machine operation, as it may cause odor overflow.
- Do not touch the high-temperature mixing bucket and handle during machine operation, as it may causes. If you need to touch the handle, please wear heat-resistant gloves.
PRODUCT OVERVIEW
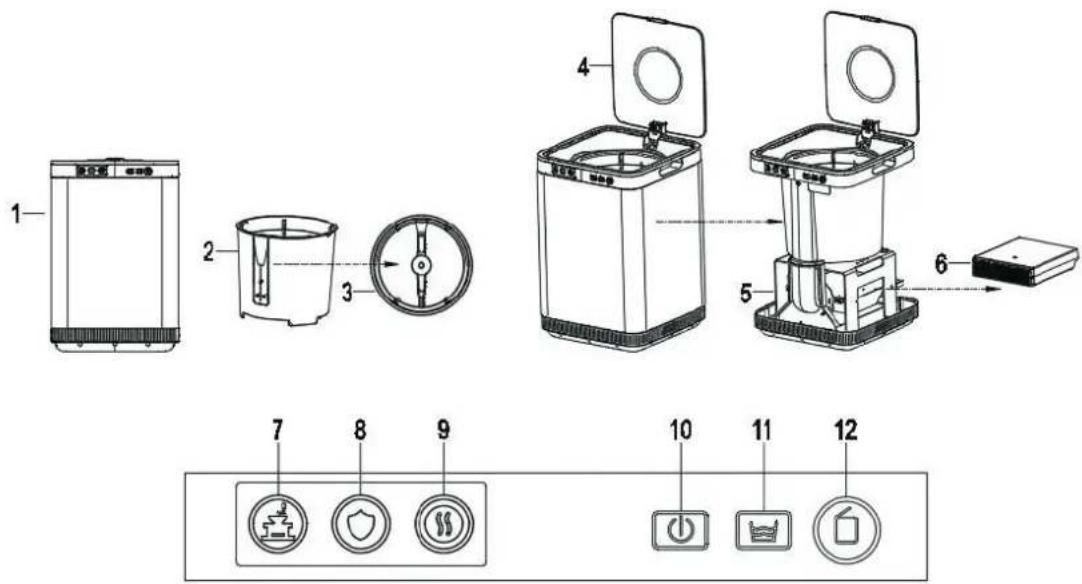
CONTROL PANEL
1.Host 7.Grinding and drying stage indicator light
2.Kitchen waste aluminum bucket 8.Disinfection and deodorization stage indicator light
3.Drum mixer 9.Cooling stage indicator light
4.Cover 10.Power button
5.UV light(UV lamp) 11.Automatic cleaning button
6.Activated carbon box 12.Cover opening button
Instructions for use
- Plug in the power supply
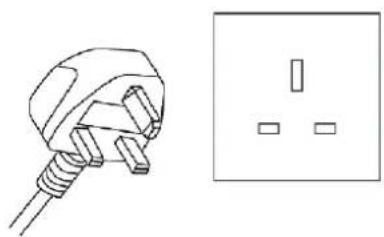
natural_image
Line drawing of a plug and its corresponding electrical outlet (no text or symbols)- Open the cover
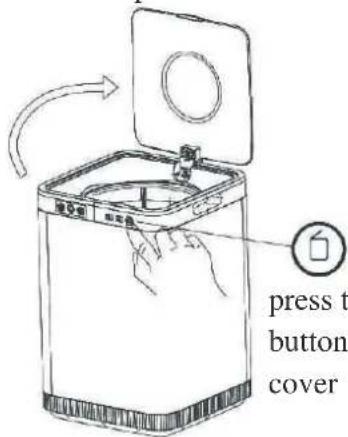
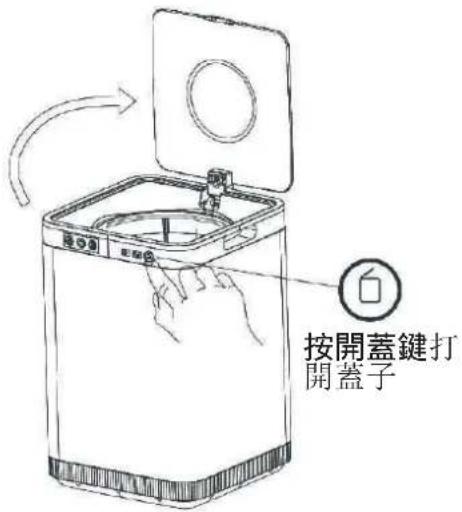
press the opening button to open the cover
- Pour kitchen waste into the kictchen waste aluminum bucket, use a brush to sweep the garbage on the side into the bucket.
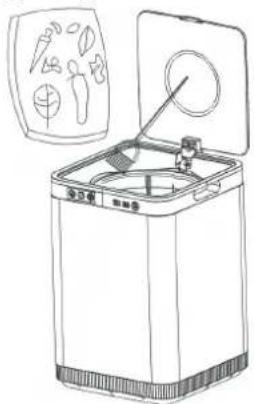
natural_image
Line drawing of a kitchen appliance with open lid and side panel (no text or symbols)- Close the cover
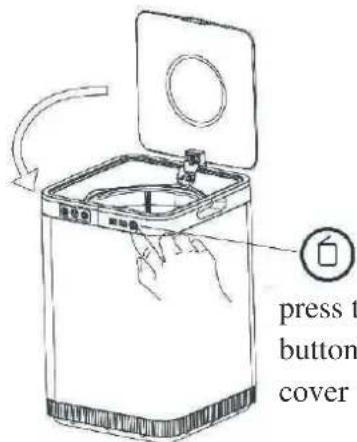
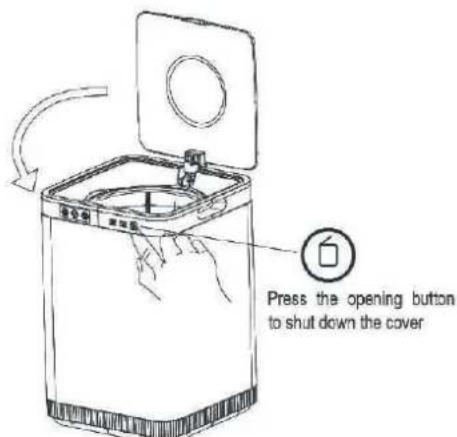
press the opening button to close the cover
natural_image
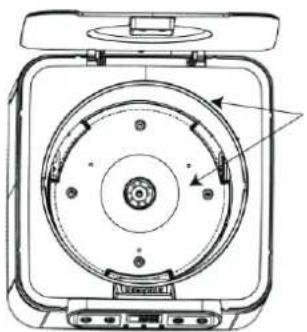
Technical line drawing of a mechanical device with central hub and mounting base (no text or symbols)Ensure that the surface of the heating plate and the surrounding area inside the machine are clean and free of foreign objects.
Clean the bottom and upper edge of the bucket to ensure cleanliness and absence of foreign objects.
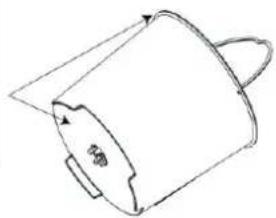
Ensure that the bottom and upper edge of the bucket are clean and free of foreign objects, otherwise it will affect the processing effect.
natural_image
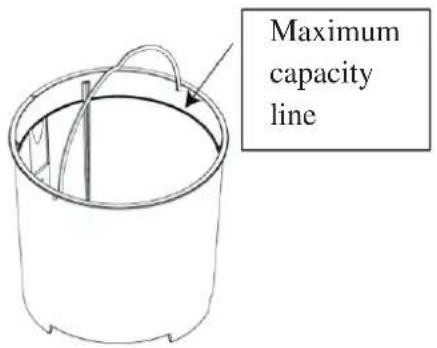
Simple line drawing of a cylindrical object with a curved handle and arrow, no text or symbols present.The weight of kitchen wastes should not exceed 1kg and the volume should not exceed the maximum capacity line of the mixing bucket.
Otherwise the machine's handling of kitchen waste will not be effective.
Attention:
(1). Try to cut kitchen waste into small pieces (such as cutting apples/pears by 50mm).
(2). Try to cut long kitchen waste short (such as cutting cucumber/radish vegetable stalks by 50mm).
(3). Try to invest as little salt and other items as possible.
(4). Do not put in large bone soup or large shellfish items.
(5). Please do not throw more than 1KG of garbage and do not exceed the maximum capacity line. Otherwise the machine's handling of kitchen waste will not be effective.
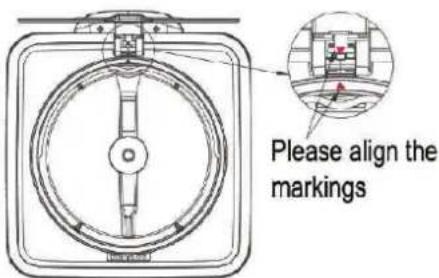
(6). Before closing the lid, align the marked arrows (otherwise it may damage the machine).
In case of power outage or other situations, after manually forcing the lid open, the machine can only be started when the system detects that the lid is closed by pressing the lid open button while the power is on.
- After closing the top cover, lightly touch the button to turn on the machine. The machine enters working mode and the UV light is on. Long press for 3 seconds, the machine stops working and returns to standby mode. When in standby mode, the three icon indicator lights on the display panel flash simultaneously.
During the work process, lightly touch the button and the machine enters a pause state, with the corresponding indicator light flashing. The pause state allows you to open the top cover, lightly touch the button again, and the machine will continue to run the current program.
After plugging in the power for 3 minutes without any operation, the machine will turn off all lights and enter a locked state. To unlock, press and hold the button for 3 seconds to put the machine into standby mode.
The indicator light automatically displays the work progress:

grinding and drying (yellow light on)

disinfection and deodorization (green light on)

cooling (blue light on)
The system will determine the processing time based on the degree and quantity of dry and wet garbage: roughly divided into low (2-3hours), Medium (4-6hours). Three processing duration (6-7hours).
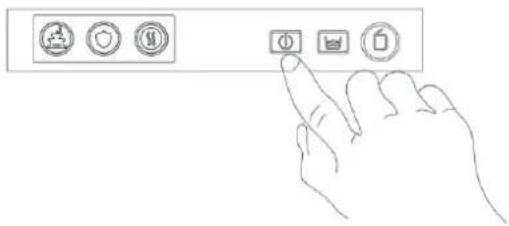
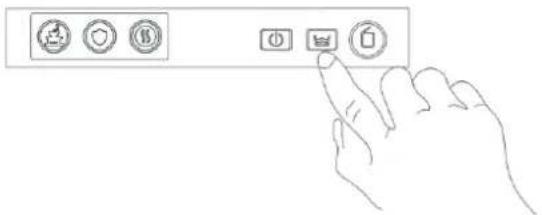
- Gently touch the button, the machine enters cleaning mode, and the three icon indicator lights on the display panel light up alternately. The machine starts working (automatic cleaning time is 1 hour).
If you encounter sticky kitchen waste that is difficult to clean, do not use hardware or metal scraping. You can put 2/3 of water into the bucket, and then press the automatic wash button to let the machine automatically clean. The solid kitchen waste will automatically come off, and then rinse the aluminum bucket of kitchen waste.
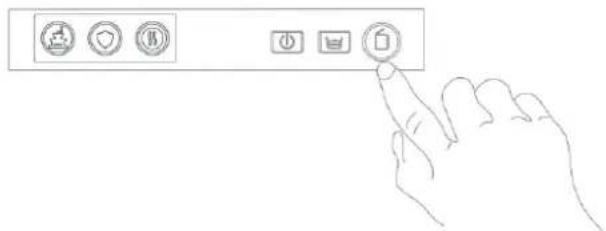
- When you want to open the top cover during work, you need to lightly touch the button to put the machine into a pause state, and then lightly touch the button to open the top cover. After opening the cover for 1 minute, the machine will automatically close the top cover and start, completing the current program. During cleaning, the lid can not be automatically opened. In standby mode, the lid will automatically close after 3 minutes of automatic opening.
After use:
1.Open the cover 2.Lift the kitchen waste bucket vertically and take it out.
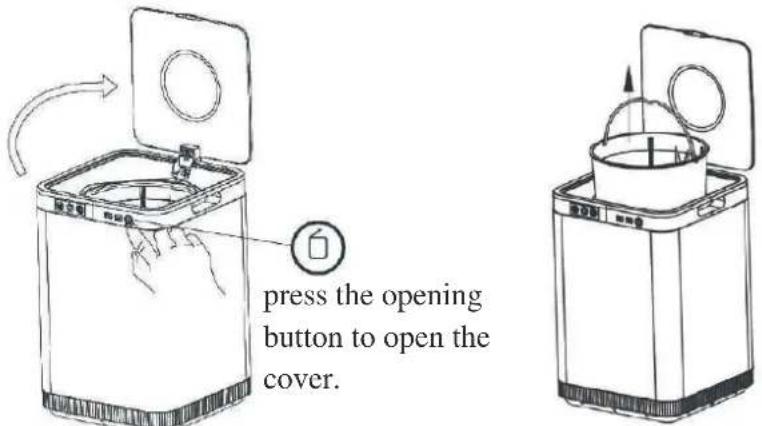
Attention: Note that the temperature remains high even after the program is completed High, please do not open the lid, wait for the equipment to cool down. Only then can the aluminum bucket be removed.
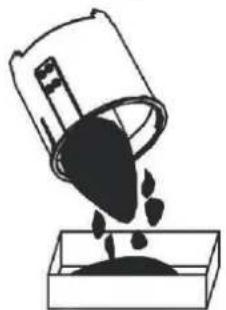
- Pour the processed waste from the kitchen aluminum bucket into the storage box.
natural_image
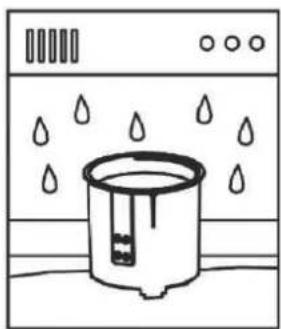
Simple line drawing of a bucket pouring liquid into a container (no text or symbols)- When using non cleaning kitchen waste aluminum buckets or directly putting them into the dishwasher, please use a soft cloth and do not scratch the coating.
natural_image
Simple line drawing of a container with liquid droplets inside, placed on a surface (no text or symbols)- Align the markings and place them back in the kitchen aluminum bucket.
- After closing the lid, unplug the plug.
- Mix the obtained fertilizer with soil in a1:30 ratio, and then add garden plants.

- Clean the kitchen waste aluminum bucket in the sink or dishwasher, and wipe the outside of the machine with a dry cloth. Finally, put the dry aluminum bucket back into the device and store it. Please use a soft cloth and do not scratch the coating.
SAFETY INSTRUCTION - LIGHT
The product contain UV light system. In normal operation the UV light would not exposed outside. When product with UV light system required have below warning:
WARNING!
- High intensity ultraviolet light.
- Eyes and skin hazard - avoid exposure to eyes/skin.
- Do not look directly at UV to avoid damaging eyesight.
Note: The UV lamp will only light up when on “power on mode”. Also it will not light up when the cover is opened<--no matter the machine is during work or not working.
Attention:
- When placing the kitchen waste aluminum bucket into the equipment according to step5, rotate it slightly left and right, and use small force to push it to the bottom, ensuring that it is completely aligned with the triangular mark and in the correct position. After the program ends, the aluminum bucket is still hot. If you want to clean it immediately, please wrap the bucket handle with a damp cloth to avoid scalding.
Can be placed in Fruit and vegetable residues:
Peels (watermelon, willow oranges, oranges, bananas, etc.)
and scraps (carrots, cauliflower, peas, chickpea puree, etc.)
Food leftovers:
Grains (bread, cereal, oatmeal, rice, pasta, pancakes, etc.), soft bones and shells (fish, eggs, shrimp, minced meat, etc.), dairy products (cheese, yogurt, etc.)
Cut poultry bones (chicken, duck, etc.)
into small pieces and put them in
Biodegradable bio materials:
Tea and coffee (filter paper, coffee grounds, tea bags, etc.)
biodegradable materials
Potted plants and leaves:
Indoor plants, garden decorations, flowers, leaves, straw, pine needles, etc
Starch:
Bread, pasta, rice, potatoes, grains, oats, and other grains
Can not be placed Soft fruit peel or fiber waste:
Corn husks, pear heads, happy fruit shells, etc
Paired with oil and sauce:
Compo stable tissue, napkins, and tissue food packaging
Sticky food:
Honey, maple syrup, jam, nut jam, etc
Bones:
Cow bones, pig bones, sheep bones, etc,
Shellfish:
Flower shells, scallops, oyster shells, etc
Daily necessities:
Soap, shampoo and conditioner, inner bags (potato chips,
biscuits, pet food), dirty diapers, baby wet paper towels,
tampons, pet feces, cigarettes, metal, general plastic,glass,
aluminum platinum packaging, alcohol, foam plastic, etc
Soup type:
Soup, vegetable water, toiletries, etc
Cleaning and maintenance
Keep the surface clean
-
Before cleaning, please unplug the plug and cut off the power.
-
Dip a soft damp cloth in a small amount of neutral detergent, gently wipe it and then dry it with a dry cloth. Do not use gasoline or other solutions.
Keep attachments clean
-
After each use, all accessories need to be cleaned to prevent dirt and scaling. When not in use for a long time, the bucket and heating plate need to be clear. Pay attention to the usage environment
-
Applicable temperature range -10 °C to 40 °C.
- The relative temperature of the air is below 95% (at a temperature of 25 °C)
- Storage temperature -40 °C to 60 °C.
- There should be no flammable, corrosive gases or conductive dust in the surro
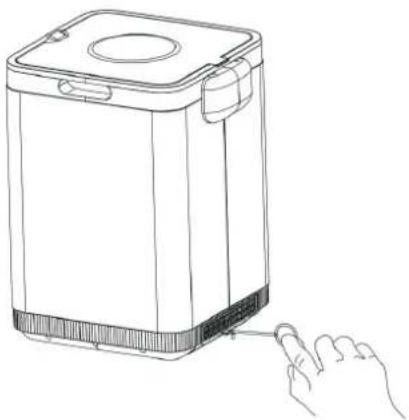
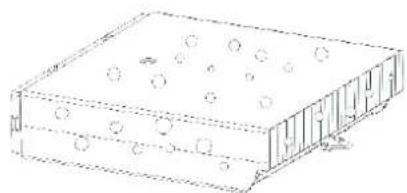
Method of replacing filter device:
natural_image
Line drawing of a hand holding a small electronic device next to a square appliance (no text or symbols)- The filter should be replace devery 6 months after use.
- After installing the needle, pull out the filter and replace it with a new one.
Tip:
To maintain sealing, the filtering device needs to be tightly attached to the body.
Therefore, when replacing the filtering device, users need to use a certain amount of force to pull it out, which is not a quality issue.
natural_image
Isometric line drawing of a rectangular container with circular holes on top and bottom (no text or symbols)Troubleshooting
This troubleshooting is for your reference only during use. If you suspect that the machine is damaged, to avoid danger and greater losses, please promptly send it to a repair center or call the consultation hotline for resolution.
| phenomenon Possible reasons Solution | ||
| Machine not working | Is the power supply connected | Press the "Power" button to start the machine |
| Component damage | Send to the maintenance department for maintenance | |
| Strange sound | Is there any hard debris inside the bucket | Remove debris and restart |
| Is the bucket stuck in place Reinstall the bucket in place | ||
| There is an odor | Is the power cord damaged Avoid power cord contact with hot objects | |
| Is there any debris on the bottom of the After bucketing, remove any debris before turning and the heating plate on the machine | ||
| Is the filtering device installed properly | Install the filtering device properly | |
| Has the filtering device reached its service life | Replace with the manufacturer's specified filtering device | |
How to make perfect compost
Understand your brown and green materials
There are two main ingredients in any successful compost pile:carbon-rich ingredients and nitrogen-rich ingredients.
Brown Material (high carbonent)
Fall leaves, Pine needles, Twigs, chipped tree branches/bark, Straw or hay, Sawdust,
Corn stalks, Paper (newspaper, writing/printing paper, paper plates, napkins, and coffee
grounds),Dryerlint,Cottonfabric,Corrugated cardboard(without waxy/slickcoatings),etc.
| Brown Material (high carbon content) |
| Fall leaves, Pine needles, Twigs, chipped tree branches/bark, Straw or hay, Sawdust, Corn stalks, Paper (newspaper, writing/printing paper, paper plates, napkins, and coffee filters), Dryer lint, Cotton fabric, Corrugated card-board (without waxy/slick coatings), etc. |
| Green Material (high nitrogen content) |
| Grass clippings, Coffee grounds/tea bags, Vegetable and fruit scraps, Trimmings from perennial and annual plants, Annual weeds that haven’t set seed, Eggshells, Seaweed, etc. |
Striking the Right Carbon-Nitrogen Balance
The magic of composting lies in the interaction between carbon compounds (brown) and nitrogen compounds (green). The perfect ratio of carbon to nitrogen in compost is close to 25:1 to 30:1, at the right wet and dry level.
Get the Feel of Piléour
A. If you are a home gardening enthusiast,
you only need to put the daily kitchen waste into the compost according to the of brown material: green material about 1:3. You can also purchase commonly used microbial composting agents to use with them.
B. If you are a professional compost maker, you can browse relevant gardening b and websites to obtain the carbon and nitrogen content of various materials, and us professional calculation methods to control the results.
When the ratio is lower than ideal (too much nitrogen), the pile will be slimy simply add more brown materials.
When the ratio is higher than ideal (too much carbon), the pile will be dry; since more green materials.
PRODUCT SPECIFICATIONS
Model No.: GFWD4WH
Voltage: 220-240V\~ Frequency: 50-60Hz
Power consumption: 500W
Product dimensions: 395.3(H) x 264(W) x 286.1 (D) mm
PRODUCT SPECIFICATIONS *The final product specification may be varied according to a different lot of material and actual input
voltage power of the usage area.
注意事項
控制面板
natural_image
Simple line drawing of a cylindrical device with a handle and internal components (no text or symbols)natural_image
Line drawing of a cylindrical container with a handle and internal structure (no text or symbols)容量最大線(廚餘堆放高度不可高於此線)
注意:
使用後:
- 打開蓋子 2. 將廚餘桶垂直提升取出
natural_image
Line drawing of a microwave oven with lid and side panel (no text or symbols)natural_image
Simple line drawing of a bucket pouring liquid into a container (no text or symbols)natural_image
Simple line drawing of a water dispenser with droplets inside (no text or symbols)natural_image
Line drawing of a hand holding a small object next to a rectangular device with a lid (no text or symbols)natural_image
Isometric line drawing of a rectangular container with circular holes and a dashed outline (no text or symbols)疑難解答
購買日期 Date of Purchase:
單據編號 Invoice No.:
The product specifications may be changed without prior notice.
Please contact customer service for details if necessary.
說明書內容以英文版本為準
If there is any inconsistency or ambiguity
between the English version and the Chinese version,
the English version shall prevail.
保養登記
Warranty Registration

於網上登記新產品保養
Register your product online
www.dchtoolbox.com
小電維修服務 - 自攜點
Repair Service - Collection Points

Gilman
since 1841

DCHToolBox
大昌行電器維修中心
4/F, DCH Building, 20 Kai Cheung Road, Kowloon Bay, Hong Kong
客户服务热线 Customer Service Hotline: (852) 8210 8210
- SAFETY INSTRUCTION - ELECTRICITY AND HEAT
- PRODUCT OVERVIEW
- CONTROL PANEL
- Instructions for use
- Attention:
- After use:
- SAFETY INSTRUCTION - LIGHT
- WARNING!
- Cleaning and maintenance
- Method of replacing filter device:
- Troubleshooting
- How to make perfect compost
- Brown Material (high carbonent)
- Striking the Right Carbon-Nitrogen Balance
- Get the Feel of Piléour
- PRODUCT SPECIFICATIONS
- 注意事項
- 控制面板
- 使用後:
- 疑難解答
Brand : GEMINI
Model : GFWD4WH
Category : Bin