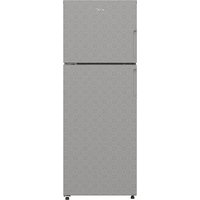
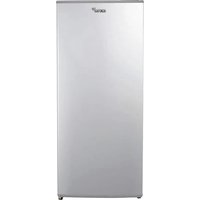
AT1130F - Refrigerator Acros - Free user manual and instructions
Find the device manual for free AT1130F Acros in PDF.


| Product Type | Refrigerator |
| Brand | Acros |
| Model | AT1130F |
| Rated Voltage | 115 V ~ |
| Rated Frequency | 60 Hz |
| Rated Current | 1.0 A |
| Water Dispenser Capacity | 4 L |
| Water Filter Replacement | Every 2 months |
| Temperature Control | Electronic with multiple settings (Cold to Coldest) |
| Defrost Method | Automatic (frost-free) |
| Shelves | Removable glass or wire shelves |
| Crisper Drawer | With humidity control slider |
| Freezer Airflow Control | Adjustable knob (Max Freezer, Recommended, Max Refrigerator) |
| Refrigerant | Flammable (type not specified) |
| Power Cord | Grounded 3-prong plug |
| Installation Clearance | Top: 1.5 in (3.81 cm), Back: 1 in (2.54 cm), Sides: 0.5 in (1.25 cm) |
| Leveling | Adjustable leveling screws, tilt backward slightly |
| Cleaning | Use non-flammable cleaner, avoid abrasive fibers |
| Manufacturer | Industrias Acros Whirlpool, S. de R.L. de C.V. |
| Country of Origin | Mexico |
Frequently Asked Questions - AT1130F Acros
User questions about AT1130F Acros
0 question about this device. Answer the ones you know or ask your own.
Ask a new question about this device
Download the instructions for your Refrigerator in PDF format for free! Find your manual AT1130F - Acros and take your electronic device back in hand. On this page are published all the documents necessary for the use of your device. AT1130F by Acros.
USER MANUAL AT1130F Acros
natural_image
Simple line drawing of a rectangular container with a side holder and internal structure (no text or symbols)natural_image
Line drawing of an open refrigerator interior showing tray, door, and drawer (no text or symbols)This use and care guide applies to the following models:
AT1130F, AT1130M.
| Nominal Electrical Characteristics | |
| Rated Current 1.0 A | |
| Frequency 60 Hz | |
| Rated Voltage 115 V ~ | |
Manufactured by Industrias Acros Whirlpool, S. de R.L. de C.V.
Antigua Carretera a Roma km 9 Col. El Milagro Apodaca, N.L.
México C.P. 66634
Tel. (81) 8329-2100
REFRIGERATOR SAFETY
Your safety and the safety of others are very important.
We have provided many important safety messages in this manual and on your appliance. Always read and obey all safety messages.

This is the safety alert symbol.
This symbol alerts you to potential hazards that can kill or hurt you and others.
All safety messages will follow the safety alert symbol and either the word "DANGER" or "WARNING."
These words mean:
! DANGER
You can be killed or seriously injured if you don't immediately follow instructions.
WARNING
You can be killed or seriously injured if you don't follow instructions.
All safety messages will tell you what the potential hazard is, tell you how to reduce the chance of injury, and tell you what can happen if the instructions are not followed.
IMPORTANT SAFETY INSTRUCTIONS
WARNING: To reduce the risk of fire, electric shock or injury to persons when using your refrigerator, follow these basic precautions:
FOR YOUR SAFETY
- Read all the instructions before using your refrigerator.
- Observe the local and federal regulations when disposing of your refrigerator.
- Do not clean refrigerator parts with inflammable liquids; the vapor may cause fires or explosions.
- This appliance is not intended for use by people (including children) whose physical, sensory or mental capacities are different or impaired or who lack the necessary experience or knowledge/expertise to do so, unless such persons are supervised or are trained to operate the appliance by a person who accepts responsibility for their safety.
- Children should be supervised to ensure that they do not play with appliances.
- Do not use electric devices inside the refrigerator's food storage compartments other than those recommended by Whirlpool.
- Do not use mechanical devices or other means to accelerate the thawing process other than those recommended by Whirlpool.
- Keep the ventilation openings of the refrigerator's housing or of the structure into which it is to be embedded free of obstructions.
- Do not damage the refrigeration circuit.
- Keep flammable materials and vapors, such as gasoline, well away from the refrigerator.
- Do not store explosive substances, such as aerosol cans containing a flammable agent, inside this appliance.
- If the power cord gets damaged, it should be replaced by our service department or by a certified electrician to avoid danger.
- Disconnect the power supply before servicing your refrigerator. Make sure that you replace all parts and panels before operating it again.
KEEP THESE INSTRUCTIONS
WARNING
Suffocation Hazard
Remove doors from your old refrigerator.
Failure to do so can result in death or brain damage.
DANGER

Explosion Hazard
Risk of fire or explosion. Flammable refrigerant used.
Do not use mechanical devices to defrost refrigerator.
Do not puncture refrigerant tubing.
Installation Instructions
WARNING

Electrical Shock Hazard
Plug into a grounded 3 prong outlet.
Do not remove ground prong.
Do not use an adapter.
Do not use an extension cord.
Failure to follow these instructions can result in death, fire, or electrical shock.
! DANGER

Explosion Hazard
Risk of fire or explosion due to puncture of refrigerant tubing.
Follow handling instructions carefully. Flammable refrigerant used.
After removing your refrigerator from its packaging
Place your refrigerator in its definitive position and follow the instructions below.
WARNING
Excessive Weight Hazard
Use two or more people to move and install refrigerator.
Failure to do so can result in back or other injury.
A. Remove the attachments from the packaging, including the interior accessories.
B. In some models, the refrigerator's vegetable storage drawer contains a plastic bag with two levelers. When unpacking, proceed as follows, see Figure 1:
- Remove the two levelers from the vegetable storage drawer.
- With the help of another person, tilt the product to one side and remove the wooden base, using a 3/8" screwdriver to remove the screws.
- Install the leveler on this side of the refrigerator.
- Repeat step 2 for the other side of the refrigerator.
- Repeat step 3 for the other side of the refrigerator.

flowchart
graph LR
    A["Raw Material Input"] --> B["1"]
    B --> C["2"]
    C --> D["3"]
    D --> E["4"]
    E --> F["5"]
    F --> G["End"]
Figure 1
C. Place the refrigerator as recommended below:
Leave a space of 1^1/2 (3.81 cm) between the top of the refrigerator and the cabinets.
■Leave a space of at least 1" (2.54 cm) between the condenser on the back of the refrigerator and the wall.
■Leave a space of 1.25 cm (1/2") in each side of the appliance to facilitate installation.
■If the refrigerator is going to be placed against a side wall, leave additional space to allow the door to open properly
D. Level your refrigerator using the following instructions: (figure 2)
For greater accuracy, check with a carpenter's level placed on top of the refrigerator. If it does not move when the door is opened and closed, the refrigerator is leveled.
■We recommend that it lean backwards slightly so that the door will tend to swing closed.

Before connecting your refrigerator
- Keep the refrigerator away from the effects of weather.
■Do not store food in the refrigerator before it has cooled appropriately.
■Use the refrigerator only as specified in this guide.
■Your refrigerator is for household use only. This appliance has been designed for use in the household setting and for similar applications, such as: kitchen areas for personnel in shops, offices and other work environments; farms and guests at hotels, motels and other residential settings; premises such as boarding houses or hotels that provide breakfast; meal services and similar applications other than the retail setting.
Grounding instructions
Grounding method
Your refrigerator is equipped with an electrical cord with a grounded 3-prong plug. To minimize the risk of electrical shock, the cord must be connected to a 3-prong wall outlet grounded in accordance with the National Electrical Code and all local codes and regulations. If no such outlet is available, it is the customer's responsibility and obligation to have a duly grounded 3-prong outlet installed by a qualified electrician.
Grounded wall outlet for 3-pronged plugs

Water Dispenser (some models)
Your new refrigerator has an innovative water dispenser on the door to keep chilled water available and reduce the number of times you open the refrigerator door, which helps reduce the product's power consumption.

Storage tank
Water storage tank
The water storage tank is filled manually and is located on the inside of the refrigerator compartment door. It has a maximum capacity of 4 liters of water.
IMPORTANT:
■Clean the system before using it for the first time. To do so, fill the storage tank with clean water and press the water dispenser paddle with a large glass or jug until you have removed at least a liter of water. Discard that water. This process will help clean the system and flush air from the dispenser valve. Once the system is clean, wait until the water chills before using the dispenser again. If water is used, fill it only with drinking water. The dispenser should be used with liquids only.
■Once the system is clean, wait until the water chills before using the dispenser again.
■If water is used, fill only with drinking water.
■The dispenser should be used with liquids only.
NOTE: Drinks such as milk, juices with pulp and seeds may clog the valve and cause the dispenser to malfunction.
■Whirlpool is not responsible for damages to the dispenser and its dispensing system caused by the use of liquids with pulp and/or seeds.
NOTES
■After 6 hours, carbonated drinks can lose their fizz.
■Wash the tank before filling it with another beverage (see Cleaning the Dispenser).
Filling the water storage tank
To fill the water storage tank, rotate the small lid on the cover and remove it. Then add water using a jug.
NOTE: The small lid cannot be completely removed from the cover of the storage tank.
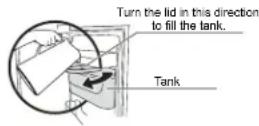
IMPORTANT: Always fill the storage tank with water when it is properly attached to the door.
How to use the water dispenser:
- Press a sturdy glass or jug against the center of the dispenser paddle.
- Once the necessary water is obtained, stop pressing against the paddle, but do not remove the glass or jug until the water stops running completely.
IMPORTANT: Always hold the glass (or container) in your hand when dispensing water. Do not try to leave a glass unattended in the dispenser well.
NOTE: The water may taste strange if the dispenser is not used periodically.

natural_image
Simple line drawing of a rectangular device with a central vertical bar and base, no text or symbols present.WARNING

Explosion Hazard
Use nonflammable cleaner.
Failure to do so can result in death, explosion, or fire.
Cleaning the dispenser
Cleaning the water storage tank:
-
With both hands, grasp the water storage tank and tilt it slightly upwards, then pull upwards until the tank completely disengages from the refrigerator door (see figure 1).
-
Place the tank on a flat surface and remove the cover by pulling upwards (see figure 2).
NOTE: Your refrigerator has a water filter in the tank that should be replaced every 2 months.
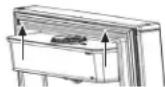
Figure 1.

Figure 2.
-
Release the valve by rotating it counter-clockwise (see figure 3) and clean it carefully.
-
Use a damp sponge or soft cloth with a neutral soap or detergent. Rinse thoroughly and make sure no soap residue is left behind. Finally, dry with a clean, soft cloth.
NOTE: Do not use coarse fibers to clean the water storage tank, as this can damage the finish.

Figure 3.
IMPORTANT: Before reattaching the storage tank to the door, make sure that:
- The valve has been properly attached. Make sure the valve stop is making contact with the stop located on the storage tank.
- And also make sure that the isolation ring is properly placed on the tank, as shown in the following figure.


To reattach the storage tank to the refrigerator door:
- Attach the valve to the tank by rotating it clockwise, insert the tank cover lid strap and reposition the cover.
- Finally, use both hands to reattach the tank to the door, tilting it slightly upward. Secure it to the side brackets on the inside of the door and push down until it fits firmly in place.
NOTE: Make sure the storage tank has been correctly secured to the door, and that there is no chance it will fall.
How to use the refrigerator with electronic control

Temperature Control
Your refrigerator is equipped with a smart temperature control. You can use it to set the refrigerator compartment temperature as needed.
To set the refrigerator compartment temperature:
The product is set to the recommended temperature at the factory. To adjust that temperature, simply press the 1 button. This will decrease product temperature. The setting change is unidirectional, from Cold to Coldest (left to right). Once the control is in the Coldest position, it will move back to the least cold setting (Cold) if pressed again.
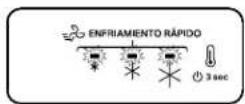


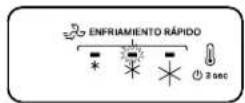
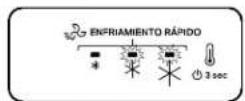
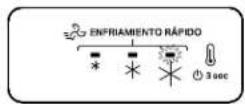
■This is the coldest temperature (Coldest) in the product. All the indicators will be on.
■The least cold temperature setting will be displayed with the first indicator (left to right) on.
■The median minimum temperature will be displayed when you press the ↓ button once from the least cold temperature. The first and second indicators will be on.
■The recommended temperature will be displayed with the second indicator on.
■The median minimum temperature will be displayed when you press the ⏻ button once from the recommended temperature. The second and third indicators will be on.
■The cold temperature will be displayed when you press the ↓ button once from the median temperature. The third indicator will come on.
Remove the entire glass or wire shelf
Position the refrigerator shelves according to what you want to store in the refrigerator.
To remove the shelves:
- Remove all the items from the shelves.
- Lift up the back part of the shelf.
- Slide the shelf out.
To replace the shelves:
- Place the back part of the shelf over the rails on the sides of the refrigerator cavity.
- Guide the front part of the shelf onto the rails.
- Slide the shelf fully in.

natural_image
Line drawing of an open refrigerator with a black plastic object placed inside (no text or symbols)Humidity control on crisper drawer (some models)
The crisper humidity control has been included in your drawer to keep your fruits and vegetables fresh.
Press left towards the left or right depending on the desired humidity level inside the crisper drawer.

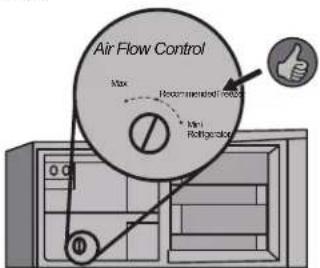
There is a knob inside the freezer to adjust the flow of air between the freezer section and the refrigerator section.
The freezer knob has three positions:
- "Max Freezer": The airflow will be concentrated more in the freezer section.
- "RECOMMENDED": Airflow is distributed between the freezer and the refrigerator.
- "Max Refrigerator": The airflow will be concentrated more in the refrigerator section.
Taking care of your refrigerator
Procedure for cleaning doors and cabinets with important rust stains: The refrigerator should be installed in a dry place. The accumulation of moisture will cause the metal to oxidize and rust.
Manual cleaning method
WARNING
Explosion Hazard
Use nonflammable cleaner.
Failure to do so can result in death, explosion, or fire.
-
Wet a sponge in water with detergent.
-
Use the soft surface of the sponge to rub the rust stain. Always rub in the same direction as the polished finish.
-
Use the hard surface to rub the rust stain. Always rub in the same direction as the polished finish.
-
Rinse the sponge with water until all the detergent has been removed.
-
Wet the fiber cloth in pure water.
-
Dry the surface of the unit thoroughly with the sponge.
-
Use a piece of dry cloth and rub the damp surface. Use a stainless steel cleaner to get a sparkling finish.
A. Hard surface
B. Soft surface
Tools required:
■Piece of dry cloth
■Soft/hard surface sponge


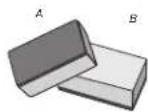
Sounds you may hear
Your new refrigerator may make sounds, and most of them are normal. However, hard surfaces such as the floor, the kitchen walls, and the refrigerator can make them louder.
Soft murmuring or whistling
This might be the fan and blowing air.
Clicking or rattling
The thermostat makes a well-defined clicking sound when the refrigerator stops, and also when it starts operating again. The freezer control clock makes the same sound when the defrost cycle begins.
Water sounds
After the refrigerator stops, you might hear a dripping noise in the pipe for a few minutes. You might also hear water running to the water collection tray, and a peculiar sizzling sound during the defrost cycles.
Before calling a technician
VERY IMPORTANT
IT IS THE USER'S RESPONSIBILITY TO VERIFY THE FOLLOWING INFORMATION BEFORE CALLING A TECHNICIAN.
If you followed the instructions in the installation, use and care guide correctly and have questions about the refrigerator's operation, this guide offers solutions to problems you can detect and correct at home.
IF THE REFRIGERATOR DOES NOT WORK
- Plug it in directly and properly, WITHOUT USING EXTENSION CORDS.
- Check the ELECTRICAL CONTACT, WHICH COULD BE DAMAGED. Plug in another appliance to test whether it works.
- Avoid operating several appliances at the same time, AS THE ELECTRICAL INSTALLATION MAY BECOME OVERLOADED.
- Make sure that the TEMPERATURE CONTROL IS IN THE ON POSITION.
• Make sure the refrigerator IS NOT CLOSE TO A HEAT SOURCE SUCH as an oven, stove or direct sunlight. - THE DOORS SHOULD CLOSE HERMETICALLY. Check the magnetic lining on the doors.
- LEVEL THE REFRIGERATOR. Remove the wooden bases and adjust the leveling screws (FIGURE 1).
- DO NOT OVERLOAD THE REFRIGERATOR, as the cold air circulation might be insufficient.
- Set the TEMPERATURE CONTROL KNOB TO MED (medium cold) and wait for at least 24 hours before changing the temperature again.
IF YOU NOTICE THAT THE REFRIGERATOR WORKS FOR LONG PERIODS OF TIME
- Check that the CONDENSER IS FREE OF DUST AND LINT (FIGURE 1).
- AVOID OPENING THE DOOR CONTINUOUSLY or for long periods of time.
DANGER
Explosion Hazard
Risk of fire or explosion due to puncture of refrigerant tubing.
Follow handling instructions carefully. Flammable refrigerant used.
- DO NOT PUT HOT FOOD INTO THE REFRIGERATOR and keep food covered.
- IF THE COMPRESSOR IS NOT WORKING CORRECTLY, the voltage may be low. Check the intensity of the light. If it is low, that indicates low voltage. Ask your power company to correct the power supply (FIGURE 1).

MANUFACTURING CERTIFICATE SERVICE
WHIRLPOOL SERVICE
KitchenAid
MAYTAG
Whirlpool
acros ^8
EVERYTHING YOU
NEED
WHEN YOU
NEED IT MOST
Remember to read the instructions in your use and care manual. Contact us if you need advice or service.
Please have the following ready:
- Your invoice and stamped warranty or proof of purchase.
• Model and Serial Number, which you will find on the product labels.

whirlpool-latam.com
Select Service and Support to find our telephone numbers and service hours, or to book assistance or service.
Connections Maintenance Warranty extensions Accessories Repairs inside and outside the warranty
DISCOVER THE GREAT
BENEFITS
OF REGISTERING YOUR PRODUCT
SCAN WITH YOUR CELL PHONE TO OBTAIN MORE INFORMATION
- Welcome information
- Product usage tips
- Maintenance tips
OR VISIT:
experienciawhirlpool.com
To register your product

Whirlpool
Visit:

YouTube Whirlpool Service
Where you will find useful videos:
• To learn how to use the functions of your appliance
- With step-by-step installation instructions and requirements
- With cleaning tips
• With answers to FAQ about your appliances
- Where we'll explain the behavior of your appliance

W11546974A
21-Jun-2021 09:35:47 EDT | RELEASED
All rights reserved.
10/19
Imprimé au Mexique
Printed in Mexico
In some European factories the letter "W" of the part code mentioned herein will be automatically replaced by the number "4000" (e.g. "W12345678" becomes "400012345678")
- REFRIGERATOR SAFETY
- Your safety and the safety of others are very important.
- ! DANGER
- WARNING
- IMPORTANT SAFETY INSTRUCTIONS
- FOR YOUR SAFETY
- DANGER
- Installation Instructions
- Before connecting your refrigerator
- Grounding instructions
- Grounding method
- Water Dispenser (some models)
- Water storage tank
- IMPORTANT:
- NOTES
- Filling the water storage tank
- How to use the water dispenser:
- Explosion Hazard
- Cleaning the dispenser
- Cleaning the water storage tank:
- To reattach the storage tank to the refrigerator door:
- How to use the refrigerator with electronic control
- Temperature Control
- To set the refrigerator compartment temperature:
- Remove the entire glass or wire shelf
- To remove the shelves:
- To replace the shelves:
- Humidity control on crisper drawer (some models)
- Taking care of your refrigerator
- Sounds you may hear
- Soft murmuring or whistling
- Clicking or rattling
- Water sounds
- Before calling a technician
- VERY IMPORTANT
- IF THE REFRIGERATOR DOES NOT WORK
- IF YOU NOTICE THAT THE REFRIGERATOR WORKS FOR LONG PERIODS OF TIME
- WHIRLPOOL SERVICE
Brand : Acros
Model : AT1130F
Category : Refrigerator