
SLCATL490 - Pressure washer SereneLife - Free user manual and instructions
Find the device manual for free SLCATL490 SereneLife in PDF.


| Product Type | Electric Pressure Washer |
| Model | SLCATL490 |
| Brand | SereneLife |
| Power Source | 120V AC, 60Hz |
| Max Pressure | 2000 PSI |
| Flow Rate | 1.5 GPM |
| Motor Type | Universal Brushed Motor |
| Hose Length | 20 ft |
| Power Cord Length | 35 ft |
| Weight | 14.5 lbs |
| Dimensions (L x W x H) | 13 x 10 x 27 inches |
| Nozzle Types | 0°, 25°, 40°, and soap nozzle |
| Detergent Tank | Integrated 1L tank |
| Wheels | 2 x 6-inch wheels for portability |
| Safety Features | Automatic shut-off trigger, thermal overload protection |
| Maintenance | Winterize by draining water, store in frost-free area |
| Accessories Included | Gun, lance, 3 nozzles, foam bottle, cleaning brush |
| Certifications | ETL listed |
Frequently Asked Questions - SLCATL490 SereneLife
User questions about SLCATL490 SereneLife
0 question about this device. Answer the ones you know or ask your own.
Ask a new question about this device
Download the instructions for your Pressure washer in PDF format for free! Find your manual SLCATL490 - SereneLife and take your electronic device back in hand. On this page are published all the documents necessary for the use of your device. SLCATL490 by SereneLife.
USER MANUAL SLCATL490 SereneLife
natural_image
White ceramic toilet with handle and ventilation slots (no text or symbols visible)SLCATL490
RV Plastic Bowl Gravity Flush Toilet
USER GUIDE
Features:
- Compact Design and Comfortable Seat
- Leak-Proof & Odorless Sealing Design
- Easy to Install with Installation Kits Inclusion
• Made from High-density Polyethylene - Easy to Use One-way, Ergonomic Foot Pedal: Partially Press to Add Water and Fully Press to Flush
• Home-like Comfort with Ergonomic Toilet Seat Design - Anti-splash Rim that Keeps Water in Bowl and Conceals Rinse Jets
• Water-saving, T-type Water Outlet for Full-bowl Flush Coverage - Extreme Low Flush Technology Uses as Little as 1 pint /0.5 Liter Per Flush
• High-Gloss Surface and Easy to Clean - Soft Close Seat for More Comfort
- With a Hand Sprayer
• Powerful and Efficient Jet Rinsing - Effectively Removes Residue and Comfortable Grip
- Ergonomic Elongated Handle
- Suitable for Cleaning Floors, Toilets, Bathing Pets, and Watering Plants
- Ideal for Indoors and Outdoor Use
What's in the Box:
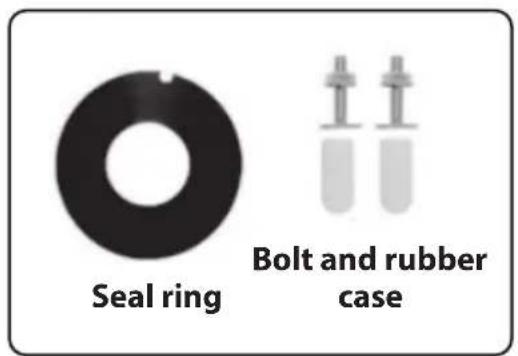
- Gravity Flush Toilet
- Hand Sprayer
- Metal Floor Flange
- Install Kits
• Water Hose Connector
Technical Specs:
• Construction Material: HDPE, PP
- Flow Rate Recommended: 3.0-5.0* gpm / 11.4-18.9 lpm
• Static Pressure Recommended: 29-72 PSI / 200-500 kPa
• Weight Capacity: 330 lbs.
- Item Weight: 13.8 -lbs.
- Product Dimensions (L x W x H): 19.1" x 15.4" x 19.7"-inches

WARNING: Cancer and Reproductive Harm - www.P65warnings.ca.gov
Caution
- Please always assemble according to the instructions.
- Floor flange and 4 self-tapping screws are included.
- Press the foot pedal to touch the ground until opening the flush valve.
- Ensure water supply pressure is no more than 58 psi.
- Hot water above 104^ F is forbidden.
Product List
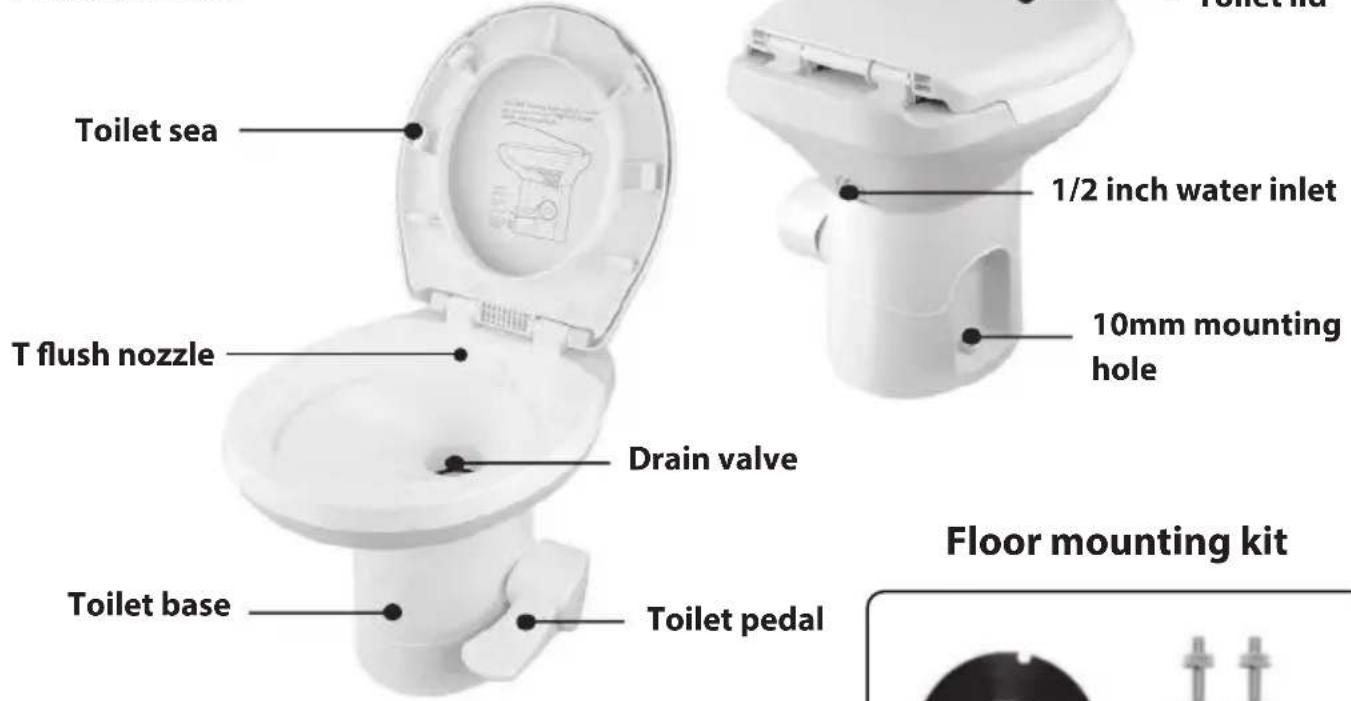
Product and Mounting Dimension
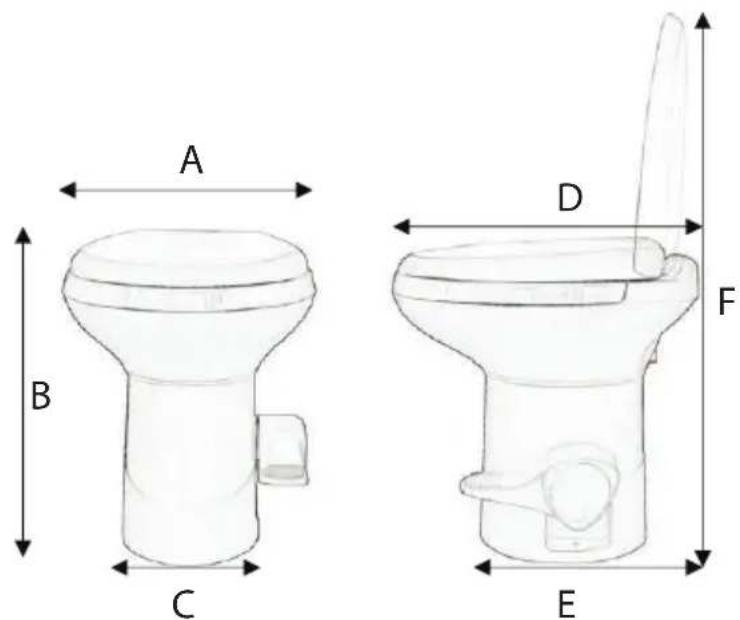
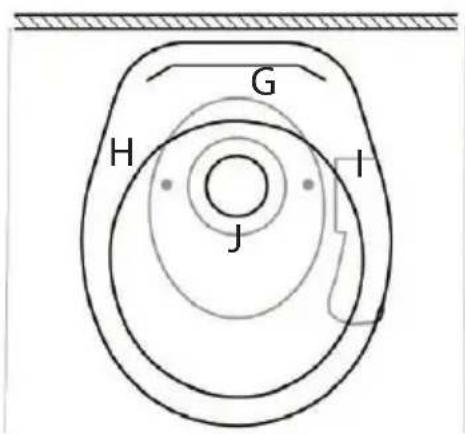
| Ref. | Description |
| A | 390mm / 15.4" |
| B 500mm / 19.7" | |
| C 233mm / 9.2" | |
| D 485mm / 19.1" | |
| E 380mm / 15.0" | |
| F 890mm / 35.0" |
| Ref. | Description |
| G | Minimum: 200mm / 7.9” |
| H | Minimum: 200mm / 7.9” |
| I | Minimum: 200mm / 7.9” |
| J 170mm / 6.7” | |
The outside diameter of the toilet drain outlet: 95mm / 3.7";
The inner diameter of the toilet drain outlet: 87mm / 3.4"
How to install toilet
- To replace an older toilet, turn off the water supply to the toilet. Remove and drain the water supply line. Remove toilet hold-down bolts/screws.
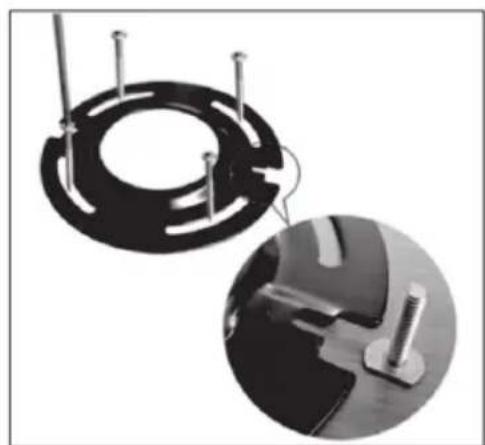
Remove the toilet from the floor. Remove and discard the old flange seal and hold-down bolts. Verify the center of the floor flange is at least 7.9" (200mm) from the back wall (Fig. 1). - When installing a new floor flange, ensure that the toilet mounting holes are located at the correct angle (Fig. 1). The floor flange must be secured to the floor with a minimum of four screws. Insert the two supplied T-bolts into the slots in the floor flange (Fig. 2).
- Verify that the floor flange seal is installed on the base of the toilet. Carefully set the toilet over the floor flange. Align the holes in the toilet base with the T-bolts as the toilet is lowered onto the floor flange.
- Install the floor mounting nuts onto the T-bolts. When tightening, the base should be securely attached and flat against the floor. Attach the bolt covers onto the nuts.
- Connect the water supply line to the 1/2 inch water inlet and turn on the water supply line (Fig. 3). Flush the toilet several times and check for leaks.
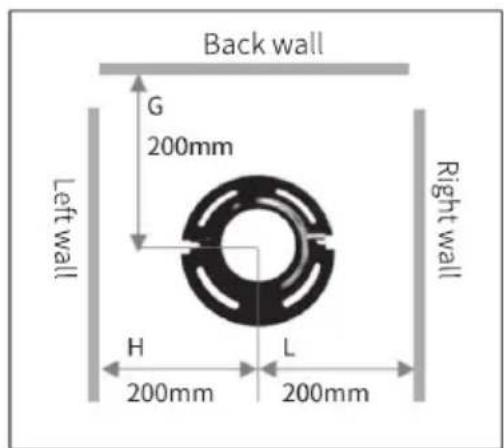
(Fig.1)
natural_image
Close-up of a mechanical clamp or bracket component with pins, shown in two views: one magnified and one detailed (no text or symbols visible)(Fig.2)
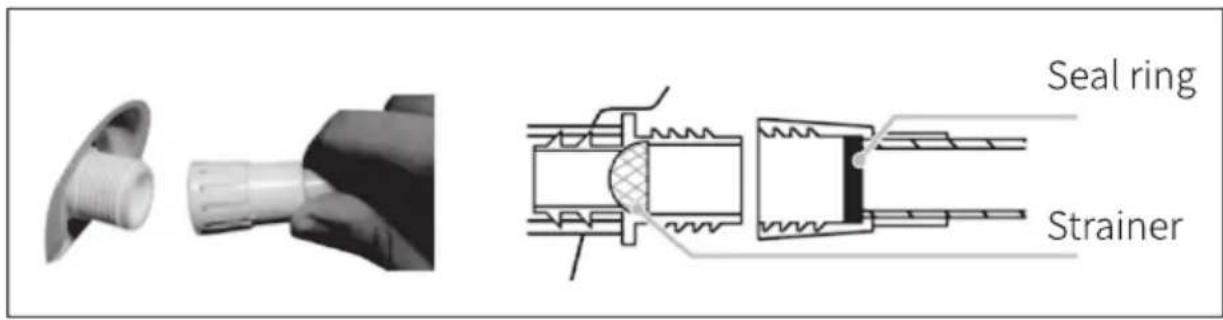
(Fig.3)
How to Install Handheld Sprayer and Water Supply
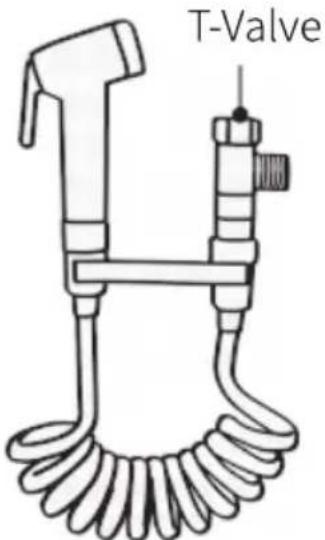
Handheld Sprayer
natural_image
Simple line drawing of a curved pipe or tube with two flanged ends (no text or symbols)Water Supply Hose
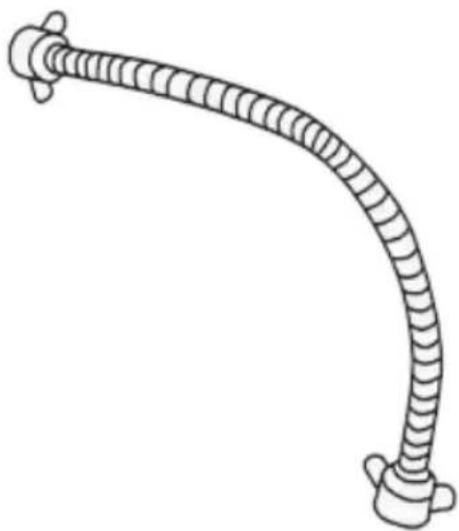
- Connect one end of the T-valve to the flexible sprayer hose and the other end to the 1/2 inch water supply hose. Then connect the other side of the flexible sprayer hose to the sprayer, and connect the other side of the 1/2 inch water supply hose to the toilet.
- Screw the sprayer hose to the sprayer head.
- Put the sprayer in the holder.
How to Operate Toilet
-
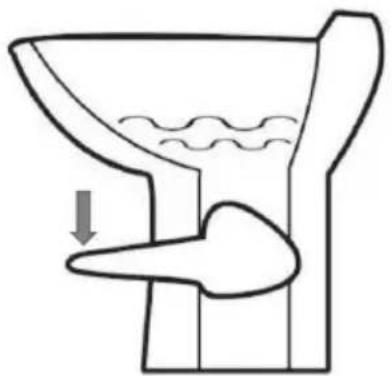
Add Water to Bowl: To add water to the toilet, press the flush pedal partway down. Water flows into the bowl while the flush valve remains closed. If the flush valve moves, release the pedal slightly. Adding water to an empty bowl helps prevent holding tank odors from entering the living space. Adding water is recommended prior to flushing solids and toilet paper (Fig. 4).
-
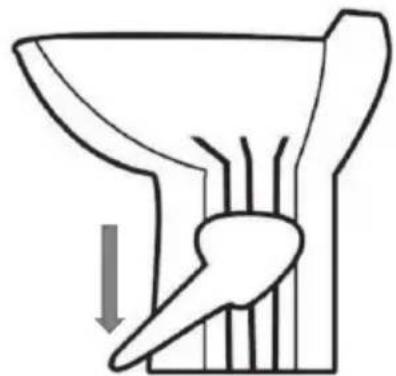
Flush Toilet: To flush, press the pedal down until it contacts the floor.
Release the pedal after completing the flush (Fig. 5). When flushing liquids, press the pedal for 1-2 seconds. When flushing solids, press the pedal until the contents in the bowl are rinsed. Flushing longer than necessary will cause the holding tank to fill too quickly. A small amount of water will collect in the bowl after flushing, creating an airtight seal.
natural_image
Simple line drawing of a funnel with an arrow indicating downward motion, no text or symbols present.(Fig.4)
natural_image
Diagram of a funnel-shaped object with internal structure and directional arrow (no text or symbols)(Fig.5)
Flush Valve/Seal Cleaning
After a period of time, mineral deposits from hard water may build up on the flush ball or seal, resulting in a slow water leak. To prevent this, periodically clean the flush valve and seal.
-
Remove minor debris from the flush valve and seal by slowly pressing and releasing the flush pedal several times. This will loosen and rinse debris from the surfaces. Repeat several times for stubborn buildup (use a soft bristle brush if necessary).
-
Lubricate the flush valve and seal periodically with silicone spray or paste lubricant.
Winterization and Storage
This toilet is not intended for use when exposed to temperatures below freezing. Before storing the toilet, you need to drain water from the toilet according to the following procedures:
- Turn off the water supply to the toilet.
- Remove the water supply line from the water inlet.
- Place a small container under the inlet to collect draining water.
- Press the flush pedal and allow the water to completely drain from the water
- Leave the water line disconnected until the threat of freezing temperatures disappears.
How to Maintain and Clean
Regular maintenance and cleaning of the toilet are essential to ensure it remains in good working condition and to extend its lifespan.
- Regular Cleaning: Clean the toilet bowl regularly with a non-abrasive toilet cleaner and a toilet brush. Wipe down the exterior surfaces of the toilet with a mild disinfectant cleaner and a soft cloth.
- Deep Cleaning: Periodically deep clean the toilet to remove any stubborn stains or buildup. Use a toilet bowl cleaner specifically designed to remove mineral deposits and hard water stains.
- Seal and Valve Maintenance: Inspect the flush valve and seal regularly for any signs of wear or damage. Clean the flush valve and seal as described in the "Flush Valve/Seal Cleaning" section. Apply silicone spray or paste lubricant to the flush valve and seal to maintain a proper seal and smooth operation.
- Check for Leaks: Regularly check the water supply line, connections, and the base of the toilet for any signs of leaks. Tighten any loose connections and replace any damaged components as necessary.
- Ventilation: Ensure the bathroom is well-ventilated to prevent mold and mildew growth. Use an exhaust fan or open windows during and after using the shower or bath to reduce humidity levels.
By following these maintenance and cleaning guidelines, you can keep your toilet in excellent condition and ensure it operates efficiently for years to come.
Register Product
Thank you for choosing SereneLife. By registering your product, you ensure that you receive the full benefits of our exclusive warranty and personalized customer support.
Complete the form to access expert support and to keep your SereneLife purchase in perfect condition.

serenelife™

Questions or Comments?
We are here to help!
Phone: 1.718.535.1800
Serenelifehome.com/ContactUs
- SLCATL490
- RV Plastic Bowl Gravity Flush Toilet
- USER GUIDE
- Features:
- What's in the Box:
- Technical Specs:
- Caution
- How to install toilet
- How to Install Handheld Sprayer and Water Supply
- How to Operate Toilet
- Flush Valve/Seal Cleaning
- Winterization and Storage
- How to Maintain and Clean
- Register Product
- serenelife™
Brand : SereneLife
Model : SLCATL490
Category : Pressure washer