KALED24DH65NA - Television Kogan - Free user manual and instructions
Find the device manual for free KALED24DH65NA Kogan in PDF.


| Product Type | LED Television |
| Brand | Kogan |
| Model | KALED24DH65NA |
| Screen Size (Diagonal) | 24 inches (61 cm) |
| Resolution | HD (1366 x 768 pixels) |
| Dimensions (W x H x D) - Without Stand | 550 x 334 x 85 mm (21.7 x 13.1 x 3.3 in) |
| Weight (Without Stand) | Approx. 3.5 kg (7.7 lbs) |
| Power Consumption (Typical) | 30 W |
| Standby Power Consumption | <0.5 W |
| Power Supply | AC 100-240 V, 50/60 Hz |
| Inputs | HDMI, USB, VGA, AV (Composite), RF |
| Connectivity | Wi-Fi (802.11 b/g/n), Ethernet (RJ45) |
| Audio Output | 2 x 3 W speakers, Headphone jack |
| Tuner | DVB-T/T2 (Digital terrestrial) |
| Energy Rating | A+ |
| Key Functions | Sleep timer, parental control, channel list, electronic program guide (EPG) |
| Accessories Included | Remote control, power cable, tabletop stand, user manual |
| Cleaning Instructions | Use a soft, dry cloth. Do not use liquid or abrasive cleaners. |
| Safety Warnings | Do not expose to rain or moisture. Do not remove back panel. Keep ventilation slots uncovered. |
| Spare Parts & Repairability | Contact Kogan customer service for authorized repair centers and spare parts availability. |
Frequently Asked Questions - KALED24DH65NA Kogan
User questions about KALED24DH65NA Kogan
0 question about this device. Answer the ones you know or ask your own.
Ask a new question about this device
Download the instructions for your Television in PDF format for free! Find your manual KALED24DH65NA - Kogan and take your electronic device back in hand. On this page are published all the documents necessary for the use of your device. KALED24DH65NA by Kogan.
USER MANUAL KALED24DH65NA Kogan
24" LED TV & DVD COMBO
SERIES 6 DH65
(KALED24DH65NA)
CONTENTS
SAFETY AND WARNINGS
Thank you for buying this Kogan product. Please read all safety instructions before using your TV.
WARNING
Never place a television set in an unstable location. A television set may fall, causing serious personal injury or death. Many injuries, particularly to children, can be avoided by taking simple precautions such as:
• Using cabinets or stands recommended by the manufacturer of the television set.
- Only using furniture that can safely support the television set.
- Ensuring the television set is not overhanging the edge of the supporting furniture.
- Not placing the television set on tall furniture (for example, cupboards or bookcases) without anchoring both the furniture and the television set to a suitable support.
- Not placing the television set on cloth or other materials that may be located between the television set and supporting furniture.
• Educating children about the dangers of climbing on furniture to reach the television set or its controls.
If your existing television set is being retained and relocated, the same considerations as above should be applied.
• To reduce the risk of fire or electric shock, do not expose this apparatus to rain or moisture.
- The apparatus shall not be exposed to dripping or splashing, and no objects filled with liquids, (for example, vases), shall be placed on the apparatus.
- When discarding used batteries, always be mindful of the environment. Ensure you follow any guidelines for recycling and safe disposal of batteries that apply in your local area. Don't throw used batteries in rubbish bin.
- When installing your TV, maintain a distance of at least 10 cm between the TV and other objects (walls, cabinet sides, etc.) to ensure proper ventilation. Failing to maintain proper ventilation may result in a fire or a problem with the product caused by an increase in its internal temperature.
- The openings/slots on the back of the apparatus have been provided for necessary ventilation. Ventilation should not be impeded by blocking these openings in any way (for example, newspapers, table-cloths, curtains, etc.)
- No naked flame sources, such as lit candles, should be placed on the apparatus. To prevent the spread of fire, keep candles or other open flames away from this product at all times.
• The device may malfunction when under electrostatic discharge. It can be manually resumed by switching power off completely (at wall outlet), then switching power on again.
• To avoid any injury caused by overturn of the product when installed with base stands, please always ensure the whole product is placed horizontally within the supporting surface and that the television is not overhanging the edge of the supporting furniture.
- If not using with base stands, use only a wall or ceiling mount which has been recommended by the manufacturer of the television.
THIS USER GUIDE COVERS THE FOLLOWING MODELS
SAFETY AND WARNINGS cont'd
- Keep small accessories out of reach of children so they are not mistakenly swallowed.
CAUTION: Connecting the power cord
Most appliances recommend they be placed upon a dedicated circuit; that is, a single outlet circuit which powers only that appliance and has no additional outlets or branch circuits.
Do not overload wall outlets. Overloaded wall outlets, loose or damaged wall outlets, extension cords, frayed power cords, or damaged or cracked wire insulation are dangerous. Any of these conditions could result in electric shock or fire. Periodically examine the cord of your appliance, and if appearance indicates damage or deterioration, immediately discontinue use of the appliance until the cord is replaced with an exact replacement part by an authorized servicer.
Protect the power cord from physical or mechanical abuse, such as being twisted, kinked, pinched, closed in a door, or walked upon. Pay particular attention to plugs, wall outlets, and the point where the cord exits the appliance.
The MAINS plug is used as the disconnect device, and the disconnect device shall remain readily operable.
Operating Temperature: 5°C to 45°C
Storage Temperature: -15°C to 45°C
Operating Humidity: ≤80%
Storage Humidity: ≤90%
CAUTION
Do not attempt to modify this product in any way without written authorization from supplier. Unauthorized modification could void the user's authority to operate this product.
It is not recommended to keep a certain still image displayed on the screen for a long time as well as displaying extremely bright images on screen.
Figures and illustrations in this User Manual are provided for reference only and may differ from actual product appearance. Product design and specifications may be changed without notice.
Refer to the table below as a guide to the symbols and warnings which may be on your TV.
| CAUTIONRISK OF ELECTRIC SHOCKDO NOT OPEN | CAUTION: TO REDUCE THE RISK OF ELECTRIC SHOCK DO NOT REMOVE COVER (OR BACK). NO USER SERVICEABLE PARTS INSIDE. REFER TO QUALIFIED SERVICE PERSONNEL. |
 | The lightning flash with arrowhead symbol, within an equilateral triangle, is intended to alert the user to the presence of uninsulated "dangerous voltage" within the products enclosure that may be of sufficient magnitude to constitute a risk of electric shock to persons. |
 | The exclamation point within an equilateral triangle is intended to alert the user to the presence of important operating and maintenance (servicing) instructions in the literature accompanying the appliance. |
 | Class II product: This symbol indicates that a safety connection to electrical earth (ground) is not required. If this symbol is not present on a product with a mains lead, the product MUST have a reliable connection to protective earth (ground). |
 | AC voltage: Rated voltage marked with this symbol is AC voltage. |
 | DC voltage: Rated voltage marked with this symbol is DC voltage. |
 | Caution. Consult instructions for use: This symbol instructs the user to consult the user manual for further safety related information. |
COMPONENTS
natural_image
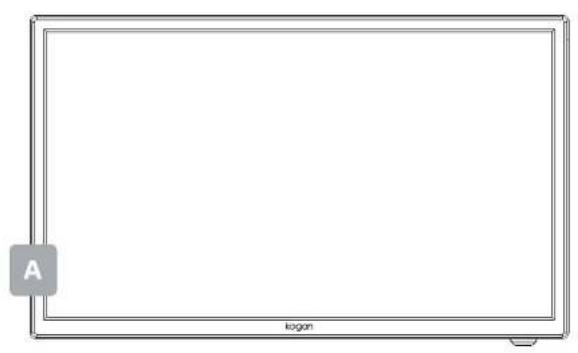
Blank rectangular frame with a label 'A' and the word 'logan' at the bottom (no other text or symbols)A Kogan LED TV & DVD COMBO
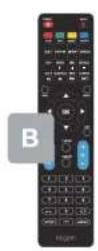
B Remote control
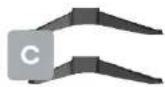
C Stand (x2)
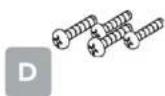
D PB4x12mm screw (x4)
E AAA battery (x2)
F Quick-start guide
G Warranty card

NOT INCLUDED
Phillips head screwdriver, antenna cable, broadband internet connection.
PRODUCT OVERVIEW
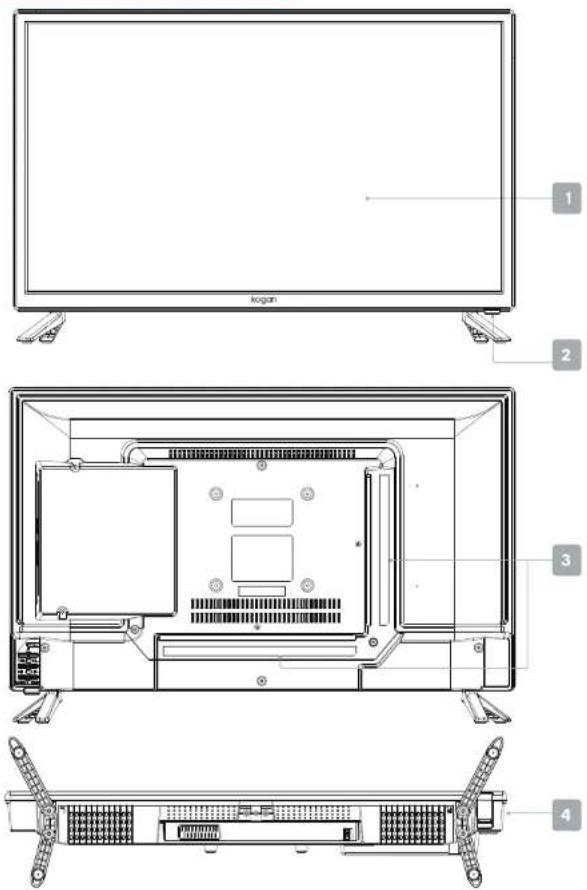
1 Kogan LED TV & DVD COMBO PANEL 3 Inputs/Ports
2 Remote sensor / Standby light 4 Power button
Inputs
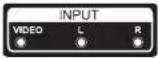 | AV inputExternal AV Signal Input AndRelevant Right/Left Sound Channel |
 | USB inputConnect a USB device here to play its media files or to recordprograms via the PVR function. |
 | Y Pb Pr inputConnect to the composite terminal of your DVD/VCR(Some models without this interface) |
 | HDMI inputDigital signal input from HDMI video connector. |
 | ANT 75Connect the antennal/cadle tv input (75/VHF/UHF) |
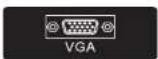 | VGA inputPC analog signal input |
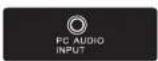 | PC AUDIO INPUTVGA input and audio input when VGA input |
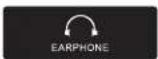 | EARPHONE outputWhen earphones are plugged in,speakers are disabled |
This is a general guide to inputs and ports, your TV may not feature all of the above.
ASSEMBLY AND INSTALLATION
BEFORE YOU GET STARTED
Spread cushioning flat to lay the TV on. This will help to prevent damage.
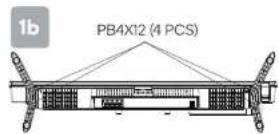
1. Stand assembly
a. Attach stands to base of TV.
b. Insert four M4x12 mm screws and use Phillips head screwdriver (not supplied) to tighten.
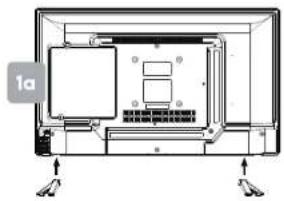
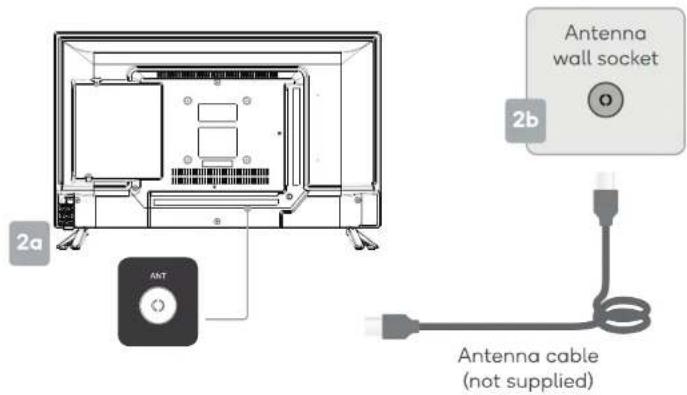
2. Connect to antenna
a. Connect an antenna cable (not supplied) via the 'ANT' input port at the back of the TV.
b. Ensure the antenna cable is also connected to a working antenna, either via an antenna wall socket in your home, or directly.
USING REMOTE CONTROL / POWER BUTTON
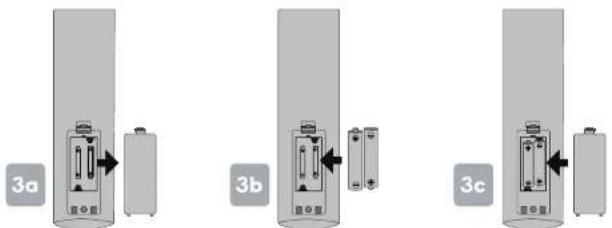
3. Remote control assembly
a. Open the battery compartment cover on the back side.
b. Insert two 1.5V AAA size batteries, making sure to match the polarity markings (+ / -) of the batteries with the diagram inside the compartment.
c. Replace battery compartment cover.
WARNINGS
• One loading of batteries will last for 1 year under normal use.
- If you do not intend to use the remote controller for a long period of time, remove them to avoid damage due to leakage.
- Do not use old and new batteries together.
- The batteries (battery pack or batteries installed) shall not exposed to excessive heat such as sunshine, fire or the like.
4. Using remote control
Unless stated, otherwise, the remote control can operate all the features of the TV.
Always point the remote control directly at the remote sensor in front of the TV.
TIPS
Do not block the path between the sensor and the remote control.
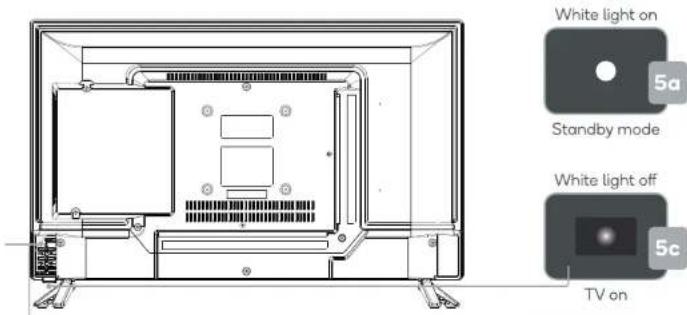
5. Turning TV on
a. Plug the power cord into a suitable power outlet. The standby will display a light, showing that the TV is receiving power.
b. Press the POWER (☐) button (on your remote or at the bottom of the TV) to turn the TV on.
c. The standby light will turn off when the TV is on.
TURNING TV OFF
Press the POWER (⏻) button on the remote control to enter standby mode.
To power down the TV completely, unplug the power cord from the power outlet.
Do not leave your set in standby mode for long periods of time. If you will not use the TV for a long time, it is recommended to unplug the set from both the power outlet and aerial.
REMOTE CONTROL OVERVIEW
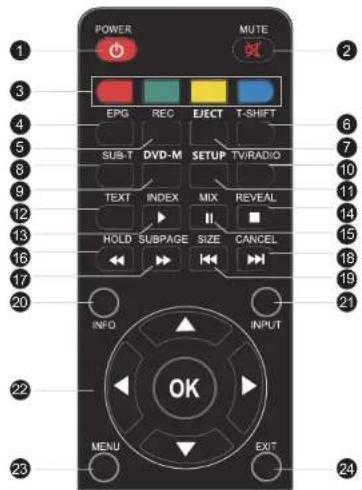
POWER: Set your TV to power on or 1 standby mode.
2 MUTE: Toggle sound on/off.
3 COLOUR BUTTONS:
Use add-on functions in OSD menu.
4 EPG: Shows Electronic Program Guide.
5 REC: Personal video record button.
6 T-SHIFT: Press to activate Time Shift function in Digital TV mode, for delayed viewing.
7 EJECT: Eject or loads the disk from DVD module.
8 SUB-T: Select sub-title of media video file.
9 DVD-M: Go to the DVD menu with the last function you used.
10 TV/RADIO: When watching channel, allows you to switch between TV and Radio modes.
11 SETUP: Show DVD setup menu.
12 TEXT: To enter Teletext mode.
13 INDEX: To display the index page.
▶: Play multimedia file.
14 REVEAL: Teletext mode-To reveal or hide the hidden words.
■: Press to stop play in media mode.
15 MIX: TV and TXT picture are mixed together in transparent background.
II: Pause multimedia file.
16 HOLD: Teletext mode-Hode current page which is display.
17 SUBPAGE: Manually jump to the previous or next sub page of Teletext.
◀◀ : Fast review and fast forward,
18 CANCEL: To cancel the display.
▶▶▶: Select the previous or the next media file.
19 SIZE: Change the size of display in Teletext mode.
20 INFO: Press to display the source and channel's info.
21 INPUT: Open the main menu, press to list the sources.
22 OK: Allow you to navigate the on-screen menus and adjust the system settings to your reference.
23 MENU: Allow you to navigate the on-screen menus.
24 EXIT: Exit from the menu or sub-menu and cancel the function in process (if possible).
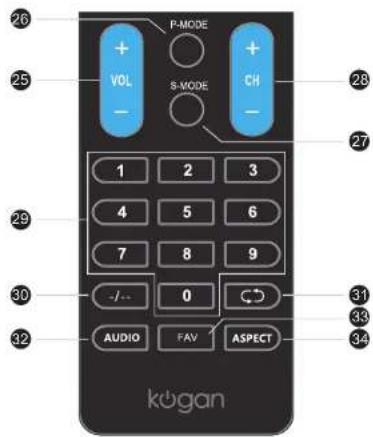
25 VOL+/VOL-: Press to increase/decrease the sound level.
26 P-MODE: Switches between the preset picture mode.
27 S-MODE: Switches between the preset sound mode.
28 CH+/CH-: Press to scan through channels.
29 0-9: Press 0-9 to select a TV Channel directly while watching TV.
30 -/-: Set up the digit of channel.
31 CD: Return to the previous viewed program.
32 AUDIO: Switch the audio channel in DVD or multimedia mode.
33 FAV: Show favorite channel list.
34 ASPECT: Press repeatedly to cycle through the available aspect modes.
FIRST TIME SETUP
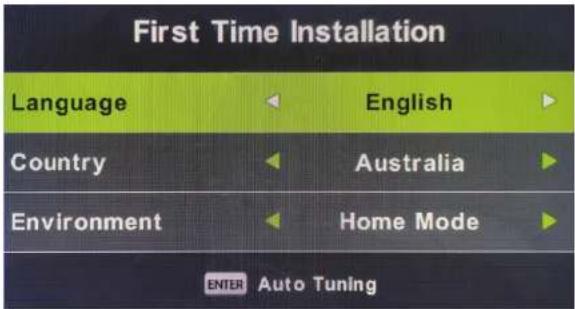
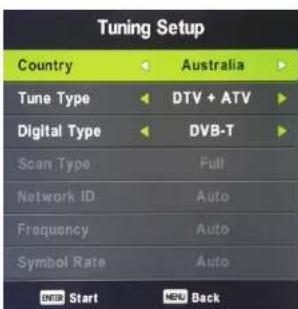
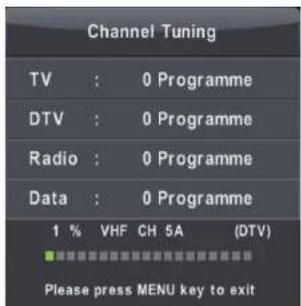
When turning the TV on for the first time, the Setup Wizard screen will appear. Use the ▲/▼ and OK buttons to navigate the following options.
Language
Select your menu language.
Country
Select your country.
TV Buttons
natural_image
Simple line drawing of a rectangular frame with a circular inset showing a cross-section (no text or symbols)Playback DVD
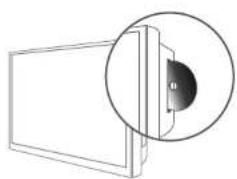
Gently insert the disc to the slot with a labeled side facing the back of the TV. Inserting the disc incorrectly may cause damage. When the disc is successfully inserted, the input mode of the TV will automatically change to DVD.
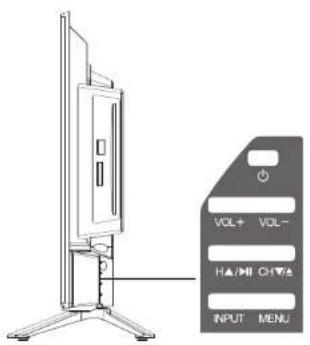
POWER(○): Turns the TV on and off.
② VOL+: Increases the volume. In the TV menu system, it acts like the right arrow on the remote control and can be us to select menu options.
① VOL:- Decreases the volume. In the TV menu system, it acts like the left arrow on the remote control and can be used to select menu options.
CH▲/HI: Short press to achieve CH+ function, long press to achieve play or pause function.
CH▲: Scans up through the channel list. In the TV menu system, it acts like the up arrow on the remote control and can be used to select menu options.
HI: Plays or pause the DVD disk.
● CH▼/▲: Short press to achieve CH- function, long press to achieve EJECT function.
CH▼: Scans down through the channel list. In the TV menu system, it acts like the down arrow on the remote control and can be used to select menu options.
▲: Insert or eject the disk.
● INPUT: Displays the Source Select List.
⑦ MENU: Displays the TV Main Menu,
TV Menu
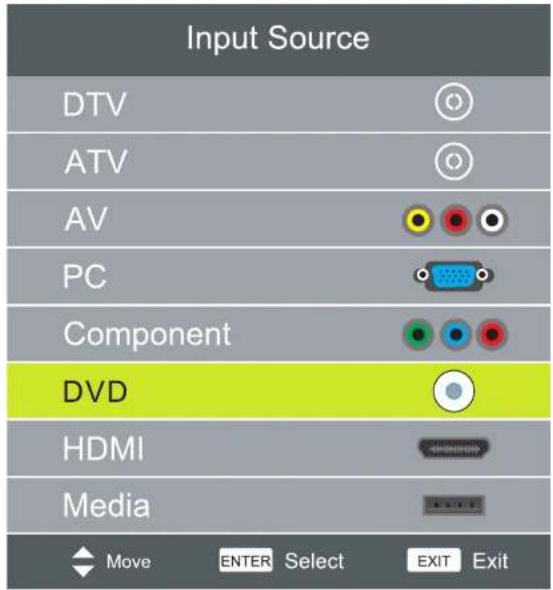
SELECTING AN INPUT SOURCE
- Press the INPUT button on the remote control, to display the input source list.
- Press the ▲/▼ buttons to select the input source, and then press OK to confirm.
- You can access connected USB drives by selecting MEDIA.
NOTE: The first time you use this TV, make sure to go through the first time installation and auto-search for all the DTV channels.
CHANNEL SETTINGS
To access CHANNEL settings, press the MENU button and go to CHANNEL.
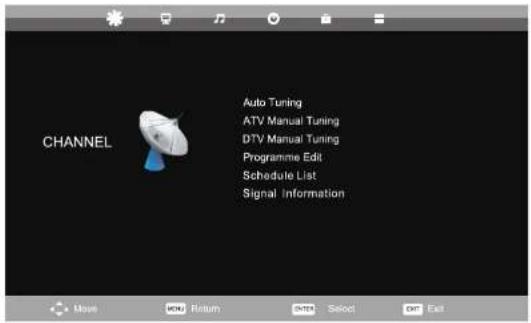
Auto Tuning
Uses up and down button to select Auto Tuning, then press Enter button to enter sub-menu.
ATV Manual tuning
Search the channel manually/You can customise the color/sound system, frequency of channel.
DTV Manual tuning
Search the channel manually. Use the arrows button to select DTV Manual Tuning, then press OK button to enter sub-menu.
Programme Edit
Via color buttons you can edit the programme, functions include delete, rename, skip channel, etc. You can also add or erase the channel to the favorite channel list via FAV button on remote control.
Schedule List
Show the Schedule list, it is available under DTV source.
Signal Information
Press ▲/▼ button to select signal information, then press the OK button to see the detailed information about the signal. Only available when there is signal under DTV.
TV Menu
PICTURE SETTINGS
To access Picture settings, press the MENU button and go to picture.
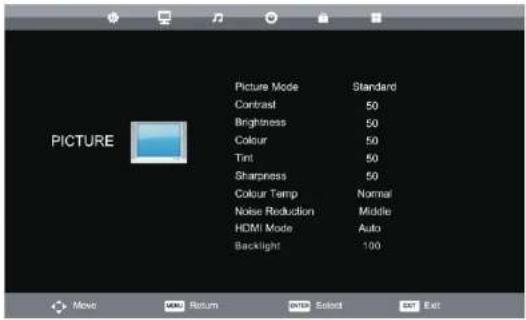
Picture Mode
Select the preset picture mode. You can also switch the mode via PMODE button on the remote control. You can only customise the contrast, color, brightness and tint in Personal mode.
Contrast
Adjusts the difference between the light and dark areas of the picture. To get better picture value, Contrast should be adjusted to the proper value.
Brightness
Adjusts the brightness of the picture, and usually is adjusted together with Contrast.
Colour
Adjust the saturation of the color based on your own like.
Tint
Adjust the tint of TV display.
Sharpness
Adjusts the sharpness of the picture. This function is not available in PC mode.
Colour Temp
Press OK button to enter the color temperature sub menu. Color Temperature Adjusts the colour temperature of the picture, to select the option: Cold, Normal, Warm.
Noise Reduction
To filter out and reduces the image noise and improve picture quality.
HDMI Mode
Select HDMI Mode to Auto,Video and PC.
SOUND SETTINGS
To access Sound settings, press the MENU button and go to sound.
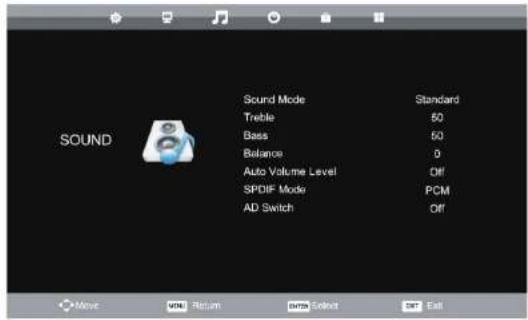
Sound Mode
Select the preset Sound Mode. You can also switch the mode via SMODE button on the remote control Standard, Music, Movie, Sport and Personal five kinds of voice mode for your choice. Bass and Treble can only be adjusted when Sound mode is set to Personal.
Treble
Adjuststhe highest part ofthe sound
Bass
Adjuststhe lowest part ofthe sound.
Balance
Adjusts how much audio (loudness) gets sent to the left and right speakers.
Auto Volume Level
This function may be set as On or Off. Auto Volume Level can set the volume automatically adjust corresponding to the input audio.
SPDIF Mode
Select three modes area available including Auto, PCM and Off.
AD Switch
Enter the AD Switch sub-menu, then select this option to adjust AD volume.
NOTE:
Balance: This item can adjust the speaker's output, it enables you to listen to best at your position. Auto volume level: This item uses for reducing the difference between channel and program's volume automatically. It made the overall water to be even. This function will also reduce the fluctuation of the sound.
TV Menu
TIME SETTINGS
To access TIME settings, press the MENU button and go to TIME.
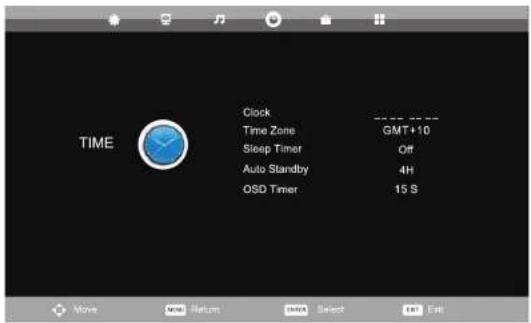
Clock
Set the TV clock.
Time Zone
Showing the country's time zone.
Sleep Timer
Set the sleep timer, the TV will automatically enter standby mode after times up.
Auto Standby
Set the auto sleep on / off. including Off, 3 hours, 4 hours and 5 hours.
OSD Timer
Set the time how long to display OSD menu. Summer Time: Set the Summer Time option to Auto, on and off.
LOCK MENU
To access LOCK settings, press the MENU button and go to Lock.
Default password is "0000", then you can set your own password to lock the TV.
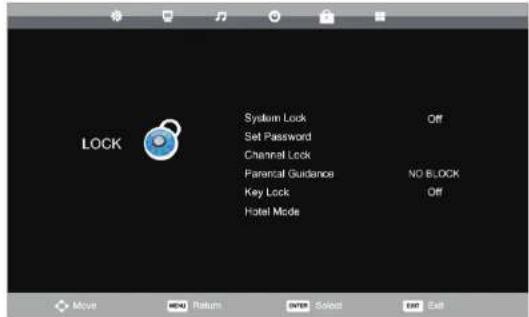
System Lock
Press OK button to enter, input password, default password is 0000.
Set Password
To set your own password, first enter the old password, and then enter your new password twice.
Channel Lock
To enter "Channel Lock" menu, select the program you want to, then press the "Green" button to lock or unlock the channel.
Parental Guidance
You can set the parental control function to suit viewing for children of all ages. Choose the categories in the sub menu.
Key Lock
You can set to lock or unlock the keypad.
Hotel Mode
To enter "Hotel Mode" menu, select the program you want to.
TV Menu
SETUP SETTINGS
To access Setup settings, press the MENU button and go to SETUP.
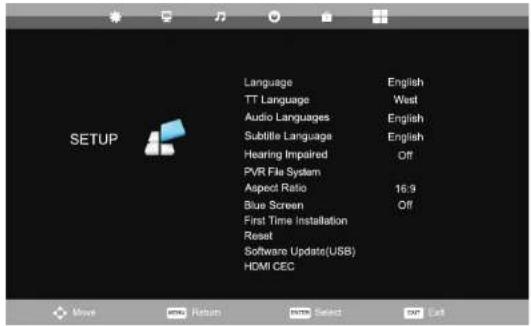
Language
Select your desired OSD language.
TT Language/Audio Language/Subtitle Language
Select your desired teletext language/ the primary audio language /the primary subtitle language.
Hearing impaired
This function is for the Hearing Impaired, when the status is on, you can see subtitles in the programs.
PVR File System
Enter the submenu to make PVR settings.
Aspect Ratio
To select between the available modes: Auto, 4:3, 16:9, Zoom1 and Zoom2
Blue Screen
To turn the blue screen on/off. If the Blue Screen is turned on, the TV will display a blue background when
there is no signal input.
First Time Installation
To set relevant options, including OSD language, country and tuning.
Reset
Press OK button to enter a dialogue, select Yes to restore factory default.
Software Update (USB)
Update the firmware of this model. (Please contact the dealer.)
HDMI CEC
Select HDMI CEC in the Option menu then press OK button to enter the sub-menu.
USB OPERATION
MEDIA PLAYBACK
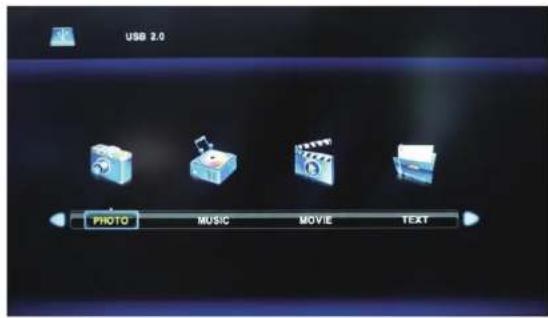
- First insert a USB Device into the TV.
- Press "MEDIA" on the remote control.
- Use the directional arrow keys to go through folders within your USB device to access Photo's, Music, Movies or text.
- Press the EXIT button to return to previous page.
DVD
DVD
Switch to DVD channel and print OK key into DVD initiate channel.
General Setup Page
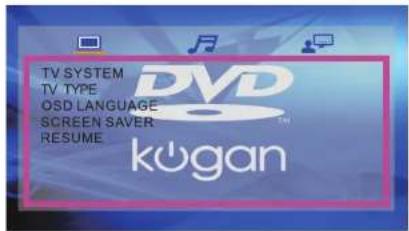
TV System
Set the TV system as PAL, Auto or NTSC. Please choose according to the local TV system and disk.
TV Type
Set the TV type as 4:3 Panscan, 4:3 LetterBox, 16:9.
OSD Language
Set the DVD OSD language as English, French or Spanish.
Screen Saver
This option turns the screen saver on or off.
Resume
This option turns the Resume on or off.
Audio Setup Page
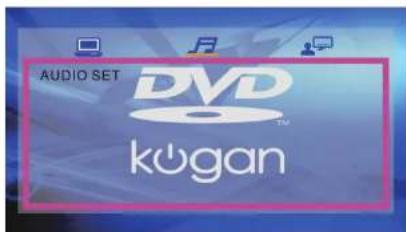
Audio Set
This option to set the type of sound.
Preference page
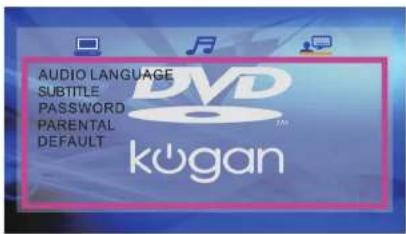
Audio Language
Set the DVD audio language.
Subtitle
Set the DVD subtitle language.
Password
Set a new DVD setup parental password.
Parental
Set the parental control rating. To change this option, you need password,
and the original one is "0000".
Default
Reset the DVD setup menu options to factory default
Important Note:
DVD disc can only be inserted into DVD Combo when TV is in DVD Mode.
SPECIFICATIONS
| Audio | Power | ||
| Speakers | 2 x 5W | Average Consumption | 36W |
| Connectivity | Energy Consumption | 83kWh per year | |
| HDMI | 1.4 | Energy Rating | 5 Star |
| HDMI-ARC | Yes | HDMI | Tuning And Signal | |
| HDMI-CEC | Yes | HDMI | Tuner Type | DVB-T/T2 , DVB-C |
| USB | 1 x USB 2.0 | ||
| Dimensions | |||
| Without Stand | 553x331x69mm | ||
| With Stand | 553x367x165mm | ||
| VESA Wall Mount Pattern | 100 x 100 | ||
| NW | 2.8 kg | ||
| GW | 3.4 kg | ||
| Display | |||
| Brightness | 180 ± 10cd/m^2 | ||
| Computer Supported Resolutions | 640x480@60Hz, 720x400@70Hz, 800x600@56/60Hz1280x720@60Hz, 1366x768@60Hz | ||
| Contrast Ratio | 3000:1 | ||
| Native Aspect Ratio | 16:9 | ||
| Refresh Rate | 60Hz | ||
| Resolution | 1366 x 768 | ||
| Response Time | 9.5ms | ||
| Size | 24" | ||
| Viewing Angle | 178^/178^ | ||
| Features | |||
| EPG | Yes | ||
| TV Resolution | HD | ||
| USB Media Playback | Yes | Note:Design and specifications are subject to change without notice.Weight and dimension shown are approximate. | |
| USB Media Playback Formats | .mpg.avi.ts.mov.mkv.dat.mp4.vob.mp3.jpg/.jpeg.bmp .png.srt .ssa/.ass.smi.sub.txt | ||
TROUBLESHOOTING
Common fixes
Many minor issues can be resolved by hard resetting, or power cycling the unit or upgrading the firmware.
To perform a hard reset, or power cycle, please use the following steps.
- Unplug it from the main power socket and leave it for 10-15 minutes.
- Press and hold the power button on the TV for 5 seconds.
- Connect the TV back to the power and turn it on.
Poor picture and sound quality
• Try a different channel
- Adjust the antenna
- Check all connections
No picture or sound in TV status
• Try another channel
- Press the TV/AV button
• Make sure TV is plugged in
- Check the antenna connection
No sound or sound is too low at maximum volume
- Check the volume settings on any external speakers connected to your television
- Adjust the TV volume accordingly
- Check another channel or input
- Check that MUTE hasn't been turned on
Picture rolls vertically
- Check all connections
No colour, wrong colour or tints
• Make sure the program itself is broadcast in colour
- Select the picture menu, then adjust the colour and tint submenus
Blurred or snowy picture, distorted sound
- Check direction, location and connections to your antenna
- Issues may be caused by the use of an indoor antenna (poor signal)
Remote control malfunctions
- Replace remote control batteries
- Check battery terminals
- Remote is out of range, move closer to TV
- Remove any obstructions between remote and IR sensor of TV
• Make sure the power cord to your TV is plugged in and turned on
Image is not centred on the screen
- Adjust the horizontal and vertical position
"No Signal" on HDMI source
- Test the device with a different HDMI cable
- Plug the device into another HDMI port
- Try a different device connected to the same cable and port
• Perform a factory reset on your TV
Care & maintenance
Unplug the television from the power supply before cleaning. Do not use any liquid cleaners or harsh chemicals. Always use a soft, damp cloth.
Cleaning the screen
Wet a soft cloth in a mixture of lukewarm water and a little fabric softener or dish washing detergent. Wring the cloth until it's almost dry, and then use it to wipe the screen.
Make sure the excess water is off the screen, and then let it air-dry before you turn on your TV.
Cleaning the casing
To remove dirt or dust, wipe the TV casing with a soft, dry, lint-free cloth. Please be sure not to use a wet cloth.
For our full TV troubleshooting guide, head online to help.kogan.com
- 24" LED TV & DVD COMBO
- SERIES 6 DH65
- CONTENTS
- SAFETY AND WARNINGS
- WARNING
- SAFETY AND WARNINGS cont'd
- CAUTION: Connecting the power cord
- CAUTION
- COMPONENTS
- NOT INCLUDED
- PRODUCT OVERVIEW
- ASSEMBLY AND INSTALLATION
- BEFORE YOU GET STARTED
- Stand assembly
- Connect to antenna
- USING REMOTE CONTROL / POWER BUTTON
- Remote control assembly
- WARNINGS
- Using remote control
- TIPS
- Turning TV on
- TURNING TV OFF
- REMOTE CONTROL OVERVIEW
- FIRST TIME SETUP
- Language
- Country
- TV Buttons
- Playback DVD
- TV Menu
- SELECTING AN INPUT SOURCE
- CHANNEL SETTINGS
- Auto Tuning
- ATV Manual tuning
- DTV Manual tuning
- Programme Edit
- Schedule List
- Signal Information
- PICTURE SETTINGS
- Picture Mode
- Contrast
- Brightness
- Colour
- Tint
- Sharpness
- Colour Temp
- Noise Reduction
- HDMI Mode
- SOUND SETTINGS
- Sound Mode
- Treble
- Bass
- Balance
- Auto Volume Level
- SPDIF Mode
- AD Switch
- NOTE:
- TIME SETTINGS
- Clock
- Time Zone
- Sleep Timer
- Auto Standby
- OSD Timer
- LOCK MENU
- System Lock
- Set Password
- Channel Lock
- Parental Guidance
- Key Lock
- Hotel Mode
- SETUP SETTINGS
- TT Language/Audio Language/Subtitle Language
- Hearing impaired
- PVR File System
- Aspect Ratio
- Blue Screen
- First Time Installation
- Reset
- Software Update (USB)
- HDMI CEC
- USB OPERATION
- MEDIA PLAYBACK
- DVD
- TV System
- TV Type
- OSD Language
- Screen Saver
- Resume
- Audio Set
- Audio Language
- Subtitle
- Password
- Parental
- Default
- Important Note:
- TROUBLESHOOTING
- Common fixes
- Many minor issues can be resolved by hard resetting, or power cycling the unit or upgrading the firmware.
- To perform a hard reset, or power cycle, please use the following steps.
- Poor picture and sound quality
- No picture or sound in TV status
- No sound or sound is too low at maximum volume
- Picture rolls vertically
- No colour, wrong colour or tints
- Blurred or snowy picture, distorted sound
- Remote control malfunctions
- Image is not centred on the screen
- "No Signal" on HDMI source
- Care & maintenance
- Cleaning the screen
- Cleaning the casing
Brand : Kogan
Model : KALED24DH65NA
Category : Television