IF-988 - Household Fan Imarflex - Free user manual and instructions
Find the device manual for free IF-988 Imarflex in PDF.


| Product Type | Household Fan |
| Model | IF-988 |
| Brand | Imarflex |
| Dimensions (Height) | Approx. 130 cm |
| Base Diameter | 35 cm |
| Weight | 4 kg |
| Power Rating | 60 W |
| Voltage | 220-240 V |
| Frequency | 50/60 Hz |
| Speed Settings | 3 levels (Low, Medium, High) |
| Oscillation | Yes, 90° wide-angle |
| Tilt Adjustment | Yes, manual up/down |
| Height Adjustment | Yes, telescopic pole |
| Material | ABS plastic blades and grille; metal stand |
| Safety Features | Overheat protection, stable anti-tip base |
| Cleaning Instructions | Wipe with soft damp cloth; do not immerse |
| Warranty | 1 year limited |
| Included Accessories | Fan assembly, base, screws, manual |
| Repairability | Spare parts available; professional repair recommended |
Frequently Asked Questions - IF-988 Imarflex
User questions about IF-988 Imarflex
0 question about this device. Answer the ones you know or ask your own.
Ask a new question about this device
Download the instructions for your Household Fan in PDF format for free! Find your manual IF-988 - Imarflex and take your electronic device back in hand. On this page are published all the documents necessary for the use of your device. IF-988 by Imarflex.
USER MANUAL IF-988 Imarflex
SPECIFICATION
MODEL NO. : IF-988
RATED VOLTAGE : 220-230Va.c. / 60Hz
POWER CONSUMPTION : 50watts
SAFETY GUIDELINES
- Read all instructions carefully.
- Check the condition of the unit after taking out from the box. Ensure that all parts are in good condition.
- Before using the unit, check if the voltage indicated corresponds with the convenience outlet (220-230Va.c.).
- Do not use any appliance with a damaged cord or plug. If the cord is damaged it should be replaced with the same type and size or bring the unit to the nearest authorized service center.
- Do not place the blender near gas stove or electric burner.
- Close supervision is necessary when any appliance is used by or near children.
- This unit must only be used for room ventilation. Do not use in bathrooms.
- Do not insert any object into the fan guard.
- Never touch the unit with wet hands.
- Do not use the plug to stop or start the operation of the unit, use the switch button.
- Always unplugged the unit before cleaning.
- Keep this instruction for future reference.
DESCRIPTION OF PARTS
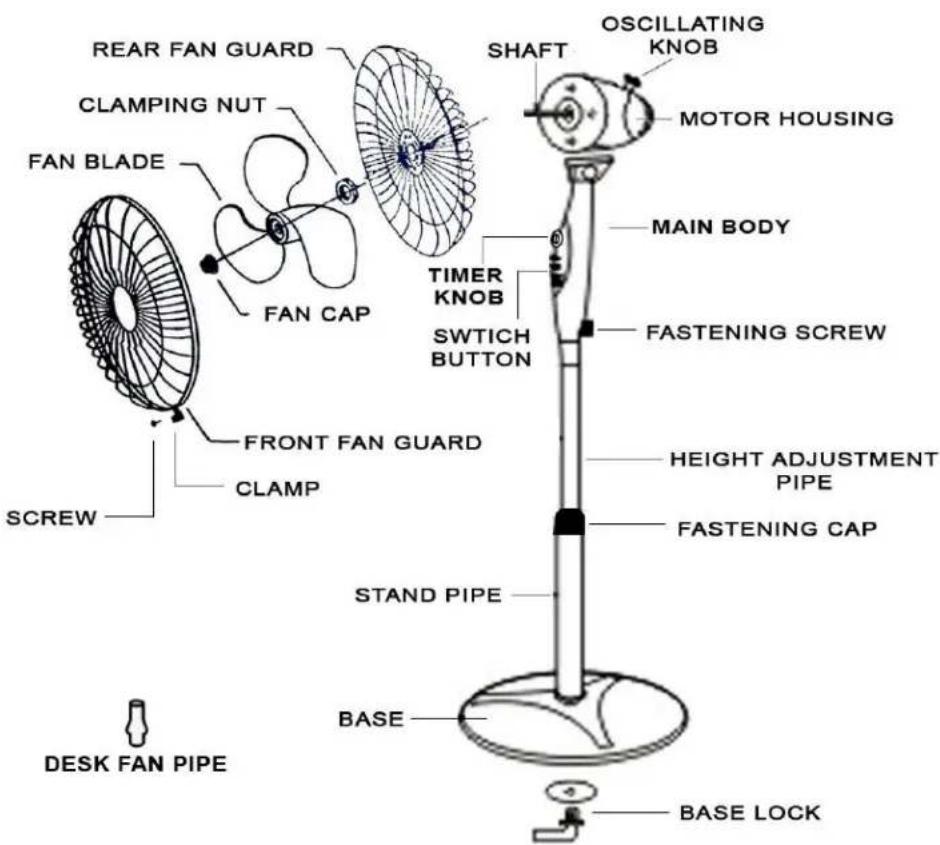
ASSEMBLY
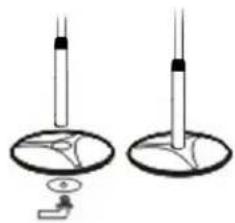
STAND FAN
natural_image
Two identical diagrams of a mechanical device with a base and lever, no text or symbols present.- Insert the Stand Pipe on top of the Base.
- Insert the Base Lock on the bottom of the Base and turn it clockwise.
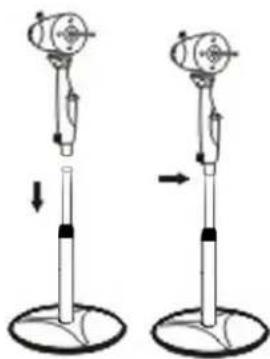
- Unscrew the Fastening Screw on the Main Body and insert Height Adjustment Pipe. Tighten the Fastening Screw.
natural_image
Two identical diagrams of a vertical device with arrows indicating motion, mounted on a base (no text or symbols)DESK FAN
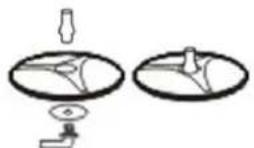
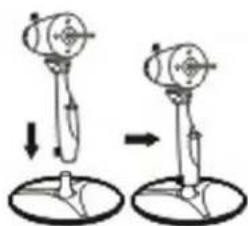
- Insert the Desk Pipe on top of the Base.
- Insert the Base Lock on the bottom of the Base and turn it clockwise.
natural_image
Diagram showing two mechanical setups with arrows indicating motion or transformation (no text or symbols)- Unscrew the Fastening Screw on the Main Body and insert Height Adjustment Pipe. Tighten the Fastening Screw.
natural_image
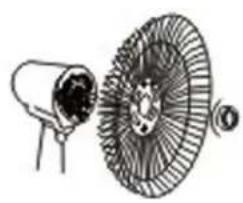
Illustration of a megaphone and a fan blade assembly (no text or symbols)- Fit the Rear Fan Guard to the motor housing by matching the three Rear Holes of the back guard to the three round pins in front of the motor housing.
- Fasten the clamping nut by turning it clockwise.
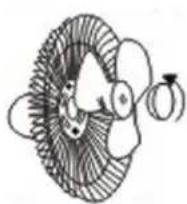
- Insert the fan blade to the motor shaft.
- Fasten the Fan Cap by turning it counter clockwise.
natural_image
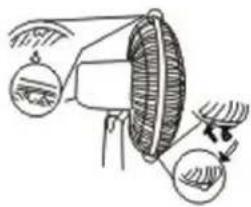
Diagram of a spray gun with a conical cover and two circular insets showing different components (no text or symbols)- Fit the Rear Fan Guard and the Front Fan Guard, push-up the Clamp and tightened the Screw
HOW TO USE
-
Plug the unit into the convenience outlet (220-230Va.c).
-
Push the Switch Button to the desired air flow. "1" indicates LOW speed; "2" indicates MEDIUM speed; "3" indicates HIGH speed; and "0" to turn it OFF.
-
PUSH the Oscillating Knob for oscillation, and PULL the Oscillating Knob for fixed position.
-
The air flow can be adjusted upward or downward by moving the Motor Housing up or down.
-
To adjust the height: Turn Fastening Cap clockwise and Pull-up/Push-down to desired height then turn the Fastening Cap counter clockwise to fix the height.
CLEANING MAINTENANCE
-
Always disconnect the unit from the convenience outlet before disassembling the unit.
-
To disassemble the unit, simply reverse the assembly instruction.
-
Wash the Front Fan Guard, Fan Cap, Fan Blade, Clamping Nut and Rear Fan Guard with soap and water.
-
Use a moistened cloth (NOT WET) to remove the dirt from the plastic and metal surfaces of Electric Fan.
-
Do not immerse the Motor Base in water or other liquids.
-
Allow the detachable parts to dry off before assembling the unit.
Brand : Imarflex
Model : IF-988
Category : Household Fan