SecureMax - Car seat Evenflo - Free user manual and instructions
Find the device manual for free SecureMax Evenflo in PDF.

User questions about SecureMax Evenflo
0 question about this device. Answer the ones you know or ask your own.
Ask a new question about this device
Download the instructions for your Car seat in PDF format for free! Find your manual SecureMax - Evenflo and take your electronic device back in hand. On this page are published all the documents necessary for the use of your device. SecureMax by Evenflo.
USER MANUAL SecureMax Evenflo
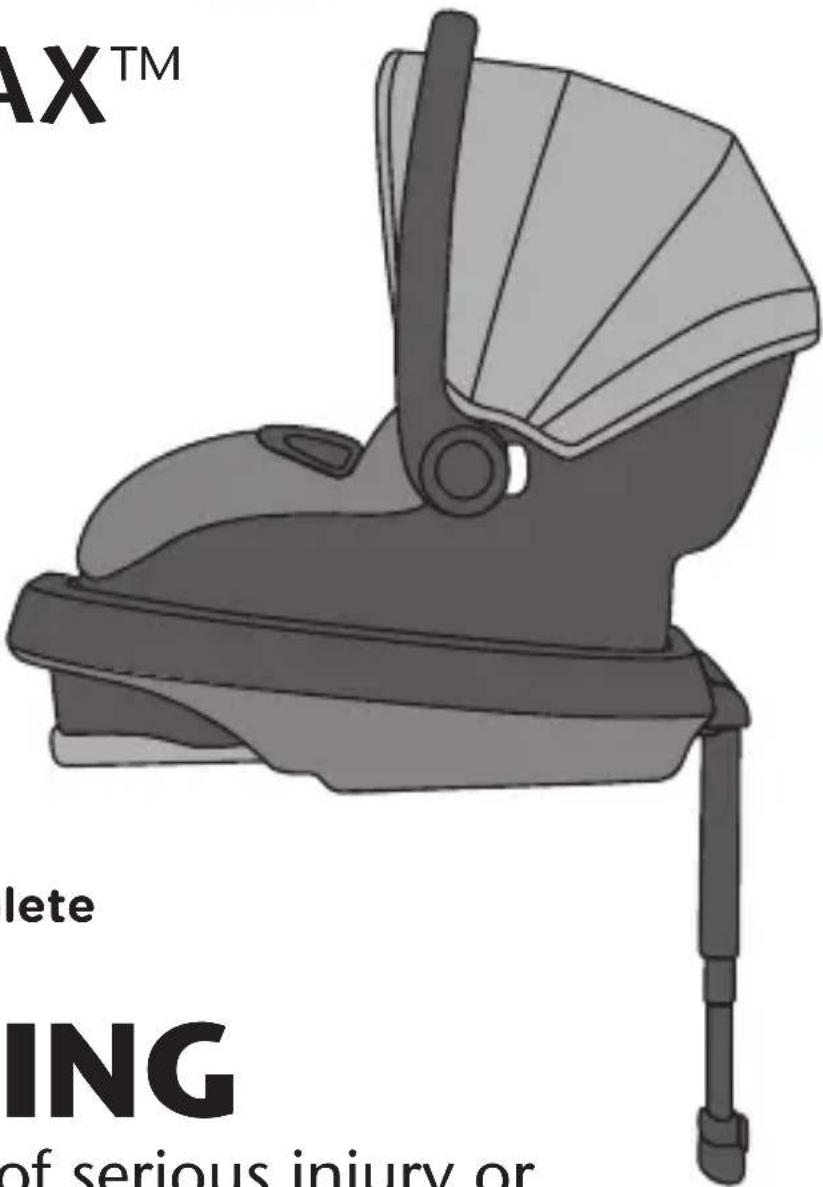
SMART REAR-FACING INFANT CAR SEAT
OWNER'S MANUAL KEEP FOR FUTURE USE.
Rear-facing\*
1.8 to 15.8 kg
(4 to 35 lbs)
43 to 81 cm
(17 to 32 in.)
text_image
AX™ lete ING of serious injury or*See page 6 for complete requirements.
WARNING
To reduce the risk of serious injury or death, read this owner's manual prior to installing and using this child restraint.
©2020 Evenflo Company, Inc.
25701576 2/20
More children are killed every year as passengers in car crashes than by any other type of injury.
To reduce the risk of SERIOUS INJURY or DEATH, read this owner's manual and your vehicle owner's manual before installing and using this child restraint.
Using a child restraint makes a big difference. By properly using this child restraint and following these instructions (and the instructions that accompany your vehicle), you will greatly reduce the risk of serious injury or death to your child from a crash.
Do not be misled by the commonly used term "safety seat"; no restraint system can prevent all injuries in all crashes. Many properly restrained adults and children are injured in motor vehicle crashes, including relatively minor crashes.
A properly used child restraint is the best way to minimize injuries to your child and to increase the chances for your child's survival in most crashes.
U.S. Regulatory Notice
This child restraint meets all the requirements of Federal Motor Vehicle Safety Standard 213.
Symbol Legend


Airbag Symbol – Alerts you to important information about airbag safety.
LATCH Symbol – Alerts you to important information about LATCH safety.
Aircraft Symbol – Alerts you to important information about aircraft safety.
Table of Contents (TOC)
Child Requirements 6
Premature Infant Use 8
Warnings 10
LATCH Warnings....22
Safe Practices....28
For Recall Information for U.S. Customers......29
Motor Vehicle/Aircraft Usage 31
Base Features 32
Child Seat Features 34
Using the Handle 36
Installing the Canopy......37
SafeZone™ Load Leg 38
Installation Checklist with Base 44
Installing the Base with the
Lower Anchor Connector Assembly 46
Installing the Base with the
Vehicle Seat Belt/Shoulder Belt 54
Installing the Base with the
Vehicle Seat Belt 58
Installation Checklist without Base 62
Installing the Carrier with the
Vehicle Seat Belt/Shoulder Belt 66
Installing the Carrier with the
Vehicle Seat Belt 68
Adjusting the Recline 70
Checking the Recline with Base ....71
Placing Your Child in the Carrier 73
Changing the Crotch Strap Position....76
Changing the Waist Strap Position 80
Using the Infant Body Support......86
Securing the Child in the Carrier 87
Removing the Child from the Carrier 92
Using as an Infant Carrier....93
LATCH Storage 95
Storing Your Instructions....96
SensorSafe ^TM 97
Securing Your Child Restraint in Aircraft...... 107
Installing the Carrier WITHOUT
the Base in Aircraft....108
Replacement Parts 114
Care and Cleaning....116
Proper Disposal of this Child Restraint......117
Warranty....118
Child Requirements
CHILD REQUIREMENTS
Warning: Failure to follow these Child Requirements could result in serious injury or death.
This child restraint is designed for use by children in rear-facing orientation only. To use this child restraint properly, children MUST meet the size and age requirements below. In addition, Evenflo recommends consulting with your child's physician before allowing your child to transition from a rear-facing to forward-facing child restraint.
The American Academy of Pediatrics (AAP) recommends keeping children rear-facing until they reach the maximum height or weight for their child restraint in rear-facing orientation. Additionally, some states' laws require children to be rear-facing until age 2.
Accordingly, you will see this guidance reflected in the Child Requirements. Please review any applicable local, state or provincial laws related to child passenger safety before installing and using this child restraint.
Rear-facing Use
- No restraint can guarantee absolute protection from injury in every crash.
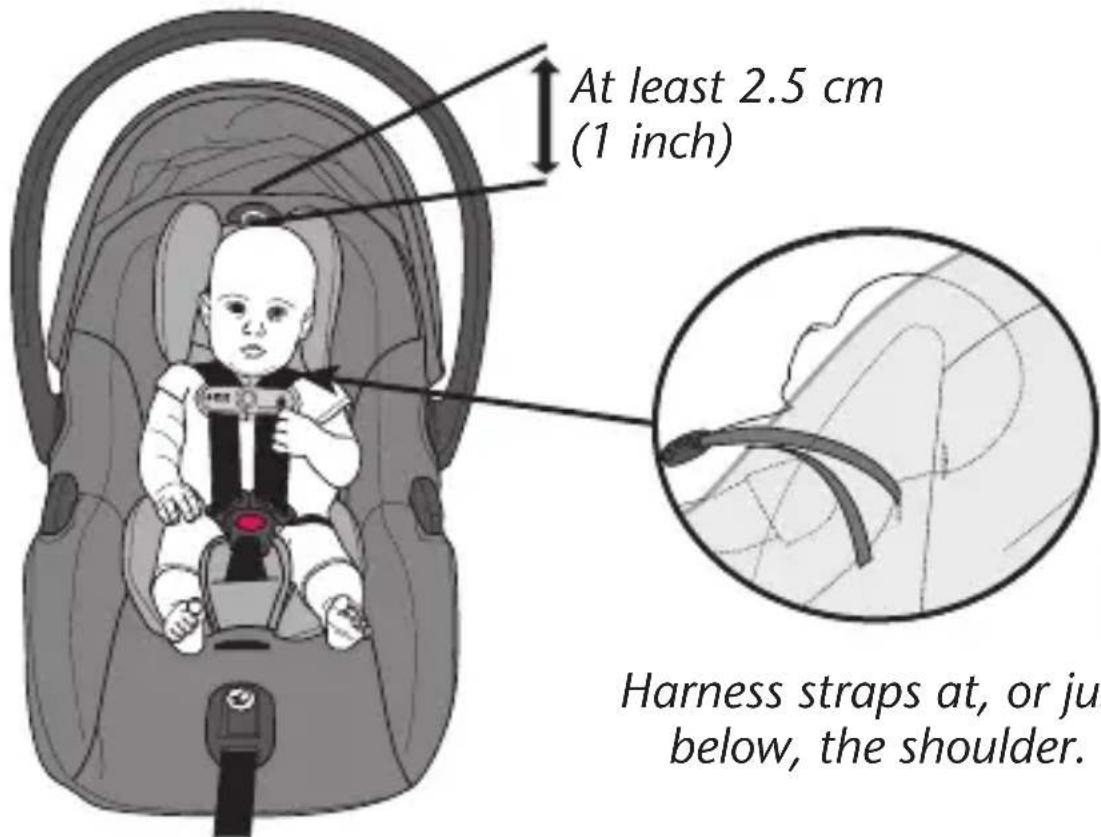
• 1.8 to 15.8 kg (4 to 35 lbs) - 43 to 81 cm (17 to 32 in.) and top of child's head is at least 2.5 cm (1 in.) below the top of the child restraint seat back.
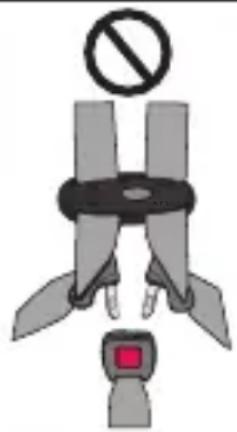
text_image
At least 2.5 cm (1 inch) Harness straps at, or ju. below, the shoulder.Harness straps at, or just below, the shoulder.
IMPORTANT: Once your child exceeds any of the size requirements above, they MUST discontinue use of this child restraint.
Premature Infant Use
Premature Infants
- DO NOT use this or any other child restraint with a premature infant until after consulting your doctor. Premature infants may have difficulty breathing when in a sitting position.
PREMATURE INFANT USE
Before using this child restraint for preterm or low birth weight infants, ensure the Child Requirements are met and follow the guidelines in this section.
According to the U.S. National Highway Traffic Safety Administration, a properly installed child restraint reduces the risk of death by over 70% for infants involved in crashes. Federal Motor Vehicle Safety Standard (FMVSS) 213 establishes design and dynamic performance requirements for child restraint systems. However, the standard has no minimum weight limit and does not address the special medical needs of preterm or low birth weight infants. To ensure that preterm and low birth weight infants are transported safely, the guidelines published by the American Academy of Pediatrics (AAP) in Pediatrics 2009;123:1424–1429 must be followed. All children should ride rear-facing in the vehicle as long as possible. Preterm and low birth weight infants are at additional risk of breathing difficulties and heart problems when placed in a child restraint. Evenflo requires that the evaluation
recommended by the AAP be conducted for all infants born earlier than 37 weeks and all newborn infants who weigh less than 5 lb at birth before their first car trip to check for breathing difficulties or heart rate problems when traveling in a rear-facing child restraint.
The AAP recommends that appropriate hospital staff observe your infant in the child restraint for a period of 90 to 120 minutes or the duration of travel, whichever is longer. This period of observation must be performed with the infant properly positioned as described in these instructions and with the child restraint placed at an angle that is approved for use in the vehicle. The hospital staff will check for any breathing difficulties or heart rate problems. Your child's pediatrician will let you know if there are any special considerations for travel. The number of trips and the duration of time the infant is seated in the child restraint should be minimized. A caregiver should ride in the back seat to monitor the infant during travel. You can learn more about the AAP's recommendations for observation of newborns and the guidelines for safe transportation of preterm and low birth weight infants, as well as other resources for parents and medical professionals, at https://www.healthychildren.org/english/safety-prevention/on-the-go/Pages/default.aspx
WARNING! DEATH or SERIOUS INJURY can occur.
General Warnings
- Child restraints should be used only for travel. Potential adverse health effects from excessive use of infant child restraints have been documented. You should limit the time spent each day in a child restraint as much as possible. You must NEVER use your child restraint as a sleeping environment in the home. NEVER leave your infant unattended in a child restraint in or out of the vehicle.
- Failure to follow these installation instructions and the instructions and warnings on the product can result in your child striking the vehicle's interior during a sudden stop or crash. Serious injury or death may result. These instructions and the instructions in your vehicle owner's manual must be followed carefully. If there is a conflict between the two, the vehicle owner's manual regarding child restraint installation must be followed.
- This child restraint MUST ALWAYS face the rear of the vehicle. Serious injury or death can occur if used forward-facing.
WARNING!
DEATH or SERIOUS INJURY can occur.
- NEVER leave child unattended.
- DO NOT use child restraint if it is damaged, broken, or missing parts.
- DO NOT use this restraint if it has been involved in a crash. It must be replaced.
- DO NOT attach additional padding, toys or other devices not made by Evenflo or described in these instructions, to the child restraint. Items not tested with the child restraint could injure the child.
- Be sure that the handle is firmly locked in Position 1 (Carry) before lifting the child restraint (p 36).
- This child restraint must be securely belted to the vehicle at all times, even when unoccupied. An unsecured child restraint may injure someone if a crash occurs.
- FOR LOW BIRTH-WEIGHT INFANT, you must always use the infant body support. The infant body support must be used for infants who weigh less than 2.7 kg (6 lbs).
WARNING! DEATH or SERIOUS INJURY can occur.

text_image
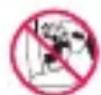
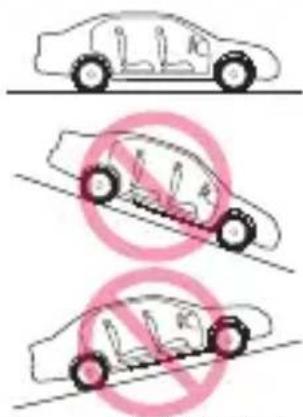
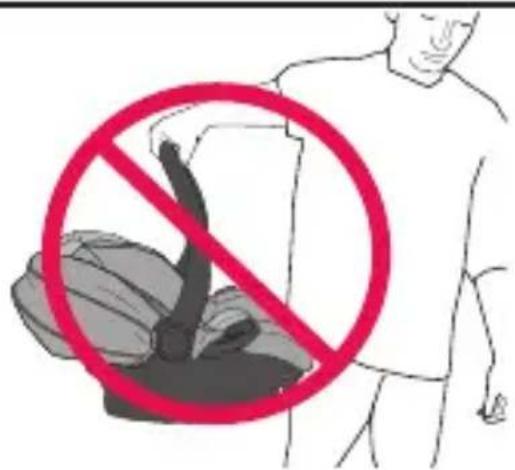
Prohibition sign with pictogram of a person holding a device, crossed out by a red circleDO NOT place rear-facing child seat on front seat with air bag.
DEATH OR SERIOUS INJURY
can occur. The back seat is the safest place for children 12 and under.
WARNING!
DEATH or SERIOUS INJURY can occur.
Air Bag Warnings
- DO NOT use this restraint in the front seat of a vehicle equipped with an air bag. Interaction between a rear-facing restraint and air bags may cause serious injury or death. If your vehicle has an air bag, refer to the vehicle owner's manual for child restraint installation. If the rear seat of your vehicle is equipped with side air bags, refer to the following information for proper usage.
Vehicles built prior to the 2002 model year:
DO NOT use this restraint in a vehicle seating position equipped with a side air bag unless authorized by the vehicle manufacturer.
Model year 2002 and newer vehicles:
Refer to your vehicle owner's manual before placing this restraint in a seating position equipped with a side air bag.
- DO NOT place any objects between the restraint and the side air bag, as an expanding air bag may cause the items to strike your child.
The forward-facing back seat is the safest place for children 12 and under.
text_image
Diagram showing two car exterior views with no smoking symbols, indicating no smoking or absence of vehicles.WARNING!
DEATH or SERIOUS INJURY can occur.
Location Warnings
- ALWAYS read and follow exactly the instructions that accompany your vehicle and child restraint.
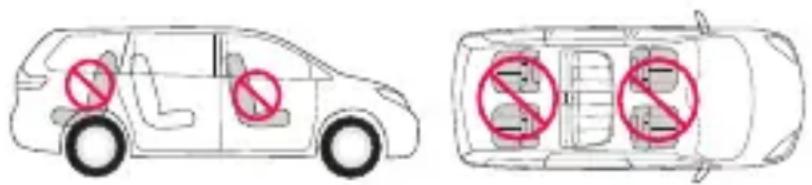
- According to accident statistics, children are safer when properly restrained in a rear seating position than in a front seating position. Generally, the center rear is safest and should be used if available. Children 12 and under should ride in the back seat of the vehicle.
- If you are unable to use the center rear seating position and have to install this child restraint directly behind a front vehicle seat, ensure that there is at least 38 mm (1.5 inches) of space between any part of the child restraint and the vehicle seat that is closest to the child’s head. This space may be necessary for the child restraint to properly perform in certain types of crashes.
- ONLY use this child restraint on forward-facing vehicle seats. DO NOT use on vehicle seats which face the rear or side.
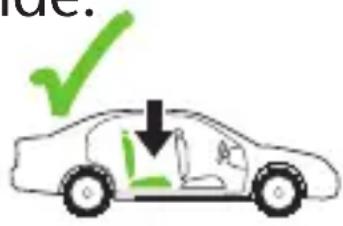
text_image
Diagram showing a car with a checkmark and a downward arrow, indicating a verification or status indicator.
text_image
Prohibition sign with no smoking symbol inside a car seat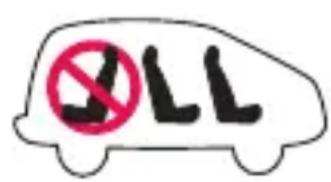
text_image
No LLLWARNING!
DEATH or SERIOUS
INJURY can occur.
- ONLY use this child restraint on vehicle seats with backs that lock into place.
- Some child restraints do not fit all vehicles or all seating locations. There are thousands of combinations of vehicle makes, models, child restraint configurations, seat belt designs and seat cushion shapes. The easiest way to determine whether your child restraint is suitable for a particular seating position is to check for a tight installation. If the child restraint cannot be properly installed, DO NOT use this child restraint.
Consult vehicle owner's manual, try a different seating location or call Evenflo at
1-800-233-2229 in the (U.S) and (Canada),.
VEHICLE TYPES IN WHICH THE RESTRAINT SYSTEM CAN NOT BE USED:
This child restraint is not to be used in vehicles that do not have vehicle seat belts or UAS lower anchorages.
WARNING!
DEATH or SERIOUS
INJURY can occur.
Vehicle Seat Belt Warnings
- ALWAYS read your vehicle owner's manual to determine Retra what vehicle belts and retractors are used in your vehicle belt. The vehicle belt MUST lock and MUST NOT loosen after the seat belt is tightened.
- DO NOT use this child restraint if it moves more than 2.5 cm (1 in.) side to side or front to back at either the rear-facing or forward-facing belt path on the child restraint. Serious injury or death may result from poor installation. If you cannot tightly secure the child restraint, try again or move it to another location.
- DO NOT loosen the vehicle seat belt to provide more leg room as this will prevent the child restraint from protecting your child.
- DO NOT use this child restraint in a seating position with door-mounted seat belts.
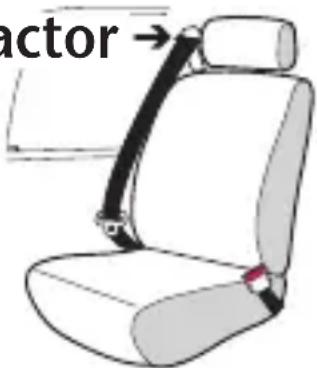
text_image
actor→
text_image
Diagram showing a car seat with a red prohibition symbol crossed out, indicating no restriction or absence.WARNING!
DEATH or SERIOUS INJURY can occur.
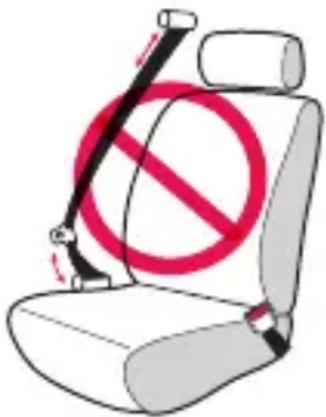
- DO NOT use this child restraint in a vehicle with seat belts that automatically move along the vehicle frame when the door is opened.

text_image
Diagram showing a car seat with a red prohibition symbol and a black seatbelt, indicating no car use or absence.- DO NOT use this child restraint in a vehicle equipped with lap belts that only lock during a sudden stop or crash (emergency locking retractor – ELR). You must use a seating location with a locking seat belt. Check your vehicle owner's manual to see if you have lap belts with ELRs.
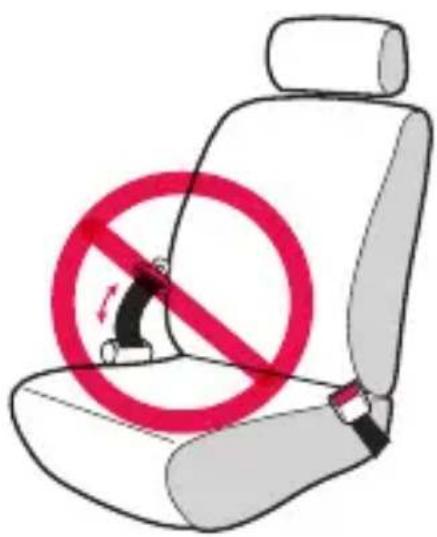
text_image
Diagram showing a car seat with a red prohibition symbol and a diagonal line indicating no change.• DO NOT use on vehicle seats when both portions of the vehicle belts are positioned forward of the seat crease.
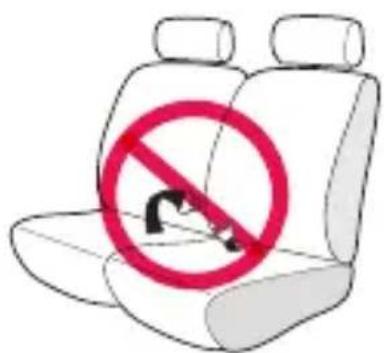
text_image
Diagram showing a car seat with a no-smoking symbol overlaid, indicating restricted driving.WARNING!
DEATH or SERIOUS
INJURY can occur.
Vehicle Seat Belt Warnings (cont.)
- DO NOT use with lap/shoulder belts with two retractors. If the vehicle seat belts are not routed and fastened correctly, the child restraint may not protect the child in a crash.
- DO NOT use with inflatable seat belts.
- Check your vehicle owner's manual to determine how to lock your seat belt for child restraint installation. The seat belt must be locked to properly secure the child restraint.
- DO NOT allow the vehicle seat belt release button to touch the child restraint. Accidental contact may cause the seat belt to release. If necessary, turn the seat belt release button away from the child restraint or move the child restraint to a different location.
- Failure to adjust the harness or vehicle seat belts snugly around the child may result in the child striking the vehicle's interior during a sudden stop or crash. Serious injury or death may occur.
text_image
Diagram showing a car seat with a red prohibition symbol and a black cable strap, indicating no liability or restriction.WARNING!
DEATH or SERIOUS
INJURY can occur.
- This child restraint must be securely belted to the vehicle, even when it is unoccupied, since in a crash an unsecured child restraint system may injure other occupants.
- Fold-down armrests could pose a hazard to a rear-facing child in certain types of collisions. Consult your vehicle owner's manual before installing any rear-facing child restraint in front of a fold-down armrest.
- The headrest on the vehicle seat that the child faces should be placed in the lowest position. The vehicle seat back that the child faces must be fully padded and free of any hard objects.
WARNING!
DEATH or SERIOUS
INJURY can occur.
Vehicle Seat Belt Warnings (cont.)
If you have any of these types of vehicle belt systems listed, these are SAFE to use to install your child restraint in the vehicle. Review vehicle owner's manual for specific instructions on child restraint installation. LATCH can be used IN PLACE OF these vehicle belt types. Refer to your vehicle owner's manual for LATCH locations.
Lap Belt with Locking Latch Plate
Once buckled, the vehicle belt is tightened by pulling on the free end of the strap until the belt is tight.

text_image
Free endLap Belt with Automatic Locking Retractor (ALR)
The automatic locking retractor does not allow the lap belt to get longer once it is buckled. The vehicle belt is tightened by feeding seat belt webbing into retractor.
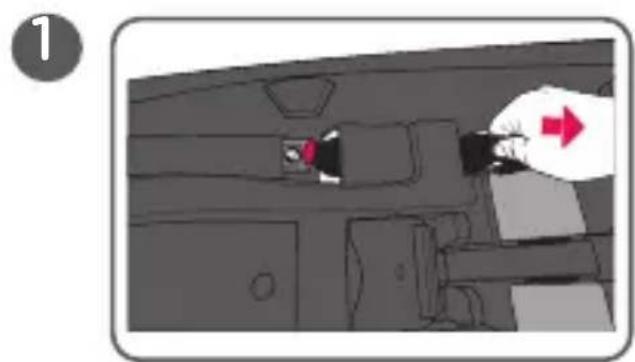
natural_image
Illustration of two hands fastening a car seatbelt (no text or symbols)WARNING!
DEATH or SERIOUS
INJURY can occur.
Lap/Shoulder Belt with Locking Latch Plate
The lap portion of this belt does not loosen once the belt is buckled.
The vehicle belt is tightened by pulling up hard on shoulder belt and feeding the extra webbing into the retractor.
natural_image
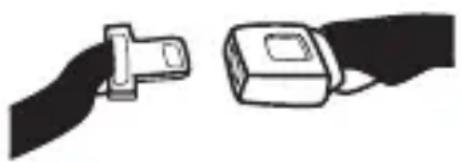
Two types of car seatbelt designs shown side by side, no text or symbols presentLap/Shoulder Belt with Sliding Latch Plate with Locking Retractor
The latch plate slides freely along the lap/shoulder belt. Vehicle belts with sliding latch plates are typically locked at the shoulder belt retractor by buckling the belt and pulling all of the webbing out slowly to switch the retra
natural_image
Illustration of two different types of buckle fasteners, one attached and one clamped (no text or symbols)Check vehicle owner's manual for specific instructions. The vehicle belt is tightened after switching the retractor by pulling up on shoulder belt and feeding the webbing into the retractor.
WARNING!
DEATH or SERIOUS INJURY can occur.

LATCH /UAS Warnings
What is LATCH?
LATCH is an acronym for (Lower Anchors and Tethers for CHildren) and refers to a pair of fixed Lower Anchors (or bars) and a Top Tether anchor that are built into your vehicle, in vehicles built after September 1, 2002.
The lower LATCH anchors are located in the crease, or bight, between the vehicle seat back and seat cushion, and if not visible, will typica indicated by 📄 symbols. Top tether anchors are located in various places behind the rear vehicle seat.
Vehicle Top Tether Anchor Points ( Forward-Facing only)
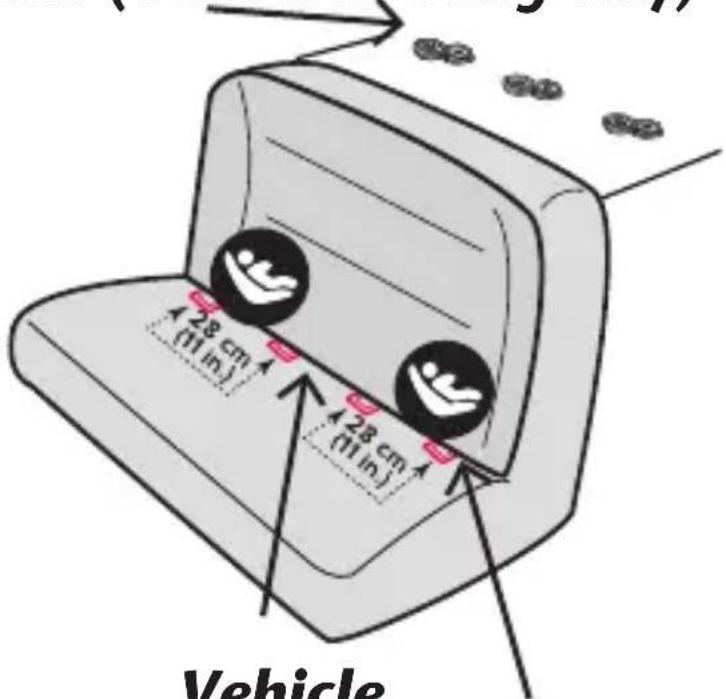
text_image
28 cm (11 in.) 28 cm (11 in.) VehicleVehicle Seat Crease
Vehicle Lower Anchors
WARNING!
DEATH or SERIOUS INJURY can occur.
Center installation in a non-standard LATCH

position:
Center installation of this child restraint is permitted using inner Lower Anchor Bars from the outside seating positions if (1) your vehicle manual allows such installation; and (2) the inner Lower Anchor Bars from the outside seating positions are 28-51 cm (11-20 in.) apart.
LATCH typically offers an easier and more consistent installation. However, this child restraint can be safely installed using either LATCH or vehicle belts and meets the requirements of Federal Safety Standard FMVSS 213 with either installation method. Either method is safe for your child when installed correctly.
DO NOT install this child restraint with LATCH and the vehicle's seat belts at the same time. Your vehicle owner's manual may refer to this system as ISOFIX, Universal Anchorage System (UAS), or Lower Universal Anchorage System.
WARNING!
DEATH or SERIOUS
INJURY can occur.

LATCH /UAS Warnings
- The LATCH system is intended to be used ONLY as described in these instructions. Serious injury or death may result from misuse. Refer to your vehicle Owner's Manual for lower anchor bar positions in your vehicle.
- In addition to these instructions, read and follow your vehicle owner's manual regarding installation of the child restraint and LATCH. If there is a discrepancy, follow your vehicle owner's manual.
- ONLY use for securing convenience base to vehicle lower anchor bars.

WARNING!
DEATH or SERIOUS
INJURY can occur.

LATCH /UAS Warnings - continued
- NEVER attach two lower anchor assembly connectors to one vehicle lower anchor bar.
- NEVER use the vehicle seat belts when using the lower anchor connector assembly. Using both together can cause slack in a sudden stop or crash.
- When not in use, the lower anchor connector assembly should be securely stored in the storage area located under the convenience base. Keep out of reach of children.
- ALWAYS be sure that the lower anchor connectors are fully engaged onto the vehicle anchor bars by pulling hard on the lower anchor connector assembly harness. If they are not totally engaged, the lower anchor connector assembly will not secure your child restraint. Serious injury or death may result.
- DO NOT use this child restraint if it moves more than 2.5 cm (1 in.) side-to-side or front to back at the vehicle belt path. Serious injury or death may result from poor installation. If you can not tightly secure the child restraint, try again or move it to another location.
WARNING! DEATH or SERIOUS INJURY can occur.
UsageWarnings
WARNING
natural_image
Diagram of a vehicle seatbelt with no text or symbols, showing two gray bands and a red belt switch (no text or labels)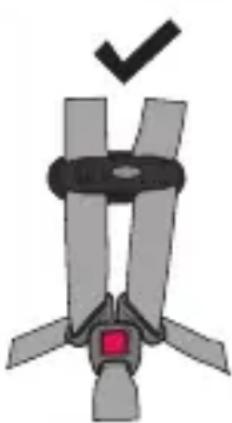
natural_image
Diagram of a seatbelt with a checkmark indicating the correct position (no text or symbols present)Children have STRANGLED in loose or partially buckled harness straps. Fully restrain the child even when carrier is used outside the vehicle.
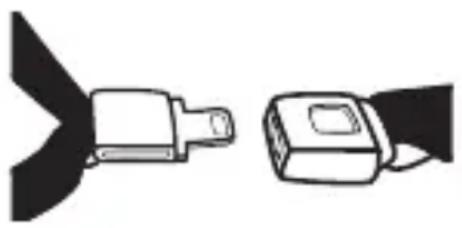
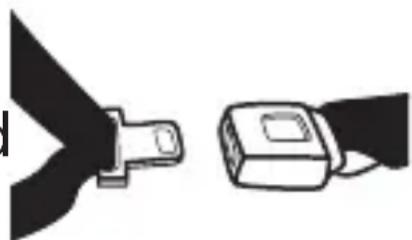
- Use ONLY the SecureMax convenience base with the SecureMax carrier. The SecureMax carrier WILL NOT LOCK safely into any other convenience base and serious injury or death may result.
- ALWAYS check the restraint and buckle for hot surfaces before putting a child into the restraint. Your child could be burned.
- In cold weather, DO NOT dress the child in bulky clothing, like snowsuits, if the child is riding in a child restraint. This clothing makes it difficult to properly tighten the harness to the child, which may allow the child to be ejected from the restraint during a crash.
WARNING!
DEATH or SERIOUS INJURY can occur.
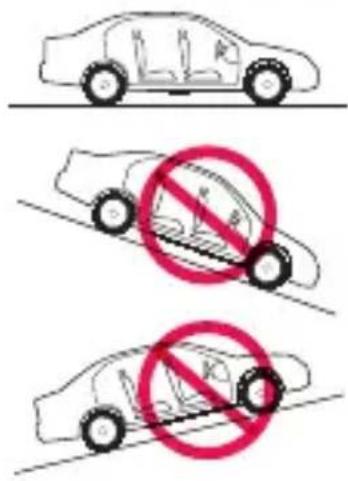
Usage Warnings - continued
- When using this restraint in Position 4 (Stand) (p. 36), ONLY use on level ground and NEVER prop the restraint up with any object.
- NEVER place this child restraint on beds, sofas, or other soft surfaces. The child restraint can roll over on soft surfaces and suffocate the child.
- NEVER place this child restraint near the edges of counter tops, tables, other high surfaces, or in shopping carts. The child’s movements can cause the child restraint to slide and fall.
- The canopy is not intended to provide UV protection.
Safe Practices
- Everyone rides buckled up or the vehicle does not go. Make no exceptions for adults or children. If someone unbuckles, stop the vehicle. Being firm and consistent right from the start will mean fewer discipline problems as children get older. Besides, an unrestrained child or adult can be thrown into and injure other passengers.
- NEVER try to tend to a crying baby's needs while driving. NEVER take a baby out of a child restraint for comforting while the vehicle is moving.
- Always place the handle in Position 3 or 4 before removing infant from carrier (p. 36).
- DO NOT allow a child to have objects such as lollipops or ice cream on a stick. The object can injure the child if the vehicle swerves or hits a bump.
- DO NOT feed an infant who is riding in a child restraint.
- Anything loose can be deadly in a crash. Put sharp or heavy items in the trunk.
- DO NOT dress the child in blanket sleepers or other clothing that would prevent the crotch strap from fitting snugly up against the child.
For Recall Information for U.S. Customers
- Child restraints could be recalled for safety reasons. You must register this restraint to be reached in a recall. Send your name, address, e-mail address if available, and the restraint's model number, and manufacturing date to:
Evenflo Company, Inc.
1801 Commerce Dr.
Piqua, OH 45356
or call 1-800-233-2229.
or register online at
www.evenflogold.com/registercarseat
Tear off and mail this part
Consumer: Just fill in your name and address and e-mail address.
Your Name
Your Street Address
City
State
Zip Code
E-mail Address
CHILD RESTRAINT REGISTRATION CARD
For Recall Information for U.S. Customers
- For recall information call the U.S. Government's Vehicle Safety Hotline at 1-888-327-4236 (TTY:1-800-424-9153), or go to: http://www.NHTSA.gov
When used with the internal harness and properly installed pursuant to these instructions,

this restraint is certified for use only in passenger and multi-purpose passenger motor vehicles, buses and trucks equipped with either lap belts only or lap/shoulder belt systems, and aircraft.
Tip!
Check with your airline before departure to make sure this restraint meets their requirements.
Refer to pages 107 to 113 for complete instructions on installing your child restraint in aircraft.
Base Features
SecureMax Base
- Recline foot adjustment button
- Recline foot
- SafeZone ^TM Load leg (Not available on all models)
- SafeZone™Load leg adjustment buttons (Not available on all models)
- SafeZone™Load leg storage compartment (stored position) (Not available on all models)
- Recline indicator
- LATCH storage pocket
- LATCH connector
- LATCH release button
- Belt path
- Carrier attachment bar
- Fit-loc ^TM belt tightener
- Fit-loc ^TM belt tightener release button
- Fit-loc ^TM belt tightener lock indicator
- User Guide storage compartment
Base Features
text_image
1 2 3 4 5 6 7 8 9 10 11 12 131415Child Seat Features
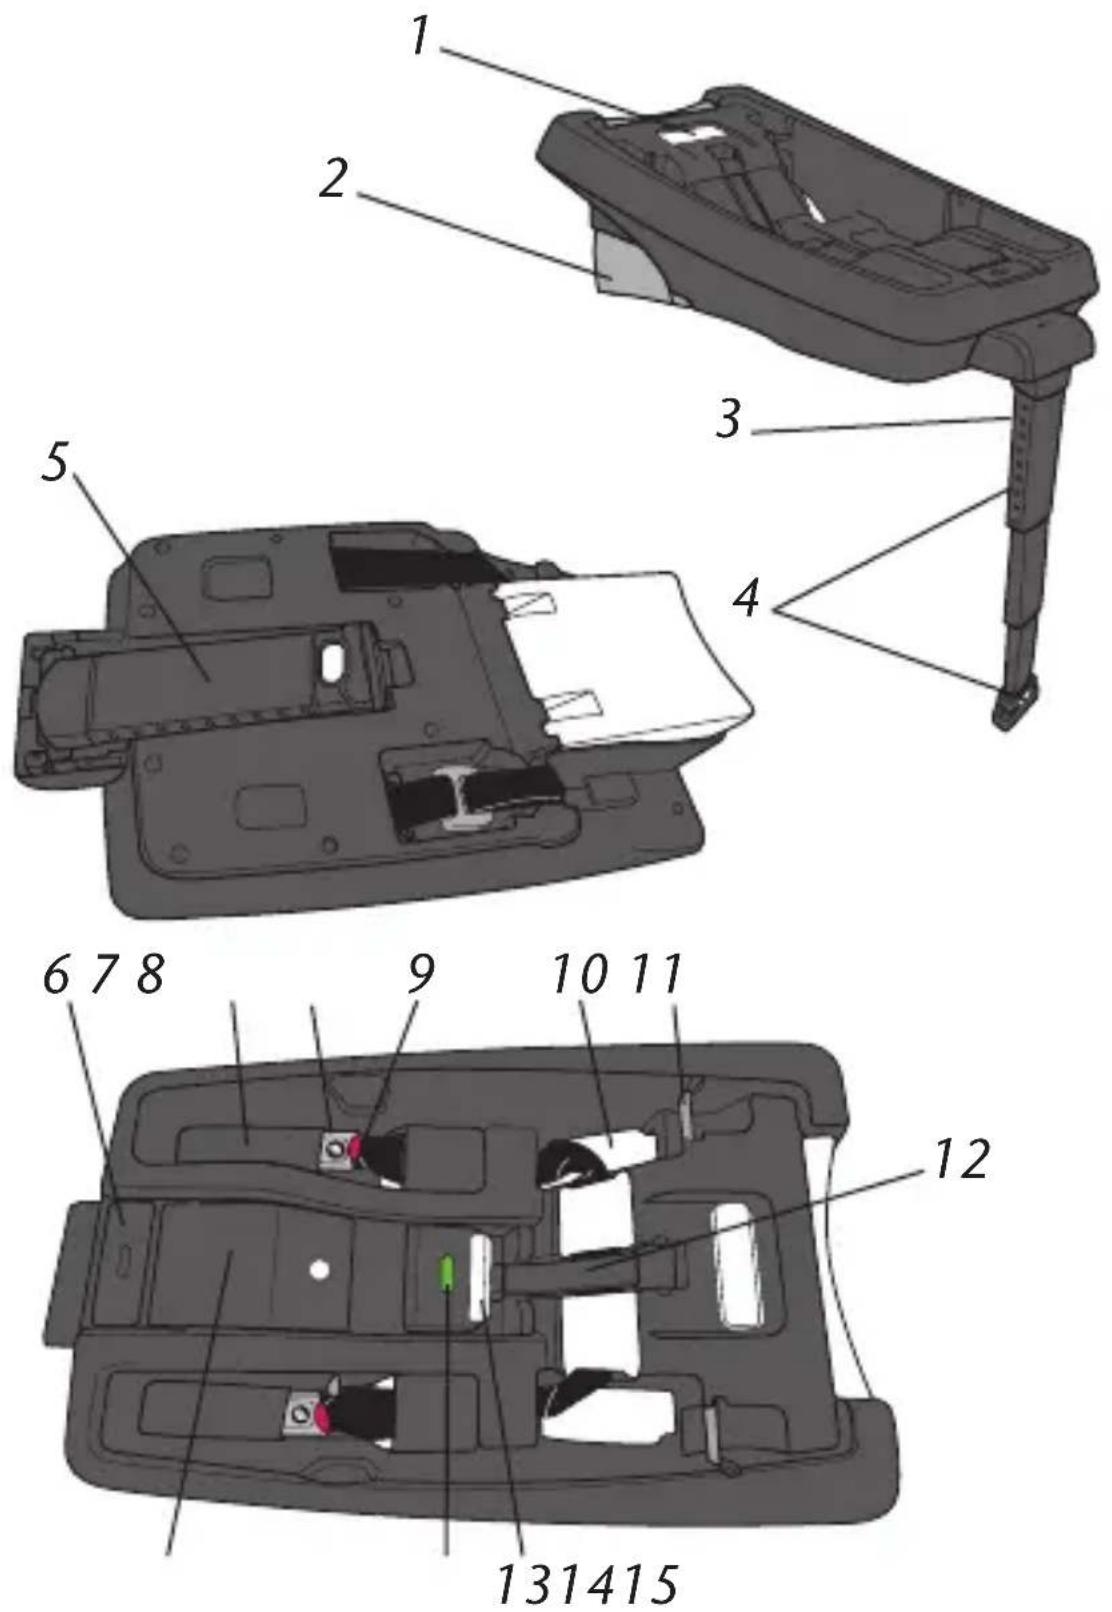
- Lap belt guides
- Base attachment hooks
- Seat pad
- Canopy
- Handle
- Headrest adjustment button
- Headrest
- Harness
-
SensorSafe ^TM Chest clip
-
Harness buckle
- Harness buckle strap
- Harness adjustment button
- Harness adjustment strap
- Infant body support
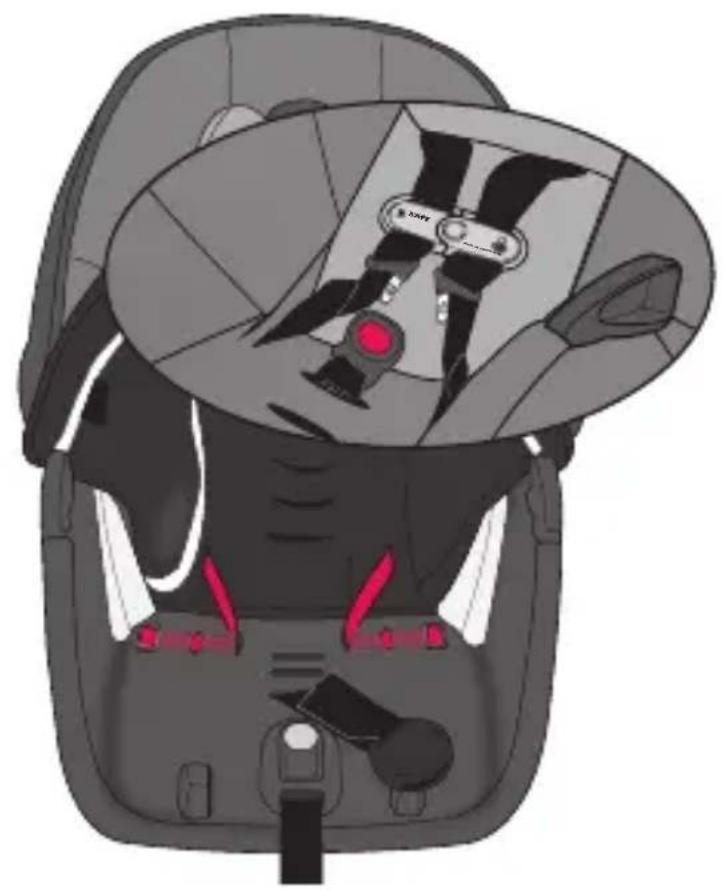
Front
text_image
Diagram of car seat assembly with numbered parts for identificationChild Seat Features
- Handle adjustment button
- Stroller attachment buttons
- Carrier release handle
- Harness strap
- Waist strap slots
- Waist strap
- Harness buckle strap retainer
- Harness splitter plate
* Not all features are available on all models. Styles may vary.
Back
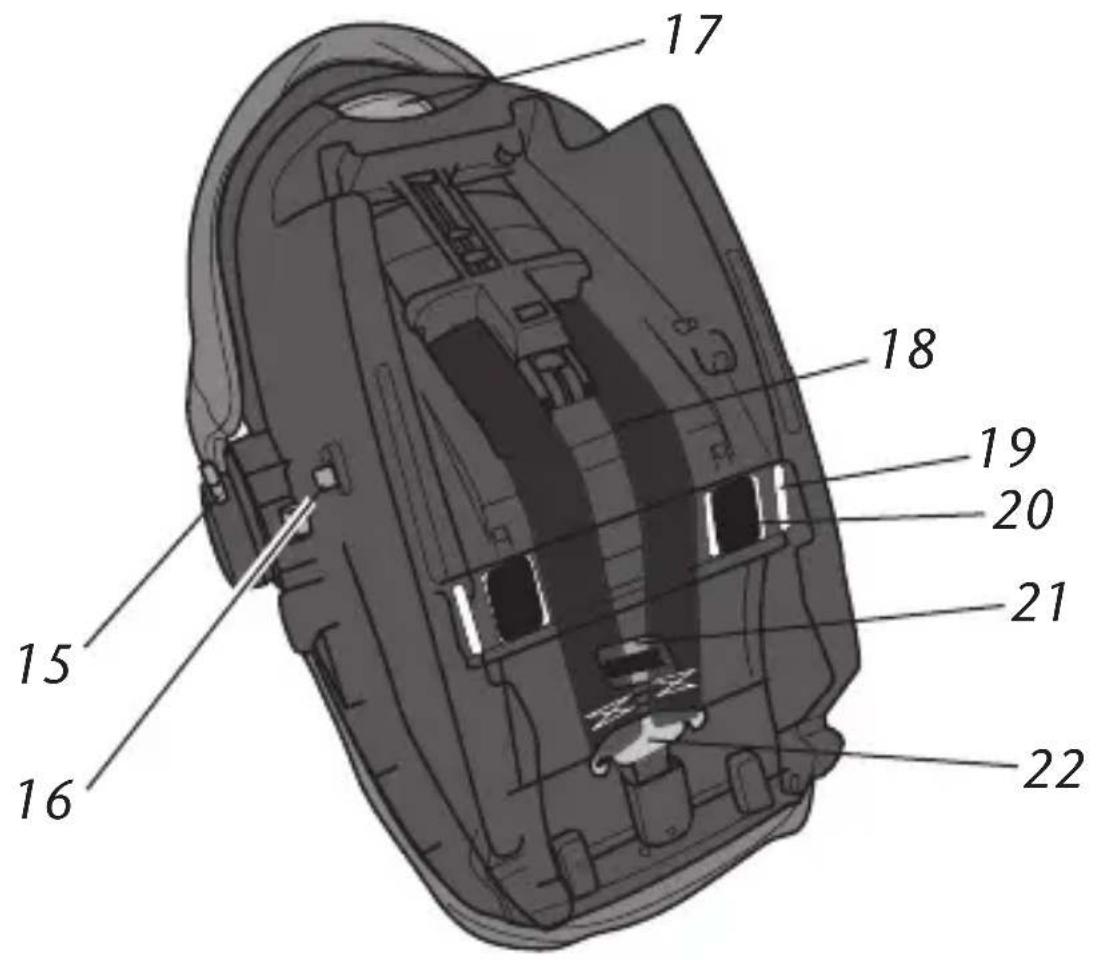
text_image
17 18 19 20 21 22 15 16Using the Handle
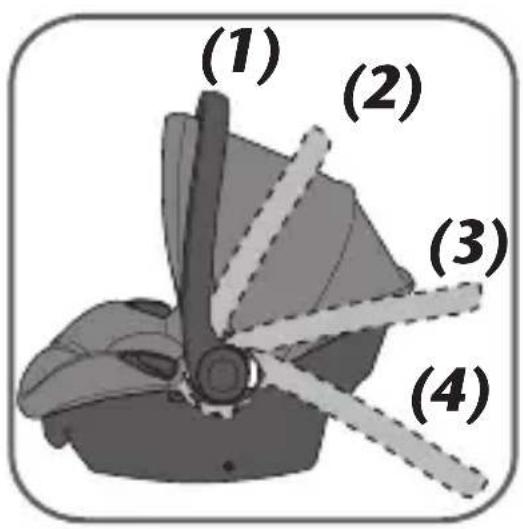
ALWAYS make sure the handle is securely locked in the upright carrying position (1) before carrying.
ANY locked position can be used in vehicle.
text_image
(1) (2) (3) (4)There are 4 positions:
- Carrying position (1),
- Middle positions (2 - 3)
NEVER use these positions to carry your child in the carrier. - Stationary position (4).
NEVER use this position to carry your child in the carrier.
text_image
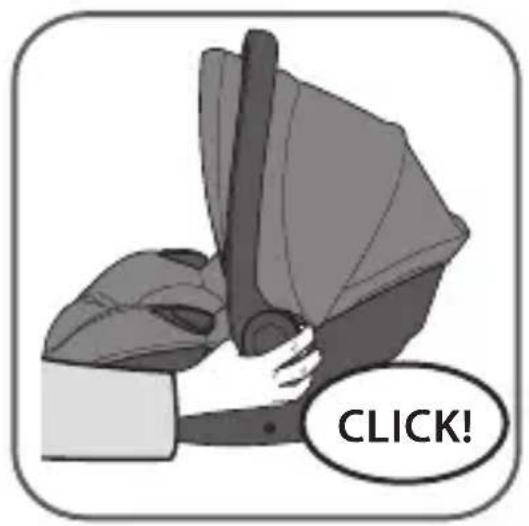
CLICK!To change handle positions, squeeze both Handle Releases and rotate the handle to the desired position until it locks into place.
Installing the Canopy
text_image
CLICK!To attach canopy, insert the canopy bow into the canopy mounts on both sides of the seat until they click into place.
natural_image
Mechanical component diagram showing a red arrow pointing to a specific part (no text or symbols present)Fasten the hook and loop patches on the canopy to the seat pad as shown. Repeat on other side of seat.
natural_image
Close-up of a hand adjusting a car seatbelt mechanism, with a red arrow pointing to the left side (no text or symbols present)To remove, press tab on canopy bow and pull out. Canopy can be removed for washing.

WARNING!
DEATH or SERIOUS INJURY can occur.
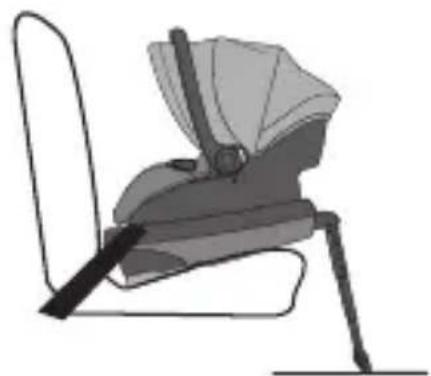
The load leg helps minimize crash forces on a baby in a frontal crash. It allows the child restraint's safety system to absorb crash energy efficiently and to transfer forces more effectively by directing them to the vehicle floor.
natural_image
Illustration of a baby seat with a checkmark indicating selection (no text or symbols present)- NEVER USE if the leg lifts the base off the vehicle seat.
- NEVER install the load leg in a seating position that will not allow the leg to be extended in a LOCKED position with firm contact with the vehicle floor.
- NEVER use the load leg if the indicator won’t turn green when locked in position and touching the vehicle floor.
- NEVER place load leg on a storage door compartment on the vehicle floor if the vehicle manufacturer warns against it. Some vehicle manufacturers do not allow the use of load legs in all seating positions. Please refer to your vehicle's owner's manual before installing the base with the load leg.
- NEVER allow children to play with the belt tightener or the load leg.
natural_image
Illustration of a chair with a red prohibition symbol (no text or symbols present)WARNING!
DEATH or SERIOUS INJURY can occur.
- The load leg MUST be locked in a locked position and the foot MUST be in contact with the vehicle floor.
- NEVER place load leg on an uneven floor in the rear of the vehicle, it must always be placed flat on the vehicle floor.
- NEVER use the load leg to recline the seat. The recline adjustment foot on the base is intended to recline the seat.
- ALWAYS CHECK to make sure the load leg is locked into the storage compartment in the base when it is not in use.
natural_image
Line drawing of a baby seat with a backrest and seatbelt (no text or symbols)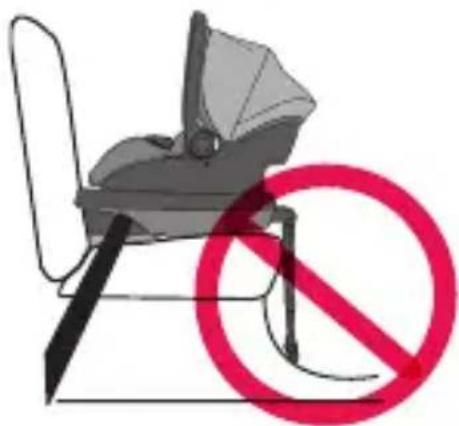
natural_image
Illustration of a seatbelt with a red prohibition symbol (no text or labels)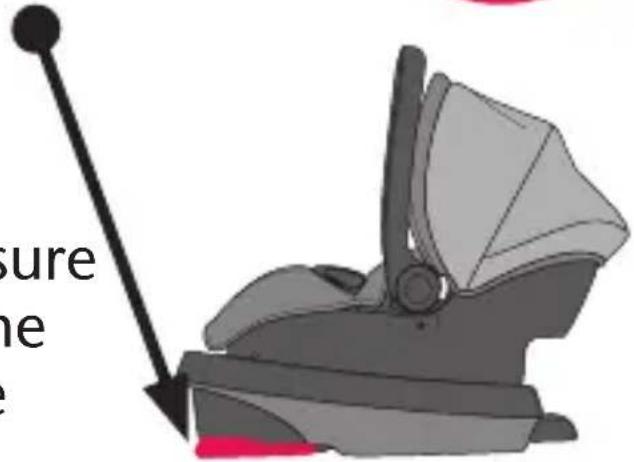
natural_image
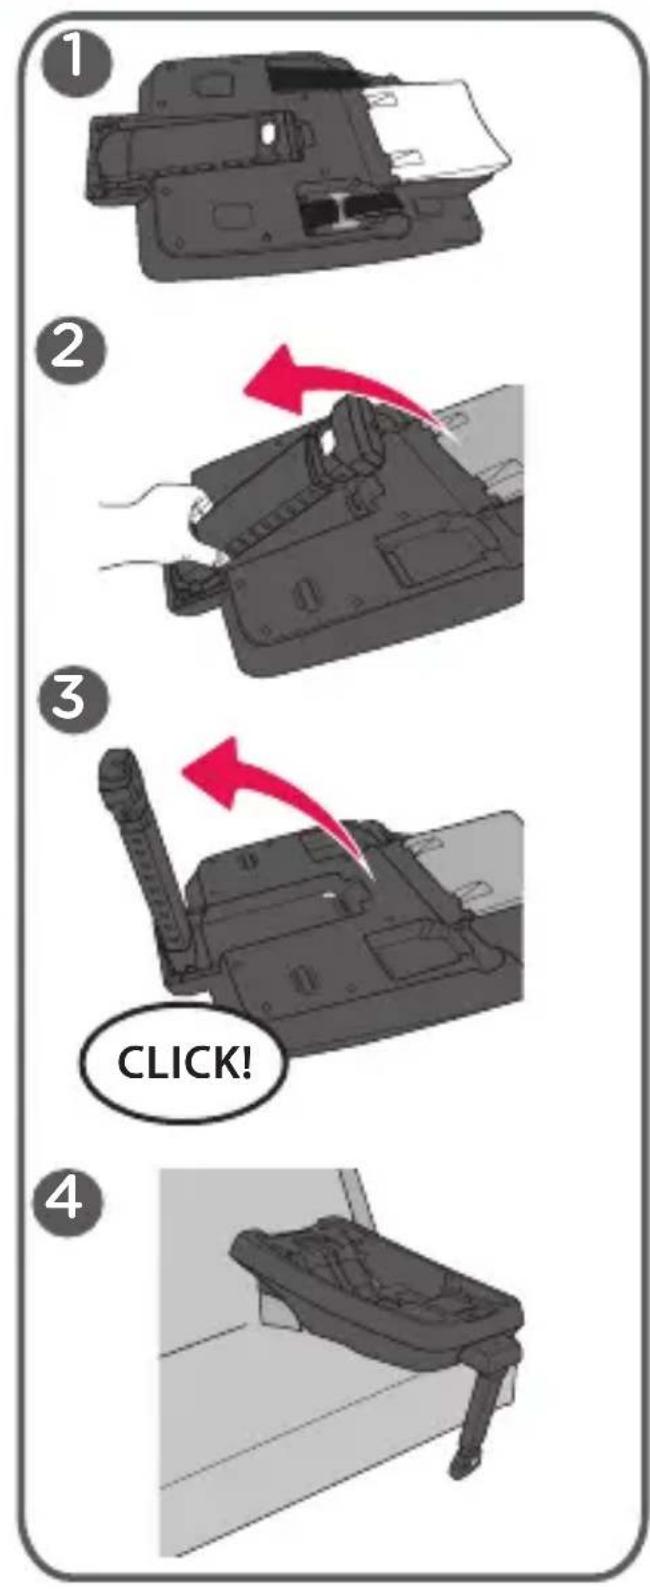
Illustration of a car seat with a vertical pole and arrow, no text or symbols presentSafeZone™ Load Leg (cont.)
text_image
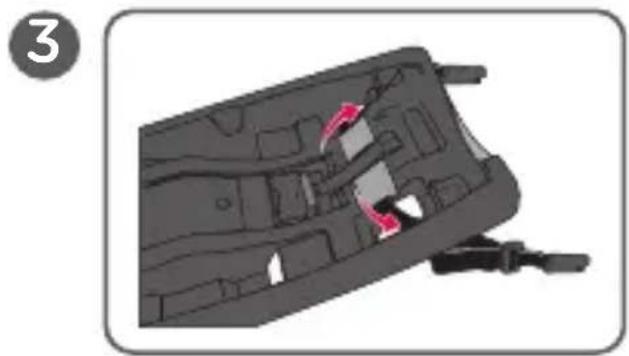
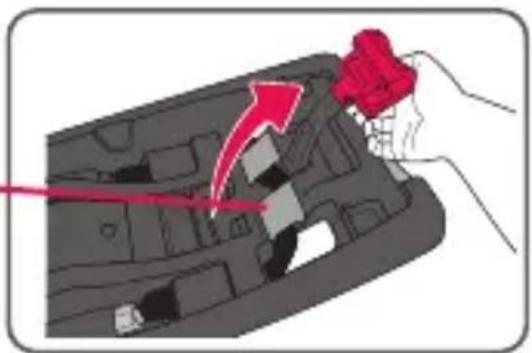
① ② ③ CLICK! ④Turn the base over as shown.
Pull the load leg out as shown. On top of load leg is an indicator. When it's fully rotated, the indicator will change to green.
Turn base over and place base on the seat as shown.
Note: After the base is installed.(p.52) place the carrier in the base. Then extend the load leg into position by following steps 5 and 6.
SafeZone™ Load Leg (cont.)
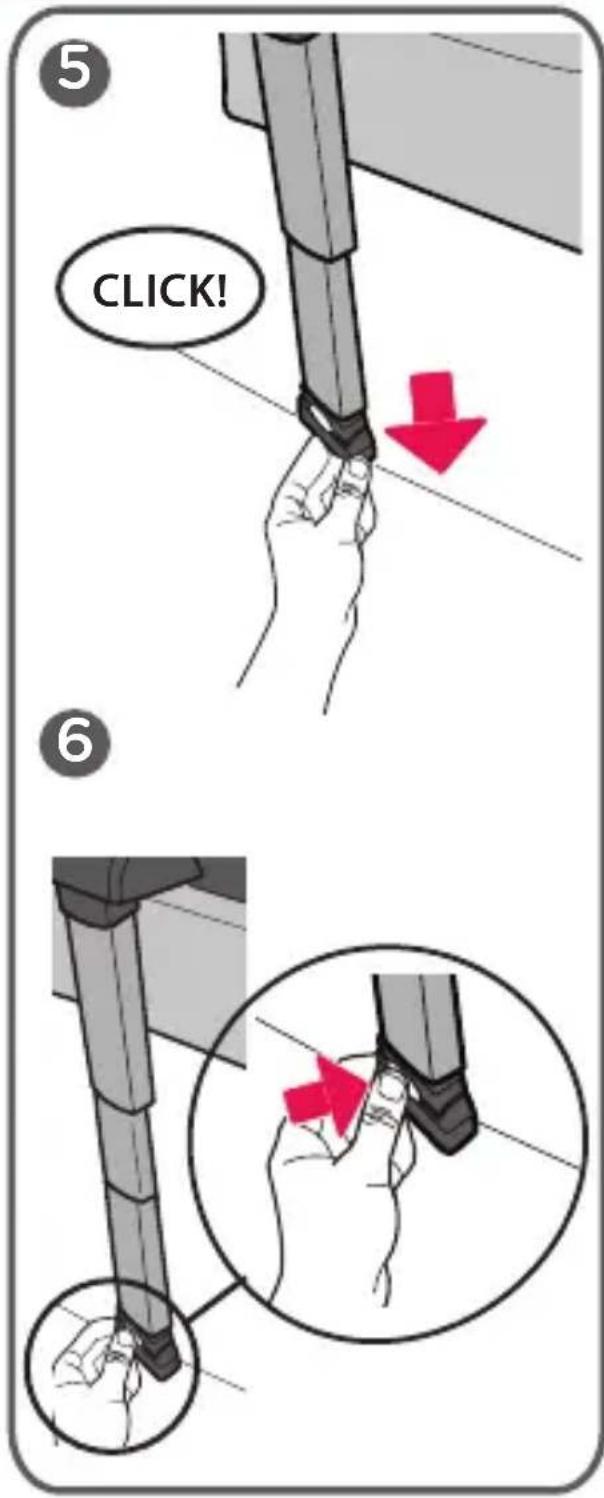
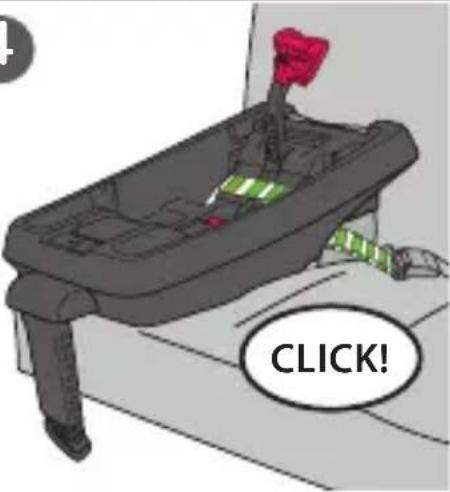
text_image
5 CLICK! 6To extend load leg, pull leg down until it reaches the floor and the indicator turns green.
If it does not rest flat on the floor, push button and lower leg to floor to extend further. Indicator should turn green.
ALWAYS CHECK to make sure when the leg rests on the vehicle floor that it does not lift the base off the seat.
Leg must always lock into one of the open positions before using. If leg does not lie flat on the floor, move to another seating location or do not use the load leg in your vehicle.
SafeZone™ Load Leg Storage
Although we recommend using the base with the load leg, in some cases it may not be possible. If it is not possible you should store or remove the load leg. Refer to page 43 for removing the load leg from the base. To store load leg, follow steps below.
To store load leg when you are not using it, push the button on the lower portion of the load leg, slide the lower portion back up until it locks into place, then rotate back into the stored location. The tab on the load leg foot is pressed into a slot in the storage location on the base. And it locks into position.
To store under base, reverse steps on page 40.
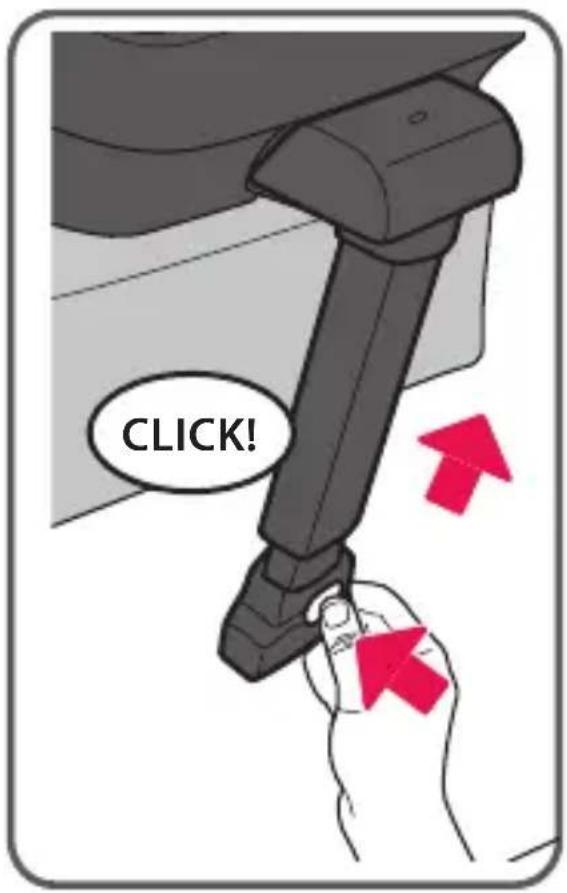
text_image
CLICK!SafeZone™ Load Leg Removal
text_image
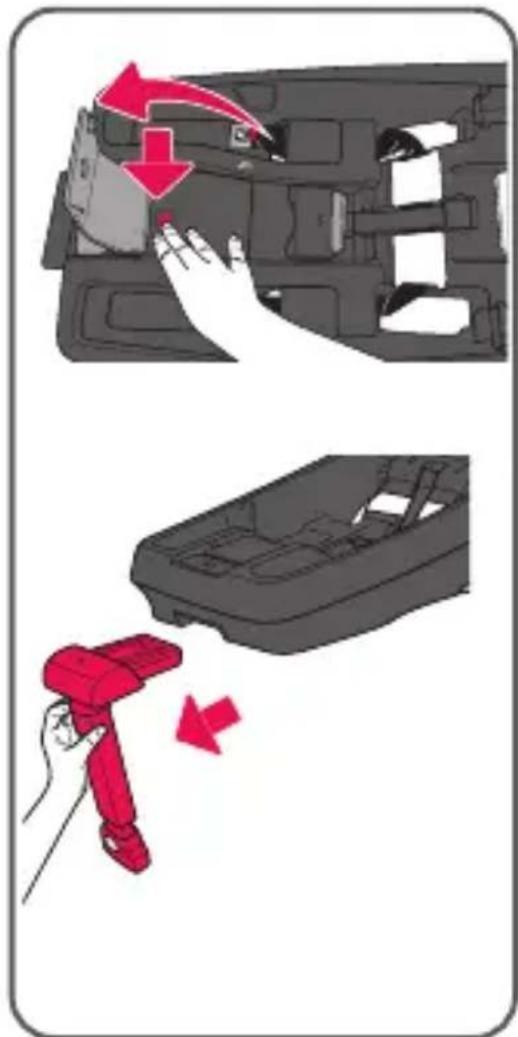
Diagram illustrating car interior cleaning steps with red arrows indicating removal and repair actionsTo remove load leg,
open the user guide storage compartment and push the button inside the compartment while pulling the leg out of the front of the base.
natural_image
3D rendered mechanical component with no visible text or symbolsNote: When not using the load leg, it should be stored in the load leg storage area under the base or removed from base. Preferred under the base.
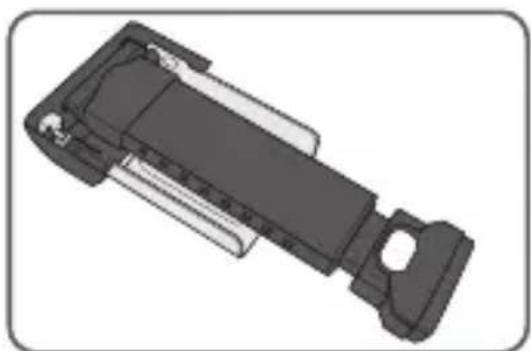
Fold and store away from children in a place where it cannot be damaged.
Installation Checklist with Base
1. Secure SecureMax base to the vehicle seat.
√ Base is securely installed with lower anchor connector assembly (p. 46-53).
OR
√ Base is securely installed with vehicle seat belt (p. 58-61).
IMPORTANT: A properly secured base does NOT move more than 2.5 cm (1 in.) from side-to-side or from front-to-back at the lower anchor connector assembly/vehicle belt path.
√ Base is adjusted so that level indicator is in correct color zone for your child (p. 69 and 70).
√ If necessary, a towel/small blanket is rolled up and placed beneath the front edge of the base for additional leveling (p. 70).
Installation Checklist with Base (cont.)
2. Secure child to the carrier. Refer to p. 87-91.
√ Harness straps are at, or below, shoulder level (p. 75).
√ Both buckle tongues are fastened (p. 89).
√ Chest clip is connected and positioned at armpit level (p. 90).
√ Harness straps are snug against the child and you should not be able to pinch the harness (p. 91).
√ Crotch strap is snug against the child but NOT under the child's bottom (p. 76).
√ Waist straps are snug against the child but NOT under the child's legs (p. 80).
3. Check your work.
√ The base does NOT move more than 2.5 cm (1 in.) from side-to-side or from front-to-back at the lower anchor connector assembly/vehicle belt path.
√ The base is level when level indicator is in the correct color zone for your child (p. 69 and 70).

Installing the Base with the Lower Anchor Connector Assembly
WARNING!
DEATH or SERIOUS INJURY can occur.
- This lower anchor connector assembly is intended to be used ONLY as described in these instructions. Serious injury or death may result from misuse.
- In addition to these instructions, read and follow your vehicle owner's manual regarding installation of the child restraint and LATCH. If there is a discrepancy, follow your vehicle owner's manual.
- ONLY use for securing base to vehicle lower anchor bars.
- NEVER attach two lower anchor assembly connectors to one vehicle lower anchor bar.
- NEVER use the vehicle seat belts when using the lower anchor connector assembly. Using both together can cause slack in a sudden stop or crash.
- When not in use, the lower anchor connector assembly should be securely stored in the storage area located under the convenience base or on the side of the base (p 93). Keep out of reach of children.
WARNING! DEATH or SERIOUS INJURY can occur.
- ALWAYS be sure that the lower anchor connectors are fully engaged onto the vehicle lower anchor bars by pulling hard on the lower anchor connector assembly harness. If they are not totally engaged, the lower anchor connector assembly system will not secure your child restraint. Serious injury or death may result.
- DO NOT use this child restraint if it moves more than 2.5 cm (1 in.) side-to-side or front to back at the vehicle belt path. Serious injury or death may result from poor installation. If you can not tightly secure the child restraint, try again or move it to another location.
- This child restraint MUST face the rear of the vehicle.
- The carrier MUST be locked firmly into the base. Check by lifting up on the carrier.
- NEVER use this child restraint in the forward-facing position.

Installing the Base with the Lower Anchor Connector Assembly (cont.)

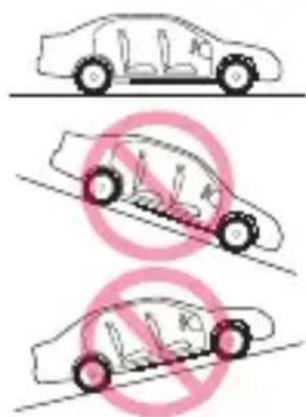
BEFORE installing base, make sure vehicle is on level ground. Place base on an approved LATCH vehicle seating location.
BEFORE installing the base, if you are using the load leg, you will need to unfold the leg, install the base, then extend the load leg. Please follow steps on pages 40-43.
text_image
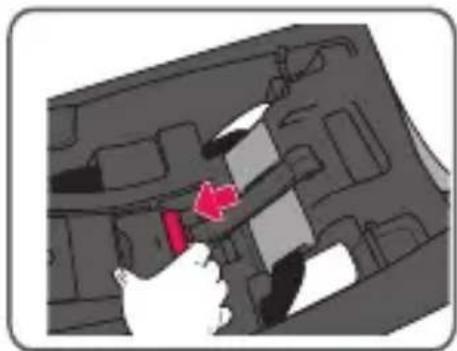
Diagram showing three scenarios of car parking and a prohibition symbol, with Chinese text indicating no parking restrictions.Remove LATCH straps from LATCH storage pockets by pulling the strap out as shown.
Extend the strap to its longest length.
text_image
1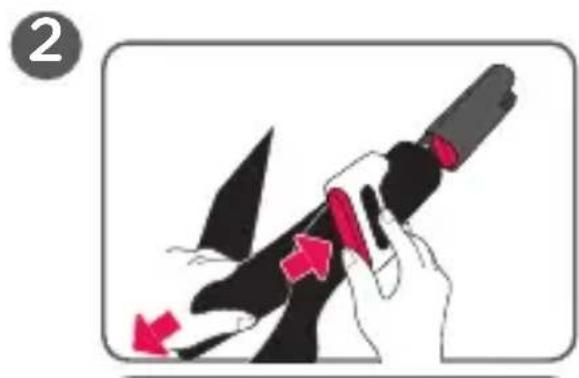
natural_image
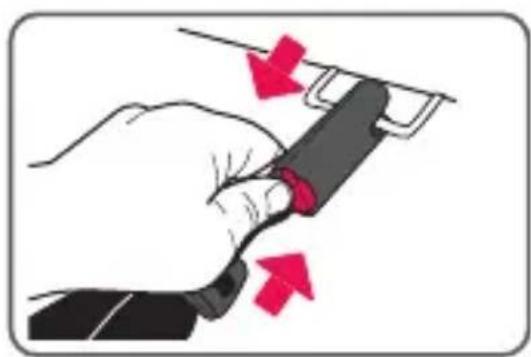
Illustration of a hand holding a black object with red arrows indicating movement or force (no text or symbols)Installing the Base with the Lower Anchor
Connector Assembly (cont.)

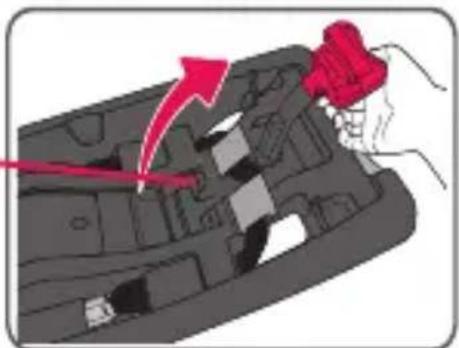
Route the LATCH belt through the belt path openings on both sides of base. Make sure not to twist the belt and make sure it lies flat.
Squeeze the button on the Fit-loc belt tightener and lift it up as shown.
natural_image
Diagram of a mechanical component with highlighted parts and directional arrows (no text or symbols)
natural_image
Illustration of a hand inserting a red arrow into a vehicle compartment (no text or symbols)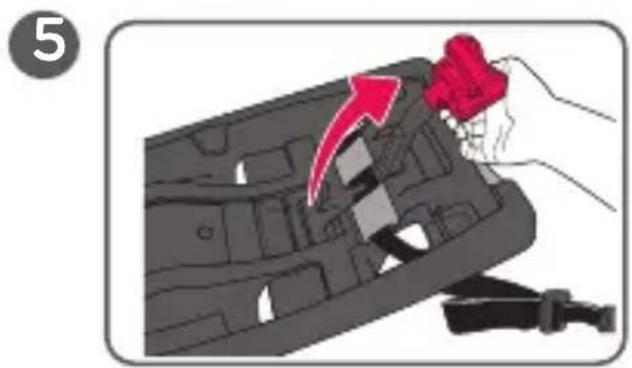
text_image
5
Installing the Base with the Lower Anchor Connector Assembly (cont.)
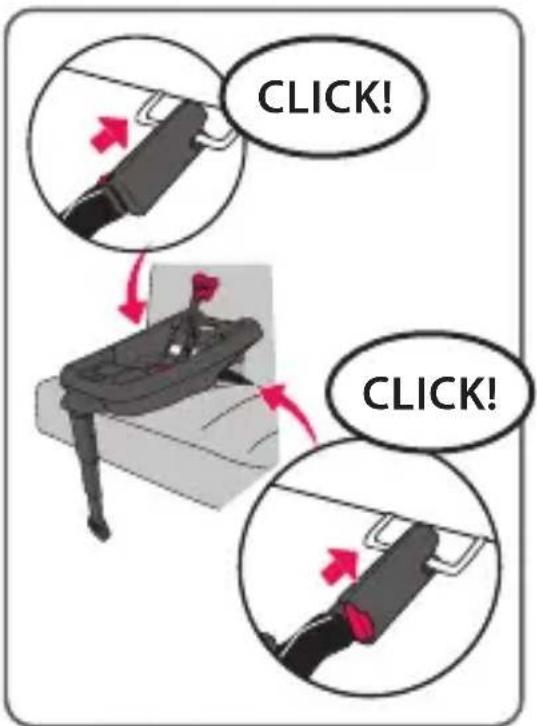
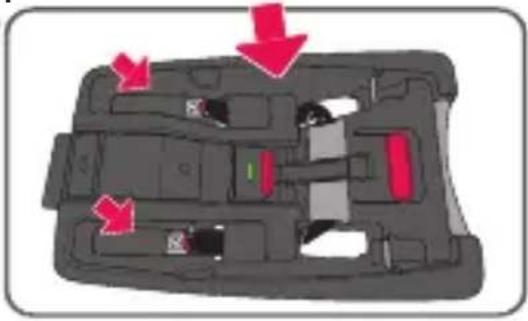
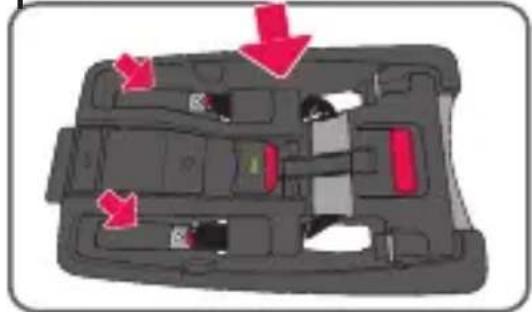
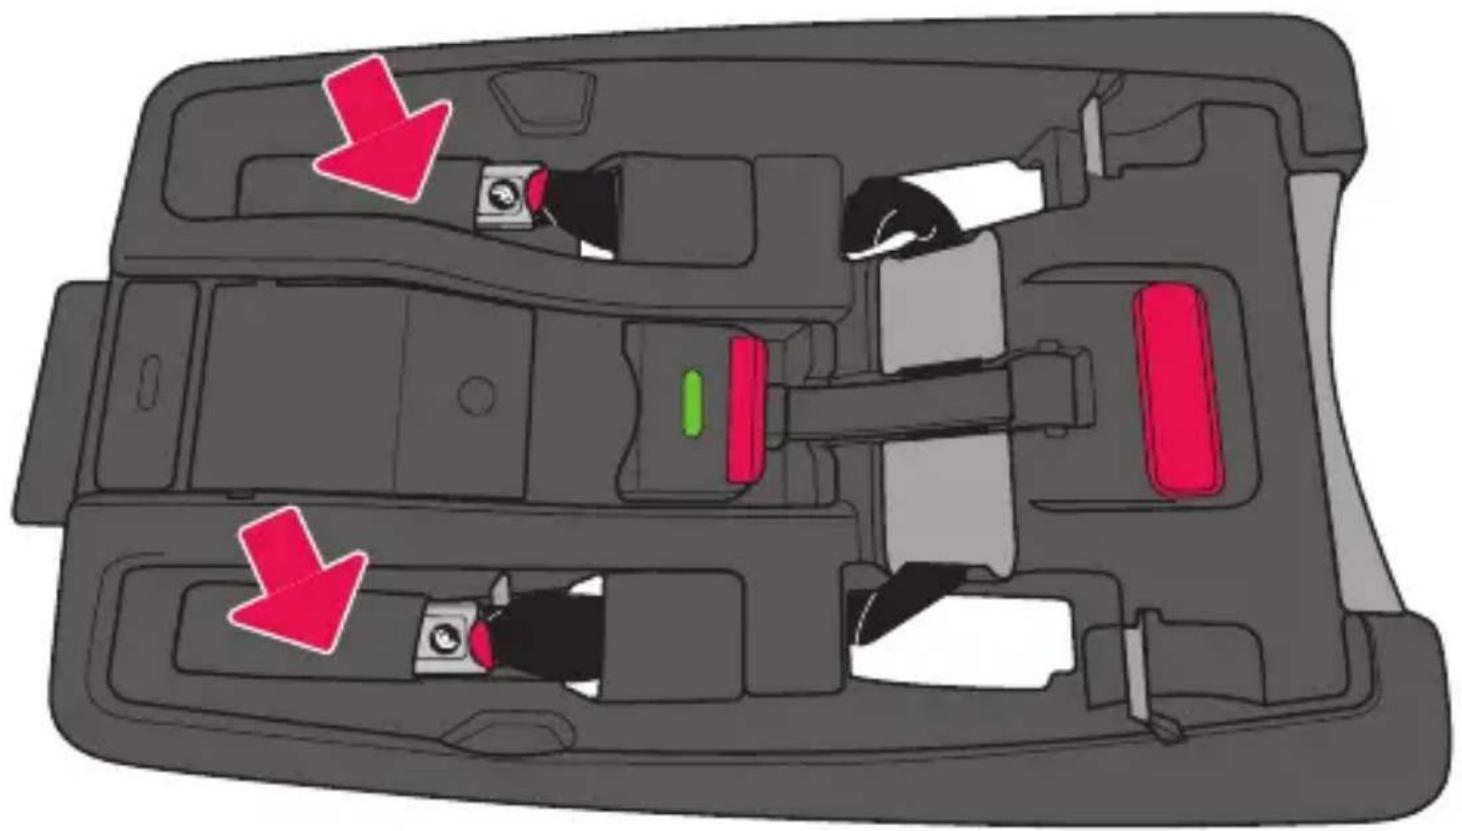
Push the LATCH connectors onto the vehicle lower anchor points on both sides of the base until you hear them CLICK onto the anchor points.
CHECK to make sure they are securely attached by pulling on them.
Pull the LATCH adjustment strap while pushing base tight against the seat. The LATCH strap will slide out from under the LATCH storage tab. If not, then pull out manually. Continue to pull on the adjustment strap to remove all the slack from the LATCH strap and to get the base snug against the vehicle seat.
Lay the free end of the belt across the belt path so it will be under the Fit-loc belt tightener after it has been closed.
6
text_image
CLICK! CLICK!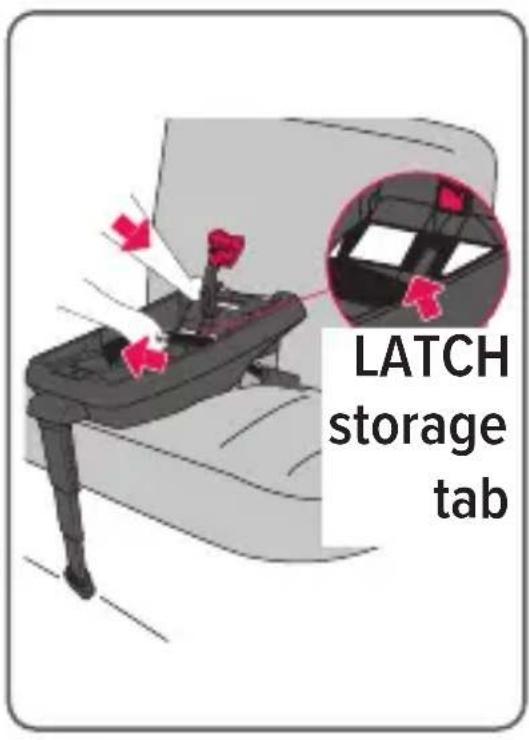
text_image
LATCH storage tabInstalling the Base with the Lower Anchor Connector Assembly (cont.)

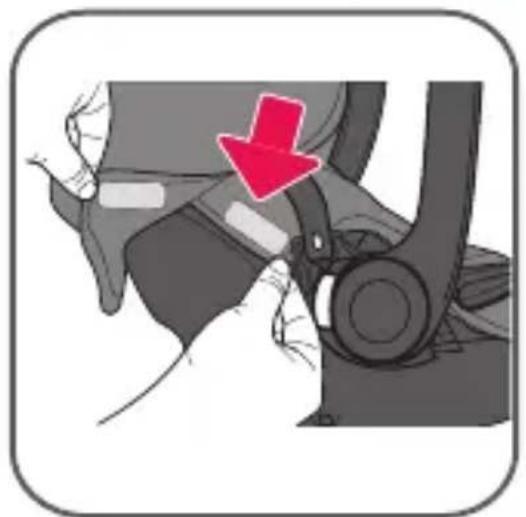
Close the Fit-loc belt tightener by pushing down with your two thumbs next to the indicator window. Keep pushing down until it locks into place and you see GREEN in the indicator window on the base.
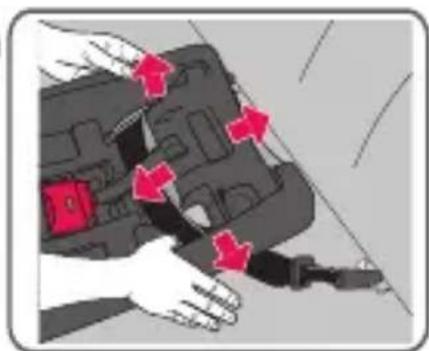
CHECK to make sure base is secure by holding both sides of the base near the LATCH strap and moving it from side to side and front and back. The LATCH belt should not loosen and the base should not move easily. The base should not move more than 2.5 cm (1 in.) from side to side or front to back.
CHECK the recline indicator to make sure the base is correctly reclined. If it is not correctly reclined, remove LATCH connectors, unlock the belt tightener and adjust the foot on the base then re-install base. CHECK that the base is correctly reclined. Refer to pages 66-70 for Adjusting the Recline.
8
natural_image
Illustration of a hand using a red hammer to press down a car interior panel (no text or symbols visible)9
text_image
CLICK!10
natural_image
Close-up of hands adjusting a device with red arrows pointing to the component (no text or symbols visible)11
natural_image
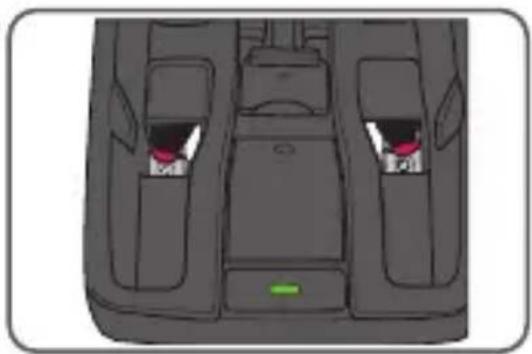
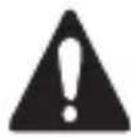
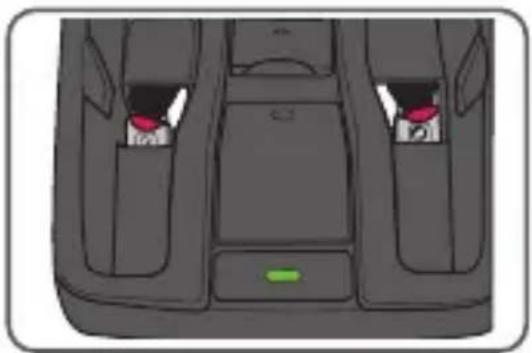
Top-down view of a vehicle dashboard with two seats and one highlighted (no text or symbols)
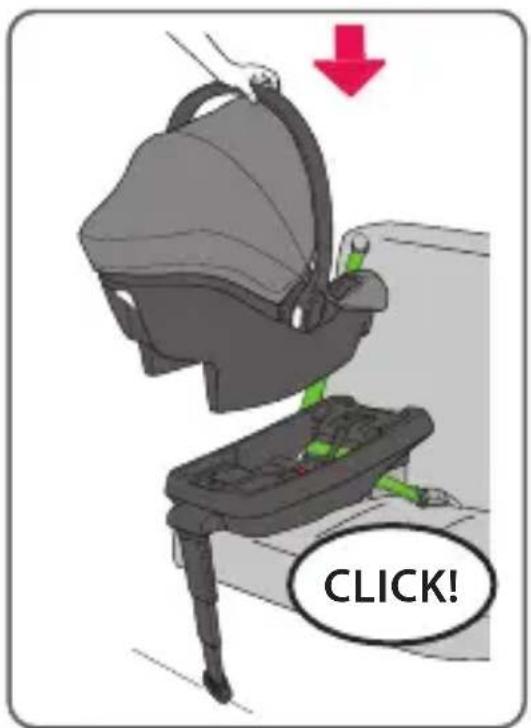
Installing the Base with the Lower Anchor Connector Assembly (cont.)
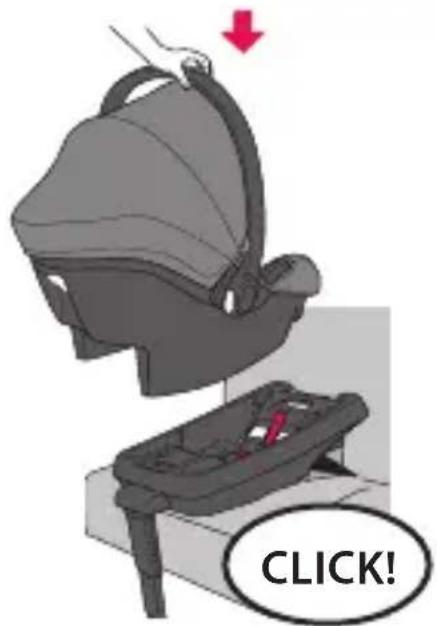
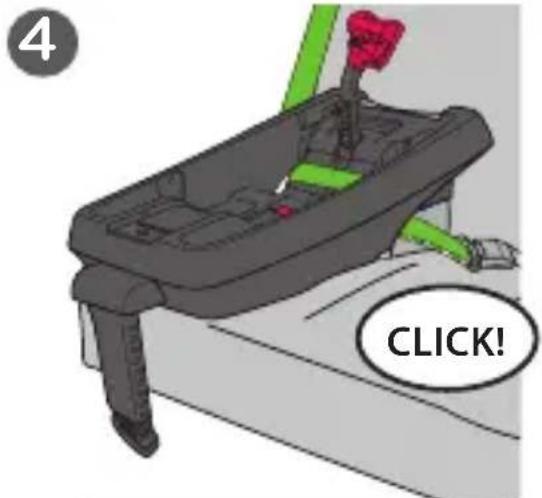
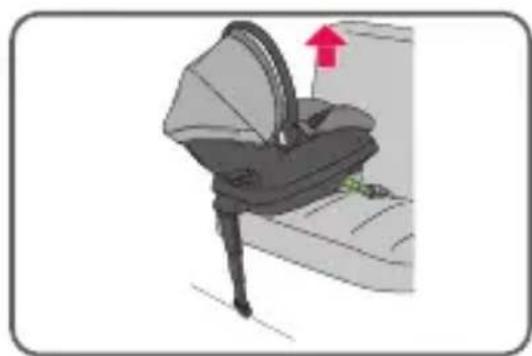
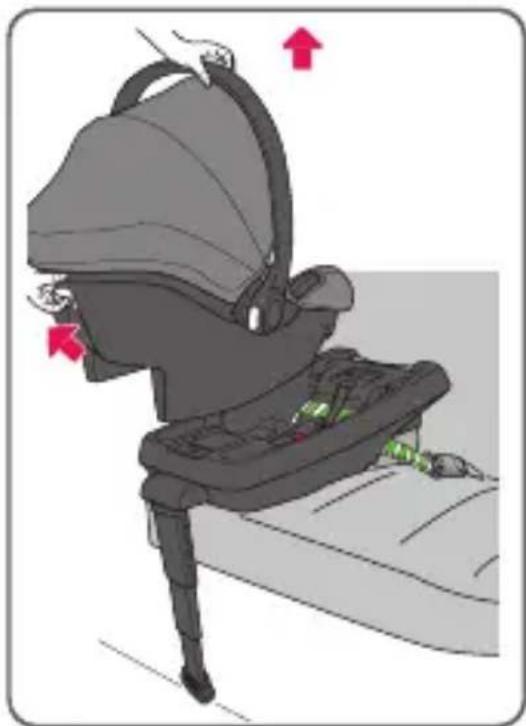
Attach the carrier into the base until you hear a click. Finish the load leg adjustment from pages 38-41.
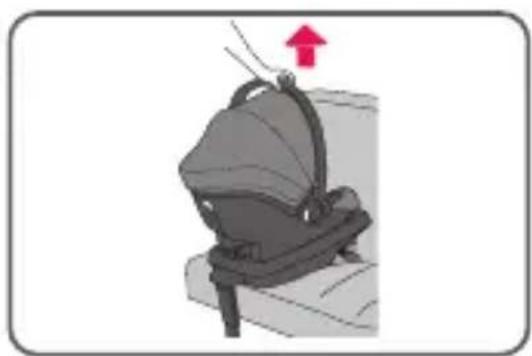
ALWAYS Lift up on the handle of the carrier to make sure that it is securely attached in the base.
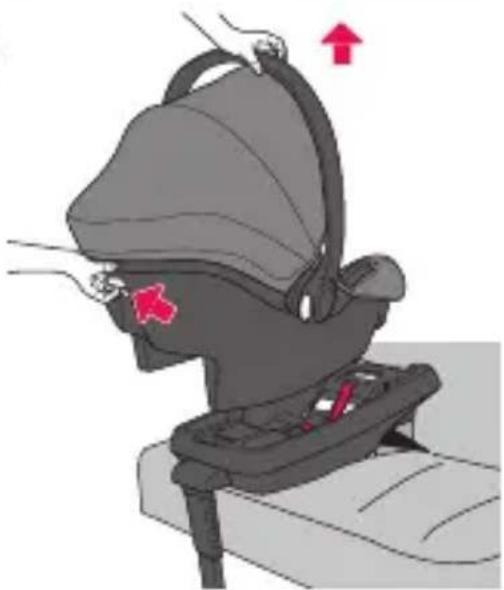
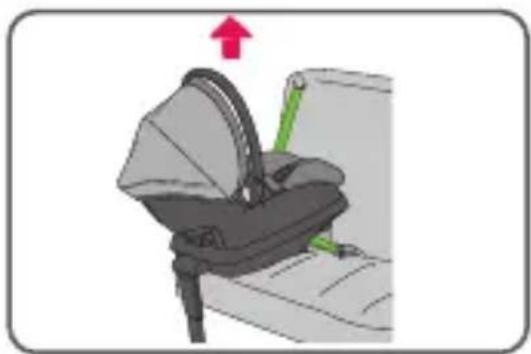
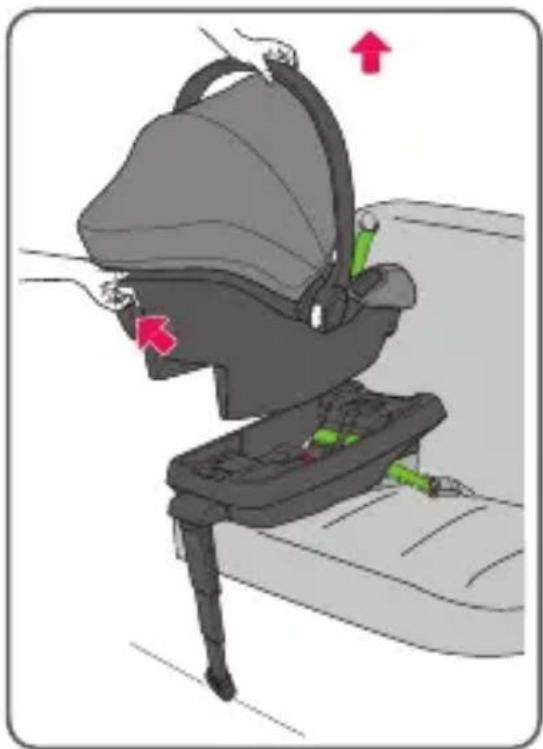
To remove the carrier from the base, squeeze the white release handle at the back of the carrier. Lift carrier away from the base.
12
text_image
CLICK!13
natural_image
Illustration of a person's seatbelt with a red upward arrow indicating motion (no text or symbols)14
natural_image
Illustration of a person wearing a seatbelt with red arrows indicating movement or pressure points (no text or symbols present)Installing the Base with the Lower Anchor Connector Assembly (cont.)

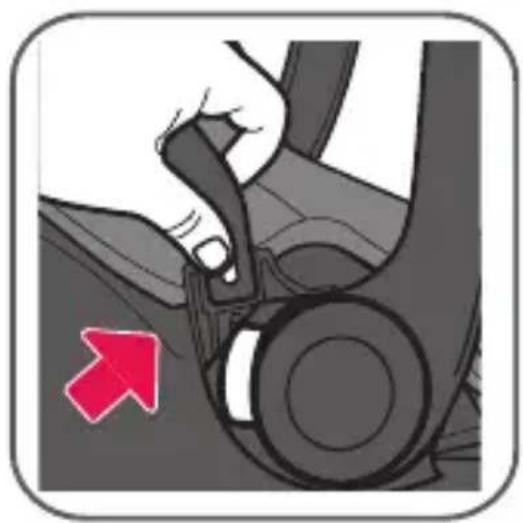
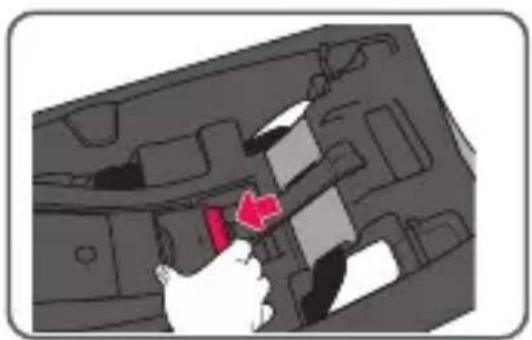
To remove base, open the Fit-loc belt tightener, then push button on LATCH connector then unhook from the anchor point.
You may need to loosen the tension on the LATCH connector by loosening the LATCH adjustment strap.
Repeat steps as shown on the other side of the base.
Pass LATCH strap UNDER the base through the openings and push connectors into the LATCH storage pockets as shown. When storing, place the LATCH strap underneath the LATCH storage tab (p 93). To do so, open Fit-loc belt tightener and slide LATCH strap under tab. When storing, NEVER allow strap to lie on top of the base area as it might interfere with the carrier latching onto the carrier attachment bars.
natural_image
Illustration of a hand using a belt buckle to lift a cable, with red arrows indicating the cable's direction (no text or symbols present)LATCH strap MUST
pass UNDER the base
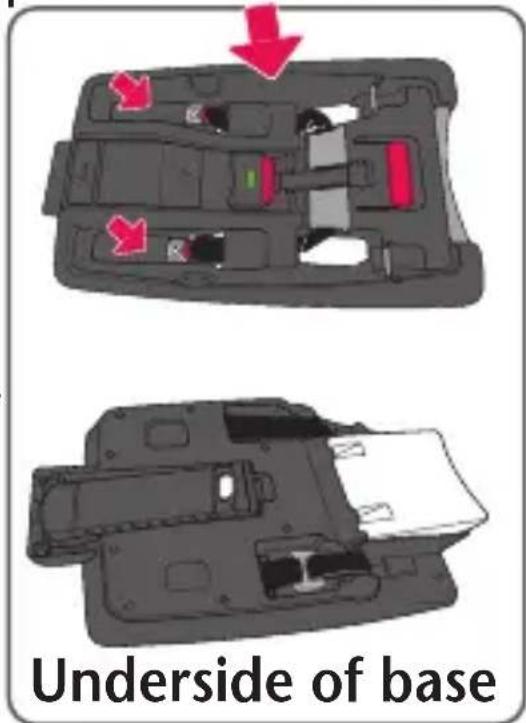
text_image
Underside of base

Installing the Base with the Vehicle Seat Belt/Shoulder Belt

BEFORE installing base, make sure vehicle is on level ground. Place base on an approved vehicle seating location.
BEFORE installing the base, if you are using the load leg, you will need to unfold the leg, install the base, then extend the load leg. Follow the steps on pages 40-43.
MAKE SURE LATCH belt is stored in the storage pockets before installing the base with the lap/shoulder belt.
Squeeze the button on the Fit-loc belt tightener and lift it up as shown.
CHECK to make sure LATCH strap is under the LATCH storage tab.
text_image
Diagram showing three scenarios of car collision with a no-detection sign, indicating collision avoidance.LATCH strap MUST pass UNDER the base
1
natural_image
Diagram of a mechanical device interior with red arrows indicating movement or force, no visible text or symbols2
natural_image
Illustration of a hand inserting a component into a vehicle's dashboard (no text or symbols visible)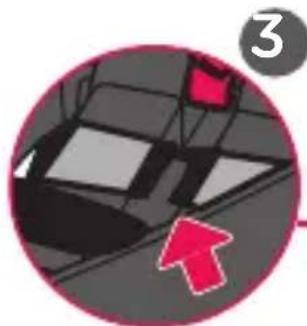
natural_image
Circular icon with a red arrow pointing to a dark object, no text or symbols present.LATCH storage tab
natural_image
Illustration of a hand using a red tool to press or install a mechanical component, with no visible text or symbols.Installing the Base with the Vehicle Seat Belt/Shoulder Belt (cont.)

Route the lap/shoulder belt through the belt path openings on both sides of base and under the Fit-loc belt tightener. Make sure not to twist the belts and make sure they lie flat.
Fasten the buckle until it clicks into place. Pull shoulder belt to remove all the slack from the vehicle belt and to get the base snug against the vehicle seat.
Close the Fit-loc belt tightener by pushing down with your two thumbs next to the indicator window. Keep pushing down until it locks into place and you see GREEN in the indicator window on the base.
CHECK to make sure base is secure by holding both sides of the base near the vehicle belt and moving it from side to side and front and back. The lap/shoulder belt should not loosen and the base should not move easily. The base should not move more than 2.5 (1 in.) from side to side or front to back.
text_image
4 CLICK!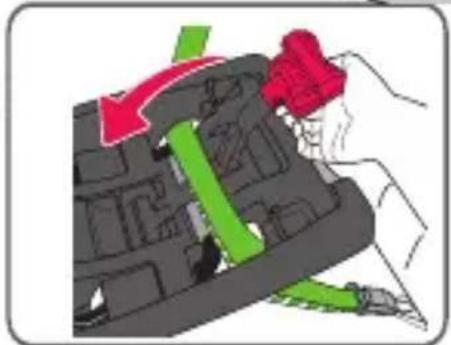
natural_image
Diagram showing a hand pressing down on a mechanical component with green arrows indicating motion (no text or symbols)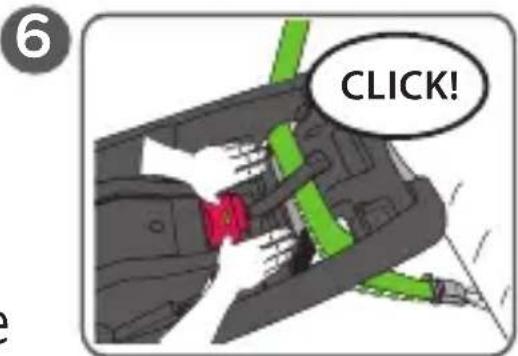
text_image
6 CLICK!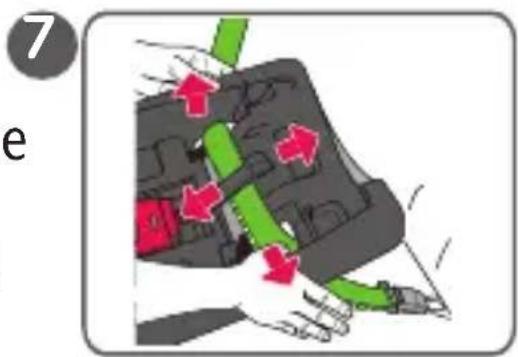
text_image
7 e

Installing the Base with the Vehicle Seat Belt/Shoulder Belt (cont.)
CHECK the recline indicator to make sure the base is correctly reclined. If it is not correctly reclined, unlock the Fit-loc belt tightener, unbuckle lap/shoulder belt, and adjust the foot on the base then re-install base. CHECK that the base is correctly reclined. Refer to pages 66-70 for Adjusting the Recline.
Attach the carrier into the base until you hear a click. Finish the load leg adjustment from pages 38-41
ALWAYS Lift up on the handle of the carrier to make sure that it is securely attached in the base.
8
natural_image
Top-down view of a car interior showing two seats with red buttons and a green indicator light (no text or symbols)9
text_image
CLICK!10
natural_image
Illustration of a car seatbelt buckle with a green belt and red arrow indicating upward motion (no text or symbols)Installing the Base with the Vehicle Seat Belt/Shoulder Belt (cont.)

To remove the carrier from the base, squeeze the release handle at the back of the carrier. Lift carrier away from the base.
To remove the base from vehicle,
squeeze the button on the Fit-loc belt tightener and lift it up (see Step 2 and 3 on page 58) then unbuckle the vehicle belt and remove it from the belt path.
11
natural_image
Illustration of a person's seatbelt device with red arrows indicating movement or force (no text or symbols)
Installing the Base with the Vehicle Seat Belt

BEFORE installing base, make sure vehicle is on level ground. Place base on an approved vehicle seating location.
BEFORE installing the base, if you are using the load leg, you will need to unfold the leg, install the base, then extend the load leg. Please follow steps on pages 40-43.
MAKE SURE LATCH belt is stored in the storage pockets before installing the base with the lap belt.
Squeeze the button on the Fit-loc belt tightener and lift it up as shown.
CHECK to make sure LATCH strap is under the LATCH storage tab.
text_image
Diagram illustrating car safety rules with three scenarios: vehicle chassis, road safety, and no-discrimination.1 LATCH strap MUST pass UNDER the base
natural_image
Diagram of a vehicle interior showing internal compartments and directional arrows (no text or labels)2
natural_image
Illustration of a hand inserting a red arrow into a vehicle interior (no text or symbols)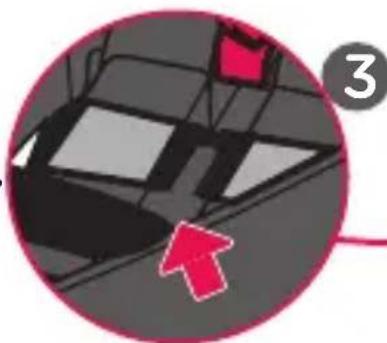
natural_image
Circular icon with a red arrow pointing to a vehicle or machine component, no visible text or symbols.LATCH storage tab
natural_image
Illustration of a hand using a tool to adjust or install a component, with a red arrow indicating the process (no text or symbols present)Installing the Base with the Vehicle Seat Belt (cont.)

Route the lap belt through the belt path openings on both sides of base and under the Fit-loc belt tightener. Make sure not to twist the belt and make sure it lies flat. Fasten the buckle until it clicks into place.
Pull the free end of the lap belt to remove all the slack and to get the base snug against the vehicle seat. Lay the free end of the belt across the belt path so it will be under the Fit-loc belt tightener after it has been closed.
Close the Fit-loc belt tightener by pushing down with your two thumbs next to the indicator window. Keep pushing down until it locks into place and you see GREEN in the indicator window on the base.
CHECK to make sure base is secure by holding both sides of the base near the vehicle belt and moving it from side to side and front and back. The lap belt should not loosen and the base should not move easily. The base should not move more than 2.5 cm (1 in.) from side to side or front to back.
text_image
CLICK!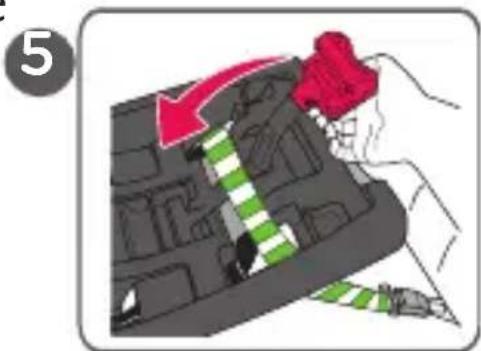
text_image
5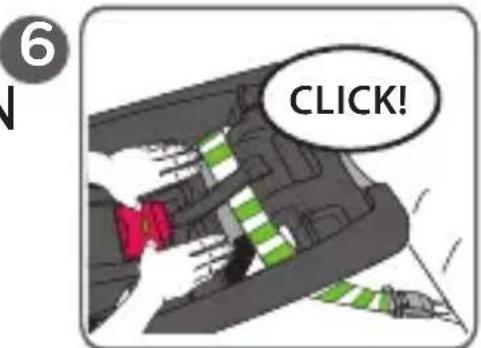
text_image
6 CLICK!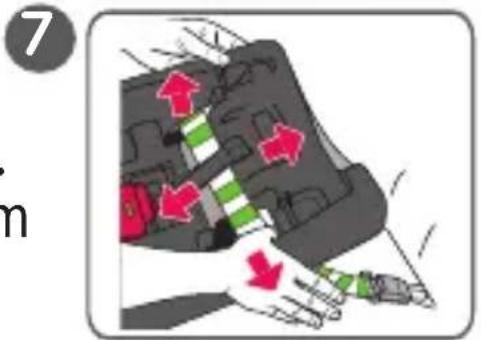
text_image
7 m
Installing the Base with the Vehicle Seat Belt (cont.)
CHECK the recline indicator to make sure the base is correctly reclined. If it is not correctly reclined, unlock the Fit-loc belt tightener, unbuckle lap belt, and adjust the foot on the base then re-install base.
CHECK that the base is correctly reclined. Refer to pages 66-70 for Adjusting the Recline.
Attach the carrier into the base until you hear a click. Finish the load leg adjustment from pages 38-41.
ALWAYS Lift up on the handle of the carrier to e sure that it is securely attached in the base.
8
natural_image
Interior view of a car dashboard with two seats and one highlighted (no text or symbols)9
text_image
CLICK!10
natural_image
Illustration of a car seatbelt device with a red arrow indicating the seatbelt (no text or symbols present)Installing the Base with the Vehicle Seat Belt (cont.)

To remove the carrier from the base, squeeze the release handle at the back of the carrier. Lift carrier away from the base.
To remove the base from vehicle, squeeze the button on the Fit-loc belt tightener and lift it up (see Step 2 and 3 on page 58) then unbuckle the vehicle belt and remove it from the belt path.
11
natural_image
Illustration of a person wearing a backpack and using a back cover device, with no visible text or symbols.Installation Checklist without Base
1. Place the child in the carrier.
√ The child’s back and bottom are flat against the back and bottom surfaces of the carrier.
√ Top of child's head is at least 2.5 cm (1 in.) below the top of the child restraint seat back.
2. Secure child to the carrier. Refer to p. 87.
√ Harness straps are at, or just below, shoulder level (p. 75).
√ Both buckle tongues are fastened (p. 89).
√ Chest clip is connected and positioned at armpit level (p. 89).
√ Harness straps are snug against the child and you should not be able to pinch the harness (p. 91).
√ Crotch strap is snug against the child, but NOT under the child's bottom (p. 76).
√ Waist straps are snug against the child, but NOT under the child's legs (p. 80).
Installation Checklist without Base (cont.)
3. Secure child restraint to the vehicle seat.
√ Carrier is securely installed with vehicle seat belt (p. 66-69).
√ The level line is level with ground (p. 71).
√ If necessary, a towel/small blanket is rolled up and placed beneath the front edge of the carrier so the child's head lies back comfortably (p. 65).
4. Check your work.
√ To properly protect your child, the carrier MUST NOT move more than 2.5 cm (1 in.) from side-to-side or from front-to-back at the vehicle belt path.
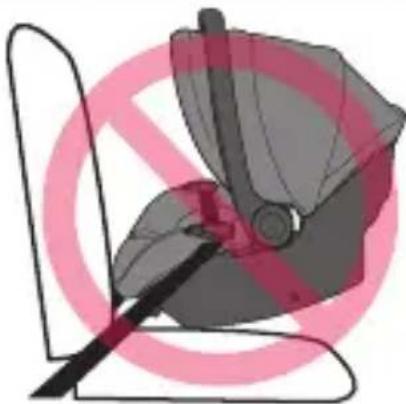
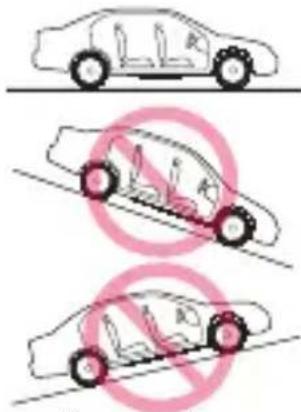
WARNING
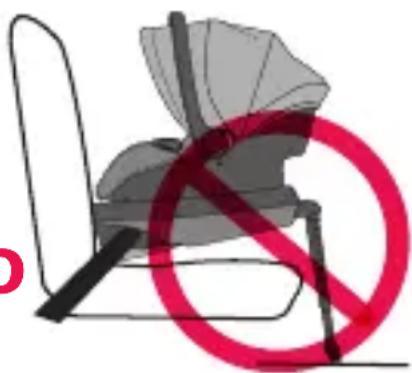
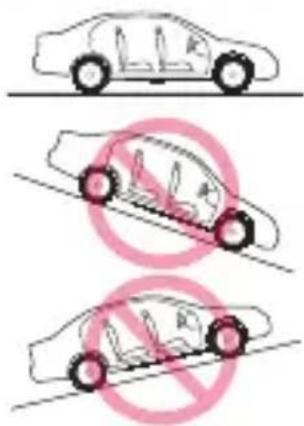
Improper recline of your child restraint or base could cause serious injury or death.
If the child restraint is too upright, an infant's head could drop forward and cause suffocation or breathing problems.
If the child restraint is too reclined, a sudden stop or vehicle crash could cause injury to a child's neck or shoulders.
natural_image
Illustration of a mechanical device with a tool, set against a pink circular background (no text or symbols)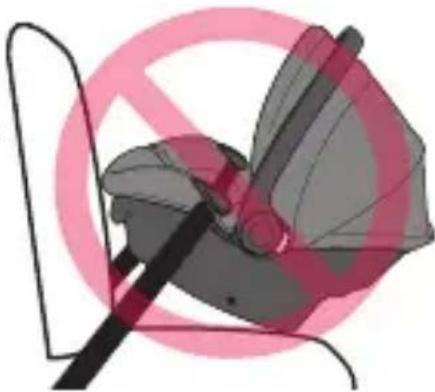
natural_image
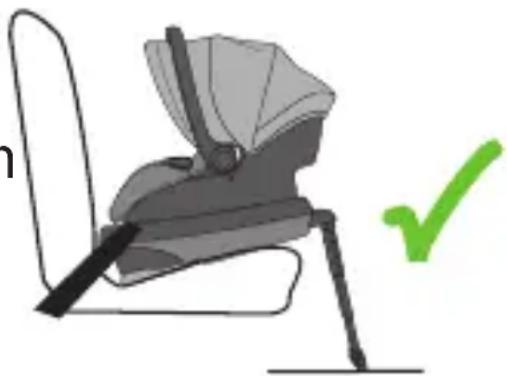
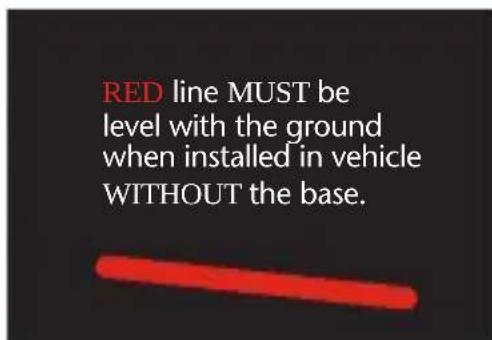
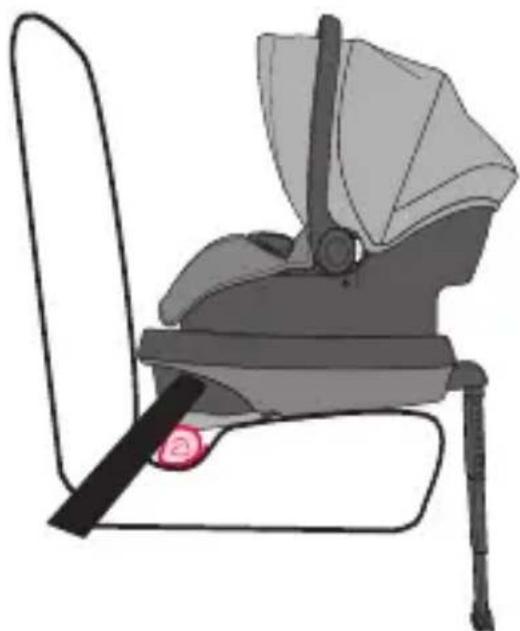
Mechanical assembly diagram showing a lever and gear mechanism with no visible text or symbolsWhen using the carrier WITHOUT base:
1) Make sure vehicle is on level ground.
2) Check the RED level line on the label to make sure that it is level with the ground.
3) If it it not level, see page 65 on how to adjust carrier with rolled towel.
text_image
RED line MUST be level with the ground when installed in vehicle WITHOUT the base.Installing the Carrier with the Vehicle Seat Belt/Shoulder Belt

When using the carrier WITHOUT the base, ALWAYS CHECK for tight installation and the red level line on the carrier each and every time you use your child restraint to make sure it is level with the ground. If it is not place a tightly rolled towel under the foot end of the carrier as shown to level it.
ALWAYS check that your child is in a comfortable position and has not slid down in the seat or moved into an awkward position. Your child's head should be flat against the carrier and not tilted toward their chest.
NEVER place a rolled towel under the child's head end of the carrier. If towel is used to adjust the seat installation angle, it must only be used in position shown.
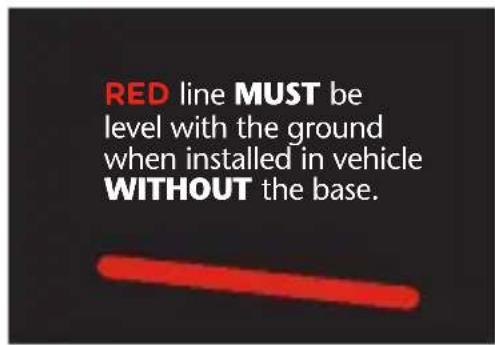
text_image
RED line MUST be level with the ground when installed in vehicle WITHOUT the base.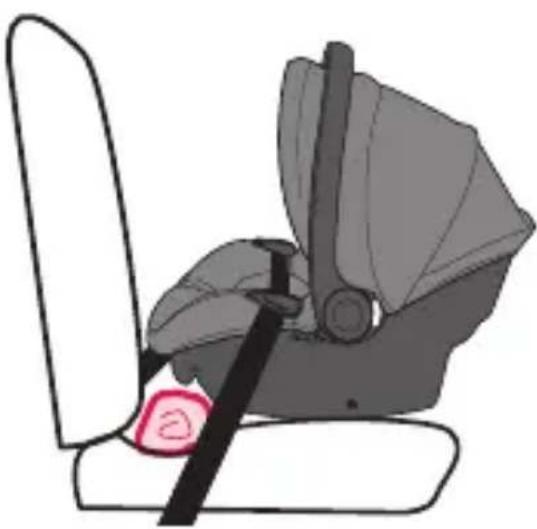
natural_image
Illustration of a car seatbelt with a black belt and red button (no text or symbols)
Installing the Carrier with the Vehicle Seat Belt/Shoulder Belt

BEFORE installing carrier, make sure vehicle is on level ground. Place carrier on an approved vehicle seat location in a rear-facing position.
text_image
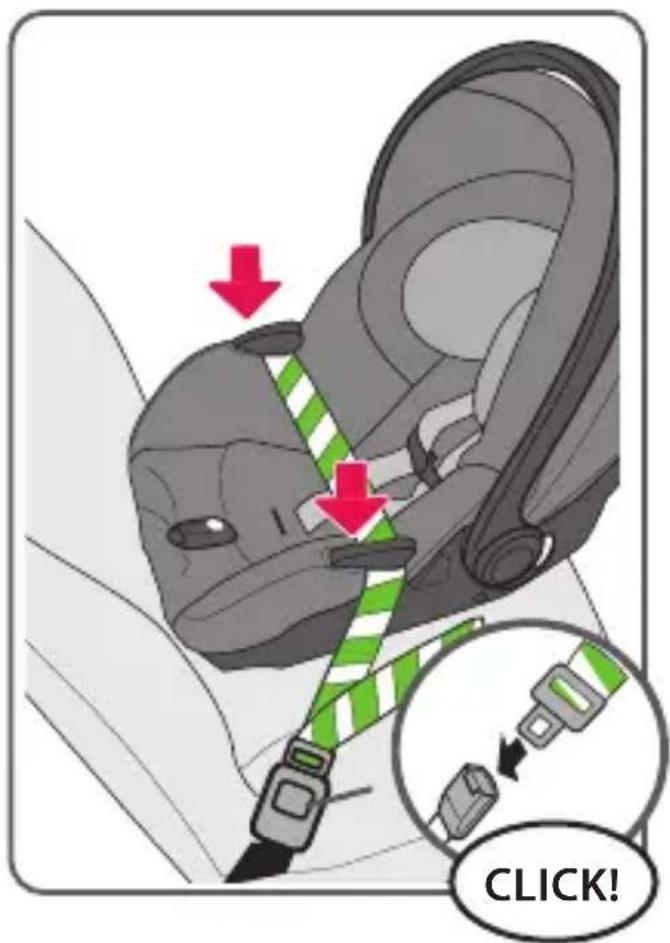
Diagram showing three scenarios of car collision avoidance with no signage, indicating vehicle safety rules.Route the lap belt portion of the vehicle belt through the lap belt guides on both sides of carrier. Make sure not to twist the belt and make sure it lies flat.
NEVER place the shoulder portion of the vehicle belt under the lap belt guides. Always position shoulder portion of vehicle belt against the back of the vehicle seat.
Fasten the vehicle belt to the buckle until it clicks into place. If vehicle belt latch plate does not lock, then the retractor must be switched to locking mode.
text_image
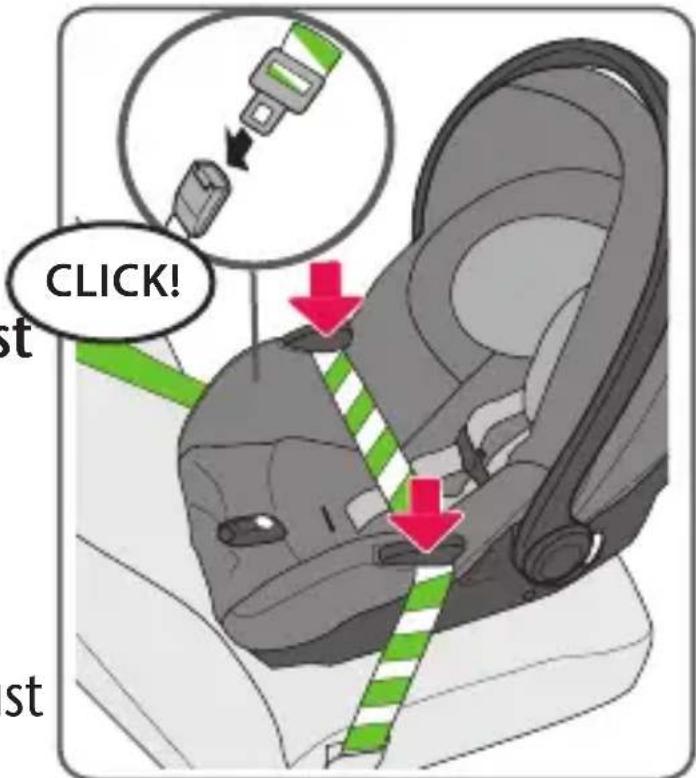
CLICK! st stCHECK the vehicle owner's manual and page 16-21 in this manual to see how to lock your seat belt. If seat belt does not lock, try another seating position.
Installing the Carrier with the Vehicle Seat Belt/Shoulder Belt (cont.)
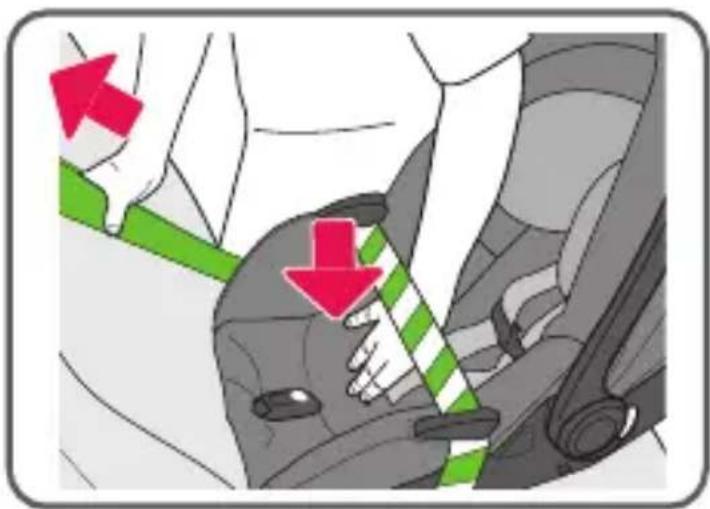
Push down in center of carrier and pull the shoulder belt portion of the vehicle belt to tighten carrier against the vehicle seat.
CHECK to make sure carrier is secure by holding both sides near the lap belt guides and moving it from side to side and front and back. The lap belt should not loosen and the carrier should not move easily. The carrier should not move more than 2.5 cm (1 in.) from side to side or front to back.
After installing carrier without base check the RED level line on the label to make sure that it is level with the ground.
If seat is still not level, refer to pages 64-65, when using the carrier WITHOUT the base.
text_image
Diagram showing car seatbelt buckle adjustment with red arrows indicating left and right changes in seat width
natural_image
Car seatbelt buckle diagram showing red arrows indicating fastening or clearance (no text or symbols)RED line MUST be level with the ground when installed in vehicle WITHOUT the base.


Installing the Carrier with the Vehicle Seat Belt

BEFORE installing carrier, make sure vehicle is on level ground. Place carrier on an approved vehicle seat location in a rear-facing position.
text_image
Diagram showing three scenarios of car collision with a prohibition sign, indicating no collision or violation.Route the lap belt through the lap belt guides on both sides of carrier. Make sure not to twist the belt and make sure it lies flat.
Fasten the vehicle belt to the buckle until it clicks into place. If vehicle belt latch plate does not lock, then the retractor must lock. CHECK the vehicle owner's manual and page 16-21 in this manual to see how to lock your seat belt. If seat belt does not lock, try another seating position.
text_image
CLICK!Installing the Carrier with the Vehicle Seat Belt (cont.)
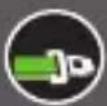
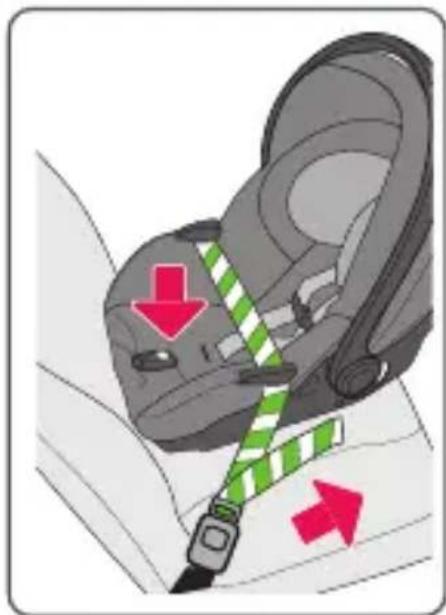
Push down in center of carrier to tighten carrier against the vehicle seat while pulling on the free end of the vehicle belt. Once tightened, tuck the free end of the strap near the vehicle seat crease.
CHECK to make sure carrier is secure by holding both sides near the lap belt guides and moving it from side to side and front and back. The lap belt should not loosen and the carrier should not move easily. The carrier should not move more than 2.5 cm (1 in.) from side to side or front to back.
After installing carrier without base check the RED level line on the label to make sure that it is level with the ground.
If seat is still not level, refer to page 62-63, when using the carrier WITHOUT the base.
natural_image
Car seatbelt buckle diagram showing red directional arrows indicating seat movement (no text or symbols)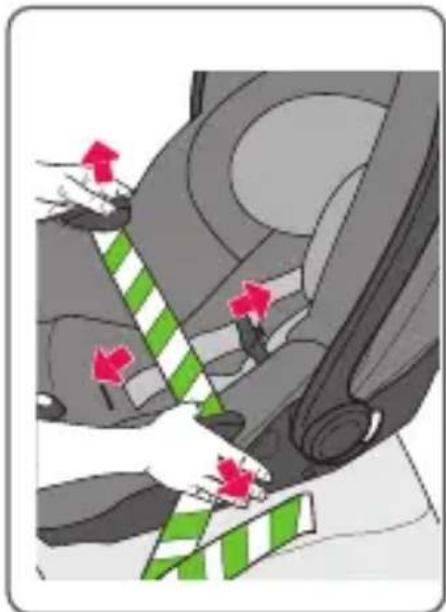
natural_image
Car interior showing hands adjusting a green and white striped belt with red directional arrows (no text or symbols)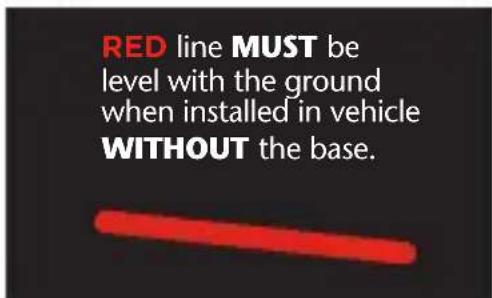
text_image
RED line MUST be level with the ground when installed in vehicle WITHOUT the base.Adjusting the Recline
The slope of the vehicle seats vary so your child restraint base has a feature for adjusting the proper recline angle.
The base has 4 recline adjustment positions for the foot.
To raise the base, push the button and the foot will spring down into one of the 4 positions until it locks into place.
To lower the base, push the button and push foot up into base until it locks into desired position.

text_image
Instructional diagram showing a shoe being adjusted to form a seatbelt, with red arrows indicating the step.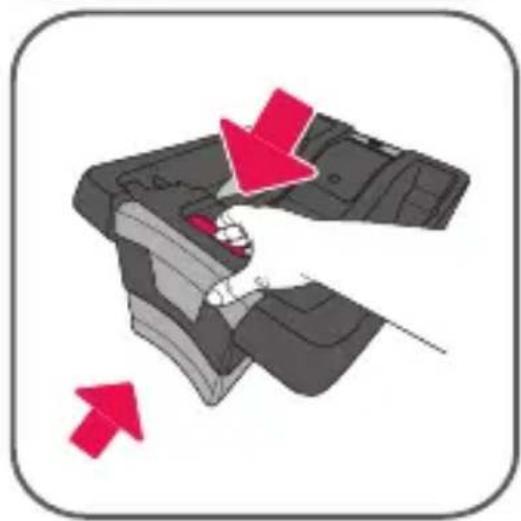
natural_image
Illustration of a person's seat with red arrows indicating movement or force (no text or symbols)Checking the Recline with the Base
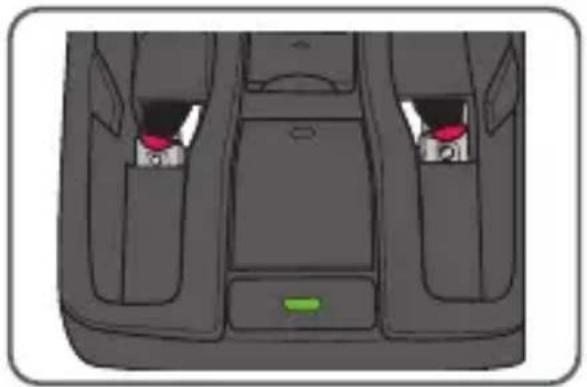
When using the carrier and the base together:
1) Make sure vehicle is on level ground.
2) Only use the recline indicator on the base to make sure the seat and base are correctly reclined.
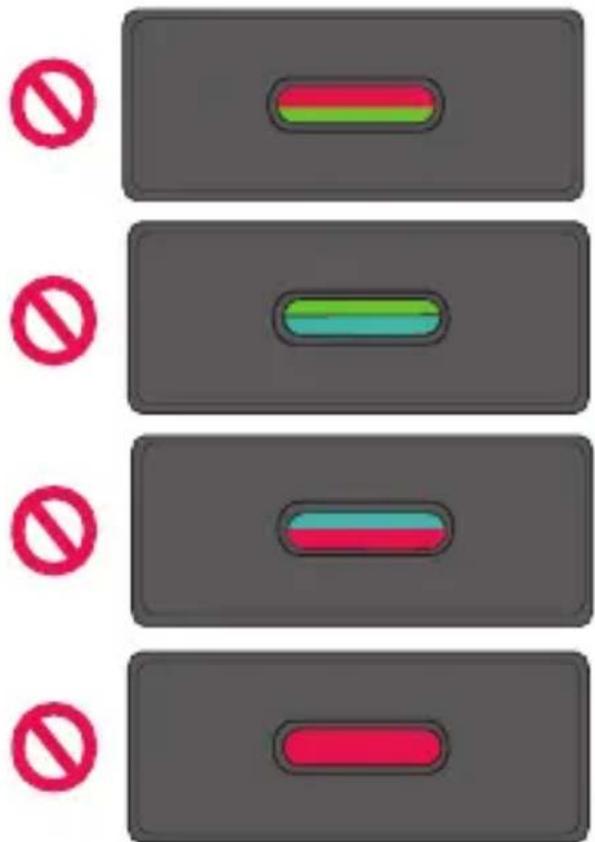
3) Recline base until you see only green or only blue.
Blue : 4-20lbs (1.8 -9.1 kg)
Green : 20-35lbs (9.1 -15.9kg)
NEVER allow green and blue to be showing in the window at the same time. The recline is NOT correct.
If seat is still not correctly reclined, see Adjusting the Recline.
natural_image
Interior view of a car dashboard with two seats and a green indicator light (no text or symbols)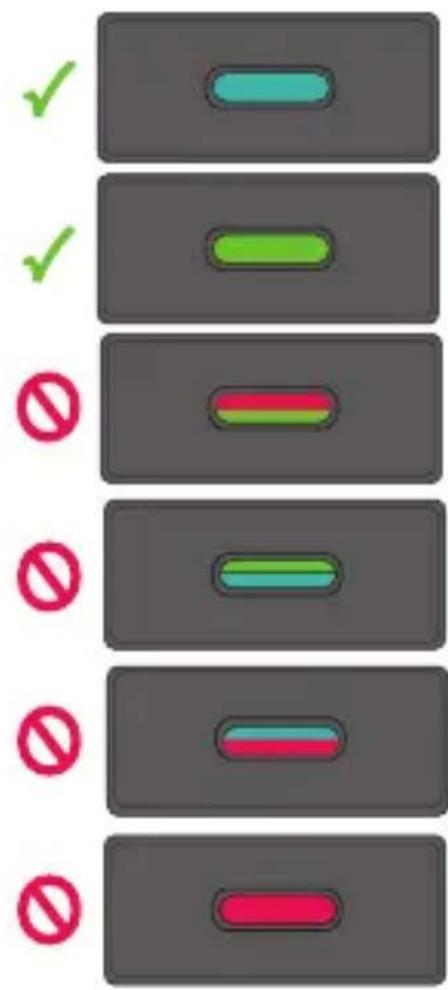
text_image
Diagram showing five vertical panels with checkmarks and prohibition signs, each containing a colored bar or rectangle.Checking the Recline with the Base (cont.)
When using the carrier with the base, if the foot is in the lowest position and the indicator still shows red or blue and green at the same time you may need to place a tightly rolled towel under the foot end of the base in order to get the seat to become properly reclined.
NEVER place a rolled towel under the child's head end of the base. If towel is used to adjust the seat installation angle, it must only be used in position shown.
natural_image
Illustration of a baby seat with a pink button, no text or symbols presentWARNING
Improper placement of the harness straps and buckle strap increases the risk of serious injury or death in a sudden stop or vehicle crash.
Depending on whether you have a smaller or larger size child, you will need to adjust the headrest, infant body support, buckle strap and waist strap locations. Please review the following sections on pages 76-85 before changing any strap positions.
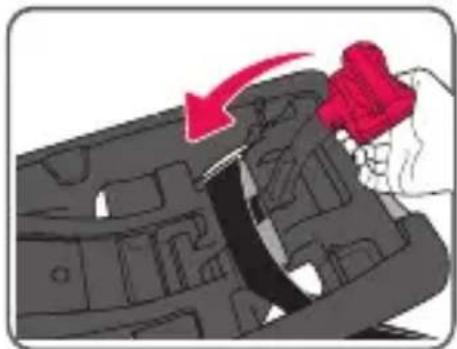
Rotate handle out of the way. From the front of seat, you will need to loosen the harness straps by pushing the harness adjustment button and pulling the harness straps toward you.
Pull the headrest up by squeezing the button at the top of the headrest.
Hook the harness buckle tongues over the vehicle belt path guides to get them out of the way to allow easier placement of child in the seat.
natural_image
Medical illustration showing a hand adjusting a car seatbelt with red arrows indicating force or movement (no text or symbols present)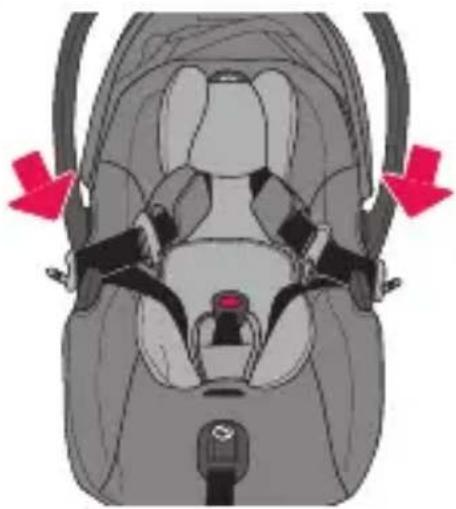
natural_image
Diagram of a car seatbelt with red arrows indicating direction of movement or pressure points (no text or symbols present)Placing Your Child in the Carrier (cont.)
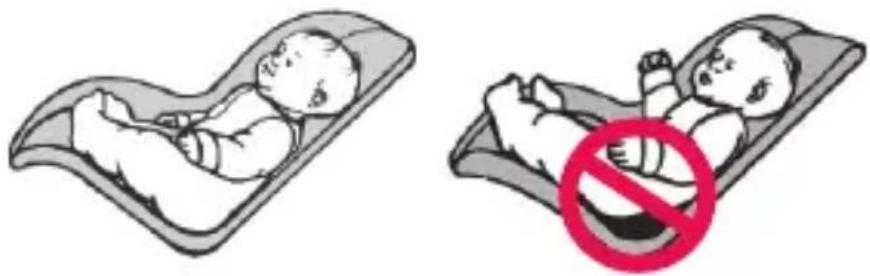
Place your child in the carrier with their bottom pushed back and their back flat against the seat.
Position the harness straps around the child's arms and the buckle strap between the child's legs, then buckle.
Fasten chest clip together and center on child's chest level with their armpit.
Squeeze headrest adjustment button and lower headrest to the closest position AT or JUST BELOW the child's shoulders.
CHECK to make sure headrest is in a locked position by pushing down.
natural_image
Illustration of two babies lying in different positions, one with a no-smoking symbol (no text or symbols present)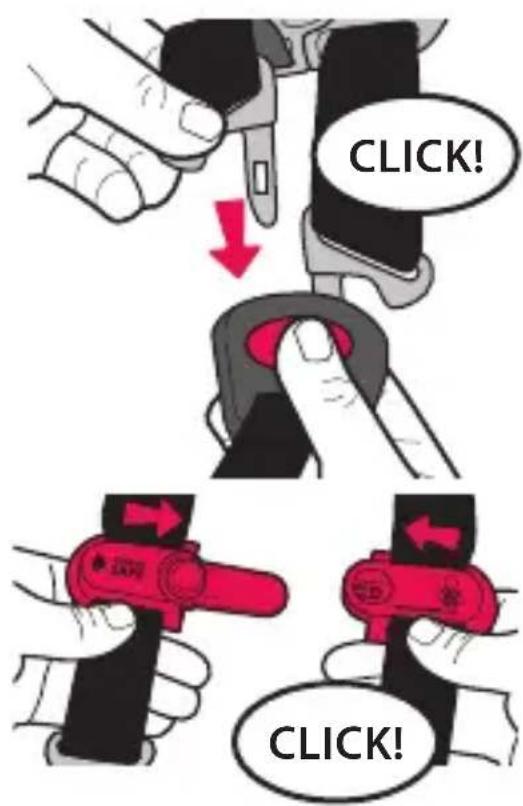
text_image
CLICK! CLICK!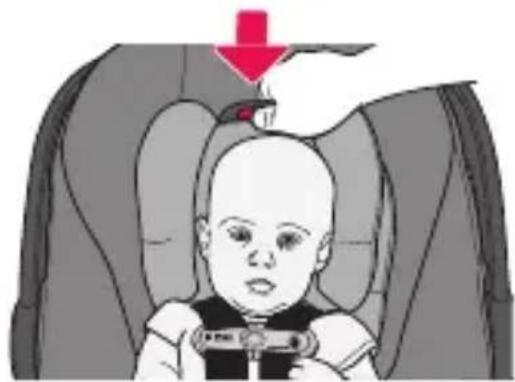
natural_image
Illustration of a baby in a car seat with a red arrow pointing to the seat (no text or symbols)Placing Your Child in the Carrier (cont.)
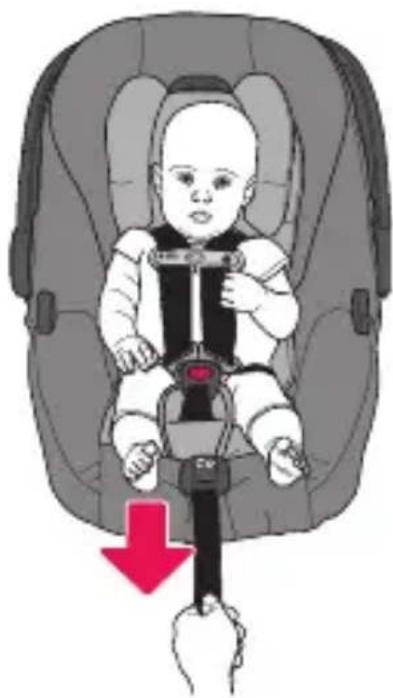
Pull all slack out of the harness system, starting with the webbing around the child's legs and moving up toward their shoulders.
Slowly pull harness adjuster strap to make the shoulder straps snug around the child's shoulders. BE CAREFUL. DO NOT allow the chest clip to slide up into their neck when tightening.
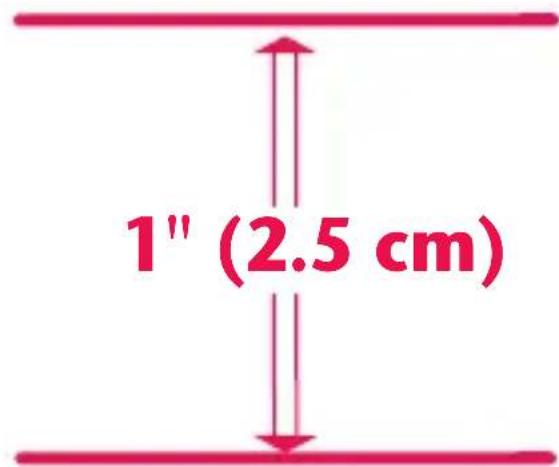
CHECK the child's head MUST BE 1" (2.5 cm) or more below the top of the seat as shown.
text_image
1" (2.5 cm)Hold up to top of seat to check for 1" spacing.
natural_image
Illustration of a baby in a car seatbelt being lifted by a hand, with a red downward arrow indicating the load (no text or symbols present)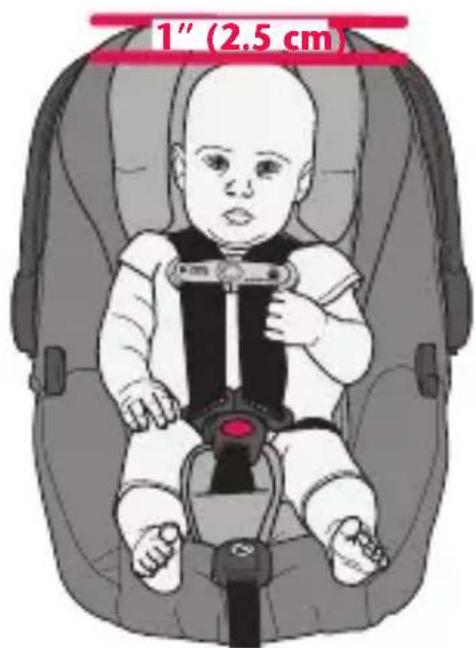
text_image
1" (2.5 cm)Changing the Crotch Strap Position
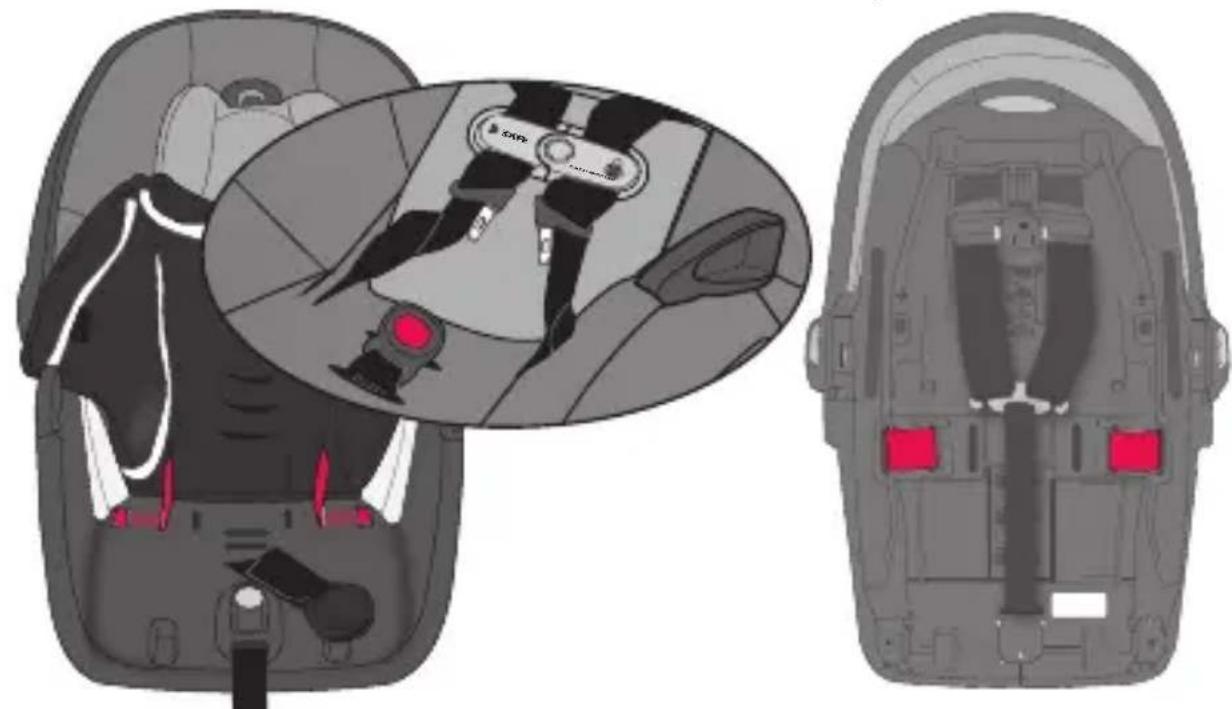
As your child grows, you will need to change the crotch strap position so that it is in the slot closest to your child. The crotch strap should ALWAYS be as close as possible to, but NEVER under, the child's bottom.
Crotch Strap in the Newborn Position
NEVER use this position for children weighing more than 3.6 kg (8 lbs).
natural_image
Top-down view of a vehicle chassis frame showing internal compartments and structural ribs (no text or symbols)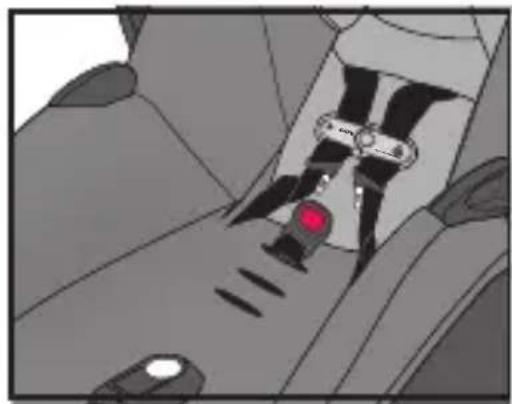
natural_image
Interior view of a car showing a red circular object on the side and a black gear-like device (no text or symbols visible)Crotch Strap in the Rear Slot
natural_image
Top-down view of a vehicle's rear engine compartment showing internal components (no text or symbols)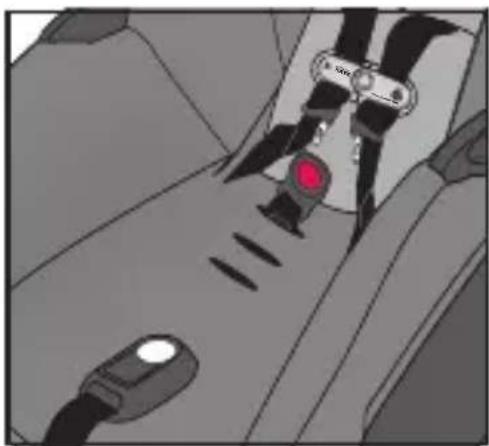
natural_image
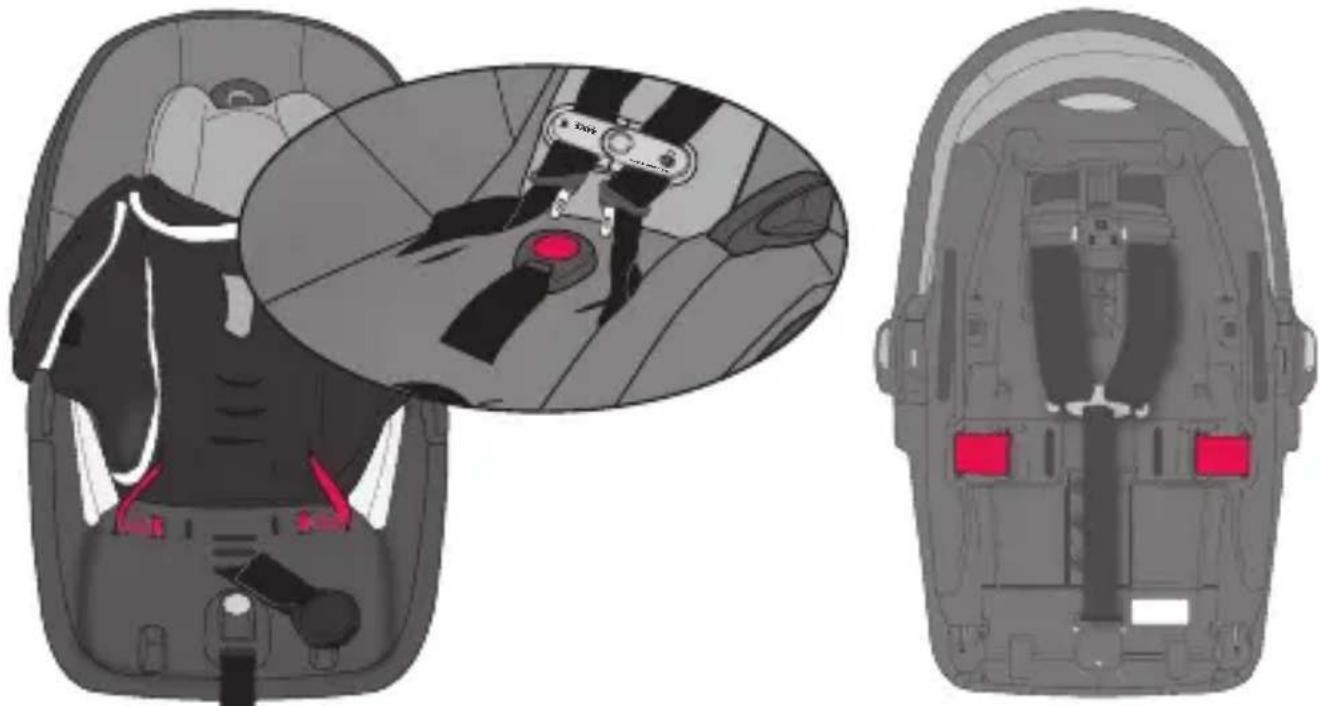
Close-up of a car's seatbelt mechanism with a red circular head (no text or symbols visible)Changing the Crotch Strap Position (cont.)
Crotch Strap in the Middle Slot
natural_image
Top-down view of a vehicle chassis showing internal compartments and structural elements (no text or symbols)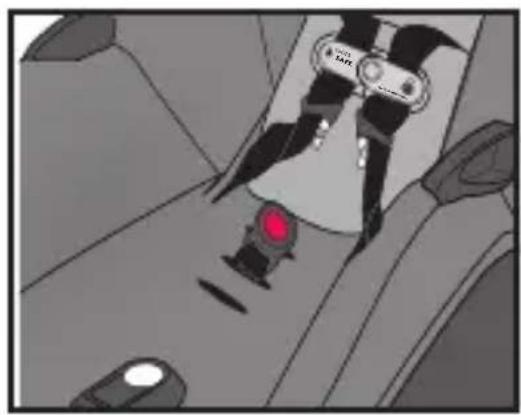
natural_image
Interior view of a car showing a red circular sensor mounted on the wheel (no visible text or symbols)Crotch Strap in the Front Slot
natural_image
Top-down view of a mechanical component with visible internal compartments and mounting holes (no text or symbols)
natural_image
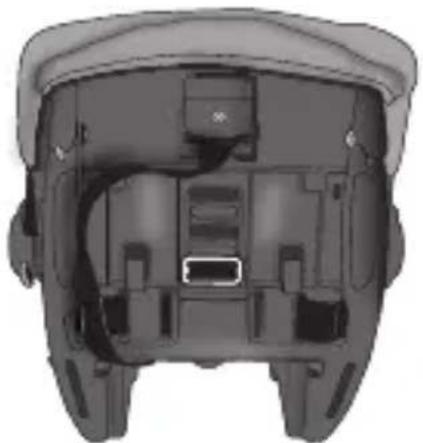
Close-up of a car seatbelt mechanism with a red key inserted (no text or symbols visible)Changing the Crotch Strap Position (cont.)
natural_image
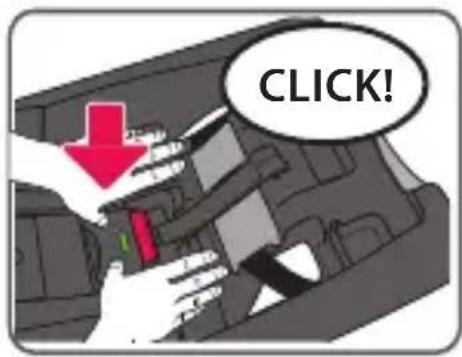
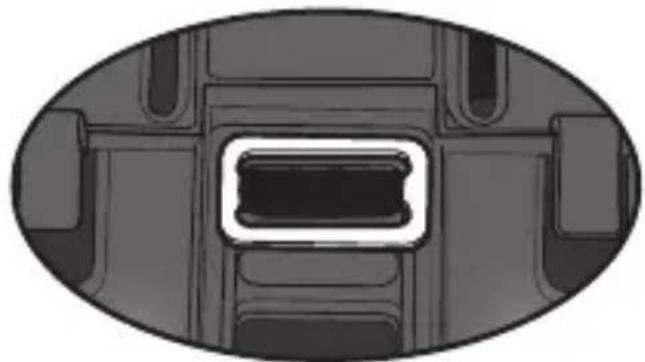
Top-down view of a vehicle chassis showing internal components and structural details (no text or symbols)1 To reposition crotch strap, loosen the harness straps and move the strap out of the way. Remove the crotch strap anchor from its position on the bottom of the carrier, and push the anchor up through the slot to the top of the seat.
natural_image
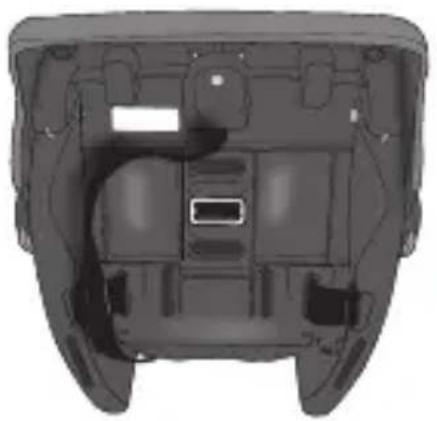
Close-up of a hand using a tool to adjust or install a car seatbelt (no visible text or symbols)2 anchor into the slot that is the closest to the child, but NEVER under the child's bottom.
natural_image
Top-down view of a car interior showing the front and rear compartments with a central rectangular component (no text or symbols)Make sure the anchor is completely through and is laying flat against the bottom of the seat. Pull up on the crotch strap to make sure it is securely fastened.
ng the Crotch Strap Position (cont.)
natural_image
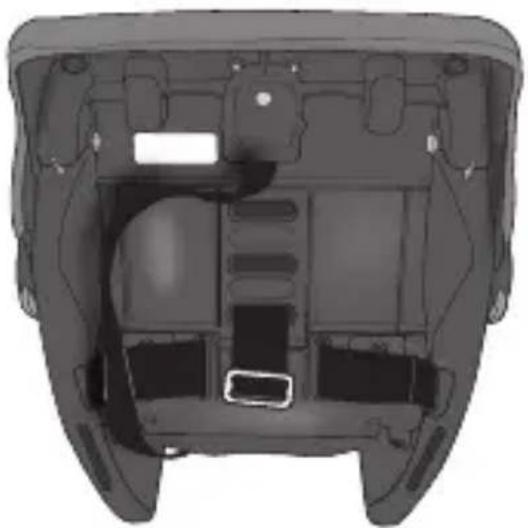
Top-down view of a vehicle chassis showing internal compartments and structural elements (no text or symbols)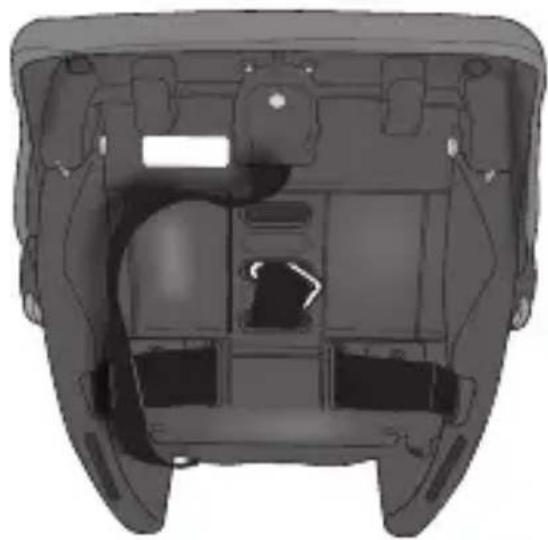
natural_image
Top-down view of a vehicle chassis frame with internal compartments and structural ribs (no text or symbols visible)For newborn position, push the anchor down through the rear slot, then feed it back up through the middle slot.
Make sure the anchor is completely through the middle or front slot and is laying flat against the bottom of the seat.
NEVER use this position for children weighing more than 3.6 kg (8 lbs).
natural_image
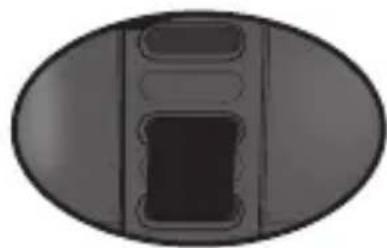
Top-down view of a dark oval-shaped object with internal compartments (no text or symbols)Rear to Middle
natural_image
Top-down view of a dark oval-shaped object with internal rectangular cutout (no text or symbols)Rear to Front
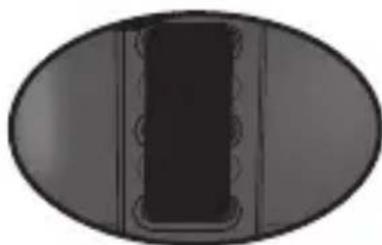
Changing the Waist Strap Position
As your child grows, you will need to change the waist strap position so that it is in the slot closest to your child. The waist strap should ALWAYS be as close as possible to, but NEVER under, the child's legs.
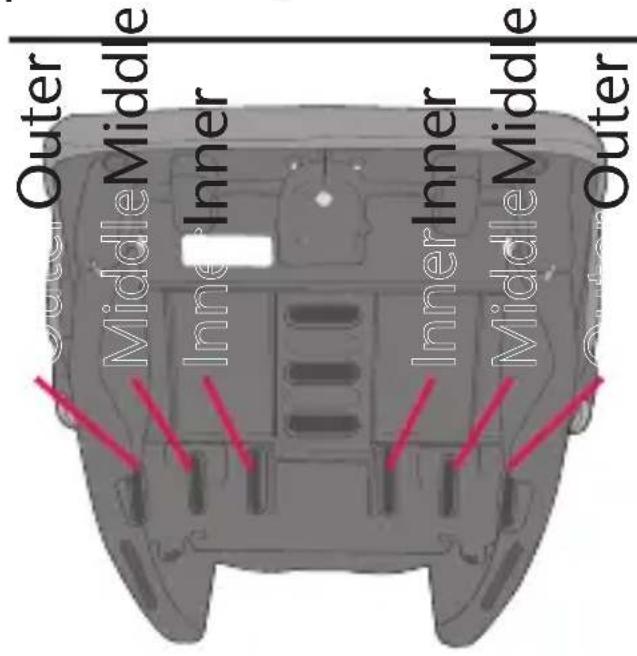
text_image
Outer Middle Inner Inner Inner Inner Middle Middle OuterApproximate Child Size:
Waist Strap Position:
| Small | 1.8 - 2.7 kg(4 - 6 lbs) | Inner |
| Medium | 2.7 - 9 kg(6 - 20 lbs) | Middle |
| Large | 9 - 15.8 kg(20 - 35 lbs) | Outer |
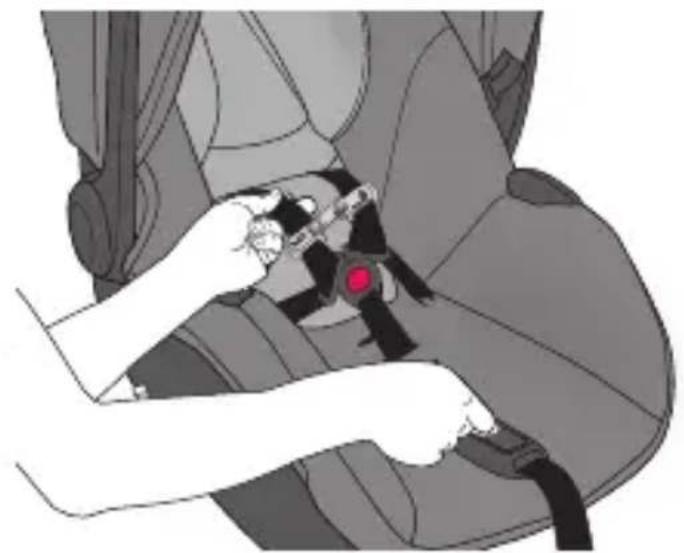
1
To reposition waist straps, loosen the harness straps by pressing the harness release button while pulling on the harness straps.
natural_image
Illustration of a car seatbelt buckle being adjusted for a person's seatbelt (no text or symbols present)Changing the Waist Strap Position (cont.)

natural_image
Hand pressing a red button on a car's side panel, with a red downward arrow indicating motion (no text or symbols)2 Push the crotch strap through the slot in the seat pad
natural_image
Interior view of a vehicle showing the front and rear compartments with a rectangular opening (no text or symbols)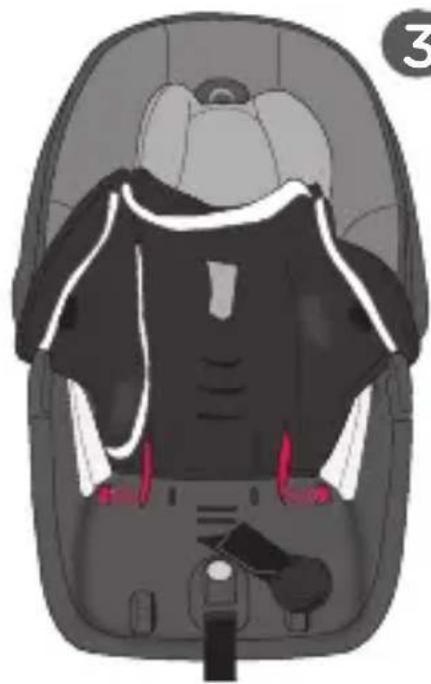
natural_image
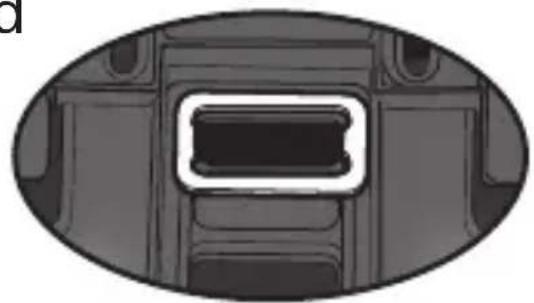
Top-down view of a car seat with black and white patterned backrest, showing seat number 3 (no text or symbols on the diagram itself)3
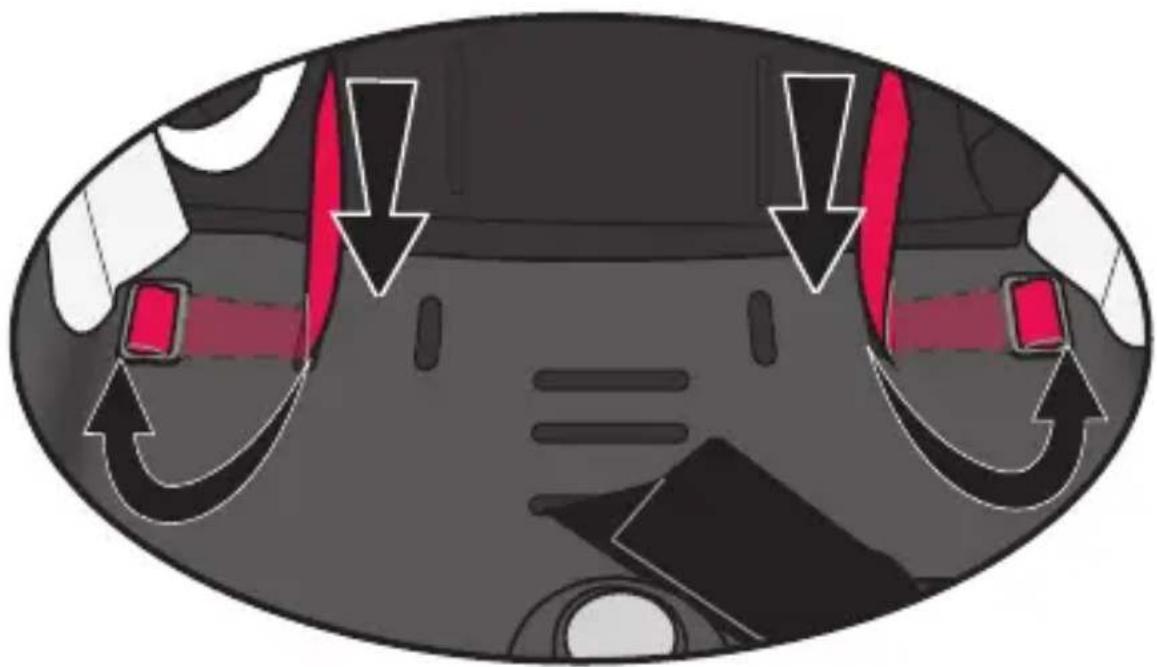
Unhook the front of the child restraint's seat pad and move it out of the way to expose the waist strap slots and anchors.
Remove the waist strap anchor from its position on top of the seat, and push the anchor down through the slot to the bottom of the seat. Then push anchor up through the slot to the top of the seat pad. Repeat on other side.
natural_image
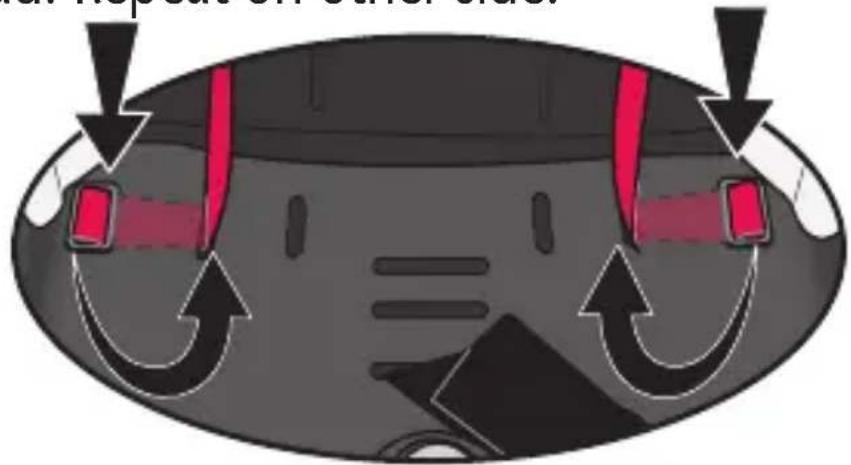
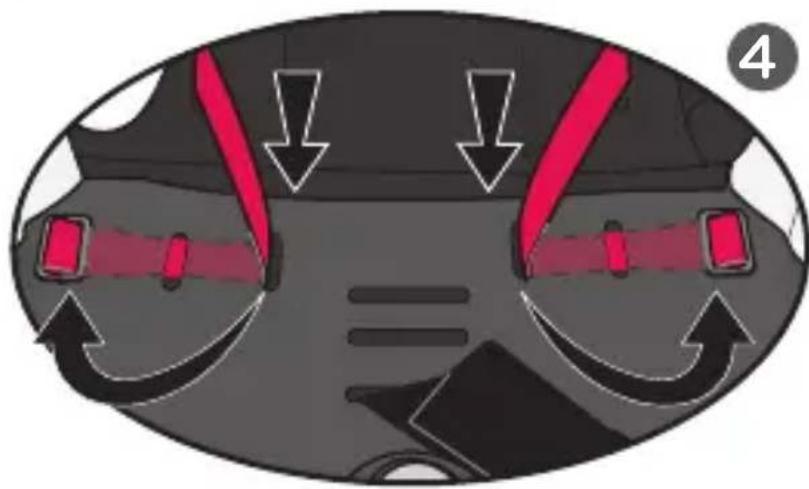
Diagram of a car head with red belt and directional arrows indicating motion or movement (no text or symbols)Changing the Waist Strap Position (cont.)
natural_image
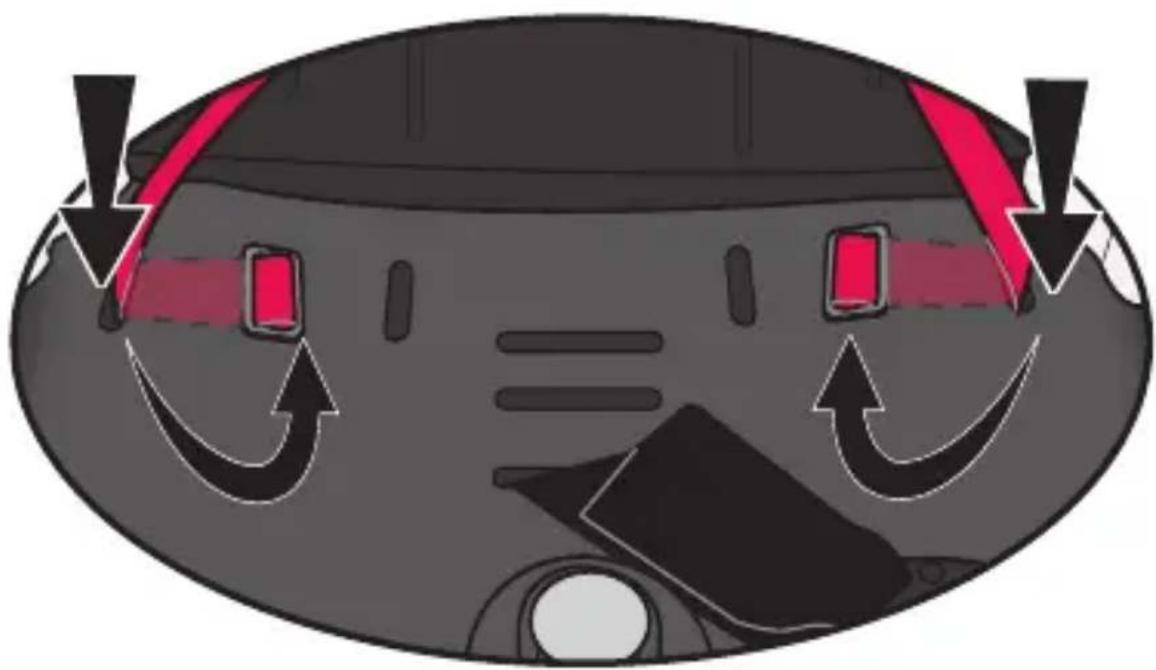
Diagram of a car seatbelt with red belt and directional arrows indicating movement (no text or symbols)Push the anchor down through the appropriate slot to the bottom of the seat. Then push anchor up through the appropriate slot to the top of the seat.
Note: See images (p. 80) to find the appropriate waist strap slots for your child's size.
Small size baby
natural_image
Illustration of a car's seatbelt with red belt and directional arrows indicating movement (no text or symbols)Changing the Waist Strap Position (cont.)
Medium size baby
natural_image
Diagram of a car's dashboard with red and black arrows indicating directional movement (no text or symbols)Large size baby
natural_image
Cartoon illustration of a car's head with red and black stripes, showing steering wheel and dashboard (no text or symbols)Changing the Waist Strap Position (cont.)
Small size baby
natural_image
Top-down illustration of a car seat with red buttons and a black visor, no text or symbols present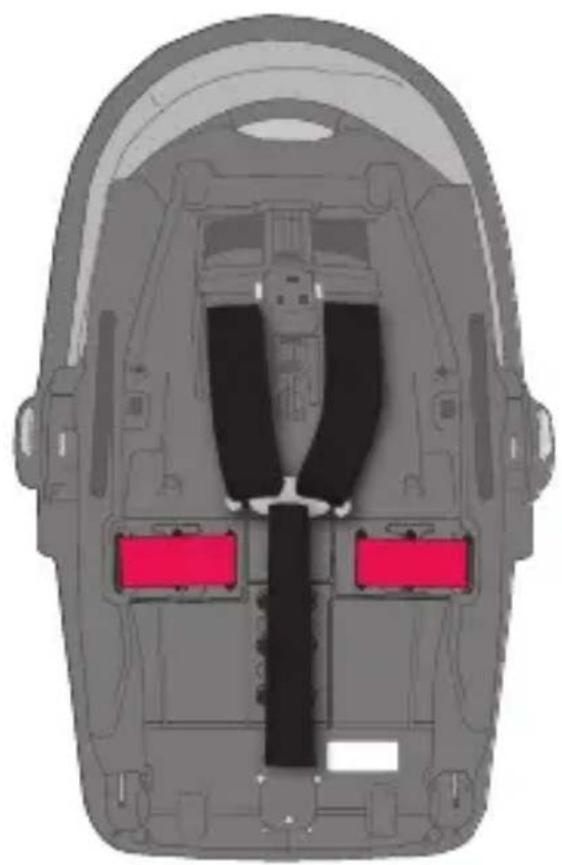
natural_image
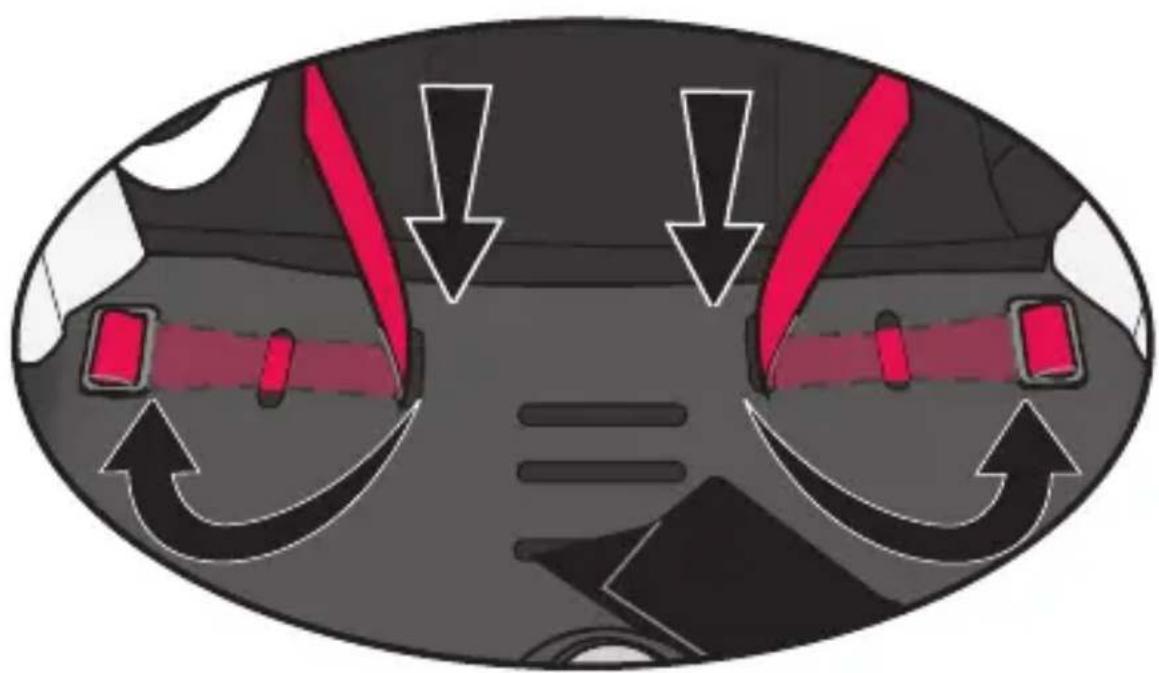
Top-down schematic of a vehicle's internal components, showing seats and belt (no text or labels)⑤ Rehook the front of the child restraint's seat pad.
Make sure the anchor is completely through and is laying flat against the bottom of the seat. Pull up on the crotch strap to make sure it is securely fastened.
Changing the Waist Strap Position (cont.)
Medium size baby
natural_image
Top-down technical illustration of a car interior showing steering wheel, dashboard, and rear view (no text or symbols)Large size baby
natural_image
Technical illustration of a car seat assembly showing front and side views with no visible text or symbolsWARNING
To prevent ejection or serious injury:
- For low birth-weight infant, you MUST always use the infant body support. The infant body support MUST BE USED for infants who weigh less than 2.7 kg (6 lbs).
- Discontinue using the infant body support when it presses the child's legs uncomfortably against the buckle.
- If you have moved the buckle strap to the slot closest to the child and there is still a gap between the buckle strap and the child, place a tightly rolled washcloth between thechild and the buckle strap to prevent child slouching or sliding down into the buckle strap.

natural_image
Top-down illustration of a car seatbelt with black straps and a red button (no text or symbols)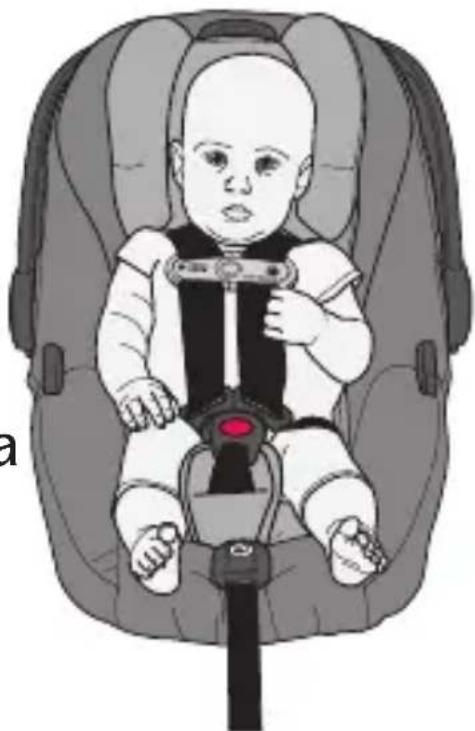
natural_image
Illustration of a baby wearing a car seatbelt, no text or symbols presentWARNING
Improper placement of the harness straps and buckle strap increases the risk of serious injury or death in a sudden stop or vehicle crash.
Rotate handle out of the way. Push the harness adjuster button then pull the harness straps toward you.
Open the chest clip by pressing the button in the center as shown. Separate the two pieces as shown and move the straps out of the way.
natural_image
Illustration of a car seatbelt buckle being adjusted for a seatbelt, with red arrows indicating the adjustment point (no text or symbols present)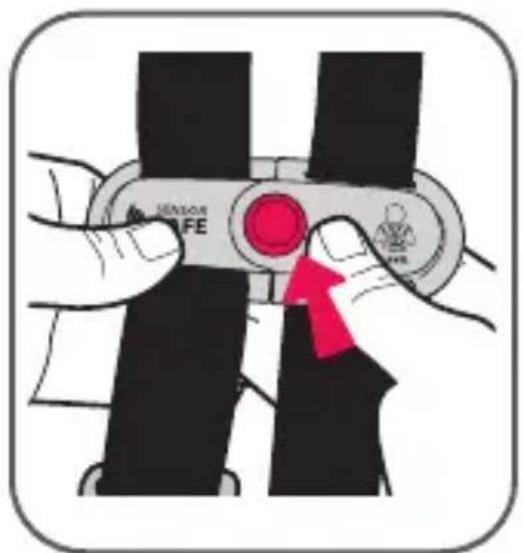
text_image
SENSOR FE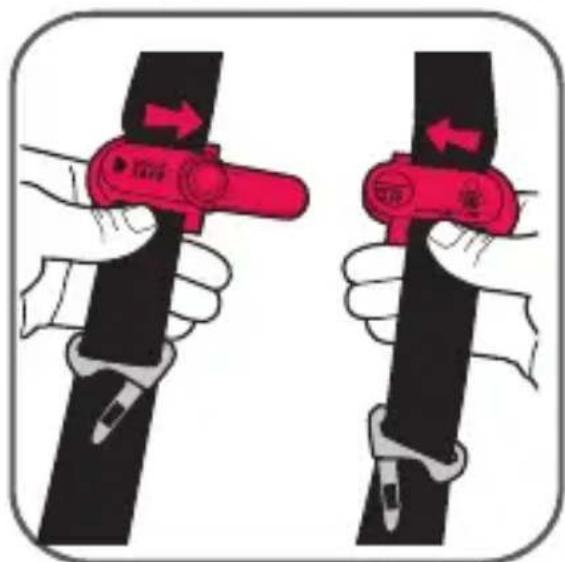
natural_image
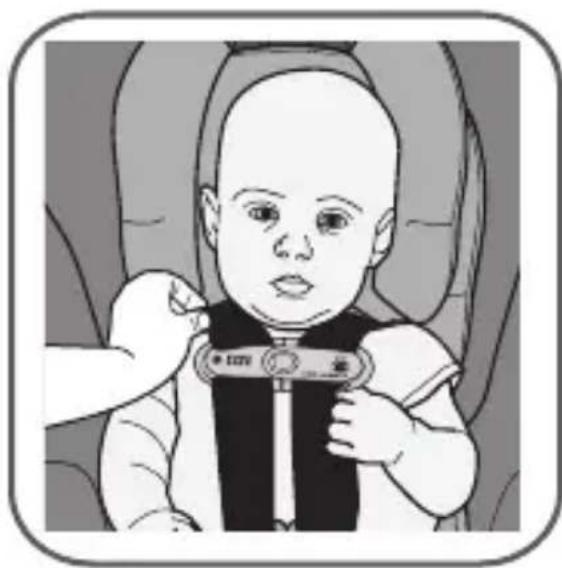
Illustration of two hands holding a red tool with directional arrows, no text or symbols presentSecuring Your Child in the Carrier (cont.)
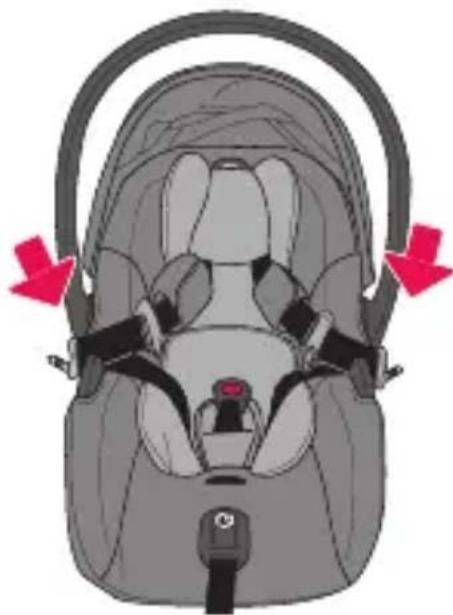
Hook the harness buckle tongues over the vehicle belt path guides to get them out of the way to allow easier placement of child in the seat.
Place your child in the carrier with their bottom pushed back and their back flat against the seat. Place the harness straps around your child.
Squeeze headrest adjustment button and lower headrest to the closest position AT or JUST BELOW the child's shoulders.
CHECK to make sure headrest is in a locked position by pushing down.
natural_image
Illustration of a car seatbelt with red arrows indicating pressure points (no text or symbols)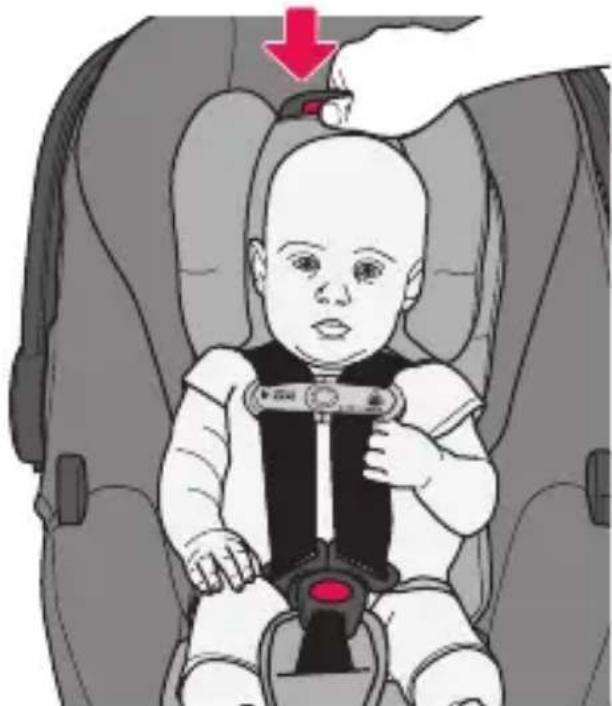
natural_image
Illustration of a baby in a car seatbelt being lifted by a hand, with a red arrow pointing to the seatbelt (no text or symbols present)Securing Your Child in the Carrier (cont.)
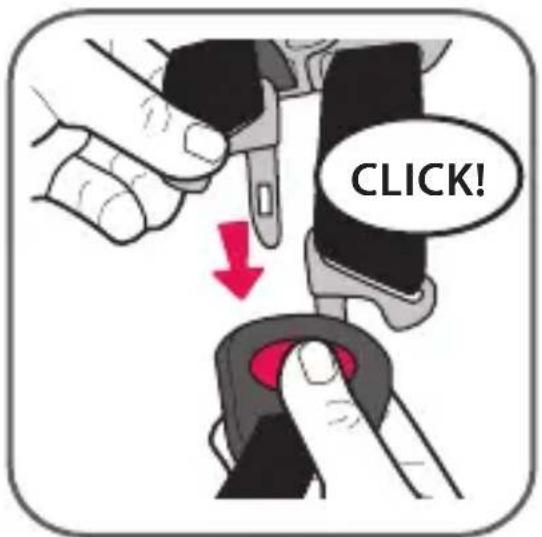
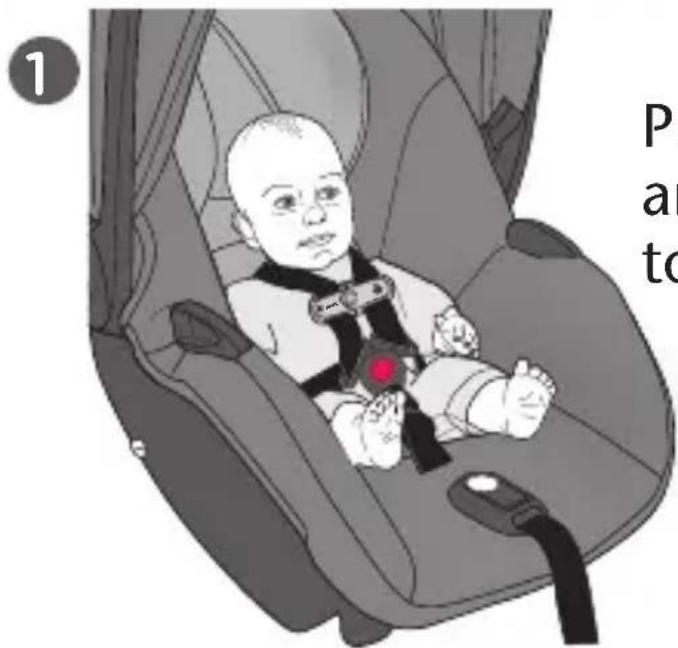
Insert the buckle tongues into the buckle as shown. MAKE sure you hear each buckle tongue click into place. Pull up on the harness strap to ensure the buckle tongues are engaged.
DO NOT use child restraint if buckle tongues DO NOT click into the buckle, please call Customer Service before using the child restraint.
Fasten chest clip together and center on child's chest level with their armpit.
Pull all slack out of the harness system, starting with the webbing around the child's legs and moving up toward their shoulders.
text_image
CLICK!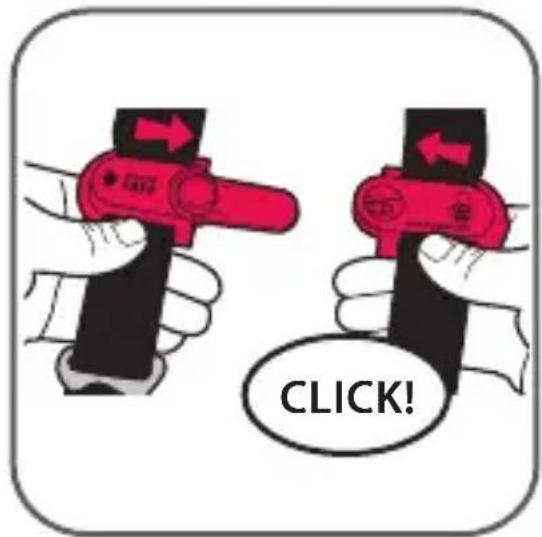
text_image
CLICK!Securing Your Child in the Carrier (cont.)
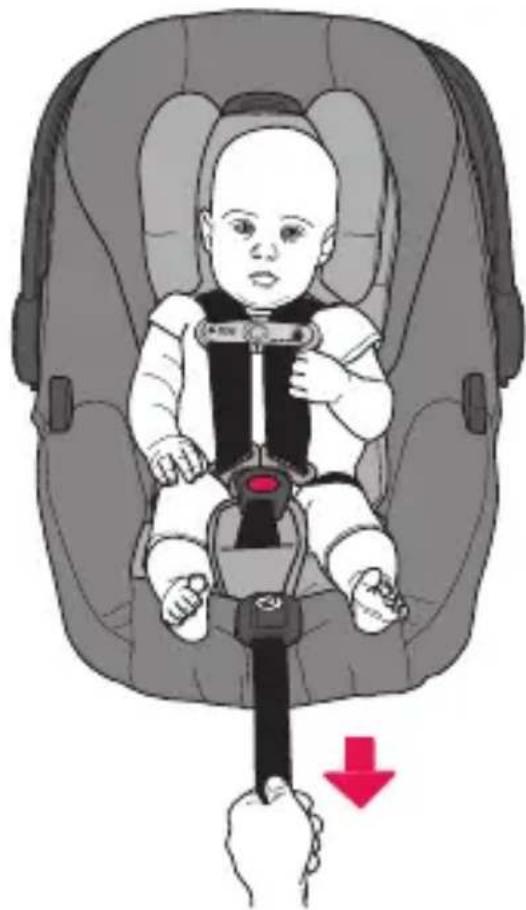
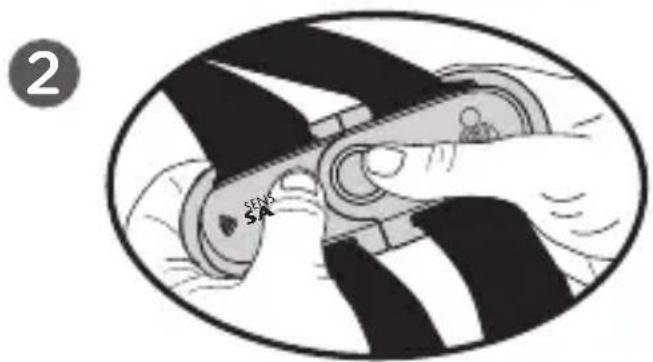
Slowly pull harness adjuster strap to make the shoulder straps snug around the child's shoulders.
BE CAREFUL. DO NOT allow the chest clip to slide up into their neck when tightening.
MAKE SURE to center the chest clip at armpit level.
CHECK to make sure harness is AT or JUST BELOW the child's shoulders.
natural_image
Illustration of a baby in a car seat being lifted by a hand, showing the seatbelt and red arrow (no text or symbols)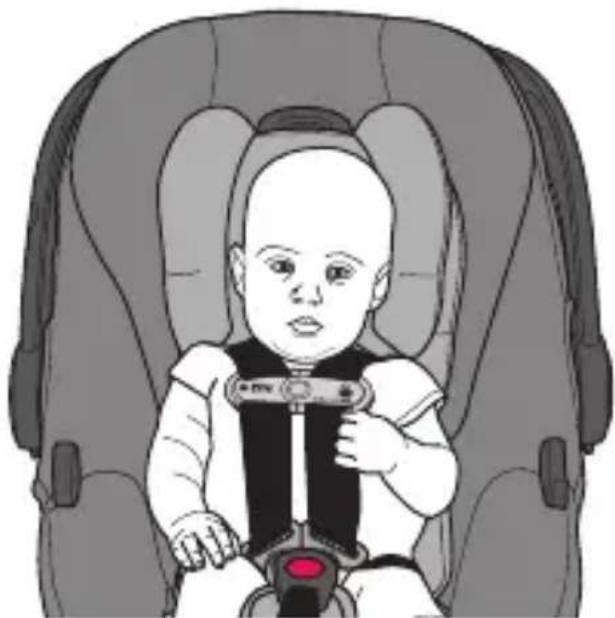
natural_image
Illustration of a baby wearing a car seatbelt, seated in a high chair (no text or symbols)Securing Your Child in the Carrier (cont.)
CHECK STEP:
MAKE SURE the straps are flat, not twisted and snug. If you can pinch a fold in the strap it is not snug.
A snug strap should not allow any slack. It lies in a relatively straight line without sagging. It does not press on the child's flesh or push the child's body into an unnatural position.
natural_image
Illustration of a baby wearing a seatbelt, seated in a car seat (no text or symbols visible)IMPORTANT: The crotch strap should ALWAYS be as close as possible to, but NEVER under, the child's bottom. Adjust the crotch strap if necessary (p. 76-79). The waist straps should ALWAYS be as close as possible to, but NEVER under, the child's legs. Adjust the waist straps if necessary (p. 80-85).
Removing the Child from the Carrier
text_image
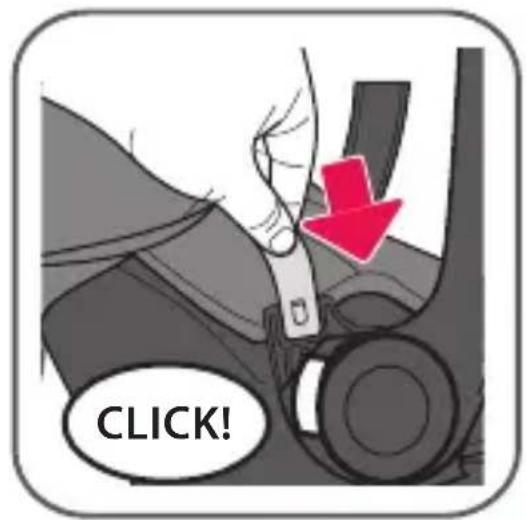
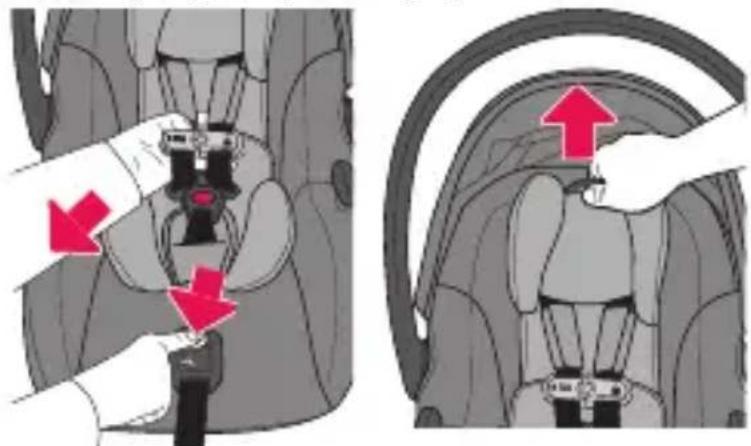
1 Pr ar toPress the red buckle release, and remove the buckle tongues.
text_image
2 SER 54Push the release button and pull the chest clip apart.
natural_image
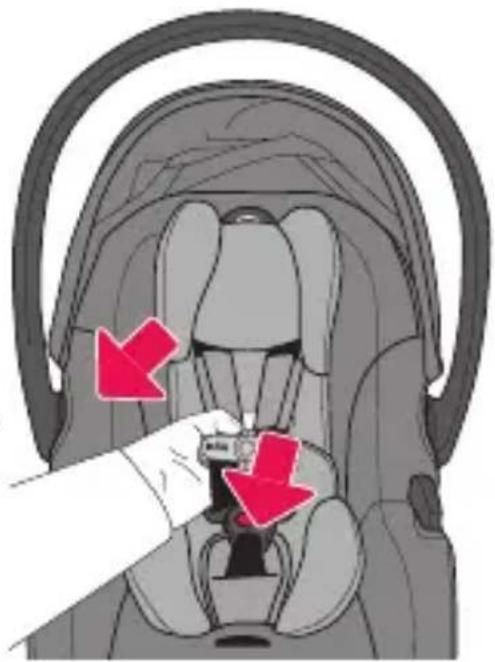
Illustration of a baby in a car seat with a red circular badge, no text or symbols presentTo loosen the harness straps, press the harness release button while pulling upward on the harness straps.
Using as an Infant Carrier
Secure the child in the carrier by following "Securing the Child in the Carrier" on page 87.
natural_image
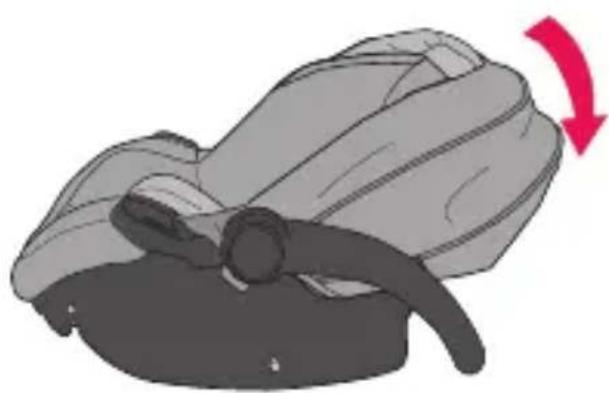
Illustration of a car seatbelt with a red arrow indicating rotation (no text or symbols)Position 4
To use as a stand: Squeeze both handle releases and rotate the handle to Position 4 (Stand) until it locks into place and the carrier rests on a level surface.
Position 1
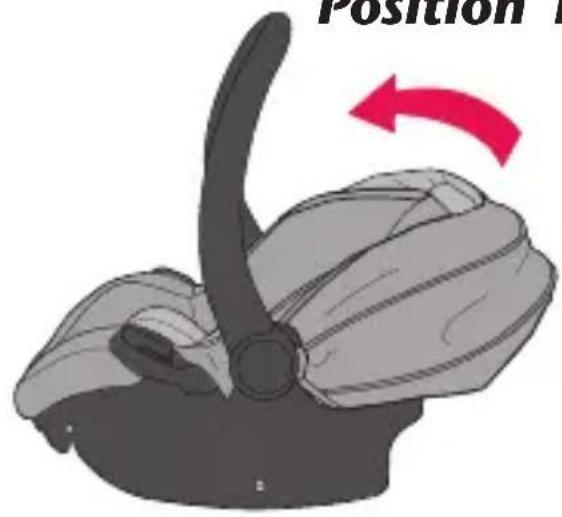
text_image
Position 1To use as a carrier: Squeeze both handle releases and rotate the handle to Position 1 (Carry) until it locks into place. Carry at your side, using the handle as shown.
WARNING!
The harness MUST be securely buckled at all times.
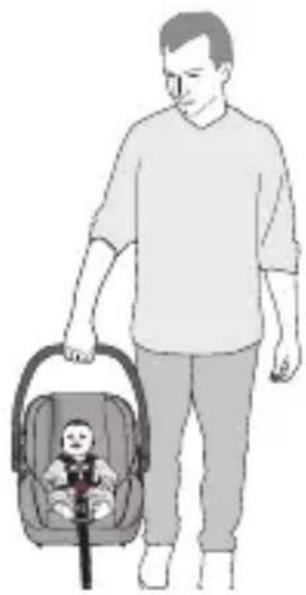
natural_image
Illustration of a person walking with a baby car seat (no text or symbols)WARNING!
DEATH or SERIOUS INJURY can occur.
- NEVER place this carrier near the edges of counter tops, tables, or other high surfaces. The child's movements can cause the carrier to slide and fall.
- NEVER leave the child in this carrier when the harness straps are loose or undone. Children have STRANGLED in loose or partially buckled harness straps. Fully restrain the child even when carrier is outside the vehicle.
- Fall Hazard: The carrier can fall from the shopping cart. Do not use on shopping cart.
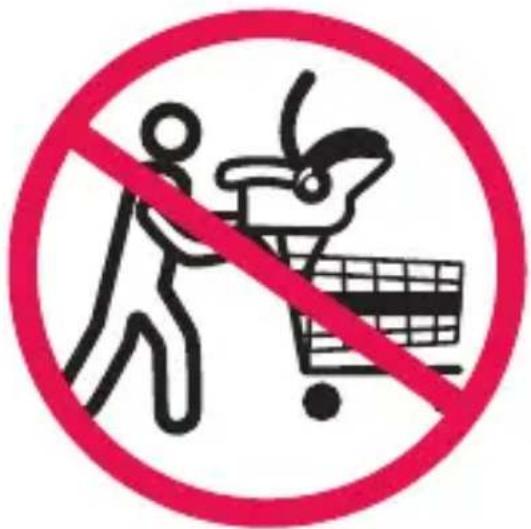
text_image
Prohibition sign with pictogram of a person pushing a shopping cart and a shopping cart, crossed out by a red diagonal line• DO NOT carry on your hip.
text_image
Illustration showing a person with a red prohibition symbol over a trash bin, indicating no litter or waste.
natural_image
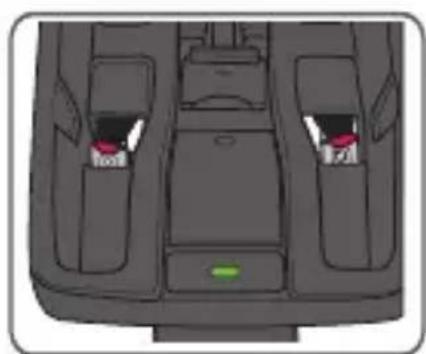
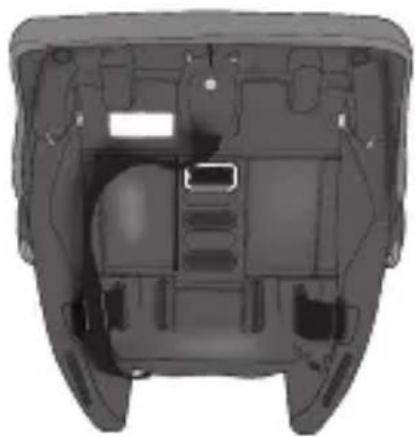
Simple icon of a baby reclining inside a circle (no text or symbols)Insert LATCH connectors into the LATCH storage pockets on the base as shown.
DO NOT store the LATCH on top of the base.
LATCH strap MUST pass UNDER the base.
text_image
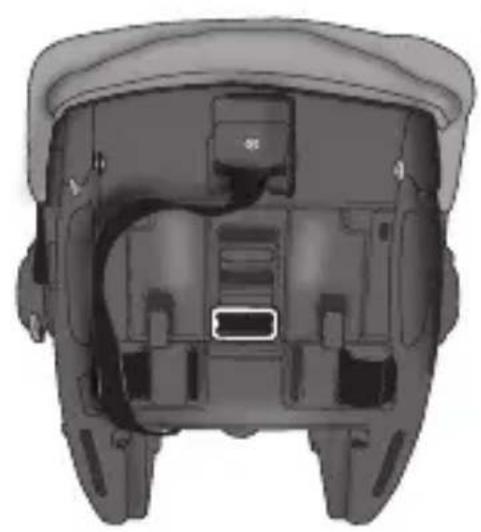
Diagram of car interior compartments with red arrows indicating directional changes, highlighting structural changes in vehicle parts.Storing Your Instructions
The preferred storage
After thoroughly reading and following these instructions, store instructions look for the logo on front of seat pad. Then store under the seat pad inside a pocket of the seat pad as shown.

text_image
nd ne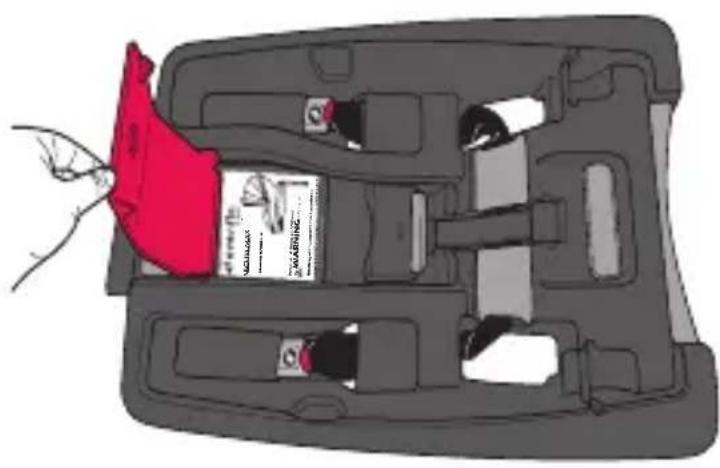
natural_image
Diagram of a car interior with a red fabric bag placed on the backrest, showing compartments and storage areas (no text or symbols)Open the door on the base and insert the manual into the instruction manual compartment or insert it into the pocket under the front edge of seat pad.
For future reference, record the model number of your child restraint AND the date of manufacture below.
Model Number: ____
Date of Manufacture: ____
NEVER INSTALL or use this Child Restraint until you have read and understand the instructions in this manual AND in your vehicle Owner's Manual. If there is a conflict between the two, the vehicle Owner's Manual must be followed.
This seat works with the SensorSafe™ Application* which can be downloaded from: The App Store® or Google Play™.**
The SensorSafe™ Application* can provide the following information directly to your smartphone:
- Reminder that your child is still in your automobile
- Current temperature of your automobile interior
- User Manuals
- Installation Videos
- Customer care contact information
SensorSafe™ Technology*
Questions? Comments?:
Visit us at: www.evenflogold.com or www.evenflogold.ca
Or call ParentLink at: 1-800-233-2229 in the (U.S) and (Canada).
* Not available on all models. Styles may vary.
** Trademarks are the property of their respective owners.
GENERAL INFORMATION ABOUT SENSORSAFE™
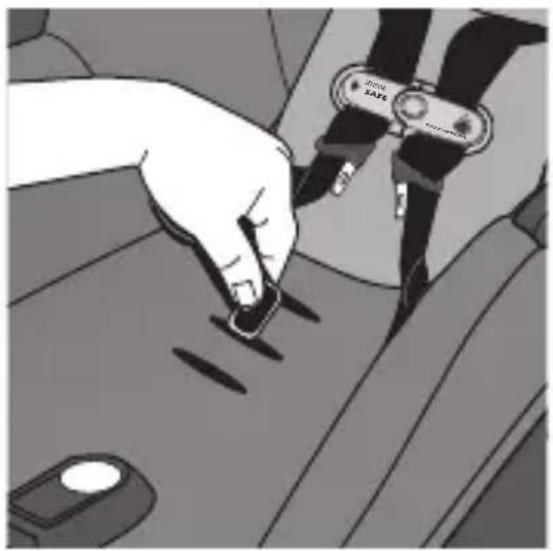
Secure your child into the child restraint as you would normally. The SensorSafe™ Receiver Plug monitors both the Chest Clip Transmitter and the vehicle. When you arrive at your destination and turn your vehicle off, the SensorSafe™ system sounds a series of gentle tones reminding you that your baby is in the vehicle. Download the SensorSafe™ application to manage your device, check manuals and set up your family alerts. Install it once and SensorSafe™ is always ready to alert you.

This product contains magnets. Before use, consult your family doctor about the compatibility of this product with pacemakers and similar devices.
IMPORTANT USAGE INFORMATION
- The SensorSafe™ system consists of two components: 1. The Chest Clip Transmitter and 2. The Receiver Plug. The system will not work unless both of these components are present in the vehicle with the Receiver installed in the vehicle's OBDII port (p. 103).
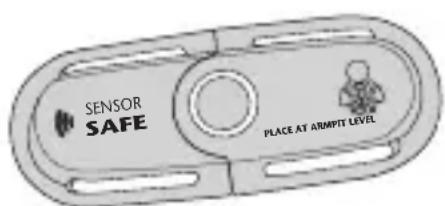
text_image
SENSOR SAFE PLACE AT ARMPTT LEVEL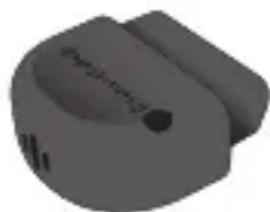
natural_image
3D rendered image of a gray mechanical knob or knob component (no text or symbols visible)CHEST CLIP TRANSMITTER RECEIVER PLUG
- This system works with the SensorSafe™ Application which can be downloaded from: The App Store® or Google Play™.** Trademarks are the property of their respective owners.
GENERAL INFORMATION ABOUT SENSORSAFE™
(CONT.)
- The SensorSafe™ Chest Clip is designed to go into a sleep mode after being clipped for 12 hours.
Although 12-hour vehicle trips without stops are uncommon and not recommended, the Chest Clip must be opened and closed after 12 hours to reactivate the SensorSafe ^TM system.
- The Receiver Plug works ONLY with 2008 or newer vehicles purchased in the U.S. or Canada. If you would like to use the SensorSafe™ Chest Clip with a Hybrid or Electric vehicle, you will need to download the application from The App Store® or Google Play™.** Additional Receiver Plugs can be purchased for additional vehicles. If you have questions, please contact Evenflo's ParentLink at: 1-800-233-2229 in the (U.S) and (Canada), to order a compatible Receiver Plug.
GENERAL INFORMATION ABOUT SENSORSAFE™ (CONT.)
BATTERY USAGE
- To preserve battery life, always store the SensorSafe™ Chest Clip in the unclipped position.
- The Chest Clip ships with 1-button cell lithium battery installed that can be replaced.
- The SensorSafe™ is designed to alert you of a low battery. If your Chest Clip battery is getting low, the SensorSafe Receiver will make a “low battery” alarm and LED will flash 10 times when the Chest Clip is closed. This “low battery” alarm will sound different from the beeps you typically hear when activating your SensorSafe™ system. The SensorSafe™ Chest clips uses a Panasonic button battery CR2032. If you should have issues with SensorSafe™ hardware, please contact Evenflo’s ParentLink at: 1-800-233-2229 in the (U.S) and (Canada), or online at:
www.evenflogold.com or www.evenflogold.ca
to order a replacement battery/parts.
SensorSafe™ Technology
Questions? Comments?:
Visit us at: www.evenflogold.com or www.evenflogold.ca
Or call ParentLink at: 1-800-233-2229 in the (U.S) and (Canada).
This device meets the requirements of SAE J3005.
FCC Certified:
Chest Clip Model: SOSR3, FCC ID: 2ABS2-SOSR3
Receiver Plug Model: SS2, FCC ID: 2ABS2-SS2
This device complies with Part 15 of the FCC Rules.
Operation is subject to the following two conditions:
(1) This device may not cause harmful interference.
(2) This device must accept any interference received, including interference that may cause undesired operation.
WARNING!
Changes or modifications not expressly approved by the party responsible for compliance could void the user's authority to operate the equipment.
NOTE: This equipment has been tested and found to comply with the limits for a Class B digital device, pursuant to Part 15 of the FCC Rules. These limits are designed to provide reasonable protection against harmful interference in a residential installation.
GENERAL INFORMATION ABOUT SENSORSAFE™ (CONT.)
This equipment generates, uses, and can radiate radio frequency energy and, if not installed and used in accordance with the instructions, may cause harmful interference to radio communications. However, there is no guarantee that interference will not occur in a particular installation. If this equipment does cause harmful interference to radio or television reception, which can be determined by turning the equipment off and on, the user is encouraged to try to correct the interference by one or more of the following measures:
- Reorient or relocate the receiving antenna.
- Increase the separation between the equipment and receiver.
- Connect the equipment into an outlet on a circuit different from that to which the receiver is connected.
- Consult the dealer or an experienced radio/TV technician for help.
Chest Clip:
RF warning statement:
The device has been evaluated to meet general RF exposure requirement. The device can be used in portable exposure condition without restriction.
Receiver Plug:
FCC Radiation Exposure Statement:
This equipment complies with FCC radiation exposure limits set forth for an uncontrolled environment. This equipment should be installed and operated with minimum distance 20cm between the radiator & your body.
1. INSTALL THE SENSORSAFE™ RECEIVER.
Locate the 16PIN OBDII port a in your vehicle. Refer to your vehicle owner's manual for location. Plug in the SensorSafe™ Receiver.
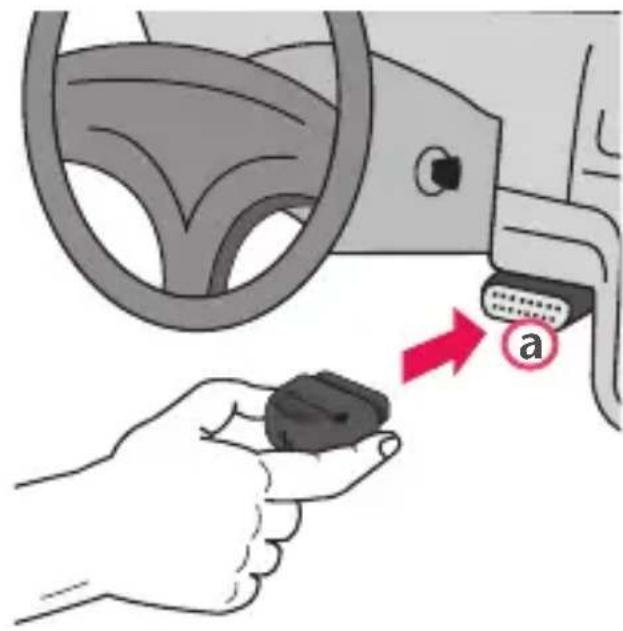
text_image
Diagram showing a hand holding a small object near a car steering wheel, with a red arrow labeled 'a' pointing to the component.If unable to locate your vehicle manual, the SensorSafe™ Application may contain information regarding the location of the 16PIN OBDII port for your vehicle Your SensorSafe™ Receiver will sound one prolonged tone when it first communicates with the vehicle network. In some vehicles this occurs immediately after installing the SensorSafe™ Receiver, in other vehicles the tone will not be heard until the vehicle has been started. This initialization signal only occurs one time after installation.
2. POWER UP THE VEHICLE.
USING SENSORSAFE™ (CONT.)
3. CYCLE THE SENSORSAFE™ CHEST CLIP.
Your SensorSafe™ Chest Clip is designed to “go to sleep” if clipped for more than 12 hours. To reset, or “wake up” the chest clip, unfasten then re-fasten it. When you do this, the blue LED will flash two times. TO PRESERVE BATTERY LIFE, ALWAYS STORE THE SENSORSAFE™ CHEST CLIP IN THE UNCLIPPED POSITION.
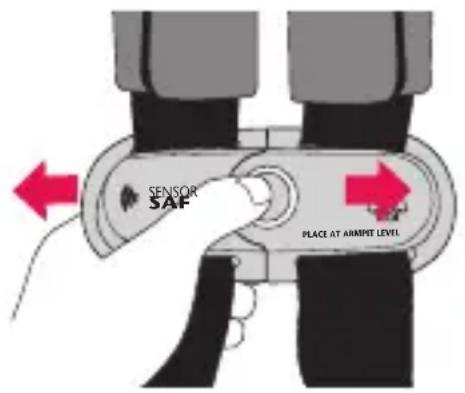
text_image
SENSOR SAF PLACE AT ARMPIT LEVEL4. DRIVE THE VEHICLE.
The SensorSafe ^TM Receiver is designed to respond after the vehicle has been driven at 5 miles per hour or more.
5. PARK THE VEHICLE AND TURN OFF THE IGNITION.
Within 2 seconds of parking your vehicle and turning off the ignition you will hear the SensorSafe™ reminder, alerting you that your baby is in the vehicle. If you don’t hear the reminder tone, test your SensorSafe™ by following steps 1-5 again. Contact Evenflo’s ParentLink at: 1-800-233-2229 in the (U.S) and (Canada), or online at: www.evenflogold.com or www.evenflogold.ca if the reminder tone again fails to sound.
Note: SensorSafe™ Receiver will also alarm if your child unclips the Chest Clip after the vehicle has been driven at 5 miles per hour or more, but only if the vehicle is on.
USING SENSORSAFE™ (CONT.)
REPLACING THE SENSORSAFE™ CHEST CLIP BATTERY.
- Loosen Harness by pressing Harness Release Button on the front of the Child Restraint and pulling forward on both Harness Straps.
- Unbuckle Harness by pressing the button on the Crotch Buckle and pulling out both Buckle Tongues.
- Open Chest Clip by pressing the Release Button and pulling the Chest Clip apart.
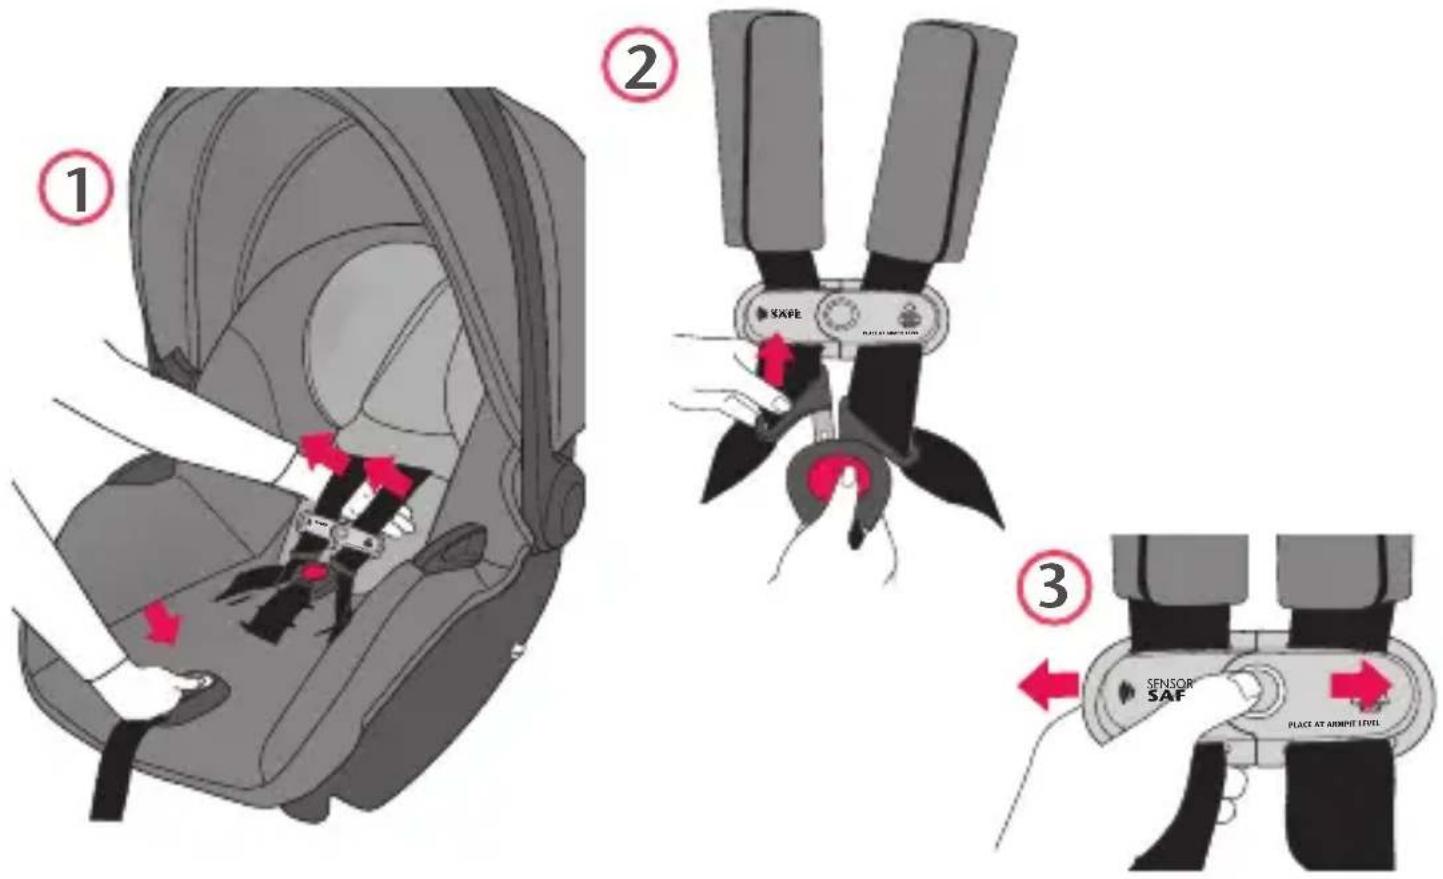
text_image
Diagram illustrating three steps of car seatbelting: setting, adjusting, and adjusting the sensor Saf.USING SENSORSAFE™ (CONT.)
- Turn the male side of the Chest Clip over and loosen screws with a small Phillips screwdriver. Remove the cover ⓐ.
- Remove Circuit Board (b) from Chest Clip. Remove Battery (c) from Circuit Board. Replace Battery with new Panasonic™ CR2032 Lithium button cell Battery, as shown.
- Place the Circuit Board with the new Battery in the Chest Clip. Replace the Cover and tighten the screws. This completes the battery replacement process.
If you have questions, please contact Evenflo's ParentLink at: 1-800-233-2229 in the (U.S) and (Canada), or online
at: www.evenflogold.com or www.evenflogold.ca
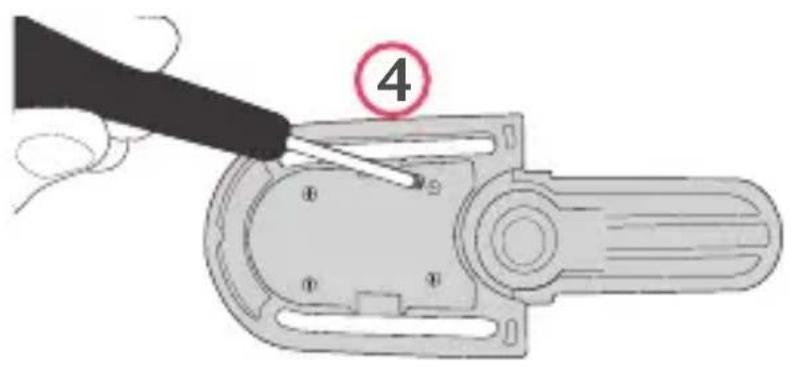
text_image
4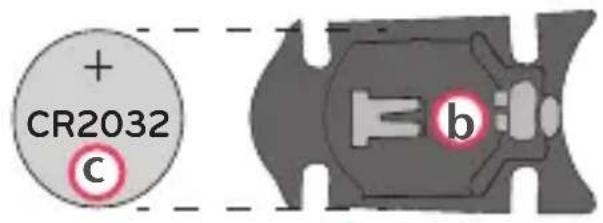
text_image
+ CR2032 c b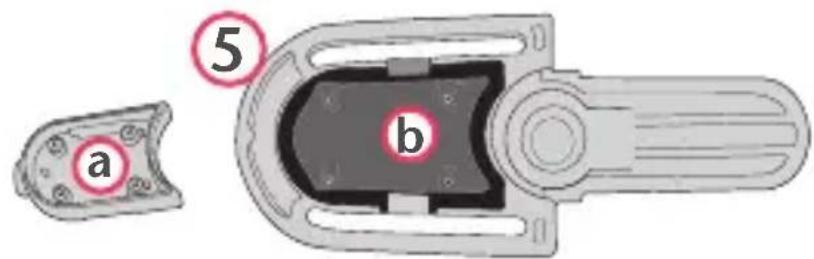
text_image
a 5 b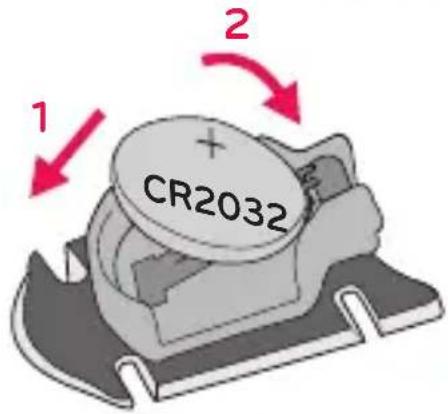
text_image
1 CR2032 2Registered trademarks referenced in this manual are the property of their respective owners.
The Federal Aviation Administration (FAA) recommends that you secure your child for air travel in an appropriate child restraint based on your child's weight and size. Turbulence can happen with little or no warning. When turbulence occurs, the safest place for your child is in a properly installed child restraint, not in an adult's lap or on the aircraft seat with its seat belt.
Keeping your child in a child restraint during the flight will help ensure your family arrives safely at your destination.
The FAA recommends that a child weighing:
- more than 18 kg (40 lbs) use an aircraft seat belt;
- less than 9 kg (20 lbs) use a rear-facing child restraint; and
- from 9 to 18 kg (20 to 40 lbs) use a forward-facing child restraint.
Please note that these FAA recommendations may vary from those applicable to the use of your child restraint in a motor vehicle.

Installing Carrier WITHOUT Base in Aircraft
IMPORTANT
You must use the internal harness when installing the child restraint in aircraft.
Before installing the child restraint, make sure the aircraft seat is in a fully upright position.
DO NOT use the convenience base when installing child restraint in aircraft.
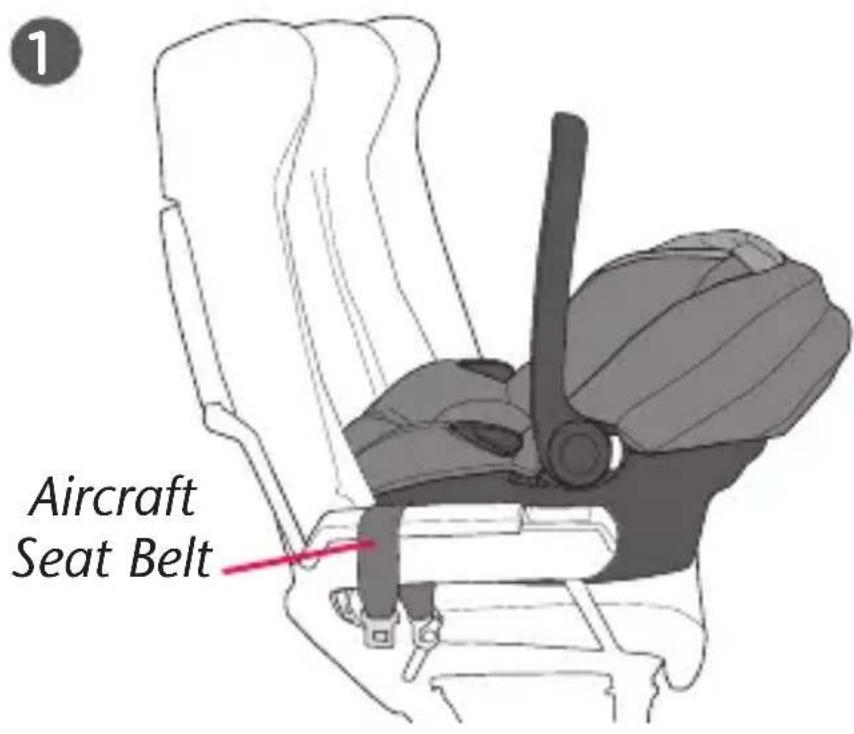
text_image
1 Aircraft Seat BeltPlace the child restraint on the aircraft seat rear-facing, as shown above.
Installing Carrier WITHOUT Base in Aircraft
(cont.)

2
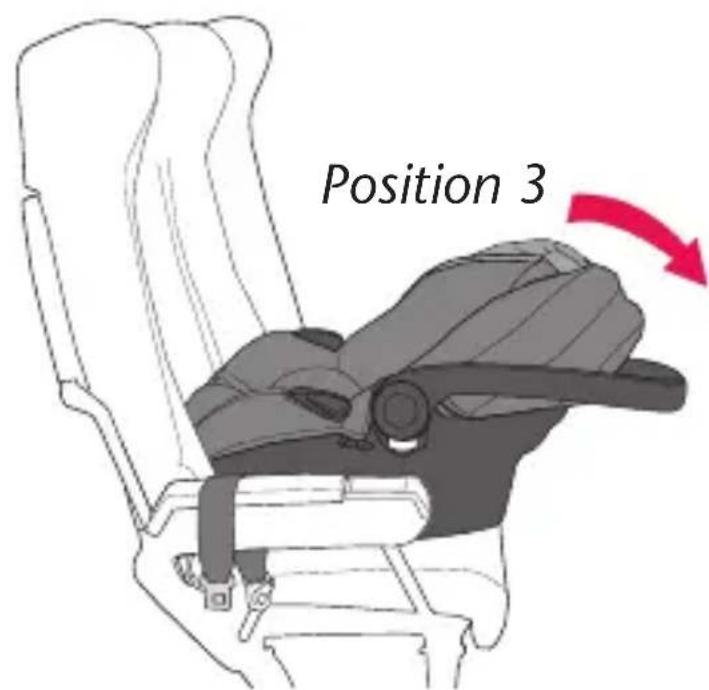
text_image
Position 3Squeeze both handle releases and move the handle to Position 3.
3
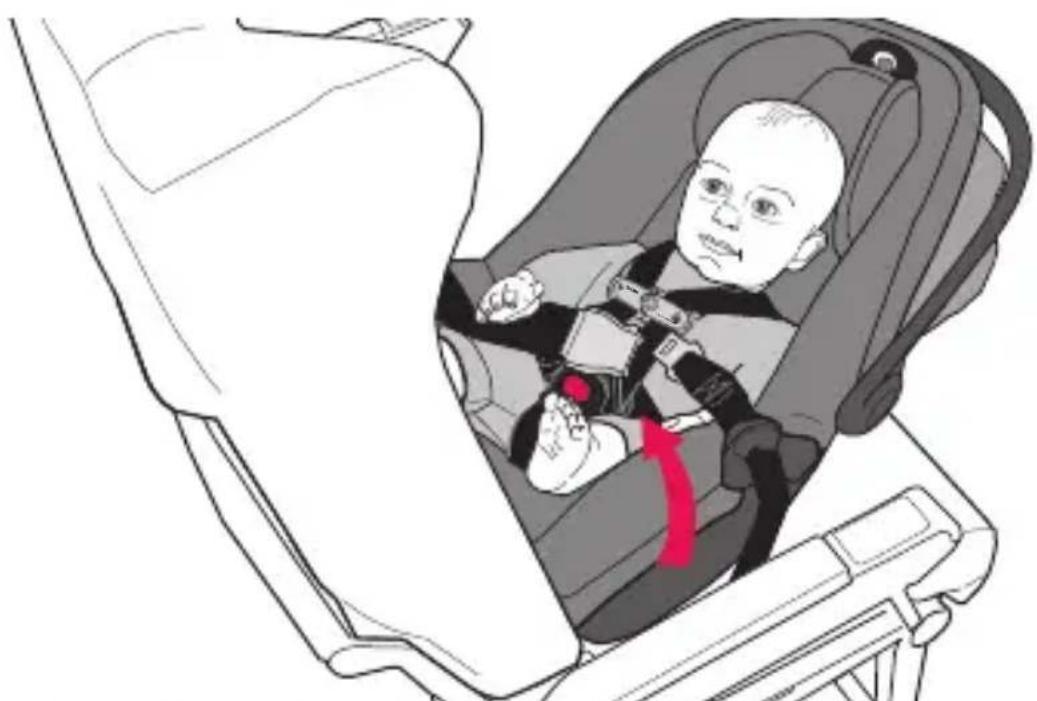
natural_image
Illustration of a baby car seatbelt inside a vehicle, with a red arrow indicating the seatbelt (no text or symbols present)Route the aircraft seat belt through the belt slots on the carrier, as shown above.

Installing Carrier WITHOUT Base in Aircraft (cont.)
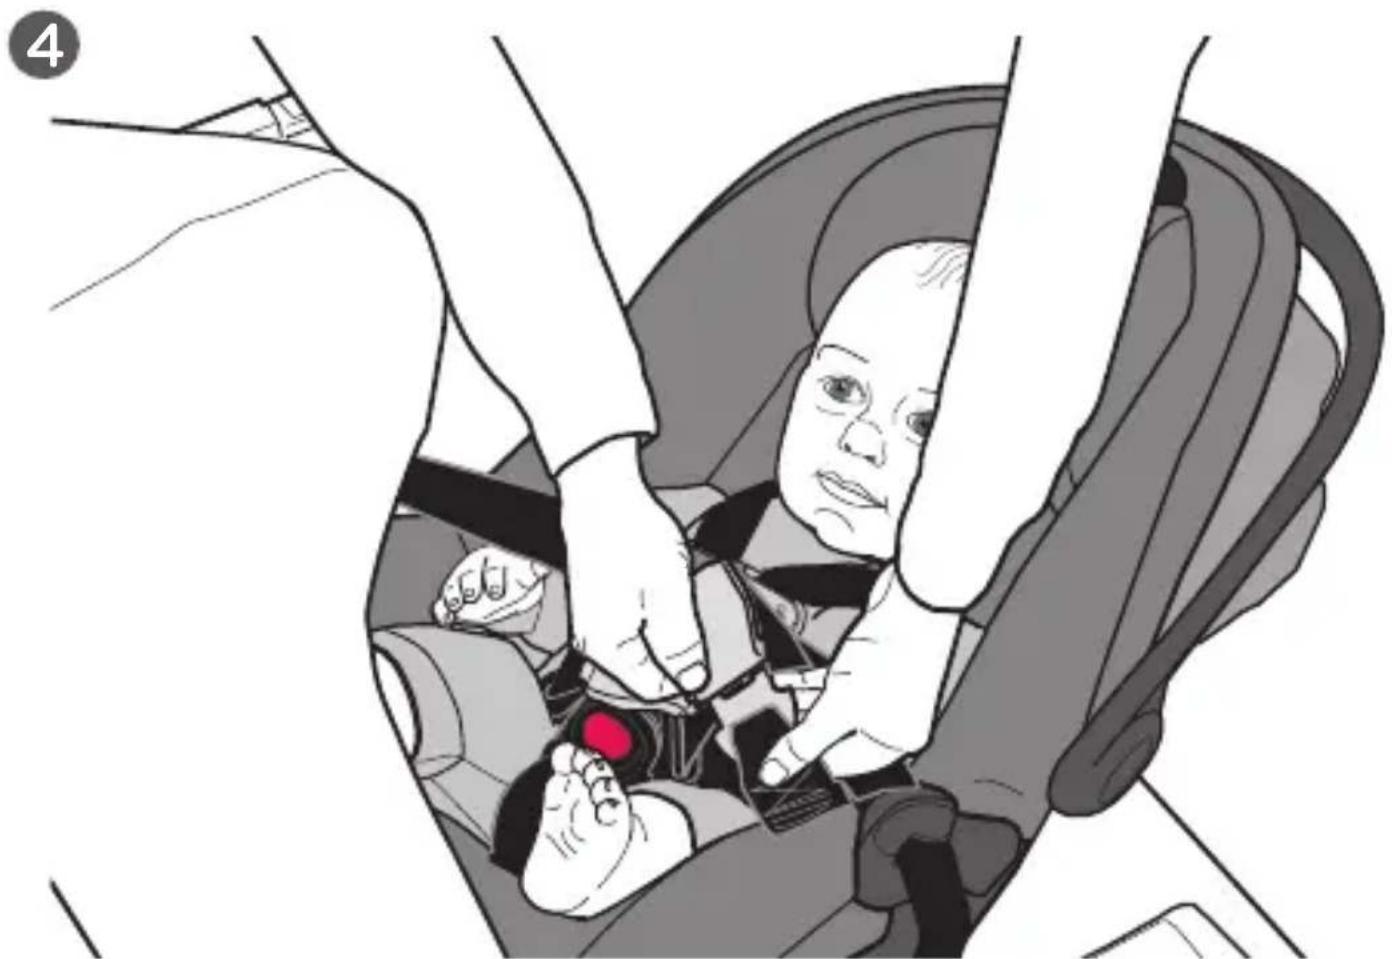
natural_image
Illustration of a baby in a car seatbelt inside a vehicle, with no visible text or symbolsFasten the aircraft seat belt.
Installing Carrier WITHOUT Base in Aircraft
(cont.)

5
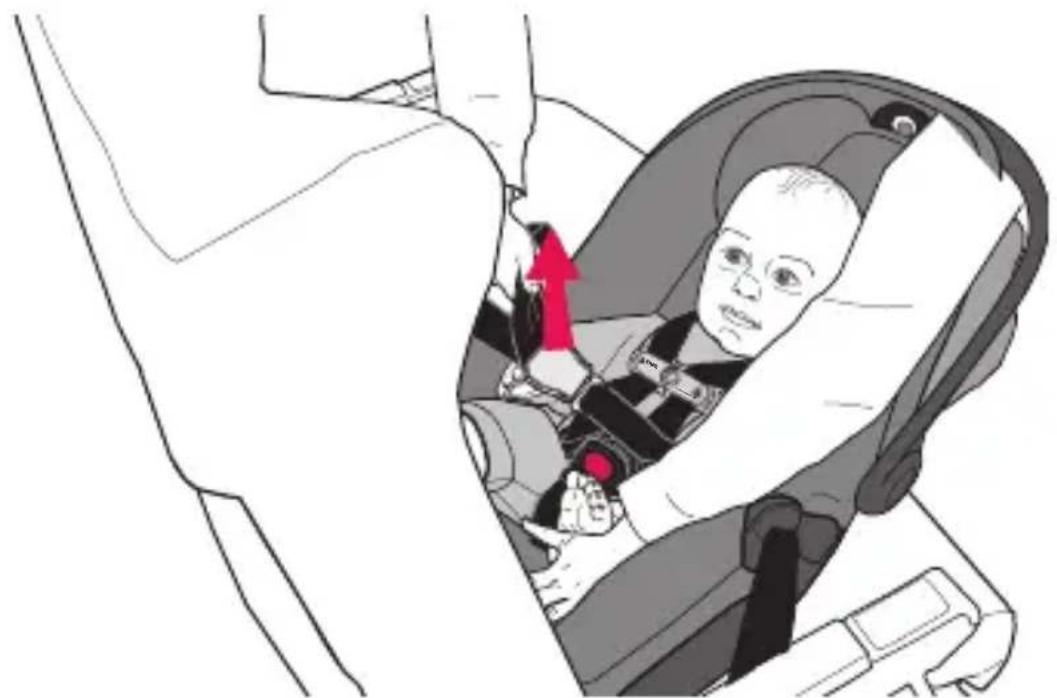
natural_image
Illustration of a person seated in a car seatbelt, with a red arrow pointing to the seatbelt area (no text or symbols present)The aircraft seat belt must be as tight as possible. Route the excess seat belt strap back through the belt slots, as shown above. Using your full weight, push the child restraint firmly onto the aircraft seat while pulling on the excess seat belt strap to tighten.
Check your work. Try to move the child restraint in all directions. If you can move the child restraint more than 2.5 cm (1 in.) side-to-side or front to back at the belt path, the aircraft seat belt is not tight enough, and you MUST install again until the seat belt is tight.

Installing Carrier WITHOUT Base in Aircraft (cont.)
6
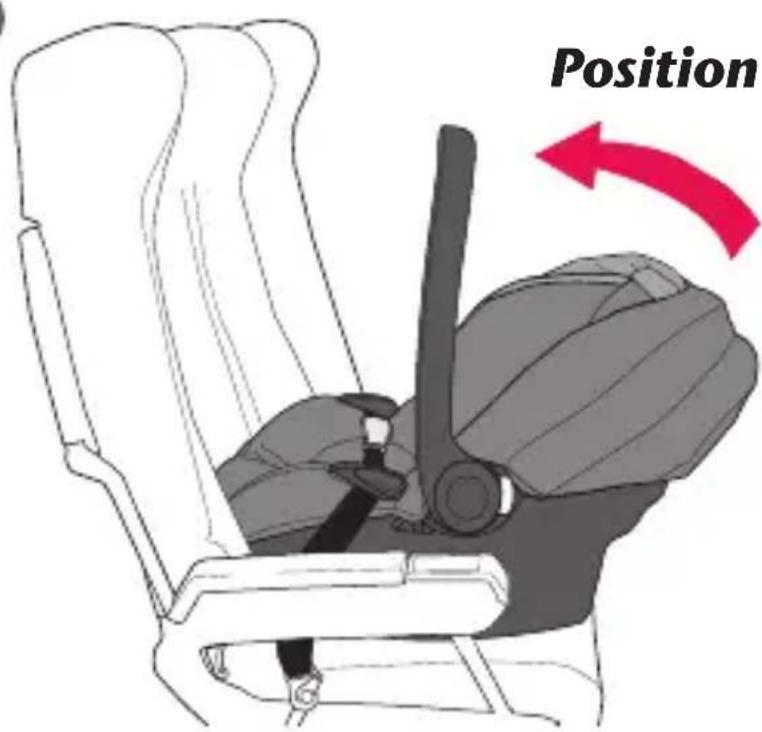
text_image
PositionPosition 1
Squeeze both handle releases and move the handle to Position 1.
7 Unfasten SensorSafe Chest Clip
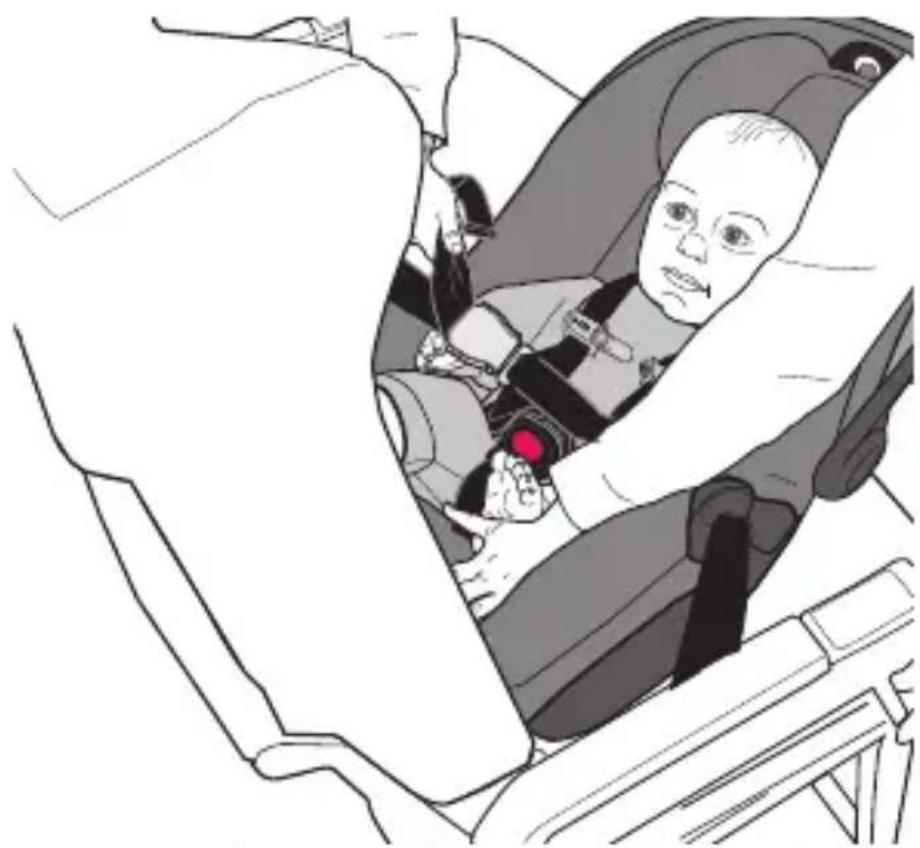
natural_image
Illustration of a person seated in a car, wearing a red accent (no text or symbols visible)As a final step, unfasten the chest clip (p. 87). In order to comply with the FAA regulation for Portable Electronic Devices (PED), the SensorSafe Chest Clip MUST be unfastened before take-off.
Note: After landing, fasten the SensorSafe Chest Clip before removing the SecureMax Infant Car Seat from the Aircraft seat.
Replacement Parts
Not available on all models. Styles may vary.
To order replacement parts you can order online at www.evenflogold.com or www.evenflogold.ca or contact Evenflo. When you contact us, please have the product model number and date of manufacture (found on the back of the child restraint).
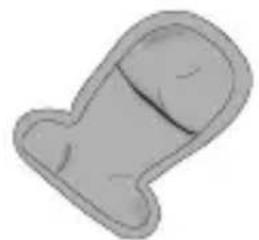
natural_image
Simple gray 3D-rendered object resembling a stylized letter or symbol, with no visible text or markings.Buckle Cover
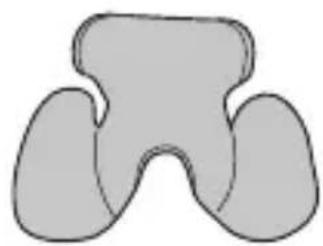
natural_image
Abstract gray shape resembling a stylized letter or symbol (no text or symbols present)Infant Pillow
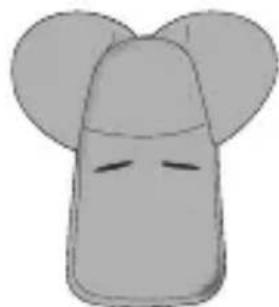
natural_image
Simple cartoon illustration of a mouse head with ears and a bow (no text or symbols)HeadRest Pillow
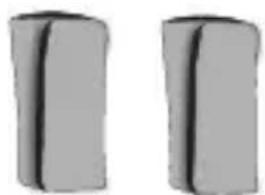
natural_image
Two gray 3D rectangular blocks with black lines, no text or symbols visibleHarness Cover
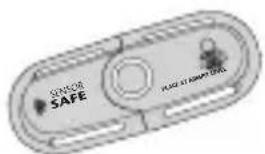
text_image
SENSOR SAFE PLACE IT SMART GEARLSensorSafe Chest Clip
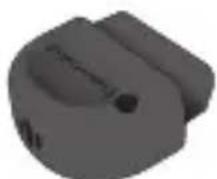
natural_image
3D rendered image of a gray mechanical knob or knob component (no text or symbols visible)SensorSafe Receiver
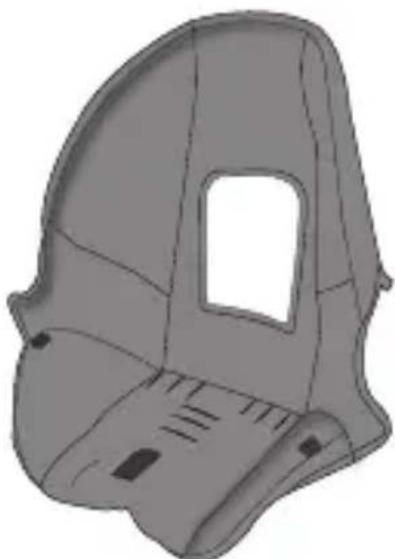
natural_image
3D rendered model of a helmet or mask component (no text or symbols visible)Seat pad
Replacement Parts (cont.)

natural_image
Simple line drawing of a symmetrical abstract shape resembling a stylized bird or tent (no text or symbols)EPS Foam
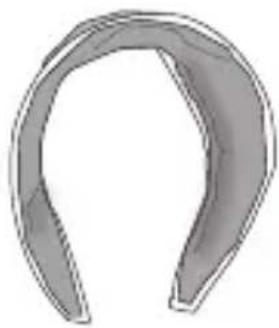
natural_image
Simple 3D-rendered gray ribbon or bow (no text or symbols)Canopy
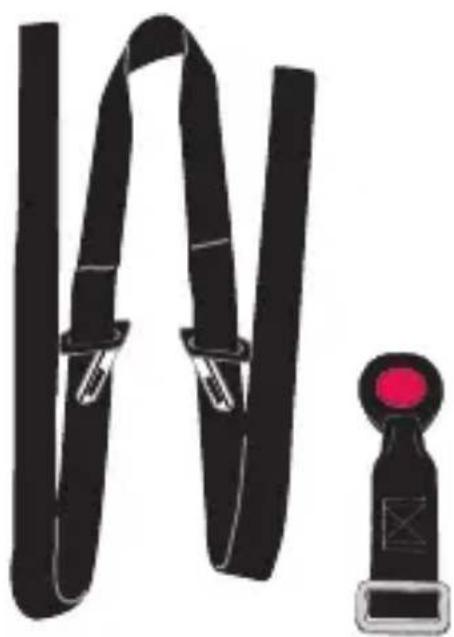
natural_image
Illustration of a black strapless cable with a red circular button attached to it, alongside a separate bracket (no text or symbols)Harness System
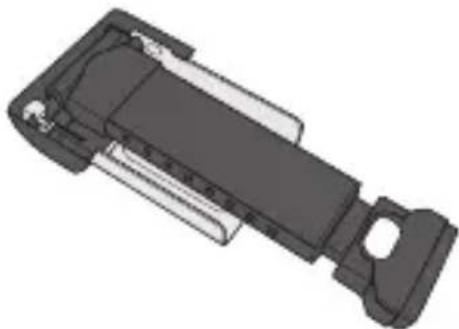
natural_image
3D mechanical component diagram showing internal structure with no visible text or symbolsSafeZone Load Leg
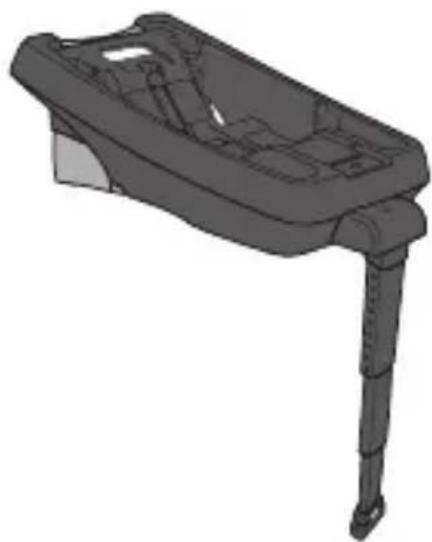
natural_image
3D rendered model of a car seat or vehicle chassis with no visible text or symbolsAccessory Base
Care and Cleaning
- DO NOT lubricate or immerse in water the LATCH connectors, the buckle, or any other part of this child restraint, unless rinsing is permitted, as stated on the back of the buckle for your restraint.
- Plastic and metal parts may be wiped clean with mild soap and water and dried with a soft cloth. Do not use abrasive cleaners or solvents.
• Take care not to damage any labels. - The harness can be wiped clean with mild soap and water. Allow harness to air dry.
- Machine wash the seat pad separately in cold water, delicate cycle. Tumble dry 10 to 15 minutes on low heat.
- NEVER use child restraint without the seat pad.
- To protect the child restraint from damage caused by weather, rodents, and other elements common to garages, the outdoors, and other storage locations, remove the seat pad and thoroughly clean the restraint and pad prior to storage. Take care to clean in the areas where crumbs and other debris tend to accumulate.
TIP!
) help protect the vehicle upholstery, place a well beneath and behind the child restraint.
WARNING!
Make sure both harness straps are installed completely on the splitter plate, as shown. After the cleaning. Failure to properly attach the harness straps to the splitter plate may result in a loose harness and serious injury or death to your child.
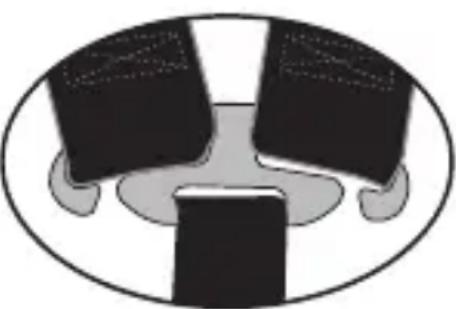
natural_image
Simple line drawing of a table with two chairs and a central table, enclosed in an oval frame (no text or symbols)Proper Disposal of this Child Restraint
When this child restraint reaches the expiration date found on the date of manufacture label, Evenflo encourages you to dispose of it properly. Most components of this child restraint are recyclable.
- Remove all fabric and padding.
- Remove all screws and disassemble the restraint.
- Recycle all fabric, padding, plastic, foam and metal parts, if accepted by your local recycling center. Responsibly discard the rest.
If your local recycling center won't accept the padding, you may dispose of it in the landfill.
To prevent injury due to hidden damage, lost instructions, outdated technology, etc., discontinue use of this restraint after the expiration date on the label or if it has been involved in a crash.
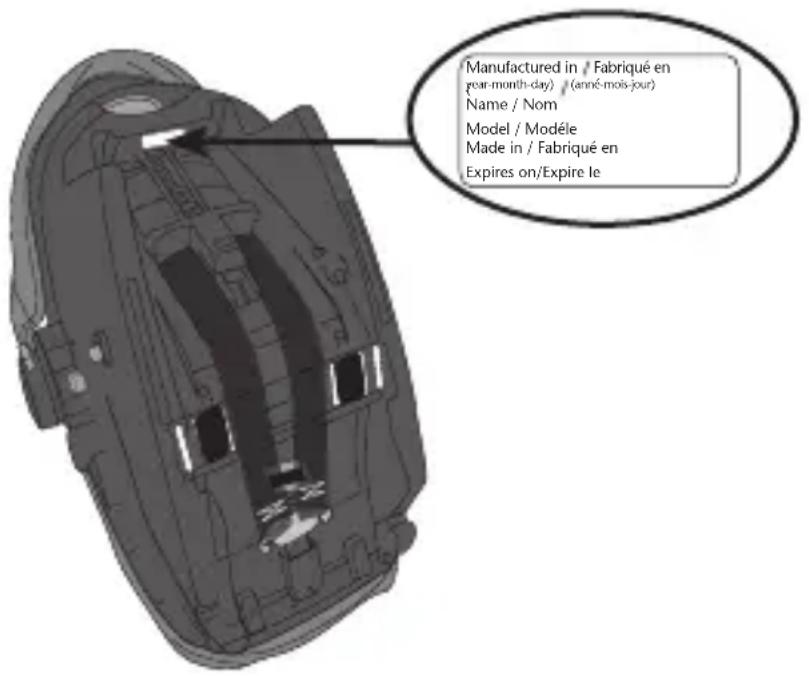
text_image
Manufactured in / Fabriqué en (year-month-day) / (anné-moié-jour) Name / Nom Model / Modèle Made in / Fabriqué en Expires on/Expire leWarranty
Evenflo Gold Lifetime Warranty
Registration in the Evenflo Gold Lifetime Warranty means that for the life of this Gold product, Evenflo warrants to the original purchaser who registers online ("Registrant") this Gold product against material irregularity. Evenflo's sole obligation under this warranty shall be, at Evenflo's option, to repair or replace any Gold product that is determined by Evenflo to be covered by this warranty. Repair or replacement as provided under this warranty is the exclusive remedy of the Registrant. Colors and fabrics change over time. Accordingly, we will replace your product or part with one of equal value. Proof of registration or proof of purchase in the form of a receipted invoice or bill of sale evidencing that the Gold product is eligible for this Gold Lifetime Warranty must be presented to obtain warranty service. This warranty is extended by Evenflo ONLY to the original Registrant and is not assignable or transferable to subsequent purchasers or end users of the Gold product. For warranty service, contact Evenflo's ParentLink Consumer Resource Center at (800) 233-2229 or
www.evenflogold.com or www.evenflogold.ca.
By simply registering your Evenflo Gold Stroller or Gold Car Seat online within 3 months of purchase, you, the Registrant, will have access to the following Gold Lifetime Warranty benefits:
- Lifetime Warranty (*Car Seats) - Through the expiration date of your Gold Car Seat, Evenflo warrants this Gold product to the Registrant against material irregularites.
- Lifetime Warranty (*Strollers) - Through the date when your child reaches the maximum weight of your Gold Stroller, Evenflo warrants the Gold Stroller frame to the Registrant against frame damage, including but are not limited to, the breaking of welds and frame tube damage. Soft goods and all other components of your Gold Stroller shall be warranted for one year from the date of purchase.
- Replacement Parts - Evenflo will send out free replacement parts based on Gold Lifetime Warranty and subject to the exclusions listed below.
- Premier Consumer Resource Center located in the USA-for product support, installation and assembly advice.
• Live Chat Support - Motor Vehicle Accident Replacement - Evenflo will replace your Gold Car Seat in the event of a motor vehicle accident.
Warranty (cont.)
\*STROLLER WARRANTY INFORMATION:
Your Evenflo Gold Stroller frame is warranted to be free from any frame damage for the life of the stroller, which is through the date when your child reaches the maximum weight limit of the Gold Stroller, under normal use and according to the instruction manual. Frame damage includes but is not limited to, the breaking of welds and frame tube damage. Soft goods and all other components shall be warranted for one year from the date of purchase.
This warranty is not transferable and extends only to the original purchaser who registered in the Evenflo Gold Lifetime Warranty.
If your Gold Stroller frame is damaged due to the following, the Gold Lifetime Warranty does not apply:
- Misuse or poor maintenance. Please refer to this instruction manual for guidance;
• Corrosion, mold or rust caused by lack of maintenance or service; - Sun intensity, sweat, detergents, damp storage or frequent washings;
- Incorrect assembly, or installation of third-party parts or accessories not compatible with the Gold Stroller;
- Accident, abuse, neglect, or use on stairs or escalators;
- Commercial use;
- Improper storage:
- Second-hand use; or
• Airline or freight damage.
\*GOLD CAR SEAT WARRANTY INFORMATION:
Your Evenflo Gold Car Seat is warranted to be free from any manufacturing irregularities for the life of the car seat under normal use conditions and according to the instruction manual. The expiration date for your Gold Car Seat is on the date of manufacture label.
This warranty is not transferable and extends only to the original purchaser who registered in the Evenflo Gold Lifetime Warranty.
If your Gold Car Seat is damaged due to the following, the Gold Lifetime Warranty does not apply:
- Misuse or poor maintenance. Please refer to this instruction manual for guidance;
- Sun intensity, sweat, detergents, damp storage or frequent washings;
• Airline or freight damage; - Improper storage; or
- Second-hand use.
Evenflo reserves the right to make modifications to the terms and conditions of this Lifetime Warranty. Please review the current Lifetime Warranty applicable to your Gold product by accessing the online instruction manuals at www.evenflogold.com and www.evenflogold.ca.

natural_image
Blank gray image with no visible content, text, or symbols
natural_image
Blank gray image with no visible content, text, or symbols
natural_image
Blank gray image with no visible content, text, or symbols
natural_image
Blank gray image with no visible content, text, or symbolsParentLink®
answers. advice. affirmation.
www.evenflogold.com or www.evenflogold.ca
USA:, Canada: 1-800-233-2229, 8 AM – 5 PM E.T.