
Triumph - Car seat Evenflo - Free user manual and instructions
Find the device manual for free Triumph Evenflo in PDF.


| Product Type | Child Restraint System (Car Seat) |
| Brand | Evenflo |
| Model | Triumph |
| Rear-Facing Weight Range | 5 - 40 lbs (2.3 - 18 kg) |
| Forward-Facing Weight Range | 22 - 65 lbs (10 - 29.4 kg) |
| Rear-Facing Height Range | 19 - 37 in (48 - 94 cm) with head at least 1 in (25 mm) below top of seat back |
| Forward-Facing Height Range | 28 - 50 in (71 - 127 cm) with ear tops at or below top of seat back |
| Minimum Age for Forward-Facing | 2 years old |
| Orientation | Rear-facing and Forward-facing |
| Installation Methods | Vehicle seat belt (lap/shoulder) with locking clip if needed; Lower Anchor Connector Assembly (LATCH) |
| Recline Positions | 3 positions: Position #1 (rear-facing only), Position #2 and #3 (forward-facing) |
| Harness System | 5-point harness with adjustable headrest, chest clip, and crotch strap |
| Harness Tightening | TensionRight™ knobs and tension release button |
| Recline Adjustment | ReclineRight™ lever |
| Cup Holder | Soft cups only; do not use with cans or hot liquids |
| Tether Strap | Forward-facing only; must be attached and tight |
| LATCH System | Lower Anchors and Tethers for Children; weight limit 50 lbs (22.7 kg) for LATCH installation |
| Aircraft Usage | Approved for both rear-facing and forward-facing installations |
| Seat Pad Care | Machine wash cold, delicate cycle; tumble dry low 10-15 min |
| Harness Care | Wipe clean with mild soap and water; air dry |
| Plastic/Metal Parts Care | Wipe with mild soap and water; no abrasive cleaners |
| Compliance Standards | FMVSS 213 (U.S.), CMVSS 213 & 213.1 (Canada) |
| Warranty | 90-day limited warranty from original purchase |
| Replacement Parts | Available at www.evenflo.com or contact ParentLink |
| Customer Support | ParentLink: USA 1-800-233-5921, Canada 1-937-773-3971, Mexico 01-800-706-12-00 |
Frequently Asked Questions - Triumph Evenflo
User questions about Triumph Evenflo
0 question about this device. Answer the ones you know or ask your own.
Ask a new question about this device
Download the instructions for your Car seat in PDF format for free! Find your manual Triumph - Evenflo and take your electronic device back in hand. On this page are published all the documents necessary for the use of your device. Triumph by Evenflo.
USER MANUAL Triumph Evenflo
Child Restraint System
Owner's Manual
Keep for future use
Rear-facing\*
2.3 to 18 kg
(5 to 40 lbs)
48 to 94 cm
(19 to 37 in.)
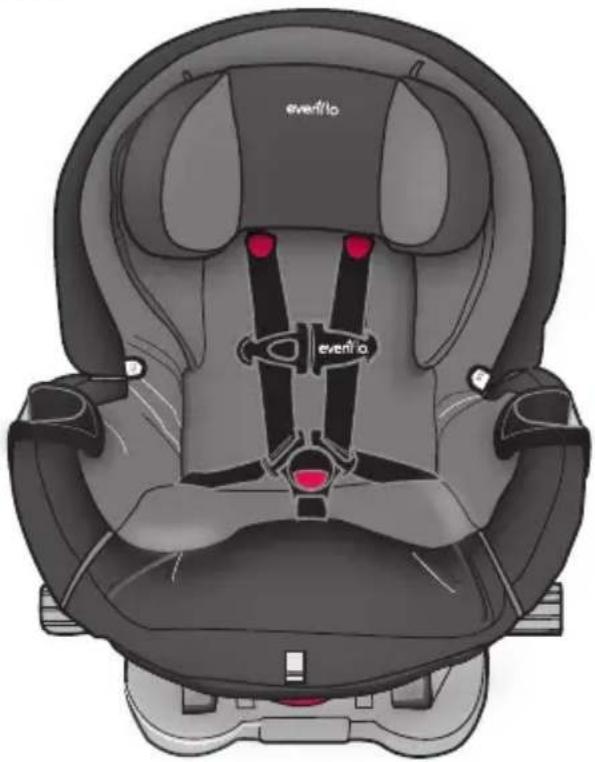
natural_image
Top-down illustration of a car comfort seat with red straps and 'eventio' branding (no text or symbols on the seats)Forward-facing\*
10 to 29.4 kg
(22 to 65 lbs)
71 to 127 cm
(28 to 50 in.)
At least 2 years old
* See page 4 for complete requirements.
To reduce the risk of serious injury
or death, read this owner's manual prior
to installing and using this child restraint.
More children are killed every year as passengers in car crashes than by any other type of injury.
To reduce the risk of SERIOUS INJURY or DEATH, read this owner's manual and your vehicle owner's manual before installing and using this child restraint. Using a child restraint makes a big difference. By properly using this child restraint and following these instructions (and the instructions that accompany your vehicle), you will greatly reduce the risk of serious injury or death to your child from a crash. Do not be misled by the commonly used term "safety seat"; no restraint system can prevent all injuries in all crashes. Many properly restrained adults and children are injured in motor vehicle crashes, including relatively minor crashes. A properly used child restraint is the best way to minimize injuries to your child and to increase the chances for your child's survival in most crashes.
U.S. REGULATORY NOTICE
This child restraint meets all applicable requirements of Federal Motor Vehicle Safety Standard 213.
CANADIAN REGULATORY NOTICE
(Model numbers ending in "C.")
This child restraint meets all applicable requirements of Canadian Motor Vehicle Safety Standards CMVSS 213 and 213.1.
Symbol Legend

Airbag Symbol – Alerts you to important information about airbag safety.

LATCH Symbol – Alerts you to important information about LATCH safety.

Tether Anchor Symbol – Alerts you to important information about Tether Anchor safety.

Aircraft Symbol – Alerts you to important information about aircraft safety.
INTERACTIVE PDF
Table of Contents(TOC)
Important Information
Child Requirements 4
Premature Infant Use 5
Warnings 6
LATCH Warnings....10
Safe Practices....12
Recall Information for U.S. Customers....12
Public Notice for Canadian Customers....13,
Motor Vehicle/Aircraft Usage 13
Storing Your Instructions....13
Visual Glossary 14
Child Restraint Features 16
Using the Child Restraint
Rear-facing
Rear-facing Installation Checklist....19
Rear-facing Installation with Seat Belt 20
Rear-facing Installation with Lower Anchor Connectors
24
Using the Child Restraint Forward-facing
Forward-facing Installation Checklist....29
Forward-facing Installation with Seat Belt 30
Forward-facing Installation with Lower Anchor Connectors....36
General Information
Securing Your Child in the Child Restraint....41,
Adjusting the Crotch Strap 43
Removing Child from the Restraint 44
Removing the Lower Anchor Connectors....45
Removing the Tether Strap 46
Removing the Seat Pad....47
Installing the Seat Pad 48
Installing the Accessories....50
Removing the Adjustable Headrest 50
Securing Your Child Restraint in Aircraft....52
Installing Child Restraint Rear-facing in Aircraft ....52
Installing Child Restraint Forward-facing in Aircraft ....55
Care and Cleaning....57
Replacement Parts 58
Limited Warranty 59
CHILD REQUIREMENTS
Warning: Failure to follow these Child Requirements could result in serious injury or death.
This child restraint is designed for use by children in both rear-facing and forward-facing orientations. To use this child restraint properly, children MUST meet the size and age requirements below. In addition, Evenflo recommends consulting with your child's physician before allowing your child to transition from rear-facing to forward-facing use of this child restraint.
The American Academy of Pediatrics (AAP) recommends keeping children rear-facing until 2 years old or until they reach the maximum height or weight for their child restraint in rear-facing orientation. Additionally, some states' laws require children to be rear-facing until age 2. Accordingly, you will see this guidance reflected in the Child Requirements below. Please review any applicable local, state or provincial laws related to child passenger safety before installing and using this child restraint.
Rear-facing
• 2.3 to 18 kg (5 to 40 lbs)
- 48 to 94~cm (19 to 37 in.) and top of child's head is at least 25~mm (1 in.) below the top of the child restraint seat back
IMPORTANT: Once your child exceeds any of the size requirements above, they MUST use this child restraint in the forward-facing orientation, if possible. If your child exceeds any of the size requirements above and is less than 2 years old, however, you MUST discontinue use of this child restraint.
Forward-facing
• 10 to 29.4 kg (22 to 65 lbs)
- 71 to 127 cm (28 to 50 in.) and tops of the child's ears are at or below the top of the child restraint seat back
- At least 2 years old
IMPORTANT: Once your child exceeds any of the size requirements for forward-facing use above, you MUST discontinue use of this child restraint. Consider use of a booster seat at that time.
PREMATURE INFANT USE
Before using this child restraint for preterm or low birth weight infants, ensure the Child Requirements are met and follow the guidelines in this section.
According to the U.S. National Highway Traffic Safety Administration, a properly installed child restraint reduces the risk of death by over 70 percent for infants involved in crashes. Federal Motor Vehicle Safety Standard (FMVSS) 213 establishes design and dynamic performance requirements for child restraint systems. However, the standard has no minimum weight limit and does not address the special medical needs of preterm or low-birth weight infants. To ensure that preterm and low-birth weight infants are transported safely, the guidelines published by the American
Academy of Pediatrics (AAP) in Pediatrics 2009; 123:1424–1429 must be followed.
All children should ride rear-facing in the vehicle as long as possible. Preterm and low-birth weight infants are at additional risk of breathing difficulties and heart problems when placed in a child restraint. Evenflo requires that the evaluation recommended by the AAP be conducted for all infants born earlier than 37 weeks and all newborn infants who weigh less than 5 pounds at birth before their first car trip to check for breathing difficulties or heart rate problems when traveling in a rear-facing child restraint.
The AAP recommends that appropriate hospital staff observe your infant in the child restraint for a period of 90 to 120 minutes or the duration of travel, whichever is longer. This period of observation must be performed with the infant properly positioned as described in these instructions and with the child restraint placed at an angle that is approved for use in the vehicle. The hospital staff will check for any breathing difficulties or heart rate problems. Your child's pediatrician will let you know if there are any special considerations for travel. The number of trips and the duration of time the infant is seated in the child restraint should be minimized. A caregiver should ride in the back seat to monitor the infant during travel.
You can learn more about the AAP's recommendations for observation of newborns and the guidelines for safe transportation of preterm and low-birth weight infants, as well as other resources for parents and medical professionals, at
https://www.healthychildren.org/english/safety-prevention/on-the-go/Pages/default.aspx
⚠ WARNING WARNING


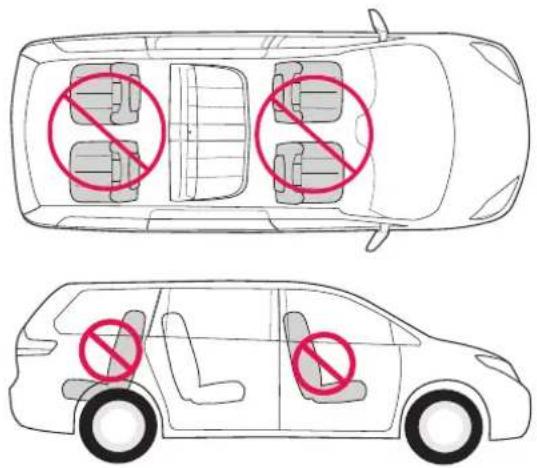
Air Bag Warning
- DO NOT use this child restraint in the front seat of a vehicle equipped with an air bag, unless the air bag has been deactivated. Interaction between a rear-facing restraint and air bags may cause serious injury or death. Air bags may cause serious injury or death to children 12 years of age and under. If your vehicle has an air bag, refer to your vehicle owner's manual for child restraint installation.
- If the rear seat of your vehicle is equipped with side air bags, refer to the following information for proper usage:
Vehicles built prior to the 2002 model year:
DO NOT use this restraint in a vehicle seating position equipped with a side air bag unless authorized by the vehicle manufacturer.
Model year 2002 and newer vehicles:
Refer to your vehicle owner's manual before placing this restraint in a seating position equipped with a side air bag.
- DO NOT place any objects between the restraint and the side air bag, as an expanding air bag may cause the items to strike your child.
The forward facing back seat is the safest place for children 12 and under.
General Warnings
Rear-facing and Forward-facing Use
- Failure to follow the Child Requirements for rear-facing and forward-facing use of this child restraint could result in serious injury or death. (See page 4 for Child Requirements).
- Failure to follow installation instructions can result in the child striking the vehicle's interior during a sudden stop or crash. Serious injury or death may result. These instructions and the instructions in your vehicle owner's manual must be followed carefully. If there is a conflict between the two, the vehicle owner's manual regarding child restraint installation must be followed.
• NEVER leave child unattended.
• Children have STRANGLED in loose or partially buckled harness straps. Fully restrain the child.
| ⚠ WARNING | ||
| Children have STRANGLEDin loose or partially buckledharness straps. Fully restrainthe child. | ||
- DO NOT use child restraint if it is damaged, broken, or missing parts.
- DO NOT use this restraint if it has been involved in a crash. It must be replaced.
• DO NOT remove back cover.
Location Warnings
Rear-facing and Forward-facing Use
- ALWAYS read and follow exactly the instructions that accompany your vehicle and child restraint.
- According to statistics, children are safer when properly restrained in a rear seating position than in the front seating position. Generally, the center rear position is safest and should be used if available.
- Some child restraints do not fit all vehicles or all seating locations. There are many thousands of combinations of vehicle makes, models, child restraint configurations, vehicle seat belt designs, and seat cushion shapes. The easiest way to determine whether your child restraint is suitable for a particular seating position is to check
⚠ WARNING WARNING

Location Warnings – continued
Rear-facing and Forward-facing Use
for a tight installation. If the child restraint cannot be properly installed, DO NOT use the child restraint. Consult vehicle owner's manual, try a different seating location, or call Evenflo for further assistance.
- ONLY use this child restraint on forward-facing vehicle seats. DO NOT use this restraint with vehicle seats that face the rear or side.
- ONLY use this child restraint on vehicle seats with backs that lock into place.
Premature Infants
Rear-facing Use Only
- DO NOT use this or any child restraint with a premature infant until after consulting your doctor. Premature infants may have difficulty breathing when in a seated or semi-reclined position. Using additional padding or pillows behind the infant's head or failing to properly recline the child restraint could increase the child's risk of serious injury or death.
Rear-facing Only Warnings
- When using this restraint rear-facing, DO NOT loosen the vehicle seat belt to provide more leg room, as this will prevent the child restraint from protecting the child.
- Fold-down armrests could pose a hazard to a rear-facing child in certain types of collisions. Consult your vehicle owner's manual before installing any rear-facing child restraint in front of a fold-down armrest.
- NEVER turn a child restraint forward-facing with a child who weighs less than 10 kg (22 lbs). Crash forces may cause serious injury or death.
- DO NOT use the tether strap when the child restraint is in the rear-facing position.
- The headrest on the vehicle seat that the child faces when sitting in the rear-facing mode should be placed in the lowest position. The vehicle seat back that the child faces must be fully padded and free of any hard objects.
Forward-facing Only Warnings
- If your child weighs more than 29.4 kg (65 lbs) or their shoulders are above the highest harness level, you MUST discontinue using this child restraint as it may no longer adequately protect your child.
- MUST be at least 2 years old.
- Adjust, or remove, the vehicle headrest in the seat where the child restraint is to be installed, so that the back of the child restraint rests against the vehicle seat back.
- The headrest on the vehicle seat in front of the child should be put in its lowest position. The vehicle seat back that the child faces must be fully padded and free of any hard objects.
Seat Belt Warnings
Rear-facing and Forward-facing Use
- DO NOT use this child restraint if it moves more than 25 mm (1 in.) side to side or front to back at either the rear-facing or forward-facing belt path on the child restraint. Serious injury or death may result from poor installation. If you cannot tightly secure the child restraint, try again or move it to another location.
- DO NOT use this child restraint in a seating position with door-mounted seat belts.
- DO NOT use this child restraint in a vehicle with seat belts that automatically move along the vehicle frame when the door is opened. These seat belts will not hold a child restraint properly.
- DO NOT use this child restraint in a vehicle equipped with lap belts that only lock during a sudden stop or crash (emergency locking retractor – ELR). You must use a seating location with a locking seat belt. Check your vehicle owner's manual to see if you have lap belts with ELRs.
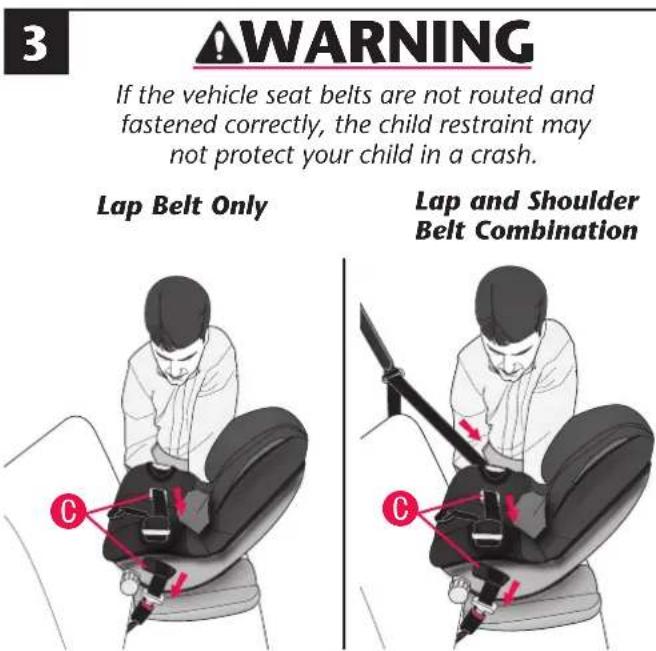
- If the vehicle seat belts are not routed and fastened correctly, the child restraint may not protect the child in a crash.
- DO NOT allow the vehicle seat belt release button to touch the child restraint. Accidental contact may cause the seat belt to release. If necessary, turn the seat belt release button away from the child restraint or move the child restraint to a different location.
- Failure to adjust the harness or vehicle seat belts snugly around the child may result in the child striking the vehicle's interior during a sudden stop or crash. Serious injury or death may occur.
⚠ WARNING WARNING


LATCH Warnings
Rear-facing and Forward-facing Use
- DO NOT use the lower anchors of the child restraint anchorage system (LATCH system) to attach this child restraint when restraining a child weighing more than 22.7 kg (50 lbs) with the internal harnesses of the child restraint.
- The LATCH system is intended to be used ONLY as described in these instructions. Serious injury or death may result from misuse. LATCH (Lower Anchors and Tethers for Children) is a system for attaching the child restraint to your vehicle seat. It can be used in place of the seat belts in vehicles with vehicle lower anchor bars. Refer to your vehicle owner's manual for the locations of the vehicle lower anchor bars.
Note: Your vehicle owner's manual may refer to this system as "Universal Anchorage System," "Lower Universal Anchorage System," or "ISOFIX."
- In addition to these instructions, read and follow your vehicle owner's manual regarding installation of the child restraint and LATCH. If there is a discrepancy, follow your vehicle owner's manual.
- ONLY use for securing child restraint to vehicle lower anchor bars.
- NEVER attach two lower anchor connectors to one vehicle lower anchor bar.
- NEVER use the vehicle seat belts when using the Lower anchor connector assembly. Using both together can cause slack in a sudden stop or crash.
- To avoid strangulation, you must store the unused LATCH harness, with all slack removed, in the storage area on the base. Roll or fold the excess LATCH strap and secure with a rubber band to prevent serious injury to vehicle occupants.
- ALWAYS be sure that the lower anchor connectors are attached to the vehicle lower anchor bars by pulling hard on the lower anchor connectors. If they are not attached, the lower anchor connector assembly will not secure your child restraint. Serious injury or death may result.
- DO NOT use this child restraint if it moves more than 25 mm (1 in.) side to side or front to back at either the rear-facing or forward-facing belt path on the child restraint. Serious injury or death may result from poor installation. If you cannot tightly secure the child restraint, try again or move it to another location.

Tether Strap Warnings
Forward-facing Use Only
- To avoid a strangulation hazard, you MUST tightly roll or fold excess or unused tether strap and secure with a rubber band. Attach the tether hook to the storage clip when not in use (p. 16). This will keep an unused tether from hitting someone during a crash.
Additional Warnings
Rear-facing and Forward-facing Use
- In hot or sunny weather, ALWAYS check the areas of the child restraint that may contact your child (e.g., buckle, buckle tongues, etc.) for hot areas before placing him/her into the child restraint. The child could be burned. Cover the child restraint with a light colored blanket when you leave the vehicle.
- This child restraint must be securely fastened to the vehicle, even when unoccupied, using the vehicle seat belts or lower anchor connectors. An unsecured child restraint may injure someone if a crash occurs.
- DO NOT use the cup holder to store cans or hard cups. Only for use with soft cups.
- DO NOT place any cups that contain hot liquids in the cup holder.
- DO NOT attach additional padding, toys, or other devices not made by Evenflo or described in these instructions for the child restraint. Items not tested with the child restraint could injure the child. Additional pads or pillows may interfere with the function of the harness system, or cause breathing problems if the child's head falls forward, increasing the risk of serious injury or death.
- Failure to follow installation instructions could result in serious injury or death. These instructions and the instructions in your vehicle owner's manual must be followed carefully. If there is a conflict between the two, the vehicle owner's manual regarding child restraint installation must be followed.
- In cold weather, DO NOT dress the child in bulky clothing like snowsuits if the child is riding in a child restraint. Bulky coats/snowsuits make it difficult to properly tighten the harness to the child, which may allow the child to be ejected from the restraint during a crash. If necessary, place a blanket over the harnessed child without interfering with the child restraint harness system.
WARNING
Safe Practices
- Everyone rides buckled up or the vehicle does not go. Make no exceptions for adults or children. If someone unbuckles, stop the vehicle. Being firm and consistent from the start will mean fewer discipline problems as children get older. An unrestrained person can be thrown into and injure other passengers.
- Many safety advocates and healthcare professionals recommend that children ride rear-facing for as long as possible. See limitations recommended on rear-facing use on the inside front cover.
- NEVER try to tend to a crying baby's needs while driving. NEVER take a baby out of a child restraint for comforting while the vehicle is moving.
- DO NOT allow a child in a vehicle to have objects such as lollipops or ice cream on a stick. The object can injure the child if the vehicle swerves or hits a bump.
- DO NOT feed an infant who is riding in a child restraint.
- Put sharp or heavy items in the trunk. Anything loose can be deadly in a crash.
Recall Information for U.S. Customers
- Child restraints could be recalled for safety reasons. You must register this restraint to be reached in a recall. Send your name, address, e-mail address if available, and the restraint's model number and manufacturing date to:
Evenflo Company, Inc.,
1801 Commerce Dr.,
Piqua, OH 45356
or call 1-800-233-5921.
or register online at:
www.evenflo.com/registercarseat
- For recall information, call the U.S. Government's
Vehicle Safety Hotline at 1-888-327-4236
(TTY:1-800-424-9153), or go to:
http://www.NHTSA.gov
Public Notice for Canadian Customers
- Child restraints could be recalled for safety reasons. You must register this restraint to be reached in a recall. Send your name, address, and the restraint's model number and manufacturing date to:
Evenflo Company, Inc., 1801 Commerce Dr., Piqua, OH 45356
or call 1-937-773-3971.
or register online at:
www.evenflo.com/registercarseatcanada
- For public notice information, call Transport Canada at 1-800-333-0510 (1-613-993-9851 in Ottawa region).
Motor Vehicle/Aircraft Usage
When used with the internal harness and properly installed pursuant to these instructions, this restraint is certified for use only in passenger and multi-purpose passenger motor vehicles, buses, and trucks equipped with either lap belts only or lap/shoulder belt systems and in aircraft.
Refer to pages 52 to 55 for instructions on installing your child restraint in aircraft.
Storing Your Instructions
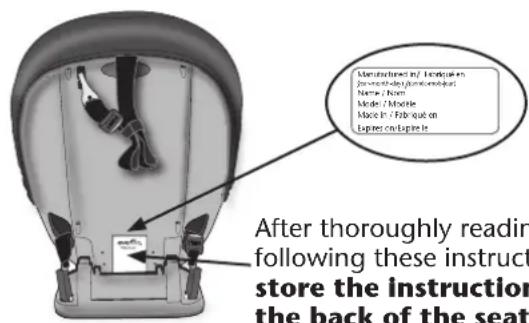
For future reference, record the model number of your child restraint AND the date of manufacture below.
Model Number: ____
Date of Manufacture: ____
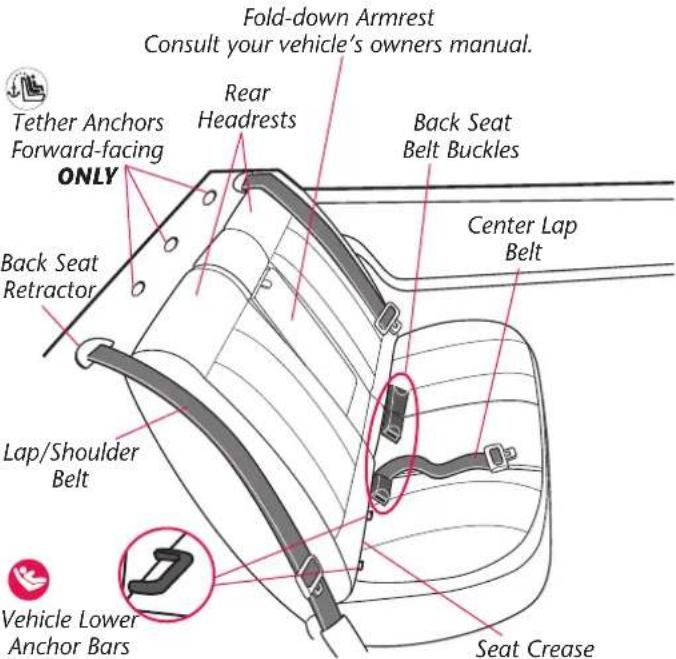
Visual Glossary
Visual Glossary
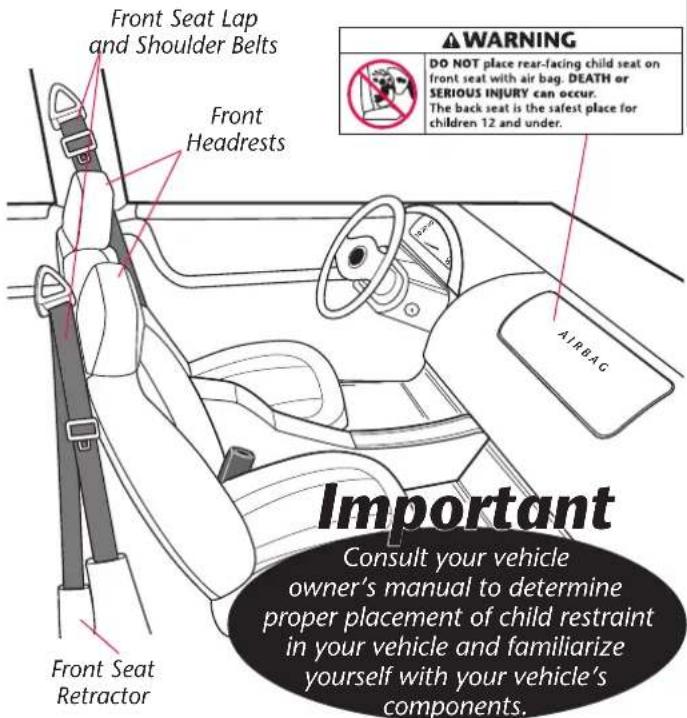
Your vehicle components may be significantly different than pictured. Consult your owner's manual to help you identify your vehicle components.
IMPORTANT: If your vehicle has side air bags, please refer to the warnings on page 6.
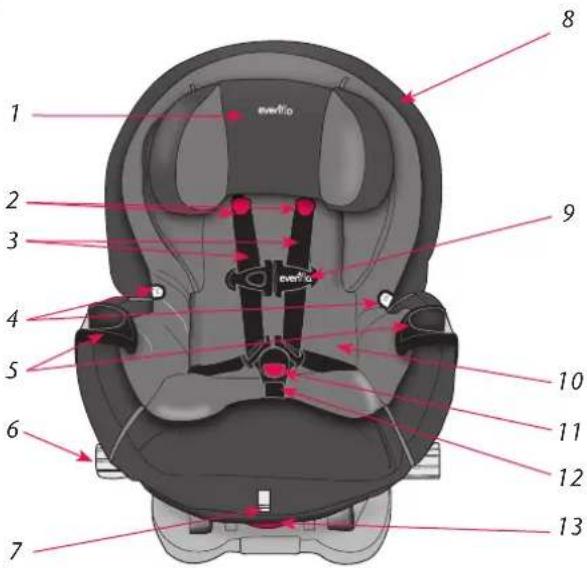
Child Restraint Features Child Restraint Features

Front
Back
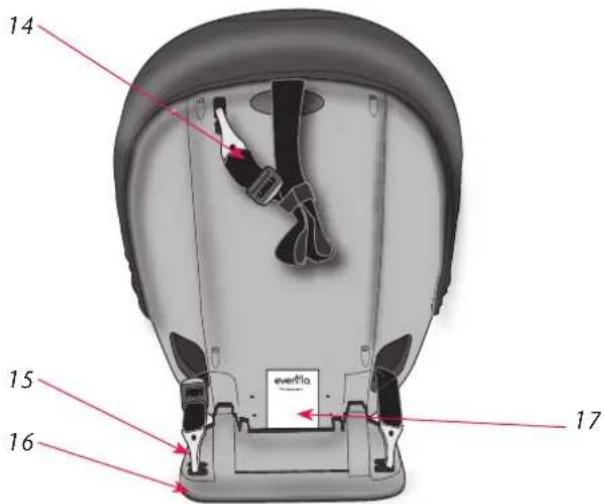
Description
- Adjustable Headrest*
- Harness Tabs
- Harness Straps
- Buckle Tongue Holders*
- Cup Holder*
- TensionRight™ Tightening Knob
- Tension Release Button
- Seat Pad
-
Chest Clip
-
BeltTrac™ Access Flap
-
Buckle
- Crotch Strap
- ReclineRight™ Lever
- Tether Strap and Hook
- Lower Anchor Connector Assembly
- Base
- Instructions
* Not all features are available on all models. Styles may vary.
Using the Child Restraint Rear-facing
Child Requirements:
• Weight: 2.3 to 18 kg (5 to 40 lbs)
- Height: 48 to 94~cm (19 to 37 in.) and top of child's head is at least 25~mm (1 in.) below the top of the child restraint seat back.
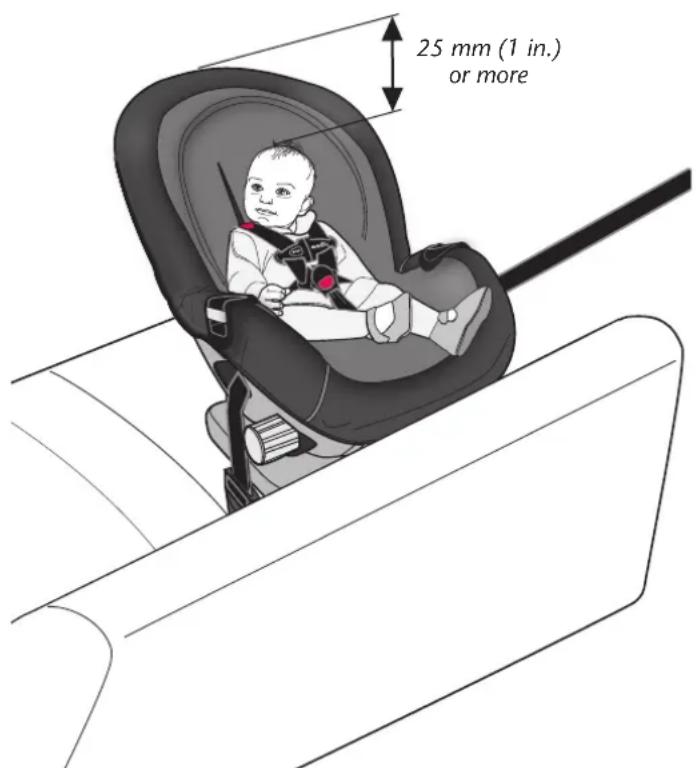
IMPORTANT: Once your child exceeds any of the size requirements above, they MUST use this child restraint in the forward-facing orientation, if possible. If your child exceeds any of the size requirements above and is less than 2 years old, however, you MUST discontinue use of this child restraint.
Rear-facing Installation Checklist
1. Secure child restraint to the vehicle seat.
√ Child restraint is in Position #1 (page 20).
√ Install with vehicle seat belt (page 20) or lower anchor connector assembly (page 24).
√ Install locking clip, if necessary (page 22).
√ Towel rolled up and placed beneath the base, if necessary (page 20).
2. Set the child in the child restraint.
Top of head is at least 25 mm (1 in.) below the top of the child restraint seat back.
3. Make necessary adjustments.
√ Harness tabs MUST be at shoulder level (page 41).
√ Crotch strap should be snug against the child (page 43).
4. Fasten the buckle. Refer to page 42.
5. Position and connect chest clip.
Chest clip MUST be at armpit level (page 42).
6. Check your work.
√ Child restraint is in Position #1 (page 20).
√ To properly secure this child restraint it MUST NOT move more than 25 mm (1 in.) from side to side or front to back at the rear-facing belt path (pages 23 and 25).
√ The child's back and bottom are flat against the back and bottom surfaces of the child restraint.
√ Harness tabs are AT shoulder level (page 41).
√ Buckle tongues are fully engaged.
√ The level arrow is parallel with ground (page 20).
WARNING
When using this restraint rear-facing, DO NOT loosen the vehicle seat belt to provide more leg room as this will prevent the child restraint from protecting your child.
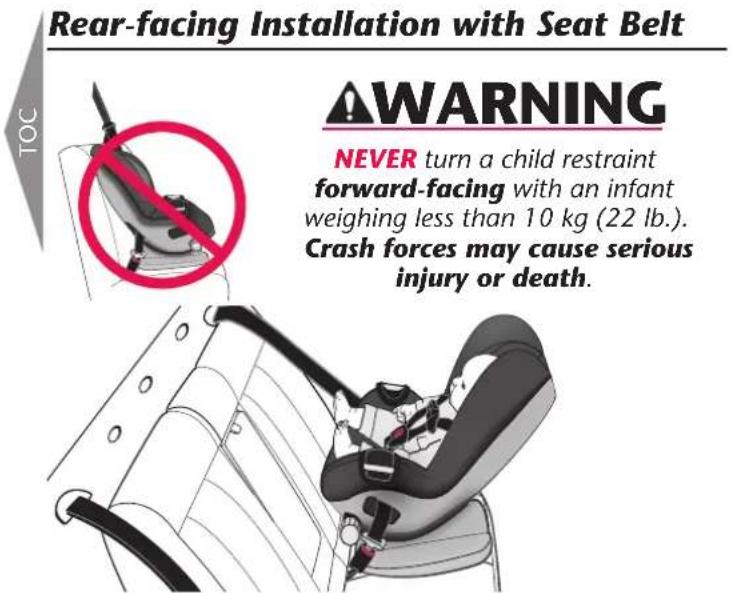
Infants MUST always ride facing the rear of the vehicle. The back of the child restraint supports and protects the baby and absorbs crash forces.
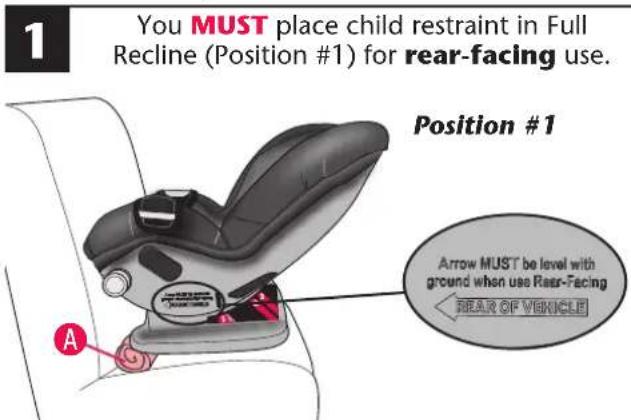
This child restraint has three recline positions. The most reclined position (Position #1) is ONLY for rear-facing. Make sure that the seat is positioned so that the level arrow is parallel with the ground.
Note: In some vehicles, it may be necessary to place a tightly rolled towel or small blanket A beneath the front edge of the child restraint to provide enough recline so that the level arrow is parallel to the ground.
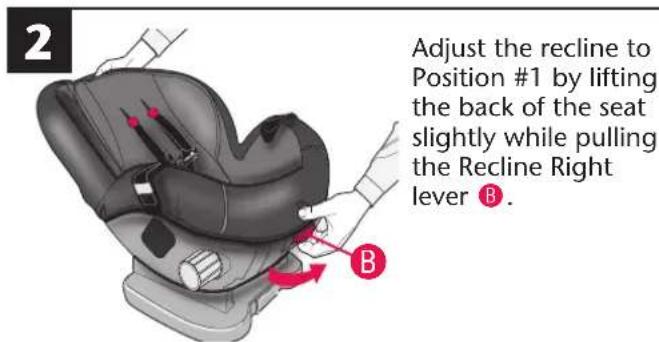
Remove bottom half of seat pad for easier belt routing, as shown.
Route the vehicle seat belt through the rear-facing belt path Ⓐ, continue through the opposite opening of the child restraint. Fasten the vehicle seat belt as shown depending on your type of seat belt. Reconnect the seat pad to the front of the child restraint.
Note: Install locking clip on lap and shoulder belt combinations, if necessary.
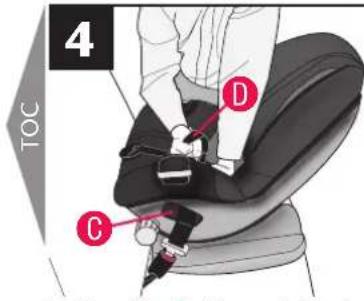
The seat belt must be as tight as possible.
Put your full weight into the child restraint as you tighten the seat belt D. If you can move the child restraint more than 25 mm (1 in.) side to side or front to back at the rear-facing
belt path C, the vehicle belt is not tight enough, and you need to try again, or install with the lower anchor connector assembly (p. 24). After your vehicle seat belts are fastened, hook the seat pad back into place.
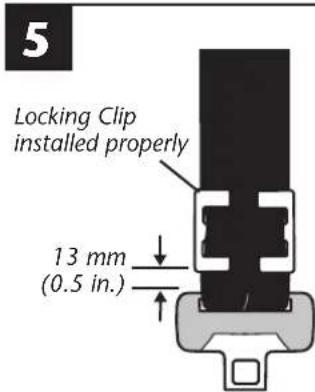
Install Locking Clip (not included), if necessary.
If your vehicle was built prior to model year 1996, and has a lap/shoulder belt that is equipped with an emergency locking retractor (ELR) AND sliding latch plate, you MUST use a Locking Clip. Check your vehicle owner's manual to identify which vehicle belt system is in your vehicle.
If your vehicle is model year 1996 or newer, it likely has a vehicle belt system that can be locked when tightened, and will not require use of a Locking Clip.
Consult your vehicle owner's manual before installing a locking clip.
If your vehicle requires a Locking Clip, please call ParentLink at 1-800-233-5921 (U.S.) or 1-937-773-3971 (Canada), or 01-800-706-12-00 (Mexico). to obtain a Locking Clip and instructions on how to install and use it.
WARNING
Remove Locking Clip from vehicle seat belt when not used with a child restraint, or the vehicle seat belt will not properly restrain an adult or child. Serious injury could occur.
WARNING
- If vehicle seat belts are not routed and fastened correctly, the child restraint may not protect your child in a crash.
- DO NOT use this child restraint if it moves more than 25 mm (1 in.) side to side or front to back at the rear-facing belt path. Serious injury or death may result from poor installation. If you can not tightly secure the child restraint, try again or move it to another location, or install with the lower anchor connector assembly.
Check your work.
Make certain the belts are tight. If you can move the child restraint more than 25 mm (1 in.) side to side or front to back at the rear-facing belt path Ⓗ, the vehicle belt is not tight enough. If you have not tightly secured the child restraint, try again, move it to another location, or install with the lower anchor connector assembly (p. 24).
7 WARNING
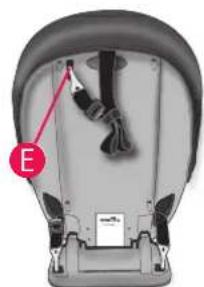
- To avoid a strangulation hazard, you MUST tightly roll or fold excess tether strap and secure with the strap/rubber band.
- Attach the tether hook to the storage clip when not in use. This will keep an unused tether from hitting someone during a crash.
natural_image
Interior view of a car seat with a highlighted cable and label E (no text or symbols on the diagram itself)When the tether strap is not in use, you MUST attach the hook Ⓔ to the back of the child restraint, and tightly roll and secure the strap with the strap/rubber band.
A loose tether strap and hook may injure your child.

Rear-facing Installation with Lower Anchor Connectors
LATCH is a system for attaching the child restraint to your vehicle seat. It is to be used in place of your vehicle's seat belts, and can be used in vehicles with LATCH anchors. Your vehicle owner's manual may refer to this system as ISOFIX or Universal Anchorage System (UAS).
WARNING
- ONLY use for securing child restraint to lower anchor bars.
- ALWAYS read and follow exactly the instructions which accompany your vehicle and child restraint.
- NEVER attach two hooks to one vehicle lower anchor bar.
- DO NOT use the vehicle seat belts to install a child restraint when using the Lower Anchor Connector Assembly.
- This Lower Anchor Connector Assembly is intended to be used ONLY as described in these instructions. Serious injury or death may result from misuse.
- ALWAYS be sure that the Lower Anchor Connector hook is fully engaged onto the Vehicle Lower Anchor Bar by pulling hard on the Lower Anchor Connector strap. If it is not totally engaged, the Lower Anchor Connector Assembly will not secure your child restraint. Serious injury or death may result.
- To avoid a strangulation hazard, you MUST store the unused Lower Anchor Connector Assembly, with all slack removed, in storage area on the base (page 45). Roll or fold excess lower anchor connector strap and secure with a rubber band to prevent serious injury to vehicle occupants.
- In addition to these instructions, read and follow your vehicle owner's manual regarding installation of child restraints and LATCH. If there is a discrepancy, follow your vehicle owner's manual.
Know Your Lower Anchor Connector Assembly
The lower anchor connector assembly that comes with your child restraint will be one of the two types below.
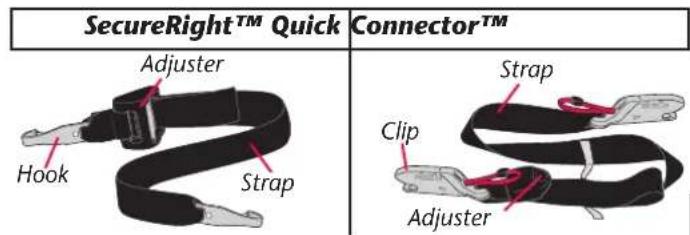
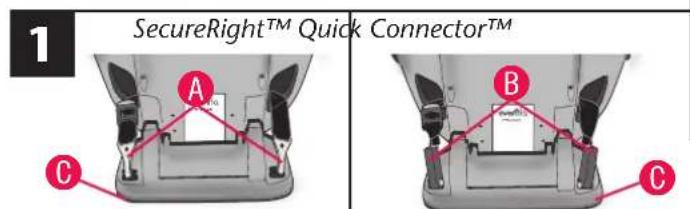
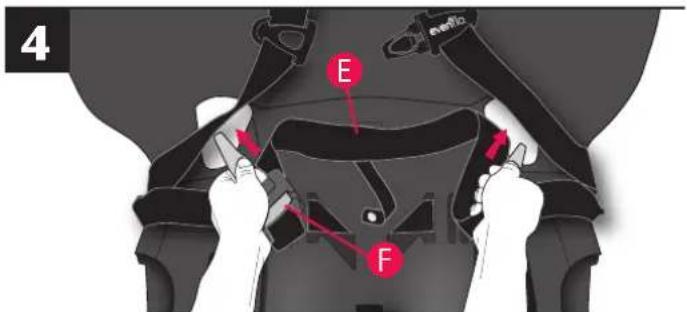
Remove both lower anchor connector hooks A or clips B from the storage clips on the base C.
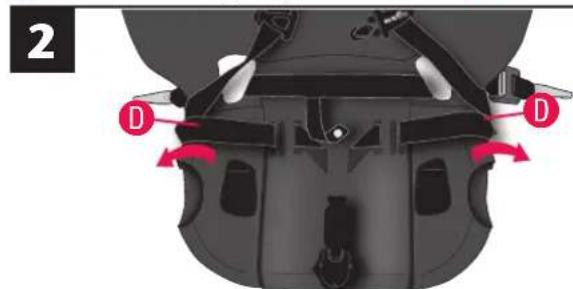
Remove the seat pad from the seat shell (page 47). Loosen harness straps Ⓓ (page 44) and place them out of the way, as shown.
natural_image
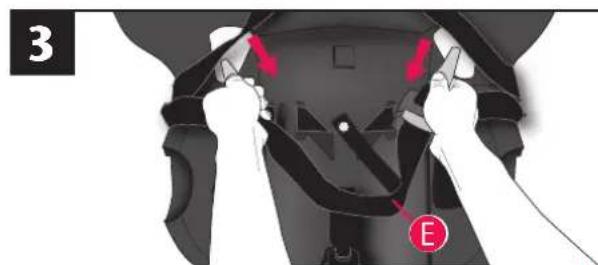
Mechanical assembly diagram showing hands adjusting a component with red arrows indicating motion (no text or symbols)Remove the lower anchor connector assembly E from the forward-facing position (back openings).
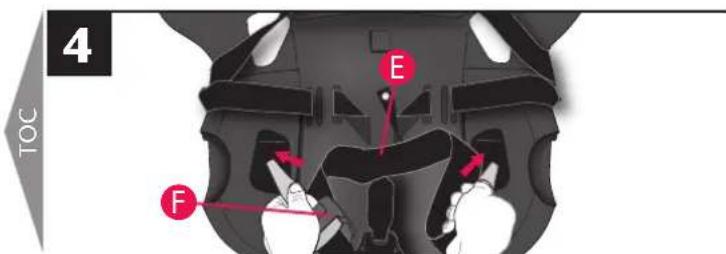
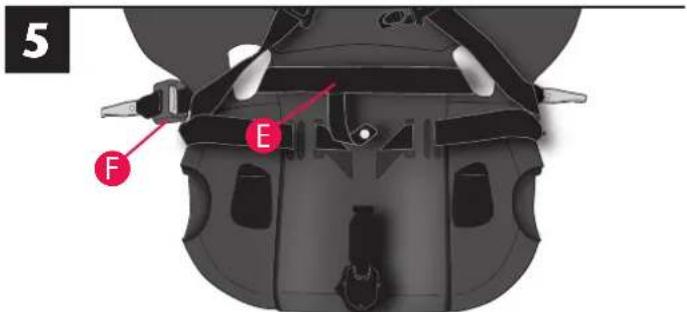
Insert the ends of the lower anchor connector assembly strap Ⓔ in the rear-facing belt path openings, as shown (front openings). Note: Make sure the adjustment buckle Ⓕ enters the opening on the correct side of the child restraint, as shown.
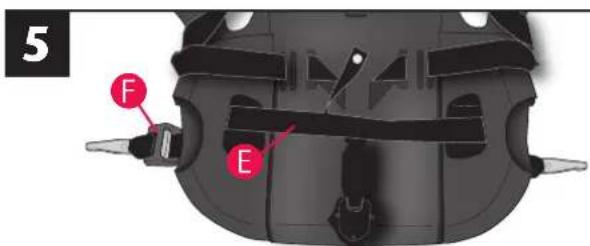
After the lower anchor connector assembly strap E has been correctly inserted, it will appear as shown above.
Note: Make sure the adjustment buckle F is on the correct side of the child restraint, as shown.
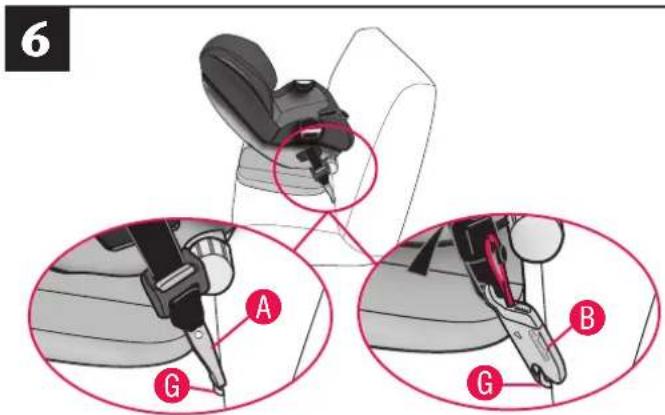
Refer to your vehicle owner's manual to locate the lower anchor bars on your vehicle seat.
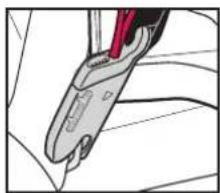
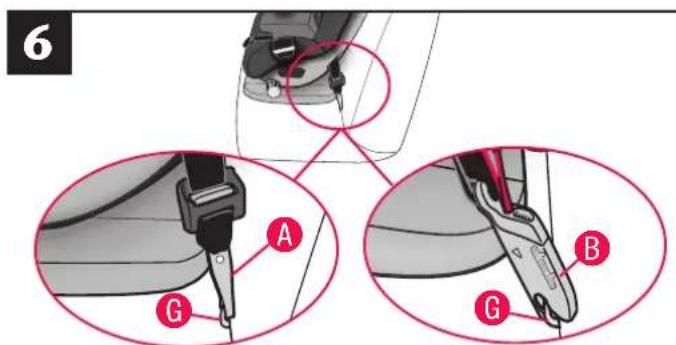
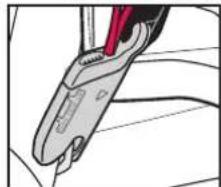
Attach the left hook A, or clip B, to the left anchor bar G, and the right hook to the right anchor bar. DOUBLE CHECK that each lower anchor connector hook or clip is fully engaged by pulling hard on the lower anchor connector assembly strap.
Correct Incorrect
natural_image
Illustration of a pair of pliers cutting through a metal sheet (no text or symbols)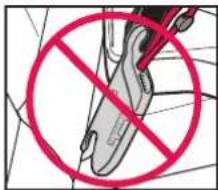
IMPORTANT: Make sure both lower anchor Quick Connectors are facing upward and the straps are not twisted.
natural_image
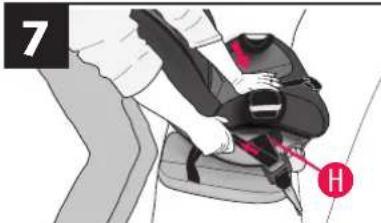
Person adjusting a car seatbelt with a red 'H' marking (no text or symbols on the suit itself)Using your full weight, push the child restraint firmly into the vehicle seat while pulling up on the lower anchor connector assembly strap to tighten.
The lower anchor connector assembly strap must be as tight as possible.
If you can move the child restraint more than 25 mm (1 in.) side to side or front to back at the vehicle belt path H, the lower anchor connector assembly strap is not tight enough. You will need to try again, find another location for your child restraint, or install with the vehicle seat belt (page 20).
To remove the lower anchor connector assembly strap, go to page 45.
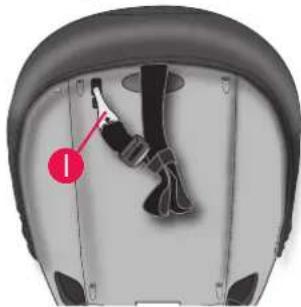
8 WARNING
- To avoid a strangulation hazard, you MUST tightly roll or fold excess tether strap and secure with the strap/rubber band.
- Attach the tether hook to the storage clip when not in use. This will keep an unused tether from hitting someone during a crash.
natural_image
Close-up of a car seatbelt seat with a numbered marker pointing to the seat (no text or symbols visible)When the tether strap is not in use you MUST attach the hook ⏻ to the back of the child restraint, and tightly roll and secure the strap with the strap/rubber band. A loose tether strap and hook may injure your child.
Using the Child Restraint Forward-facing
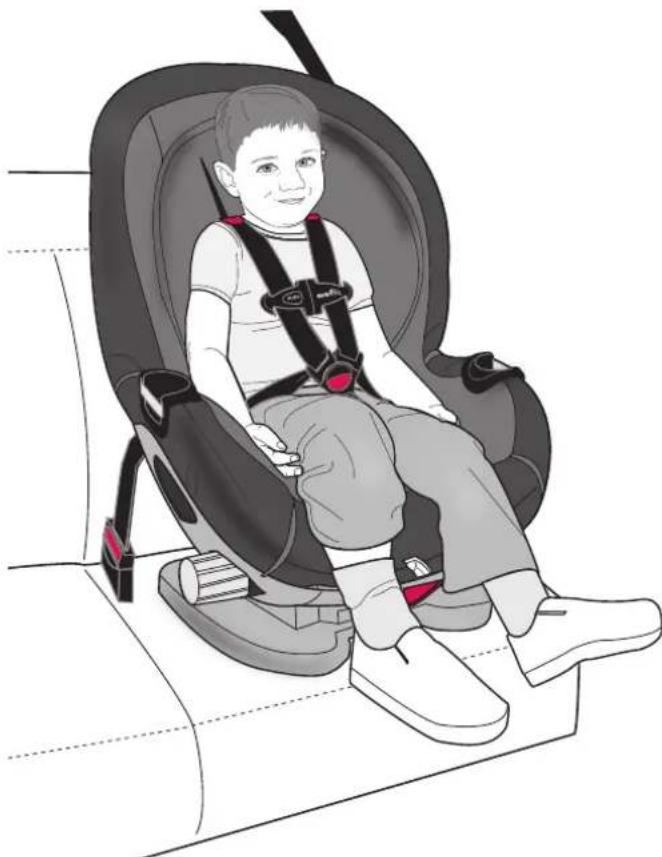
Child Requirements:
• Weight: 10 to 29.4 kg (22 to 65 lbs)
- Height: 71 to 127 cm (28 to 50 in.) and tops of child's ears are at or below the top of the child restraint seat back
• Age: At least 2 years old
natural_image
Illustration of a child wearing a car seatbelt and safety harness, seated in a compact car seat (no text or symbols visible)IMPORTANT: Once your child exceeds any of the size requirements for forward-facing use above, you MUST discontinue use of this child restraint. Consider use of a booster seat at that time.
Forward-facing Installation Checklist
1. Secure child restraint to the vehicle seat.
√ Child restraint is in Position #2 or #3 (page 30).
√ Child restraint base sits flat on vehicle seat.
√ Install with vehicle seat belt (page 30) or lower anchor connector assembly (page 36).
√ Install tether strap (page 34 or 40).
√ Install locking clip, if necessary (page 32).
2. Set the child in the child restraint.
The top of the child's ears MUST be below the top of the child restraint seat back.
3. Make necessary adjustments.
√ Harness tabs MUST be at shoulder level (page 41).
√ Crotch strap should be snug against the child (page 43).
4. Fasten the buckle. Refer to page 42.
5. Position and connect chest clip.
Chest clip MUST be at armpit level (page 42).
6. Check your work.
√ Child restraint is in Position #2 or #3 (page 30).
√ Child restraint base sits flat on vehicle seat.
√ To properly secure this child restraint it MUST NOT move more than 25 mm (1 in.) from side to side or front to back at the forward-facing belt path (pages 33 and 39).
√ The child's back and bottom are flat against the back and bottom surfaces of the child restraint.
√ Harness tabs are AT shoulder level (page 41).
√ Buckle tongues are fully engaged.
√ Tether strap is securely attached and tightened (page 34 or 40).
Forward-facing Installation with Seat Belt
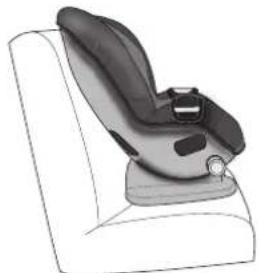
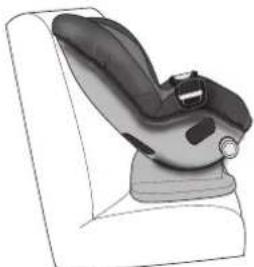
1 The Intermediate Recline Position (Position #2) and Full Upright Position (Position #3) are ONLY
for forward-facing use. Always make sure the bottom of the child restraint sits flat on the vehicle seat.
Full Upright Position (Position #3)
natural_image
Illustration of a car seat with black and white buttons, no text or symbols presentThe child must weigh
10 to 29.4 kg
(22 - 65 lb.).
Intermediate Recline Position (Position #2)
natural_image
Illustration of a baby car seat with black and gray seats, no text or symbols presentThe child must weigh
10 to 22.7 kg
(22 - 50 lb.).
2
natural_image
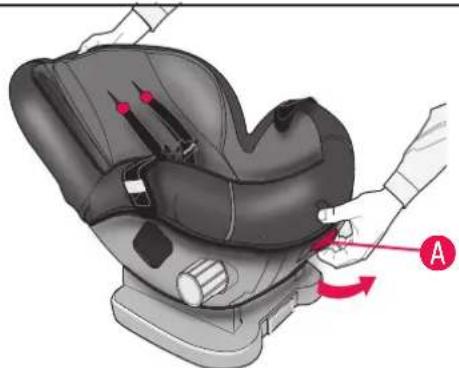
Illustration of a car seat with hands and a red arrow indicating rotation (no text or symbols)Adjust the recline to Positions #2 or #3 by lifting the back of the seat slightly while pulling the ReclineRight lever Ⓐ.
WARNING
If the vehicle seat belts are not routed correctly, the child restraint may not protect your child in a crash.
natural_image
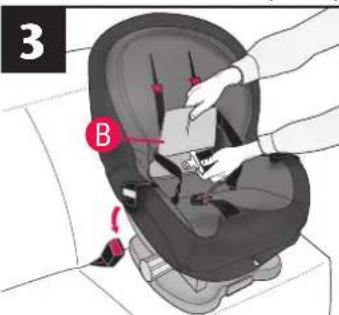
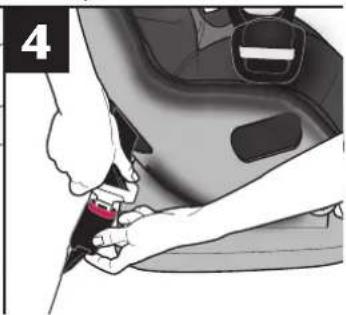
Close-up of hands adjusting a red belt buckle on a car seat (no text or symbols visible)Route the vehicle seat belt through the child restraint.
Use the BeltTrac access
flap B for easier seat belt routing.
Buckle the vehicle seat belt.
5
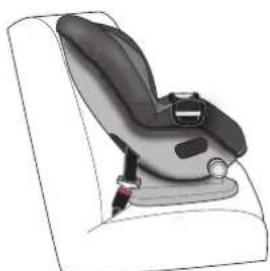
Lap Belt Only
Lap and Shoulder Belt Combination
natural_image
Illustration of a car seatbelt device (no text or symbols visible)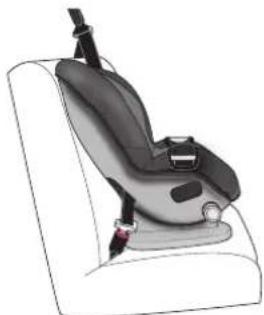
natural_image
Illustration of a car seat with black and gray seats, no text or symbols presentFasten the vehicle seat belt as shown depending on your type of seat belt.
Note: Install locking clip on lap and shoulder belt combinations, if necessary.
WARNING
DO NOT allow the vehicle seat belt release button to touch the child restraint. Accidental contact may cause the seat belt to release. If necessary, turn the vehicle seat belt button away from the child restraint or move the child restraint to a different location.
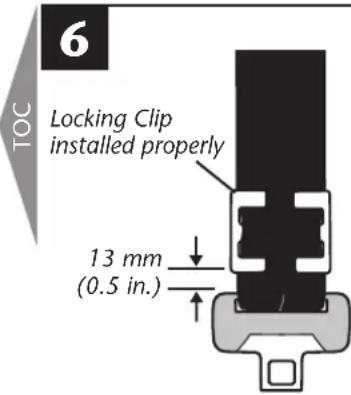
Install Locking Clip (not included), if necessary. If your vehicle was built prior to model year 1996, and has a lap/shoulder belt that is equipped with an emergency locking retractor (ELR) AND sliding latch plate, you MUST use a Locking Clip. Check your vehicle owner's manual to identify which vehicle belt system is in your vehicle.
If your vehicle is model year 1996 or newer, it likely has a vehicle belt system that can be locked when tightened, and will not require use of a Locking Clip.
Consult your vehicle owner's manual before installing a locking clip.
If your vehicle requires a Locking Clip, please call ParentLink at 1-800-233-5921 (U.S.) or 1-937-773-3971 (Canada), or 01-800-706-12-00 (Mexico) to obtain a Locking Clip and instructions on how to install and use it.
WARNING
Remove Locking Clip from vehicle seat belt when not used with a child restraint, or the vehicle seat belt will not properly restrain an adult or child. Serious injury could occur.
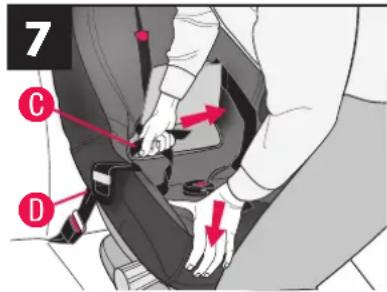
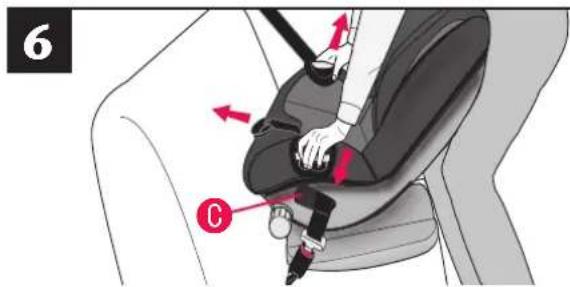
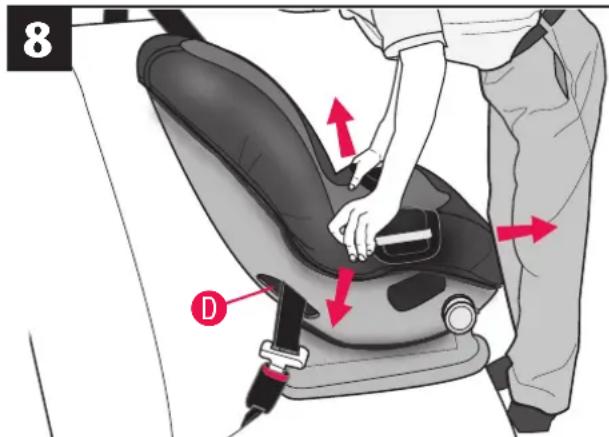
The vehicle seat belt must be as tight as possible. Using your full weight, push the child restraint firmly into the vehicle seat as you tighten the vehicle belt Ⓗ.
If you can move the child restraint more than 25 mm (1 in.) side to side or front to back at the forward-facing belt path D, the seat belt is not tight enough, you will need to try again, or install with the lower anchor connector assembly (page 36).
⚠ WARNING
- If vehicle seat belts are not routed and fastened correctly, the child restraint may not protect your child in a crash.
- DO NOT use this child restraint if it moves more than 25 mm (1 in.) side to side or front to back at the vehicle belt path. Serious injury or death may result from poor installation. If you can not tightly secure the child restraint, try again or move it to another location, or install with the lower anchor connector assembly (page 36).
Note: If your tether strap does not reach the vehicle tether anchor bracket, call Evenflo's ParentLink for a tether extender, at 1-800-233-5921 (U.S.) or 1-937-773-3971 (Canada), or 01-800-706-12-00 (Mexico).
WARNING
- To avoid a strangulation hazard, you MUST tightly roll or fold excess tether strap and secure with the strap/rubber band.
- Attach the tether hook to the storage clip when not in use. This will keep an unused tether from hitting someone during a crash.
After adjusting the top tether strap, you may have excess strap; DO NOT cut it off. If you do, it may not be long enough to use in another vehicle. Instead, tightly roll up the excess tether strap and place the rubber band around the bundle.
Note: Refer to your vehicle owner's manual for the location of the tether anchor bracket in your vehicle. Older vehicles may not come equipped with anchor bracket hardware. Check with your vehicle dealer. If you have questions regarding tether anchors that are not addressed by the vehicle owner's manual or answered by an authorized dealer/vehicle manufacturer, call Evenflo's ParentLink at 1-800-233-5921 (U.S.) or 1-937-773-3971 (Canada), or 01-800-706-12-00 (Mexico).
This page is intentionally blank.

Forward-facing Installation with Lower Anchor Connectors
LATCH is a system for attaching the child restraint to your vehicle seat. It is to be used in place of your vehicle's seat belts, and can be used in vehicles with LATCH anchors. Your vehicle owner's manual may refer to this system as ISOFIX or Universal Anchorage System (UAS).
natural_image
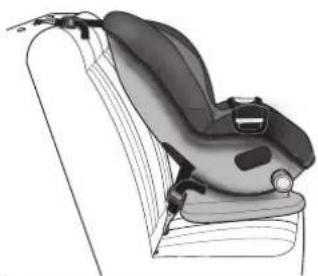
Line drawing of a car seat assembly (no text or symbols)DO NOT Install by this method for a child weighing more than 22.7 kg (50 lb.).
WARNING
- ONLY use for securing child restraint to lower anchor bars.
- ALWAYS read and follow exactly the instructions which accompany your vehicle and child restraint.
- NEVER attach two hooks to one vehicle lower anchor bar.
- DO NOT use the vehicle seat belts to install a child restraint when using the Lower Anchor Connector Assembly.
- This Lower Anchor Connector Assembly is intended to be used ONLY as described in these instructions. Serious injury or death may result from misuse.
- ALWAYS be sure that the Lower Anchor Connector hook is fully engaged onto the Vehicle Lower Anchor Bar by pulling hard on the Lower Anchor Connector strap. If it is not totally engaged, the Lower Anchor Connector Assembly will not secure your child restraint. Serious injury or death may result.
- To avoid a strangulation hazard, you MUST store the unused Lower Anchor Connector Assembly, with all slack removed, in storage area on the base (page 45). Roll or fold excess lower anchor connector strap and secure with a rubber band to prevent serious injury to vehicle occupants.
⚠ WARNING
- In addition to these instructions, read and follow your vehicle owner's manual regarding installation of child restraints and LATCH. If there is a discrepancy, follow your vehicle owner's manual.
Know Your Lower Anchor Connector Assembly
The lower anchor connector assembly that comes with your child restraint will be one of the two types below.
SecureRight™ Quick Connector™
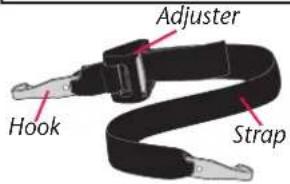
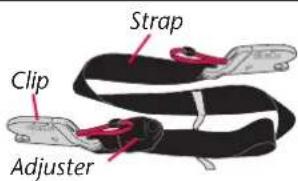
1 SecureRight™ Quick Connector™
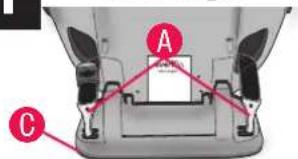
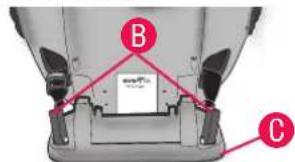
Remove two lower anchor connector hooks A, or clips B, from the base C.
2 Lower Anchor Connector Strap in Forward-facing Position
natural_image
Close-up of a mechanical component with red arrows indicating motion or force direction (no visible text or symbols)Lower Anchor Connector Strap in Rear-facing Position
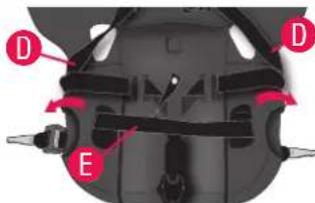
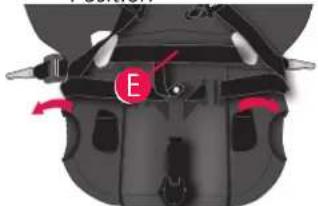
Remove the seat pad from the seat shell (page 47). Loosen harness straps D (page 44) and place them out of the way, as shown.
- If your lower anchor connector strap is already in the forward-facing position (back openings), proceed to step 6.
- If your lower anchor connector strap E is in the rear-facing position (front openings), continue to step 3.
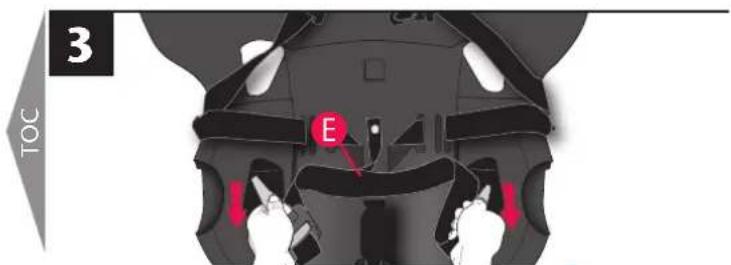
Remove the lower anchor connector strap E from the rear-facing position (front openings).
Insert the ends of the lower anchor connector strap in the forward-facing belt path openings, as shown (back openings). Note: Make sure the adjustment buckle enters the opening on the correct side of the child restraint, as shown.
After the lower anchor connector strap E has been correctly inserted, it will appear as shown above.
Note: Make sure the adjustment buckle F is on the correct side of the child restraint, as shown.
Refer to your vehicle owner's manual to locate the lower anchor bars on your vehicle seat.
Attach the left hook A, or clip B, to the left anchor bar G, and the right hook to the right anchor bar.
DOUBLE CHECK that each lower anchor connector hook or clip is fully engaged by pulling hard on the lower anchor connector strap.
Correct Incorrect
natural_image
Illustration of a pliers being inserted into a wire (no text or symbols visible)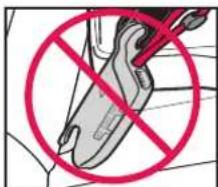
IMPORTANT: Make sure both lower anchor Quick Connectors are facing upward and the straps are not twisted.
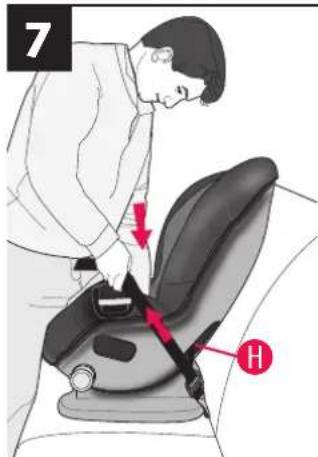
Using your full weight push the child restraint firmly into the vehicle seat, while pulling up on the lower anchor connector strap to tighten.
The lower anchor connector strap must be as tight as
possible. If you can move the child restraint more than 25 mm (1 in.) side to side or front to back at the belt path H, the lower anchor connector strap is not tight enough. You will need to try again, find another location
for your child restraint, or install with the vehicle seat belt (page 30). To remove the lower anchor connector strap, go to page 45.
8 ⚠WARNING
- Failure to follow these instructions could result in serious injury to your child or other vehicle occupants.
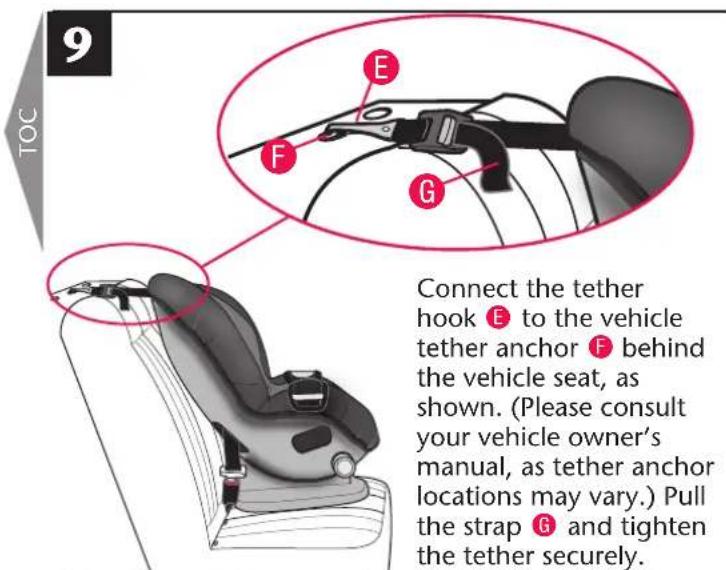
- The tether strap is for forward-facing use only.
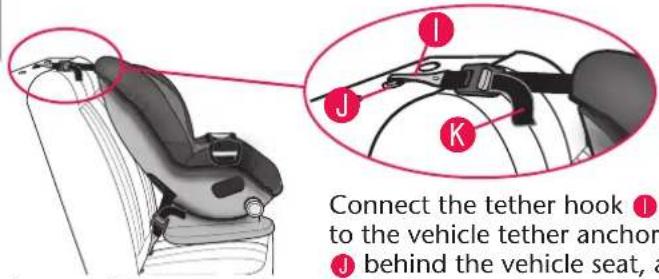
shown. (Please consult your vehicle owner's manual, as tether anchor locations may vary.) Pull the strap K and tighten the tether securely.
Note: If your tether strap does not reach the vehicle tether anchor bracket, call Evenflo's ParentLink for a tether extender, at 1-800-233-5921 (U.S.) or 1-937-773-3971 (Canada), or 01-800-706-12-00 (Mexico).
WARNING
- To avoid a strangulation hazard, you MUST tightly roll or fold excess tether strap and secure with the strap/rubber band.
- Attach the tether hook to the storage clip when not in use. This will keep an unused tether from hitting someone during a crash.
After adjusting the top tether strap, you may have excess strap; DO NOT cut it off. If you do, it may not be long enough to use in another vehicle. Instead, tightly roll up the excess tether strap and place the rubber band around the bundle.
Note: Refer to your vehicle owner's manual for the location of the tether anchor bracket in your vehicle. Older vehicles may not come equipped with anchor bracket hardware. Check with your vehicle dealer. If you have questions regarding tether anchors that are not addressed by the vehicle owner's manual or answered by an authorized dealer/vehicle manufacturer, call Evenflo's ParentLink at 1-800-233-5921 (U.S.) or 1-937-773-3971 (Canada), or 01-800-706-12-00 (Mexico).
Securing Your Child in the Child Restraint
1
natural_image
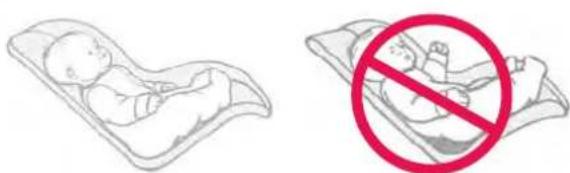
Two illustrations: one showing a baby lying in a blanket, the other showing a baby with a no-smoking symbol (no text or symbols present)Place baby in the child restraint. The baby's back and bottom should be flat against the restraint. If there is a gap, the baby will not be comfortable.
2
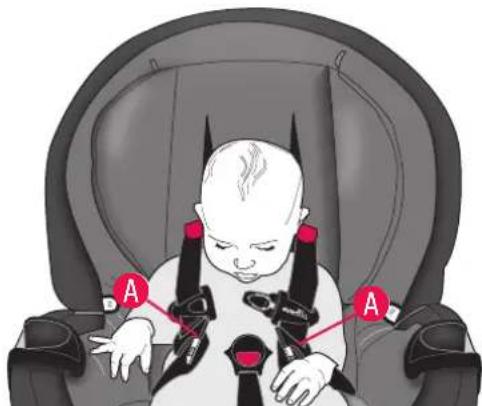
Bring each harness strap over the child's shoulders. Slide the buckle tongues A down towards the buckle to snug the harness.
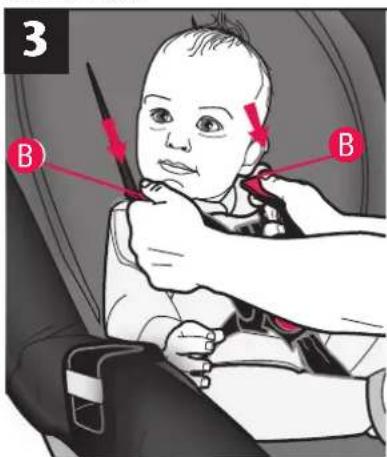
Grasp both harness tabs Ⓑ and slide downward until the harness straps are at the child's shoulders.
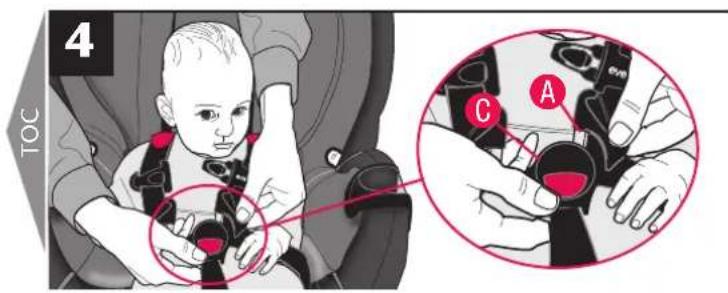
Insert both buckle tongues A into the buckle C. Pull up on the harness strap to check that the buckle tongues are fastened.
natural_image
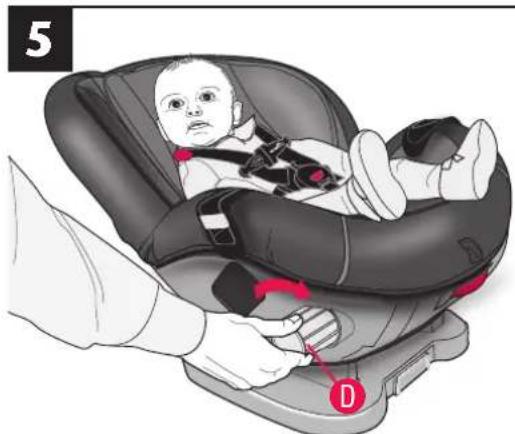
Illustration of a baby in a car seat being assisted by a hand, with no text or symbols present.Tighten the harness straps by turning either one of TensionRight knobs D. To loosen the harness straps, refer to page 44.
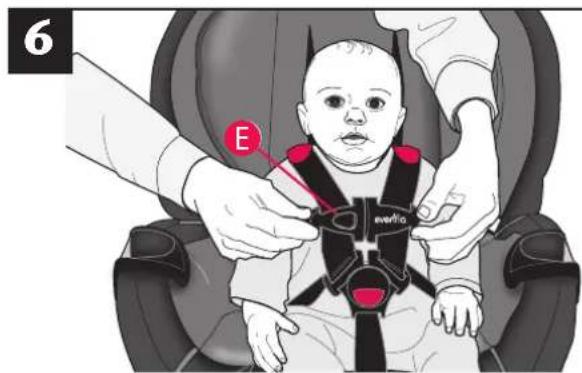
Fasten the chest clip Ⓔ by snapping the two halves together, as shown. Slide chest clip to armpit level.
natural_image
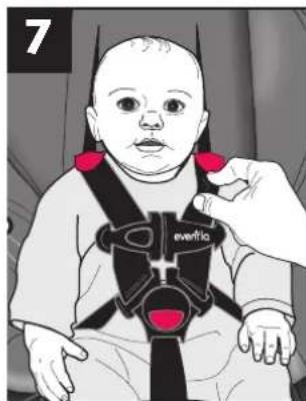
Illustration of a baby wearing a full-body seatbelt with red straps, no text or symbols presentThe harness straps must be snug against the child. A snug strap should not allow any slack. It lies in a relatively straight line without sagging. It does not press on the child's flesh or push the child's body into an unnatural position. Check the harness straps near the shoulders for slack. You should NOT be able to pinch the harness (see illustration). Adjust as needed.
Adjusting the Crotch Strap
As your child grows, you will need to change the crotch strap position so that it is in the slot closest to your child. The crotch strap should ALWAYS be as close as possible to, but NEVER under, the child's bottom.
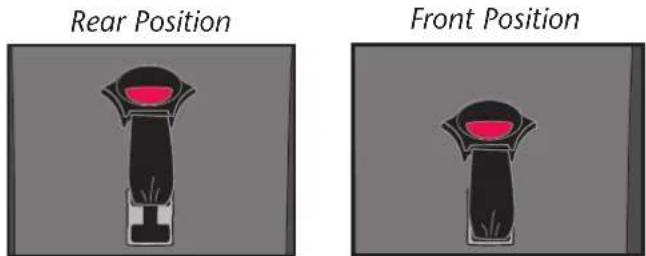
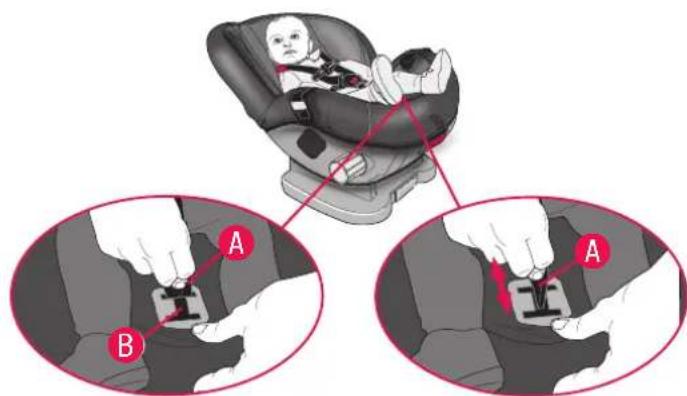
To adjust the crotch strap, grasp the bottom of the strap A and twist it to align with the length wise slot B. Move to the desired position. Twist the strap back into position. Be sure that the crotch strap is securely in place.
Removing Child from the Restraint
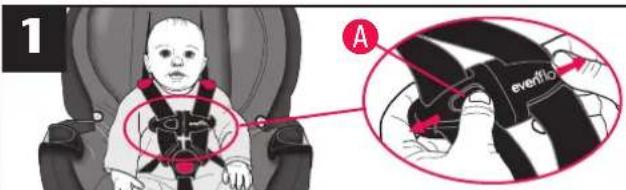
To unfasten the chest clip, push the release button and pull apart.
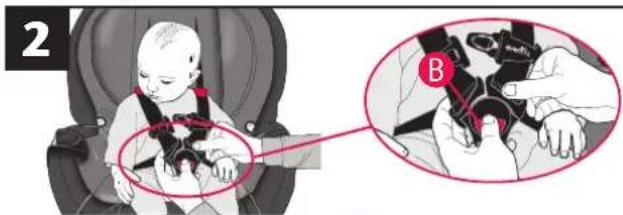
Press the red buckle release Ⓑ, and remove the buckle tongues.

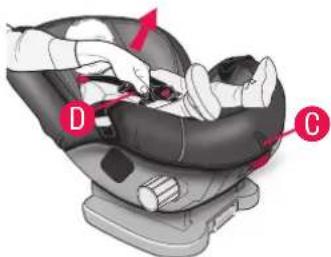
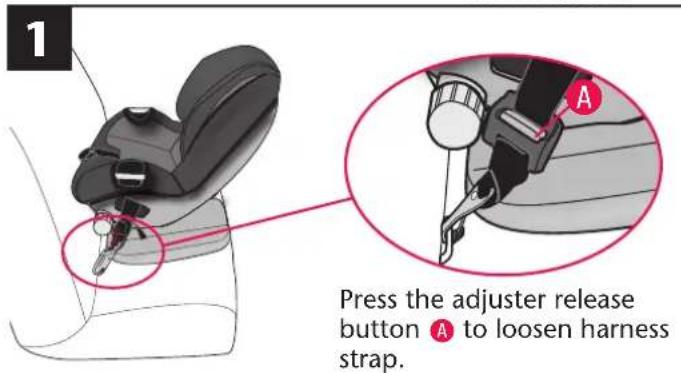
Loosen the harness strap by pressing the tension release button C located on the front of the seat. While pressing the button C, pull up on the harness straps D near the child's lap.
To easily remove your child, unbuckle the crotch buckle and insert the buckle tongues into the buckle tongue holders on each side of the restraint.
Not available on all models.
Removing the Lower Anchor

Connectors
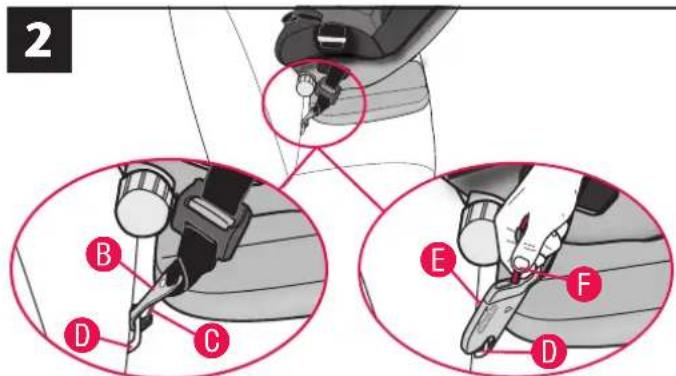
To remove the hook Ⓑ, press the tab Ⓓ and twist, then remove from anchor Ⓓ.
To remove the clip E, pull the red release strap F and remove clip from anchor D.
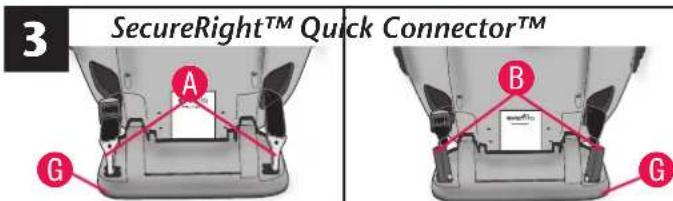
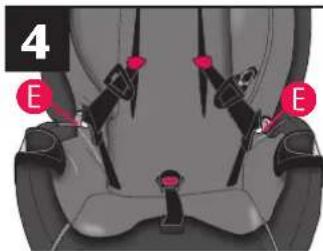
When the lower anchor connector system is not in use, you MUST attach each hook Ⓐ, or clip Ⓑ, onto the base Ⓐ. Be sure the lower anchor connector straps are tucked completely inside the seat shell. A loose lower anchor connector strap and hook may injure your child.

Removing the Tether Strap
1
The tether strap that comes with your child restraint will be one of the two types below.
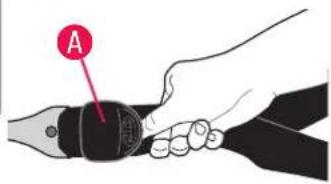
Tilt the adjuster Ⓐ and slide the tether strap to loosen.
natural_image
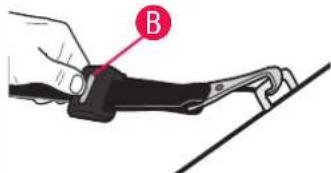
Illustration of a hand holding a black object with a labeled point B, against a diagonal line (no text or symbols beyond label)Press the adjuster release button Ⓑ to loosen tether strap.
2
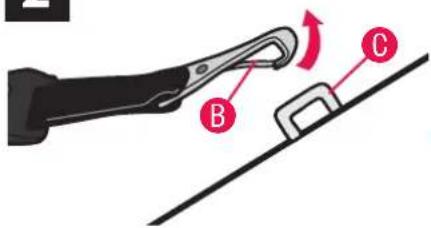
Press the tab B and twist, then remove the hook from the anchor C.
3
WARNING
- To avoid a strangulation hazard, you MUST tightly roll or fold excess tether strap and secure with the strap/rubber band.
- Attach the tether hook to the storage clip when not in use. This will keep an unused tether from hitting someone during a crash.
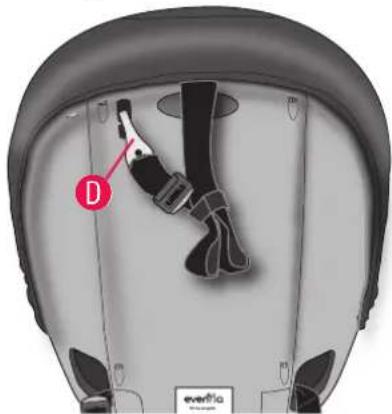
When the tether strap is not in use you MUST attach the hook to the back of the child restraint, and tightly roll and secure the strap with the strap/rubber band. A loose tether strap and hook may injure your child.
Removing the Seat Pad
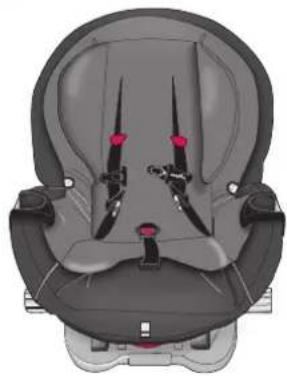
1
You will need to remove your seat pad for cleaning.
natural_image
Top-down view of a baby car seat with black straps and red buttons (no text or symbols)Unbuckle harness straps and disconnect chest clip.
2
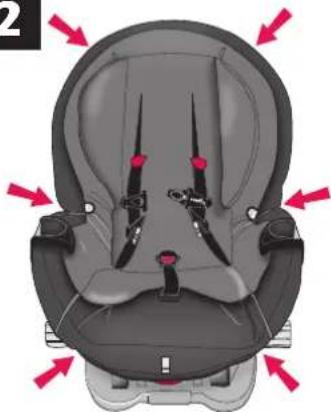
natural_image
Top-down view of a baby car seat with red arrows indicating pressure points (no text or symbols present)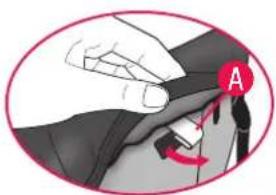
natural_image
Illustration of a hand holding a tool near a small object with a red arrow and letter A label (no text or symbols on the diagram itself)Starting at the bottom of the seat, unfasten all seat pad hooks A.
3
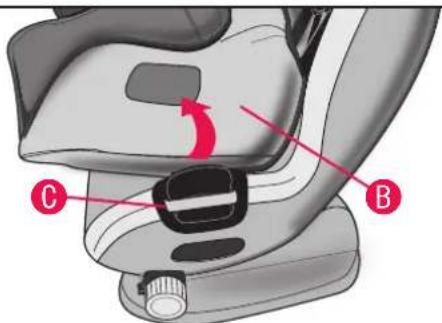
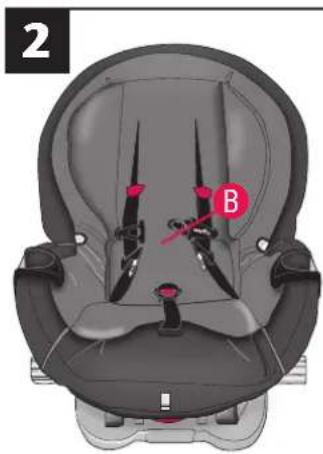
Carefully remove the seat pad B from around each cup holder C.*
*Cup holders not available for all models. Styles may vary.
Open the BeltTrac access flap and remove the seat pad from the seat shell.
Installing the Seat Pad
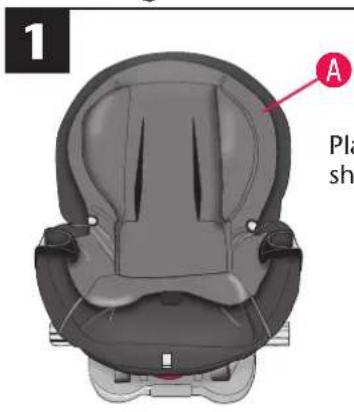
Place seat pad A in seat shell.
natural_image
Interior view of a car comfort seat with labeled points A and B (no text or symbols beyond labels)Push BeltTrac access flap ● behind harness straps and bring buckle assembly through the seat pad, as shown.
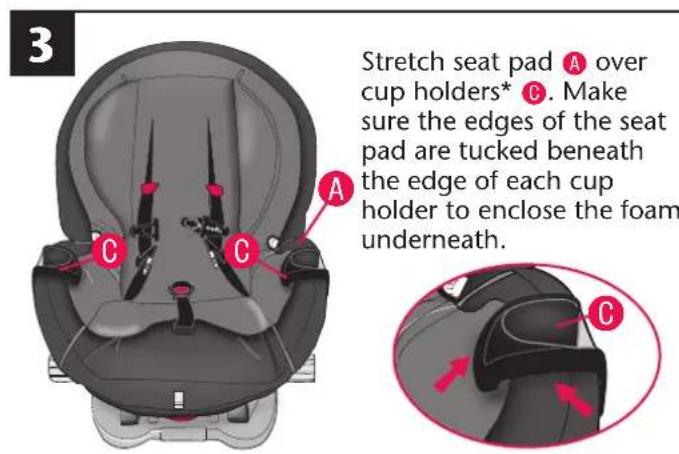
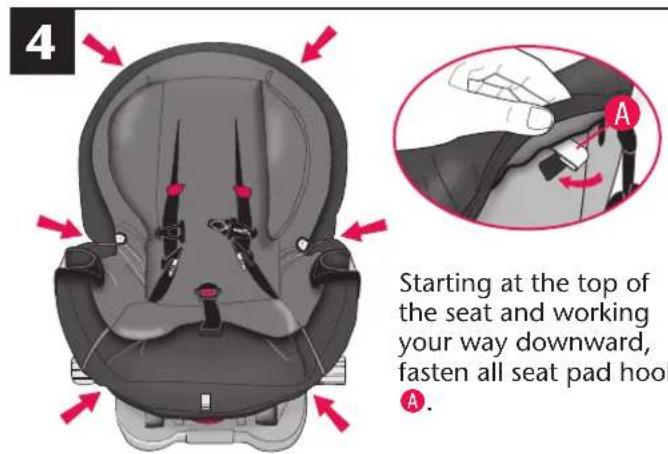
*Cup holders not available for all models. Styles may vary.
Installing the Accessories
The Body Pillow and Infant Head Support
WARNING
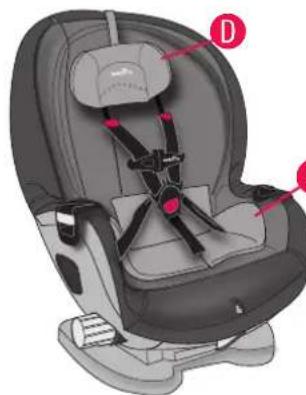
Use the Body Pillow and Infant Head Support with the child restraint in the rear-facing position ONLY.
natural_image
Interior view of a car comfort seat with labeled parts (no text or symbols beyond labels)The optional Body Pillow C is used to help support your child by placing it in the restraint, as shown.
©
For about the first three months, a baby's head needs extra support.
The optional Infant Head Support Ⓓ should lie flat against the seat back, as shown. Be sure to cut off the plastic attachment between the head support and the seat pad. Small parts may be a choking hazard.
Removing the Adjustable Headrest
1
Not available on all models.
natural_image
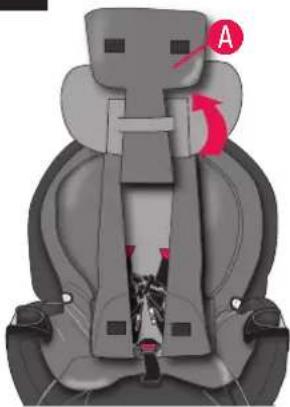
Interior view of a car seat assembly with highlighted cable fasteners (no text or symbols)DO NOT use if the top of the child's ears are above the top of the headrest at its highest position.
Remove the headrest for this child to use the restraint, as long as the child meets all other height and weight requirements.
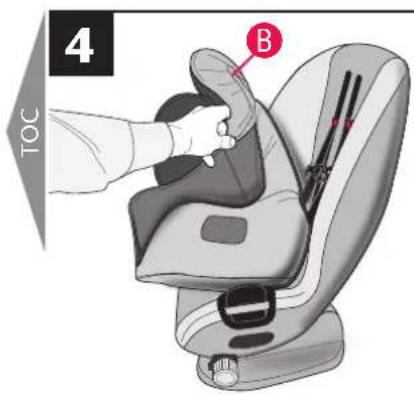
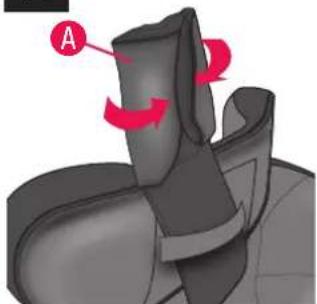
Unbuckle harness straps, disconnect chest clip, and raise BeltTrac access flap A.
2
natural_image
3D mechanical component diagram showing a curved surface with red arrows indicating motion direction (no text or symbols)Fold in both sides of the BeltTrac access flap A.
3
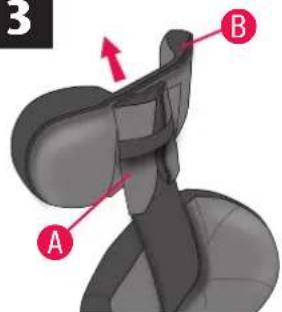
Remove the headrest B from the folded BeltTrac access flap A.
4
natural_image
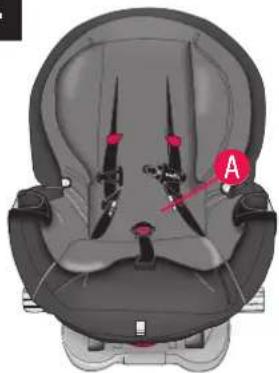
Top-down view of a baby car seat with labeled points A and B (no text or symbols beyond labels)Lower BeltTrac access flap Ⓐ and attach Velcro®.

Securing Your Child Restraint in Aircraft
The Federal Aviation Administration (FAA) recommends that you secure your child for air travel in an appropriate child restraint based on your child's weight and size. Turbulence can happen with little or no warning. When turbulence occurs, the safest place for your child is in a properly installed child restraint, not in an adult's lap or on the aircraft seat with its seat belt. Keeping your child in a child restraint during the flight will help ensure your family arrives safely at your destination.
The FAA recommends that a child weighing:*
- more than 18 kg (40 lbs) use an aircraft seat belt;
• less than 9 kg (20 lbs) use a rear-facing child restraint; and
• from 9 to 18 kg (20 to 40 lbs) use a forward-facing child restraint.
* Please note that these FAA recommendations may vary from those applicable to the use of your child restraint in a motor vehicle.

Installing Child Restraint Rear-facing in Aircraft
1
IMPORTANT: Before installing the child restraint, make sure the aircraft seat is in a fully upright position.
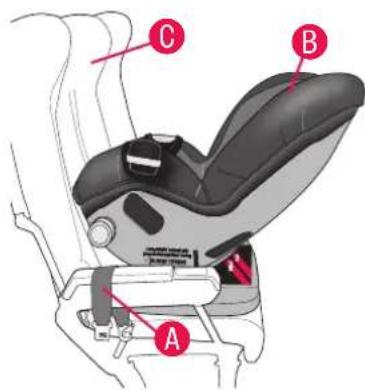
Unbuckle the aircraft seat belts A and lay over the armrests, as shown. Adjust the child restraint B to its recline position (page 21), then place it on the aircraft seat C rear-facing.
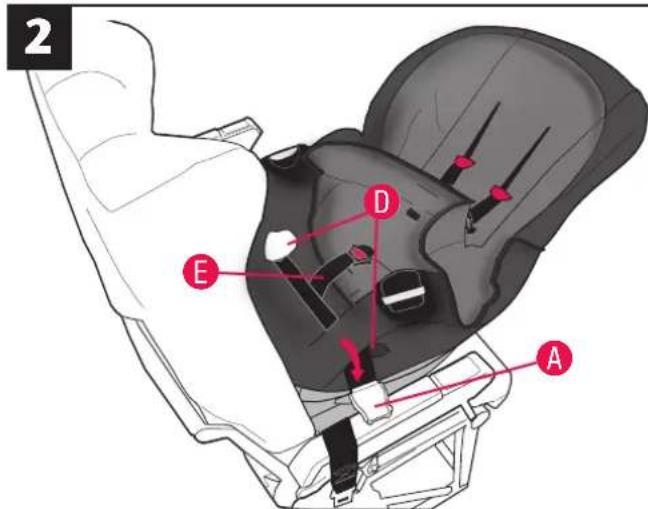
Pull the seat pad off the front of the child restraint. Route the aircraft seat belt A through the rear-facing belt path D opening on one side and continue through the belt path opening on the opposite side of the child restraint, as shown above.
IMPORTANT: Make sure the aircraft seat belt A is in front of the crotch strap E, as shown above.
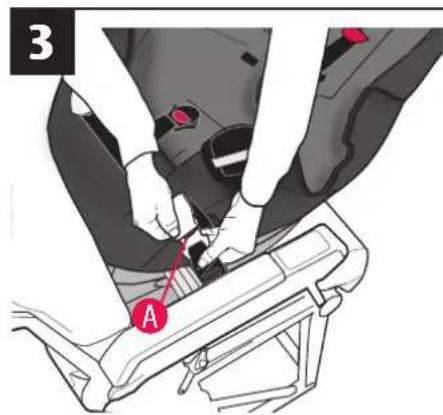
Fasten the aircraft seat belt A.
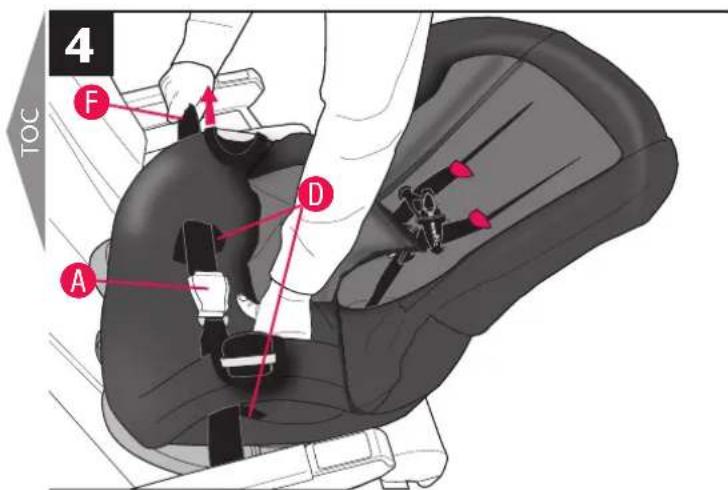
The aircraft seat belt A must be as tight as possible. Route the excess seat belt strap F back through the rear-facing belt path D opening, as shown above. Using your full weight, push the child restraint firmly onto the aircraft seat while pulling on the excess seat belt strap to tighten.
Check your work. Reconnect the seat pad to the front of the child restraint. Try to move the child restraint in all directions. If you can move the restraint more than 25 mm (1 in.) side to side or front to back at the rear-facing belt path D, the aircraft seat belt A is not tight enough, and you MUST install again until the seat belt is tight.
5
Secure your Child in the Child Restraint
Refer to page 41.
Installing Child Restraint Forward-facing in Aircraft

1
IMPORTANT: Before installing the child restraint, make sure the aircraft seat is in a fully upright position.
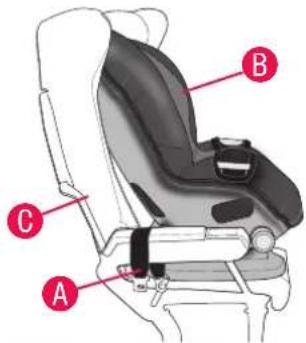
Unbuckle the aircraft seat belts A and lay over the armrests, as shown. Adjust the child restraint B to its upright position (page 30), then place it on the aircraft seat C forward-facing.
2
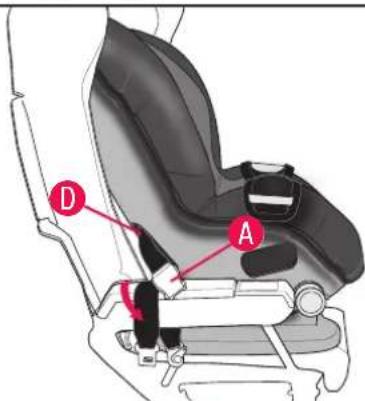
Route the aircraft seat belt A through the forward-facing belt path D opening in the back of the child restraint and continue through the belt path opening on the opposite side of the child restraint.
Note: Lift the restraint's seat pad away for easier access.
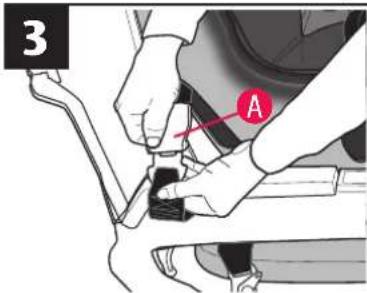
Fasten the aircraft seat belt A.
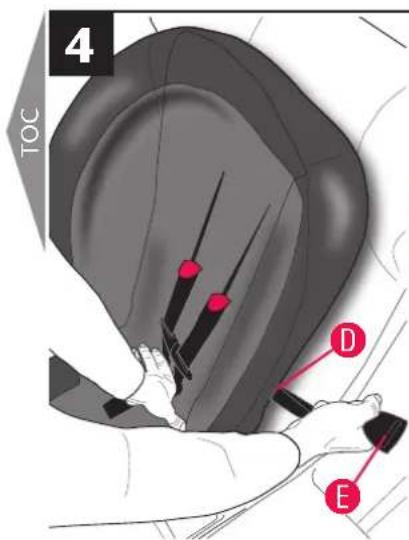
The aircraft seat belt must be as tight as possible. Route the excess aircraft seat belt strap
E back through the forward-facing belt path D opening, as shown above.
Using your full weight, push the child restraint firmly onto the aircraft seat while pulling on the excess seat belt strap to tighten.
Note: Because of the fixed length of aircraft seat belts, the belt buckle could be behind the child's back after tightening the belt. For your child's comfort, Evenflo recommends cushioning the child's back by placing a small pillow or folded-up blanket, or a folded-up jacket, over the belt buckle.
Check your work. Reconnect the seat pad to the front of the child restraint. Try to move the child restraint in all directions. If you can move the restraint more than 25 mm (1 in.) side to side or front to back at the forward-facing belt path, the aircraft seat belt is not tight enough, and you MUST install again until the seat belt is tight.
5
Secure your Child in the Child Restraint
Refer to page 41.
Care and Cleaning
- DO NOT lubricate or immerse in water the LATCH connectors, the buckle, or any other part of this child restraint, unless rinsing is permitted, as stated on the back of the buckle for your restraint.
- Plastic and metal parts may be wiped clean with mild soap and water and dried with a soft cloth. Do not use abrasive cleaners or solvents.
• Take care not to damage any labels.
- The harness can be wiped clean with mild soap and water. Allow harness to air dry.
- Machine wash the seat pad separately in cold water, delicate cycle. Tumble dry 10 to 15 minutes on low heat.
- NEVER use child restraint without the seat pad.
- To protect the child restraint from damage caused by weather, rodents, and other elements common to garages, the outdoors, and other storage locations, remove the seat pad and thoroughly clean the restraint and pad prior to storage. Take care to clean in the areas where crumbs and other debris tend to accumulate.
To help protect the vehicle upholstery, place a towel beneath and behind the child restraint.
Replacement Parts
Limited Warranty
Not available on all models. Styles may vary.
To order replacement parts you can order on-line at www.evenflo.com or contact Evenflo. When you contact us, please have the product model number and date of manufacture (found on the back of the child restraint).


Not included with child restraint, see page 22 or 32
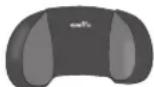

Headrest
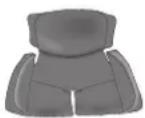

Body Pillow
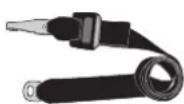

Tether Extender
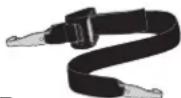

Lower Anchor nrector Assembly
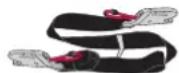

Lower Anchor vector Assembly with quick Connectors™
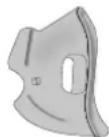

Seat Foam-Rgt
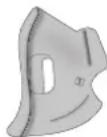

Seat Foam-Lft
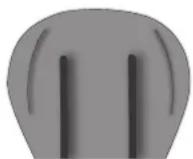

Seat Foam-Top
natural_image
Illustration of a car seat with visible seat, seat, and seat details (no text or symbols)
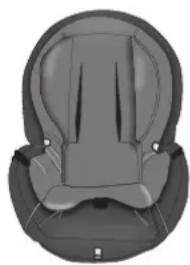
Seat Pad


Cup Holder
Proper Disposal of this Child Restraint
When this child restraint reaches the expiration date found on the date of manufacture label, Evenflo encourages you to dispose of it properly. Most components of this child restraint are recyclable.
- Remove all fabric and padding.
- Remove all screws and disassemble the restraint.
- Recycle all fabric, padding, plastic, foam and metal parts, if accepted by your local recycling center. Responsibly discard the rest.
If your local recycling center won't accept the padding, you may dispose of it in the landfill.
To prevent injury due to hidden damage, lost instructions, outdated technology, etc., discontinue use of this restraint after the expiration date on the label or if it has been involved in a crash.
For a period of 90 days from the original purchase of this Product, Evenflo warrants to the original end user ("Purchaser") this Product (including any accessories) against defects in material or workmanship. Evenflo's sole obligation under this express limited warranty shall be, at Evenflo's option, to repair or replace any Product that is determined to be defective by Evenflo and determined to be covered by this warranty.
Repair or replacement as provided under this warranty is the exclusive remedy of the Purchaser. Proof of purchase in the form of a receipted invoice or bill of sale evidencing that the Product is within the warranty period must be presented to obtain warranty service. This express limited warranty is extended by Evenflo ONLY to the original Purchaser of the Product and is not assignable or transferable to subsequent purchasers or end users of the Product. For warranty service, contact Evenflo's ParentLink Consumer Resource Center at
www.evenflo.com.
EXCEPT TO THE EXTENT PROHIBITED BY APPLICABLE LAW, ANY IMPLIED WARRANTY OF MERCHANTABILITY OR FITNESS FOR A PARTICULAR PURPOSE ON THIS PRODUCT IS HEREBY DISCLAIMED. EVENFLO SHALL NOT BE LIABLE FOR ANY INCIDENTAL, CONSEQUENTIAL, SPECIAL OR PUNITIVE DAMAGES OF ANY KIND FOR BREACH OF THE EXPRESS LIMITED WARRANTY ON THIS PRODUCT, OR ANY WARRANTY IMPLIED BY OPERATION OF LAW. OTHER THAN THE EXPRESS LIMITED WARRANTY SET FORTH ABOVE, THERE ARE NO OTHER WARRANTIES THAT ACCOMPANY THIS PRODUCT AND ANY ORAL, WRITTEN OR ANY OTHER EXPRESS REPRESENTATION OF ANY KIND IS HEREBY DISCLAIMED.
ParentLink®
answers. advice. affirmation."
USA: 1-800-233-5921, 8 AM to 5 PM E.T.
Canada: 1-937-773-3971
México: 01-800-706-12-00
ParentLink®
answers. advice. affirmation.
USA: 1-800-233-5921, 8 AM to 5 PM E.T.
Canada: 1-937-773-3971
México: 01-800-706-12-00
- Child Restraint System
- Owner's Manual
- Rear-facing\*
- Forward-facing\*
- More children are killed every year as passengers in car crashes than by any other type of injury.
- U.S. REGULATORY NOTICE
- CANADIAN REGULATORY NOTICE
- Symbol Legend
- INTERACTIVE PDF
- Table of Contents(TOC)
- Important Information
- Using the Child Restraint
- Rear-facing
- Using the Child Restraint Forward-facing
- General Information
- CHILD REQUIREMENTS
- Forward-facing
- PREMATURE INFANT USE
- ⚠ WARNING WARNING
- Air Bag Warning
- Vehicles built prior to the 2002 model year:
- Model year 2002 and newer vehicles:
- General Warnings
- Location Warnings
- Location Warnings – continued
- Rear-facing and Forward-facing Use
- Premature Infants
- Rear-facing Use Only
- Rear-facing Only Warnings
- Forward-facing Only Warnings
- Seat Belt Warnings
- LATCH Warnings
- Tether Strap Warnings
- Forward-facing Use Only
- Additional Warnings
- WARNING
- Safe Practices
- Recall Information for U.S. Customers
- Public Notice for Canadian Customers
- Motor Vehicle/Aircraft Usage
- Storing Your Instructions
- Visual Glossary
- Child Restraint Features Child Restraint Features
- Description
- Using the Child Restraint Rear-facing
- Child Requirements:
- Rear-facing Installation Checklist
- Secure child restraint to the vehicle seat.
- Set the child in the child restraint.
- Make necessary adjustments.
- Fasten the buckle. Refer to page 42.
- Position and connect chest clip.
- Check your work.
- The seat belt must be as tight as possible.
- Install Locking Clip (not included), if necessary.
- Consult your vehicle owner's manual before installing a locking clip.
- Check your work.
- WARNING
- Rear-facing Installation with Lower Anchor Connectors
- Know Your Lower Anchor Connector Assembly
- WARNING
- Forward-facing Installation Checklist
- Forward-facing Installation with Seat Belt
- The Intermediate Recline Position (Position #2) and Full Upright Position (Position #3) are ONLY
- Intermediate Recline Position (Position #2)
- 2
- 5
- ⚠ WARNING
- Forward-facing Installation with Lower Anchor Connectors
- Refer to your vehicle owner's manual to locate the lower anchor bars on your vehicle seat.
- The lower anchor connector strap must be as tight as
- ⚠WARNING
- Securing Your Child in the Child Restraint
- 1
- Adjusting the Crotch Strap
- Removing Child from the Restraint
- Removing the Lower Anchor
- Connectors
- Removing the Tether Strap
- 3
- Removing the Seat Pad
- Installing the Seat Pad
- Installing the Accessories
- The Body Pillow and Infant Head Support
- ©
- Removing the Adjustable Headrest
- 4
- Securing Your Child Restraint in Aircraft
- Installing Child Restraint Rear-facing in Aircraft
- Secure your Child in the Child Restraint
- Installing Child Restraint Forward-facing in Aircraft
- Care and Cleaning
- Replacement Parts
- Limited Warranty
- Proper Disposal of this Child Restraint
- www.evenflo.com.
- ParentLink®
Brand : Evenflo
Model : Triumph
Category : Car seat