MS115 - Pregnant Acoustic Solutions - Free user manual and instructions
Find the device manual for free MS115 Acoustic Solutions in PDF.

| Product Type | Active Bookshelf Speaker |
| Brand | Acoustic Solutions |
| Model | MS115 |
| Dimensions (W x H x D) | 6.5 x 9.8 x 5.5 inches (16.5 x 25 x 14 cm) |
| Weight | 3.5 lbs (1.6 kg) |
| Power Source | AC 120V/60Hz or DC 12V (adapter included) |
| Power Output | 20W RMS (10W per channel) |
| Frequency Response | 80 Hz – 20 kHz |
| Impedance | 4 Ohm |
| Driver Size | 3.5 inches (89 mm) full-range |
| Bluetooth Version | 4.2 |
| Wireless Range | Up to 33 ft (10 m) |
| Audio Inputs | 3.5mm AUX, RCA (L/R) |
| Controls | Volume knob, power switch, Bluetooth pairing button |
| LED Indicator | Blue (connected), Red (standby), Flashing (pairing) |
| Housing Material | MDF wood with vinyl finish |
| Color | Black |
| Standards Compliance | CE, RoHS |
| Warranty | 1 year limited |
| Included Accessories | AC adapter, 3.5mm audio cable, user manual |
Frequently Asked Questions - MS115 Acoustic Solutions
User questions about MS115 Acoustic Solutions
0 question about this device. Answer the ones you know or ask your own.
Ask a new question about this device
Download the instructions for your Pregnant in PDF format for free! Find your manual MS115 - Acoustic Solutions and take your electronic device back in hand. On this page are published all the documents necessary for the use of your device. MS115 by Acoustic Solutions.
USER MANUAL MS115 Acoustic Solutions
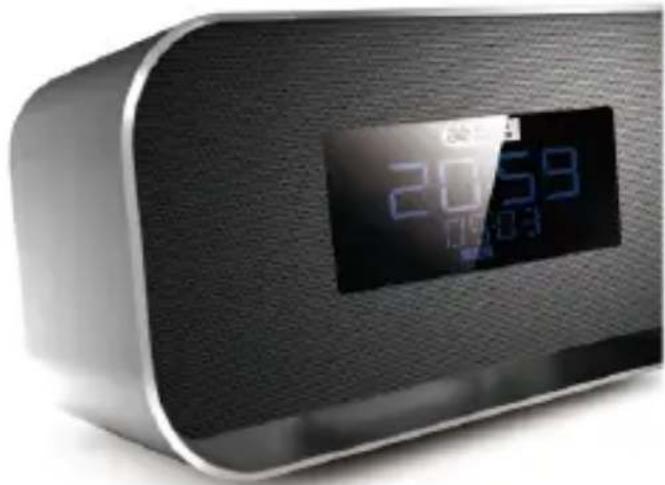
Clock Radio With Bluetooth MS115BT
natural_image
Close-up of a modern digital alarm clock with a digital display showing 20:59 and 10:30 (no visible text or symbols beyond the display)instruction manual

acoustic solutions
Table of Contents
Safety Warnings 2
Pack Contents 7
Product Overview 8
Power Operation.... 11
Install battery.... 11
Connecting the AC Power 12
Charge for external devices 13
Setting the Clock 14
Setting the Clock Manually....14
Synchronize clock with RDS 14
General Operation....15
Adjust volume level 15
Adjust display brightness 15
Listening to Radio Broadcasts....16
Tuning in to a Station 16
Program radio stations manually....17
Show RDS information....18
Play from Bluetooth device....19
Listening to an external device....20
Setting the alarm timer 21
Setting the Sleep Timer 23
Specifications 24
Troubleshooting....25
Safety Warnings
- Read all the instructions carefully before using the unit and keep them for future reference.
- Retain the manual. If you pass the unit onto a third party make sure to include this manual.
- The product complies with the requirement of the 1999/5/EC directive.
Damage
- Please inspect the unit for damage after unpacking.
- Do not continue to operate the unit if you are in any doubt about it working normally, or if it is damaged in any way - switch off, withdraw the mains plug and consult your dealer.
Location of Unit
- The unit must be placed on a flat stable surface and should not be subjected to vibrations.
- Do not place the unit on sloped or unstable sur faces as the unit may fall off or tip over.
- The mains socket must be located near the unit and should be easily accessible.
Temperature
- Avoid extreme degrees of temperature, either hot or cold.
Place the unit well away from heat sources such as radiators or gas/electric fires.
- Avoid exposure to direct sunlight and other sources of heat.
Naked Flames
- Never place any type of candle or naked flame on the top of or near the unit.
Moisture
- To reduce the risk of fire, electric shock or product damage, do not expose this unit to rain, moisture, dripping or splashing. No objects filled with liquids, such as vases, should be placed on the unit.
- If you spill any liquid into the unit, it can cause serious damages. Switch it off at the mains immediately. Withdraw the mains plug and consult your dealer.
Ventilation
- To prevent the risk of electric shock or fire hazard due to overheating, ensure that curtains and other materials do not obstruct the ventilation vents.
- A minimum distance of 5cm around the unit should be maintained to allow for sufficient ventilation.
- Do not install or place this unit in a bookcase, built-in cabinet or in another confined space.
Ensure the unit is well ventilated.
Safety
- Always disconnect the unit from the mains supply before connecting/ disconnecting other devices or moving the unit.
- Unplug the unit from the mains socket before a lightning storm.
- In the interests of safety and to avoid unnecessary energy consumption, never leave the unit switched
on while unattended for long periods of time, e.g. overnight, while on holiday or while out of the house. Switch it off and disconnect the mains plug from the mains socket.
Mains Adapter Cable
- Make sure the unit or the unit stand is not resting on top of the mains adapter cable, as the weight of the unit may damage the cable and create a safety hazard.
- Where the plug of the Direct Plug-in Adapter coupler is used as the disconnect device, the disconnect device shall remain readily operable.
Mains Adapter
- The mains adapter will continue to draw electricity from the mains supply when plugged in the mains socket. In the interests of safety and to avoid unnecessary energy consumption, never leave the adapter plugged in the mains socket while unat tended for long periods of time.
Disconnect the adapter from the power supply.
Interference
- Do not place the unit on or near appliances which may cause electromagnetic interference. If you do, it may adversely affect the operating performance of the unit, and cause a distorted picture or sound.
Batteries
- Do not ingest the battery, chemical Burn Hazard. This product contains a coin/button cell battery. If the
coin/button cell battery is swallowed, it can cause severe internal burns in just 2 hour and can lead to death.
- Keep new and used batteries away from children. If the battery compartment does not close securely, stop using the product and keep it away from children. If you think batteries might have been swallowed or placed inside any part of the body, seek immediate meeical attention.
- Batteries used in the remote control for this unit are easily swallowed by young children and this is dangerous.
- Keep loose batteries away from young children and make sure that the battery holder tray is secure in the remote control. Seek medical advice if you believe a cell has been swallowed.
- Please dispose of batteries correctly by following the guidance in this manual.
- Batteries (battery pack or batteries installed) shall not be exposed to excessive heat such as sunshine, fire or the like.
Supervision
- Children should be supervised to ensure that they do not play with the unit.
- Never let anyone especially children push anything into the holes, slots or any other openings in the case
- this could result in a fatal electric shock.
Service
- To reduce the risk of electric shock, do not remove screws.
The unit does not contain any user-serviceable parts. Please leave all maintenance work to qualified personnel. - Do not open any fixed covers as this may expose dangerous voltages.
Maintenance
- Ensure the unit is fully unplugged from the power supply before cleaning.
- Do not use any type of abrasive pad or abrasive cleaning solutions as these may damage the unit's surface.
- Do not use liquids to clean the unit.
Pack Contents
Make sure all of the following contents are included.
- Main Unit
- Main Adaptor
- Audio Cable
- Instruction Manual
Product Overview
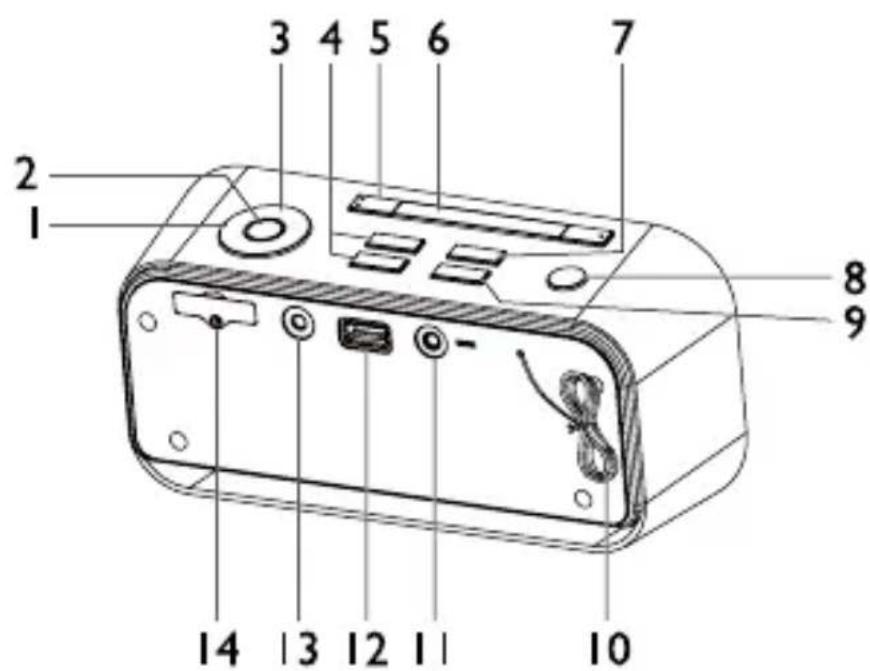

1. /
- Select a preset radio station
- Adjust time
2. ▶II/SET
- Set the clock
- Program radio stations
3. VOL+ ▲VOL-▼
- To increase/decrease the volume
4. TUNE ▶▶/TUNE ◀◀
- Tune to a radio station
5. ALARM1/ALARM2
- Set the alarm timer
- Turn off the alarm tone
- View alarm settings
- Stop alarm
6. BRIGHTNESS/SNOOZE
- Adjust the display brightness
- Repeat the alarm
7. SLEEP
- Set the sleep timer
8. /SOURCE
- Turn on the unit or switch to standby mode
- Select a source
9. DISPLAY
- For selected FM radio stations, display RDS information
10. ANT
- Attached FM radio antenna
- AUX IN
- Connect an external device
- 5V=4A
- USB Charging Port
- DC 5V
- Connect the AC adapter
-
Battery compartment
-
Speaker
-
Display panel
- Show current status
Power Operation
Caution: Make all connections before plugging the unit into the AC Power outlet.
Install battery
Caution: Risk of explosion! Keep battery away from heat, sunshine or fire. Never discard batteries in fire.
For first-time use:
Remove the protective tab to activate the unit battery.
- Loosen the screw on the battery compartment cover with a screwdriver.
- Replace a new one lithium CR2025 battery with correct polarity (+/-) as indicated.
- Close the battery compartment to the original position and tighten the screw with a screwdriver.
Note: Remove the battery from unit when it is not to be used for a long period.
Connecting the AC Power
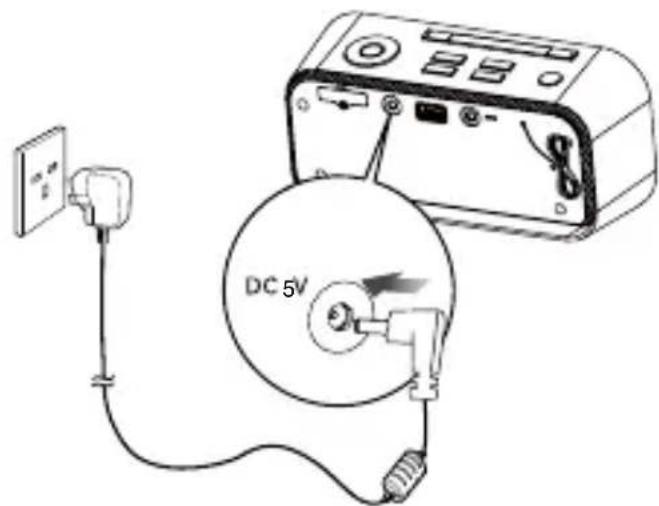
Insert the AC adapter's DC plug into the unit, then insert one side of AC power cord into a wall outlet, and your system is at your command!
Caution: Be sure to unplug the power plug from the outlet when going out or when the unit is not in use for an extended period of time.
Turning the Power On and Off
- Turning the System On
Press the ⏻ button, the unit switches to the last selected source.
- Switching the system to Standby mode
Press and hold the ⏻ button to switch the unit to standby mode. The time (if set) appear on the display panel.
Charge for external devices
When the unit is connected to power, the 5V = 1A socket on the rear of the unit to charge of part of the external devices, such as: phone.
Setting the Clock
Setting the Clock Manually
- In standby mode, press and hold the SET button for 2 seconds, [24 H] begins to blink on the display panel.
- Set the 12/24 hour format with the ▶ or ◀ buttons.
- Press the SET button to confirm and the hour digits begin to blink.
- Repeat above steps 2-3 to set the hour, minute, month, day, and year.
Note:
- If no button is pressed in 15 seconds, the unit exits clock setting mode automatically.
Synchronize clock with RDS
You can synchronize time shown on the unit with that on the RDS station.
- Tune to a RDS radio station that transmits time signals.
- Press the SET button, the unit reads RDS time automatically.
General Operation
Adjust volume level
During play, press the VOL+▲ or VOL-▼ buttons to increase/decrease the volume level.
Adjust display brightness
Press the BRIGHTNESS button repeatedly to select different levels of display brightness.
Listening to Radio Broadcasts
Caution:
- Position the antenna as far as possible from TV, VCR or other radiation source.
- For optimal reception, fully extend and adjust the position of the antenna.
Tuning in to a Station
- Repeatedly press SOURCE button to select the FM source.
- Select a station using one of the following methods.
- Auto Tuning
Press and hold the TUNE▶▶ or TUNE◀◀ buttons for one second or more, the frequency changes down or up automatically until a station is found.
- Manual Tuning
Repeatedly press the TUNE▶▶ or TUNE◀◀ buttons to change the frequency until you find the station you want.
- Select a preset radio station
Repeatedly press the ▶ or ◀ buttons to select the desired preset number. Its band and frequency are displayed on the front panel.
Program radio stations manually
You can program a maximum of 20 preset radio stations (FM).
- Automatically
Press and hold the SET button for two second or more to activate automatic program mode.
- [AUTO] is displayed.
- All available stations are programmed.
- The first programmed radio station is broadcast automatically.
- Manually
- Tune to a radio station.
- Press the SET button to activate program mode.
-
The preset number will blink.
-
Repeatedly press the ▶ or ◀ buttons to allocate a number to this radio station.
Note: If you select more than 20, the preset number will be changed to "1" automatically.
-
Press the SET button again to store the station.
-
Repeat above steps 1 to 4 for each station you want to store in memory with a preset number.
Note: If the system is unplugged or if a power failure occurs, the preset stations will not be erased.
Show RDS information
Many FM stations are broadcasting added data compatible with Radio Data System (RDS). This radio set offers convenient functions using such data.
Press the DISPLAY button repeatedly to select the information that displayed as follows.
- Programme Service Name
When an RDS station is received, the RDS name of that station instead of the frequency. When the DISPLAY button is pressed during Programme Service display, the Clock Time is displayed for few seconds, then Programme Service display returns.
- Programme Type
Programme type identification signal. (Example: News, Rock, Classical music.)
- Radio Text
This displays the news of stations.
- Clock Time System
The Clock Time system may not properly operate in areas where RDS Clock Time service is not available. Once Clock Time service is received, the Clock Time system keeps operating. "RDS CLOCK" is displayed in areas where no Clock Time services are available.
- Changing Display
During Programme Service display, press the DISPLAY button repeatedly to select the Clock Time, Programme Type or Frequency. They will be displayed for a few seconds, then the Programme Service display returns.
Play from Bluetooth device
The unit has a Bluetooth function that can receive a signal within 10 metres.
Pairing the unit with a Bluetooth device to listen to music:
- Repeatedly press SOURCE button to select the bluetooth source.
- Activate your Bluetooth device and select the search mode.
- "MS115BT" will appear on your Bluetooth device.
- Select "MS115BT" and enter "0000" for the password if necessary.
-
Start music play on your Bluetooth device, you can use this unit to control the function to your Bluetooth device.
-
To pause/resume play, press ▶||.
- To skip to a track, press ◀/▶.
- To increase or decrease the volume, press
VOL+ ▲/VOL-▼.
- Long pressing the SET button for 5 seconds or more to disable the function from your Bluetooth device.
Note:
- If the signal strength is weak, your Bluetooth receiver may disconnect, but it will re-enter pairing mode automatically.
- This unit supports A2DP (Advanced Audio Distribution Profile).
Listening to an external device
You can also listen to an external audio device through this unit.
-
Repeatedly press SOURCE button to select the AUDIO IN source.
-
Connect the audio cable to:
- the AUX IN jack (3.5mm) on the back of the unit.
- the headphone jack on an external device.
- Start to play the device (see the device user manual).
Setting the alarm timer
You can set two alarms which go off at different time.
- Ensure that you have set the clock correctly. (See "Setting the Clock".)
- Press and hold the ALARM1 or ALARM2 buttons for 2 seconds or more, the " 🔍" or " 🔊 and the hour digits begin to blink.
- Set the hour with the ▶ or ◀ buttons.
- Press the SET button to confirm and the minute digits begin to blink .
- Repeat above steps 3-4 to set the minute.
- Repeat above steps 3-4 to select whether to ring alarm the whole week, on weekdays, or at weekend.
- Repeat above steps 3-4 to set the alarm tone (FM, BUZZ or USB).
- Repeat above steps 3-4 to set the alarm volume.
Note: If USB source is selected and the audio cannot be played, BUZZ is activated automatically.
To deactivate or re-activate an alarm timer
Press the ALARM1 or ALARM2 buttons twice in normal clock display mode to activate alarm function and again to deactivate it.
- If timer is activated, " 🔊" or " 🔊 is displayed.
- If timer is deactivated, " 🔊" or " 🔊 is disappeared.
Repeat alarm
When the alarm rings, press the SNOOZE button, the alarm repeats ringing 9 minutes later.
Stop alarm ring
When the alarm rings, press the corresponding ALARM1 or ALARM2 buttons, the alarm stops but the alarm settings remain.
View the alarm settings
Press the corresponding ALARM1 or ALARM2 buttons.
Setting the Sleep Timer
You can set the unit to turn off automatically after a certain period of time.
- When the unit is turned on, press the SLEEP button repeatedly to select a set period of time (in minutes):
OFF, 120, 90, 60, 45, 30, 15
When sleep timer is activated, the "SLEEP" is displayed.
To deactivate sleep timer
Repeatedly press the SLEEP button until "OFF" is displayed.
When sleep timer is deactivated, the “SLEEP” is disappears.
Specifications
Main adaptor
Model No. Y12FE-050-2000B
Vendor ....Kings
Input.....AC100-240V, 50-60Hz, 0.35A
Output....5V = 2A
Main Unit
FM Frequency Range....87.5\~108 MHz
Output Power....3W x 2 RMS
USB Port.... 5V---1A
Dimensions....185(W) x 91(H) x 65(D) mm
Speaker Impedance 3Ω
Speaker Input Power....3W
Troubleshooting
If you are having a problem with your unit, check this list for a possible solution before calling for service.
If you cannot solve the problem from the hints given here, or the unit has been physically damaged, call a qualified person, such as your dealer, for service.
No power
- Ensure that the AC adapter is connected securely.
- Ensure that there is power at the AC Mains.
No sound
- Adjust the volume.
No response from the unit
- Disconnect and reconnect the AC adapter, then turn on the unit again.
Poor radio reception
- Increase the distance between the unit and your TV or VCR.
- Fully extend and adjust the FM antenna.
Timer does not work
- Set the clock correctly.
- Switch on the timer.
Clock/timer setting erased
- Power has been interrupted or the power cord has been disconnected.
- Reset the clock/timer.

The symbol on the product or its packaging indicates that this product must not be disposed of with your other household waste. Instead, it is your responsibility to dispose of your waste equipment by handing it over to a designated collection point for the recycling of waste electrical and electronic equipment. The separate collection and recycling of your waste equipment at the time of disposal will help conserve natural resources and ensure that it is recycled in a manner that protects human health and the environment.
For more information about where you can drop off your waste for recycling, please contact your local authority, or where you purchased your product.
Notes for battery disposal
The batteries used with this product contain chemicals that are harmful to the environment. To preserve our environment, dispose of used batteries according to your local laws or regulations. Do not dispose of batteries with normal household waste.
For more information, please contact the local authority or your retailer where you purchased the product.
CE

PRODUCT GUARANTEE
This product is guaranteed against manufacturing defects for a period of

Year
This product is guaranteed for twelve months from the date of original purchase. Any defect that arises due to faulty materials or workmanship will either be replaced, refunded or repaired free of charge where possible during this period by the dealer from whom you purchased the unit.
The guarantee is subject to the following provisions:
- The guarantee does not cover accidental damage, misuse, cabinet parts, knobs or consumable items.
- The product must be correctly installed and operated in accordance with the instructions contained in this manual.
- It must be used solely for domestic purpose.
- The guarantee will be rendered invalid if the product is re-sold or has been damaged by inexpert repair.
- Specifications are subject to change without notice.
- The manufacturer disclaims any liability for the incidental or consequential damages.
- The guarantee is in addition to, and does not diminish your statutory or legal rights.
Guarantor: Argos Ltd
489 - 499 Avebury Boulevard
Central Milton Keynes
MK9 2NW
- Table of Contents
- Safety Warnings
- Damage
- Location of Unit
- Temperature
- Naked Flames
- Moisture
- Ventilation
- Safety
- Mains Adapter Cable
- Mains Adapter
- Interference
- Batteries
- Supervision
- Service
- Maintenance
- Pack Contents
- Product Overview
- /
- ▶II/SET
- VOL+ ▲VOL-▼
- TUNE ▶▶/TUNE ◀◀
- ALARM1/ALARM2
- BRIGHTNESS/SNOOZE
- SLEEP
- /SOURCE
- DISPLAY
- ANT
- Power Operation
- Install battery
- For first-time use:
- Connecting the AC Power
- Turning the Power On and Off
- - Turning the System On
- - Switching the system to Standby mode
- Charge for external devices
- Setting the Clock
- Setting the Clock Manually
- Note:
- Synchronize clock with RDS
- General Operation
- Adjust volume level
- Adjust display brightness
- Listening to Radio Broadcasts
- Caution:
- Tuning in to a Station
- - Auto Tuning
- - Manual Tuning
- - Select a preset radio station
- Program radio stations manually
- - Automatically
- - Manually
- Show RDS information
- - Programme Service Name
- - Programme Type
- - Radio Text
- - Clock Time System
- - Changing Display
- Play from Bluetooth device
- Listening to an external device
- Setting the alarm timer
- To deactivate or re-activate an alarm timer
- Repeat alarm
- Stop alarm ring
- View the alarm settings
- Setting the Sleep Timer
- To deactivate sleep timer
- Specifications
- Main adaptor
- Main Unit
- Troubleshooting
- No power
- No sound
- No response from the unit
- Poor radio reception
- Timer does not work
- Clock/timer setting erased
- Notes for battery disposal
- PRODUCT GUARANTEE
- Year
Brand : Acoustic Solutions
Model : MS115
Category : Pregnant