OP40R - Ventilateur domestique Omega Altise - Free user manual and instructions
Find the device manual for free OP40R Omega Altise in PDF.

| Product Type | Pedestal Fan |
| Model | OP40R |
| Brand | Omega Altise |
| Dimensions (Height) | 130 cm |
| Base Diameter | 35 cm |
| Net Weight | 5 kg |
| Power Supply | 220-240 V ~ 50 Hz |
| Power Consumption | 60 W |
| Speed Settings | 3 speeds (Low, Medium, High) |
| Oscillation | Yes, 90° horizontal |
| Timer | 0 to 7.5 hours |
| Remote Control | Included (battery CR2025) |
| Adjustable Tilt | Yes, manual tilt |
| Blade Diameter | 40 cm |
| Noise Level | ≤ 55 dB(A) |
| Airflow | 2000 m³/h (max) |
| Material | ABS plastic, metal stand |
| Color | Black and silver |
| Cord Length | 1.8 m |
| Safety Features | Overheat protection, tip-over switch |
| Cleaning | Wipe with damp cloth; do not immerse |
| Warranty | 2 years (manufacturer) |
Frequently Asked Questions - OP40R Omega Altise
User questions about OP40R Omega Altise
0 question about this device. Answer the ones you know or ask your own.
Ask a new question about this device
Download the instructions for your Ventilateur domestique in PDF format for free! Find your manual OP40R - Omega Altise and take your electronic device back in hand. On this page are published all the documents necessary for the use of your device. OP40R by Omega Altise.
USER MANUAL OP40R Omega Altise
40cm Remote Control Pedestal Fan

natural_image
White ALTise air conditioner fan with a clear blue and white design, mounted on a stand (no text or symbols visible on the fan itself)Instruction Manual
Important Safety Instructions
- Read all instructions.
- Disconnect the power plug before dismantling, assembling or before cleaning.
- Avoid touching mobile parts of the fan.
- Make sure the fan is on a dry and even surface.
- Never insert fingers, pencils or any other objects through the guards whenever the power plug is connected, especially while running.
- The appliance is not intended for use by young children or infirm persons unless they have been adequately supervised by a responsible person to ensure that they can use the appliance safely.
- Young children or infirm persons should be supervised to ensure that they do not play with the appliance.
- Do not use the appliance for any other purpose than its intended use.
- The fan must not be used if the guards are not fastened according to instructions.
- When the power cord is damaged, it must be replaced by the manufacturer or its service agent or a similarly qualified person in order to avoid a hazard.
- Do not use your appliance with an extension cord unless it has been checked and tested by a qualified electrician or electrical supplier.
Read all instructions before using this unit. Keep them for future reference.
Specifications
| Model | OP40R |
| Rated Voltage | 220-240V / 50Hz |
| Watts | 50W |
| Dimensions (h x w x d) mm | 1280 x 400 x 400 |
| Controls | Electronic / Remote |
scil
| Settings | 3 speed, timer-off |
| Fan blade size | 40cm |
| Tilt action | Tilting fan head |
| Oscillating fan head | |
| Warranty | 2 year replacement |
Assembly Instructions
- Remove all items of packaging from the fan.
- Insert the pedestal tube into the base plate. Carefully turn the unit upside down and secure with the L shaped locking screw as shown in Figure 1. Return to an upright position.
-
Loosen the height adjustment ring and extend the support pole. Initially the support pole will be held tightly in place. If necessary, use a pair of pliers to grasp the support pole and pull it into position.
-
Retighten the height adjustment ring to prevent slipping, then place the fan assembly (control panel and motor casing) onto the pole and tighten the pole screw manually. Do not over tighten.
-
Remove the blade cap from the motor shaft by turning it clockwise. Then remove the locking nut by turning it anti-clockwise.
-
Place the rear grille into position, ensuring that it is aligned with the locating lugs (see Figure 2). If this is done correctly, the carry handle on the grille will be at the top.
-
Fix the grille into position by replacing the rear grille locking nut tightly by hand. Do not force the locking nut (see Figure 2).
-
The groove in the centre of the fan blade aligns with the T-bar on the motor shaft to ensure it is positioned correctly.
-
Fix the blade into place by gently hand tightening the blade cap onto the motor shaft in an anti-clockwise direction (see Figure 3). Do not over tighten.
-
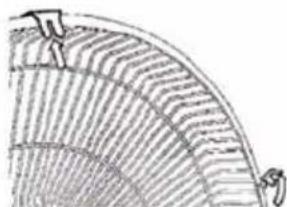
Open all locking clips on the front grille (see Figure 4).
-
Place the front grille into position and secure it by fastening the clips over the outer rim. The small screw and nut at the bottom of the grille must be fitted for additional safety. (see Figure 5).

natural_image
Simple line drawing of a circular basin with a central column and a top outlet (no text or symbols)Figure 1.
Figure 2.

text_image
Locating lugs Locking Nut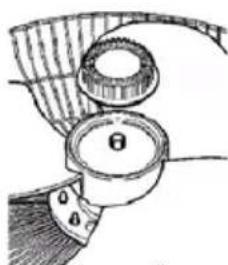
natural_image
Technical illustration of a mechanical component with labeled parts (no readable text or symbols)Figure 3.
natural_image
Diagram of a curved, segmented structure with internal grid lines and two small protrusions (no text or symbols)Figure 4.

natural_image
Diagram of a curved structure with grid pattern and labeled points (no text or symbols)Figure 5.
Operating Instructions
- Use in a dry place, free of excessive humidity and water.
- When connected to the power the Power LED on the fan control panel will glow.
- This unit can be operated by the control panel on the fan or by remote control in the same manner. The corresponding LED on the fan control panel will be illuminated according to your selection.
ON/OFF: Will turn the fan on and off. The fan will start in NORMAL mode and LOW fan speed will be selected.
SPEED: Selects the speed of the fan from LOW, MEDIUM and HIGH.
MODE: There are three types of airflow that can be selected:
- Normal mode is usual fan function airflow and can be combined with the 3 fan speeds as desired.
- Natural mode can be selected in combination with the 3 fan speeds.
a. When HIGH is selected the fan will alternate between High, Medium and Low speeds.
b. When MEDIUM is selected the fan will alternate between Medium and Low speeds.
c. When LOW is selected the fan will alternate between Low speed and OFF.
- Sleep mode when combined with the 3 fan speeds will:
a. When HIGH is selected the fan will operate at High Natural mode for 30mins, then Medium Natural mode for 30mins, then Low Natural mode for the remaining time.
b. When MEDIUM is selected the fan will operate at Medium Natural mode for 30mins, then Low Natural mode for the remaining time.
c. When LOW is selected the fan will operate on Low Natural mode.
TIME: Pressing the time key will activate the timer-off function. Each time the key is pressed the timer will be increased by 30mins up to a maximum of 7.5 hours. When the timer reaches the set time the fan will stop automatically.
OSC: The oscillation button will start the fan oscillating. Press again for fixed operation.

text_image
OSC TIME MODE SPEED ON/OFF omega altiseFan Direction Adjustment
- Do not attempt to make any adjustment to the direction of the grille and fan assembly until the fan has been turned off and unplugged from the socket.
- To adjust the direction of the fan, hold the grille and gently tilt the fan head until the desired position is reached.
- Plug the fan back into the socket and turn the fan on.
Care and Maintenance
- Always disconnect the cord from the electrical outlet when cleaning your fan.
- Light accumulated dust may be removed from the fan with a soft cloth or vacuum cleaner using the dusting brush attachment.
- Wipe the exterior surfaces of the fan occasionally with a cloth moistened (not dripping wet) with a mild soap solution. Dry the case thoroughly with a soft dry cloth before operating the fan.
- Avoid the use of gasoline, benzine, thinner etc as they may result in damage to the fan.
- Store the fan in a clean dry place when not in use.

CAUTION! Do not immerse the fan in water or allow water to drip into the interior of the fan housing as this could create a fire or electric shock hazard.
WARNING! Do not attempt to open or repair the fan yourself. Doing so could void the warranty and cause damage or personal injury.
Omega Altise products are distributed in Australia by MEA,
(A Division of Hagemeyer Brands Australia Pty Ltd)
ABN 28 001 375 686
Locked Bag 4013, Kingsgrove NSW 2208
Phone: 1300 739 033
Fax: 1800 838 899
Email: customerservice@meaappliances.com.au
Web: meaappliances.com.au