MW1612B - Microwave Emerson - Free user manual and instructions
Find the device manual for free MW1612B Emerson in PDF.


| Product Type | Countertop Microwave Oven |
| Brand | Emerson |
| Model | MW1612B |
| Capacity | 1.6 cu. ft. |
| Dimensions (W x D x H) | 20.5 x 16.5 x 12.5 inches |
| Weight | 32 lbs |
| Power Supply | 120V ~ 60Hz, 1500W |
| Microwave Power Output | 1200W |
| Control Type | Digital touchpad with LED display |
| Functions | Quick cook, defrost, popcorn, reheat, timer, clock |
| Door Opening | Push-button release |
| Interior Light | Yes |
| Turntable | Removable glass tray, 13.5 inch diameter |
| Child Lock | Yes |
| Auto Shut-off | Yes |
| Cleaning Instructions | Wipe exterior with damp cloth; clean interior with mild soap and water |
| Spare Parts Availability | Contact Emerson customer service or authorized dealers |
| Repair Service | Refer to user manual for authorized service centers |
| Warranty | 1 year limited warranty |
Frequently Asked Questions - MW1612B Emerson
User questions about MW1612B Emerson
0 question about this device. Answer the ones you know or ask your own.
Ask a new question about this device
Download the instructions for your Microwave in PDF format for free! Find your manual MW1612B - Emerson and take your electronic device back in hand. On this page are published all the documents necessary for the use of your device. MW1612B by Emerson.
USER MANUAL MW1612B Emerson
OWNER'S MANUAL MW1612B
Visit our web site at "www.emersonradio.com"
PRECAUTIONS TO AVOID POSSIBLE EXPOSURE TO EXCESSIVE MICROWAVE ENERGY
(a) Do not attempt to operate this oven with the door open since open-door operation can result in harmful exposure to microwave energy. It is important not to defeat or tamper with the safety interlocks.
(b) Do not place any object between the oven front face and the door or allow soil or cleaner residue to accumulate on sealing surfaces.
(c) Do not operate the oven if it is damaged. It is particularly important that the oven door close properly and that there is no damage to the (1) door (bent), (2) hinges and latches (broken or loosened), (3) door seals and sealing surfaces.
(d) The oven should not be adjusted or repaired by anyone except properly qualified personnel.
(e) For more safety tips, visit following FDA web site: http://www.fda.gov/cdrh/radhealth/products/microwave.html
CONTENTS
Precautions to Avoid Possible Exposure to
Excessive Microwave Energy ....1
Important Safety Instructions ....2
Safety Precautions ....3
Federal Communications Commission Radio Frequency Interference Statement ....4
Grounding Instructions ....5
Installation 5
Care of Your Microwave Oven ..
How to Use Your Microwave Oven Safely ....6
Location of Controls ....7
Operation 8
Setting the Clock....8
Weight Defrost ....9
Time Defrost....9
Power....10
Cooking In One Stage....10
Kitchen Timer....10
Cooking in Two Stages 11
Defrosting/Cooking in Two Stages......12
Express Cook....12
Stop/Clear Button 12
Auto Cook 13
Auto Cook Menu Chart ....14
Memory 15
Child Lock 16
Inquiry 16
Cooking Guide 17
The Principles of Microwave Cooking ..17
Food Characteristics ......17
Microwave Techniques....17
Hot Snacks and Appetizers......18
Seafood....18
Meats 19
Poultry....19
Eggs & Cheese....20
Soups....20
Vegetables ......21
Casseroles....21
Sauces....22
Sandwiches....22
Pasta and Grains 23
Cereals....23
Convenience Foods....23
Desserts....24
Specifications 25
Before You Call for Service ....25
Limited Warranty....26
IMPORTANT SAFETY INSTRUCTIONS
When using electrical appliances, basics safety precaution should be followed, including the following:
WARNING – To reduce the risk of burns, electric shock, fire, injury topersons, oreposure to excessive microwave energy:
1 Read all instructions before using this appliance.
Read and follow the specific
2 "PRECAUTIONSTO AVOIDPOSSIBLE EXPOSURETO EXCESSIVE MICROWAVE ENERGY" found on page 1.
3 This appliance must be grounded. Connect only to a properly grounded outlet. See "GROUNDING INSTRUCTIONS"
found on page 5.
4 Install or locate this appliance only in accordance with the provided installation instructions.
5 Some products such as whole eggs and sealed containers (for example, closed glass jars) may explode and should not be heated in this oven.
6 Use this appliance only for its intended use as described in this manual. Do not use corrosive chemicals or vapors in this appliance. This type of oven is specifically designed to heat, cook, or dry food. It is not designed for industrial or laboratory use.
7 As with any appliance, close supervision is necessary when used by children.
8 Do not operate this appliance if it has a damaged cord or plug, if it is not working properly, or if it has been damaged or dropped.
9 This appliance should be serviced only by qualified service personnel. Contact the nearest authorized service facility for examination, repair or adjustment.
10 Do not cover or block any openings on this appliance.
11 Do not store or use this appliance outdoors. Do not use this product near water, for example, near a kitchen sink, in a wet basement, or near a swimming pool, or similar location.
12 Do not immerse cord or plug in water.
13 Keep cord away from heated surfaces.
14 Do not let cord hang over edge of table or counter.
15 When cleaning surfaces of door and oven that come together when closing the door, use only mild, non-abrasive soaps or detergents applied with a sponge or soft cloth.
16 To reduce the risk of fire in the oven cavity:
(a) Do not overcook food. Carefully attend appliance if paper, plastic, or other combustible materials are placed inside the oven to facilitate cooking.
(b) Remove wire twist-ties from paper or plastic bags before placing bag in oven.
(c) If materials inside the overignite, keep oven door closed, turn oven off, and disconnect the power cord, or shut off power at the fuse or circuit breaker panel.
(d) Do not use the cavity for storage purposes. Do not leave paper products, cooking utensils, or food in the cavity when not in use.
17 Do not use this microwave oven to heat corrosive chemicals (forexample, sulfides and chlorides). Vapors from such corrosive chemicals may interact with the contact and
SAVE THESE INSTRUCTIONS
IMPORTANT SAFETY INSTRUCTIONS
springs of the safety interlock switches, thereby rendering them inoperable.
18 Keep the splatter shield clean at all times. Wipe the oven interior with a soft damp cloth after each use. If you leave grease or fat anywhere in the cavity it may overheat, smoke or even catch fire when next using the oven.
19 Liquids, such as water, coffee, or tea are able to be overheated beyond the boiling point without appearing to be boiling due to surface tension of the liquid. Visible bubbling or boiling when container is removed from the microwave oven is not always present. THIS COULD RESULT IN VERY HOT LIQUIDS SUDDENLY BOILING OVER
WHEN THE CONTAINER IS DISTURBED OR AUTENSIL IS INSERTED INTO THE LIQUID. To reduce the risk of injury to persons:
(a) Do not overheat the liquid.
(b) Stir the liquid both before and halfway through heating it.
(c) Do not use straight-sided containers with narrow necks.
(d) After heating, allow the container to stand in the microwave oven for a short stime before removing the container.
(e) Use extreme care when inserting a spoon or other utensil into the container.
SAVE THESE INSTRUCTIONS
SAFETYPRECAUTIONS
GeneralUse
1 Do NOT attempt to tamper with or make any adjustments or repairs to door, control panel or any other part of the oven. Do NOT remove outer panel from oven. Repairs should only be done by qualified service personnel.
2 Do NOT operate the oven empty. The microwave energy will reflect continuously throughout the oven if no food or water is present to absorb energy.
3 If a fire occurs in the oven, the press Stop/Clear button and LEAVE THE DOOR CLOSED. Disconnect the power cord, or shut off power at the fuse or circuit breaker panel.
4 Do NOT attempt to dry clothes, newspapers or other materials in the oven. They may catch on fire.
5 Do NOT use recycled paper products. Recycled paper towels, napkins and waxed paper can contain metal flecks which may cause arcing or ignite. Paper products containing nylon or nylon filaments should be avoided, as they may ignite.
6 Some styrofoam trays (like those that meat is packaged on) have a thin strip of metal embedded on the bottom. When microwaved, the metal can burn the floor of the oven or ignite a paper towel.
7 Avoid inserting nails, wire, etc. through any holes in the unit during operation. Never insert a wire, nail or any other metal objects through the holes on the cavity or any other holes or
gaps, because such objects may cause electric shock and microwave leakage.
Utensils
1 METAL CONTAINERS or dishes with metallic rims should not be used. Arcing may occur.
2 METAL TWIST-TIES may not be used in the microwave oven.
3 Do NOT use SEALED JARS or NARROW NECK bottles for cooking or reheating. They may shatter.
4 Do NOT use CONVENTIONAL THERMOMETERS in the microwave oven. They may cause arcing.
5 Remove PLASTIC STORE WRAPS before cooking or defrosting foods in the oven.
6 For FURTHER INFORMATION on proper cooking utensils, refer to the COOKING GUIDE on page 17.
Food
1 Never use your microwave oven for HOME CANNING. The oven is not designed to permit proper canning. Improperly canned food may spoil and be dangerous to consume.
2 COOKING TIMES given in the cooking guide are approximate. Factors that may affect cooking are starting temperature, altitude, volume, size and shape of food and utensils used. As you become familiar with the oven, you will be able to adjust for these factors.
SAFETYPRECAUTIONS
3 It is better to UNDERCOOK RATHER THAN OVERCOOK foods. If food is undercooked, it can always be returned to the oven for further cooking. If food is overcooked, nothing can be done. Always start with minimum cooking times.
4 SMALL QUANTITIES of food or foods with LOW MOISTURE content can burn, dry out or catch on fire if cooked too long.
5 Do NOT boil eggs in their shell. Pressure may build up and the eggs may explode.
6 Potatoes, apples, egg yolks, whole corn squash and sausage are some examples of foods with NONPOROUS SKINS. These must be pierced before cooking to prevent bursting.
7 POPCORN must be popped in a microwave corn popper. Microwave popped corn produces a lower yield than conventional popping. Do not use oven for popcorn unless popped in a microwave approved popcorn utensil or unless it's commercially packaged and recommended especially for microwave ovens. Do not use oil unless specified by the manufacturer.
8 Do NOT attempt to deep fat fry in your oven.
9 HEATED LIQUIDS can ERUPT if not mixed with air. Do not heat liquids in your microwave oven without first stirring.
10 DoNOTusepapertowelstocoverfood astheycanignite.
FEDERALCOMMUNICATIONSCOMMISSIONRADIO FREQUENCYINTERFERENCEESTATEMENT
WARNING This equipment generates and uses ISM frequency energy and if not installed and used properly, in strict accordance with the manufacturer's instructions, may cause interference to radio and television reception.
It has been type-tested and found to comply with limits for an ISM Equipment pursuant to part 18 of FCC Rules, which are designed to provide reasonable protection against such interference in a residential installation.
However, there is no guarantee that interference will not occur in a particular installation equipment does cause interference to radio or television reception, which can be determined by by turning the equipment off and on, the user is encouraged to try to correct the interference by one or more of the following:
* Reorient the receiving antenna of radio or television.
* Relocate the Microwave oven with respect to the receiver.
* Move the microwave oven away from the receiver.
* Plug the microwave oven into a different outlet so that microwave oven and receiver are on different branch circuits.
THE MANUFACTURER is not responsible for any radio or TV interference caused by UNAUTHORIZED MODIFICATION to this microwave oven. It is the responsibility of the user to correct such interference.
ARCING
If you see arcing, press STOP/CLEAR button and correct the problem.
Arcing is the microwave term for sparks in the oven.
Arcing is caused by:
* Metal or foil touching the side of the oven.
* Foil not molded to food (upturned edges act like antennas).
* Metal, such as twist-ties, poultry pins, or gold rimmed dishes, in the microwave.
*Recycled paper towels containing small metal pieces being used in the microwave.
*Burnt (carbonized) food residue or grease spattered inside of cabinet.
SAVE THESE INSTRUCTIONS
GROUNDINGINSTRUCTIONS
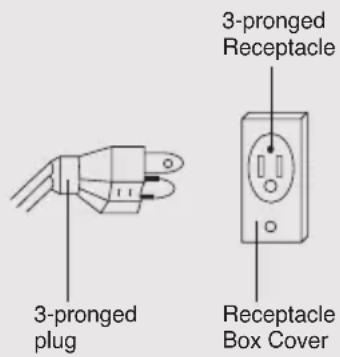
Thisappliancemustbegrounded. In the event of an electrical short circuit, grounding reduce the risk of electric shock by providing an escape wire for the electric current. This appliance is equipped with acord having a grounding wire with grounding plug. The plug must be inserted into an outlet that is properly installed and grounded.
WARNING: Improper use of the grounding plug can result in a risk of electric shock. Consult a qualified electrician or service personnel if the grounding instructions are not completely understood, or if doubt exists as to whether the appliance is properly grounded.
If it is necessary to use an extension cord, use only a three wire extension cord that has a three blade grounding plug, and a three slot receptacle that will accept the plug on the appliance. The marked rating of the extension cord should be equal to or greater than the electrical rating of the appliance.
INSTALLATION
- Steady, flat location: When positioning the microwave oven, it should be set on a steady, flat surface.
- Ventilation: Do not block air vents. If they are blocked during operation, the oven may overheat and eventually cause oven failure. For proper ventilation, keep three inches of space between the oven's top, sides, rear and the area where the unit is to be installed.
- Radio and TV reception: Poor television reception and radio interference may result if the oven is located close to a TV, radio, antenna, or antenna wire. Position the oven as far from them as possible.
- Temperature and moisture: Keep the oven away from hot air, steam or splashing liquids when choosing a place to locate it, otherwise, the unit's operation may be adversely affected, causing it to break down.
5. Powersupply:
- Check your local power source. This microwave oven requires a AC120V, 60Hz, 15Amp power supply.
-
Use a receptacle that will accept the ground prong.
(a) A short power supply cord is provided to reduce the risks resulting from becoming entangled in or tripping over a longer cord.
(b) Longer cord sets or extension cords are available and may be used if care is exercised in their use.
(c) If a long cord or extension cord is used, (1) the marked electrical rating of the cord set or extension cord should be at least as great as the electrical rating of the appliance, (2) the extension cord must be a grounding-type 3-wire cord, and (3) the longer cord should be arranged so that it will not drape over the counter top or tabletop where it can be pulled on by children or tripped over unintentionally. -
Examine the oven for any damage such as: Dents, a misaligned door, broken door or a dent in the cavity. If any of the above are visible, DO NOT INSTALL THE UNIT. Notify the dealer immediately.
Whenusinga3-prongedplug
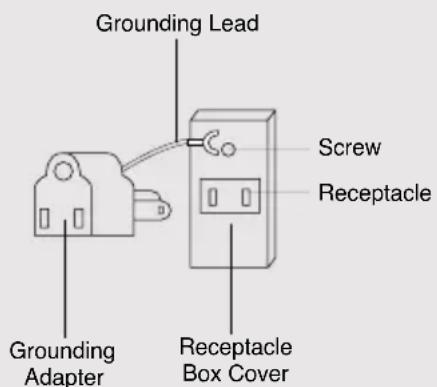
When using agrounding adapter, makes sure the receptacleboxisfully grounded.
1 Disconnect the AC plug from the outlet before cleaning.
2 Keep the inside of the oven clean. When food spatters or spilled liquids adhere to oven walls, wipe with a damp cloth. Mild detergent may be used if the oven gets very dirty. The use of harsh detergent or abrasives is not recommended.
3 The outside oven surface should be cleaned with mild soap and water. Then wiped dry with a soft cloth. To prevent damage to the operating parts inside the oven, water should not be allowed to seep into the ventilation slots. If the Control Panel becomes dirty or wet, clean with a soft, dry cloth.
Do not use harsh detergents or abrasives cleaner.
4 If steam accumulates on both sides of the oven door, wipe with a soft cloth. This may occur when the microwave oven is operated under high humidity conditions and this is not an indication of a malfunction in the unit.
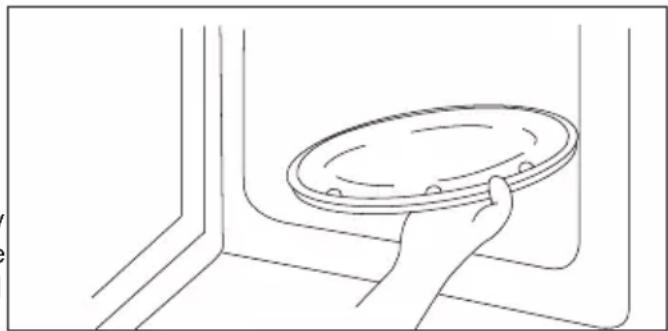
5 It is occasionally necessary to remove the glass tray for cleaning. Wash the tray in warm, sudsy water or in a dishwasher.
natural_image
Line drawing of a hand holding a circular object inside a container (no text or symbols)6 The roller guide and oven cavity floor should be cleaned regularly to avoid excessive noise. Simply wipe the bottom surface of the oven with mild detergent water and dry. The roller guide may be washed in mild, sudsy water or in the dishwasher.
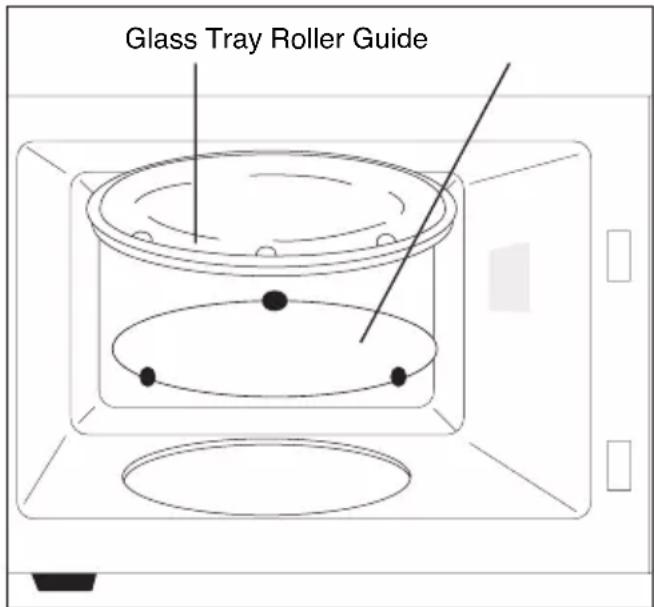
RollerGuide
1 The ROLLER GUIDE and oven floor should be cleaned frequently to prevent excessive noise.
2 The ROLLER GUIDE MUST ALWAYS be used for cooking together with the Glass Tray.
GlassTray
1 Do NOT operate the oven without the Glass Tray in place.
2 Do NOT use any other Glass Tray with this oven.
3 If the Glass Tray is hot, ALLOW IT TO COOL before cleaning it or placing it in water.
4 Do NOT cook directly on the Glass Tray.
Although you rovenis provided with safety features, it is important to observ the following:
a) It is important not to defeat or tamper with safety interlocks.
b) Do not place any object between the oven face and the door or allow residue to accumulate on sealing surfaces. Wipe the sealing area frequently with a mild detergent, rinse and wipe dry. Never use abrasive powders or pads.
c) When opened, the door must not be subjected to strain, for example, a child hanging on an open door or any load which could cause the oven to fall forward and cause injury and damage to the door. Do not operate the oven if it is damaged, until it has been repaired by a qualified person. It is particularly important that the oven door close properly and that there is no damage to the following:
(1) Door (bent), (2) Hinges and Latches (broken or loosened), (3) Door seals and sealing surfaces.
d) The oven should not be adjusted or repaired by anyone except properly qualified service personnel.
LOCATION OF CONTROLS
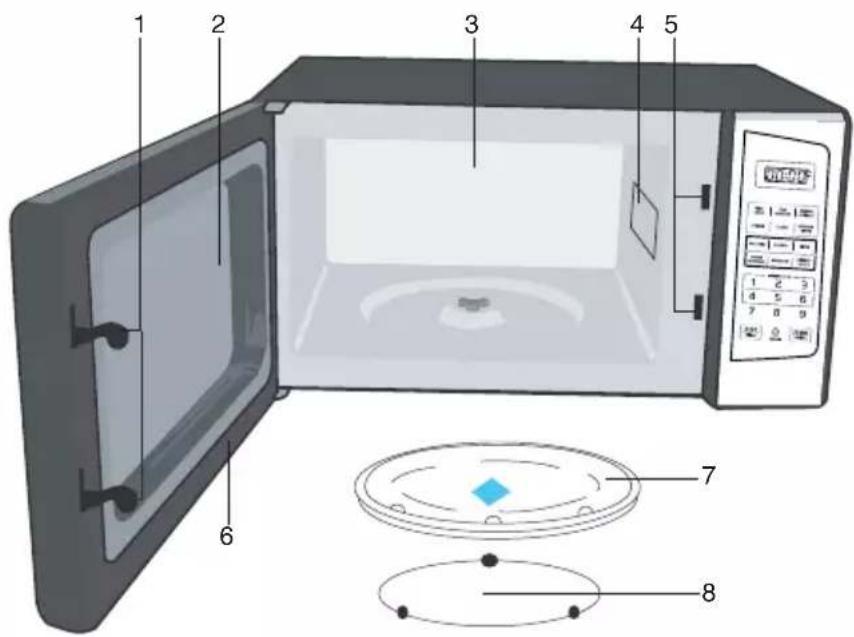
- Door Latches-When the door is closed, they will automatically lock shut. If the door is opened while the oven is operating, the magnetron will automatically shut off.
- Door Screen- Allows viewing of food. The screen is designed so that light can pass through, but not the microwaves.
- Oven Cavity
- Spatter Shield (Do NOT Remove)-Protects the microwave outlet from splashes of cooking foods.
- Safety Interlock System-Prevents the oven from operating while the door is opened.
- Door Seal-The door seal maintains the microwaves within the oven cavity and prevents microwave leakage.
- Glass Cooking Tray -Made of special heat resistant glass. The tray must always be in proper position before operating the oven. Do not cook food directly on the tray.
- Roller Guide-Supports the glass cooking tray. Must always be in proper position by operating the oven.
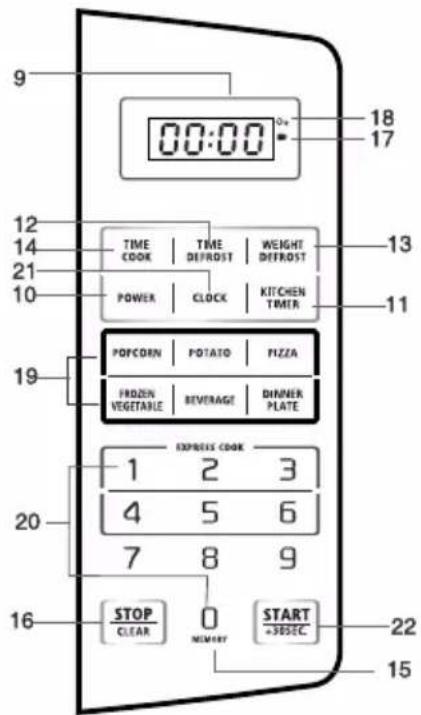
- Display
-
Power Button-Used to set a power level.
-
Kitchen Timer Button-Used to set the kitchen timer function.
- Time Defrost Button-Used to set the oven to estimate the defrosting time by a present time.
- Weight Defrost Button -Used to set the oven to estimate the defrosing time by weight entered.
- Time Cook Button-Used to set the cooking according to the desired power and time.
- Memory Button- Used to set the memory function.
- Stop/Clear Button- Used to stop and/or clear a cooking program.
- Cup Indicator
- Oz Indicator
- Auto Cook Menu-Used to select an Auto Cook program.
- Number Button - Used to enter the cooking time, kitchen timer, etc. Number keys 1-6 are also used for Express Cook Function.
- Clock Button-Used to set the clock.
- Start/+30Sec. Button-Press to start a cooking program.
Alert: Please clean microwave oven often. Failure to do so may create a fire hazard and void the warranty.
OPERATION
SETTING THE CLOCK
When first plugged in, the oven will display "0:00". Set the time as follows:
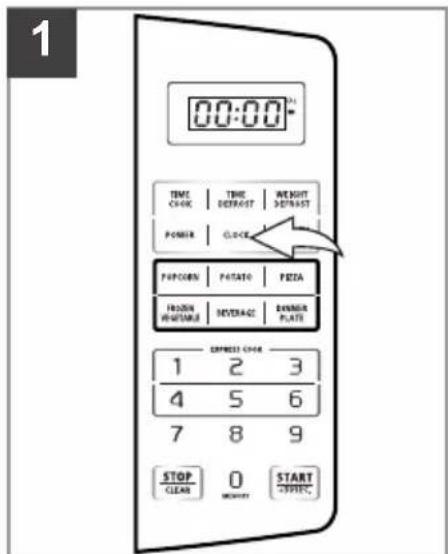
With the oven NOT cook press the CLOCK button; first hour digit will blink.
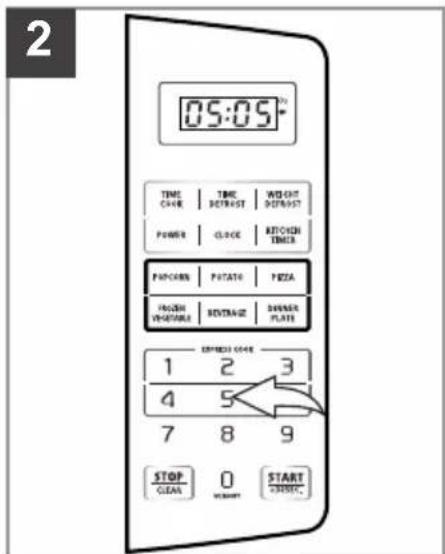
Press two Number the set the current hour. press two Number buttons to set the current minute. Two buttons must be pressed, i.e. "0" "5" "0" "5". "0550"
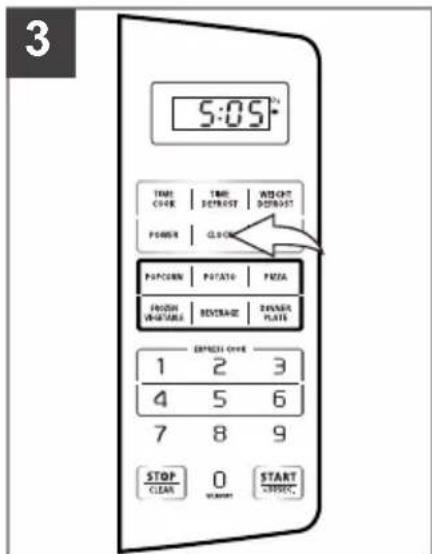
Please use CLOCK button; the display will show the p time. After the clock has been set, the time will appea blinking colon, unless the oven is cooking or defrosting.
NOTES:
- To reset the present time in the display window when the oven is off, press the CLOCK button and reset.
- If you make a mistake when setting the time, press the STOP/CLEAR button.
- To recall the actual time while the oven is cooking or defrosting, simply press the CLOCK button and the display will show the actual time for three seconds.
OPERATION (CONTINUED)
WEIGHT DEFROST
Weight Defrost lets you easily defrost foods by eliminating guesswork in determining defrosting time. The minimum weight for Auto Weight Defrost is 4 oz. and maximum weight is 100 oz.
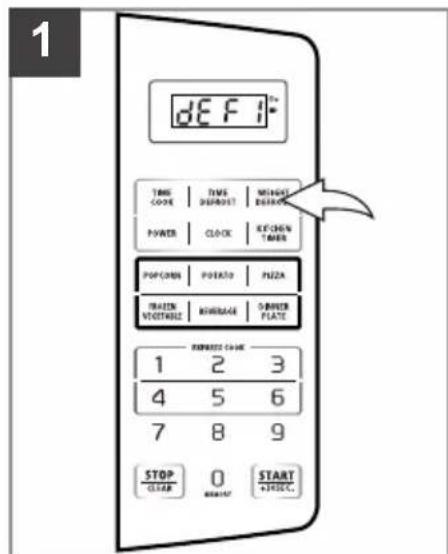
Press the WEIGHT DEFROST button.
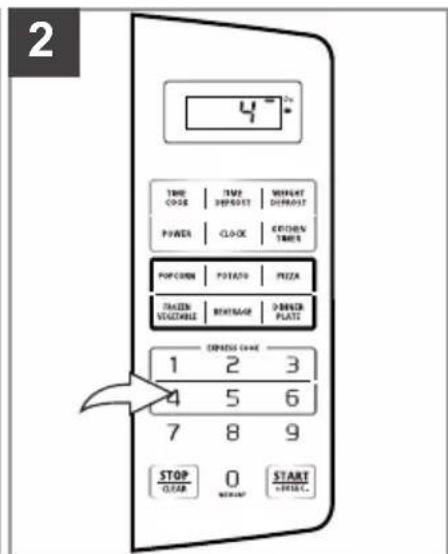
Press the Number buttons set the desired weight, ounces.
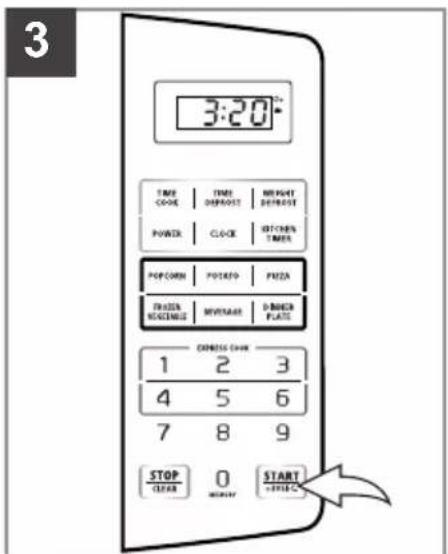
Press the START/+30SEC. button to start defrosting; unit start counting down remaining defrosting time and beep five times when completed.
TIME DEFROST
Time Defrost will automatically set the oven to defrost at a time set by the user. The minimum time for Time Defrost is one second. The maximum time is 99 minutes, 99 seconds.
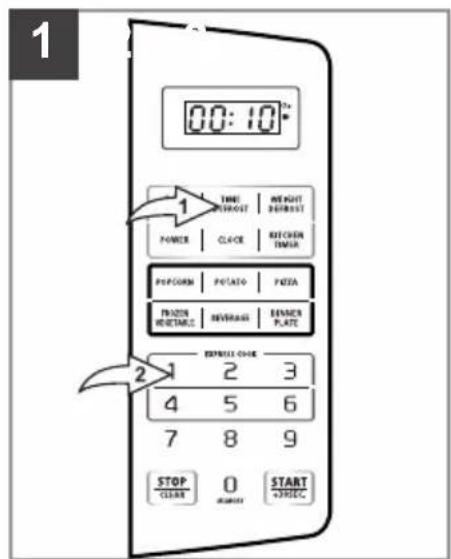
Press TIME DEFROST button ① .Then press the Nu buttons ② to set the desi time.
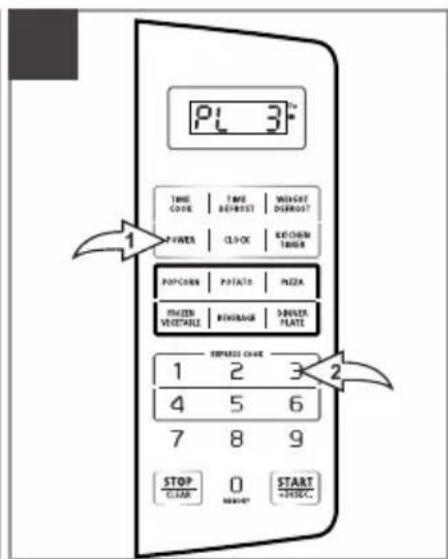
The default microwave power is 3. To change, press POWER button 1 once followed by the Number buttons 2 of the desired power level.
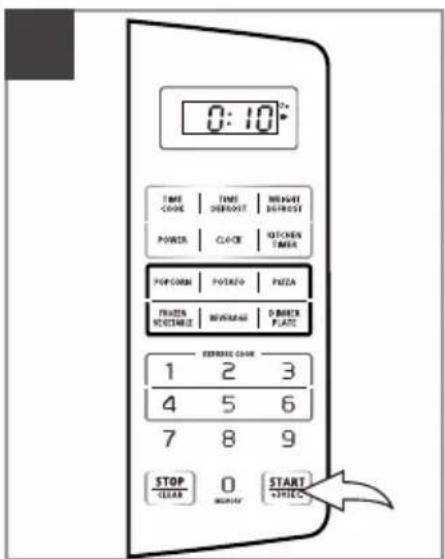
Press the START/+30SEC. button to start defrosting; unit start counting down remaining defrosting time and beep five times when completed.
OPERATION (CONTINUED)
POWER
This microwave has eleven power levels to choose from when TIME COOK button is used. Follow steps in COOKING IN ONE STAGE or COOKING IN TWO STAGES. To change, press POWER once, then press number key for the power level you want.
| Level | 10 | 9 | 8 | 7 | 6 | 5 | 4 | 3 | 2 | 1 | 0 |
| Power | 100% | 90% | 80% | 70% | 60% | 50% | 40% | 30% | 20% | 10% | 0% |
COOKING IN ONE STAGE
The maximum cooking time is 99 minutes, 99 seconds.
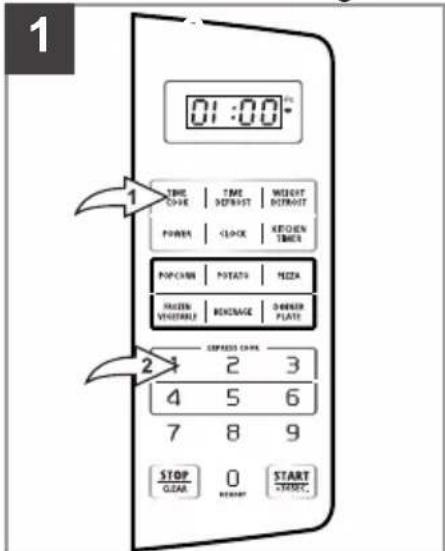
Press the TIME COOK button ①. Then press the Number buttons ② to set the desired cooking time.
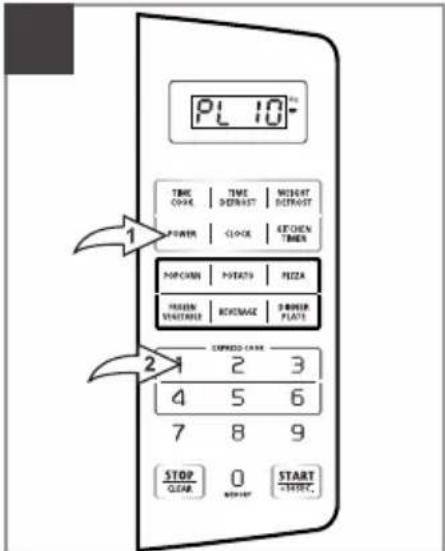
Press the POWERbutton ①. "PL 10" will light in the display to indicate power level 10. Then press the Number buttons ② to select a different power level.
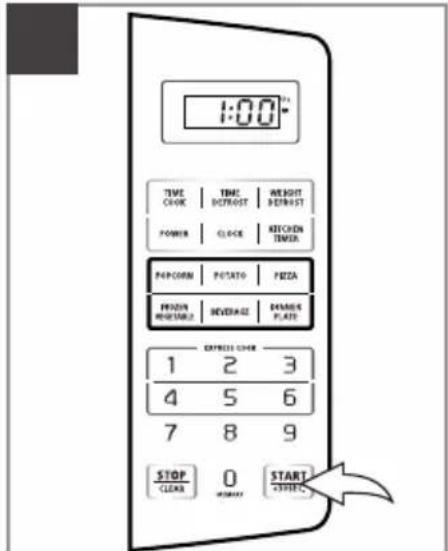
Press the START/+30SEC. ybutton to start cooking; the unit will start counting down the remaining cooking time and beep five times when completed.
KITCHEN TIMER
Allow the timer to be set, no microwaves are produced when doing so.
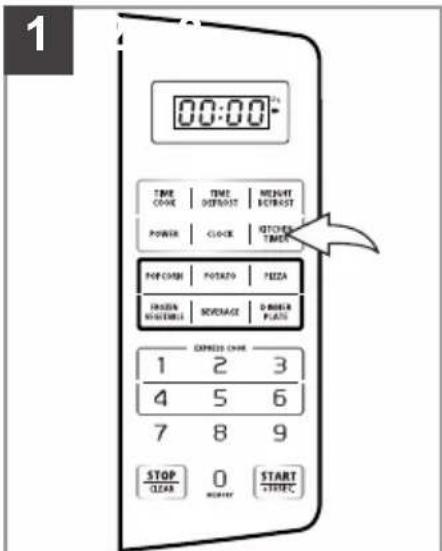
Press KITCHEN TIMER button.
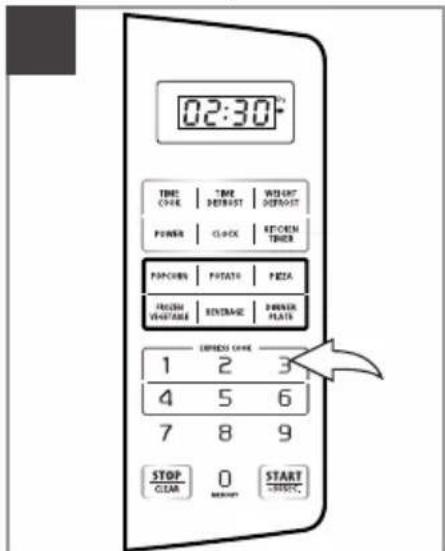
Press two Number buttons to set the Timer minutes, and then two Number buttons to set the Timer seconds.
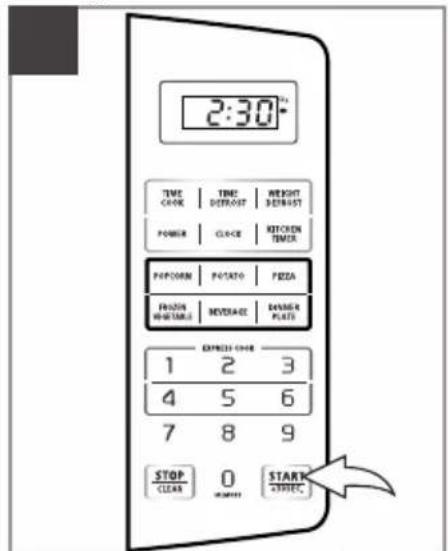
Press the START/+30SEC. button to start counting the remaining Timer time. The unit will beep five times when completed.
OPERATION (CONTINUED)
COOKING IN TWO STAGES
The maximum cooking time is 99 minutes, 99 seconds.
1
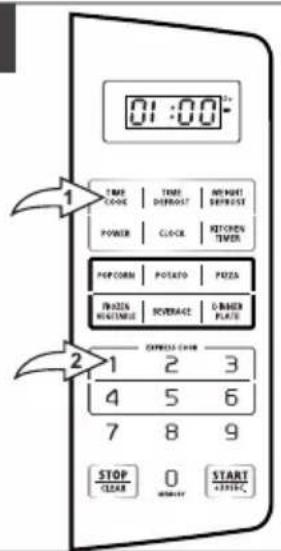
Press the TIME COOK button ①. Then press the Number buttons ② to set the desired cooking time.
2
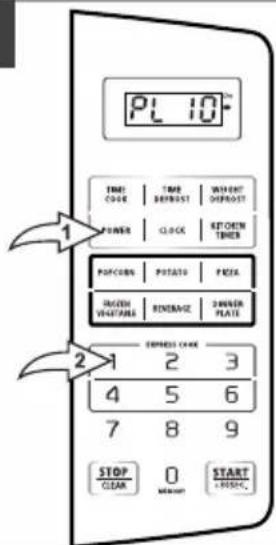
Press the POWER button ①. "PL 10" will light in the to indicate power level 10. Then press the Number button to select a different power for the first stage.
3
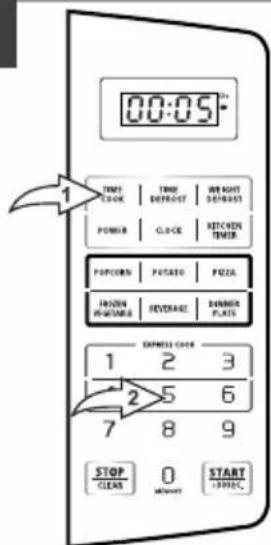
Press the TIME COOK button ①. This play press the Number but ② to set the desired cooking time.
4
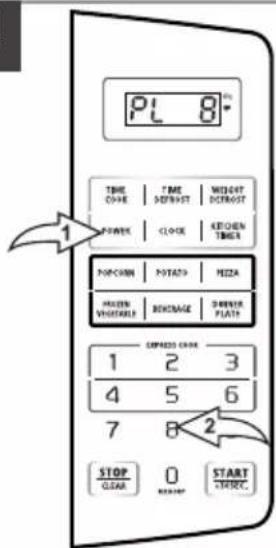
Press the POWER button ①. "PL 10" will light in the display to indicate power level 10. Then press the Number buttons ② to select a different power level for second stage.
5
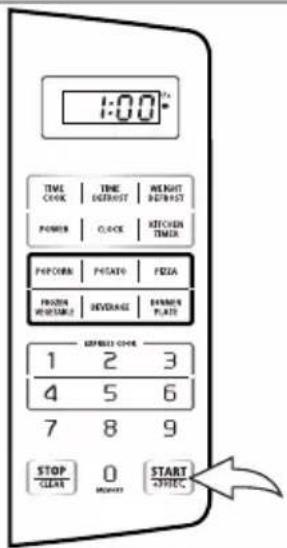
Press the START/+30SEC. button to start cooking first stage; the unit will counting down the remain cooking time and beep between stages, and then perform the second st cooking.
OPERATION (CONTINUED)
DEFROSTING/COOKING IN TWO STAGES
The minimum weight for Weight Defrost is 4 oz. and maximum weight is 100 oz.
The minimum time for Time Defrost is 1 second and maximum time is 99 minutes 99 seconds.
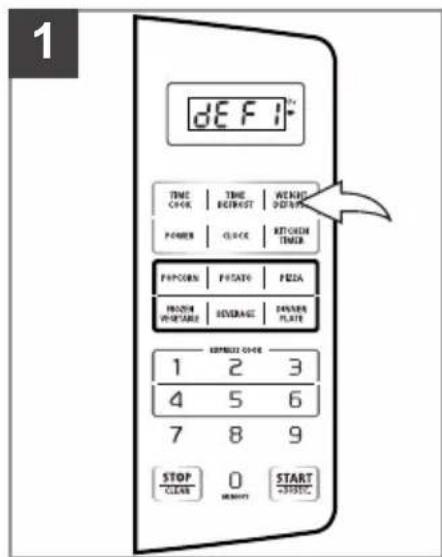
Press the WEIGHT DEFROST or TIME DEFROST button.
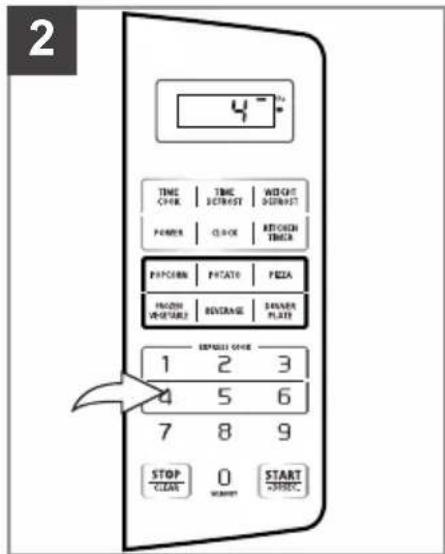
Press the Number buttons to set the desired weight, in ounces in WEIGHT DEFROST or to set the desired time in TIM EDEFROST. Set the next stage by following steps 3 and 4 on the previous page.
Press the START/+30SEC. button to start defrosting (the first stage); the unit counting down the remain cooking time and beep between stages, and then perform the second stage cooking.
EXPRESS COOK
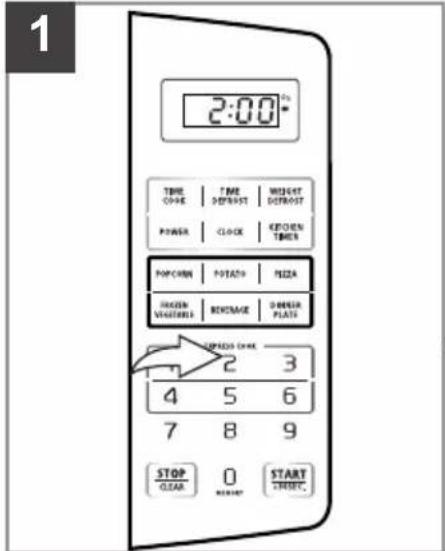
Press the Number buttons 1-6 and the microwave will immediately start cooking at power level 10 for the selected time. For example, press "2" to cook for two minutes.
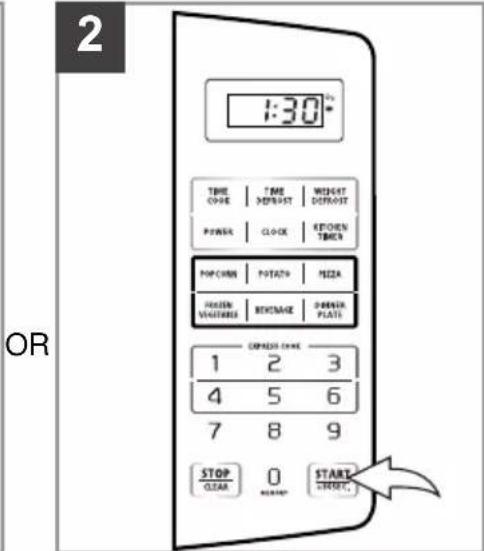
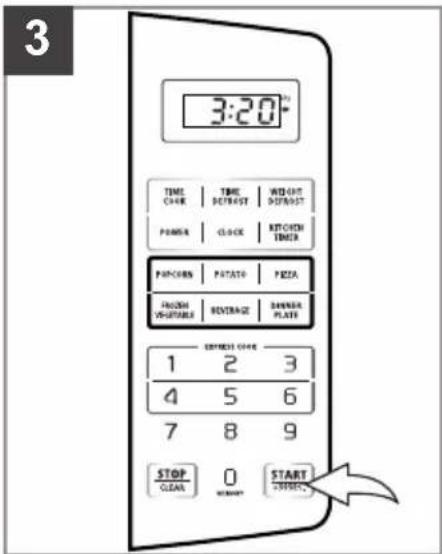
Press the START/+30SEC. button and the unit will cook for additional 30 seconds. Each additional press will increase the cooking time by 30 seconds.
STOP/CLEAR BUTTON
• To stop cooking or clear a cooking program, simply press the STOP/CLEAR button once to stop cooking, or twice to cancel a cooking program.
• Always press the STOP/CLEAR button before opening the door.
OPERATION (CONTINUED)
AUTO COOK
Auto cook lets you easily cook items in the oven, as it will automatically set the times and power levels to give better results than one power only cooking.
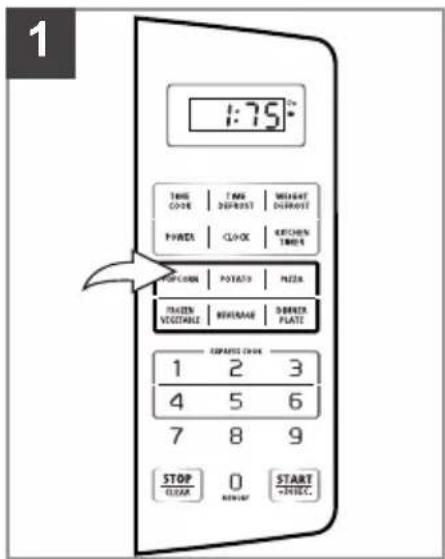
Press the desired AUTO COOK button (POPCORN, POTATO, PIZZA, BEVERAGE, DINNER PLATE OR FR VEGETABLE).
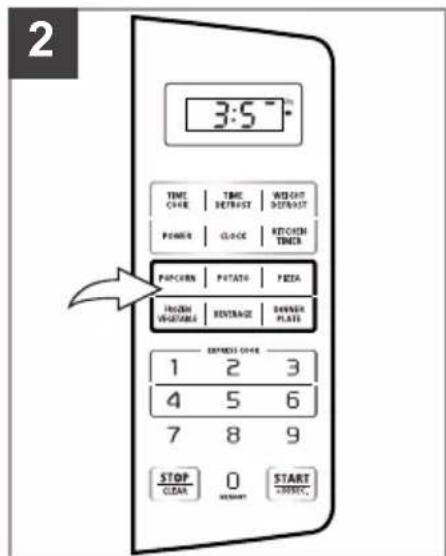
Repeatedly press the desired AUTO COOK button to set the desired weight/portion (see @24) on the next page.)
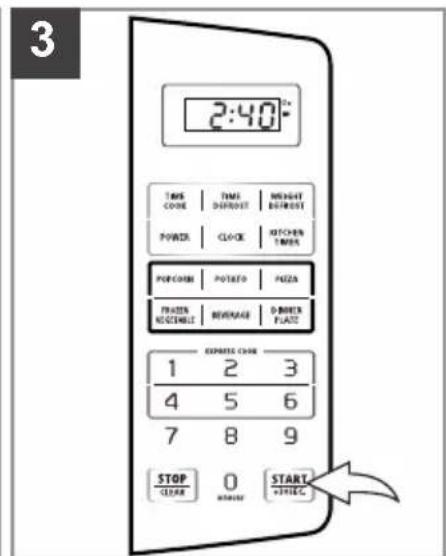
Press the START/+30SEC. button to start cooking; The unit will start counting down the remaining cooking time and beep five times when completed.
OPERATION (CONTINUED)
AUTO COOK MENU CHART
| Button | Press | Weight/Portion |
| Popcorn | Once | 1.75 Oz |
| Twice | 3.0 Oz | |
| Three times | 3.5 Oz | |
| Potato(8 oz/piece) | Once | 1 PC |
| Twice | 2 PCS | |
| Three times | 3 PCS | |
| Pizza | Once | 4.0 Oz |
| Twice | 8.0 Oz | |
| Three times | 14.0 Oz | |
| Beverage(120 ml/cup) | Once | 1 Cup |
| Twice | 2 Cups | |
| Three times | 3 Cups | |
| Dinner Plate | Once | 9.0 Oz |
| Twice | 12.0 Oz | |
| Three times | 18.0 Oz | |
| Frozen Vegetable | Once | 4.0 Oz |
| Twice | 8.0 Oz | |
| Three times | 16.0 Oz |
OPERATION (CONTINUED)
MEMORY
Memory is used to preset a cooking function in memory location 1-3.
1
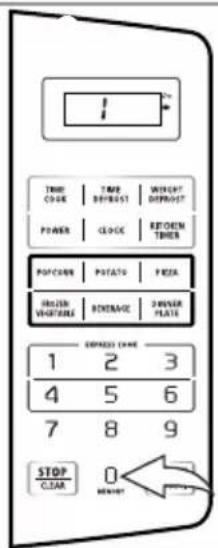
Repeatedly press the MEMORY button to select a memory location (1 to 3).
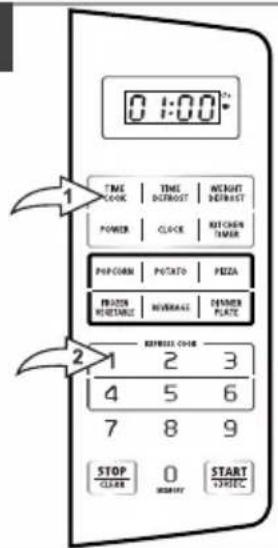
Press the TIME COOK button ① . Then press the Number buttons ② to set the desired cooking time.
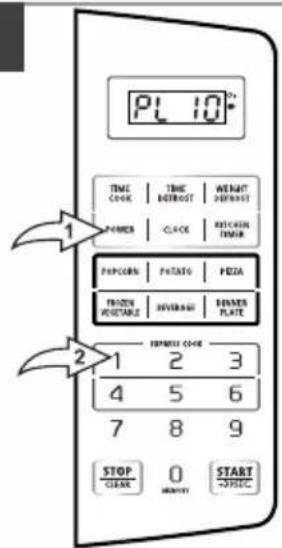
Press the POWER button ①. "PL 10" will light in the display to indicate power level 10. Then press the Number buttons ② to select a different power level. Repeat step 2 and 3 to perform a second stage, if desired.
MEMORY RECALL
Used to select a memory preset.
4
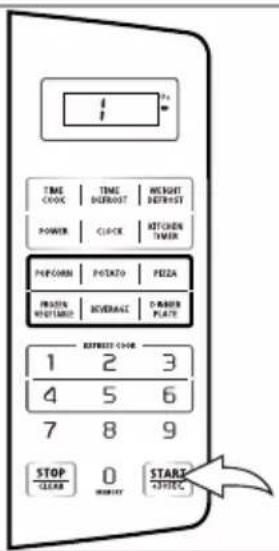
Press the START/+30SEC. button once to save your settings into the chip. To save in memory press START/+30SEC. button or START/+30SEC. button once again and cooking will start.
1
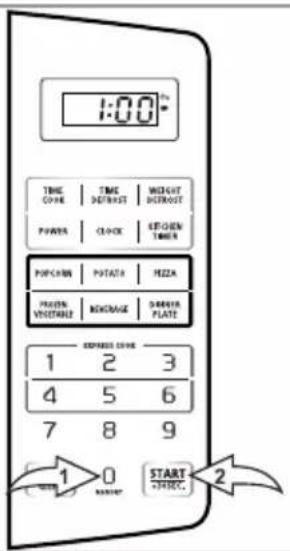
Repeatedly press the MEMORY button ① to select a preset (1-3). Then press the START/+30SEC. resetton ② to start the cooking operation.
OPERATION (CONTINUED)
CHILD LOCK
The Child Lock prevents unwanted oven operation by small children. The oven can be set so that the control panel is deactivated or locked.
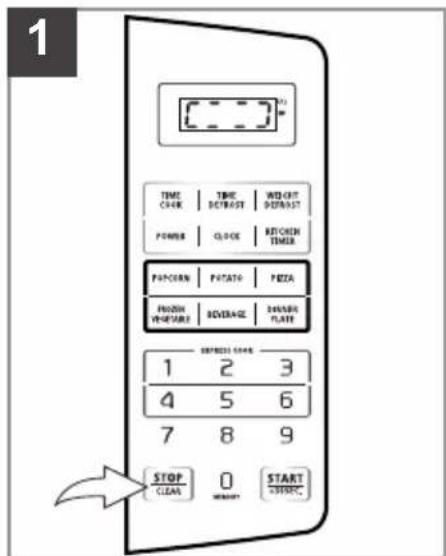
TO ACTIVATE: Press and hold the STOP/CLEAR button for three seconds (when the time appears in the display); the unit beep once and the display will appear as shown above and no buttons can be pressed.
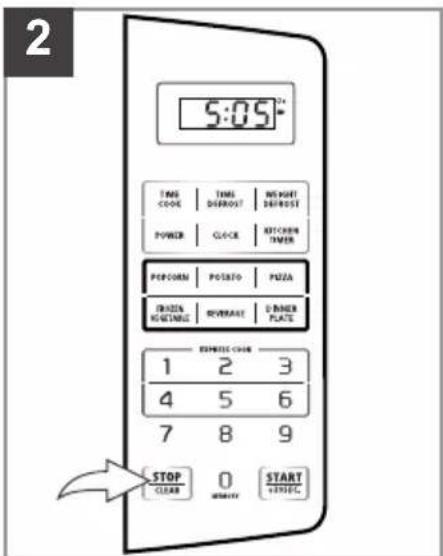
TO DEACTIVATE: Press and hold the STOP/CLEAR button for three seconds; the unit beep once and the current time will appear in the display.
INQUIRY
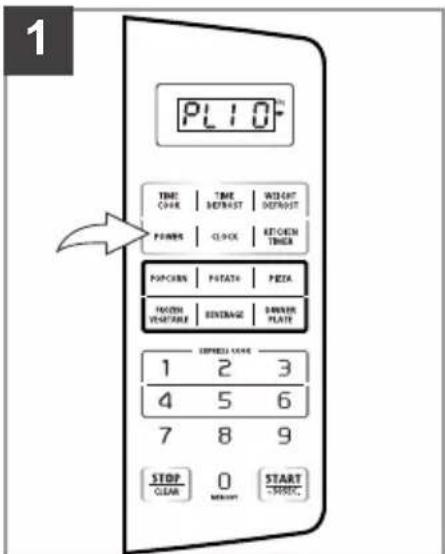
During cooking, press the POWER button to display the current power level for three seconds.
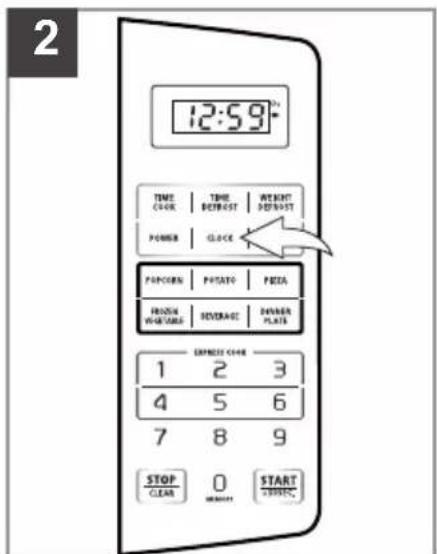
During cooking, press the CLOCK button to display the current time for three seconds.
COOKINGGUIDE
THEPRINCIPLESOFMICROWAVECOOKING
MicrowavesareaformofhighfrequencyradiowavessimilartothoseusedbyaradioincludingAM,FMand CB.Electricityisconvertedintomicrowaveenergybythemagnetrontube.Fromthemagnetrontube, microwaveenergyistransmittedtotheovenwhereitisreflected,transmittedandabsorbedbythefood.
Reflection: Microwaves are reflected by metal just as a ball is bounced off of a wall. For this reason, metal utensils arenotsuitableforuseinthemicrowave.Acombinationofstationaryinteriorwallsandarotatingmetalturtableor stirrerfanhelpsassurethatthemicrowavesarewelldistributedwithintheovencavitytoproduceevencooking.
Transmission: Microwaves pass through some materials such as paper, glass and plastic much like sunlight shining throughawindow.Becausethesesubstancesdonotabsorboreflectthemicrowaveenergy,theyareidealmaterials formicrowaveovencookingcontainers.
Absorption: During cooking, microwaves will be absorbed by food. They penetrate to a depth of about 3/4 to 1 1/2 inches. Microwave energy activates themolecules in the food (especially water, fat and sugar), and heatisproduced.
If you vigorously ruby your hand to get her, you will feel heat produced by friction. The internal cooking of larger foods is done by conduction as the heat which is produced by friction is conducted to them middle of the food. Foods also continue to cook by conduction during standing time.
FOODCHARACTERISTICS
Quantity: The amount of food placed in a microwave oven has a direct effect on the cooking time. Small amounts offoodorliquidrequirelesscookingtimethanlargeramountsofthesamesubstance.Asquantityincreases, concentrationdecreases.
Size: Small pieces cook faster than large ones. To speed cooking, cut pieces smaller than two inches (5 cm), so microwavescanpenetratetothemiddlefromallsides.Pieceswhicharesimilarinsizeandshapecookmoreevenly.
Shape: Many foods are uneven, like a chicken, ribs or broccoli. The thin parts will cook faster than the thick parts, while uniformly thick foodscookevenly. Tocompensate for irregular shapes, placethin piecestoward the center of the dish and thicker piecestoward the edge of the dish.
Starting Temperature: Frozen or refrigerated foods take longer to cook than foods at room temperature.
Bone and Fat: Because bones conduct heat, the side of the meat the bone is on will cook first, while boneless cuts cookslowerbutmoreevenly.Fatattractsmicrowaves. Themiddleofthesefoodsiscookedbyheatconduction.
Moisture Content: Microwaves are attracted by moisture. Naturally moist foods absorb microwaves better than dry ones. Addaminimumofliquidtomoistfoods, asexcesswaterslowscooking.
Density: The density of food determines how easily the microwaves can penetrate and how quickly it will cook. Porousfoods, likechoppedbeeformashedpotatoes, microwavefasterthandenseoneslikesteakorwholepotatoes.
Piercing: Steam builds up pressure in foods which are tightly covered by a skin or membrane. Pierce potatoes, egg yolksandchickenliverstoppreventbursting.
MICROWAVETECHNIQUES
Stirring: Stir foods from outside to center of dish once or twice during cooking to equalize heat and speed microwaving. Foodswillnotburnorstick,sothere'snoneedtostirconstantlyasyoudoinconventionalcooking.
Arrangement: Arrange foods with thin or delicate ends, like drumsticks or asparagus spears, with the thick or tougher portions to the outside of the dish. The parts which need more cooking will receive more energy, so food will microwave evenly.
Spacing: Individual foods, such as baked potatoes and cupcakes will cook more evenly if placed in the oven an equal distance apart. When possible, arrange foods in a circular pattern. Similarly, when placing foods in a baking dish, arrange around the outside of the dish, not lined up next to each other. Food should not be stacked on top of each other.
Rearrangement: Rearrange overlapping areas, like tails of long fish fillets, from top to bottom, and closely packed pieces, likemeatballs, from the outsideto the center of the dish.
Standing Time: Standing time is especially important in microwave cooking. Microwave energy creates heat in the outer layers of the food. As a result of normal conduction, the food continues to cook for a few minutes after removal from the oven. Lettingroasts, largewholevegetables, casserolesandcakesstandtofinishcookingallowsthemiddlestocook completelywithoutovercooking, dryingortougheningtheoutsides.
Covering: Covering speeds cooking time, retains moisture, tenderizes, insures even cooking and prevents spattering. Casserole lids or plastic wrap are used for a tighter seal. Vent plastic by turning back one edge at the side of dish to form a narrow slot where excess steam can escape. Various degrees of moisture retention are also obtained by using wax paperormicrowave-safepapertowels.
Browning: Microwave energy cooks some foods so quickly that the fats and sugars within the food do not have time to caramelize and give a "browned" appearance. Browning agents do not affect the quality of microwaved foods, but can add color and flavor. For meats and poultry, use bouquet sauce diluted with water or melted butter, soy, Worcestershire, barbecueorsteaksauce,asprinklingofpaprikaordrygravymix;jellyglazeocrumbcoating.Frostingandtopping finishcakesandbreads.Topcasserolesattheendofmicrowavingwithgratedcheeseocrumbs.
COOKINGGUIDE (CONTINUED)
SomeFoodsDoNotMicrowaveWell
EggsinShellsandhardboiledeggscanburst.
Pancakesdonotcrust, but they reheat well. Fully-prepared, frozen pancakes are available for microwaving.
DeepFatFryingcancauseburns.
Bottleswithnarrownecksmayshatterifheated.
Pop Popcorn only in special microwave poppers. Do not use oil unless specified by the manufacturer, or heat longerthanrecommended. Neverpoppopcorninpaperbagsorglassutensilsordirectlyontheglasstray.
HOTSNACKSANDAPPETIZERS
Hotappetizerscanbepreparedveryquicklyinthemicrowaveoven.
Manyappetizersmaybecokedontheservingplatter,providedtheplatterdoesnothavemetaltrim.Atime savingtip-preparethesefoodsaheadoftime,refrigerateorfreeze,andrefreshintheovenatservingtime.
Aplateofappetizerswilltakeonlysecondstorefresh.
Cheesemeltsveryrapidlyandwilltoughenifovercooked,sowatchfoodscombinedwithcheesecloselyso thatovercookingwillnotoccur.Assoonascheesestartstobubble,cookingiscompleted.
Appetizersthathaveacrisppastryexteriorarebestpreparedinaconventionaloven.
Toprepareappetizerswrappedinbacon, it will be necessary to prepare the bacon and then wrap around the foods. Oysters wrapped in bacon are easier to prepare in the broiler of your conventional loven.
Seafoodmixturescanbepreparedinservingshellsasmicrowaveenergywillpassthroughtheseafoodshells withoutheating.Aluminumfoilshouldnotbeusedforshells.
Ifspreadsareplacedoncrackers,careshouldbetakennottoovercookasmoisturefromthefoodwillcause crackerstobecomesoggy.Crackersusedforspreadsshouldbeverydryandcrisp.Thishelpsavoid sogginess.Heatonlyuntilspreadisatservingtemperature.
Thetimerequiredtoheatallappetizerswilldependontheamountoffood,andthenumberandthetypeof dishselected.Rememberthefoodwillbecomeveryhotevenifthedishiscool.Cheesemixturesretainheat longerwhenheatedwithmicrowaveenergy.
SEAFOOD
GuideforCookingSeafood
Microwavingisoneoftheeasiestandmostefficientwaysofpreparingfishandseafood,whichstaydelicate andtenderwithquick,moistcooking.Overcookingdriesoutandtoughensseafood,soyoushouldcheckit aftertheminimumtime.Ifthickpieceslikefishsteaksorlobstertailsaredoneontheoutside,butstillslightly translucentinthemiddle,letthemstandforafewminutes;internalheatwillcompletethecooking.
| FoodPowerCookingTimeStandingSpecialNotesLevelTime | ||||
| WholeFish100(1lb.to11/2lbs.) | 6-7min.5min. | Turnoverafterhalfthetime. | ||
| Fish Fillet(1lb.) | 100 | 5 - 6 min. | 4 - 5 min. | Turn over after half the time. |
| Fish Steak1inchthick(1lb.) | 100 | 4 - 5 min. | 5 - 6 min. | Turn over after half the time.Coverwithmicrowaveablecover. |
| Shrimp(1lb.) | 100 | 3 - 4 min. | 5 min. | Rearrange once during cooking.Coverwithmicrowaveablecover. |
| Sea Scallops(1lb.) | 80 | 6 - 7 min. | 5 min. | Rearrange once during cooking.Coverwithmicrowaveablecover. |
COOKING GUIDE (CONTINUED)
MEATS
GuideforCookingMeats
Roasts,chops,hamburgersandsmallcutsoftendermeatcookbeautifullyinthemicrowaveoven.Mostroasts canbecookedrare,mediumrareorevenwelldoneinlessthanonehour.Lesstendercutsofmeatsuchas potroastcanbesimmeredfork-tenderinasauceorgravy.Toughcutsthatrequireslowcookingwilldobetter inaconventionaloven.Alargepieceofmeat,especiallyiftheshapeisuneven,shouldbeturnedover occasionallyforuniformroasting.
| MeatPowerCookingTimeStandingSpecialNotesLevel(perlb)Time | ||||
| BeefRoastRare806-8min.5-7min. | ||||
| Medium | 80 | 8 - 10 min. | 10 - 15 min. | Turn over after half the time. |
| Well | 8010-12min. | 10-15min. | ||
| PorkRoast | ||||
| Bone-in | 80 | 12 - 15 min. | 10 min. | Cover with microwaveable cover. |
| Boneless | 80 | 16 - 18 min. | 10 - 15 min. | Turn over after half the time. |
| LambRoast | ||||
| Bone-in | Medium | 807-9min.10-12min. | ||
| Well | 80 | 9 1/2 - 11 1/2 min. | 10 - 15 min. | |
| Boneless | Medium | 809-11min.10-12min. | ||
| Well | 8011-131/2min. | 10-15min. | ||
| BeefPatties(31/2oz)each | ||||
| 2 patties | 100 | 2 1/2 - 3 min. | 5 - 7 min. | Turn over and rearrange after half the time. |
| 4 patties | 100 | 3 1/2 - 4 1/2 min. | 5 - 7 min. | |
| MeatLoaf(2 lbs.) | 100 | 15 - 17 min. | 10 - 12 min. | Cover with microwaveable cover. |
| BaconSlices(4strips) (1slice;weight: 1oz.,length:11in.) | 1004-5min.— | Coverwithmicrowaveablecover. | ||
| HamSlices (1 in. thick) 4slices | 50 | 7 1/2 - 8 1/2 min. | 5 - 7 min. | Cover with microwaveable cover. |
POULTRY
GuideforCookingPoultry
Chickenisoneofthemostpopularfoodsandmicrowavingchickenisoneofthebestusesofyourmicrowave oven.Chickenstaysjuicyandtenderinthemicrowaveoven.However,juicinesspreventsbrowningbecause chickencrispsandbrownsonlywhentheskindriesoutenoughtochangecolor.Standingtimeisimportant, becauseitallowstheinteriortofinishcookingwithouttougheningthedelicatebreastmeat.
| Poultry | Power Level | Cooking Time | Standing (perlb.) | Special Notes Time |
| Chicken whole | 100 | 6 - 8 min. | 10 - 15 min. | Place breast side up on roastingrack.Letstand, covered,beforeserving. |
| Chicken cut up | 100 | 6 - 7 min. | 7 - 10 min. | |
| Turkey | 80 | 6 1/2 - 8 min. | 10 -15 min. | |
| CornishHens | 100 | 7-8min. | 7-10min. | |
| Turkey Breast | 50 | 10 - 11 min. | 5 - 7 min. | Rearrange once during cooking. Coverwithmicrowaveablecover. |
COOKINGGUIDE (CONTINUED)
EGGS&CHEESE
GuideforCookingEggs&Cheese
•CHEESE
Cheesemeltsquicklyandsmoothly. Whenservingcheeseasanappetizer, flavorisatpeakwhenserved atroomtemperature. Usealowpowerlevelformelting. Cheesemeltsbestwhensreddedandheated withmilkorotherliquids. Stircheesemixturesseveraltimesforevenheating.
•EGGS
Eggscookdifferentlybymicrowave. The high fat content of veggyolksabsorbs energy, soyolks cook faster than whites. It's easy topoacheggsinamicrowave oven, but if you want soft yolks, remove eggs from the oven before whites are completely cooked. Abrief standing time allows whitestoset without overcooking yolks. Check eggs for completion of cooking early, they toughen when overcooked. When eggs and yolks are mixed together for omelets, scrambled eggs or custards, they cook more evenly and need less stirring than during conventional cooking methods. Donottry to cook eggs in the shell. Steam can build up insideth shells, causing them to burst.
ScrambledEggs
EggsButterMilkorCookonProcedure
WaterPower100
| 21Tbsp.2Tbsp.1-2min. | Placebutterinsmallcasseroleandmelt. |
| 41Tbsp.2Tbsp.2-3min. | Addeggsandmilk,scramblingwithfork. |
| 62Tbsp.4Tbsp.3-4min. | Cookasdirectedinchart,breaking up and stirringeggstwice.Let stand, covered, beforeserving. |
PoachedEggs
| Eggs | Water | Cook Water onPower100 | Cook Eggs onPower80 | Standing Time | Procedure |
| 1 | 11/2 cups | 4-6min. | 1min.2min. | Placewaterintomediumcasserole.Cook atHighuntilboiling.Breakeggs,oneata time,intoseparatedish,pierceyolkonce with wooden pick and slip egg carefully into hotwater,cookasdirectedinchart. | |
| 2 | 1 1/2 cups | 4 - 6 min. | 1 1/2 - 2 min. | 2 min. | |
| 4 | 2 cups | 6 - 7 min. | 2 1/2 - 3 min. | 2 min. |
SOUPS
GuideforCookingSoups
Satisfyappetiteswithsavorysoupspreparedinyourmicrowaveoven.Adaptyourfavoritesbyusingsimilar cookingtimesandtechniques.
| Food | Power Level | Cooking Time | Standing Time | Special Notes |
| CannedCondensed Creamstyle,Bean,Pea orMushroom(101/2-111/2oz) | ||||
| With Water | 100 | 4 1/2 - 5 1/2 min. | 2 - 3 min. | Stir halfway through cooking time. Cover with microwaveablecover. |
| With Milk | 80 | 5 1/2 - 6 1/2 min. | 2 - 3 min. | |
| Dry Soup Mix | 100 then | 5 1/2 - 7 min. | 2 - 3 min. | Add water. Cover with microwaveablecover. |
| 1 envelope (10 1/2 oz.) | 50 | 3 - 4 min. | Stir twice. | |
| Broth (10 1/2 oz.) | 100 | 4 - 5 min. | 2 - 3 min. | Stir twice. Cover with microwaveablecover. |
COOKING GUIDE (CONTINUED)
VEGETABLES
GuideforCookingFreshVegetables
NutritionresearchindicatesthatmanymicrowavedvegetablesandfruitsloselesswatersolublevitaminCthan whencookedconventionally. Thisisduetoshortercookingtimeandtothefactthatlesscookingwateris neededwhenmicrowavingfruitsandvegetables.Bestofall,vegetableskeeptheirfreshcolor,textureand flavor. Vegetablesshouldbemicrowavedcoveredwithventedplasticwraporacasserolelid. Vegetables cookedintheirskins,suchaspotatoes,arealreadysotightlycoveredthattheyshouldbeprickedwithafork beforecookinginordertoreleaseexcesssteam.Toassureevencooking,vegetablesshouldbecutinuniform piecesandstirredduringthecookingtime.Alwaysaddsalttowaterbeforeaddingvegetables.Reducetime aminuteortwoforcrisp-tendertexture.Increasetimeforverysofttexture.Remembertoallowstandingtime oftwotofiveminutesaftercookingbecause,asmostfoodsdo,vegetableswillcontinuetocookafterthey areremovedfromthemicrowaveoven.
| FoodWaterCookonStandingSpecialNotes AmountPower100Time | ||||
| Asparagus | ||||
| Spears(1lb.)1/4cup5-6min.2min.MediumCasserole.Rearrange Cuts(1lb.)1/2cup 5-6min.2min.once. | ||||
| Freshgreenbeans(1/2lb.) 1/4cup 4-5min.2min.Stirtwice. | ||||
| Frozen green beans (1/2 lb.) 2 Tbsp. | 5 1/2 - 6 1/2 min. | 2 min. | Stir twice. | |
| Green Peas (2 cups) 1/4 cup | 4 - 5 min. | 2 min. | Small casserole. Stir twice. | |
| Broccoli(2cups) 1/4cup | 4-5min.2min.Mediumcasserole. | Rearrangeonceduringcooking. | ||
| Brussels Sprouts (1 lb.) 1/4 cup | 6 - 7 1/2 min. | 2 - 3 min. | Medium casserole. Stir once. | |
| Cabbage (1 lb.) 1/4 cup | 5 - 6 min. | 2 - 5 min. | Rearrange once during cooking. | |
| Cauliflower pieces (1 head) 1/4 cup | 6 - 7 min. | 2 - 5 min. | Cover with microwaveable cover. Stironce. | |
| Mushroom slices (1/2 lb.) 2 Tbsp. | 3 - 4 min. | 2 - 3 min. | Small casserole. Stir once. | |
CASSEROLES
Casseroles may require occasional stirring to distribute heat. They cook more evenly when made with ingredients of similar size and shape. Because of their shorter cooking time, casseroles cooked in the microwaveovengenerallyneedlessliquid.Casseroleswithcreamandcheesesauces,ormeatswhichneed slowercookingtotenderize,cookbestonpowerlevel40.
When cooking a favorite casserole, maketwo and freeze these second for future use. Line acasserole or baking dish with plastic wrap. Transfer the cooked food to the lined container and freeze. As soon as the food is frozen in the shape of the dish, remove it and wrap with freezer paper. Later it can be unwrapped and returned to the container for defrosting and heating.
DryCasseroleMixtures
Manypreparedboxtypecasserolesareavailableonthegroceryshelves.Manyhavefreezedriedfoodsor evaporatedfoodsincluded.Cookingperiodsaresoshorttheremaynotbetimeforthefoodstoabsorbthe moisturesufficientlyandreconstitutethefoods.Topreparethistype,boiltheamountofwaterrecommended on the package. Add the noodles (when included), cover and cook for approximately 10 minutes. Allow noodles to stand covered for an additional 10 minutes, rinse with warm water and drain. Then follow package directions forpreparingthemix.Reheatfourtosixminutesbeforeserving.
COOKING GUIDE (CONTINUED)
SAUCES
GuideforCookingSauces
Saucesboiloverrapidly,especiallythosethatcontainmilk.Assoonasthedoorisopened,cookingstops.If ingredientsarenottakendirectlyfromtherefrigerator,cookingtimewillbelessthangivenintherecipe.Stir saucequickly,aboutevery30secondstoeliminatelumps.Besuretouseacontainertwicethesizeofthe amountofliquidtopreventboilingover.
Awoodenspoonmaybeleftinthedishwhilesauceiscookingforeasystirring.Ifsauceisstirredslowly, cookingtimemayrequireabout15secondslonger.Ifdesired,aone-quartglassmeasuremaybeusedto preparesomesauces.
WhiteSauce
AmountButterFlourMilkCookCookSpecialNotes
ButterSauce
| 1cup,thin1Tbsp1Tbsp1cup | 30sec. | 21/2-31/2min. | CookonFullpowerasdirected oruntilthickened,stirringonce.Letstand,covered,beforeserving. | |||
| med. | 2 Tbsp | 2 Tbsp | 1 cup | 1 min. | 2 1/2 - 3 1/2 min. | |
| thick | 3 Tbsp | 3 Tbsp | 1 cup | 1 min. | 3 - 4 min. | |
BrownGravy
| Amount | Fat from Drippings | Flour | Liquid or Drippings | Cook on Power100 | Special Notes |
| 1 cup, thin | 1 Tbsp | 1 Tbsp | 1 cup | 2 1/2 - 3 1/2 min. | CookonFullpowerasdirected oruntilthickened,stirringonce. Letstand,covered,beforeserving. |
| med. | 1 Tbsp | 1 Tbsp | 1 cup | 3 - 4 min. | |
| thick1Tbsp | 1Tbsp | 1cup | 3-4min. |
SANDWICHES, INCLUDING HAMBURGERS AND HOT DOGS
GuideforHeatingSandwiches
Sandwichesheatveryquicklybecause,beingporous,theyhavealowdensity.Sincethefillingisusuallymore densethanthebreadorrolls,thefillingdeterminestheheatingtime.Surprisingly,thefillingwillalwaysbe hotterthanthebreadfeels.Caremustbetakennottoovercookasthebreadwillbecometough.Useseveral thinslicesofmeat.Thinslicesheatmorequicklyandarebetterthanonethickslice.Theslowheatingthickslice oftencausesthebreadtoovercookbeforethemeatishot.Sandwichesmaybeplacedonapaperplate,napkin or paper towel to be warmed. The sandwich should be covered with a microwave-safe paper towel. Remove wrappingimmediatelyafterwarming.Already-bakedfrozenbreadsandrollsmaybeusedforsandwiches.The filling,however,shouldbethawedfirst.Toastedbreadisfineforsandwichesandprovidesafirmbase.Thetoast iswarmedonly;nofurtherbrowningoccurs.
| Food | Amount | Cook onPower100 | SpecialNotes |
| Sandwich (6 oz.) | 1 | 1min. | |
| 2 | 1 1/2 - 2 min. | Place on microwaveable plate. | |
| 4 | 3-4min. | ||
| Hamburger (4oz.) | 1 | 1 min. | Cover with microwaveable cover. |
| 4 | 3-4min. | ||
| Hot Dog (2oz.) | 4 | 1 1/2 - 2 min. | Cover with microwave-safe papertowel. |
| Sloppy Joe | 4 | 4 min. | Place on microwaveable plate. |
COOKING GUIDE (CONTINUED)
PASTA&GRAINS
GuideforCookingPastaandGrains
Rawlonggrainricetakestimetorehydrate.Microwavingtimeisalittleshorterthanconventional,butthe greatestadvantageistheeasewithwhichyoucanpreparefluffyricewithoutstickingorburning.Cookedrice andpastareheateasilyinthemicrowaveovenwithoutlossofflavorortexture.Noextrawaterisneededto preventstickingordrying,sothere'snodangerofovercookingriceandpastaorthinningsauces.
| FoodHotSaltOilorPowerCookingStandingWaterButterLevelTime | ||||||
| Pasta(8oz) | ||||||
| Egg Noodles | 4 cups | 1 tsp. | 1 Tbsp. | 100 | 6 1/2 - 7 1/2 min. | 2 - 5 min. |
| Macaroni | 4 cups | 1 tsp. | 1 Tbsp. | 100 | 8 - 10 min. | 2 - 5 min. |
| Spaghetti | 4 cups | 1 tsp. | 1 Tbsp. | 100 | 8 - 10 min. | 2 - 5 min. |
| Lasagna Noodles | 4 cups | 1 tsp. | 1 Tbsp. | 100 | 12 - 14 min. | 2 - 5 min. |
| Rice,LongGrain | ||||||
| White Rice (1 cup) | 2 cups | 1 tsp. | 1 tsp. | 100then80 | 5 - 6 min.91/2-12min. | 5 - 7 min. |
| Brown Rice (1 cup) | 2 cups | 1/2 tsp. | 1 tsp. | 100then80 | 5 - 6 min.22-27min. | 5 - 7 min. |
CEREALS
Microwaveablehotcerealscanbecookeddirectlyinthecerealbowlandmakecleaningupeasy.
CONVENIENCEFOODS
FrozenFoods
A large variety of frozen foods, special dishes and dinners are available and the selections continue to increase. Themarketischangingrapidly, thereforeitisimpossiblelotolistthefoodsandtypesavailable and recommend cooking procedures. In this book we can only give general direction to assist you.
T.V.Dinners
To prepare a T.V. dinner, follow the maker's instructions for use with microwave ovens. To cook a T.V. dinner will require approximately five to seven minutes for the food to thaw and heat to serving temperature (dependingonthetypesoffood). Allowplasticwraptoremainoverthedishfortwominutestoallowheatto equalize. Dinnersthatcontainmashedpotatoeshavpresentedabitofaproblemduetothelargecompact mass of this particular food. You may want to remove about half the mashed potatoes after defrosting is started, then spread the remaining potatoes over the individual section of the tray. Heat the removed mashed potatoesinanindividualdish. Forfoodsthatshouldbecrispwhencookingiscompleted,removetheplastic wrapandusethebroilerofaconventionaloventocrispthefood.
IndividualFrozenFoods
These may be commercially prepared for frozen home. Placethe container off frozen food in the oven and heat only until the food starts to defrost and can be removed easily. Empty contents into a casserole or serving dish and continue to defrost and heat. Do not heat foods in deep foil containers. To crisp and brown special toppings, use the broiler of a conventional oven. If allowed to heat to serving temperature in a plastic container, the container will warp from the high heat off food.
FrozenFoodsinCookingPouchesorBoilableBags
To prepare these foods, slit the plastic bag. An X-type cut will help remove the food at the end of cooking time. Placethecutsidedownonaservingdish(withnometaltrim). Heatfoodsotherthanvegetablesforabout threeminutes. Frozenvegetablesrequireabouteighttonineandahalfminutesofcookingtime. Allowthe pouch bag to remain over the food for about two minutes to allow time for the heat to equalize. Foods prepared incheeseorwhitesauceshouldberemovedfromthepouchandplacedinaglasscasseroledishandstirred topreventovercookingofthesaucearoundtheedgesofthedish.
COOKINGGUIDE (CONTINUED)
CompleteMealsfromTableLeftovers
Completemealsfromleftoverscanbepreparedinadvance.Foodscanbefrozenandreadyforquickheating intheovenatanytime.Choosefoodssuitableforfreezingandputservingportionsonpaper,glassorchina (nometaltrim)plates.Wrapwithrecommendedfreezerpaperandfreezequickly.Whenapportioningthe servingsoffoodontheplate,useapproximatelythesameamountofeachkindoffoodformoreevenheating. Mashedpotatoeswillheatquickerifspreadslightlyandhollowed,withapatofbutterinthecenter.Toprevent smallpiecesofvegetables,corn,peas,etc.,fromdehydratingduringheating,moundwellnearthecenterof theplate.
DESSERTS
There'salwaystimetomakedessertwithamicrowaveoven.Fruitdessertshavearemarkablyfreshflavor andtexture.Microwavedcakesarehigherandmoretenderthanconventionallybaked;sincecakesareusually frosted,browningisunimportant.Microwavedpiecrustsareexceptionallytenderandflaky,whiledelicate custardsandpuddingsareeasytoprepare.
GuideforCookingCakes
| FoodPowerCookingTimeStandingSpecialNotesLevelTime | ||||
| Cake,round10031/2-5min.2-5min.(Mixed 9 inch) | 80 | Pourintogreasedandwax4 1/2 - 6 min. | paper lined cake dish. | |
| Ring or Angel Food Cake | 80 | 5 1/2 - 6 1/2 min. | 2 - 5 min. | Cover with wax paper. |
| Muffin (6 muffins) | 50 | 4 1/2 - 6 1/2 min. | 2 - 5 min. | Rearrange once. |
| Custard (6 servings) | 50 | 10 - 12 min. | 5 - 7 min. | Rearrange once. |
Baking
- Barcookiesworkbest.Greasingorliningofthemicrowaveablebakingdishisoptional.
• If insufficient browning disturbs you, frost, glaze or add food coloring to white or yellow batters. - Amicrowaveablecookiesheetcanbemadebycoveringcardboardwithwaxedpaper.
- Round glass baking dishes, and fluted or smooth microwaveable ring molds work best for cakes. You can make a microwave ablering mold of your own by placing a medium-size glass in the center of around glass baking dish.
- Because your cakes will rise higher in microwave cooking, never fill microwaveable cake pans more than halffull.
- Reduce baking powder and soda by approximately one-fourth when converting a conventional recipe.
- Fill paper-lined muffin cups to only half full which allows for muffins to rise more than normal.
- You can prepare your own "brown 'n serve" breads and rolls by baking them ahead of time in the microwave oven. Then, placetheminaconventionaloventobrownpriortoserving.
- Breads and rolls should be reheated to the point where they are warm to the touch. Overheating or overcookingmakesbreadtoughandrubbery.
- When making yeast bread in a microwave oven, choose a recipe with cornmeal, whole wheat flour, or rye flourtoachievearichercolor.
SPECIFICATIONS
| Item Rating Specification | ||||
| Power Supply 120V~ 60Hz | ||||
| Power Consumption | 1550W (12 A) | |||
| Microwave Output Power | 1100W | |||
| Oven Capacity | 1.6 cubic feet | |||
| Outside Dimensions | 21.8 (W) x 20.2 | 12.8 | (D$53 mH) inches x | 326 mm) |
| Weight | 36.7 Lbs (16.65 kg) Approx. | |||
BEFORE YOU CALL FOR SERVICE
Refer to the following checklist before you call for service.
If the oven does not work:
- Check that the power cord is securely plugged in.
- Check that the door is firmly closed.
- Check that the cooking time is set.
- Check for a blown circuit fuse or tripped main circuit breaker in your house.
- Check that the Child Lock feature is not engaged.
If there is sparking in the cavity:
- Check the containers, dishes or utensils in the oven and make sure they are not metal or have metal trim.

Emerson™
SERVICE
FOR ADDITIONAL SET-UP OR OPERATING ASSISTANCE
PLEASE CALL:
1-800-898-9020 OR 1-800-695-0098
FOR CUSTOMER SERVICE, PLEASE E-MAIL TO:
internet@emersonradio.com
OR WRITE TO:
Emerson Radio Corp.
Consumer Affairs Dept.
3 University Plaza
Suite 405
Hackensack, N.J. 07601
LIMITEDWARRANTY MICROWAVEOVENS
EmersonRadioCorp.warrantsthisproducttobefreefrommanufacturingdefectsinoriginalmaterial,includingoriginal parts,andworkmanshipundernormaluseandconditions("manufacturingdefect")foraperiodofone(1)yearfrom dateoforiginalpurchasein,andifusedin,theUnitedStates("warranty").Shouldservicebenecessaryunderthis warranty,EmersonwillprovidethefollowingatanIndependentServiceCenterorRegionalRepairFacilitypermitted byEmersontoperformrepairs,providedthemanufacturingdefectisverifiedalongwiththedateofpurchase:
*Repairserviceforone(1)yearfromdateoforiginalpurchaseatnochargeforlaborandparts.
*Replacementofadefectivemagnetronforseven(7)yearsfromdateoforiginalpurchase(labornotincludedafter initialtwelve(12)months).
In the event the product must be mailed to our Regional Repair Facility which is permitted by Emerson to perform repairs, please DIAL TOLL FREE 1-800-695-0098 to obtain an authorization number and then:
*Packtheunitinawell-paddedheavycorrugatedbox.
* Enclose your check or money order payable to EMERSON RADIO in the amount of \$15.00 to coverreturnshippingandhandlingcosts.
*Encloseacopyofyourproofofpurchase(warrantyservicewillnotbeprovidedwithoutdatedproofofpurchase).
*ShiptheunitprepaidviaUPSorparcelpost(insured).
NOTE: This warranty does not cover:
(a) Damagetoequipment not properly connected to the product.
(b)CostincurredintheshippingoftheproducttoandfromaRegionalRepairFacilitypermittedbyEmersonto performwarrantyrepairs.
(c) Damageorimproperoperationofunitcausedbycustomerabuse,misuse,negligenceorfailuretofollow operatinginstructionsprovidedwiththeproduct.
(d)Ordinaryadjustmentstotheproductwhichcanbeperformedbycustomerasoutlinedintheowner'smanual.
(e)ProductsnotpurchasedintheUnitedStates.
(f) DamagetoproductifusedoutsidetheUnitedStates.
THISWARRANTYISNON-TRANSFERABLEANDAPPLIESONLYTOTHEORIGINALPURCHASERANDDOES NOTEXTENDTOSUBSEQUENTOWNERSOFTHEPRODUCT.ANYAPPLICABLEIMPLIEDWARRANTIES, INCLUDINGTHEWARRANTYOFMERCHANTABILITY,ARELIMITEDINDURATIONTOAPERIODOFTHE EXPRESSEDWARRANTYASPROVIDEDHEREINBEGINNINGWITHTHEDATEOFORIGINALPURCHASEAT RETAILANDNOWARRANTIES,WHETHEREXPRESSEDORIMPLIED,SHALLAPPLYTOTHEPRODUCT THEREAFTER.EMERSONMAKESNOWARRANTYASTOTHEFITNESSOFTHEPRODUCTFORANY PARTICULARPURPOSEORUSE.
THEEXTENTOFEMERSONRADIOCORP'SLIABILITYUNDERTHISLIMITEDWARRANTYISTHEREPAIROR REPLACEMENTPROVIDEDABOVEAND,INNOEVENT,SHALLEMERSONRADIOCORP'SLIABILITYEXCEED THEPURCHASEPRICEPAIDBYTHEPURCHASEROFTHEPRODUCT.UNDERNOCIRCUMSTANCESSHALLEMERSONRADIOCORP.BELIABLEFORANYLOSS,DIRECT,INDIRECT,INCIDENTAL,SPECIAL,OR CONSEQUENTIALDAMAGEARISINGOUTOFORINCONNECTIONWITHTHEUSEOFTHISPRODUCT.THIS WARRANTYISVALIDONLYINTHEUNITEDSTATESOFAMERICA.
THIS WARRANTY GIVES YOU SPECIFIC LEGAL RIGHTS. HOWEVER, YOU MAY HAVE OTHER RIGHTS WHICH MAY VARY FROM STATE TO STATE. SOME STATES DO NOT ALLOW LIMITATIONS ON IMPLIED WARRANTIES OR EXCLUSION OF CONSEQUENTIAL DAMAGE, THEREFORE THESE RESTRICTIONS MAY NOT APPLY TO YOU.
The serial number can be found on the back cabinet. Wesuggest that you record the serial number of your unit in the space below for future reference.
ModelNumber:
SerialNumber:
MV1094F

- OWNER'S MANUAL MW1612B
- PRECAUTIONS TO AVOID POSSIBLE EXPOSURE TO EXCESSIVE MICROWAVE ENERGY
- CONTENTS
- IMPORTANT SAFETY INSTRUCTIONS
- SAVE THESE INSTRUCTIONS
- SAFETYPRECAUTIONS
- GeneralUse
- Utensils
- Food
- FEDERALCOMMUNICATIONSCOMMISSIONRADIO FREQUENCYINTERFERENCEESTATEMENT
- ARCING
- GROUNDINGINSTRUCTIONS
- INSTALLATION
- Powersupply:
- RollerGuide
- GlassTray
- Although you rovenis provided with safety features, it is important to observ the following:
- LOCATION OF CONTROLS
- OPERATION
- SETTING THE CLOCK
- NOTES:
- OPERATION (CONTINUED)
- WEIGHT DEFROST
- TIME DEFROST
- POWER
- COOKING IN ONE STAGE
- KITCHEN TIMER
- COOKING IN TWO STAGES
- DEFROSTING/COOKING IN TWO STAGES
- EXPRESS COOK
- STOP/CLEAR BUTTON
- AUTO COOK
- MEMORY
- MEMORY RECALL
- CHILD LOCK
- INQUIRY
- COOKINGGUIDE
- THEPRINCIPLESOFMICROWAVECOOKING
- FOODCHARACTERISTICS
- MICROWAVETECHNIQUES
- COOKINGGUIDE (CONTINUED)
- SomeFoodsDoNotMicrowaveWell
- HOTSNACKSANDAPPETIZERS
- SEAFOOD
- GuideforCookingSeafood
- COOKING GUIDE (CONTINUED)
- MEATS
- GuideforCookingMeats
- POULTRY
- GuideforCookingPoultry
- EGGS&CHEESE
- GuideforCookingEggs&Cheese
- •CHEESE
- •EGGS
- ScrambledEggs
- SOUPS
- GuideforCookingSoups
- VEGETABLES
- GuideforCookingFreshVegetables
- CASSEROLES
- DryCasseroleMixtures
- SAUCES
- GuideforCookingSauces
- WhiteSauce
- SANDWICHES, INCLUDING HAMBURGERS AND HOT DOGS
- GuideforHeatingSandwiches
- PASTA&GRAINS
- GuideforCookingPastaandGrains
- CEREALS
- CONVENIENCEFOODS
- FrozenFoods
- T.V.Dinners
- IndividualFrozenFoods
- FrozenFoodsinCookingPouchesorBoilableBags
- CompleteMealsfromTableLeftovers
- DESSERTS
- Baking
- SPECIFICATIONS
- BEFORE YOU CALL FOR SERVICE
- If the oven does not work:
- If there is sparking in the cavity:
- LIMITEDWARRANTY MICROWAVEOVENS
Brand : Emerson
Model : MW1612B
Category : Microwave