
F-YWP33N - Dehumidifier PANASONIC - Free user manual and instructions
Find the device manual for free F-YWP33N PANASONIC in PDF.


| Product Type | Dehumidifier |
| Brand | Panasonic |
| Model | F-YWP33N |
| Dehumidification Capacity (30°C, 80% RH) | 33 pt/day (15.6 L/day) |
| Dehumidification Capacity (27°C, 60% RH) | 20 pt/day (9.5 L/day) |
| Water Tank Capacity | 4.0 L |
| Energy Consumption (Dehumidifying Mode) | 265 W |
| Energy Efficiency Factor (27°C, 60% RH) | 2.30 L/kWh |
| Airflow Rate (High) | 120 m³/h |
| Power Supply | AC 230V, 50Hz |
| Dimensions (W x H x D) | 315 x 540 x 210 mm |
| Weight (Net) | 10.5 kg |
| Noise Level (Silent Mode) | 32 dB(A) |
| Noise Level (Normal Mode) | 40 dB(A) |
| Refrigerant | R-134a |
| Operating Temperature Range | 5°C – 35°C |
| Timer | 1 – 12 hours (On/Off) |
| Air Purification Function | Yes (with Ionic Air Filter) |
| Filter Cleaning Reminder | Yes |
| Auto Defrost | Yes |
| Continuous Drainage | Yes (via hose) |
| Mobility | Caster wheels and handle |
Frequently Asked Questions - F-YWP33N PANASONIC
User questions about F-YWP33N PANASONIC
0 question about this device. Answer the ones you know or ask your own.
Ask a new question about this device
Download the instructions for your Dehumidifier in PDF format for free! Find your manual F-YWP33N - PANASONIC and take your electronic device back in hand. On this page are published all the documents necessary for the use of your device. F-YWP33N by PANASONIC.
USER MANUAL F-YWP33N PANASONIC
natural_image
White Panasonic portable water heater with a clear lid and control panel (no visible text or symbols on the device body)Correct use will help you save electricity
Warranty card included Separately
Thank you for purchasing this Panasonic product.
- Please read these operating instructions carefully, in order to use the product correctly and in a safe manner.
- Please read the "Safety precautions" section (page2\~4)caerfully before use.
● Make sure that the correct information is written on the warranty card, including the date of purchase and the name of the distributor. Keep the warranty documentation in a safe place along with the operating instructions for future reference.
Panasonic®
Operating Instructions
Dehumidifier
Model No. F-YWP33N
This product is for indoor use only
Contents
< Page >
Safety Precautions 2\~4
Parts Name 5
Control panel 6
Note 7
Operation mode / Air volume selection .....8
To set humidity 9
Laundry mode 10
Air Direction Selection 11
● Air direction setting example …… 12
nanoe™ bacteriostasis and deodorization · 13
Timer / Handling of louver falling off /
Handling of full water tank 14
How to drain continuously 15
Maintenance 16\~17
- About Laundry mode 18
● Effectiveness of Filter 18
● Sound settings 18
● Key lock setting 19
- W-HEXS, the more energy saving dual dehumidification system …… 19
Fault 20
Emergency measures 21
Specifications 24
Preparing for use
Operation
Trouble shooting
The appliance is not intended for use by persons (including children) with reduced physical, sensory or mental capabilities, or lack of experience and knowledge, unless they have been given supervision or instruction concerning use of the appliance by a person responsible for their safety.
Children should be supervised to ensure that they do not play with the appliance
If the supply cord is damaged, it must be replaced by the manufacturer, its service agent or similarly qualified persons in order to avoid a hazard.
Please disconnect the power plug and empty the tank before doing any maintenance work.
Safely precautions
Always pay attention to these precautions
To prevent users and others bodily harm or property losses, we are explaining the precautions must be observed.
■ Ignoring the symbols incorrect operation, can result in harm or level of damage, described in the following two categories.

This symbol indicates the "Possibility of death or serious injury".

This symbol indicates the "Possibility of injury or damage to property".
■ Meanings of symbols that always observed are as shown below.

This symbol indicates an action that "requires caution".


This symbol indicates a "never do this" action.
This symbol indicates an "always do this" action.
! WARNING
■ Do not do anything that may damage the power cord or power plug.

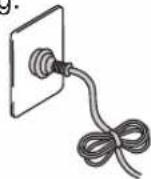
Do not damage, modify, bend strongly, pull, place heavy objects on top or binding with nylon yam or wire on power plug. If using damaged power cord, may result in electric shock, short circuit, causing fire.
- If the supply cord is damaged, it must be replaced by the manufacturer, its service agent or similarly qualified persons in order to avoid a hazard.
■ Do not unplug the power plug with wet hands.

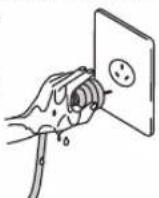
Electric shocks may occur.
■ Avoid the power cord if it is damaged or modified
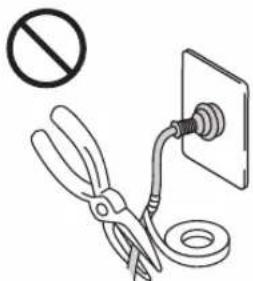
Damage from heavy objects placed on top, heating, or pulling could cause fire or electric shock.
■ Do not use overloaded the rated current of the power outlet and wiring equipment.
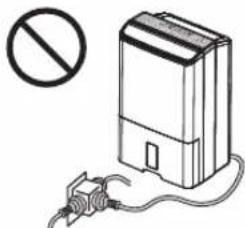
natural_image
Illustration of a portable electronic device connected to a cable with a prohibition symbol (no text or labels present)Use too many branch lines will exceed the rated current, it may cause a fire by overheating.
■ Do not use a damaged power cord
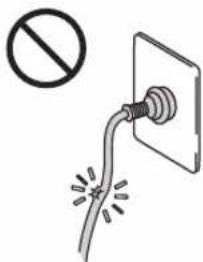
Using damaged power cord, electric shocks or fire may occur. Please consult with the dealership or service station.
■ Do not start or stop the unit by plugging or unplugging the power plug.
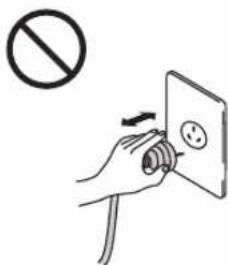
It may cause fire or electric shocks by overheating.
■ Insert the power plug completely

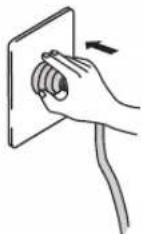
If the power plug is not inserted securely, fire due to overheating may occur.
- Do not use damaged power plugs or loose wall sockets.
■ Do not use the voltage other than as specified for unit.

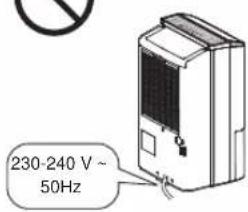
It may cause fire or electric shocks by overheating.
! WARNING
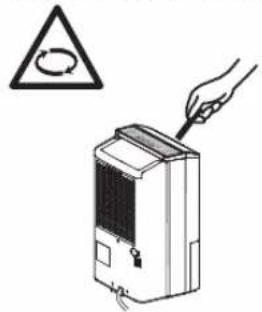
■ Do not insert fingers or other objects into the air inlet or outlet.
natural_image
Illustration of a hand using a screwdriver to adjust or install a device with a warning symbol (no text or labels present)The rotating fan inside the unit could cause injury.
■ Do not unplug roughly.
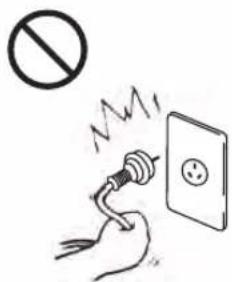
Unplug roughly may damage the power cord, cause electric shock, short circuit fire.
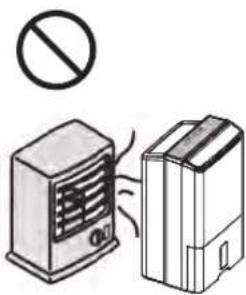
■ Do not place the unit near a heater.
natural_image
Illustration of a heat exchanger and a device emitting exhaust smoke, with no text or symbols present.Plastic parts may melt and cause fire.
■ Periodically clean the dust and dirt on the power plug.
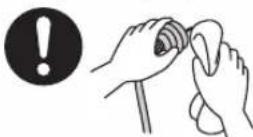
If dust accumulates on the power plug, humidity may cause damage to insulation and may result in fire.
● Unplug the power plug and wipe it with dry cloth. If not using the unit, unplug the power plug.
■ Never try to repair the unit by yourself.
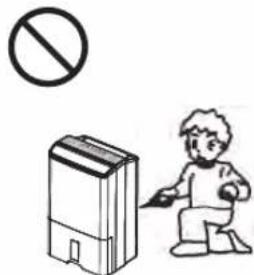
Fire or electric shock may occur.
- Please consult the purchasing dealership or service station for repairs.
■ Do not stretch the power cord.
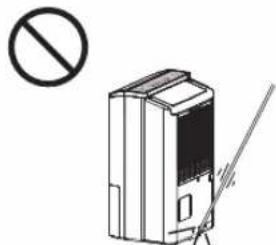
natural_image
Illustration of a device with a prohibition symbol and a diagonal line, no text or labels present.It may cause short circuit or broken wires (which may cause fire or electric shock.)
■ Switch off and then unplug out the power plug when error occurs (smoke etc.)
- Incorrect On/Off operations.
- Switch electric leakage or fuse burned frequently.
• Power cord or power plug heats up abnormally. - Burning smell or abnormal noise during operation.
• Water leakage from the unit.
• Other abnormal faulty condition.
It may cause fire or electric shock by overheating.
● Please consult the purchasing dealership or service station.
■ Do not pull on the power cord when carrying or storing the unit.
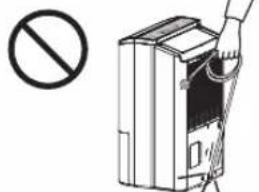
It may damage the wires inside the cord, and fire or electric shock may occur.
CAUTION
■ Monitor indoor temperature during prolonged operation.

During operation, heat from the unit may cause indoor temperature to rise, operating in closed room may cause discomfort.
● Pay particular attention if infants or the elderly are present.
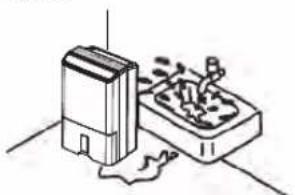
■ Do not operate in areas where water may be easily splashed onto the unit.

natural_image
Simple line drawing of a device next to a container with contents, no text or symbols present.Fire or electric shock may occur.
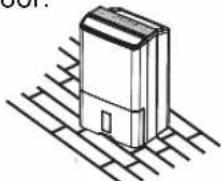
■ Place the unit on level and sturdy floor.

natural_image
Isometric line drawing of a rectangular device with a handle and control panel, placed on a grid-patterned surface (no text or symbols)If the unit tilts, water will overflow, and wet the property potentially causing fire or electric shock.
■ Do not use unit near flammable gas.

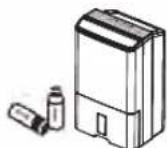
If flammable gases permeate the surrounding space, it may cause fire.
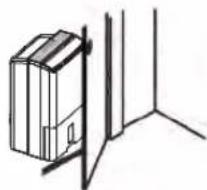
■ Do not use in confined spaces such as closets.

natural_image
Simple line drawing of a cabinet mounted on a vertical wall, no text or symbols presentIf there is insufficient ventilation, overheating and fire may occur.
■ Do not use in places exposed to direct sunlight, wind or rain.

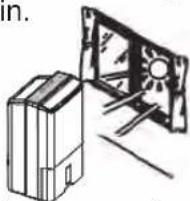
Resulting heat may cause fire or electric shock.
Safety Precautions
CAUTION
■ Do not use in place where there are artworks or academic documents.
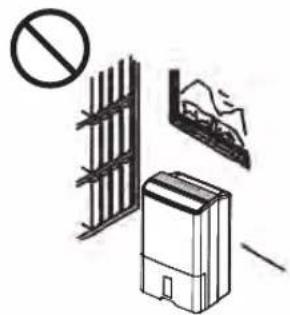
natural_image
Illustration of a portable air conditioner unit with no visible text or symbolsDeterioration of stored articles may occur.
■ Do not place any heat or flame producing instrument in air outlet of the unit.

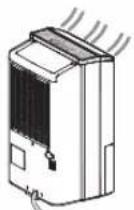
Incomplete combustion may cause carbon monoxide poisoning.
■ When moving the Dehumidifier, turn off the unit and empty the water in the water tank.

Fire, Electric shock, damage to household items caused by water leakage may occur.
■ Do not place flower vases or other water container on top of the unit.

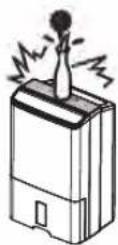
Water may spill into the unit and fire or electric shock may occur.
■ Do not cover the air inlet or air outlet with cloths or towels.

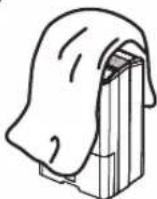
Air circulation will decrease and overheating or fire may occur.
■ When the unit is to be cleaned, switch off and unplug.

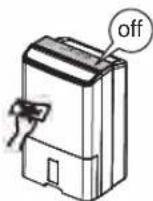
The high-speed rotation of the fan inside may cause injury.
■ Do not wash the Dehumidifier directly with water.

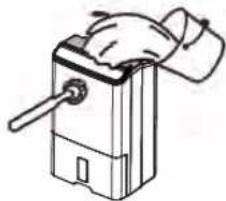
natural_image
Line drawing of a hand using a handheld device to lift a cylindrical component (no text or symbols)Water leakage may cause electric shock.
■ Do not sit or climb on the unit.

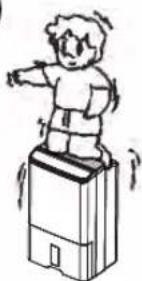
natural_image
Simple line drawing of a person standing on a device (no text or symbols)You may fall over, and injury may occur.
If unit will remain unused for a long period, unplug the power plug, for safety.

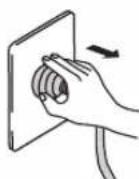
Accumulation of dust and foreign objects may lead to heat and fire may occur.
■ Do not clean your product by spraying insecticides to it or wiping it with benzene or thinner.

Fire, Electric shock, damage to household items caused by water leakage may occur.
■ Do not move or transport the unit by holding the louvers.

The unit may fall down and injury may occur.
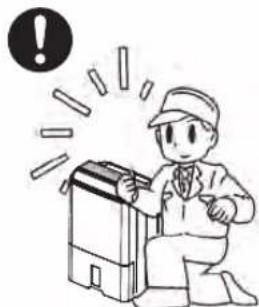
■ After prolonged use, perform periodic inspection.
natural_image
Illustration of a person kneeling beside a device with warning symbols (no text or labels)Particularly the air filter and drains should be checked routinely to avoid overheating and leakage, resulting in house fires and items wetted.
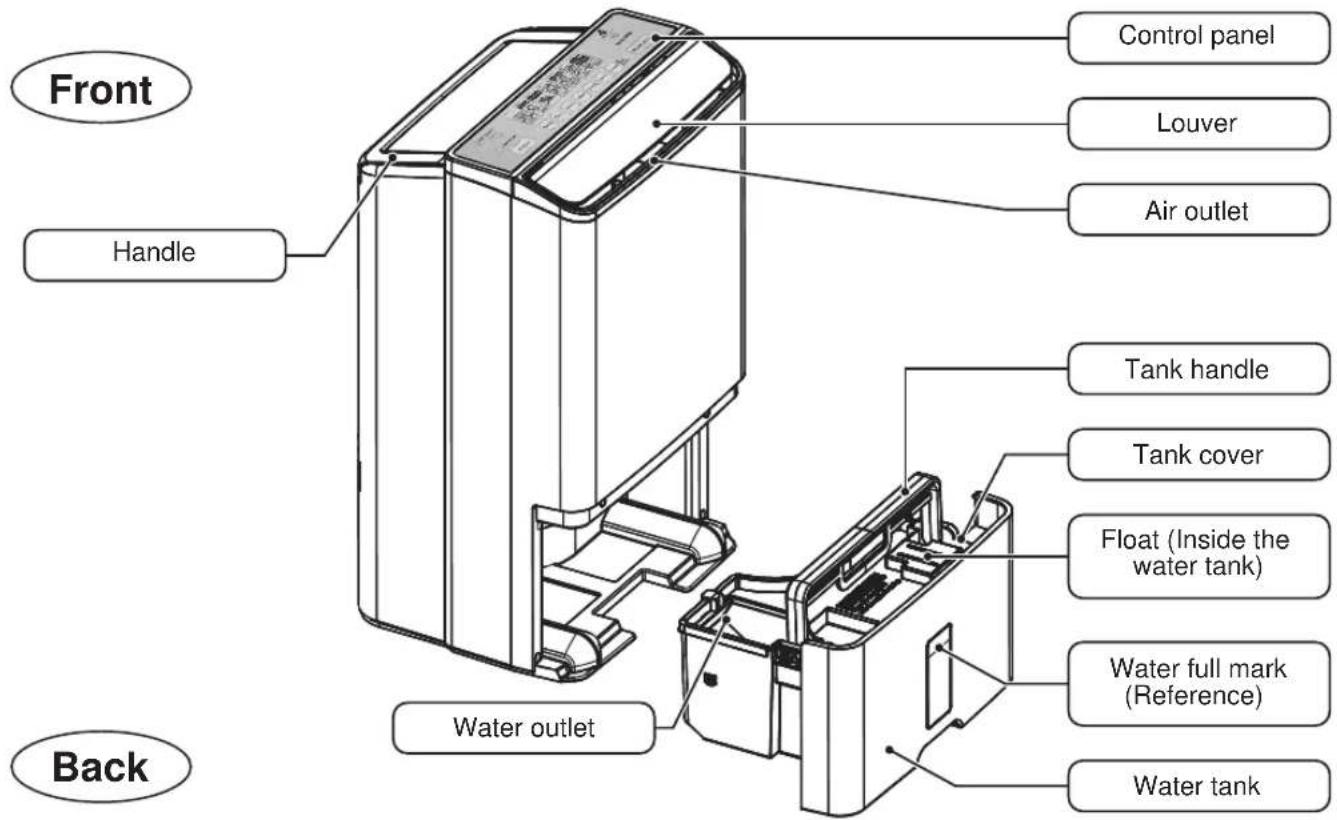
Parts Name
Note
Caster
(On the bottom of unit/4 pieces)

CAUTION
- Do not move roughly on the carpet, or when tank is filled with water. (May cause the unit to fall or spill water thus dampen the house and property.)

natural_image
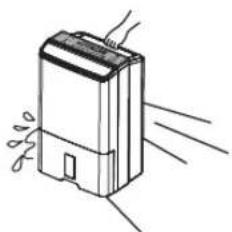
Simple line drawing of a device emitting exhaust lines (no text or symbols)Where to use
- At least 20 cm distance from the wall. (Walls and furniture near unit, may be stained by electrostatic.)
- At least 1 m distance from any TV, radio (To prevent screen interference, noise)
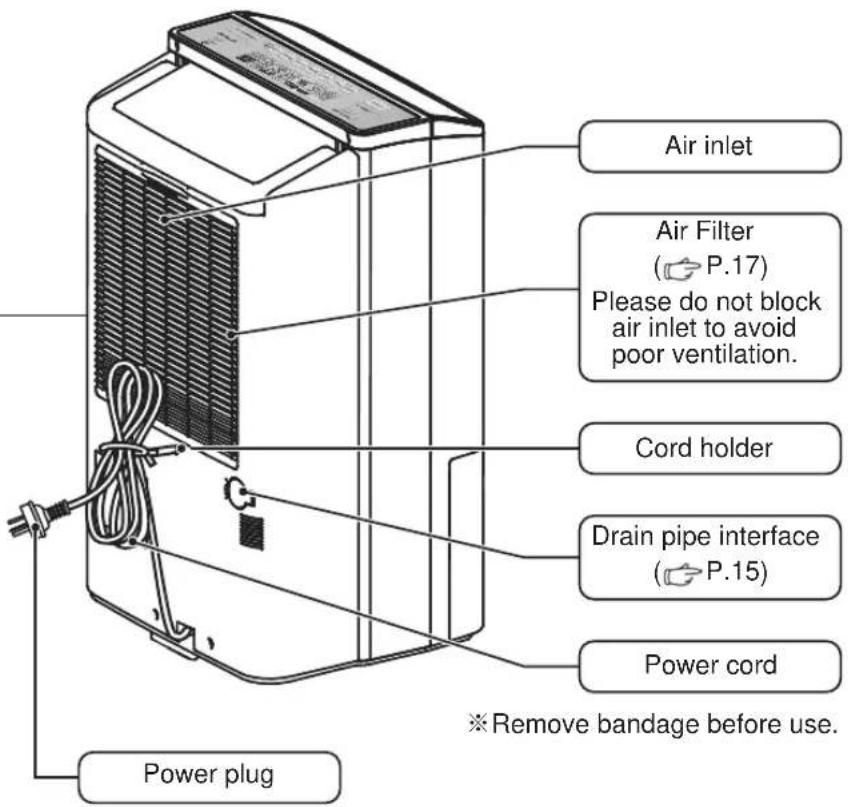
Air inlet
Air Filter
Please do not block air inlet to avoid poor ventilation.
Cord holder
Drain pipe interface
Power cord
※ Remove bandage before use.
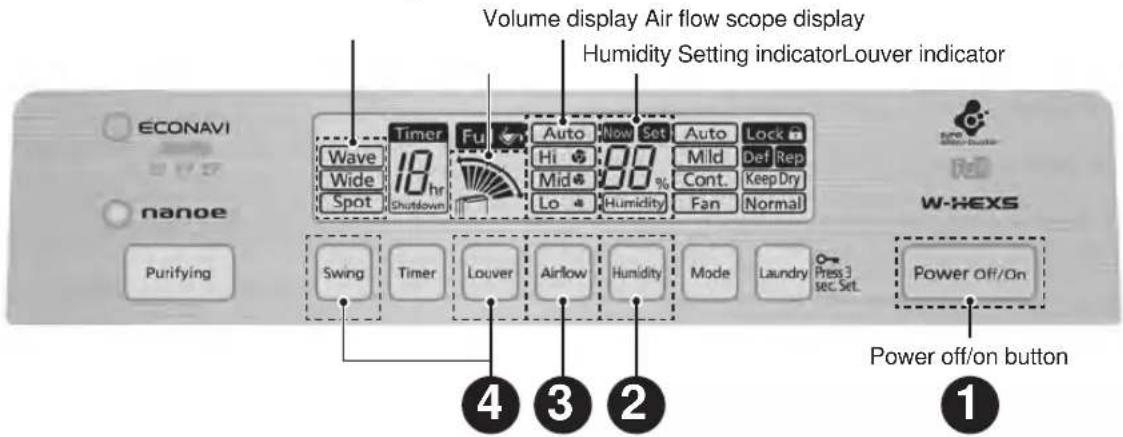
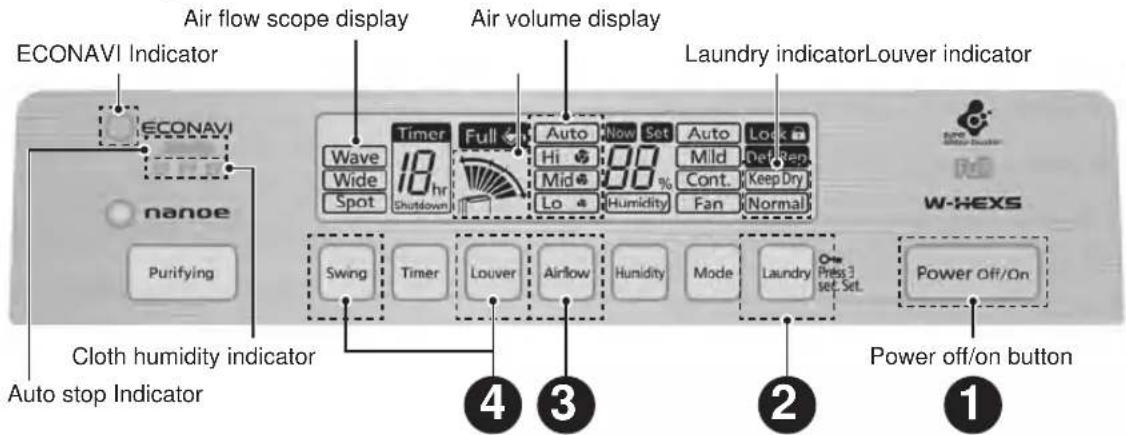
Control panel
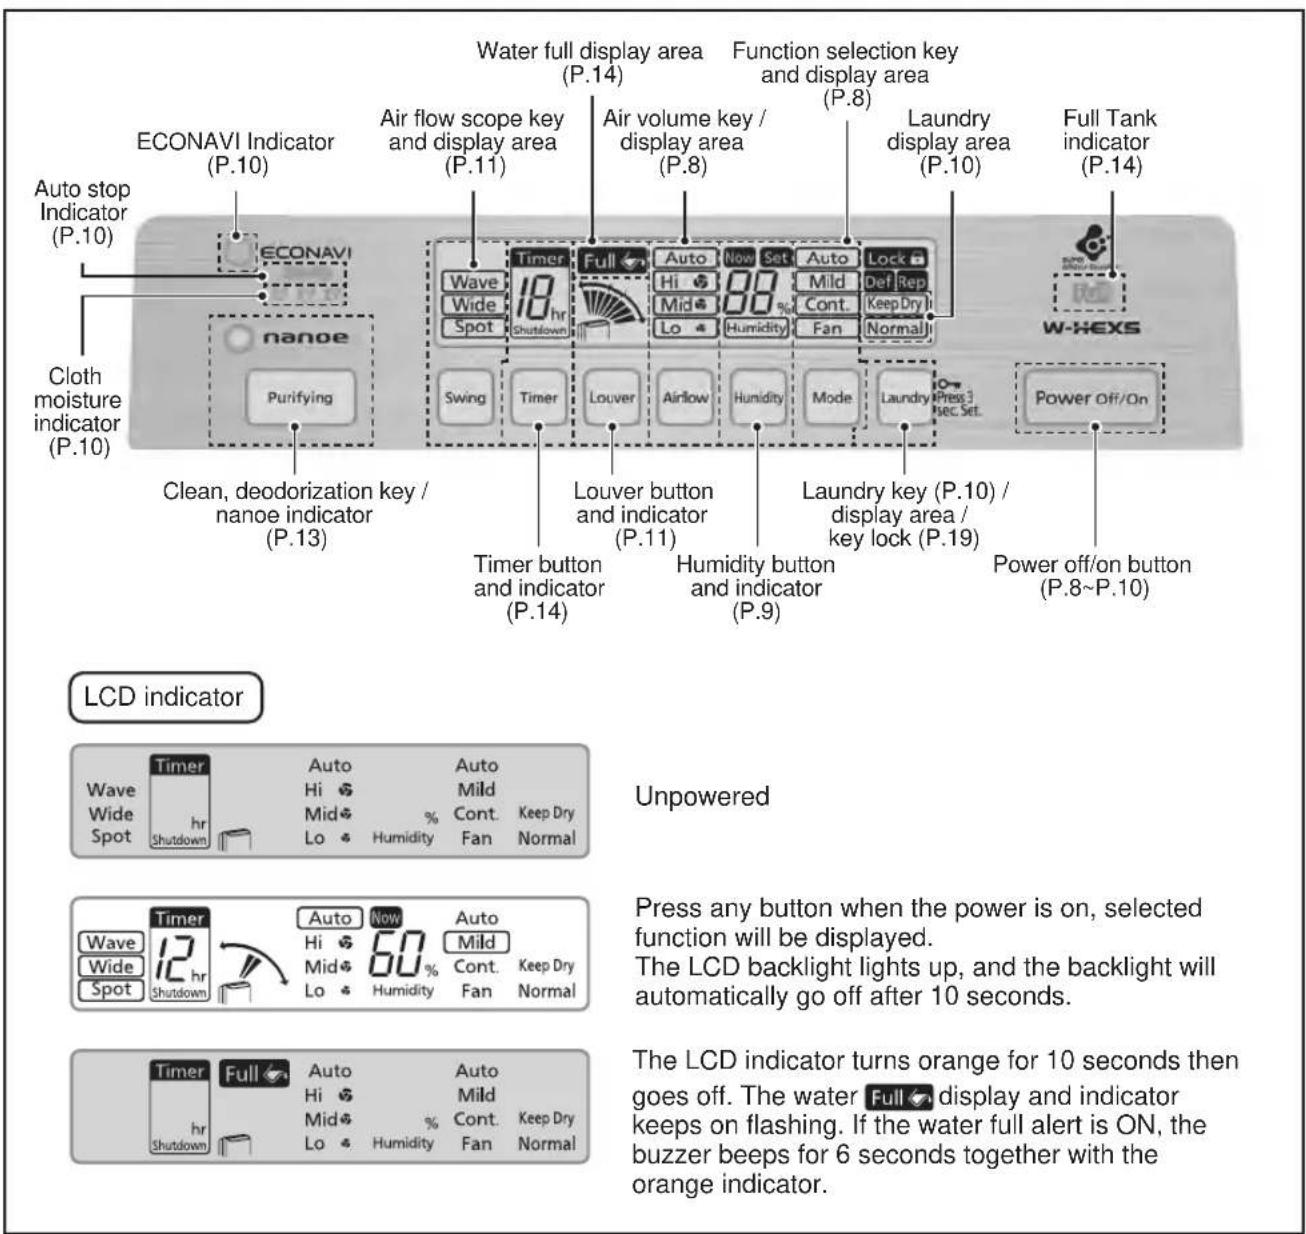
Note
| Display of humidity | * It displays "Hi" if the humidity is higher than 85 % and display "Lo" if the humidity is less than 24 % | Hi % Lo% |
| Check | *[Rep] When indicator flashes and error code "11" prompts, check the following:● When unit is tipped over.1 Unplug the power plug.2 Set the unit back upright (wipe away any spilled water).3 Let the unit stand for half a day or more without using it. (to dry the unit inside completely in case any water has spilled inside)4 Insert the power plug again and restart the unit.● Does the unit tilt?→ Unplug the power plug and then reconnect it.● Is magnet or metal placed atop the machine?→ Remove magnet or metal object,Unplug the power and then reconnect it. | * It indicates unit failure when the [Rep] indicator do not flashing(For example)Case Rep + 01,02,....1102% There are eleven fault codes● Please unplug the power plug immediately, and consult service station to repair the unit. |
| Full | * When the [Full] indicator and the water full display area flash, it indicates that the tank is full of water. All functions won't be able to work if the tank remains full. | |
| Defrost | *[Def] When Defrost indicator is flashing, the unit is defrosting.→Only the Power off/ on button works. Other buttons will be disabled. | |
| Mildew prevention | * Power off mildew prevention:* The product may run 3 minutes in fan mode after operation stopped (by manual or timer settings) to dry its internal side for mildew prevention. Press Power off/on key when in this mode to cancel this function.(P.S.1)* This function may not get enabled due to compressor operation time.P.S.1 When compressor operates more than 10 minutes. | |
| Protection | ● To prevent you from forgetting to switch off the unit, operation will stop automatically if no button is pressed for 24 hours.● If room temperature is higher than 32 °C, the air volume will increase automatically in order to protect the unit.● The unit should be operated within an indoor temperature range of 5~35 °C. Operation out of this range may cause some undesired problem.● The unit will stop operation when power failure occurs, and return to standby mode after power recovery. To ensure compressor life, do not operate within 3 minutes after switching off the unit. | |
| Safety protection | ● In case there is foreign matter, water, or dust entered your product or you press and hold on or more of its keys for 17 seconds the safety protection mode begins. Its original use status retains. No other key, except the "Power off" key, functions in this mode.* The safety protection mode may run up to 10 hours and then auto power off (or by pressing "Power off" key).* Once "Lock" and "Rep" indicator light up, remove any foreign matter, water, and dirt or your hand from the product to exit this mode. | |
| Comfort | ● The dehumidifier is used for daily life, such as the removal of unpleasant humidity and laundry drying. However, if ambient humidity is under 50 %, unit cannot help maintain a comfortable humidity environment. | |
| Factory default | ● StandbyPress and simultaneously for about 7 seconds to activate.If "00" is displayed, the unit is reset to the factory default.* After resetting to the factory default, all operating modes will be restored to their default settings. | |
| Memory function | ● When you stop and start the unit, it will return to the previous mode.● If you disconnect and connect the plug again, the unit will return to the previous mode.(Except timed settings) | |
Attention
● Avoid leaving any operating dehumidifier unattended.
- Recommend to have a regular inspection on the dehumidifier by a Qualified Person.
Operation mode / Air volume selection
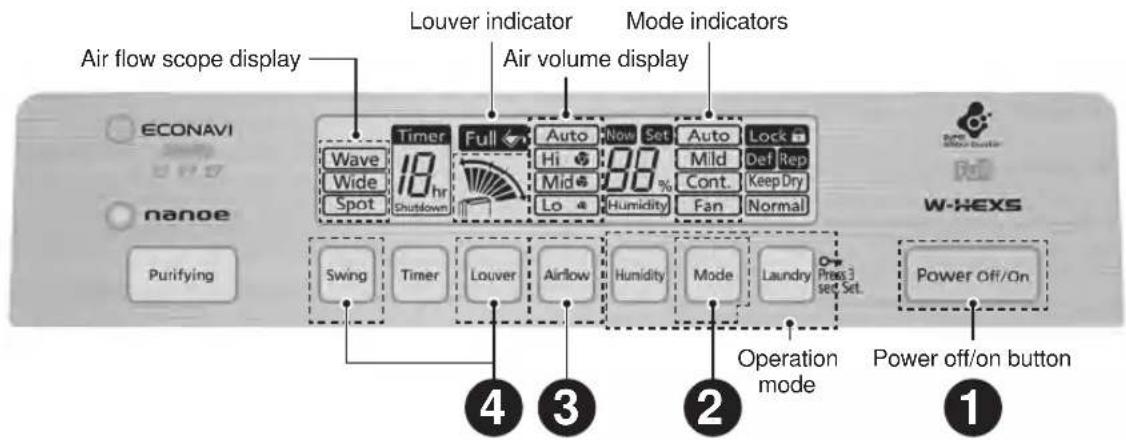
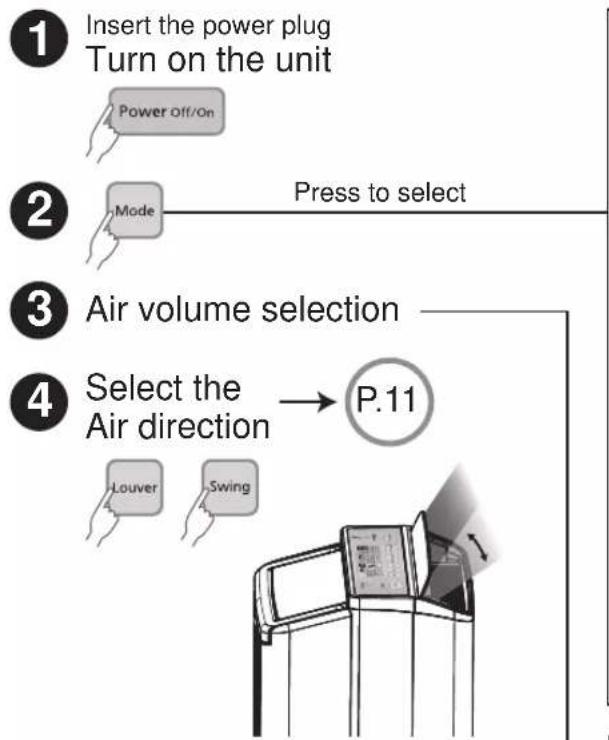
flowchart
graph TD
    A["1 Insert the power plug Turn on the unit"] --> B["2 Mode"]
    B --> C["3 Air volume selection"]
    C --> D["4 Select the Air direction"]
    D --> E["5 Air Direction P.11"]
■ To stop operation
● The product may run 3 minutes in fan mode after operation stopped to dry its internal side.
(power off mildew prevention p.7)
- Please unplug the power plug at least 3 minutes after stopping the operation.
■ To use timed power off (P.14)

■ When Full Tank Indicator is flashing (P.14)
● Operation will stop → Please empty the tank
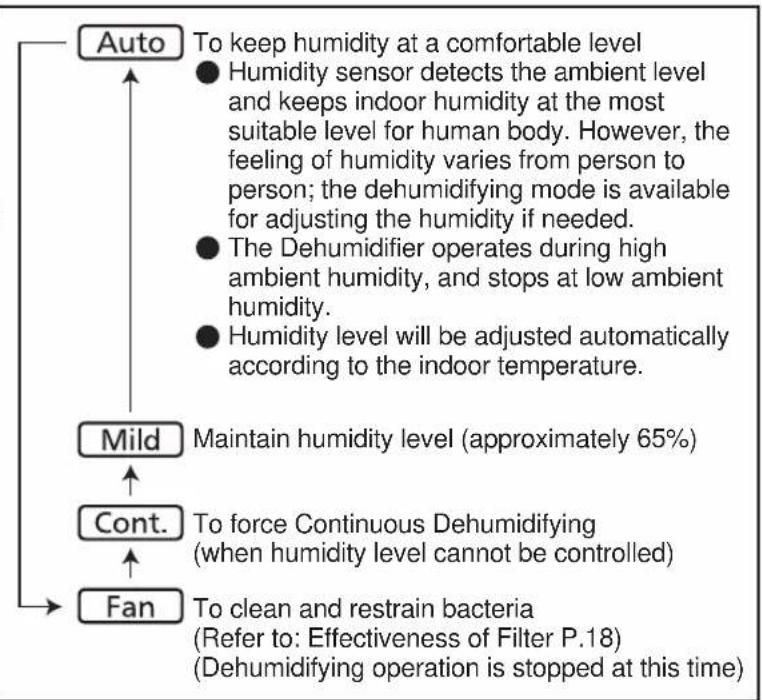
flowchart
graph TD
    A["Auto"] --> B["Mild"]
    B --> C["Cont."]
    C --> D["Fan"]
    A -->|To keep humidity at a comfortable level\n● Humidity sensor detects the ambient level and keeps indoor humidity at the most suitable level for human body. However, the feeling of humidity varies from person to person; the dehumidifying mode is available for adjusting the humidity if needed.\n● The Dehumidifier operates during high ambient humidity, and stops at low ambient humidity.\n● Humidity level will be adjusted automatically according to the indoor temperature.| E
    B -->|Maintain humidity level (approximately 65%)| F
    C -->|To force Continuous Dehumidifying\n(when humidity level cannot be controlled)| G
    D -->|To clean and restrain bacteria\n(Refer to: Effectiveness of Filter P.18)\n(Dehumidifying operation is stopped at this time)| H
Air volume selection (Laundry/Mode/Humidity)
(select operation mode P8\~P10 before selecting settings)
To change air volume
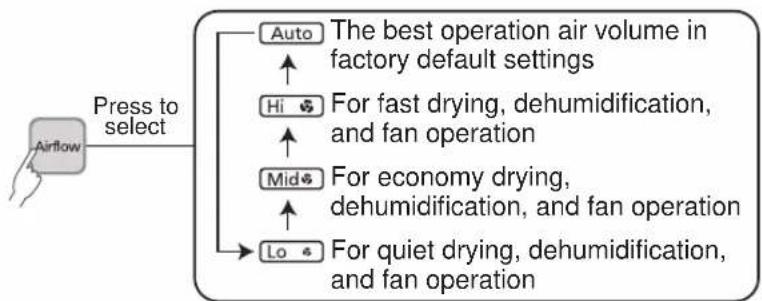
flowchart
graph TD
    A["Airflow"] -->|Press to select| B["Auto"]
    A -->|Press to select| C["Hi"]
    A -->|Press to select| D["Mid"]
    A -->|Press to select| E["Lo"]
    B --> F["The best operation air volume in factory default settings"]
    C --> G["For fast drying, dehumidification, and fan operation"]
    D --> H["For economy drying, dehumidification, and fan operation"]
    E --> I["For quiet drying, dehumidification, and fan operation"]
- Your product may enter protection mode with air volume and direction in case room temperature goes above 32°C. (system sounds three beeps if you try to press air volume and direction key)
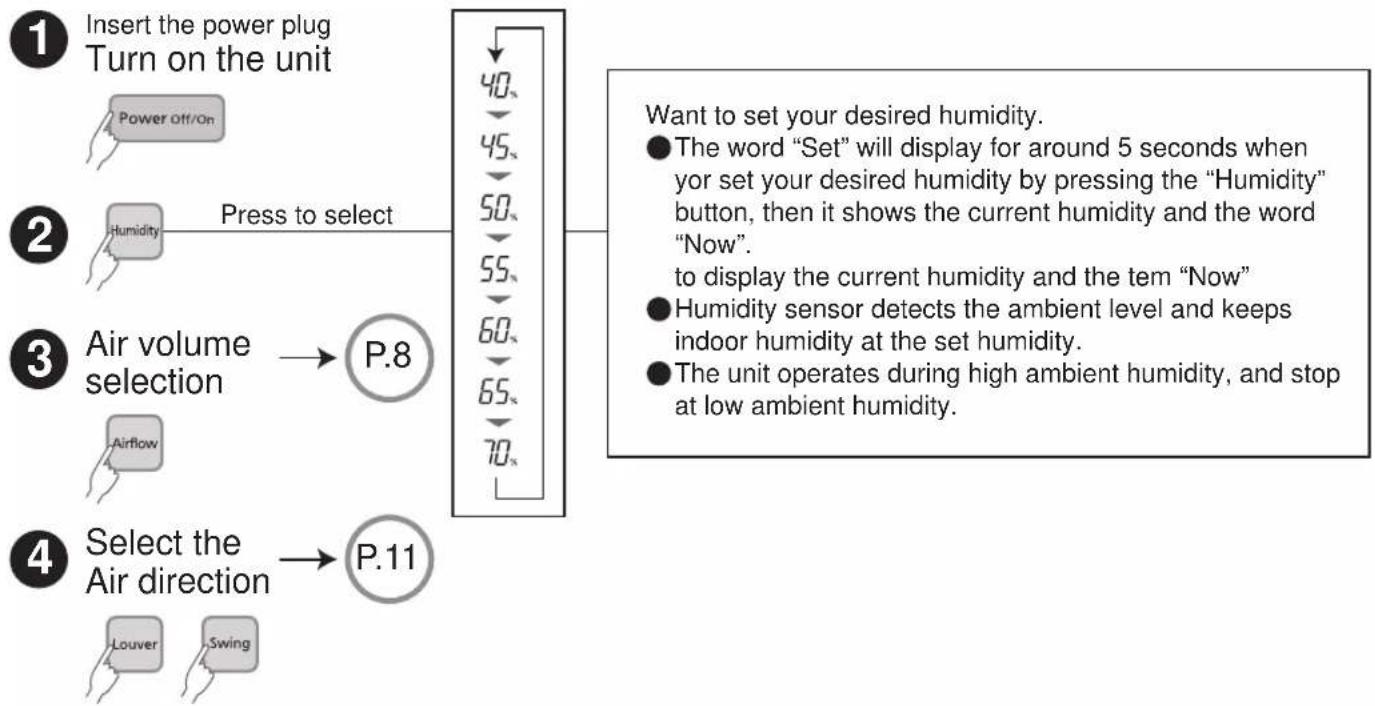
To set humidity
flowchart
graph TD
    A["1 Insert the power plug Turn on the unit"] --> B["2 Press to select Humidity"]
    B --> C["3 Air volume selection"]
    C --> D["4 Select the Air direction"]
    D --> E["5.8"]
    E --> F["6.11"]
    F --> G["70"]
    G --> H["40, 45, 50, 55, 60, 65, 70"]
    H --> I["Want to set your desired humidity."]
    I --> J["● The word "Set" will display for around 5 seconds when yor set your desired humidity by pressing the "Humidity" button, then it shows the current humidity and the word "Now". to display the current humidity and the tem "Now"."]
    I --> K["● Humidity sensor detects the ambient level and keeps indoor humidity at the set humidity."]
    I --> L["● The unit operates during high ambient humidity, and stop at low ambient humidity."]
■ To change air volume (P.8)

■ When Full Tank indicator is flashing (P.14)
● Operation will stop → Please empty the tank
■ To stop operation
● The product may run 3 minutes in fan mode after operation stopped to dry its internal side. (power off mildew prevention p.7)
● Please unplug the power plug at least 3 minutes after stopping the operation.
■ To use timed power off (P.14)

Laundry mode
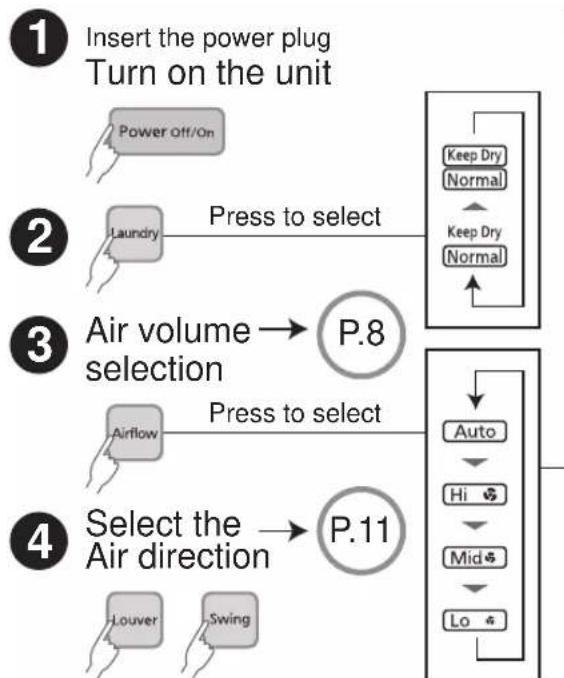
flowchart
graph TD
    A["1 Insert the power plug Turn on the unit"] --> B["2 Power off/on"]
    B --> C["3 Air volume selection"]
    C --> D["4 Select the Air direction"]
    D --> E["4 Select the Air direction"]
    C --> F["4 Airflow"]
    F --> G["4 Airflow to select"]
    G --> H["4 Airflow to select"]
    H --> I["4 Airflow to select"]
    I --> J["4 Airflow to select"]
    J --> K["4 Airflow to select"]
    K --> L["4 Airflow to select"]
    L --> M["4 Airflow to select"]
    M --> N["4 Airflow to select"]
    N --> O["4 Airflow to select"]
    O --> P["4 Airflow to select"]
    P --> Q["4 Airflow to select"]
    Q --> R["4 Airflow to select"]
    R --> S["4 Airflow to select"]
    S --> T["4 Airflow to select"]
    T --> U["4 Airflow to select"]
    U --> V["4 Airflow to select"]
    V --> W["4 Airflow to select"]
    W --> X["4 Airflow to select"]
    X --> Y["4 Airflow to select"]
    Y --> Z["4 Airflow to select"]
    Z --> AA["4 Airflow to select"]
    AA --> AB["4 Airflow to select"]
    AB --> AC["4 Airflow to select"]
    AC --> AD["4 Airflow to select"]
    AD --> AE["4 Airflow to select"]
    AE --> AF["4 Airflow to select"]
    AF --> AG["4 Airflow to select"]
    AG --> AH["4 Airflow to select"]
    AH --> AI["4 Airflow to select"]
    AI --> AJ["4 Airflow to select"]
    AJ --> AK["4 Airflow to select"]
    AK --> AL["4 Airflow to select"]
    AL --> AM["4 Airflow to select"]
    AM --> AN["4 Airflow to select"]
    AN --> AO["4 Airflow to select"]
    AO --> AP["4 Airflow to select"]
    AP --> AQ["4 Airflow to select"]
    AQ --> AR["4 Airflow to select"]
    AR --> AS["4 Airflow to select"]
■ To stop operation
● The product may run 3 minutes in fan mode after operation stopped to dry its internal side.
(power off mildew prevention p.7)
● Please unplug the power plug at least 3 minutes after stopping the operation.
■ When using timer (P.14)

● The ECONAVI Indicator, Auto Stop Indicator, Laundry Humidity Indicator will turn off in this mode.
■ When Full Tank Indicator is flashing (P.14)
● Operation will stop → Please empty the tank
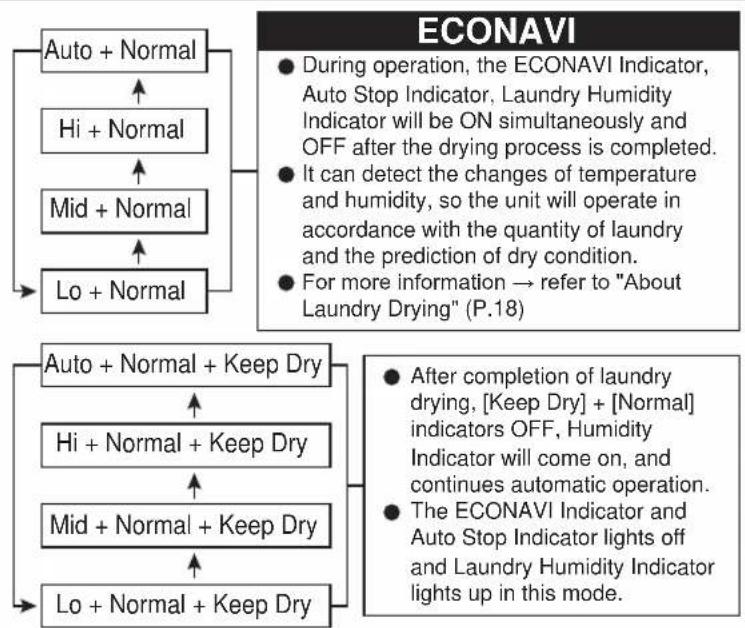
flowchart
graph TD
    A["Auto + Normal"] --> B["Hi + Normal"]
    B --> C["Mid + Normal"]
    C --> D["Lo + Normal"]
    D --> E["End"]

    F["During operation, the ECONAVI Indicator, Auto Stop Indicator, Laundry Humidity Indicator will be ON simultaneously and OFF after the drying process is completed."]
    G["It can detect the changes of temperature and humidity, so the unit will operate in accordance with the quantity of laundry and the prediction of dry condition."]
    H["For more information → refer to "About Laundry Drying" (P.18)"]

    I["After completion of laundry drying, [Keep Dry"] + [Normal] indicators OFF, Humidity Indicator will come on, and continues automatic operation.]
    J["The ECONAVI Indicator and Auto Stop Indicator lights off and Laundry Humidity Indicator lights up in this mode."]
    K["Hi + Normal + Keep Dry"]
    L["Mid + Normal + Keep Dry"]
    M["Lo + Normal + Keep Dry"]
    N["End"]
■ Intelligent dryness monitoring system (☐ ☐ ☐)
● This function is valid for cloth drying.
● It tells drying status of cloths.

Laundry starts

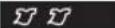
Approximately 1/3 dryness



Approximately 2/3 dryness



Laundry completed (※Keep Drying Operation)


Operation completed
※ After laundry completed, in order to prevent humidity returns to the laundry, please maintain laundry condition.
- Based on type of laundry, quantity, and method of hanging, and room condition, etc, there may be variation of dry conditions.
- If user is not satisfied with the dry condition, [Keep Drying] Function may be chosen as an option.
nanoe™ indicator
- To refresh cloths with deodorization and sterilization nanoe™ function will be enabled automatically by system in cloth drying mode. The LED indicator lights up and cannot be cleared manually. The system beeps two times if you try to operate the "Purifying" button.
Air Direction Selection

Please refer to pages below for air direction selection!
P.12
Select operation mode P8\~P10 before selecting air direction.
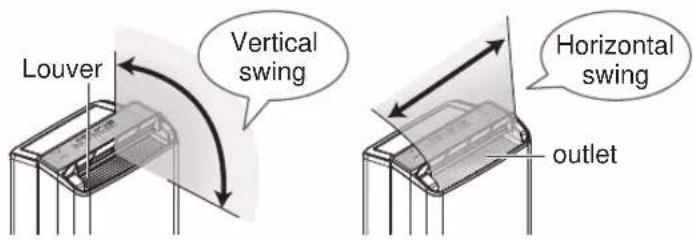
Operation
The swing can be set to match the height of the place where you would like the air to reach.
■ To swing louver
Running
(Press to select)
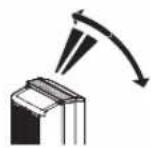
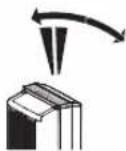
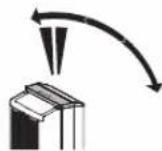

DownUpAuto
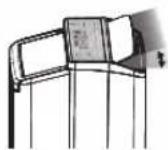
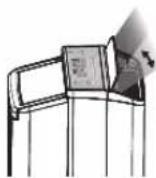
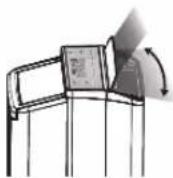
■ To fix the louver
Select Auto to enable louver swing. When it reaches the desired location, press the
again.
● The louver direction indicator lights off and the louver stops swinging and starts blowing in one direction.
Note
- Do not move the louver while swinging operation is in progress. (The swing range will change.)
The swing can be set to match the width of the place where you would like the air to reach.
Running
(Press to select)

flowchart
graph TD
    A[" "] --> B[" "]
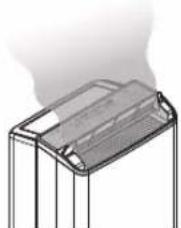
    B --> C["WaveWideSpot(normal)"]
    C --> A
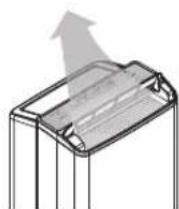
● Focus air in one direction
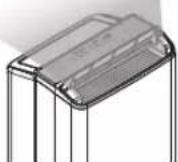
● Send air in wide range from left to right
natural_image
Illustration of a transparent electronic component with four pins, emitting smoke (no text or symbols)● Send air in center as well as left hand and right hand side
- If you do not select a horizontal swing setting, the dry air outlet will expel air along its entire width.
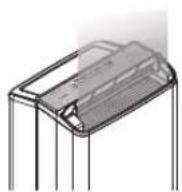
Air direction setting example
Tips for drying effectively
① Place the dehumidifier at a place that all clothes can be reached evenly.
② Leave space between each item of clothing so that air can circulate freely.
③ Leave a distance of 40 cm or more between the dehumidifier and the clothes, depending on the amount of clothes.
| Laundry | Dry cloths at lower part | Swing directionDownAir rangeWide*1 | 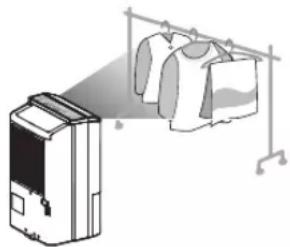 |
| Dry cloths at upper part | Swing directionUpAir rangeWide*1 | 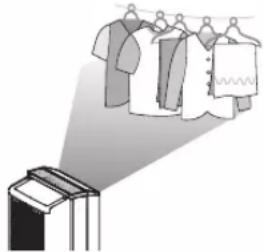 | |
| Dry cloths at both upper and lower part | Swing directionAutoAir rangeWide*1 | 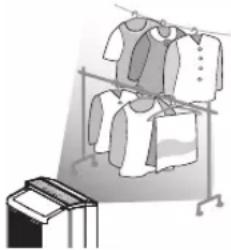 | |
| Dry cloths of small quantity | Swing directionAuto*2Air rangeSpot | 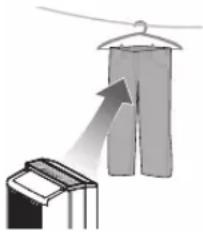 |
| Dehumidification | Wardrobe and shoe cabin, etc. | Swing directionAuto*2Air rangeWide | 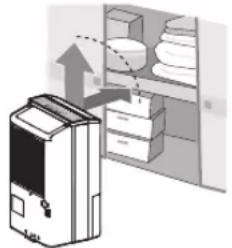 | ●Leather items such as shoes can not be dried with a dehumidifier.(They will become warped or damaged.) |
| Ceilings and walls, etc. | Swing directionUpAir rangeWide | 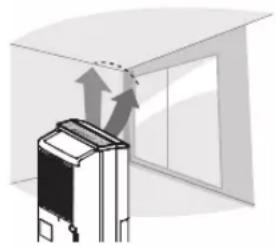 |
* 1: If there are items which are difficult to be dried, placing in between other items, use the "Wave" setting to make drying more effective.
* 2: Choose either "Up" or "Down" depending on how high the clothes are hanging and how high the closet is.
nanoe™ bacteriostasis and deodorization
nanoe™ (Laundry/Mode/Humidity)
■ To clean and deodorize during operation
Press to select
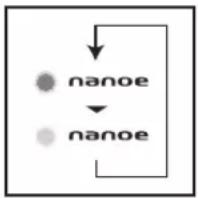
During "Laundry"
To refresh cloths, with deodorization and sterilization nanoe™ function will be enabled automatically. The LED indicator lights up and cannot be cleared manually. The system beeps if you try to operate the "Purifying" button. If sound set OFF, there is no beep.
In "Mode" and "Humidity"
The nanoe™ function may be switched on/off as desired.
About nanoe™
Environment conditions for generation Little amount of ozone
- The nanoe™ is generated from indoor air which may fail to run successfully due to various temperature and humidity conditions.
● Generation conditions Indoor temperature: 5°C\~35°C with dew temperature above 2°C.
Relative humidity: 30%\~85%
The generation of nanoe™ ion may be accompanied with little amount of ozone. It's far less than ozone level existing in natural forest and bears virtually no impact on human body.
- In case of odor of ozone, disable the "cleaning and deodorization" function.
nanoe ^TM
nanoe™ nano water ion (nanoe™ ion hereafter) is a charged clean water ion by separating water molecules with high voltage. The nanoe™ ion technology features sterilization★※1, allergens inhibition※2, fungi elimination※3 and deodorization※4 for skin healthy space.
★ Floating fungi: Results after 4 hours test in 25 cubic meter closed space instead of practical outcome in daily life environment.
★ Adhering fungi: Results after 8 hours test in 23 cubic meter closed space instead of practical outcome in daily life environment.
Deodorization effects vary with ambient environment (temperature, humidity), operation hours, deodorization, type of fabrics.
● Standalone test and practical use effectiveness may differ from each other due to conditions and use method.
● This device is not a medical equipment.
※1
● Experimental organization: Foundation Kitasato Environmental Science Center
● Experimental methods: Placed in test room of 25 cubic meter and count bacteria collected
● Sterilization method: Releasing nano water ion
● Subjects: Floating fungi
● Results: More than 99% floating fungi killed after 4 hours "BSHF 24_0301_1"
● Experimental organization: The Japan Food Research Laboratories
● Experimental methods: Count bacteria adhere to standard cloths in 23 cubic meter room
● Sterilization method: Releasing nano water ion
● Subjects: Bacteria adhere to standard cloths
● Results: More than 99.9% bacteria adhere to standard cloths killed after 8 hours "No. 13044083003-01"
※2 ●Experimental organization: Panasonic Corporation Analysis Center
● Experimental methods: Placed in test room of 23 cubic meter and test by ELISA method
● Removal method: Releasing nano water ion
● Subjects: Pollen (cedar)
● Results: More than 88% allergic substance inhibited in 8 hours "BAA33-130402-F01"
※3 ●Experimental organization: The Japan Food Research Laboratories
● Experimental methods: Measuring changes in fungi in test room of 23 cubic meter
● Sterilization method: Releasing nano water ion
● Subjects: Planktonic fungi
● Results: Positive effects in 8 hours "No. 13044083002-01"
※4 ●Experimental organization: Panasonic Corporation Analysis Center
● Experimental methods: Verify with 6-grade odor intensity table in test room of 23 cubic meter
● Deodorization method: Releasing nano water ion
● Subjects: Adhering cigarette odor
● Results: Odor intensity dropped to grade 1.2 in 2 hours "BAA33-130125-D01".
Timer / Handling of louver falling off / Handling of full water tank
To use timer for power off
- Press Timer button during operation to set up desired auto power off time. Press this key to cycle through from 1 to 12 hours (press and hold it to cycle automatically).
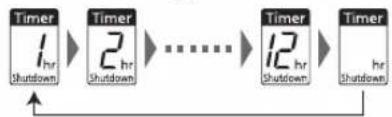
flowchart
graph LR
    A["Timer\n1 hr\nShutdown"] --> B["Timer\n2 hr\nShutdown"]
    B --> C["..."]
    C --> D["Timer\n12 hr\nShutdown"]
    D --> E["Timer\nhr\nShutdown"]
● The timer displays remaining time once it is set. Take example. For timer set to 9 hours and with 8 hours to go, it displays 8 hours.
● The timer keeps count down once it is set even after the water tank is full and operation aborted.
- Set timer in cloth drying mode will prevent ECONAVI indicator, auto stop indicator, and cloth humidity indicator from lighting up.
Handling of louver falling off
Louver fall off
■ Installation of louver
1 Point and insert holes to the left to thud at left side of your product
2 The louver is flat and slightly bent at its center part.
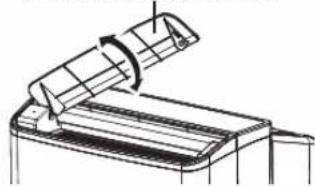
3 Insert right hand side of it to machine body.
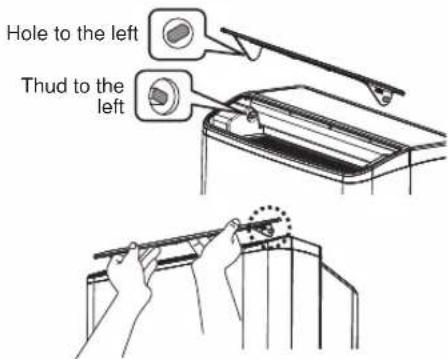
Turn the louver upward and downward for easy inserting
natural_image
Technical line drawing of a mechanical assembly or cutting tool (no text or symbols visible)Handling of full water tank
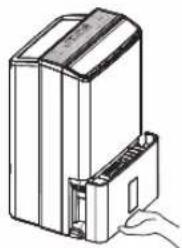
● The product stops operation automatically when water in tanks reaches the full level (about 5.2 liter). The LCD indicator turns orange for 10 seconds then goes off. The water Full display and indicator keeps on flashing. (If the water full sound is ON (P18), the buzzer beeps for 6 seconds together with the orange indicator.)
● Please empty water tank as described below
1 Hold the machine body steady with one hand and gently remove water tank out of it with another hand
● Without hitting each other (cause to failure)
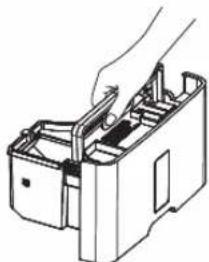
natural_image
Technical line drawing of a mechanical component with a handle and mounting bracket (no text or symbols)2 Move water tank handle to drainage position
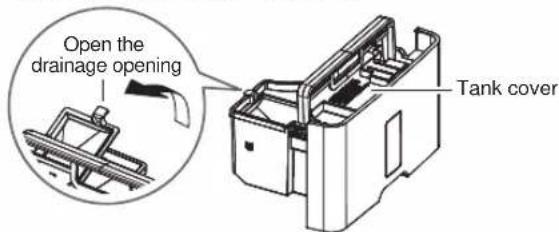
natural_image
Line drawing of a hand inserting a device into a box (no text or symbols)3 Pull up the water tank cover to open the drainage opening.
4 Hold water tank handle and its bottom to drain it.
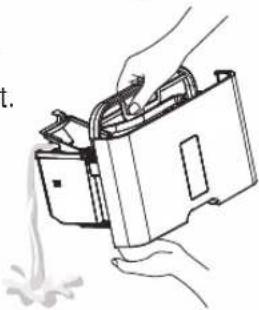
natural_image
Illustration of hands holding a device with a spray bottle (no text or symbols)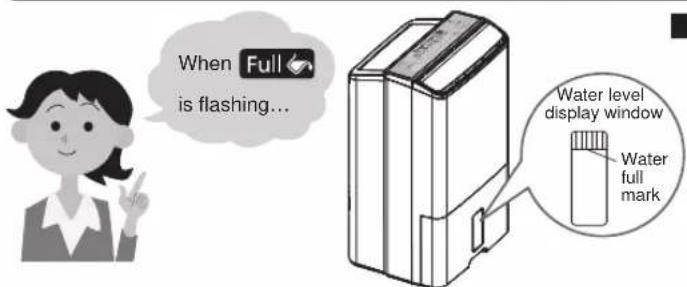
■ Water tank installation Close the drainage opening, insert water tank into place
- Close both water tank cover and drainage opening for installation (or the water tank may fail to install into place and may lead to water leak)
● Push water tank into place. In case of damaged poorly installed water tank the water full indicator may fail to flash and system operation may fail to start. Please remove the water tank and install again.
How to drain continuously
■ You may connect a hose to this product for continuous drainage if applicable (call your service center or dealer for continuous drainage installation or removal)
CAUTION
■ Secure drainage hose firmly.

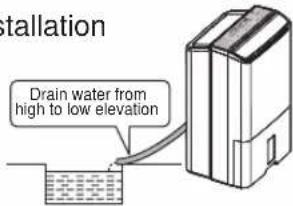
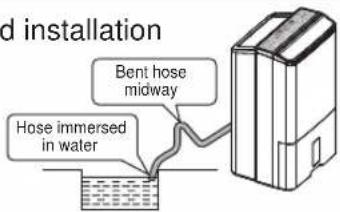
Keep drainage hose from bending and elevation difference for good drainage. Poor drainage may lead to water leak and wet floor.
- Keep temperature around drainage hose above zero Celsius

Or water in drainage hose may get frozen. This may block the hose from drainage and lead to water leak and wet floor.
Drainage hose installation
Valid installation
Invalid installation
Required accessories
● Commercially available plastic water hose Length: 30cm longer than distance from dehumidifier to drainage opening Inner diameter: 15mm
Note
Temperature difference in between water in drainage hose and environment may lead to water condensed on surface of drainage hose. Take insulation measures if necessary.
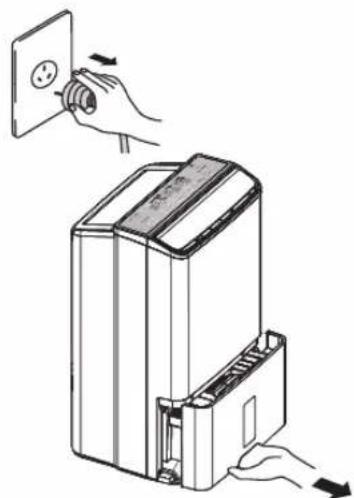
1 Remove power plug and water tank
natural_image
Illustration of a hand inserting a plug into a device with a circular button, showing mechanical components (no text or symbols)2 Open up drainage hose holder
(turn it 90 degree outward instead of removing it)
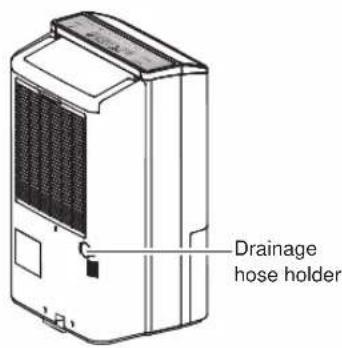
3
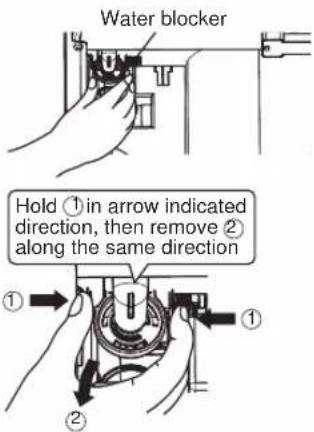
4
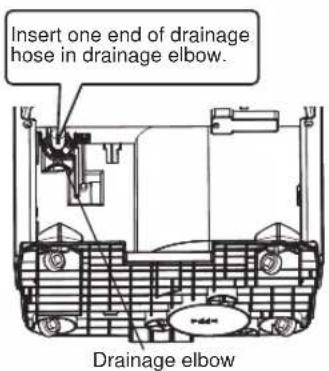
5 Install water tank Install drainage
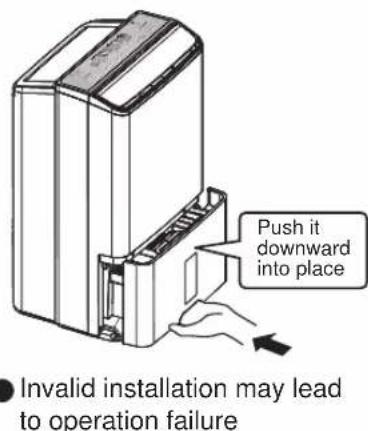
Note: Please call your service center or dealer to un-install it as invalid installation may lead to water leak out of water tank.
Maintenance

natural_image
Illustration of a smiling woman in business attire pointing upward (no text or symbols)Empty the water tank before doing any maintenance work!
■ Please disconnect the power plug and empty the tank. (see P.14 for how to empty the tank)
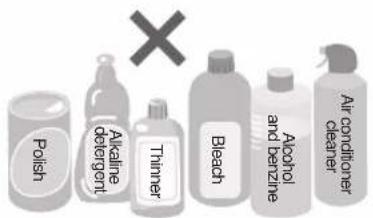
● Cleaning agents such as those shown at under should not be used.
- If using a chemically-treated cloth, be sure to read the instructions of the cloth.
● Cleaning agents such as those shown at under should not be used.
- If using a chemically-treated cloth, be sure to read the instructions of the cloth.
Water tank: Once per month
● Wash water tank and tank cover with clean water 2-3 times.
● You don't need to remove the float, just clean it with water.
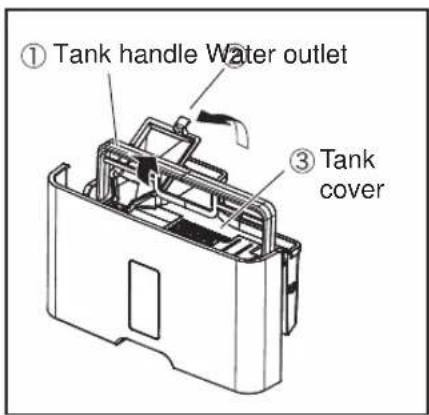
■ To remove the tank cover
① Turn water tank handle up
② Open the water outlet
③ Pull water tank cover upward
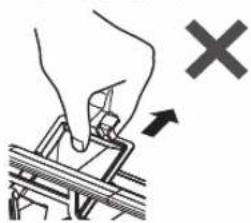
● Do not strongly pull on the water outlet.
natural_image
Illustration of a hand pressing a component with an arrow indicating force (no text or symbols)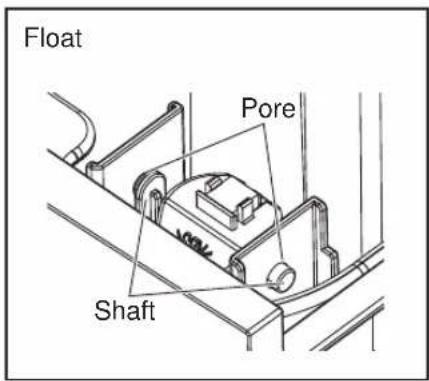
Float
● Clean dirt around shaft with water (to prevent float from malfunctions)
- Do not remove float (invalid installation of it may lead to operation failure and water leak) → Insert both axis in hole as illustrated in figure to the left when float falls off.
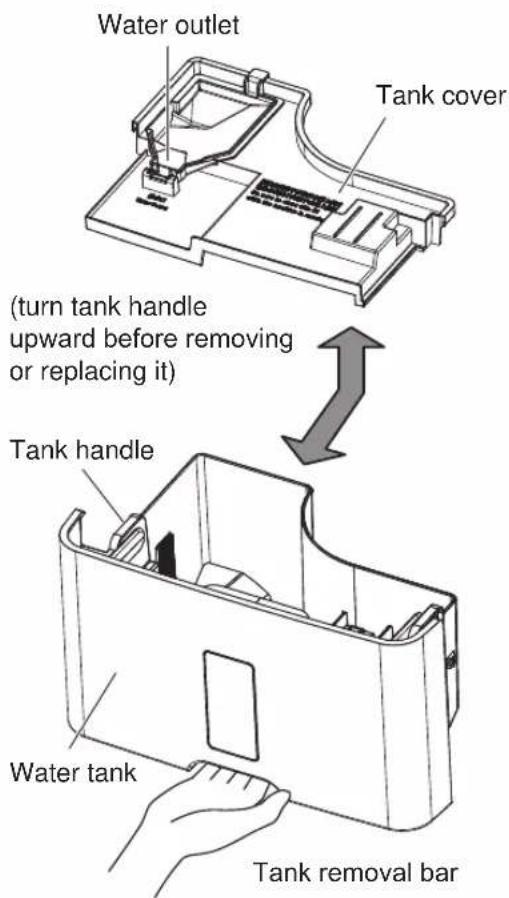
- Remove sticky dirt with thinned neutral detergent
● Inner wall of tank may get black (due to dirt in air which dissolved in water)
■ Wipe machine body with wrung out wet cloth before wiping with dry cloth again.
● Do not leave the body widthwise (this may lead to water leak)
- Remove sticky dirt with thinned neutral detergent
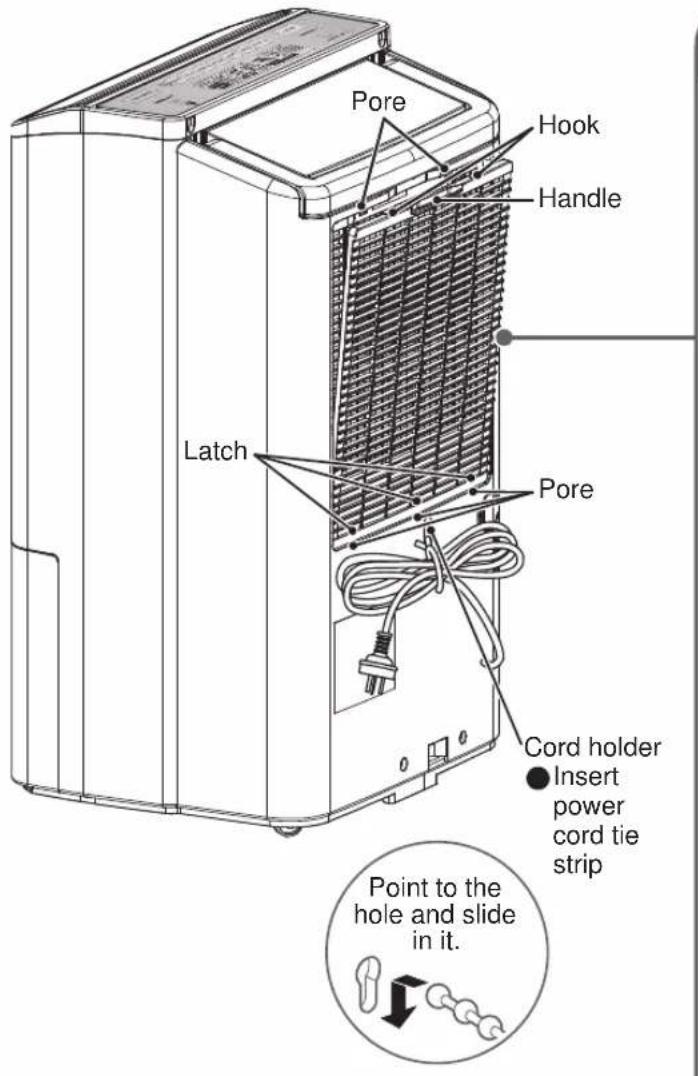
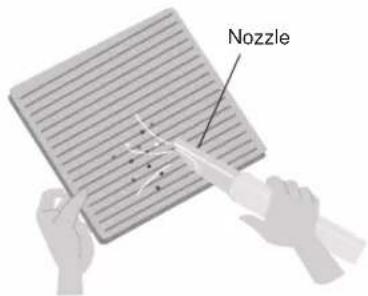
Filter (clean it biweekly)
Remove dirt with vacuum cleaner
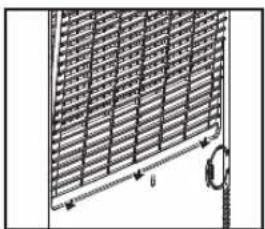
■ How to remove it
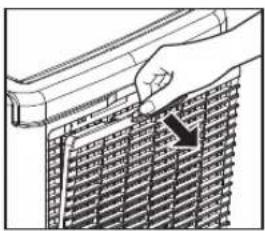
natural_image
Hand holding a cylindrical object with a grid pattern, no visible text or symbols● Pull the handle forward
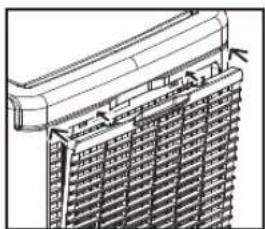
How to install
natural_image
Diagram of a grid-patterned panel with a circular component and dimension line (no text or symbols)① Insert the three lower latches in pores in the body
natural_image
Exterior view of a modern building facade with grid-like structure and ventilation grilles (no signage or text)② Press two hooks at upper part into body
- Replace in case of any damage.
● Regular maintenance (dehumidification capacity may drop, power bill may rise, and more failures may follow due to dirt and clogged filter)
For machine not to use for long time
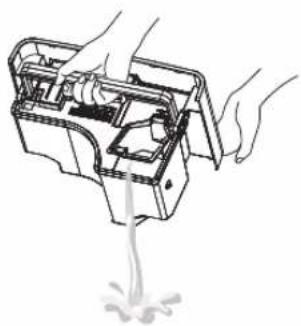
natural_image
Illustration of hands cleaning a mechanical device with liquid spilling out (no text or symbols)① Select function Fan and set it to run for 4 hours and power off automatically afterwards.
② Remove power plug, leave it for one day, empty the water tank afterwards (p.14).
③ Clean body, water tank, and filter.
④ Cover body with plastic bag.
⑤ Store dehumidifier in place of low humidity, good ventilation, and flat surface. (leave it tilted may lead to failure and water leak)
About Laundry mode
About ECONAVI
Select Normal along with Air (Auto, Hi, Mid, or Lo) to start the drying operation. The ECONAVI indicator, auto stop indicator, and cloth humidity indicator light up during drying and off afterwards. (p.10) Detect changes in temperature, humidity; run and auto stop operation according to amount of cloths and estimated drying status.
● Reference operation hours before auto stop.(Unit:Hour)
| Model No. | F-YWP33N | ||
| Volume of cloths | Drying operation hours | ||
| Auto /Mid Hi Lo | |||
| 2-4 kg roughly | 3.7~5.2 | 3.4~5.0 | 4.2~6.1 |
| 4-6 kg roughly | 5.4~7.4 | 5.2~7.2 | 6.1~8.0 |
Test conditions: Temperature at 20°C; humidity at 80%, room size at 20 square meters (results as tested by this company)
● Actual operation time, power consumption, dehumidification level may vary with conditions of environment, type, amount, hanging pattern of cloths, room size.
- To dry cloths with dehumidifier it's better to do it in space small and well closed for less energy waste.
Operation stops after about 10 hours.
Effectiveness of Filter
The filter contains super alleru-buster and antimicrobial agents to help inhibit allergens, bacteria and fungi activity.
Super alleru-buster
Inhibit growth of allergens (e.g. pollen and dust) trapped in filter
Test Institution: Osaka Municipal Technical Research Institute
Test Method: Using enzyme immunoassays measurement methods for reduction of fine allergens material
Test Results: Allergen activity inhibited
Antibacterial
May inhibit bacteria * 3 and fungi * 4 caught in filter.
*3 Test Institution: (fiscal) Japan Food Analysis Center.
Test Method: Use standard agar and agar plate culture method.
Test Results: Inhibit more than 99% bacteria
*4 Test Institution: (fiscal) Japan Food Analysis Center.
Test Method: The anti-fungal test method (halo test method).
Test Results: Effective fungi resistance under the halo test method.
- Filter may end up with peculiar odor of "Family health green tea extract". This is normal and bears no harm to human body.
● The filter changes light brown afterwards. Frequently used filter may end up with brown spots. This is normal and does not hamper its performance.
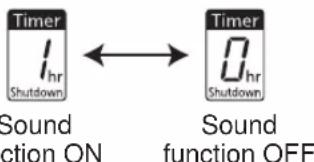
Sound settings
● You can change sound settings only in standby mode
● Factory default: Key sound ON, water full sound OFF
With memory
● Key sound setting:
Standby
flowchart
graph LR
    A["Timer I_hr Shutdown"] <--> B["Timer 0 hr Shutdown"]
    style A fill:#f9f,stroke:#333
    style B fill:#f9f,stroke:#333
    note1["Sound action ON"] below A
    note2["Sound function OFF"] below B
The 1 and 0 indicator alternate flash in 2 seconds interval. Remove your hand when the one you need is flashing to finish the setup operation.
● Water full sound setting:
Standby
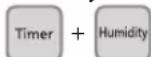
Press and hold both buttons for 3 seconds.
The 1 and 0 indicator alternate flash in 2 seconds interval. Remove your hand when the one you need is flashing to finish the setup operation.
Key Lock setting
● Key Lock on
During standby or operation, please press Laundry button for 3 seconds to activate the Key Lock.
When the LCD Lock lights up, all functions are not available.
(The backlight will light up by pressing any button when locked)
● Key Lock off
During standby or operation, please press 📁 button for 3 seconds to unlock.
When the LCD Lock goes off. All functions are available.
★ Key Lock will be automatically released when power failure occurs. The Key Lock must be re-set.
★ When the tank is full, Key Lock cannot be canceled by pressing the button if the tank is not emptied.
W-HEXS, the more energy saving dual dehumidification system
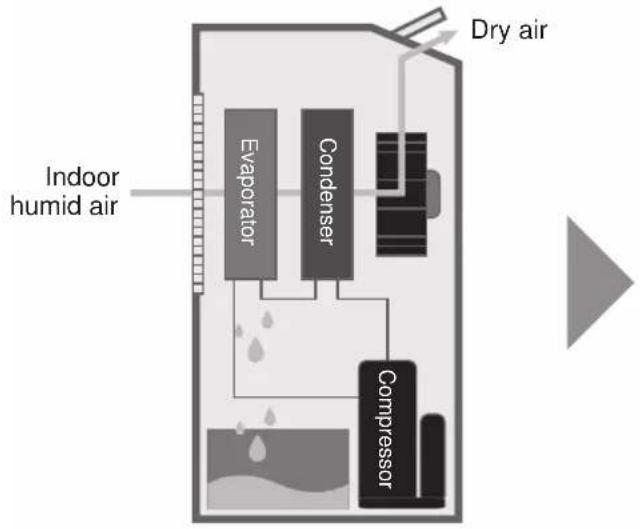
Differing from conventional dehumidification system's single air flow direction the W-HEXS comes with multi-layer dehumidification membranes. This not only expands air inlet direction but also improves power efficiency of dehumidification.
flowchart
graph TD
    A["Indoor humid air"] --> B["Condenser"]
    B --> C["Evaporator"]
    B --> D["Compressor"]
    C --> E["Dry air"]
    D --> E
    style A fill:#f9f,stroke:#333
    style B fill:#ccf,stroke:#333
    style C fill:#cfc,stroke:#333
    style D fill:#fcc,stroke:#333
    style E fill:#ffc,stroke:#333
Conventional dehumidification system
Dehumidification by condenser and evaporator along with compressor
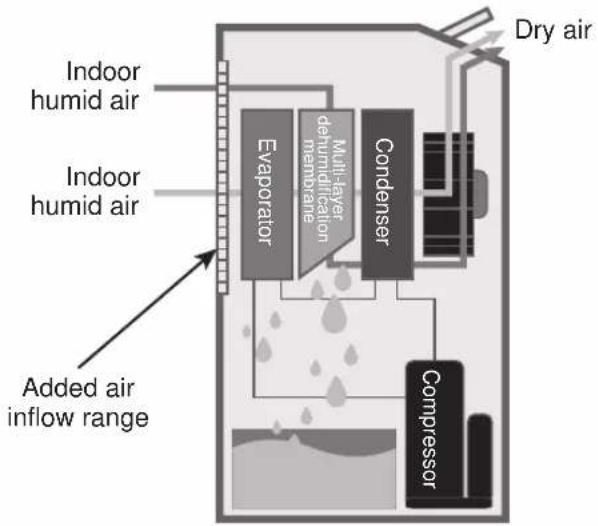
W-HEXS dual dehumidification system
Multi-layer dehumidification membrane plus conventional dehumidification system
Fault
Please check the following first.
If the problem persists after taken all these steps, disconnect power plug and call your dealer or service center.
| Error Please ensure its contents | |
| 1Buttons do not operate. | ●Is the Full tank indicator is flashing (P.14), or is Repair indicator flashing? (P.7), Key lock Set? (P.19) |
| 2The Full Tank indicator is flashing even though the tank is not full. | ●Are the tank and float correctly installed inside the unit? (P.14, P.16)●Was the tank banged against the unit during insertion? (P.14)→ Remove the tank and then reinstall it gently. |
| 3Water is leaking. | ●Has the unit been tilted or knocked over?●Was the unit moved while there was still water in the tank? (P.4)●Has the float come off? (P.16) |
| 4The tank does not fill up with water.(The unit is not dehumidifying very well.) | ●Is the filter clogged (P.17), or is something blocking the air inlet or air outlet? (P.4)●Are the room temperature and humidity low? (The unit dehumidifies less as the room temperature and humidity become lower.)●Is the unit set to operate in “Auto” or “Mild” mode? (P.8)●If the temperature is outside the range of 5 °C ~ 35 °C , dehumidifier operation will stop and become blower operation. (P.7) |
| 5No water remains inside the unit. | ●Is the Fan mode set?→ Fan mode will not retain water. |
| 6It takes a long time to dry clothes. | ●Is wet, cold air entering the room?→ Keep doors and windows closed as much as possible while drying clothes. |
| 7Clothes do not dry completely. | ●Did prior clothes drying cycle complete?●Is wet, cold air entering the room?→ Avoid open doors and windows as much as possible while drying clothes.●Is there a heater in use near the unit?(If the surrounding temperature is too high, the sensor will be unable to accurately judge the drying time.)●Is the air blowing onto the all clothes?●Are the clothes hung too closely together or in layers? |
| 8The humidity does not go down. | ●Is wet, cold air entering the room?→ Avoid opening doors and windows while lanundry.●Is there other steam release equipment exists indoor? |
| 9Condensation forms all the time, even during dehumidifying. | ●It may not be possible for dehumidifying to be fully effective if you place the dehumidifier in some places such as near windows, or behind furniture where air circulation is poor. |
| 10The Check indicator flashes with error code [11] displays. | ●Is machine body tilting?→1. Disconnect the plug, lift machine body up straight and wipe waters leaked2. leave the machine idle for more than half a day (to dry the unit inside completely in case any water has spilled inside)3. connect the plug, run dehumidification again●Is machine body tilted too much?→ Unplug the power plug and then reconnect it.●Is magnet or metal placed atop the machine? (P.7) |
| 11Mal-action | ●Is the control panel contaminated with foreign matter, droplet, or dust? (P.7) |
| 12There is hiss, squeak, or water flow sound heard | ●This is the sound of refrigerant flowing within dehumidifier or nano-ion generation and is not a failure. |
In case of the following, disconnect the power plug and call service center or dealer
| Error Please ensure its contents | |
| 13 The "Check" indicator lights (without flashing) and prompts error code (P.7 check) | ● Machine failure, please note down the error code and call service center or dealer. |
Emergency measures
In case of the following situations, remove power cord and call your dealer or service center immediately.
● Poor switch operation.
● Leak switch or fuse cutout frequently.
● Power cord and plug over heated.
● Odor or noise during operation.
● Water leaks from host.
● Other error or failure.
Please observe the rule
Please have your power cord replaced by equipment manufacturer, service center, or qualified technician for your own safety.
Memo
Memo
Specifications
| Model No. | F-YWP33N | |
| Power supply | 230-240 V~50 Hz | |
| Power plug shape | ◎ | |
| Operating condition | Temperature(°C) | 30 |
| Relative humidity(%) | 80 | |
| Dehumidification capacity(L/Day) | 33 | |
| Power consumption (W) | 330 | |
| Water tank capacity (L) | The unit automatically stops at around 5.2 litres | |
| Weight (kg) | 17.5 | |
| Dimensions (WxHxD) (mm) | 370X614X298 | |
● Power consumption by dehumidifier at standby mode: 0.8W. (with power plug connected)
Customer's record
For model name and production number of this product, please refer to the back side of machine. Please record them in the space provided and keep for future reference.
| MODEL NO. | SERIAL NO. |
| DATE OF PURCHASE | MANUFACTURER NAME |
| MANUFACTURER ADDRESS | |
| TELEPHONE NUMBER | |
- Correct use will help you save electricity
- Warranty card included Separately
- Panasonic®
- Operating Instructions
- Dehumidifier
- Model No. F-YWP33N
- This product is for indoor use only
- Contents
- Safely precautions
- ! WARNING
- CAUTION
- Safety Precautions
- Parts Name
- Note
- Where to use
- Control panel
- Attention
- Operation mode / Air volume selection
- ■ To stop operation
- ■ To use timed power off (P.14)
- ■ When Full Tank Indicator is flashing (P.14)
- Air volume selection (Laundry/Mode/Humidity)
- To change air volume
- - Your product may enter protection mode with air volume and direction in case room temperature goes above 32°C. (system sounds three beeps if you try to press air volume and direction key)
- To set humidity
- Laundry mode
- ■ When using timer (P.14)
- ■ Intelligent dryness monitoring system (☐ ☐ ☐)
- nanoe™ indicator
- Air Direction Selection
- Operation
- ■ To swing louver
- ■ To fix the louver
- Air direction setting example
- Tips for drying effectively
- nanoe™ bacteriostasis and deodorization
- nanoe™ (Laundry/Mode/Humidity)
- ■ To clean and deodorize during operation
- During "Laundry"
- In "Mode" and "Humidity"
- About nanoe™
- Environment conditions for generation Little amount of ozone
- nanoe TM
- ※1
- Timer / Handling of louver falling off / Handling of full water tank
- To use timer for power off
- Handling of louver falling off
- Louver fall off
- ■ Installation of louver
- Handling of full water tank
- How to drain continuously
- Required accessories
- Maintenance
- Water tank: Once per month
- For machine not to use for long time
- About Laundry mode
- About ECONAVI
- Effectiveness of Filter
- Super alleru-buster
- Antibacterial
- Sound settings
- Key Lock setting
- ● Key Lock on
- ● Key Lock off
- W-HEXS, the more energy saving dual dehumidification system
- Conventional dehumidification system
- W-HEXS dual dehumidification system
- Fault
- Emergency measures
- Please observe the rule
- Memo
- Specifications
- Customer's record
Brand : PANASONIC
Model : F-YWP33N
Category : Dehumidifier