Kimberley Mk2 - Heating Jindara - Free user manual and instructions
Find the device manual for free Kimberley Mk2 Jindara in PDF.

| Product Type | Wood Heater |
| Brand | Jindara |
| Model | Kimberley Mk2 |
| Heating Output | 12 kW |
| Heating Area | Up to 200 m² |
| Fuel Type | Wood |
| Flue Size | 150 mm (6") |
| Construction Material | Steel with firebrick lining |
| Dimensions (H x W x D) | 800 x 500 x 500 mm |
| Weight | 100 kg |
| Efficiency | 75% |
| Emissions | Low (meets Australian standards) |
| Air Control | Primary and secondary air controls |
| Ash Management | Removable ash pan |
| Door Type | Cast iron with ceramic glass |
| Log Length | Up to 400 mm |
| Clearances (to combustibles) | Side: 300 mm, Rear: 200 mm, Front: 1000 mm |
| Flue Outlet | Top or rear (adaptable) |
| Warranty | 10 years (limited) |
| Certification | AS/NZS 4013 compliant |
Frequently Asked Questions - Kimberley Mk2 Jindara
User questions about Kimberley Mk2 Jindara
0 question about this device. Answer the ones you know or ask your own.
Ask a new question about this device
Download the instructions for your Heating in PDF format for free! Find your manual Kimberley Mk2 - Jindara and take your electronic device back in hand. On this page are published all the documents necessary for the use of your device. Kimberley Mk2 by Jindara.
USER MANUAL Kimberley Mk2 Jindara
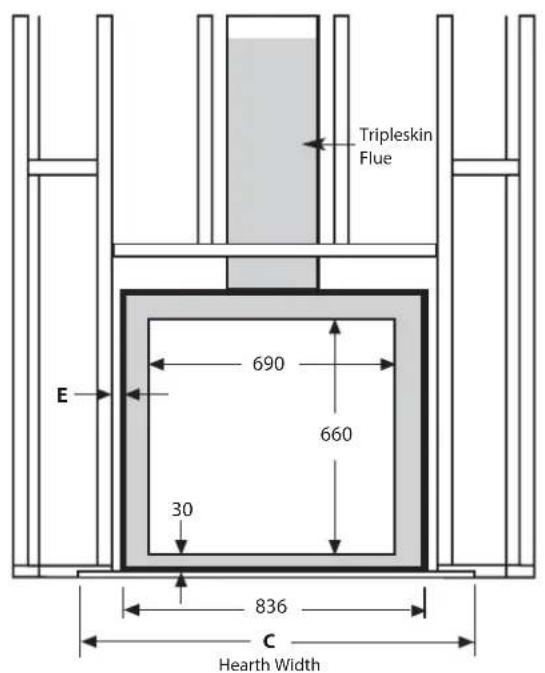
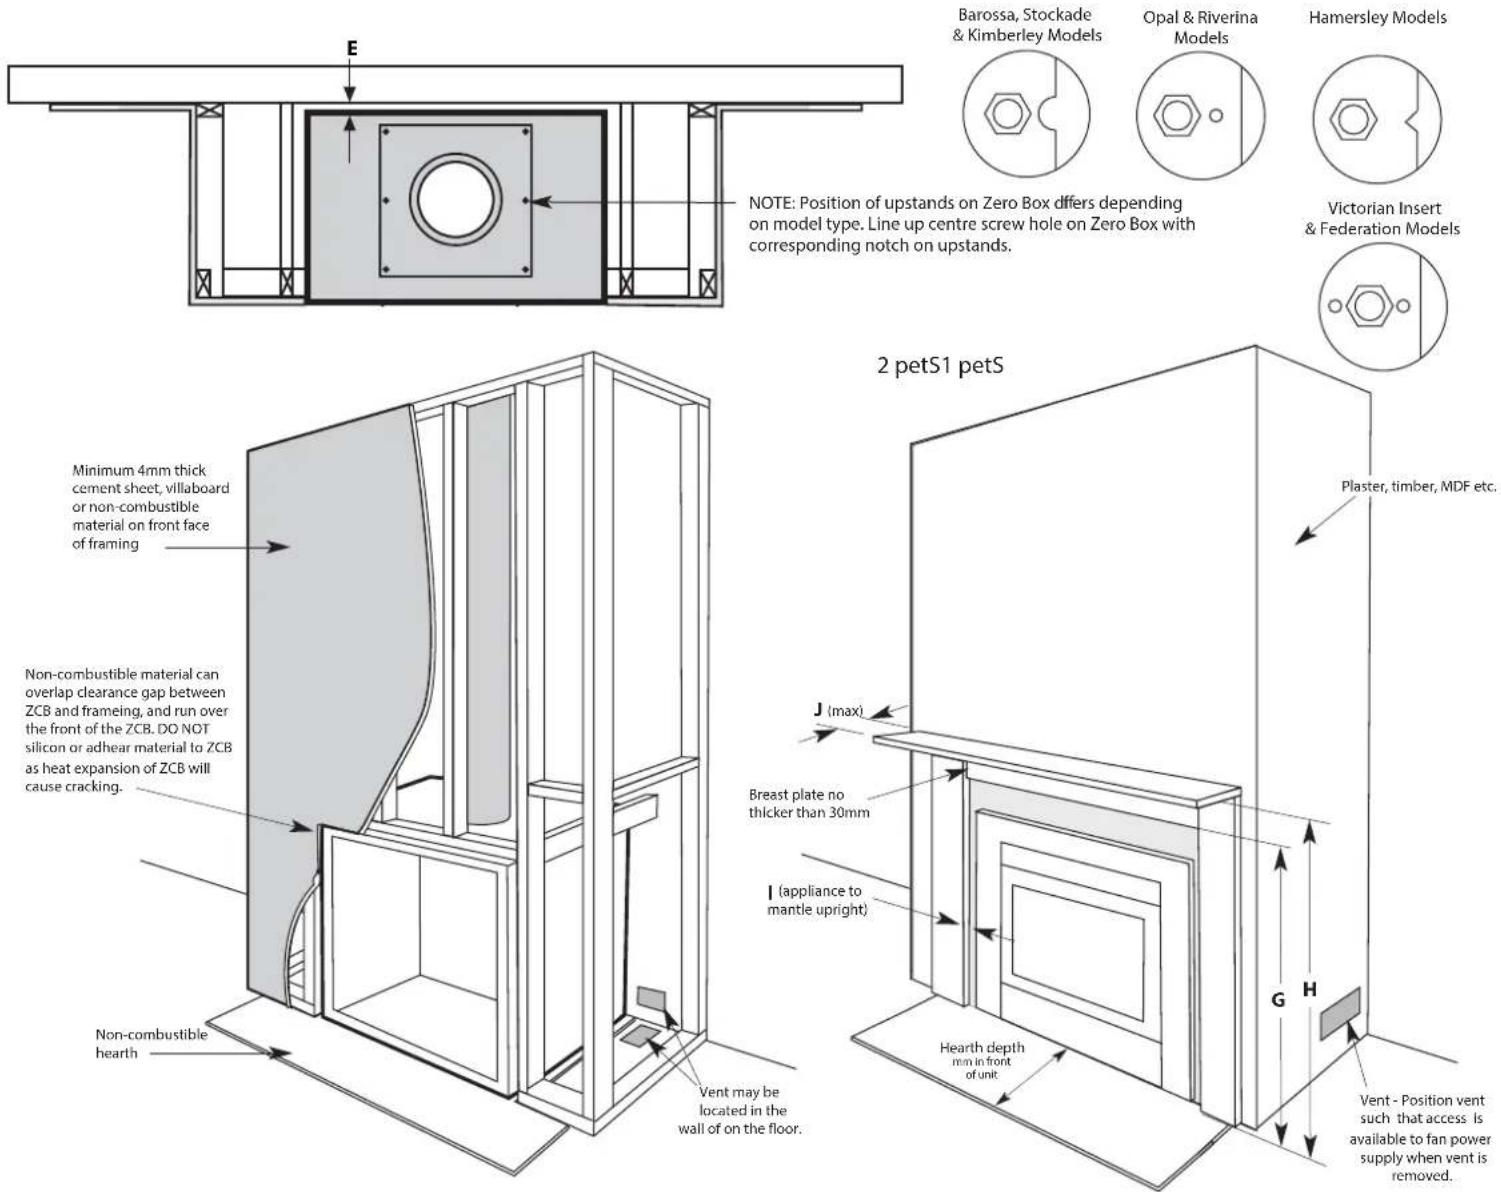
Compact Zero Clearance Cabinet Installation
To suit Insert models: Opal SRS4, Riverina SRS3, Stockade SRS5, Barossa SRS3, Kimberley Mk2, Hamersley Mk2 Federation Mk2 & Victorian Insert
text_image
Tripleskin Flue 690 660 30 836 C Hearth Width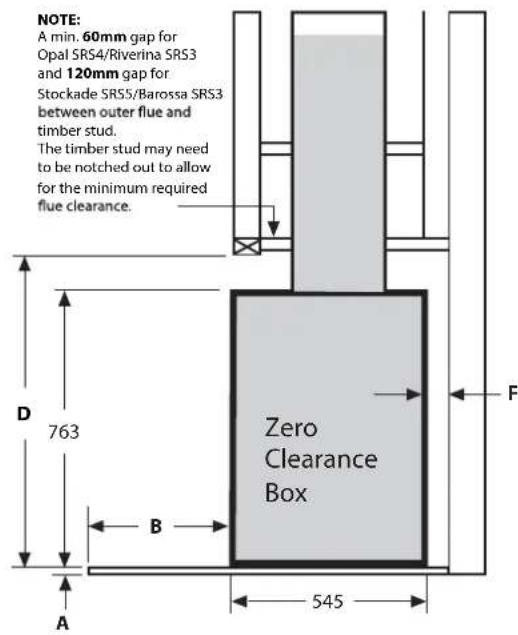
text_image
NOTE: A min. 60mm gap for Opal SRS4/Riverina SRS3 and 120mm gap for Stockade SRS5/Barossa SRS3 between outer flue and timber stud. The timber stud may need to be notched out to allow for the minimum required flue clearance. D 763 B 545 A Zero Clearance Box FClearance to combustibles
All dimensions in millimetres, images not to scale
| MODEL | A | B | C | D | E | F | G | H | I | J | Hearth depthmm in frontof unit |
| Opal | 12 | 570 | 890 | 810 | 40 | 20 | 1040 | 1100 | 50 | 250 | 530 |
| Riverina | 12 | 570 | 890 | 810 | 40 | 20 | 1040 | 1100 | 50 | 250 | 530 |
| Stockade | 12 | 550 | 950 | 810 | 40 | 20 | 1340 | 1390 | 50 | 250 | 510 |
| Barossa | 12 | 550 | 950 | 810 | 40 | 20 | 1340 | 1390 | 50 | 250 | 510 |
| Kimberley | 18 | 615 | 940 | 1063 | 100 | 50 | 1050 | 1140 | 25 | 250 | 550 |
| Hamersley | 18 | 705 | 1000 | 1063 | 100 | 50 | 975 | 1225 | 150 | 250 | 600 |
| Federation | 18 | 705 | 1000 | 1063 | 100 | 50 | 975 | 1225 | 150 | 250 | 600 |
| Victorian | 18 | 705 | 1000 | 1063 | 100 | 50 | 975 | 1225 | 150 | 250 | 600 |
| See oversheet for dimensions. | |||||||||||
Installation notes:
The Gason Zero Clearance Cabinet is an approved cabinet that allows for Eureka/Jindara Insert woodheaters as stated above to be installed within a non-masonry fireplace in accordance with AS2918:2001.
This can be achieved by following the installation guidelines listed below.
- Select the position that you wish to install your ZCC, carefully allowing for flue clearances of 305mm in the roof cavity (The outer flue being 255mm requires a 25mm clearance on either side to combustibles, making overall clearance 305mm).
- Place hearth (non-combustible cement sheet, villaboard or similar) in the position desired for the ZCC, ensuring hearth will extend fully underneath ZCC as shown above for relevant model. Place the ZCC into position.
- Notel line and the ZC with corresponding holes depending on model. Refer to diagram on sheet 2.
- Fit the flue to the upstands and terminate at the required height above the roof line.
- Fit 300mm x 100mm vermin proof vent directly behind where the ZGAll be located, as near as practicable to the floor. This vent will allow air access to the zero box either from another room or external air. Note, if installed timber floor, an additional two vents are required. i.e. Either through the floor, one each side of the zero box, or alternatively, through the side wall(s), if applicable.
- Build your frame around the ZCC maintaining the clearances listed above.
• Cover the front face of framing with a minimum 4mm cement sheet or non-combustible material. - Cover the rest of the frame to suit your requirements with plaster, timber, MDF etc.
- Insert your chosen appliance into the zero cabinet. Note: x2 galvanized c-section brackets supplied are required to centralise Opal/Riverina, Stockade/Barossa. For installation of Kimberley, Hamersley, Federation and Victorian, appliances must sit on c-section to ensure correct installation height is achieved. Fit active flue and cowl once appliance is in position.
• Install the mantel if required. Note if mantle is made out of a combustible material the following dimensions must be adhered to.
Compact Zero Clearance Cabinet Installation
text_image
E NOTE: Position of upstands on Zero Box differs depending on model type. Line up centre screw hole on Zero Box with corresponding notch on upstands. 2 petS1 petS Barossa, Stockade & Kimberley Models Opal & Riverina Models Hammersley Models Victorian Insert & Federation Models Minimum 4mm thick cement sheet, villaboard or non-combustible material on front face of framing Non-combustible material can overlap clearance gap between ZCB and framing, and run over the front of the ZCB. DO NOT silicon or adhear material to ZCB as heat expansion of ZCB will cause cracking. Non-combustible hearth Vent may be located in the wall of on the floor. J (max) Breast plate no thicker than 30mm I (appliance to mantle upright) G H Hearth depth mm in front of unit Vent - Position vent such that access is available to fan power supply when vent is removed.6 inch Flue Kit (Eureka & Jindara)
Minimum Requirements:
- 5 x 6" S/S Flue
- 4 x 8" Gal Flue
- 4 × 10^n Gal Flue
Note: Some states will use different size flue kits which will require the appropriate upstand.
- 10" Upstands

text_image
10" 55mm 450mm 425mm- 8" Upstand

text_image
97mm 370mm 370mm
text_image
10" Gal Flue 8" Gal Flue 6" S/S Flue 4th Skin 3rd Skin 2nd Skin 1st Skin Heater Spigot 10" Upstand 8" UpstandSheet 2 NEXT - GPN 231080 Rev. A
Sheet 2 NEXT - GPN 231080 Rev. A