Townsend - Heating Jindara - Free user manual and instructions
Find the device manual for free Townsend Jindara in PDF.

| Product Type | Electric Fan Heater |
| Brand | Jindara |
| Model | Townsend |
| Dimensions (HxWxD) | 25 x 20 x 30 cm |
| Weight | 2 kg |
| Power Source | 220-240 V ~ 50/60 Hz |
| Power Consumption | 2000 W (max) |
| Heat Settings | 2 levels (low / high) + fan-only |
| Thermostat | Adjustable thermostat control |
| Safety Features | Overheat protection, tip-over switch |
| Cooling Fan | Yes, fan-only mode for summer use |
| Noise Level | ~45 dB (low setting) |
| Heating Element | PTC ceramic |
| Airflow | Oscillating head for wide distribution |
| Filter | Washable rear filter |
| Cleaning | Wipe exterior with soft dry cloth; wash filter with water |
| Maintenance | Check and clean filter monthly during heavy use |
| Spare Parts | Replaceable heating element, filter, and fan motor |
| Repairability | Modular design; user-replaceable parts available |
| Certifications | CE, RoHS |
| Warranty | 2 years |
| Cable Length | 1.8 m |
| Use | Indoor residential spaces |
Frequently Asked Questions - Townsend Jindara
User questions about Townsend Jindara
0 question about this device. Answer the ones you know or ask your own.
Ask a new question about this device
Download the instructions for your Heating in PDF format for free! Find your manual Townsend - Jindara and take your electronic device back in hand. On this page are published all the documents necessary for the use of your device. Townsend by Jindara.
USER MANUAL Townsend Jindara
WARRANTY
Subject to clauses 2 & 3 of this warranty, A.F. Gason Pty Ltd ACN 004 667 556 warrants the following components of its heaters against defect in workmanship and/or materials for the following periods from the date of purchase:
e firebox for ten years;
The paint finish for a period of 12 months if the purchaser has followed the instructions provided by Gason in the Operation and Installation
Instructions manual; and
All other components for 12 months except the glass, fire brick lining or baffle plates if, in the opinion of Gason, these items have been damaged by impact.
2. This extended warranty does not apply;
a. If the heater has been purchased from a person who has not been authorised by Gason to sell its products;
b. If, in the opinion of Gason, the heater or any other component has been subject to abuse, misuse, alteration, modification or has not been installed, operated, or maintained in accordance with the instructions provided by Gason; or,
c. To owners other than the original purchaser.
3. If you believe that the heater you purchased contains a manufacturing defect and you wish to make a claim under this warranty, please contact an authorised Gason service centre to arrange for an assessment.
4. If, after assessing the heater Gason determines that the heater contains a manufacturing fault, Gason may at its own discretion:
a. Replace the heater; b. Repair or replace specific components of the heater nr
c. Provide a full refund.
5. Parts replaced under warranty are warranted for the balance of their original warranty period.
6. If, at the discretion of Gason the heater or any parts need to be replaced, serviced or repaired at an authorised Gason service centre, then the person claiming under this warranty must pay all parts associated with:
a. Returning the heater; and
b. The delivery or collection of any new or repaired heater.
Our goods come with guarantees that cannot be excluded under the Australian Consumer Law. Y failure and for compensation for any other reasonably foreseeable loss or damage. Your are also
goods fail to be of acceptable quality and the failure does not amount to a major failure.
Any benefits you receive under these warranties are in addition to other rights and remedies that you may have as a consumer under law in relation to the heater to which these warranties relate.
(1) F_0 = F_1 + F_2 (其中, F_0 = F_1 + F_2 )
These warranties are given by:
A.F. Gason Pty Ltd
Blake Street
Blake Street
Ararat Vic 3377
Please contact us if you have any queries on:
Phone: 03 9763 3200
or email us via the "Contact Us" section of our website: www.gason.com.au
1.5.2. 本报告期,公司及子公司累计实现净利润为人民币30,000万元。
A.F. Gason Pty.Ltd. reserves the right to modify or alter specifications, materials, etc. in the interest of product improvement.

text_image
Jindara WOODHEATING®
natural_image
Black wood stovet with open lid and side legs, no visible text or symbolsTownsend Freestanding
Operation & Installation Instructions
Rev A Please keep these instructions for future reference.
GPN: 236791
Townsend Freestanding
1
Townsend Freestanding
14
| READ AND FOLLOW THESE INSTRUCTIONS FULLY AND CAREFULLY BEFORE INSTALLING AND USING THIS APPLIANCE.To aid heater installation, remove door, baffle system, and firebricks to reduce overall heater weight. Refer to the set-up section of this manual. | |
| A flue fire with resulting damage may occur if the appliance is not installed and maintained as per this booklet.Never place combustible materials such as wood, paper or furniture near the appliance.This appliance is designed to burn dry hardwood. Do not burn rubbish, driftwood, flammable liquids, pressurised canisters, or any substance containing salt or corrosives.This appliance must not be installed and operated in an area where kerosene, petrol, paint thinners, or other flammable liquid is used or stored.The flue system must be inspected and cleaned annually or sooner if required. Failure to do so could result in excessive build up of creosote which may result in a flue fire, which may damage the flue or cause damage to your home.The surface of the appliance becomes hot during operation. Do not touch the surface of this appliance. Keep children away from the appliance during operation. Do not allow anyone to operate this appliance who is not familiar with this instruction booklet. | |
| Your heater is coated with the best available heat resistant paint. Even though the paint has been baked after application, it may require further temperature curing. It may discolour if you overfire the heater on its first fire. Please follow these instructions carefully to ensure the quality of the paint on your heater is maintained.For the first two or three firings, never exceed Medium air setting and do not load the fire more than half full. Do not use softwood fuel (cut up pallets etc.) other than for kindling when first lighting the fire.Ensure that the lower air slide is fully closed once the fire is established during the curing process.On the initial fire up you may detect smoke coming from the paint finish, and from any oils that may be impregnated in the steel of the firebox. This is normal. It is suggested to well ventilate your home on the initial fire up.Do not wipe the heater while the paint is curing. After the paint has cured, the only maintenance required to maintain the heater's finish is to wipe it with a soft cloth (with water if necessary). DO NOT USE ANY COMMERCIAL CLEANERS OR SOLVENTS ON THE PAINT FINISH.We are proud of the presentation of our products. If at any time you need to freshen up the paint, your local Jindara dealer has touch-up paint available for purchase.The heater is painted in Stove Bright Metallic Black - Paint code 6309. |
If you have any enquiries, please contact the dealer from whom you purchased your heater.
PLEASE COMPLETE:
Dealer Name:
Dealer Address:
Email:
Phone:
Troubleshooting + Tips
- Sluggish or Lazy Fire
- A sluggish or lazy fire can be caused by a number of different factors, or a combination of several factors.
- Ensure that the wood you are burning is of good quality, and has been well seasoned to ensure its moisture content is below 16%. Overly wet wood will cool the fire, smoke excessively, and cause your unit to run poorly. The best way to determine the moisture content of your wood is to use a digital moisture meter. Wood that looks dry on the outside can still be high in moisture on the inside.
- Ensure that there is not a negative pressure inside your house. Wood burning fires consume air as part of the combustion process. They need a constant supply of air to function correctly. If your home is overly sealed and air is unable to get to the fire as needed, it will create a negative pressure inside the house compared to the outside, which will cause your fire to smoke and run poorly. Running extraction fans in your kitchen or bathroom can also impact on this In well sealed modern homes. The best way to test for this is to try opening an external door or window near the heater while it is running, to determine whether it runs better with ready access to outside air.
- Non-standard flue installations can also cause your fire to run poorly if not correctly installed. The addition of bends and elbows in the flue will restrict the flow of flue gases more than normal, meaning that you may need to fit an additional length of flue in order for your heater to draw properly.
- Environmental factors such as consistent wind, structures or vegetation near the flue outlet, or other unforeseen factors can have a dramatic impact on the performance of your heater. These can usually be overcome by fitting an extra length of flue, or through the fitment of a specialty cowl such as a wind chaser or a vertical discharge cowl.
- Ensure you are putting enough wood in your fire. Modern fireplaces are designed to run hotter and cleaner than older designs. This means that they perform best when they are well stocked with wood and have a hefty bed of hot coals. You will become familiar with the unit as you use it, and learn what sort of operation best suits your needs and wood type. As a general rule it is best to start out by building a big fire and then reducing the fuel load to a level that you find suitable for your needs. This allows the flue to reach an appropriate operating temperature for it to draw properly from the beginning, which will promote an active fire and good heat output.
Townsend Freestanding
13
Troubleshooting + tips
• Air Controls Jamming
- Check that there are no visible physical obstructions to the air slides, such as charcoal or wood.
- Try freeing the air slide using WD-40, or a similar lubricant. It may be necessary to remove the air plates and gain access to the air slides, in order to clean out any debris or contamination contributing to the jamming.
• Heater Emitting Smoke
- It is normal for your wood burning heater to emit a certain amount of smoke when the door is opened during operation. Smoke will move in the path of least resistance as it rises from the fire, and when your heater door is opened, the opening becomes that path of least resistance.
It is important that you adhere to the instructions in this manual, and that the heater is operated with the door closed at all times, except for when you are lighting the fire, or refuelling.
• A sluggish or lazy fire will generate more smoke than an active hot fire. If you have shut your fire down for a long burn, more smoke will be generated when you open the door. - If you find that your fire is emitting noticeable amounts of smoke into the room during normal operation, or excessive amounts of smoke when the door is opened, check that the baffles are correctly fitted and in good condition, and that there are no other visible defects with the heater. If there is no problem found with the heater itself, there is more than likely a problem with your flue system and you should have it inspected by a plumber for blockages or downdraft.
• No Overnight Burn
- Check that the air slides are not stuck open, and that the upper and lower air plates are fixed securely to the door. - Ensure that the baffles are correctly installed and are free from any damage.
- Ensure that the door rope is sealing against the door opening, all the way around the door opening. This can be checked by placing a strip of paper between the door and the firebox and closing the door, then checking to see if the paper is clamped in place or free to move. If the paper is free to move, you will need to inspect your door seal and either replace the rope or adjust your door catch.
- Ensure that you have a reasonable ash bed in the base of your firebox. The ash bed acts as a heat store, and helps to maintain hot coals once the fire has burnt low.
- Ensure that you are loading your fire with good quality hardwood, and in sufficient quantities for an overnight burn. You should try to fill the firebox as much as possible when loading for an overnight burn, with large logs at least 15cm in diameter.
• Round logs with smooth outer surfaces tend to take longer to burn when compared to logs that have been split from larger pieces and have exposed rough surfaces.
• Excessive Ash Build Up
- Different types of wood will generate different amounts of coals and ash, depending on its composition and on how you use the heater. Given the variety of wood available in Australia, you will need to determine which wood is available to you that best suits the heater.
- All testing and certification for wood heaters sold in Australia is carried out using seasoned River Red Gum, which is an energy dense hardwood. Red Gum burns hot with large coals that reduce to very little ash, and is the recommended wood in ideal circumstances.
• Depending on what wood is available to you, you may find that your firebox builds up with ash more quickly than desired. This is unfortunately a function of the wood being burnt, not the heater itself. - Ensure your wood is well seasoned and not overly sappy. Good hardwood with moisture content below 16% is ideal.
- Burning bark will generate excessive ash, try to avoid burning it.
• Consistently running your fire with the air slides shut down will generate excessive coals and ash, as well as creosote build up. Burning a hot fire will help to reduce these back down after a couple of cycles.
Townsend Freestanding
2
Jindara Townsend Installation

WARNING
Installation
THE INSTALLATION OF THIS APPLIANCE MUST BE CARRIED OUT AS PER THIS MANUAL AND THE FLUE MANUFACTURER'S SPECIFICATIONS. WE RECOMMEND THAT YOU USE A QUALIFIED INSTALLER TO CARRY OUT THE INSTALLATION OF THIS APPLIANCE. EXTREME CARE SHOULD BE TAKEN WHEN HANDLING THE APPLIANCE.
If you have any other enquiries regarding installation of the appliance, please contact the dealer from whom you purchased the heater.
Scope Of Installation Specifications
The Jindara Townsend is tested in accordance with the requirements of AS/NZS 2918:2018 for the configurations and flue types specified in this manual. Any installation that falls outside of the specifications in this manual other than the addition of bends or extensions to the flue, is considered to be an untested installation as per AS/NZS 2918:2018. AF Gason Pty. Ltd. accepts no liability whatsoever for the safety of installations under such circumstances.
AF Gason Pty. Ltd. accepts no liability whatsoever for any interpretation of AS/NZS 2918:2018. It is important that you understand these installation instructions and minimum clearances to combustible materials before selecting a position for your wood heater, to ensure a safe and correct installation is achieved.
Installation Permit
Depending on your local authority requirements, a permit may be required for the installation of your heater. It is your responsibility to arrange the same.
Flue Requirements
As per the dimensions in Table A (referencing figures 1 and 2), the Jindara Townsend must be installed with either of the following flue types:
- Standard 6" Decromesh Default Flue Kit incorporating an additional 900mm high x 180 degree stainless steel rear flue shield fitted between the Decromesh and the active flue, or
- 6" Half shield Default Kit (Double Sleeve Flue Kit).
NOTE THAT INSTALLATION CLEARANCES ARE DIFFERENT FOR EACH FLUE TYPE.
The flue system installed with the Jindara Townsend must comply with Australian and New Zealand installation standards AS/NZS 2918:2018, and be installed to the flue manufacturer's instructions.
The performance of your heater is highly dependant on an effective flue system. In many cases, poor start-up, dirty glass, down draft causing smoke spillage when the door is open, and reduced heat output, can all be caused by the flue system being too short or incorrectly installed. Excessive flue length is also undesirable, as it can cause excessive flue draft, resulting in short burn times and over-firing of the heater.
Clearance To Combustibles
The Jindara Townsend conforms to AS/NZS 2918:2018 when positioned in relation to combustible surfaces as specified in Table A (referencing figures 1 and 2), and as per these instructions. The figures shown state the minimum distance the heater can be placed in relation to any combustible materials - plaster, wallpaper, timber, MDF, etc.
In the instance that your Jindara heater is surrounded by non-combustible materials - brick, stone, concrete, cement sheet or similar, wall clearances can be reduced to 50mm. A 50mm clearance is required to ensure room air can circulate around the wood heater during operation.
For further information regarding installation of your heater, please contact the Jindara dealer from whom you purchased the heater.
Hearth & Floor Requirements
If the Jindara Townsend is to be installed onto a combustible floor, a cement sheet or similar non-combustible hearth or floor (as per specifications on page 3) protector must be placed in between the appliance and the combustible floor. Minimum hearth requirements are specified in Table A (referencing figures 1 and 2).
If the heater is to be installed onto a non-combustible surface that meets the minimum floor protector requirements specified, an additional floor protector may not be required.
Installation (continued)
| Table A: Minimum clearances to combustibles, flue and hearth requirements. Note: All measurements shown below are in millimeters. | ||
| Dlm. 6" Decromesh Default Flue Kit with 900mm high x 180" stainless steel rear flue shield | 6" Half Shield Default Flue Kit (Double Sleeve Flue Kit) | |
| A 24 24 | ||
| B 820 820 | ||
| C 618 (From base of foot) 618 (From base of foot) | ||
| D 1060 10 60 | ||
| E | 750 825 | |
| F | 250 300 | |
| G 500 / 350* | 475 / 300* | |
| H 1135 / 984* | 1109 / 935* | |
| I | 1714 / 1564* | 1689 / 1514* |
Please refer to figures 1 and 2 below to find each corresponding dimension in Table A.
Figure 1 - Parallel Installation Figure 2 - Corner Installation

text_image
SIDE WALL F REAR WALL A B C D
text_image
A B C H G EACH SIDE* Requires additional side wing heat shields to achieve minimum corner clearance (purchased separately)
Maintaining & Servicing your Jindara Wood Heater
Fitting a New Door Seal
- Open the door and lift it free of its hinges.
• Place the door face down on a soft flat surface to protect paintwork and glass.
- Remove the old door rope and scrape the rope channel free from residual glue.
- Clean the rope retaining channel with a clean dry cloth, to remove any dust and debris. The use of wax and grease remover may be necessary if the channel is particularly dirty.
• Apply a generous bead of high-temp silicone around the retaining channel.
- Press the new 14mm OD door rope into the rope retaining channel, placing the start-stop joint in the middle of the door on the hinge side.
• Re-fit the door to the heater and close the door, to apply pressure to the rope while the silicone cures.
Note: The door handle may need to be adjusted to allow the door to close completely if previously adjusted to accommodate an ageing rope.
Leave the door closed for at least 12 hours before lighting the heater, and initially run at a low temperature to allow the adhesive to fully bond to the door.
Cleaning the Glass
Generally the only time you may need to clean your glass is after a long overnight burn. If you find that you have a wet sticky black film on your glass (creosote), it is best to burn the heater as normal for a load of wood or two, allowing it to then extinguish with the upper air slide fully open. This should burn the moisture out of the creosote build up and clean the majority of it away through the air circulation from the air wash, leaving you with a lighter dry build up of ash on the glass. Once the door has cooled to a temperature that you can touch it comfortably, use a damp cloth with water or glass cleaner, wipe the glass clean. You should not need to use a scraper or abrasives to clean the glass, if you have difficulty getting the glass clean, try using wet ash from the firebox and newspaper to scrub the glass, before wiping it clean with the damp cloth.
Creosote on the glass is normally a sign that the heater has been shut down too early after loading, or for too long. It can also be an indicator that you have burnt excessively wet or green wood. Refer to our troubleshooting section for more information on this.
Important: Ensure glass cleaner does not come into contact with the paint work.
Replacing the Door Glass
• Open the door and lift it free of its hinges.
• Place the door face down on a soft flat surface to protect paintwork and glass.
• Using an M3 hex key, remove the 4x retaining screws securing the lower air plate assembly. Taking care not to dislodge the door rope from its channel, flip the plate towards the centre of the door to gain access to the glass retaining panel. Take note of the 2 lower air slide spacers, set them aside so that they are not lost.
- Do the same with the 3x retaining screws for the upper air plate assembly. Note that there is only one spacer for the upper air slide.
• Using an M3 hex key to remove 2x retaining screws for each panel, remove the upper and lower glass retaining panels.
Remove the door glass from the door, ensuring that the mounting face is clean and free of anything that would prevent the new glass from sitting in place.
• Fit new fibreglass tape to the outer edge of the replacement door glass, then sit the glass in position.
• Re-fit the upper and lower glass retainers, ensuring they are sitting flat and are holding the glass correctly.
- Ensure the upper and lower air slides are sitting in place properly, and ensure that the air slide spacers are sat back in place, before sitting the upper and lower air plate assemblies back in position.
- Secure the upper and lower air plate assemblies, ensuring that they are sitting flat and that the air slides are still able to move.
- It may be necessary to apply high temperature silicone underneath the door rope, in any sections where it has dislodged from the rope channel.
• Re-fit the door to the heater, ensuring that the door is kept closed long enough for the silicone to cure if needed.
Townsend Freestanding
11
Townsend Freestanding
4
Maintaining & Servicing your Jindara Wood Heater

WARNING
Maintenance
IT IS RECOMMENDED THAT YOU SEEK THE SERVICES OF A LICENSED PLUMBER TO CARRY OUT FLUE MAINTENANCE.
THE BAFFLE SYSTEM IS A CRITICAL PART OF YOUR HEATER. IF THE BAFFLE SYSTEM IS DAMAGED, BURNT OUT, DISCARDED, OR NOT INSTALLED AS PER THESE INSTRUCTIONS, POOR PERFORMANCE AND EXCESSIVE FIREBOX AND FLUE TEMPERATURES CAN RESULT.
IF FIREBOX FAILURE, FLUE FAILURE, OR EXCESS DAMAGE TO THE APPLIANCE OR ITS SURROUNDINGS IS REPORTED DUE TO INCORRECT INSTALLATION OR OPERATION OF THE BAFFLE SYSTEM, AF GASON PTY. LTD. RESERVE THE RIGHT TO DISALLOW ANY WARRANTY CLAIMS IN RELATION TO THE ABOVE-MENTIONED.
Cleaning your Flue
It is recommended that you seek the services of a licensed plumber to carry out flue maintenance.
Firstly and carefully remove the firebox baffles and set them aside, following the instructions given on pages 4 & 5. Close the heater door. Obtain a 150mm flue brush from you local Jindara dealer. Proceed to a position where you can access the flue cowl, and remove it from the flue. Follow the instructions provided with your flue brush to assemble it, slowly push the brush down the chimney until it stops. Pull the brush back through and repeat the process. Each time you do this, you will notice the brush will go further down the chimney until it reaches the bottom, as the dislodged soot and creosote falls down the chimney into the firebox. Ensure that you re-fit the flue cowl when you have finished cleaning the flue. Clean the residue from the firebox and re-fit the baffles and other components, as per the instructions in the relevant sections of this manual. Make sure the flue is cleaned thoroughly, as creosote will take longer to re-form in a well cleaned flue, compared to one left with residual creosote build up.
Inspecting the Baffles
It is recommended that your heater baffles be inspected at least once a year, more often if your heater is operated for more than six months of the year. A convenient time to do this is when your are cleaning the flue.
The baffles should be free from deformation or bowing, and there should be no holes in the steel (excluding the tertiary air slots in the Lower baffle).
If the baffles are compromised in any way, they should be replaced. Operating your heater with defective baffles will lead to losses in efficiency and heat output, and will also lead to high flue temperatures. Operating your heater with a compromised baffle system, or without either of the baffles, will likely result in premature wear of the heater, and is deemed to be misuse of the appliance.
Maintaining the Door Seal
To maintain efficient and safe use of your Jindara wood heater, you may need to adjust the door handle tightness. It is important that you periodically check the door seal, to ensure that it is sealing against the face of the firebox at all points when the door is in the closed position. If the door seal is excessively worn or damaged and unable to seal adequately, you will need to replace it.
Adjusting the Door Handle
- Open the door to gain access to the retaining screw.
• Using an M 2.5 hex key, remove the retaining screw.
- Looking from the front of the door, rotate the handle counter-clockwise to lighten the door catch, or clockwise to loosen the door catch.
- Once the desired setting has been achieved, re-fit the retaining screw.
Installation (continued)
Baffle System
The Jindara Townsend's baffle system comprises of two components:
• 8mm Upper Baffle Plate
- 6mm Lower Baffle Plate
When removing the baffle system to clean the flue, the baffle system must be inspected and replaced in the configuration as shown in Figures 3 and 4 (page 5).
If the system components are compromised in any way it is important the components are replaced.
Baffle removal is carried out in the reverse order of baffle installation.
Fitting the Baffle System
1. Upper Baffle:
A. Lift the Upper Baffle into place by reaching through the door opening, orientated with the folded edge pointing down (1).
B. Lift the back edge of the baffle up, and to the rear of the firebox (2), resting the rear of the baffle on baffle hanger 'A'.
C. Once the rear of the baffle is resting on baffle hanger 'A', bring the front of the baffle plate up and towards the very front of the firebox. Rest the folded edge down into baffle hanger 'B', and ensure a secure snug fit (3).

text_image
Upper Baffle Figure 3 B 3 2 A 1Townsend Freestanding
5
Installation (continued)
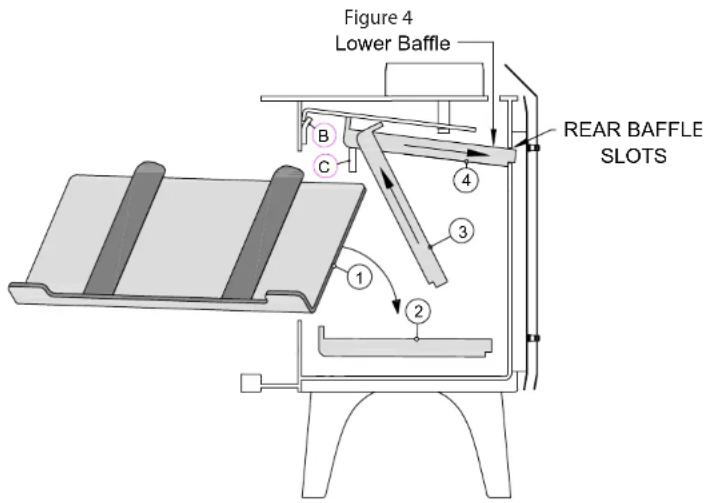
2. Lower Baffle:
A. Position the baffle with the baffle lip facing down, and the channel sections facing to the right of the firebox (1).
B. Feed the baffle through the door opening, towards the right rear corner of the firebox.
C. Once the baffle is through the door opening, rotate it so the baffle is square with the firebox, with the front lip facing upwards, and the flat side facing down (2).
D. With the rear of the baffle plate pressed against the bottom back corner of the firebox, lift the baffle plate tilting the front lip up, and over baffle hanger 'C' (3).
E. Bring the baffle plate forward over baffle hanger 'C', then raise the rear, and slide the channels of the baffle into the "REAR BAFFLE SLOTS". Ensure baffle is pressed hard against rear of firebox (4).
text_image
Figure 4 Lower Baffle REAR BAFFLE SLOTS 1 2 3 4 B CTownsend Freestanding
10
Operating your Jindara Townsend Wood Heater (continued)
The Cast Iron Door
To open the cast iron door of your Jindara Townsend, rotate the handle 90 degrees counter-clockwise, and pull outward. To close the door, push the door shut and rotate the handle 90 degrees clockwise, the handle will locate firmly when fully locked. The door should swing freely during both operations; if it does not, consult your Jindara dealer.
The cast iron door of your Jindara Townsend should always be closed during operation, except for when you are lighting or re-fueling your fire. The heater is unable to circulate air inside the firebox effectively with the door open, and extended periods of the door being open during operation can result in smoke escaping into the room. Operating your heater with the door open for extended periods of time constitutes misuse, and AF Gason Pty. Ltd. will not be held liable for any resultant damage.
Daily Operations
When you get up in the morning, move both the upper and lower air slide controls to the fully open position to start the embers glowing. Place 3 or 4 pieces of wood on top of the embers and close the door. After around 20 minutes or once the pieces of wood are well alight, move the lower air slide control to the closed position, and adjust the upper air slide control to suit your desired heat output.
When refuelling during normal operation, it is not necessary to open the lower air slide, unless the fire has died down and needs assistance to get going again. Leaving the lower air slide open for extended periods during normal use can lead to over-firing, and is deemed to be improper use of the heater.
Keep in mind that each piece of wood contains a finite amount of energy. Feeding more air to the fire by leaving the air slides open, will allow the fire will burn hotter than with the air slides closed, as more energy is able to be released as heat at the same time. This means that with the air slides open, each piece of wood will also burn for shorter periods of time than with the air slides closed, meaning you will need to re-fuel your fire more frequently.
For best results, you should burn hardwood logs around 9cm - 15cm in diameter, and 25cm long, with a moisture content between 14% - 16%. Place the logs facing front to rear in the firebox, as this will promote good air circulation around them, and prevent the logs from rolling forward against the door glass while burning.
Overnight Burn
Approximately 30 minutes before turning the heater down for overnight burn it is recommended to load the heater with larger pieces of wood. Leave the air upper air slide in the open position, and let the heater run for 30 minutes. This will reduce the moisture content in the wood before shut down, helping to reduce the formation of creosote in the firebox and flue. Set the air control to the setting you have found best for your requirements, and retire for the evening.
It is important that you understand that modern heaters cannot be shut down overnight as easily as older heaters. The reason for this is that when heaters are shut down too much for long burns, the fuel is starved of air which leads to excessive smoke emissions and creosote formation within the firebox and flue. All new wood heaters are subject to the restrictions of modern emissions and efficiency standards, which have been put in place to minimise the impact of smoke emissions from wood heaters.
Ensuring that you select large pieces of good wood to shut down overnight with, maintaining a sufficient ash bed, and following the instructions in this manual are all important factors in achieving a successful overnight burn. The aim when burning overnight is to have only a few hot embers left in the bottom of the firebox in the morning, not large lumps of wood.
Understanding your Heater
Your Jindara Townsend wood heater is designed to meet and exceed the emissions and efficiency requirements of Australian & New Zealand standards AS/NZS 4012-2014 & AS/NZS 4013:2014, which have been put in place to reduce emissions, lower wood consumption, and ensure that wood heating remains a viable source of heat for Australians moving forward.
As a result of this, your heater may perform differently to older heaters that you may be familiar with. Modern wood heaters can be more sensitive to poor quality wood, as well as installation factors such as flue set-up, and pressure differentials between the inside of your house and outside. See the troubleshooting section of this manual if you are having difficulty getting your heater to perform properly, or contact the dealer from whom you purchased the heater, who will be able to assist you and offer advice on getting your heater to run properly.
Townsend Freestanding
9
Townsend Freestanding
6
Operating your Jindara Townsend Wood Heater
| [20W3]WARNINGRead these instructions | DO NOT ATTEMPT TO OPERATE THIS APPLIANCE WITHOUT READING AND UNDERSTANDING THESE OPERATING INSTRUCTIONS THOROUGHLY. FAILURE TO OPERATE THIS APPLIANCE CORRECTLY MAY RESULT IN DAMAGE TO THE APPLIANCE OR RESULT IN A FLUE FIRE.Features and operating methods of the Jindara Townsend are not typical of all wood heaters. As such it is Imperative that you read and understand these instructions, and operate the heater accordingly. Failure to do so is likely to result in poor performance of the unit, and may present a safety risk to the user. |
 WARNINGAir slide operation WARNINGAir slide operation | DONOTLEAVETHELOWERAIRSLIDEOPENTHROUGHOUT THEBURN CYCLE. REFER TO SECTION “LIGHTING YOUR FIRE” (BELOW) FOR CORRECT OPERATING PROCEDURE. |
Building your Fire
Place a firelighter in the bottom of the firebox near the centre, then place a large amount of dry kindling in a criss-cross pattern, such that the pile is at least half the height of the firebox. Kindling pieces should be around 2cm thick, and around 25cm long. On top of the kindling, place 3-4 larger wood pieces, around 6cm thick and 25cm long. Building your fire in this manner ensures that it will get going quickly and provide you with warmth sooner. Attempting to light a fire with small quantities of kindling will more than likely generate excessive smoke and prolong the start-up process.
Lighting your Fire
Ensure that both air slides on the door are fully open (to the right). Ignite the firelighter you have placed underneath the kindling, and close the door once ignition has begun.
Do not leave the door ajar to get the fire going as you would with some other heaters; the upper and lower air inlets will only draw correctly when the door is fully closed.
After around 20 minutes or once the fire is established, close the lower air slide (slide the knob to the left) and adjust the upper air slide position to suit your desired heat output from the fire. DO NOT LEAVE THE LOWER AIR SLIDE OPEN THROUGHOUT THE BURN CYCLE.
On the initial fire up you may detect smoke coming from the paint finish, and from any oils that may be impregnated in the steel of the firebox. This is normal. It is suggested to well ventilate your home on the initial fire up. During the initial fire up, the upper air slide should only be opened to half way and the lower air slide should be fully closed, once the fire has been established. Please refer to our instructions on "Paint Curing & Care" on page 1.
Installation (continued)
Fitting the Firebricks and Firebrick Retainer
Your Jindara Townsend requires firebricks to be installed, to ensure that the fire operates correctly, and to prevent damage to the firebox through excessive heat.
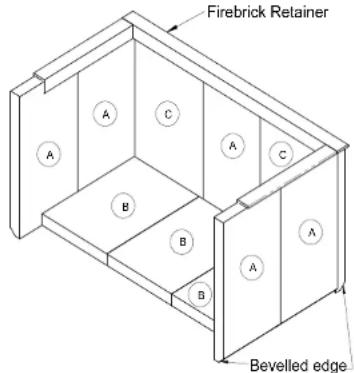
This fireplace uses three different size firebricks. Please use table B below, and figures 5 and 6 to differentiate between each brick and its installation location.
Fitment is as follows:
- Feed the firebrick retainer into the firebox, so that the long edge faces towards the rear of the firebox, with the flat face pointing up.
- Lift the long edge of the retainer up, allowing you to slip the rear firebricks into place. Ensure the bevelled edge of the firebricks are facing down and towards the outside of the firebox, as shown in figure 6.
- Lift the front ends of the retainer and fit the side firebricks in the same manner as the rear.
- Fit the lower firebricks.
- Ensure that the firebrick retainer is sitting properly in position over the firebricks.
Removal of the firebricks and retainer is carried out in reverse order of installation.
| Table B - Firebricks | ||
| Designation | Width | Length |
| A | 155 | 310 |
| B | 175 | 250 |
| C | 205 | 310 |
Figure 5
(Note Identification shown above bricks are as labeled on supplied boxes).
236460 - A
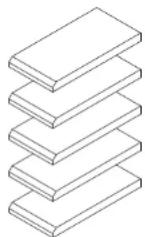
236460 - B

236460 - C

Figure 6
Firebrick Retainer
text_image
Firebrick Retainer A C A B B B A A A Bevelled edgeTownsend Freestanding
7
Townsend Freestanding
8
Installation (continued)
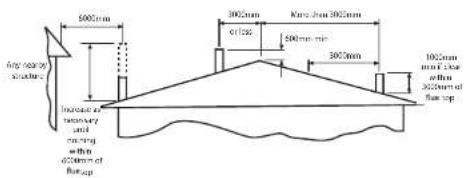
Flue and chimney requirements
The flue pipe shall extend not less than 4.6m above the top of the floor protector. Note: Installation must be carried out by a licensed installer in accordance with AS/NZS 2918:2018.
text_image
Any rear to stroke 500mm 1002mm 6/1/20 300mm Knee 2mm 3002mm 500mm rim 300mm 1002mm and rear within 300mm of flue top Increase at recovery and exing within 400mm of flue top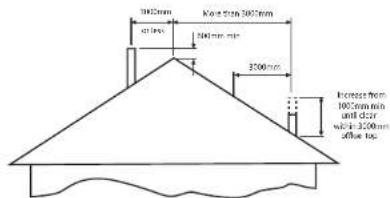
text_image
300mm 60mm 200mm min 300mm Increase from 100mm min and 45mm width: 1200mm width topFigure 6 REFERENCE: A52918.2018 FIGURE 4.9 - MINIMUM HEIGHT OF FILE SYSTEM

text_image
Roofing Ceiling Ceiling Plate 150mm clts 25mm 25mm 15mm 3 x diameter from active flue to heat sink surface Flue pipe Flue pipe casing Routen Gap 25mm Gap 25mm 150mm 100mm 450mm/25 mm X9 R2018Figure 7 REFERENCE: ASSISTING FIGURE 4.6 TYPICAL EXAMPLE OF A SLOPED PENE RATION FOR AN UNTESTED FLUE SYSTEM
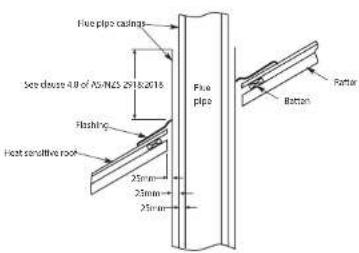
text_image
Flue pipe cadings See device 41 of AS/NCS 2518/2016 Flushing Heat sensitive roof 25mm 23mm 25mm Flue pipe Batter PartorFigure 8
REFERENCE: AS2F 52018 FIGURE 4.5 EXAMPLE OF HOOP PENETRATION
Installation (continued)
Fitting the Door
The cast iron door of your Jindara Townsend is attached to your heater with two hinges. Exercise caution when handling the door assembly, as it is bulky and heavy. Fitment is as follows:
-
Stand the door up so that is vertical, in the same orientation that it will be fitted to the heater.
-
Hold the door at 45 - 90 degrees from the door opening, positioning the hinges over the hinge pins of the firebox.
-
Lower the door so that the hinges locate on the hinge pins, ensuring that you do not let go until you are certain that the hinges are correctly located.
Removal of the door is carried out in reverse order of installation.
Final Inspection Prior to Use
Before lighting the first fire in your Jindara Townsend, check the following list of items to ensure that your heater will perform correctly, and safely:
- Ensure Lower and Upper Baffles are correctly and securely fitted.
- Ensure that the firebricks are installed correctly with their retainer.
- Ensure the door is correctly fitted, and that the door catch can be engaged/disengaged as required.
- Check that both the upper and lower air slides can be operated within their full range.
- Check that the door seals are in place and fitting correctly.