
DS6200 - Camera OREGON SCIENTIFIC - Free user manual and instructions
Find the device manual for free DS6200 OREGON SCIENTIFIC in PDF.


| Product Type | Digital Camera |
| Model | DS6200 |
| Brand | Oregon Scientific |
| Image Sensor | 6.0 Megapixel CMOS |
| Zoom | 3x Optical, 4x Digital |
| Display | 2.4-inch LCD |
| Storage Media | SD/SDHC Card (up to 32GB) |
| Power Source | 2 x AA Batteries (Alkaline or NiMH) |
| Dimensions (W x H x D) | 95 x 62 x 28 mm |
| Weight | 120 g (without batteries) |
| Main Functions | Photo capture, video recording, self-timer, flash, macro mode |
| Video Resolution | 640 x 480 pixels (VGA) |
| Connectivity | USB 2.0, TV-out (RCA) |
| Cleaning and Maintenance | Clean lens with soft cloth; store in dry place; remove batteries if unused for long |
| Safety Precautions | Do not disassemble; avoid exposure to water; keep away from children |
| Spare Parts | USB cable, neck strap, user manual available |
| Repairability | Limited; contact Oregon Scientific support for service |
Frequently Asked Questions - DS6200 OREGON SCIENTIFIC
User questions about DS6200 OREGON SCIENTIFIC
0 question about this device. Answer the ones you know or ask your own.
Ask a new question about this device
Download the instructions for your Camera in PDF format for free! Find your manual DS6200 - OREGON SCIENTIFIC and take your electronic device back in hand. On this page are published all the documents necessary for the use of your device. DS6200 by OREGON SCIENTIFIC.
USER MANUAL DS6200 OREGON SCIENTIFIC
System Requirements....2
Product Overview....2
Front View....2
Back View 2
Getting Started 3
Battery Installation ....3
Turning the Power On / Off....3
Sleep Mode....3
Taking Pictures .... 3
Preview / Playback Mode Onscreen Menus.... 3
Preview Mode Menu ....3
Playback Mode Menu ....4
Installing Camera Drivers and ArcSoft Programs.... 4
Installing Camera Drivers....4
Installing ArcSoft PhotoImpression 5.0....5
Installing ArcSoft VideoImpression 2.0....6
Installing QuickTime Player 6 ....8
Uninstalling Application Programs 9
Uninstalling ArcSoft PhotoImpression 5.0....9
Uninstalling ArcSoft VideoImpression 2.0 9
Downloading Photos Using Photolmpression 5.0 9
Video Playback Using Videolmpression 2.0....10
Playing Movie Clips Using QuickTime Player 6 .... 11
Specifications.... 12
Important Notice.... 13
Statement of Responsibility 13
Notes on Copyright 13
General Warnings 13
About Oregon Scientific.... 14
Trademark Information.... 14
FCC Statement 14
Declaration of Conformity 15
INTRODUCTION
Thank you for choosing this camera to pursue your digital adventures. Whether you are creating memories of your friends and family or exploring the great outdoors to get the utmost satisfaction from your digital camera, please take a moment to read through this manual. Its contents will send you on an educational journey into your camera's multiple capabilities.
PACKAGE CONTENTS
- Digital camera
- Neck strap
- Installation CD (including camera drivers, ArcSoft® software and user manual)
- USB cable
- Carry bag
- Video cable
- Quick start guide
- Warranty card
- Registration card
- 2 x AAA batteries
SYSTEM REQUIREMENTS
- Pentium 166 MHz computer with active USB port
• Windows 98SE / ME / 2000 / XP - CD ROM drive
- Color monitor
- Mouse and keyboard
NOTE For transferring still images or for video conferencing, your computer must have a modem and communication software for Internet connection.
PRODUCT OVERVIEW
FRONT VIEW

- SHUTTER button
- POWER ON / OFF button
- Viewfinder
- Lens
- USB and TV port
BACK VIEW
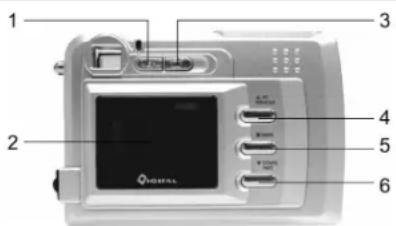
- MENU button
- LCD display
- Display button
- ▲ Up / Previous / Zoom in button
- ■ ENTER / PLAYBACK button
- ▼Down / Next / Zoom out button
GETTING STARTED
BATTERY INSTALLATION
- Open the battery compartment cover.
- Insert batteries according to the correct polarity (+ and -) as shown on the inside of the battery compartment.
- Close the battery compartment cover.
- To turn the camera on, press POWER ON / OFF until a beep is heard and the LCD screen is on. The camera is now ready to take pictures.
- To turn the camera off, press POWER ON / OFF until the camera beeps and the LCD screen is blank.
SLEEP MODE
- When the camera is turned on but is not being used for 60 seconds, it will automatically go into sleep mode to save battery power.
- To re-activate the camera from sleep mode, press POWER ON / OFF once. The camera is ready to take the next picture.
TAKING PICTURES
- Aim the camera and compose your image by looking through the viewfinder.
- Press SHUTTER down. A buzz sound will be heard indicating that a picture has been taken.
- The LCD screen will show the number of pictures taken.
NOTE The camera stores all pictures in the built-in memory or Secure Digital (SD) memory card.
PREVIEW / PLAYBACK MODE ONSCREEN MENUS
PREVIEW MODE MENU
Follow the flowchart below to access the camera's Preview Mode onscreen menu options (Mode, Self-Timer, Flash, Exposure, Setup) and select / adjust their respective settings.
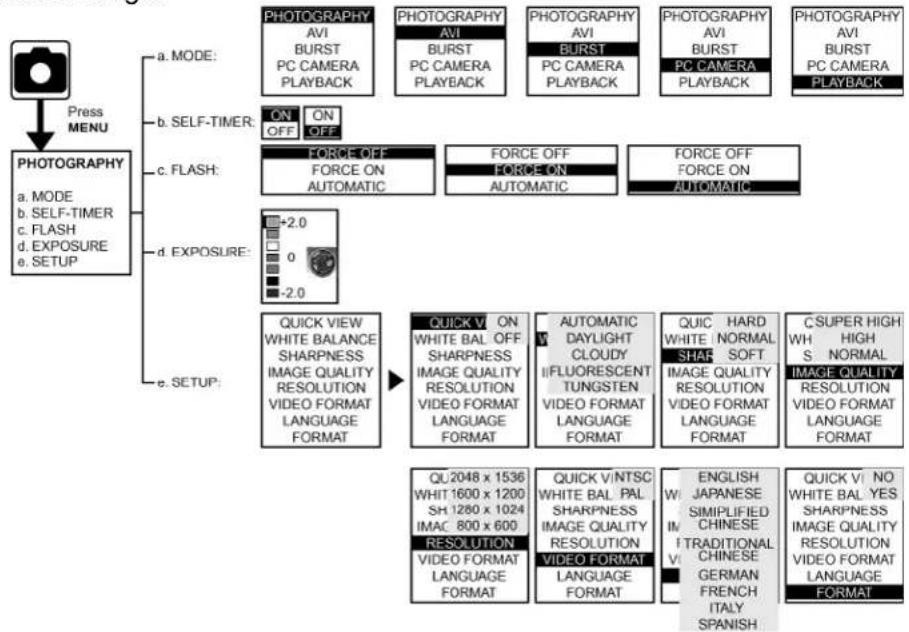
flowchart
graph TD
    A["Press MENU"] --> B["PHOTOGRAPHY"]
    B --> C["a. MODE: ON OFF"]
    B --> D["b. SELF-TIMER: ON OFF"]
    B --> E["c. FLASH: FORCE OFF\nFORCE ON\nAUTOMATIC"]
    B --> F["d. EXPOSURE: FORCE OFF\nFORCE ON\nAUTOMATIC"]
    B --> G["e. SETUP: QUICK VIEW\nWHITE BALANCE SHARPNESS\nIMAGE QUALITY RESOLUTION\nVIDEO FORMAT\nLANGUAGE FORMAT"]
    B --> H["e. SETUP: QUICK VIEW ON\nWHITE BAL OFF\nSHARPNESS\nIMAGE QUALITY RESOLUTION\nVIDEO FORMAT\nLANGUAGE FORMAT\nQUICK VINTSC\nWHITE BAL PAL\nSHARPNESS\nIMAGE QUALITY RESOLUTION\nVIDEO FORMAT\nLANGUAGE FORMAT\nQUICK HARD\nWHITE NORMAL\nSHAR SOFT\nIMAGE QUALITY RESOLUTION\nVIDEO FORMAT\nLANGUAGE FORMAT\nQUICK VINTSC\nWHITE BAL PAL\nSHARPNESS\nIMAGE QUALITY RESOLUTION\nVIDEO FORMAT\nLANGUAGE FORMAT\nENGLISH\nWISIMPLIFIED IN CHINESE\nTRADITIONAL VIECHINESE\nGERMAN\nFRENCH ITALY SPANISH\nQUICK VI NO\nWHITE BAL YES\nSHARPNESS\nIMAGE QUALITY RESOLUTION\nVIDEO FORMAT\nLANGUAGE FORMAT"]
PLAYBACK MODE MENU
Follow the flowchart below to access the camera's Playback Mode onscreen menu options and select / adjust their respective settings:

flowchart
graph TD
    A["PLAYBACK"] --> B["a. MODE:"]
    A --> C["b. DELETE:"]
    A --> D["c. DPOF PRINT:"]
    A --> E["PHOTOGRAPHY AVI BURST PC CAMERA PLAYBACK"]
    A --> F["VIDEO FORMAT LANGUAGE FORMAT"]
    A --> G["PHOTOGRAPHY AVI BURST PC CAMERA PLAYBACK"]
    A --> H["PHOTOGRAPHY AVI BURST PC CAMERA PLAYBACK"]
    A --> I["VIDEO FORMAT LANGUAGE FORMAT"]
    A --> J["PHOTOGRAPHY AVI BURST PC CAMERA PLAYBACK"]
    A --> K["PHOTOGRAPHY AVI BURST PC CAMERA PLAYBACK"]
    A --> L["PHOTOGRAPHY AVI BURST PC CAMERA PLAYBACK"]
    A --> M["PHOTOGRAPHY AVI BURST PC CAMERA PLAYBACK"]
    A --> N["PHOTOGRAPHY AVI BURST PC CAMERA PLAYBACK"]
    A --> O["PHOTOGRAPHY AVI BURST PC CAMERA PLAYBACK"]
    A --> P["PHOTOGRAPHY AVI BURST PC CAMERA PLAYBACK"]
    A --> Q["PHOTOGRAPHY AVI BURST PC CAMERA PLAYBACK"]
    A --> R["PHOTOGRAPHY AVI BURST PC CAMERA PLAYBACK"]
    A --> S["PHOTOGRAPHY AVI BURST PC CAMERA PLAYBACK"]
    A --> T["PHOTOGRAPHY AVI BURST PC CAMERA PLAYBACK"]
    A --> U["PHOTOGRAPHY AVI BURST PC CAMERA PLAYBACK"]
    A --> V["PHOTOGRAPHY AVI BURST PC CAMERA PLAYBACK"]
    A --> W["PHOTOGRAPHY AVI BURST PC CAMERA PLAYBACK"]
    A --> X["PHOTOGRAPHY AVI BURST PC CAMERA PLAYBACK"]
    A --> Y["PHOTOGRAPHY AVI BURST PC CAMERA PLAYBACK"]
    A --> Z["PHOTOGRAPHY AVI BURST PC CAMERA PLAYBACK"]
    A --> AA["PHOTOGRAPHY AVI BURST PC CAMERA PLAYBACK"]
    A --> AB["PHOTOGRAPHY AVI BURST PC CAMERA PLAYBACK"]
    A --> AC["PHOTOGRAPHY AVI BURST PC CAMERA PLAYBACK"]
    A --> AD["PHOTOGRAPHY AVI BURST PC CAMERA PLAYBACK"]
    A --> AE["PHOTOGRAPHY AVI BURST PC CAMERA PLAYBACK"]
    A --> AF["PHOTOGRAPHY AVI BURST PC CAMERA PLAYBACK"]
    A --> AG["PHOTOGRAPHY AVI BURST PC CAMERA PLAYBACK"]
    A --> AH["PHOTOGRAPHY AVI BURST PC CAMERA PLAYBACK"]
    A --> AI["PHOTOGRAPHY AVI BURST PC CAMERA PLAYBACK"]
    A --> AJ["PHOTOGRAPHY AVI BURST PC CAMERA PLAYBACK"]
    A --> AK["PHOTOGRAPHY AVI BURST PC CAMERA PLAYBACK"]
    A --> AL["PHOTOGRAPHY AVI BURST PC CAMERA PLAYBACK"]
    A --> AM["PHOTOGRAPHY AVI BURST PC CAMERA PLAYBACK"]
    A --> AN["PHOTOGRAPHY AVI BURST PC CAMERA PLAYBACK"]
    A --> AO["PHOTOGRAPHY AVI BURST PC CAMERA PLAYBACK"]
    A --> AP["PHOTOGRAPHY AVI BURST PC CAMERA PLAYBACK"]
    A --> AQ["PHOTOGRAPHY AVI BURST PC CAMERA PLAYBACK"]
    A --> AR["PHOTOGRAPHY AVI BURST PC CAMERA PLAYBACK"]
    A --> AS["PHOTOGRAPHY AVI BURST PC CAMERA PLAYBACK"]
    A --> AT["PHOTOGRAPHY AVI BURST PC CAMERA PLAYBACK"]
    A --> AU["PHOTOGRAPHY AVI BURST PC CAMERA PLAYBACK"]
    A --> AV["PHOTOGRAPHY AVI BURST PC CAMERA PLAYBACK"]
    A --> AW["PHOTOGRAPHY AVI BURST PC CAMERA PLAYBACK"]
    A --> AX["PHOTOGRAPHY AVI BURST PC CAMERA PLAYBACK"]
    A --> AY["PHOTOGRAPHY AVI BURST PC CAMERA PLAYBACK"]
    A --> AZ["PHOTOGRAPHY AVI BURST PC CAMERA PLAYBACK"]
    A --> BA["PHOTOGRAPHY AVI BURST PC CAMERA PLAYBACK"]
    A --> BB["PHOTOGRAPHY AVI BURST PC CAMERA PLAYBACK"]
    A --> BC["PHOTOGRAPHY AVI BURST PC CAMERA PLAYBACK"]
    A --> BD["PHOTOGRAPHY AVI BURST PC CAMERA PLAYBACK"]
    A --> BE["PHOTOGRAPHY AVI BURST PC CAMERA PLAYBACK"]
    A --> BF["PHOTOGRAPHY AVI BURST PC CAMERA PLAYBACK"]
    A --> BG["PHOTOGRAPHY AVI BURST PC CAMERA PLAYBACK"]
    A --> BH["PHOTOGRAPHY AVI BURST PC CAMERA PLAYBACK"]
    A --> BI["PHOTOGRAPHY AVI BURST PC CAMERA PLAYBACK"]
    A --> BJ["PHOTOGRAPHY AVI BURST PC CAMERA PLAYBACK"]
    A --> BK["PHOTOGRAPHY AVI BURST PC CAMERA PLAYBACK"]
    A --> BL["PHOTOGRAPHY AVI BURST PC CAMERA PLAYBACK"]
    A --> BM["PHOTOGRAPHY AVI BURST PC CAMERA PLAYBACK"]
    A --> BN["PHOTOGRAPHY AVI BURST PC CAMERA PLAYBACK"]
    A --> BO["PHOTOGRAPHY AVI BURST PC CAMERA PLAYBACK"]
    A --> BP["PHOTOGRAPHY AVI BURST PC CAMERA PLAYBACK"]
    A --> BQ["PHOTOGRAPHY AVI BURST PC CAMERA PLAYBACK"]
    A --> BR["PHOTOGRAPHY AVI BURST PC CAMERA PLAYBACK"]
    A --> BS["PHOTOGRAPHY AVI BURST PC CAMERA PLAYBACK"]
    A --> BT["PHOTOGRAPHY AVI BURST PC CAMERA PLAYBACK"]
    A --> BU["PHOTOGRAPHY AVI BURST PC CAMERA PLAYBACK"]
    A --> BV["PHOTOGRAPHY AVI BURST PC CAMERA PLAYBACK"]
    A --> BW["PHOTOGRAPHY AVI BURST PC CAMERA PLAYBACK"]
    A --> BX["PHOTOGRAPHY AVI BURST PC CAMERA PLAYBACK"]
    A --> BY["PHOTOGRAPHY AVI BURST PC CAMERA PLAYBACK"]
    A --> BZ["PHOTOGRAPHY AVI BURST PC CAMERA PLAYBACK"]
    A --> CA["PHOTOGRAPHY AVI BURST PC CAMERA Play Back"]
INSTALLING CAMERA DRIVERS AND ARCSOFT PROGRAMS
INSTALLING CAMERA DRIVERS


- Insert CD-ROM and select "Driver" 2. Click "Next"

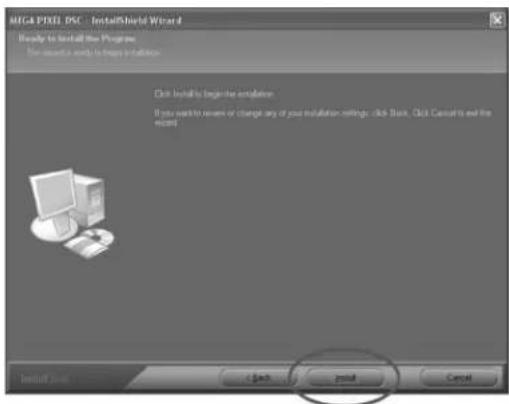
- Select Setup type, then click "Next"
- Click "Install"
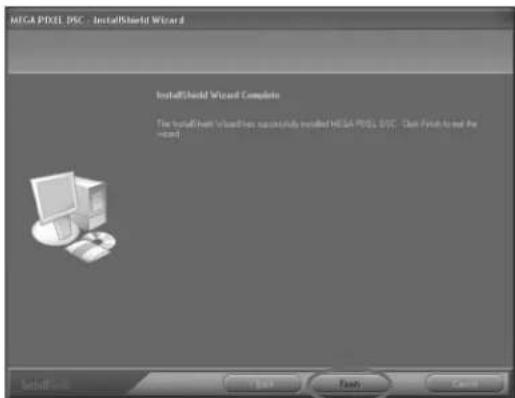
- Click "Finish"
INSTALLING ARCSOFT PHOTOIMPRESSION 5.0
- Turn your computer on
- Insert the installation CD into your computer's CD-ROM drive

- The introduction screen will appear automatically
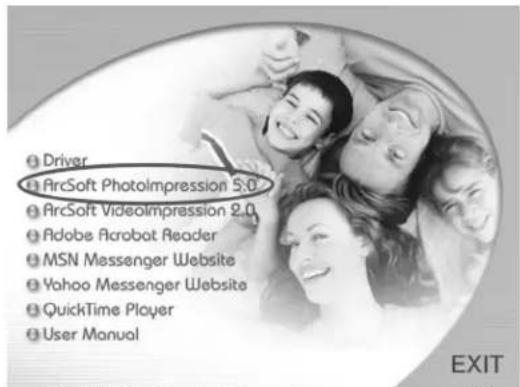
- Click "ArcSoft Photolmpression 5.0"

- Follow the on-screen instructions to install Photolmpression 5.0


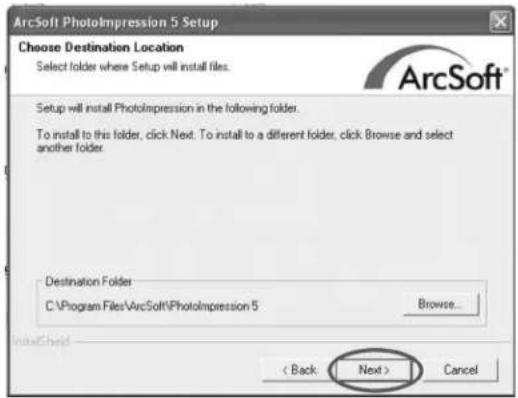

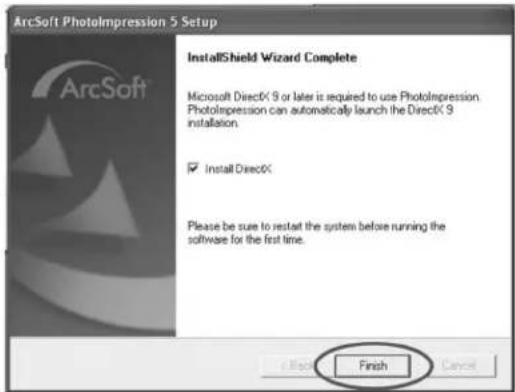
- Re-start your computer
NOTE To find out more about Photolmpression 5.0 or how to use it, consult the online help by clicking the "?" icon or "help" from the pull-down menu.
INSTALLING ARCSOFT VIDEOIMPRESSION 2.0
- Turn your computer on
- Insert the installation CD into your computer's CD-ROM drive

- The introduction screen will appear automatically

- Click "ArcSoft VideoImpression 2.0"

- Follow the on-screen instructions to install Videolmpression 2.0


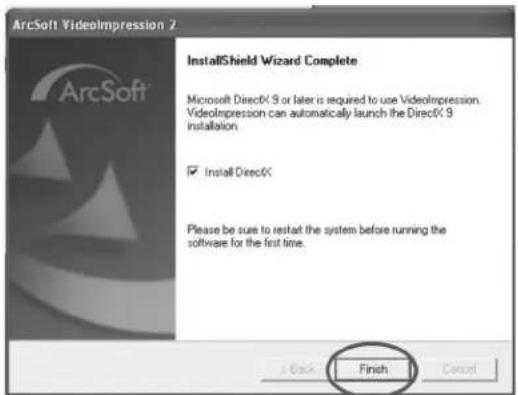
- Re-start your computer
NOTE To find out more about Videolmpression 2.0 or how to use it, consult the online help by clicking the "?" Icon or "help" from the pull-down menu.
INSTALLING QUICKTIME PLAYER 6
- Turn your computer on
- Insert the installation CD into your computer's CD-ROM drive

- The introduction screen will appear automatically

- Click "QuickTime Player"

- Follow the on-screen instructions to install QuickTime Player 6

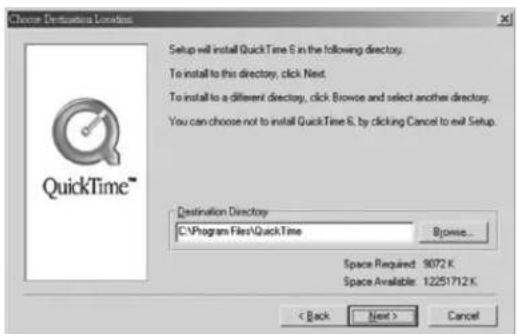
- Re-start your computer

NOTE To find out more about QuickTime Player 6 or how to use it, consult the online help by clicking the "?" Icon or "help" from the pull-down menu.
UNINSTALLING APPLICATION PROGRAMS
UNINSTALLING ARCSOFT PHOTOIMPRESSION 5.0
- Go toStart > Programs > ArcSoft > Photolmpression 5.0 > Uninstall.
- Follow the on-screen instructions to uninstall software.
UNINSTALLING ARCSOFT VIDEOIMPRESSION 2.0
- Go to Start > Programs > ArcSoft > Videolmpression 2.0 > Uninstall.
- Follow the on-screen instructions to uninstall software.
Turn the camera on and connect it to the computer with the supplied USB cable. The camera will be set at "Mass Storage" Mode where its memory can be used as a USB mass storage device and appears as a disk drive in Windows Explorer. Any file can be copied to and from the camera's memory, just like any other file on any other disk drive.
For Windows 98SE users, go to Microsoft's website at www.microsoft.com to download the latest Windows updates supporting mass storage function.

- Click the "Photolmpression 5.0" icon on the desktop
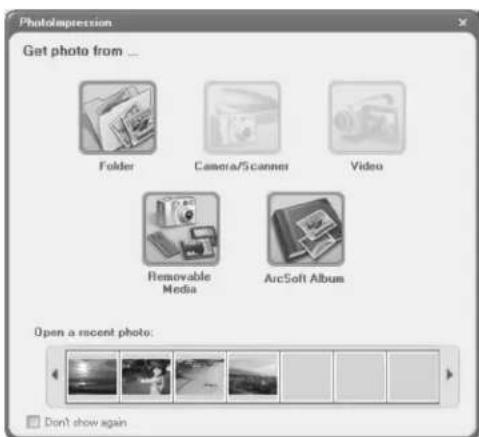
- Click "Removable Media"
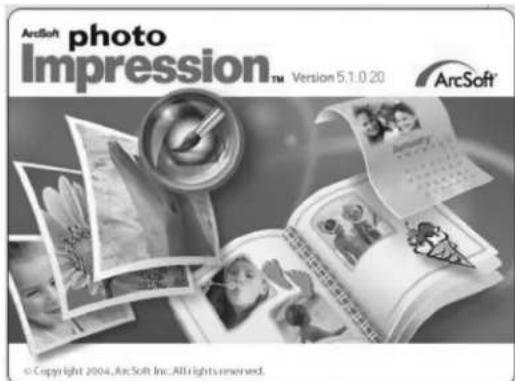
- The Photolmpression 5.0 introduction screen will appear

- Click "OK"
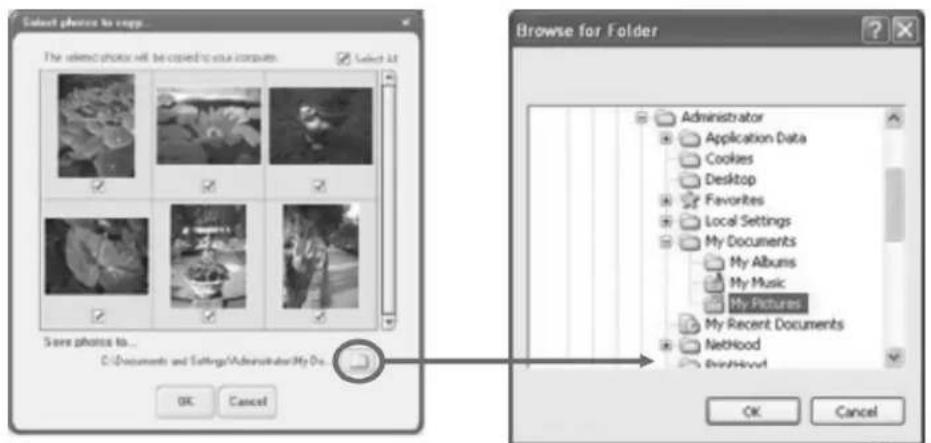
- Click on the photos which you wish to copy from the camera and click "☐" to select the folder you wish to save on your computer. (Ex., My Pictures")
![Select photos to copy... Job completed. 6 photos[ ] have been copied to your computer. OK](/content/2026/05/1042681/images/5bd1c5358af8f17359c332a9fc553ab967f6a89e57421ac3e49db95f262c14cf.jpg)
- Click "OK"
Change the camera to PC Camera Mode: MENU \ Mode \ PC Camera

- Click the "VideoImpression 2.0" icon on the desktop
- The VideoImpression 2.0 introduction screen will appear

- Click "Create a New Video"

- Click "Get From File"

- Click the ".avi" file to open
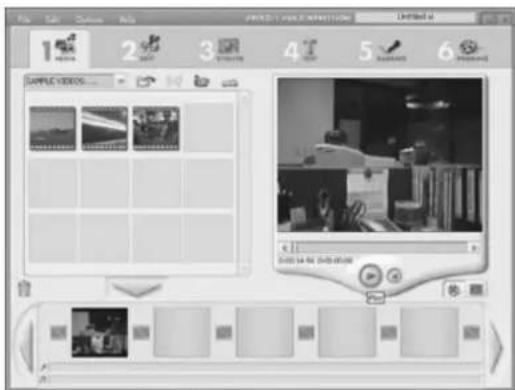
- Select “☐” (Enter Movie Mode) and click “▶” (Play) button. The video will begin playing
PLAYING MOVIE CLIPS USING QUICKTIME PLAYER 6
Turn the camera on and connect to the computer via the USB cable. The camera will be set to "Mass Storage" Mode.

- Click the "QuickTime Player" icon on desktop

- The "QuickTime Player" introduction screen will appear

- Open the "File" menu bar and select "Open Movie in New Player"

- Select "Desktop" and Click "My Computer"

- Click "VOLUMELABE (F:)” 6. Click

"SVI-0001"
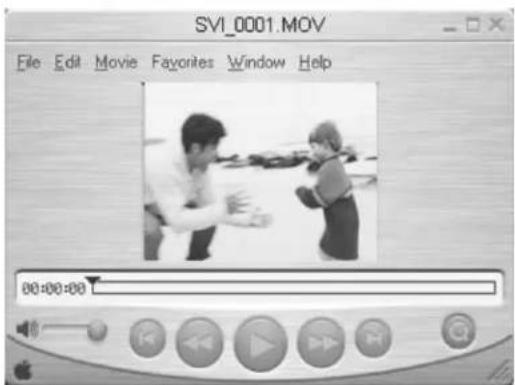
- Movie will begin playing
SPECIFICATIONS
| Image sensor CMOS | |
| Lens specification F2.8, sensor area 0.5"f = 8.64mm (43 mm equivalent), viewing angle 54° | |
| Operating system Microsoft Windows 98SE / 2000 / ME / XP | |
| White balance Auto / Manual (daylight / cloudy / tungsten / fluorescent) | |
| Exposure control Auto | |
| Frame rate (video mode) QVGA 320x240 pixels at 30fps | |
| Resolution (still picture mode based on 8MB Flash memory) | 2048x1536 pixels1600x1200 pixels1280x1024 pixels800x600 pixels |
| PC interface USB | |
| Fixed storage lens 65cm ~ | infinity |
| Storage 8MB Flash memory + Secure Digital card (card not included) | |
| Compression JPEG (pictures); MPEG (videos) | |
| Display 1.5" color TFT LCD | |
| Zoom 4X digital zoom | |
| Video output NTSC or PAL | |
| Power source AAA 1.5V x | 2 batteries (included) |
| Dimensions 88 (L) x 60 (W) x 20 (H) mm | |
IMPORTANT NOTICE
STATEMENT OF RESPONSIBILITY
Oregon Scientific assumes no responsibility for any incidental losses (such as the costs of photography or the loss of income from photography) incurred because of faults with this product.
NOTES ON COPYRIGHT
Photos and videos recorded using your digital video camera cannot be used in ways that infringe copyright laws without the consent of the owner, unless intended only for personal use. Note that some restrictions apply to the photographing of stage performances, entertainments and exhibits, even when intended purely for personal use. Users are also asked to note that the transfer of memory containing photos or data protected under copyright laws is only permissible within the restrictions imposed.
GENERAL WARNINGS
- Do not attempt to disassemble the camera yourself. Always take it to an authorized service facility for repair.
- Do not immerse the device in water or subject the camera to impact or shock. If accidentally dropped in water, quickly pour out the water and dry the camera with sunlight or an air-blower.
- Do not, under any circumstances, touch the exposed electronic circuitry of the device, as there is a danger of electric shocks.
- Take special care when handling a damaged LCD display, as the liquid crystals can be harmful to your health.
- Do not use or store the device in locations that may adversely affect the product such as rain, snow, desert, and magnetic fields.
- Protect the camera from excessive humidity, which may wet the lens and blur any pictures taken.
- Check all major functions when the device is unused for a long period. This is to ensure its full operation. Maintain regular testing and cleaning of your device.
- Do not look through the viewfinder at the sun or other strong lights. This could damage your eyesight.
- Avoid leaving the camera exposed to direct sunlight, as the action of the lens could cause fires.
- Remove the batteries and memory card before storing the camera for long periods of time. Then, keep it in a well-ventilated place in order to prevent molding.
- To store the camera, wrap it in a piece of clean, soft cloth and place it in a cool, dry, place free of any dust or moisture.
ABOUT OREGON SCIENTIFIC
Visit our website (www.oregonscientific.com) to learn more about Oregon Scientific products such as digital cameras, MP3 players, children's electronic learning products and games, projection clocks, health and fitness gear, weather stations, and digital and conference phones. The website also includes contact information for our customer care department in case you need to reach us, as well as frequently asked questions and customer downloads.
We hope you will find all the information you need on our website, however if you're in the US and would like to contact the Oregon Scientific customer care department directly, please visit: www2.oregonscientific.com/service/support OR call 1-800-853-8883. For international inquiries, please visit www2.oregonscientific.com/about/international/default.asp.
TRADEMARK INFORMATION
Windows is a trademark of Microsoft Corporation of the United States and other countries. Windows is an abbreviated term referring to the Microsoft Windows Operating System.
ArcSoft®, Photolmpression® and Videolmpression® are registered trademarks of ArcSoft, Inc.
QuickTime® is a registered trademark of Apple Computer, Inc.
All other trademarks mentioned in this manual or other documentations provided with your Oregon Scientific™ product are trademarks or registered trademarks of their respective holders.
FCC STATEMENT
This device complies with Part 15 of the FCC Rules. Operation is subject to the following two conditions: (1) This device may not cause harmful interference, and (2) This device must accept any interference received, including interference that may cause undesired operation.
WARNING Changes or modifications not expressly approved by the party responsible for compliance could void the user's authority to operate the equipment.
NOTE This equipment has been tested and found to comply with the limits for a Class B digital device, pursuant to Part 15 of the FCC Rules. These limits are designed to provide reasonable protection against harmful interference in a residential installation.
This equipment generates, uses and can radiate radio frequency energy and, if not installed and used in accordance with the instructions, may cause harmful interference to radio communications. However, there is no guarantee that interference will not occur in a particular installation. If this equipment does cause harmful interference to radio or television reception, which can be determined by turning the equipment off and on, the user is encouraged to try to correct the interference by one or more of the following measures:
- Reorient or relocate the receiving antenna.
-
Increase the separation between the equipment and receiver.
-
Connect the equipment into an outlet on a circuit different from that to which the receiver is connected.
- Consult the dealer or an experienced radio / TV technician for help.
DECLARATION OF CONFORMITY
The following information is not to be used as contact for support or sales. Please call our customer service number (listed on our website at www.oregonscientific.com), or on the warranty card for this product) for all inquiries instead.
We
Name: Oregon Scientific, Inc.
Address: 19861 SW 95th Ave., Tualatin, Oregon 97062 USA
Telephone No.: 1-800-853-8883
is in conformity with Part 15 of the FCC Rules. Operation is subject to the following two conditions: 1) This device may not cause harmful interference. 2) This device must accept any interference received, including interference that may cause undesired operation.
CE
© 2005 Oregon Scientific. All rights reserved.
- Product Overview....2
- Getting Started 3
- Taking Pictures .... 3
- Preview / Playback Mode Onscreen Menus.... 3
- Installing Camera Drivers and ArcSoft Programs.... 4
- Uninstalling Application Programs 9
- Downloading Photos Using Photolmpression 5.0 9
- Video Playback Using Videolmpression 2.0....10
- Playing Movie Clips Using QuickTime Player 6 .... 11
- Specifications.... 12
- Important Notice.... 13
- General Warnings 13
- About Oregon Scientific.... 14
- Trademark Information.... 14
- FCC Statement 14
- INTRODUCTION
- PACKAGE CONTENTS
- SYSTEM REQUIREMENTS
- PRODUCT OVERVIEW
- GETTING STARTED
- BATTERY INSTALLATION
- SLEEP MODE
- TAKING PICTURES
- PREVIEW / PLAYBACK MODE ONSCREEN MENUS
- PREVIEW MODE MENU
- PLAYBACK MODE MENU
- INSTALLING CAMERA DRIVERS AND ARCSOFT PROGRAMS
- INSTALLING ARCSOFT PHOTOIMPRESSION 5.0
- INSTALLING ARCSOFT VIDEOIMPRESSION 2.0
- INSTALLING QUICKTIME PLAYER 6
- UNINSTALLING APPLICATION PROGRAMS
- UNINSTALLING ARCSOFT PHOTOIMPRESSION 5.0
- UNINSTALLING ARCSOFT VIDEOIMPRESSION 2.0
- PLAYING MOVIE CLIPS USING QUICKTIME PLAYER 6
- IMPORTANT NOTICE
- STATEMENT OF RESPONSIBILITY
- NOTES ON COPYRIGHT
- GENERAL WARNINGS
- ABOUT OREGON SCIENTIFIC
- TRADEMARK INFORMATION
- FCC STATEMENT
- DECLARATION OF CONFORMITY
- We
Brand : OREGON SCIENTIFIC
Model : DS6200
Category : Camera