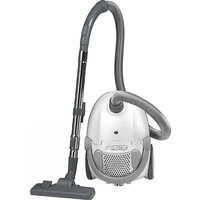
VC-H4513ES-13 - Vacuum Cleaner Coline - Free user manual and instructions
Find the device manual for free VC-H4513ES-13 Coline in PDF.


| Product Type | Canister Vacuum Cleaner |
| Model | VC-H4513ES-13 |
| Article Number | 18-4231 (UK) / 34-3007 (EU) |
| Power Output | 2000 W |
| Mains Supply | 220-240 V AC, 50 Hz |
| Mains Lead Length | 6 m |
| Sound Level (LwA) | < 84 dB |
| Sound Level (LpA) | < 73 dB |
| Dust Bag Type | Replaceable dust bag |
| HEPA Filter | Replaceable HEPA filter |
| Air Intake Filter | Washable, clean twice a year |
| Included Accessories | Floor brush, narrow nozzle, brush nozzle, fabric nozzle |
| Suction Power Control | Slide button on top |
| Cable Rewind | Push-button rewind |
| Floor Brush Adjustment | Button for carpet/hard floor |
| Safety Features | Auto shut-off if clogged? Not specified; manual states do not use if damaged |
| Disposal | Follow local ordinances |
Frequently Asked Questions - VC-H4513ES-13 Coline
User questions about VC-H4513ES-13 Coline
0 question about this device. Answer the ones you know or ask your own.
Ask a new question about this device
Download the instructions for your Vacuum Cleaner in PDF format for free! Find your manual VC-H4513ES-13 - Coline and take your electronic device back in hand. On this page are published all the documents necessary for the use of your device. VC-H4513ES-13 by Coline.
USER MANUAL VC-H4513ES-13 Coline
Vacuum Cleaner coline®
Dammsugare • Støvsuger • Pölynimuri

natural_image
Exterior view of a modern vacuum cleaner with black and white background (no text or symbols visible)Art. No.: Model. No:
18-4231 VC-H4513ES-13-UK
34-3007 VC-H4513ES-13
English 2
Svenska 8
Norsk 14
Suomi 20
Vacuum Cleaner 2000 W
Article number 18-4231 Model VC-H4513ES-13-UK
34-3007 VC-H4513ES-13
Please read the entire instruction manual before using the product and save it for future reference. We reserve the right for any errors in text or images and any necessary changes made to technical data. If you have any questions regarding technical problems please contact our Customer Services (see address on reverse).
Safety
The vacuum cleaner should only be used as described in the manual.
Only use accessories recommended by the manufacturer.
- This product must not be used by anyone (including children) suffering from physical or mental impairment. This product should not be used by anyone who does not have the proper experience or knowledge of the product unless they have been instructed in its use by someone who takes responsibility for their safety. Never let children play with the product.
- Do not expose the vacuum cleaner and its mains lead to moisture, blows or high temperatures.
- Do not use the vacuum cleaner if the mains lead or plug is damaged. Neither should you use it if you have dropped it on the floor, left it outdoors or if it has been in contact with water.
- Do not leave the vacuum cleaner unattended when it is connected to a power point. Pull the plug out when the vacuum cleaner is not in use. Turn off the product and always pull the plug itself when disconnecting it from the wall socket. Do not pull the lead.
- Do not vacuum outdoors or on wet surfaces. Store the vacuum cleaner indoors.
- Do not pull or carry the vacuum cleaner by the mains lead. Do not use the lead as a handle and do not let it fasten in door jambs. Do not pull it around sharp corners, edges or run over the lead.
- Do not insert any item into any opening other than the suction port. Do not vacuum if any opening is clogged. Keep the openings free from dust, fluff, hair and anything that can reduce the airflow.
- Do not vacuum anything that is smoking or burning, e.g. cigarettes, matches or hot ashes. Do not vacuum flammable liquids such as petrol.
- Be extra careful when vacuuming on stairs.
- Do not vacuum if the dust filter is damaged or not positioned correctly. Always use the correct dust filter.
- If the vacuum cleaner is damaged, it must be repaired. Contact Customer Services (see reverse).
- Never use the vacuum cleaner if the mains lead is damaged. Inspect the lead regularly. If the lead is damaged it must be changed by a qualified service technician. Contact Customer Services (see reverse).
Product description

Assembly
1. Attaching and detaching the suction hose
- Attaching the suction hose: Insert the hose into the suction port on top of the vacuum cleaner. Push it in until you hear a click.
- Detaching the suction hose: Gently press in the scored catches on the hose fixing and detach the hose.

natural_image
Line drawing of a vacuum cleaner with a handle and blade, no text or symbols present2. Attaching the suction tube and floor brush
- Slot together the vacuum hose and the handle as shown in the figure.

natural_image
Diagram of a mechanical component with directional arrows indicating motion or flow (no text or symbols)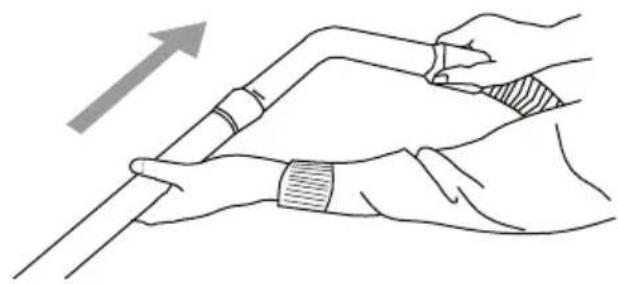
natural_image
Illustration of hands holding a tool with an arrow indicating upward motion (no text or symbols)- Press the button on the suction tube to adjust its length.

natural_image
Diagram showing a device being inserted into a cylindrical tube, with an arrow indicating the insertion direction (no text or symbols present)- Attach the floor brush to the suction tube as shown in the figure.
- The floor brush can be adjusted to suit carpets or hard floors. This is controlled by a button on top of the floor brush.
3. Using the accessories
natural_image
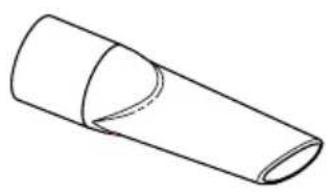
Simple line drawing of a cylindrical object with a curved cutout (no text or symbols)Narrow nozzle:
For radiators, channels, corners, skirting boards, between sofa cushions, etc.

natural_image
Technical line drawing of a cylindrical connector with internal fins (no text or symbols)Brush nozzle:
For furniture, blinds, lamp shades, etc.
natural_image
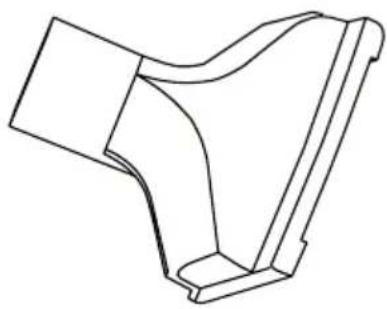
Technical line drawing of a mechanical bracket or housing component (no text or symbols)Fabric nozzle:
For furniture and other upholstery.
Operation
Before using the vacuum cleaner, first pull out enough lead and then plug it into a wall socket. A yellow mark on the lead indicates a suitable length. Do not pull the lead out past the red mark.
- Push the on/off button on top of the vacuum cleaner to turn it on.
- Adjust the suction power with the slide button on top of the vacuum cleaner.
- To rewind the lead, push the cable rewind button with one hand and allow the lead to run through the fingers of your other hand so that you make sure it doesn't whip around and cause damage.
Care and maintenance
1. Changing the dust bag
Never use the vacuum cleaner without a dust bag. If you forget to insert a dust bag or insert one incorrectly you will not be able to close the lid of the vacuum cleaner properly.


- Remove the suction hose from the vacuum cleaner.
- Open the vacuum cleaner lid.
- Remove the old dust bag and insert a new one.
- Close the lid and reattach the suction hose.
2. Cleaning the air intake filter (internal filter)
-
Disconnect the plug from the wall socket before cleaning the filter.
-
Open the vacuum cleaner lid.
-
Remove the air filter by sliding it upwards.
-
Rinse the filter in lukewarm water and allow it to air dry. Never wash the filter in the washing machine. Do not use a hair dryer or similar to dry it.
-
Replace the filter.

natural_image
Technical line drawing of a vacuum cleaner internal structure (no text or symbols)- The filter should be cleaned at least twice a year or whenever it looks dirty.
- Never use the machine without a filter. Using the machine without a filter can result in reduced suction or damage the motor.
- You may also replace the filter with a new one. If the filter needs to be replaced, use universal filter 34-4442. The filter can be cut to size using the old one as a template.
3. Changing the HEPA filter
- Open the HEPA filter lid by pressing the two tabs upwards.
- Remove the HEPA filter and replace it with a new one.
- Replace the cover.

natural_image
Line drawing of a vacuum cleaner with attached filter array and directional arrows (no text or symbols)Disposal
Follow local ordinances when disposing of this product. If you are unsure of how to dispose of this product, please contact your municipality.
Specifications
Type VC-H4513ES-13
Mains supply 220–240 V AC, 50 Hz
Power output 2000 W
Mains lead 6 metres
Sound level LwA < 84 dB
LpA <
73 dB
Dammsugare 2000 W
Artikelnummer 18-4231 Modell VC-H4513ES-13-UK 34-3007 VC-H4513ES-13
natural_image
Line drawing of a vacuum cleaner with handle and blade, no text or symbols presentnatural_image
Illustration of hands holding a tool with an upward arrow, no text or symbols present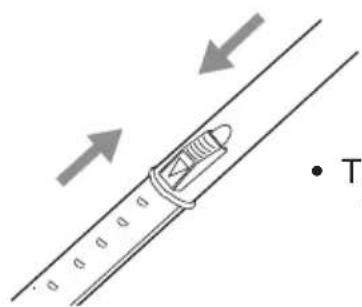
natural_image
Diagram of a boat moving along a curved road with directional arrows indicating flow (no text or symbols)natural_image
Line drawing of a vacuum cleaner with a pipe being inserted (no text or symbols)natural_image
Simple line drawing of a cylindrical object with a curved cutout (no text or symbols)Smalt munstycke:
natural_image
Technical line drawing of a cylindrical mechanical component with internal grooves (no text or symbols)Borstmunstycke:
natural_image
Technical line drawing of a mechanical bracket or bracket (no text or symbols)Textilmunstycke:

natural_image
Technical line drawing of a vacuum cleaner internal structure (no text or symbols)natural_image
Line drawing of a vacuum cleaner with attached filter array and directional arrows (no text or symbols)Avfallshantering
natural_image
Line drawing of a vacuum cleaner with a diagonal blade extending from it (no text or symbols)natural_image
Line drawing of hands holding a tool with an upward arrow, no text or symbols present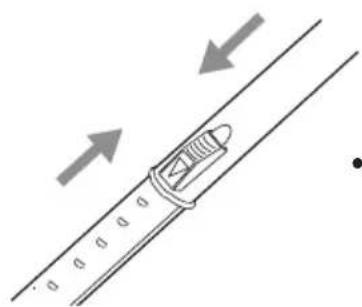
natural_image
Diagram of a boat navigating a river with directional arrows indicating flow or movement (no text or symbols)natural_image
Line drawing of a vacuum cleaner with a pipe being inserted, showing the component and motion direction (no text or symbols)natural_image
Simple line drawing of a cylindrical object with a curved cutout (no text or symbols)Smalt munnstykke:
natural_image
Technical line drawing of a cylindrical mechanical component with internal grooves (no text or symbols)Børstemunnstykke:
natural_image
Pure technical line drawing of a mechanical bracket or housing (no text or symbols)Tekstilmunnstykke:

natural_image
Technical line drawing of a vacuum cleaner internal structure (no text or symbols)natural_image
Line drawing of a vacuum cleaner with internal components and directional arrows indicating assembly (no text or symbols)Avfallshändtering
natural_image
Line drawing of a vacuum cleaner with a handle and blade, no text or symbols presentnatural_image
Illustration of hands holding a tool with an upward arrow, no text or symbols present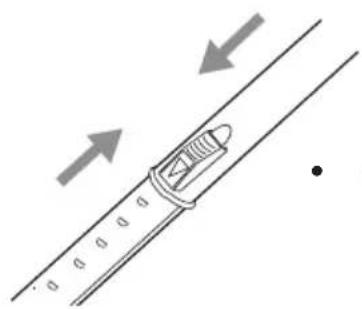
natural_image
Diagram of a moving vehicle on a road with directional arrows indicating motion (no text or symbols)natural_image
Diagram showing a vacuum cleaner connected to a cylindrical component via a cable (no text or symbols present)natural_image
Simple line drawing of a cylindrical object with a curved cutout (no text or symbols)Kapea suutin:
natural_image
Technical line drawing of a cylindrical mechanical component with internal grooves (no text or symbols)Harjasuutin:
natural_image
Pure technical line drawing of a mechanical bracket or bracket (no text or symbols)Tekstiilisuutin:

natural_image
Technical line drawing of a vacuum cleaner internal structure (no text or symbols)natural_image
Line drawing of a vacuum cleaner with attached filter array and directional arrows (no text or symbols)Kierrätys
For consumer contact, please visit
www.clasohlson.co.uk and click on
customer service.
INTERNET www.clasohlson.co.uk


- Vacuum Cleaner coline®
- Vacuum Cleaner 2000 W
- Safety
- Product description
- Assembly
- Attaching and detaching the suction hose
- Attaching the suction tube and floor brush
- Using the accessories
- Narrow nozzle:
- Brush nozzle:
- Fabric nozzle:
- Operation
- Care and maintenance
- Changing the dust bag
- Cleaning the air intake filter (internal filter)
- Changing the HEPA filter
- Disposal
- Specifications
- Dammsugare 2000 W
- Artikelnummer 18-4231 Modell VC-H4513ES-13-UK 34-3007 VC-H4513ES-13
- Smalt munstycke:
- Borstmunstycke:
- Textilmunstycke:
- Avfallshantering
- Smalt munnstykke:
- Børstemunnstykke:
- Tekstilmunnstykke:
- Avfallshändtering
- Kapea suutin:
- Harjasuutin:
- Tekstiilisuutin:
- Kierrätys
Brand : Coline
Model : VC-H4513ES-13
Category : Vacuum Cleaner