LED19VH50 - Television Viore - Free user manual and instructions
Find the device manual for free LED19VH50 Viore in PDF.


| Product Type | LED Television |
| Screen Size | 19 inches (48 cm) |
| Display Resolution | 1366 x 768 pixels (HD Ready) |
| Aspect Ratio | 16:9 |
| Refresh Rate | 60 Hz |
| Dimensions (without stand) | 44.5 x 29.5 x 7.5 cm (W x H x D) |
| Dimensions (with stand) | 44.5 x 32.0 x 16.5 cm |
| Weight (without stand) | 2.5 kg |
| Weight (with stand) | 2.8 kg |
| Power Consumption (typical) | 30 W |
| Power Consumption (standby) | < 0.5 W |
| Power Supply | AC 100-240 V, 50/60 Hz |
| Main Features | HD Ready, USB Media Player, HDMI, VGA, Composite, DVB-T/T2/C |
| Audio Output | 2 x 3 W speakers |
| Connectivity | 1 x HDMI, 1 x VGA, 1 x USB, 1 x Composite, 1 x Antenna, 1 x Headphone |
| Supported File Formats (USB) | MP4, AVI, MKV, MP3, JPEG |
| Mounting | VESA 100 x 100 mm |
| Cleaning Instructions | Wipe gently with a soft, dry cloth. Do not use liquids or abrasive cleansers. |
| Safety Notes | Place on a stable surface, ensure ventilation, unplug during storms or long absence. |
| Spare Parts & Repairability | Remote control and stand available; limited repairability, contact Viore support for service. |
Frequently Asked Questions - LED19VH50 Viore
User questions about LED19VH50 Viore
0 question about this device. Answer the ones you know or ask your own.
Ask a new question about this device
Download the instructions for your Television in PDF format for free! Find your manual LED19VH50 - Viore and take your electronic device back in hand. On this page are published all the documents necessary for the use of your device. LED19VH50 by Viore.
USER MANUAL LED19VH50 Viore
OPERATING INSTRUCTIONS
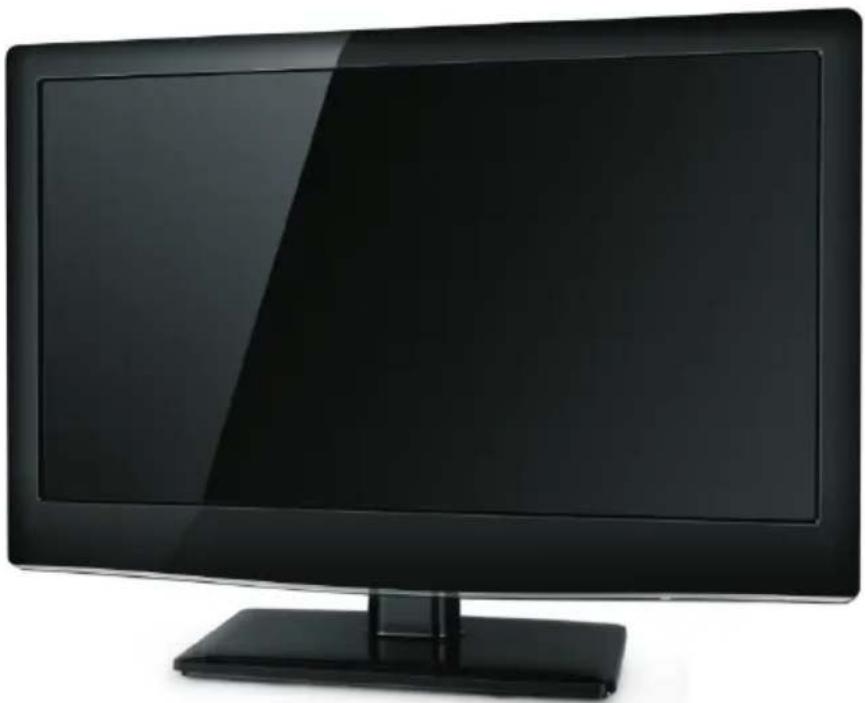
19" HD LCD Television with LED Backlight
LED19VH50
natural_image
Black flat-screen computer monitor with blank screen and stand (no text or symbols visible)AIR (TV)/CABLE MODE SELECTION
The Air/CABLE menu option is set to the "CABLE" (Cable Television) mode at the factory. If you want to use an antenna for the built-in TV tuner, this menu option must be set to the "Air" mode. Please refer to "6. Channel MENU" in page 14 of this manual for the details.

FOR QUESTIONS OR TECHNICAL SUPPORT
Please call:
1-877-777-1428 (USA / PUERTO RICO)
1-877-777-1429 (CANADA)
Please do not return this TV to the store.
Contents
Safety and warnings.... 2-3
Introduction....4
Installation....5-8
Wall.Mount 9
Remote Control....10
Operation....11-15
Trouble Shooting....16
Warranty Card....17
Important Safety Instructions
1) Read these instructions.
2) Keep these instructions.
3) Heed all warnings.
4) Follow all instructions.
5) Do not use this apparatus near water.
6) Clean only with dry cloth.
7) Do not block any ventilation openings, install in accordance with the instructions.
8) Do not install near any heat sources such as radiations, heat registers, stoves, or other apparatus (including amplifiers) that produce heat.
9) Do not defeat the safety purpose of the polarized plug. If the provided plug does not fit into your outlet, consult an electrician for replacement of the obsolete outlet.
10) Protected the power cord from being walked on or pinched particularly at plugs, convenience receptacles, and the point where they exit from the apparatus.
11) Only use attachments/accessories specified by the manufacturer.
12) Unplug this apparatus during lighting storms or when unused for long periods of time.
13) Refer all servicing to qualified service personnel. Servicing is required when the apparatus has been damaged in any way, such as power-supply cord or plug is damaged, liquid has been spilled or objects have fallen into the apparatus, the apparatus has been exposed to rain or moisture, does not operate normally, or has been dropped.
14) Only use attachments/accessories specified provided by the manufacturer, the product is supplied by AC adapter, the AC adapter is used as disconnect device, the disconnect device shall remain readily operable
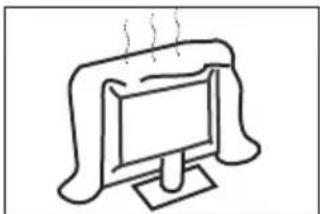
15) The ventilation should not be impeded by covering the ventilation openings with items, such as newspapers, table-cloth, curtains, etc.
16) No naked flame sources, such as lighted candles, should be placed on the apparatus.
17) Attention should be drawn to the environmental aspects of battery disposal.
18) The use of apparatus in moderate climate.
WARNING:
To reduce the risk of fire or electric shock, do not expose this apparatus to rain or moisture.
WARNING:
The batteries shall not be exposed to excessive heat such as sunshine, fire or the like.
WARNING:
Never place heavy or sharp objects on the LCD panel or frame.
WARNING:
The excessive sound pressure from earphones and headphones can cause hearing loss.
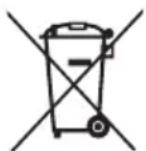

This marking indicates that this product should not be disposed with other household wastes throughout the EU. To prevent possible harm to the environment or human health from uncontrolled waste disposal, recycle it responsibly to promote the sustainable reuse of material resources. To return your used device, please use the return and collection systems or contact the retailer where the product was purchased. They can take this product for environmental safe recycling.

natural_image
Illustration of a computer monitor with lightning bolts and a crossed-out hand gesture (no text or symbols)High voltages are used in the operation of this television receiver. Do not remove the cabinet back from your set. Refer servicing to qualified service personnel.
natural_image
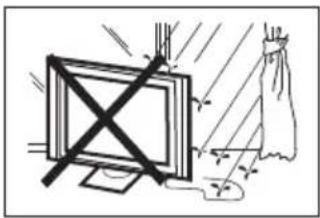
Simple line drawing of a monitor with a cross mark and a hanging cloth, no text or symbols presentTo prevent fire or electrical shock hazard, do not expose the television receiver to rain or moisture.

Do not drop or push objects into the television cabinet slots or openings. Never spill any kind of liquid on the television receiver.
natural_image
Simple line drawing of a computer monitor with a curved frame and a base, emitting steam (no text or symbols)Do not block the ventilation holes in the back cover. Adequate ventilation is essential to prevent failure of electrical components.
natural_image
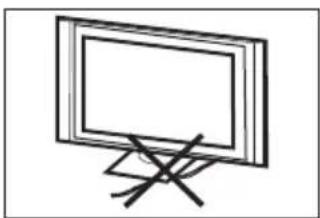
Simple line drawing of a flat-screen monitor with a stand and diagonal lines (no text or symbols)Do not trap the power supply cord under the television receiver.

natural_image
Cartoon illustration of a person falling off from a computer screen with a crossed-out window (no text or symbols)Never stand on, lean on, or suddenly push the television or its stand. You should pay special attention to children. Serious injury may result if it falls.
natural_image
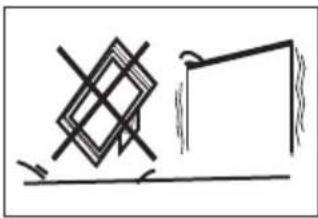
Simple line drawing of a geometric structure with intersecting lines and a rectangular frame (no text or symbols)Do not place your television on an unstable cart, stand, shelf or table. Serious injury to an individual, and damage to the television, may result if it falls.

natural_image
Illustration of a person reacting to a CD with a computer monitor (no text or symbols present)When the television receiver is not used for an extended period of time, it is advisable to disconnect the AC power cord from the AC outlet.
natural_image
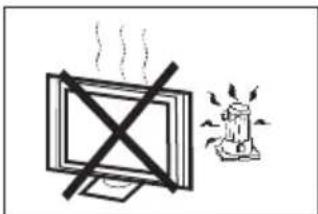
Simple line drawing of a monitor with a cross symbol and a small firecracker nearby (no text or symbols)Avoid exposing the television receiver to direct sunlight and other sources of heat. Do not stand the television receiver directly on other products which give off heat, e.g. video cassette players and audio amplifiers. Do not place naked flame sources, such as lighted candles on the television.
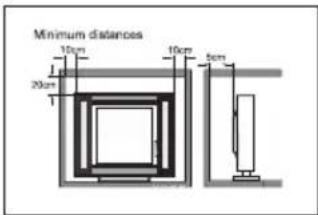
If the television is to be built into a compartment or similar enclosure, the minimum distances must be maintained. Heat build-up can reduce the service life of your television, and can also be dangerous.
Main features
■ 19"wide screen for a complete home theater experience
■ Super slim LCD TV with LED backlight
■ 1366 x 768 native resolution for HD performance
■ Integrated ATSC TV tuner for HDTV broadcast reception
■ Beautiful color depth with a dynamic contrast ratio of 10000:1
■ Dual HDMI inputs for true digital connections
■ VGA port for connection to PC
Accessories
Adapter.... 1
Infrared Remote Control...... 1
User's Manual 1
Battery(AAA).... 2
QSG.... 1
Main parameter
| Viewing Picture Size(diagonal) | 19 inch |
| Resolution: | 1366x768 |
| Aspect Ratio: | 16:9 |
| TV System: | ATSC Digital system and NTSC Analog system |
| Video Signal System: | NTSC/PAL/SECAM |
| Receiving Channel: | Cable :1-135/ Air: 2-69(ATV&DTV) |
| Power consumption: | 35W |
| Input Power Voltage: | DC 12V |
| Audio Output Power(THD ≤ 7%): | 2x3W |
| Rear High-Definition Multimedia Interface(HDMI) Input | x 2 |
| YCb(Pb)Cr(Pr) Input | x 1 |
| Rear Composte Video Input | x 1 |
| Analog RGB(VGA) Input | x 1 |
| Audio Input | x 2 |
| Headphone Output | x 1 |
| Coaxial Output | x 1 |
| Horizontal definition(TV line) | Composite Video Input >=350Video Input >=400YCb(Pb)Cr(Pr) >=400 |
Front panel

1: Remote control sensor.
2: Indicator LED:
BLUE

POWER ON.
RED

STAND BY.
3: Key board.
REAR Connections

All the terminals are(from left to right):POWER SOCKET,AV,AUDIO INPUT,YPbPr INPUT Note: CVBS and YPbPr share one audio channel.
SIDE Connections

All the terminals are(from left to right):
HDMI1,HDMI2,USB,VGA,HEADPHONE,PC AUDIO,COAXIAL,RF
Note: 1. When HDMI1 port get DVI signal, the audio signal receives from the PC Audio channel.
- When HDMI2 port get DVI signal, the audio signal receives from the YPbPr/AV Audio channel.
KEYBOARD
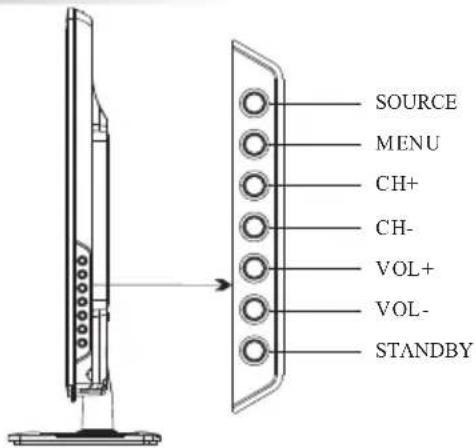
- SOURCE:
Display the input source menu. In MENU mode, press "SOURCE" to confirm the selected item.
- MENU:
Display main MENU.
- CH+/CH-
In TV mode, press “CH+” or “CH-” to change the channel up and down. In MENU mode, press “CH+” or “CH-” to select items.
- VOL+/VOL-
Adjust sound level. In MENU mode, press “VOL+” or “VOL-” to adjust the item that you selected.
- STANDBY
Press this button to turn the unit ON from STANDBY mode. Press it again to turn the set back to STANDBY.
ANTENNA
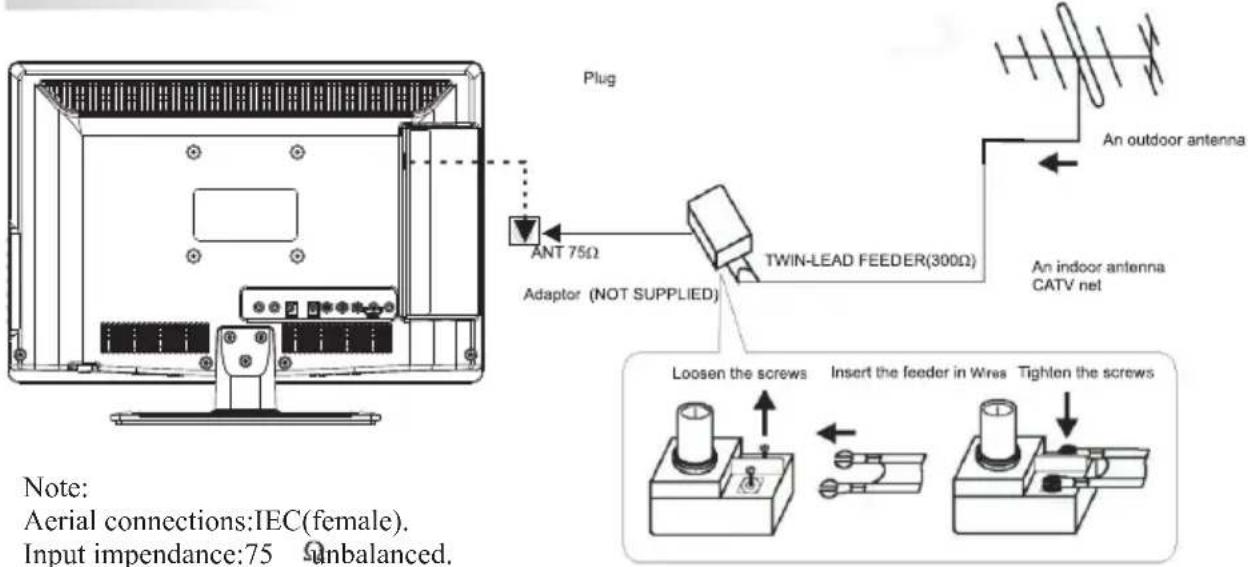
PC
STEPS:
Be sure both the TV and computer are set to
Power off.
- Connect VGA and audio cable.
- Connect the power cord.
- Power on the TV, switch to PC mode.
- Power on the PC.
This sequence is very important.
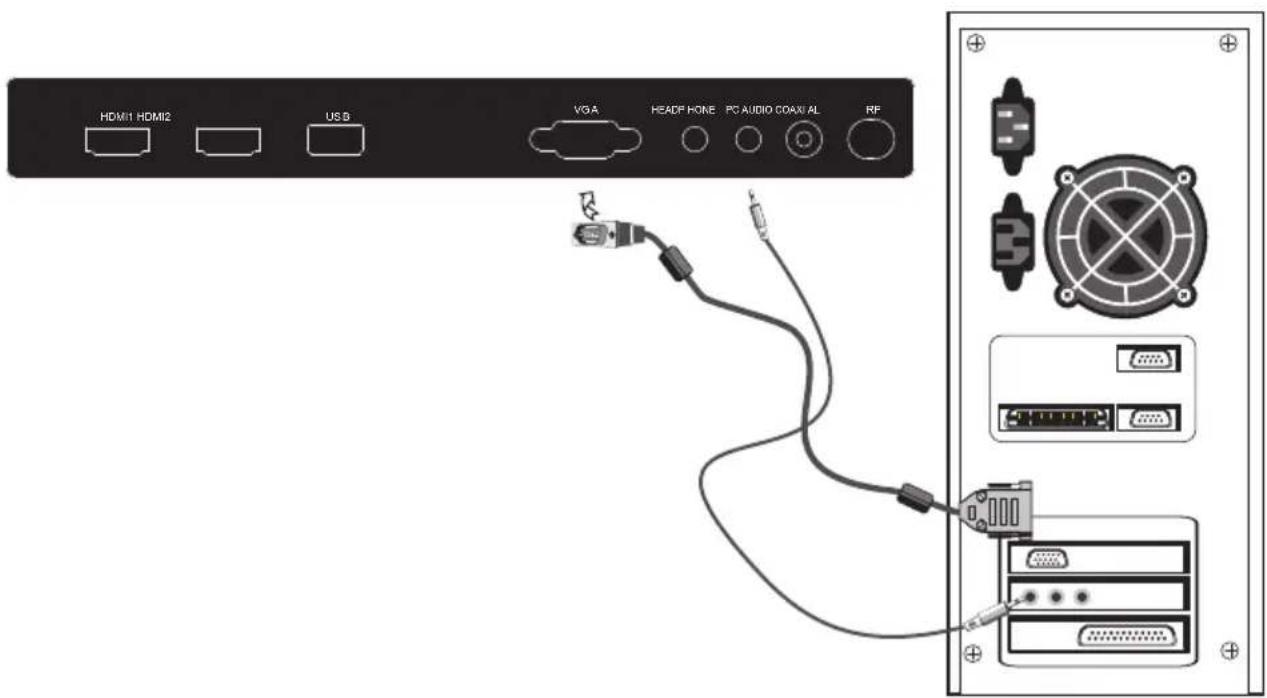

PC
PRESET MODE
| RESOLUTION | V.Freq.(Hz) H.Freq.(KHz) | ||
| 1 | 720*400 | 70 | 31.47 |
| 2 | 640*480 | 60 | 31.47 |
| 3 | 640*480 | 75 | 37.50 |
| 4 | 800*600 | 60 | 37.88 |
| 5 | 800*600 | 75 | 46.88 |
| 6 | 1024*768 | 60 | 48.36 |
| 7 | 1024*768 | 70 | 56.48 |
| 8 | 1024*768 | 75 | 60.02 |
| 9 | 1280*1024 | 60 | 63.98 |
| 10 | 1280*1024 | 75 | 80.00 |
AV EQUIPMENT
You can use the input terminals on TV set rear as follows.
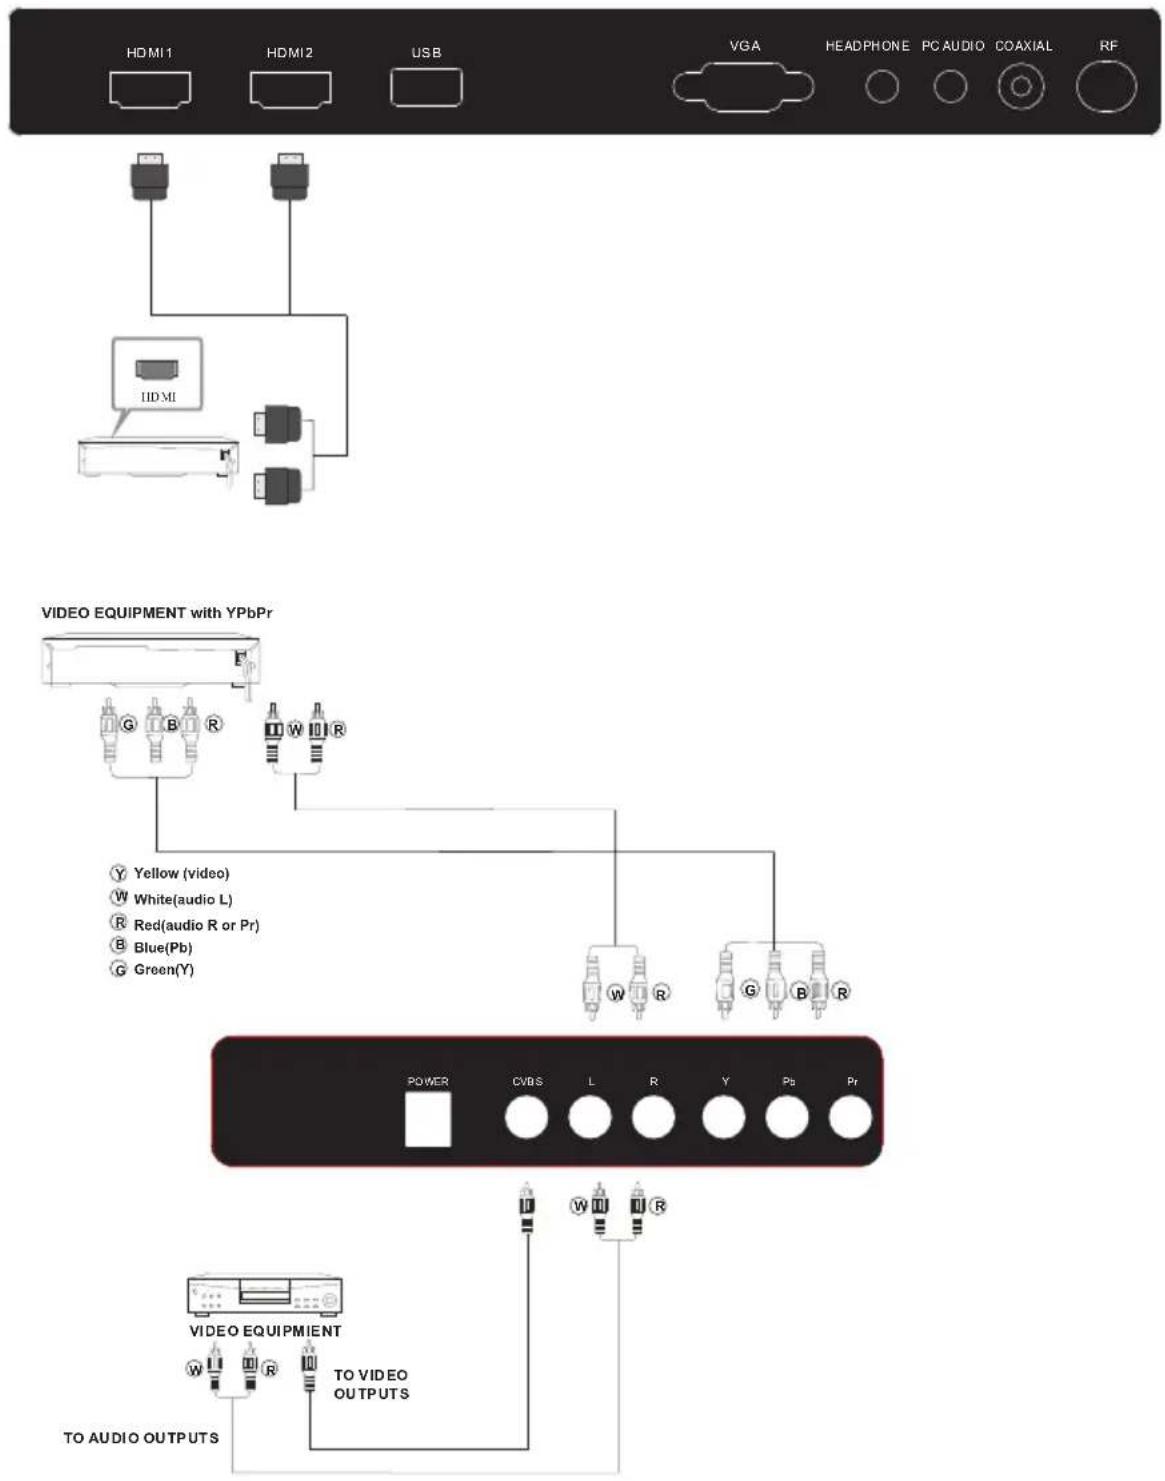
It can be connected to the following appliances: VCR, multi disc player, DVD, camcorder, video game or stereo system, etc.....
YPbPr can support these video formats:480i,576i,480p,576p,720p,1080i.
Instruction for Wall Mount
A wall mount kit (purchased separately) would allow you to mount your VIORE TV on the wall. For detailed information on installing the wall mount, refer to the instructions provided by the wall mount manufacturer. It is strongly recommended to contact a technician for professional assistance for wall mount installation. VIORE is not responsible for any damage to the product or injury to yourself or others resulting from the wall-mounting.
Dimensions for Mounting Hole Pattern

- This VIORE TV is compatible with a 100mm x 100mm mounting hole pattern.
- 4 pcs of type M4 screws are required for installing the wall mount bracket to your VIORE TV. Do not use screws that are longer than 10 mm. Screws that are too long may cause damage to the inside of the TV set.
- Do not fasten the screws too tight for this may damage the TV or cause the TV to fall, resulting in personal injury. VIORE is not liable for these kinds of incidents
- Do not mount your VIORE TV at more than a 15 degree tilt.
- Always use two people to mount the TV to a wall.
- Do not install your Wall Mount Kit while your TV is turned on. It may result in personal injury due to electric shock.

Insert Batteries Into the Remote Control


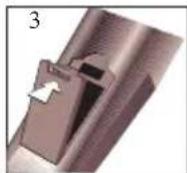
- Remove the battery cover.
- Inserting the 2 AAA 1.5V batteries making sure the polarity (+ or -) of the batteries matches the polarity marks inside the unit.
- Mount the battery cover. Replace with new batteries when the TV set begins to show the following symptoms: Operation is unsteady or erratic. Sometimes the TV set does not function with Remote Control Unit.
Remark:
1) Alkaline Battery Recommended.
2) Remove batteries when they are exhausted or if the remote control is not to be used for long time.
1: POWER
To set the TV standby or on.
2: NUMBER KEY
For direct access to program.
3:
Displays the main on-screen menu.
4: CURSOR
To move within the menu.
5: EXIT
Used to exit menu.
6: VOL+/-
To adjust sound level.
7: P.M
To switch picture mode.
8:
Press to display and select the available video sources.
9: MUTE
To disable or enable the sound.
10: RECALL
To access the previously viewed program.
11: ENTER
Confirms selection.
12: TV DISPLAY
Displays/removes the program Information
13: S.M
To switch sound mode.
14: CH+/CH-
To access the next or previous Program.
15: ASPECT
To change picture aspect.
16: CH LIST
Used to display the channel list.
17: EPG
Display all the information of DTV programs.
18: FAV
Used to access your favourite channels in digital TV mode.
19: HDMI
Hot key directly go to HDMI source.
20: AV
Hot key directly go to AV source.
21: DTV STRENGTH
Used to display the DTV signal strength menu.
22: TV
Hot key directly go to TV source.
23: YPbPr
Hot key directly go to YPbPr source.
24: CC
Enable or disable the CC function.
25: VGA
Hot key directly go to VGA source.
26: MTS
Switch the sound stereo.
27: COLOR KEYS
Reserved keys
1. PICTURE MENU
The first item of the MENU is PICTURE MENU. You can adjust picture effect here, such as contrast, brightness, etc.
Press ▼▲ to select, press ◀▶ to adjust, press MENU to exit.

Note:
If you want to adjust contrast, brightness, color, and sharpness, the picture mode must return to "Custom" status.
Advanced Video:
Press ▼▲button to select Advanced Video ,Press button, the screen will display as follow:

2. AUDIO menu
The second item of the MENU is AUDIO MENU. You can adjust sound here.
Press ▼▲ to select, press ◀▶ to adjust, press MENU to exit.
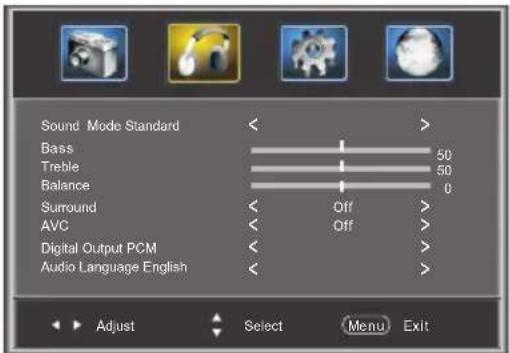
The item of Audio language is available in ATSC program.
3. SETUP MENU
The third item of the MENU is SETUP MENU. You can setup system here.
Press ▼▲ to select, press ◀▶ to adjust, press MENU to exit.
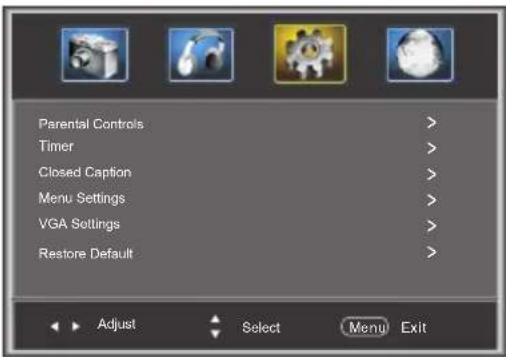
Note:
Restore Default: Reset all the settings to default value.
3.1. Parental Controls:
Press ▼▲button to select ,Parental Controls button, the screen will display as follow:
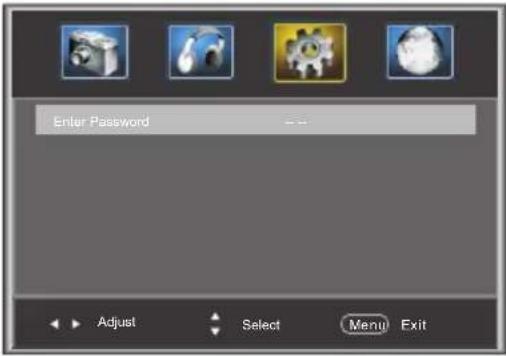
Input the password, it will go into Parental Control menu. Factory default password is 6666.

Change Password:
Press ▶ button, the screen will display as follow:

1).Old password: Input the old password
2). New password: Input the new password
3). Confirm password: Input the new password again
P.G switch:
When the RaretalisCOMrothe below options can be adjusted.
US: Press ▶ button, the screen will display as follow:

1):TV: Press ▶button, the screen will display as follow:

| Rating Content | Content | |||||
| FV(Fantasy violence) | V(Violence) | S(Sexual situation) | L(Adult language) | D(Sexually suggestive dialog) | ||
| Suggested age | TV-Y (All children) | |||||
| TV-Y7(Direct to order children) | X | |||||
| TV-Gi(General audience) | ||||||
| TV-PG(Parental Guidance suggested) | X | X | X | X | ||
| TV-14(Parents strongly cautioned) | X | X | X | X | ||
| TV-MA(Mature audience only) | X | X | X | |||
And use ENTER key to switch lock/ unlock Parental Control feature.
2). MPAA: switch the movie-rating control level; N/A, G, PG, PG-13, R, NC-17, X.
| Rating | Description | |
| Age | G | General audiences, All Ages admitted |
| PG | Parental Guidance suggested. Some material may not be Suitable for children. | |
| PG-13 | Parents strongly cautioned. Some material .may be Inappropriate for children under 13. | |
| R | Restrict. Under 17 requires accompanying parent or adult guardian(age varies in some jurisdictions) | |
| NC-17 | No one 17 and under admitted. | |
| X | X is an order rating that is unified with NC-17 but may be encoded in the data of order movies. | |
Canada: Press ▶button, the screen will be displayed as follow:

1): Canada English: switch the english rating control level: EXEMPT, C, C8+, G, PG, 14+, 18+.
| Rating | Description | |
| Age | E | Exempt: Includes news, sports, documents and other information programming: talk shows, music videos, and varicty programming. |
| C | Children: Intended for younger children under the age of 8 years. Pays careful attention to themes that could threaten their sense of security and well-being. | |
| C8+ | Children over 8 years old: Contains no portrayal of violence as the preferred, acceptable, or only way to resolve conflict; nor encourage children to imitate dangerous acts which they may see on the screen . | |
| G | General: Considered acceptable for all age groups, Appropriate viewing for the entire family, contains very little violence, physical, verbal or emotional. | |
| PG | Parental Guidance: Intended for a general audience, but may not be suitable for younger children (under the age of 8) because it could contain controversial themes or issues. | |
| 14+ | Over 14 Years: Could contain themes where violence is one of the dominant elements of the storyline But it must be integral to the development of plot or character. Language usage could be profane and nudity , present within the context of theme. | |
| 18+ | Adults: Intended for viewers 18 years and older and might contain depictions of violence, which while related to the development of plot, character or themes, are intended for adult viewing. Could contain graphic language and portrayals of secretary and nudity. | |
2). Canada French: switch the French-rating control level: E, G, 8ANS+, 13 ANS+, 16ANS+, 18ANS+.
| Rating | Description | |
| Age | E | Exempt programming |
| G | General :All ages and children, contains minimal direct violence,but may be integrated into the plot in a humorous or unrealisticmanner . | |
| 8ans+ | General but inadvisable for young children :May be viewed by awidc public audience, but could contain scenes disturbing tochildren under 8 who cannot distinguish between imaginary andreal situations. Recommended for viewing with paren. | |
| 13ans+ | Over 13 years: Could contain scenes of frequent violent scenesand in tense violence. | |
| 16ans+ | Over 16 years: Could contain frequent violent scenes and violence. | |
| 18ans+ | Over 18 years: Only for adult viewing. Could contain frequentviolent scenes and extreme violence. | |
RRT setting: in ATSC digital TV mode, it could be adjusted
Reset RRT: Press ▶ button, the screen will be displayed as follow:

3.2 Timer
You can adjust timer here.
Press ▼▲to select, press ◀▶to adjust, press MENU to exit.
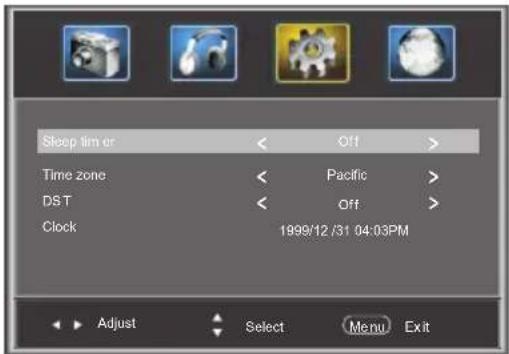
Sleep Timer: adjust this item, you can set the sleep timer.
Note:
The item of Time zone, the item of DST and the item of clock are available in ATSC program, and the Clock item can't be adjust.
3.3 Closed Caption: switch close caption mode.
Press ▼▲ button to select Closed Caption ,Press button, the screen will display as follow:

1): Advanced selection: only ATSC program is available.
2):Option:Used to edit CC font.
Press ▶ button, the screen will display as follow:
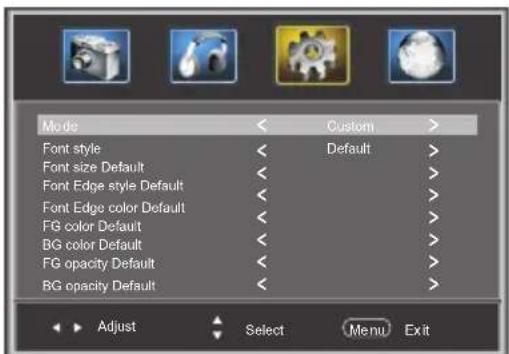
NOTE: Only ATSC program is available.
3.4 Menu Settings
You can adjust Menu Settings here.
Press ▼▲ to select, press ◀▶ to adjust, press MENU to exit.

3.5 VGA Settings: In PC Mode is available.
Press ▼▲button to select VGA Settings ,Press button, the screen will display as follow:

1). H-Pos: Adjust the horizontal position of the screen.
2). V-Pos: Adjust the vertical position of the screen.
3). Clock: Fine tune the screen width.
4). Phase: Fine tune the phase of the screen. Usually don't adjust this item.
5). Auto: Auto adjust to fit the screen.
4. Channel MENU
The fourth item of the MENU is Channel MENU.
You can adjust digital and analogc TV Channel.
Press ▼▲ to select, press ◀▶ to adjust.

1). Air/Cable: select Air TV signal and cable TV signal.
2). Auto Scan: If it's the first time you use the TV, you should scan all the TV channels first, press the ▶ button to confirm, you will see below menu :
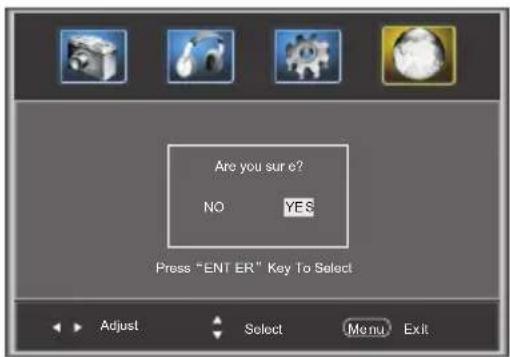
select "yes" item and press the ENTER button to confirm, you will see below menu which indicates auto search is in process.

3). Favorite: Press ◀ button to choose/delete the favorite channel.
4). Show/Hide: Press ◀ button to display or hide currently channel.
5). Channel NO. :Display the currently channel number.
6). Channel lable: Press ▲▼button to edit currently channel name.
7). DTV signal: Display DTV signal intension. It can't be selected and adjusted.
5. Multimedia MENU
If you select storage source. You can use Multimedia Menu to play the JPEG picture and Mp3 music.
1. Select Photo item
If select Photo item, the JPEG menu display on screen below:
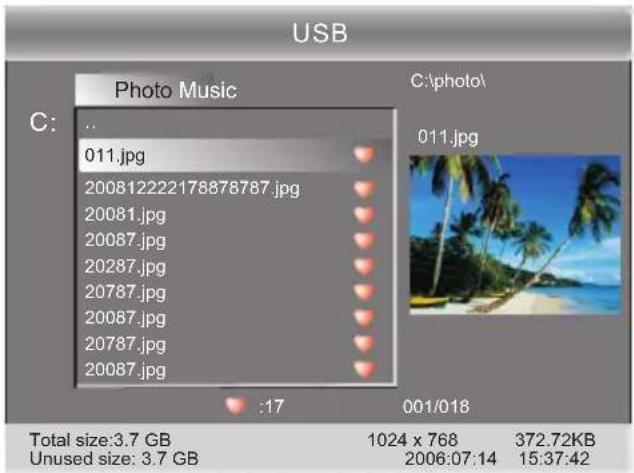
Use ♦ select the .jpg files or folders, use "OK" key to play, use EXIT key to stop playing or go to upper menu.
2. Select Music item
If select Music item, the Music menu display on screen below:

Use ♦ select the .mp3 files or folders, use "OK" key to play, use EXIT key to go to upper menu.
: play
II : pause
: stop
: fast back
: previouse
: next
: fast forward
: repeat all
: random play
| Trouble phenomenon Symptom | Inspection Check | ||
| Picture Audio | |||
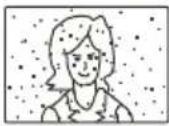 | Snow Noise |  | antenna position, direction or connection |
 | Ghost |  Normal audio Normal audio | antenna position, direction or connection |
 | Interference |  Noise Noise | electronic equipment, car/motorcycle, fluorescent light |
 | Normal Picture |  Mute Mute | Volume(check if mute is activated or if the audio system connections are not correct) |
 | No picture Mute |  | Power cord is not insertedPower switch is not openedContrast and brightness/volume setupPress standby key on the remote control for inspecting |
 | No colour Norm |  r control r control | |
 | Picture breaking up |  Normal audio or weak Normal audio or weak | retune channel |
 | No colour |  Noise Noise | TVsystem |
The LEDTV panel is built with very high precision technology giving you fine picture details in vibrant color. Occasionally, a few non-active pixels may appear on the screen as a fixed point of red, green, blue, black or white. Please note this does not affect the performance of the product.
VIORE™ LIMITED WARRANTY
FLAT PANEL TELEVISION
This VIORE brand Product, as supplied and distributed by VIORE and delivered new in the original carton to the original purchaser is warranted by VIORE against manufacturing defects in materials and workmanship for a limited warranty period of one (1) year on parts and labor. However, there will be only a 90 day parts and labor limited warranty for commercial use.
This Limited Warranty does not apply to store display products and product sold as a "marked down" special, in "as is" condition, "close outs", "liquidation and clearance sales", "open box", products missing accessories, no fault found or damaged at time of delivery to Viore.
Proof of purchase within one year from date of purchase in the form of a Bill of Sale, Receipt or Receipted Invoice is evidence the Product is within the limited warranty period. The Bill of Sale, Receipt or Receipted Invoice must be presented as a pre-condition to obtaining the limited warranty service.
This limited warranty begins on the original date of purchase, and is valid only on Products purchased through VIORE authorized dealers and used in the United States, Canada, and Puerto Rico by the original purchaser. To receive warranty service, the purchaser must contact VIORE for problem determination and service procedures. Warranty service may only be performed by a duly authorized VIORE service center. The original dated bill of sale, receipt or receipted invoice must be presented upon request as proof of purchase to VIORE or VIORE's authorized service center.
VIORE will repair or if repairs cannot be made, VIORE will replace this Product at no charge with the same, like or similar Product if the Product is defective as specified in this limited warranty during the limited warranty period. VIORE may use new or remanufactured parts or products to repair or replace the Product at its sole discretion. All replaced parts and Products become the property of VIORE and must be returned to VIORE. Replacement parts and Products assume the remaining original limited warranty, or ninety (90) days, whichever is longer.
Product freight needs to be prepaid by original purchaser and shipped in either its original packaging or packaging affording an equal degree of protection. VIORE shall not be responsible for or obligated to replace damaged goods. If you reside in California and you cannot transport the television due to the size, weight, and method of attachment, VIORE will provide transportation for the television to the repair facility. If you reside in a state other than California, you are responsible for the costs of transporting the television to a repair facility.
If the product is received damaged by VIORE, it is the responsibility of the consumer to file a claim against the carrier. VIORE will only store the damaged product for 30 days and reserves the right, in its sole discretion, to dispose of the damaged product or ship it back to the consumer at consumer's expense after 30 days.
This limited warranty covers manufacturing defects in materials and workmanship encountered in normal, and except to the extent otherwise expressly provided for in this statement, noncommercial use of this product, and shall not apply to the following, including, but not limited to: Damage which occurs in shipment; delivery and installation; applications and uses for which this product was not intended; altered product or serial numbers; cosmetic damage or exterior finish; accidents, abuse, neglect, fire, water, lightning or other acts of nature; use of products, equipment, systems, utilities, services, parts, supplies, accessories, applications, installations, repairs, external wiring or connectors not supplied or authorized by VIORE which damage this product or result in service problems; incorrect electrical line voltage, fluctuations and surges; customer adjustments and failure to follow operating instructions, cleaning, maintenance and environmental instructions that are covered and prescribed in the instruction book; reception problems and distortion related to noise, echo, interference or other signal transmission and delivery problems; burned-in images. VIORE does not warrant uninterrupted or error-free operation of the product.
THERE ARE NO EXPRESS OR IMPLIED WARRANTIES OTHER THAN THOSE LISTED AND DESCRIBED ABOVE, AND NO WARRANTIES WHETHER EXPRESS OR IMPLIED, INCLUDING, BUT NOT LIMITED TO, ANY IMPLIED WARRANTIES OF MERCHANTABILITY OR FITNESS FOR A PARTICULAR PURPOSE, SHALL APPLY AFTER THE EXPRESS WARRANTY PERIODS STATED ABOVE, AND NO OTHER EXPRESS WARRANTY OR GUARANTY GIVEN BY ANY PERSON, FIRM OR CORPORATION WITH RESPECT TO THIS PRODUCT SHALL BE BINDING ON VIORE. REPAIR OR REPLACEMENT AS PROVIDED UNDER THIS LIMITED WARRANTY IS THE EXCLUSIVE REMEDY OF THE CONSUMER. VIORE SHALL NOT BE LIABLE FOR ANY INCIDENTAL, OR CONSEQUENTIAL DAMAGES FOR BREACH OF ANY EXPRESS OR IMPLIED WARRANTY ON THIS PRODUCT; EXCEPT TO THE EXTENT PROHIBITED BY APPLICABLE LAW, ANY IMPLIED WARRANTY OF MERCHANTABILITY OR FITNESS FOR A PARTICULAR PURPOSE ON THIS PRODUCT IS LIMITED FOR THE DURATION OF THIS LIMITED WARRANTY. THIS LIMITED WARRANTY SHALL NOT EXTEND TO ANYONE OTHER THAN THE ORIGINAL PURCHASER OF THIS PRODUCT, IS NONTRANSFERABLE AND STATES YOUR EXCLUSIVE REMEDY.
Some states do not allow limitations on how long an implied warranty lasts, or the exclusion or limitation of incidental or consequential damages, so the above limitations or exclusions may not apply to you. This warranty gives you specific legal rights, and you may also have other rights which vary from state to state. Any provision contained herein which is found contrary to state or local laws shall be deemed null and void and the remaining provisions shall continue in full force and effect.
To obtain warranty service, please contact VIORE at:
Phone: 1-877-777-1428 (USA / Puerto Rico)
1-877-777-1429 (Canada)
www.viore.com
Viore, Inc.
7801 Hayvenhurst Avenue, Van Nuys, CA 91406
Ver.101005-1
Printed in China

- OPERATING INSTRUCTIONS
- 19" HD LCD Television with LED Backlight
- AIR (TV)/CABLE MODE SELECTION
- Contents
- Important Safety Instructions
- WARNING:
- Main features
- Accessories
- ANTENNA
- PC
- STEPS:
- AV EQUIPMENT
- Instruction for Wall Mount
- PICTURE MENU
- AUDIO menu
- SETUP MENU
- Parental Controls:
- P.G switch:
- Timer
- Closed Caption: switch close caption mode.
- Menu Settings
- VGA Settings: In PC Mode is available.
- Channel MENU
- Multimedia MENU
- Select Photo item
- Select Music item
- VIORE™ LIMITED WARRANTY
- FLAT PANEL TELEVISION
Brand : Viore
Model : LED19VH50
Category : Television