UT-KAFFEEKLASSIK - Coffee maker Ursus Trotter - Free user manual and instructions
Find the device manual for free UT-KAFFEEKLASSIK Ursus Trotter in PDF.


| Brand | Ursus Trotter |
| Model | UT-KAFFEEKLASSIK |
| Product Type | Coffee Maker (Filter Coffee Maker) |
| Capacity | 12 Cups (Approx. 1.5 L) |
| Filtration | Permanent Filter (Reusable) |
| Control Type | Electronic with LCD Display |
| Brew Strength Selection | Yes (Normal/Strong) |
| Programmable Timer | Yes (Delay Brew Function) |
| Automatic Shut-Off | Yes (After 40 Minutes) |
| Warming Plate | Yes (Keep Warm Function) |
| Carafe Material | Glass |
| Housing Material | Plastic |
| Power Source | AC (Check Rating Label) |
| Drip-Stop Feature | Yes (Removing Carafe Stops Dripping) |
| Water Level Indicator | Yes (Gauge on Water Tank) |
| Removable Parts | Funnel, Permanent Filter, Carafe |
| Cleaning Method | Hand Wash with Mild Detergent |
| Descaling Recommendation | Regularly with Descaler or Citric Acid |
| Safety Features | Auto Shut-Off, Overheat Protection |
| Warranty | Guaranteed by Ursus Trotter (see guarantee card) |
Frequently Asked Questions - UT-KAFFEEKLASSIK Ursus Trotter
User questions about UT-KAFFEEKLASSIK Ursus Trotter
0 question about this device. Answer the ones you know or ask your own.
Ask a new question about this device
Download the instructions for your Coffee maker in PDF format for free! Find your manual UT-KAFFEEKLASSIK - Ursus Trotter and take your electronic device back in hand. On this page are published all the documents necessary for the use of your device. UT-KAFFEEKLASSIK by Ursus Trotter.
USER MANUAL UT-KAFFEEKLASSIK Ursus Trotter
German Engineering & Design
KAFFEEFILTER
Cafetera filtro


natural_image
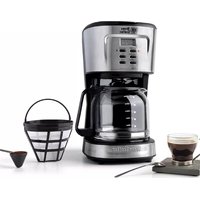
Product photo of a Jewu Trotter with glass coffee receiver, straw basket, and coffee cup (no visible text or symbols)KAFFEEFILTER UT-KAFFEEKLASIK
LEA ESTE MANUAL DETENIDAMENTE ANTES DE USARLO Y GUÁRDELO PARA FUTURAS CONSULTAS
PANEL DE CONTROL
When using electrical appliance. Basic safety precautions should always be followed including the following:
- Read all instructions.
- Make sure that your outlet voltage corresponds to the voltage stated on the rating label of the coffee maker.
- To protect against fire, electric shock and injury to persons do not immerse cord, plug, or in water or other liquid.
-
Close supervision is necessary when any appliance is used by or near children.
-
Unplug from outlet when not in use and before cleaning. Allow to cooling before putting on or taking off parts, and before cleaning the appliance.
-
Do not operate any appliance with a damaged cord or plug or after the appliance malfunctions, or has been damaged in any manner. Return appliance to an authorized service facility for examination, repair or adjustment.
-
The use of accessory not recommended by the appliance manufacturer may result in fire, electric shock or injury to persons.
-
Do not use outdoors.
-
Do not let cord hang over edge of table or counter, or touch hot surface.
-
Do not place on or near a hot gas or electric burner, or in a heated oven.
-
Do not use appliance for other than intended use.
-
Do not clean container with cleansers, steel wool pads, or other abrasive material.
-
To disconnect, turn any control to "Off", remove plug from wall outlet. Always hold the plug. But never pull the cord.
-
Scalding may occur if the cover is removed during the brewing cycles. Be careful not to get burned by the steam.
-
Some parts of appliance are hot when operated, so do not touch with hand. Use handles or knobs only.
-
Never leave the empty carafe on the warming plate otherwise the carafe is liable to crack.
-
Never use the appliance if the carafe shows any signs of cracks or carafe having a loose or weakened
handle. Only use the carafe with this appliance. Use carefully as the carafe is very fragile.
- Do not set a hot container on a hot or cold surface.
-
Do not let the coffee maker operate without water.
-
Do not use a cracked container or a container having a loose or weakened handle.
-
Please do not open the top cover and make sure the glass cup is placed on the warming plate correctly during the brewing.
-
To reduce the risk of fire or electrical shock, do not remove the cover. No user serviceable parts inside. Repair should be done by authorized service personnel only.
-
The container is designed for use with this appliance. It must never be used on a range top.
-
This appliance can be used by children aged from 8 years and above and persons with reduced physical, sensory or mental capabilities or lack of experience and knowledge if they have been given supervision or instruction concerning use of the appliance in a safe way and understand the hazards involved. Children shall not play with the appliance. Cleaning and user maintenance shall not be made by children without supervision.
-
Children should be supervised to ensure that they do not play with the appliance.
-
This appliance is intended to be used in household and similar applications such as:
- staff kitchen areas in shops, offices and other working environments;
- farm houses;
– by clients in hotels, motels and other residential type environments;
- bed and breakfast type environments.
-
Do not use outdoors.
-
Save these instructions.
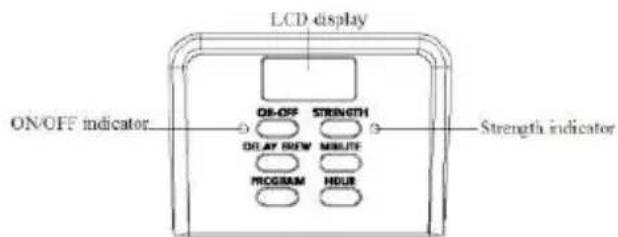
CONTROL PANEL

BEFORE THE FIRST USE
Check that all accessories are complete and the unit is not damaged. Fill water into water tank to the MAX level and brew water for several times without coffee powder, then discard the water. Clean and dry all detachable parts thoroughly according to the section "CLEANING AND MAINTENANCE".
- Open the top cover and fill the water tank with drinking water. The water level should not exceed MAX level as indicated on the water level gauge.
- Place the funnel into the funnel support, make sure it is assembled correctly, otherwise the top cover cannot be closed. Place the permanent filter in the funnel.
- Add coffee powder into permanent filter. Usually a cup of coffee needs a level spoon of coffee powder, but you may adjust according to personal taste. Close the top cover completely.
- Insert the carafe with handle closed onto warming plate horizontally.
- Plug the power cord into the outlet. If you want to adjust the coffee strength, you can press "STRENGTH" button once, and then the STRENGTH
indicator will illuminate in orange and the appliance will brew thick coffee. If you do not want to adjust the coffee strength, just follow the following operation to brew normal coffee.
- Press ON/OFF button, the ON/OFF indicator illuminates in red. The LCD display indicates "AM 12:00", and then the appliance begins to work.
Note: The brewing process can be interrupted by pressing the ON/OFF button at any time, and the ON/OFF indicator will extinguish, indicating your coffee maker is shut off.
Note: During brewing process, the buttons of "PROGRAM", "DELAY BREW", "HOUR" and "MINUTE" are invalid.
- The brewing process can be interrupted by pressing the ON/OFF button at any time, the ON/OFF indicator will extinguish. The appliance will continue brewing once ON/OFF button is pressed again.
Note: You can take out carafe, pour and serve at any time. The appliance will stop dripping automatically. But the time cannot exceed 30 seconds.
- Remove out carafe to serve when finish brewing (about one minute later after the coffee stops dripping out.)
Note: the coffee you get will less than the water you have added, as some water is absorbed by coffee ground and adhere to the plastic.
-
When the process is finished, if you do not want to serve immediately, keep the coffee maker is energized, the coffee can be kept warm on the warming plate. And the appliance will shut off automatically after 40 minutes from the ON/OFF button being activated if it has not been manually disconnected at the completion of brewing. For an optimum coffee taste, serve it just after brewing.
-
Always turn the coffee maker off and disconnect the power supply when not use.
Note: pay attention to pour the coffee out, otherwise you may be hurt as the temperature of coffee just finished is high.
DELAY FUNCTION
If you do not want the coffee maker to start operation immediately, for example now it is AM 8:10, you hope that the coffee maker will automatically start working at PM 1:00, first follow steps 1 to 5 of "USING YOUR COFFEE MAKER", and then you can set the automatic start function as follows:
- Set the current time that is AM 8:10 by pressing the buttons of "HOUR" and "MINUTE".
Note: The time cycle is 12 hours.
- Press PROGRAM button once, ON/OFF indicator flashes in green, the LCD display indicates "AM
12:00" flickeringly. Set the automatic start time that is PM 1:00 by pressing the buttons of "HOUR" and "MINUTE".
- Press the DELAY BREW button, the ON/OFF indicator illuminates in green solidly. After a while, the LCD display indicates the current time.
Note: You may cancel the automatic start function by pressing DELAY BREW button. If you want to change the automatic start time, only following the above steps 2-3 again.
- When the time is due, the ON/OFF indicator will illuminate in red and the appliance starts brewing. When the process is finished, if you do not want to serve immediately, keep the coffee maker is energized, the coffee can be kept warm on the warming plate. And the appliance will shut off automatically after 40 minutes from the ON/OFF indicator illuminates in red if it has not been manually disconnected at the completion of brewing. For an optimum coffee taste, serve it just after brewing.
Note: During brewing process, the buttons of "PROGRAM", "DELAY BREW", "HOUR" and "MINUTE" are invalid.
CLEANING AND MAINTENANCE
CAUTION: Be sure to unplug this appliance before cleaning. To protect against electrical shock, do not immerse cord, plug or unit in water or liquid. After each use, always make sure plug is first removed from wall outlet.
- Clean all detachable parts after each use in hot sudsy water.
- Wipe the exterior surface of unit with a soft, damp cloth to remove stains.
- Water droplets may buildup in the above area of the funnel and drip onto the product base during brewing. To control the dripping, wipe off the area with a clean, dry cloth after each use.
- Use a damp cloth to gently wipe the warming plate. Never use abrasive cleaner to clean it.
- Replace all parts and keep for next use.
REMOVING MINERAL DEPOSITS
To keep your coffee maker operating efficiently, periodically you should clean away the mineral deposits left by the water according to the water quality in your area and the use frequency, we recommend removing mineral deposits as follows:
-
Fill the tank with water and descaler to the max level as indicated on the water level gauge (the scale of water and descaler is 4:1, the detail refers to the instruction of descaler. Please use "household descaler", you may also use the citric acid instead of the descaler (the one hundred parts of water and three parts of citric acid).
-
Insert glass carafe onto the warming plate.
- Make ensure filter (without coffee powder) and funnel are assembled in place.
- Switch on the appliance and allow it to "brew" descaling solution by follow the operation above.
- After "brew" one-cup solution, switch off the appliance.
- Leave the solution stay for 15 minutes and repeat step 3-5.
- Switch on the appliance and run off the solution until the water tank is completely empty.
- Rinse by operating the appliance with water at least 3 times.
HINTS FOR GREAT-TASTING COFFEE
- A clean coffee maker is essential for making great-tasting coffee. Regularly clean the coffee maker as specified in the "CLEANING AND MAINTENANCE" section. Always use fresh, cold water in the coffee maker.
- Store unused coffee powder in a cool, dry place. After opening a package of coffee powder, reseal it tightly and store it in a refrigerator to maintain its freshness.
- For an optimum coffee taste, buy whole coffee beans and finely grind them just before brewing.
- Do not reuse coffee powder since this will greatly reduce the coffee' flavor. Reheating coffee is not recommended as coffee is at its peak flavor immediately after brewing.
- Clean the coffee maker when over-extraction causes oiliness. Small oil droplets on the surface of brewed, black coffee are due to the extraction of oil from the coffee powder.
- Oiliness may occur more frequently if heavily roasted coffees are used.
ENVIRONMENT FRIENDLY DISPOSAL
You can help protect the environment!
Please remember to respect the local regulations: hand in the non-working electrical equipments to an appropriate waste disposal center.

natural_image
Simple line drawing of a trash bin with crossed lines indicating no waste or discharge (no text or symbols)POLIZA DE GARANTIA

natural_image
Stylized emblem featuring a central eagle with a shield and wings, enclosed in a laurel wreath (no text or symbols)Ursus Trotter

- KAFFEEFILTER
- Cafetera filtro
- KAFFEEFILTER UT-KAFFEEKLASIK
- LEA ESTE MANUAL DETENIDAMENTE ANTES DE USARLO Y GUÁRDELO PARA FUTURAS CONSULTAS
- PANEL DE CONTROL
- BEFORE THE FIRST USE
- DELAY FUNCTION
- CLEANING AND MAINTENANCE
- REMOVING MINERAL DEPOSITS
- HINTS FOR GREAT-TASTING COFFEE
- ENVIRONMENT FRIENDLY DISPOSAL
- POLIZA DE GARANTIA
- Ursus Trotter
Brand : Ursus Trotter
Model : UT-KAFFEEKLASSIK
Category : Coffee maker