
OH4311 - Heating VOX - Free user manual and instructions
Find the device manual for free OH4311 VOX in PDF.


| Product Type | Fan Heater |
| Brand | VOX |
| Model | OH4311 |
| Power Output | 2000 W |
| Heat Settings | 2 (Low / High) |
| Thermostat | Adjustable |
| Oscillation | Yes |
| Safety Features | Overheat Protection, Tip-Over Switch |
| Dimensions (H x W x D) | 250 x 200 x 300 mm |
| Weight | 2.0 kg |
| Power Supply | 220-240 V, 50/60 Hz |
| Cord Length | 1.5 m |
| Noise Level | ~45 dB |
| Heating Element | Ceramic |
| Control Type | Manual Knob |
| Portability | Built-in Handle |
| Cleaning | Wipe with dry cloth; do not use water |
| Filter | Washable mesh filter (rear) |
| Storage | Store in cool, dry place |
| Certification | CE |
Frequently Asked Questions - OH4311 VOX
User questions about OH4311 VOX
0 question about this device. Answer the ones you know or ask your own.
Ask a new question about this device
Download the instructions for your Heating in PDF format for free! Find your manual OH4311 - VOX and take your electronic device back in hand. On this page are published all the documents necessary for the use of your device. OH4311 by VOX.
USER MANUAL OH4311 VOX
UPUTSTVO ZA UPOTREBU ULJANI RADIJATOR

VOX
ELECTRONICS
OH-4309/4311
OPERATING INSTRUCTIONS OIL RADIATOR
Usage:
- There are two power switches, you can adjust them on your requirement.
- Please make sure that the rated voltage is suitable and the rated electric current is not lower than 10A.
- When using, turn the temperature switch deasil to the max position and the room temperature will rise higher and higher.
- If the room temperature is too high during use and you want to lower it, adjust the switch to "middle" or "low" position.
- During use the radiator will keep the required temperature, when the room temperature gets to the require temperature the radiator will stop automatically. When the room temperature is lower than required, the radiator will start working automatically.
- Turn off the thermostat knob, the indicator light will be off.
Technical parameters:
| Model | Rated voltage | Rated frequency | Rated power | Specification | Protection against electricity category |
| CR403-7 | 230V | 50Hz | 1500W | 7pieces | I |
| CR403-9 | 230V | 50Hz | 2000W | 9pieces | I |
| CR403-11 | 230V | 50Hz | 2500W | 11pieces | I |
Electric Drawing
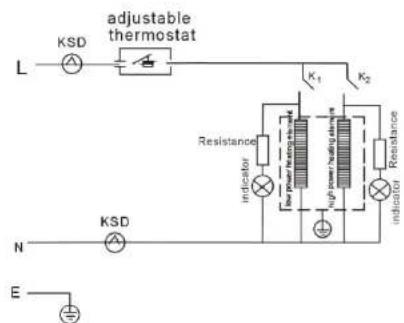
Oil Radiator Instruction Manual
- Please read this manual carefully before using your oil radiator, so that you can use it correctly.
- Please keep this manual handy for future reference.
Brief Introduction of the Product
The Oil Radiators adopt the electron thermal-tube as heating element to heat the oil sealed in. This series of product has the features as high quality and long using life. It is suitable for family and office.
Feature:
- High quality and long using life.
- High efficiency heating oil sealed in, quickly heating, without peculiar smell, without noise.
- There is one knob switches and change into three different power.
- There is temperature fuse to prevent overheating.
- Convenient to use and easy to collect.
- Truckled design, easy to move.
Notes:
- The radiator should be placed on flat ground. You must not place it precipitately or tipsily.
- Please do not use the radiator in a place full of combustible or explosive gas, bathroom or a shower or a swimming pool.
- For your safety, do not put your hand or stick into the hole or slot of the radiator. (Especially for children).
- When in use, the distance between the radiator and the wall and any other objects should be above 20cm. Within 1m above its top there should not be any other thing for the gas convection.
Warning: The radiator must not be located immediately below a socket-outlet.
- Please do not use the same electrical outlet with any other appliance.
- In order to avoid overheating, do not cover the heater. If you want to clean the radiator, please unplug it first.
- This radiator is filled with a precise quantity of special oil. Repairs requiring opening of the oil container are only to be made by the manufacturer or a service agent who should be contacted if there is an oil leakage.
- Regulations concerning the disposal of oil when scrapping the appliance have to be followed.
- If the supply cord is damaged, it must be replaced by the manufacturer or its service agent or a similarly qualified person in order to avoid hazard.
- If nobody is in, please unplug the appliance.
- While the radiator is in use, please do not open the door or window continually otherwise it will influence the heating effect.
- The appliance can be used by children aged from 8 years and above and persons with reduced physical, sensory or mental capabilities or lack of experience and knowledge if they have previously been given supervision or instruction concerning use of the appliance in a safe way and understand the hazards involved. Children must not play with the appliance. Cleaning and user maintenance shall not be done by children without supervision.
13 Children younger than 3 years should be kept away unless continuously supervised. - Children aged from 3 years and less than 8 years shall only switch on/off the appliance provided it has been placed or installed in its intended normal operating position and they have been given supervision or instruction concerning use of the appliance in a safe way and understand the hazards involved. Children aged from 3 years and less than 8 years shall not plug in, regulate and clean the appliance or perform user maintenance.
CAUTION — Some parts of this product can become very hot and cause burns. Particular attention has to be paid when children and vulnerable people are present. -2-
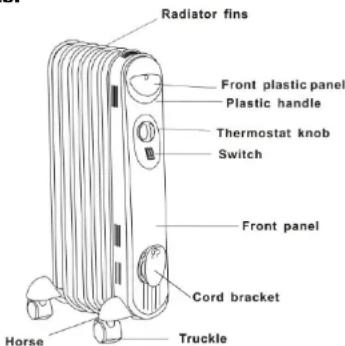
Components:
ASSEMBLY INSTRUCTIONS
The heater is packaged with the feet unattached. You must attach them before operating the heater.
WARNING: Do not operate without feet attached. Do operate the heater only in upright position (feet on the bottom, controls on the top); any other position could create a hazardous situation.
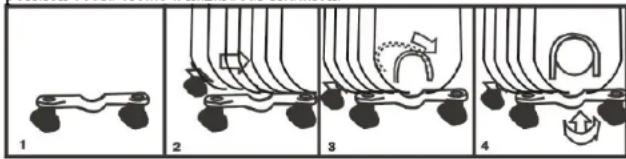
- Place the radiator body upside-down on a scratch-free location, make sure it is stable and cannot fall.
- Do not store the appliance while it is still hot.
- To attach the castor mounting plate to the radiator body, you should insert the threaded ends of the U bolt in the holes on castor 1 mounting plate.
- Screw the wing nuts back to the U bolt and fasten the wing nut properly.

OH-4309/4311
UPUTSTVO ZA UPOTREBU ULJANI RADIJATOR
Upotreba:
Brand : VOX
Model : OH4311
Category : Heating