BD-Z - Synthesizer Patching Panda - Free user manual and instructions
Find the device manual for free BD-Z Patching Panda in PDF.

User questions about BD-Z Patching Panda
0 question about this device. Answer the ones you know or ask your own.
Ask a new question about this device
Download the instructions for your Synthesizer in PDF format for free! Find your manual BD-Z - Patching Panda and take your electronic device back in hand. On this page are published all the documents necessary for the use of your device. BD-Z by Patching Panda.
USER MANUAL BD-Z Patching Panda

natural_image
Stylized black-and-white illustration of a stylized face with floral patterns and decorative elements (no text or symbols)INTRODUCTION:
BD-Z is a versatile kick drum module for Eurorack system focus to design a wide range of bass drum percussive sounds.
The implementation of thru-zero FM/PM BD-Z can deliver an immense variety of textures and harmonics, it has an amount of control over the modulation input to preserve the primary kick drum sound or not.
Additionally the implementation of amplitude modulation to the sound core can add harmonics from the modulation source to be able to shape the sound, transform it, morph it into many other drums sounds like bongos, congas, etc.
Attention carefully was considered to maintain the signal gain always punchy so when the amplitude decay or the distortion is fully open it won't get out of control.
The distortion can deliver more abrasive tones, it has a dedicated accent like the vintage style drum machines to add dynamics to the rhythms.
Features two amplitude envelopes out to control other utilities with the shape of the signal.
BD-Z is a powerful Kick drum module with many modulation possibilities.
INSTALLATION:
* Disconnect your synth from the power source.
* Double check polarity from the ribbon cable, unfortunately if you damage the module by powering in the wrong direction it will not be covered by the warranty.
* After connecting the module check again you have connected the right way, the red line must be on the -12V

natural_image
Illustration of cartoon pandas on a dark background (no text or symbols)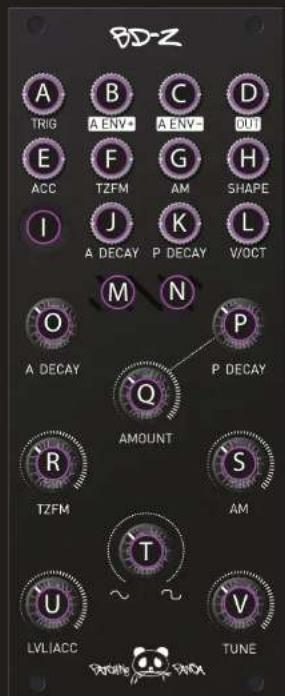
natural_image
Abstract wave pattern with blue and yellow oscillating lines on black background (no text or symbols)INSTRUCTIONS
A Trigger input
B Amplitude envelope + out
© Amplitude envelope - out
D Signal output
E Trigger accent input
F Thru-Zero modulation input
G Amplitude modulation input
H Clipping distortion CV input
① Manual trigger push button
J Amplitude envelope decay CV
K Pitch envelope decay CV input
L V/OCT input
M Amplitude envelope LED
N Pitch envelope LED
Amplitude envelope decay pot
P Pitch envelope decay pot
Q Pitch envelope decay amount
R Thru-Zero modulation amount
S Amplitude modulation amount
T Distortion modulation amount
U Level / Accent amount
V Fine Tune pot

natural_image
Illustration of cartoon pandas on a dark background (no text or symbols)CALIBRATION:
Set all pots to minimum except Decay pot to maximum.
Connect the CV out from your sequencer to V/OCT input, send triggers to Trig input, send the Output to your DAW.
In your DAW open tuner VST to monitore notes.
Send C1 from your sequencer, in your DAW monitor the output while turning the multiturn trimmer to read C1.
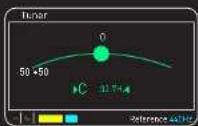
DAW
Send C9 from your sequencer, monitor your DAW to read C9 while turning the multiturn trimmer to read C9.
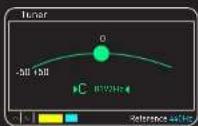
DAW
Send C1 again from your sequencer, monitor your DAW to read C1 while truning the multiturn trimmer marked C1.
Repeat the process as much as needed until you finish adjusting. Unplug the cable from the V/OCT input, turn the C1 trimmer to adjust the desired lowest oscillator frequency.

natural_image
Abstract wavy line patterns in purple, cyan, and blue against a black background (no text or symbols)