PLAM1600 - Receiver Pyle - Free user manual and instructions
Find the device manual for free PLAM1600 Pyle in PDF.

User questions about PLAM1600 Pyle
0 question about this device. Answer the ones you know or ask your own.
Ask a new question about this device
Download the instructions for your Receiver in PDF format for free! Find your manual PLAM1600 - Pyle and take your electronic device back in hand. On this page are published all the documents necessary for the use of your device. PLAM1600 by Pyle.
USER MANUAL PLAM1600 Pyle
OUR TECHNICAL DEPARTMENT WILL GLADLY ANSWER ANY QUESTIONS YOU MAY HAVE ABOUT OUR PRODUCTS. THEY CANNOT, HOWEVER TELL YOU THE STATUS OF A REPAIR, OR HANDLE OTHER CUSTOMER SERVICE SITUATIONS
natural_image
Exterior view of a black and silver electronic device with a logo (no visible text or symbols)IMPORTANT: PACK CAREFULLY IN ORIGINAL CARTON IF POSSIBLE. WE ARE NOT RESPONSIBLE FOR DAMAGE INCURRED IN RETURNING ITEMS FOR REPAIR. A LETTER STATING YOUR EXACT STREET ADDRES, DAYTIME PHONE NUMBER, AND THE PROBLEM YOU ARE EXPERIENCING SHOULD BE INCLUDED. YOU MUST ALSO ENCLOSE A COPY OF THE ORIGINAL RECEIPT A SPROOF OF DATE OF PURCHASE
PYLE®
WWW.PYLEAUDIO.COM
PYLE SERVICE CENTER
1600 63RD STREET
BROOKLYN, NY 11204
1-800-934-2277
MONDAY THROUGH THURSDAY. 9AM TO 5PM
FRIDAY 9AM TO 2PM EASTERN.

text_image
PYLE ACADEMYPOWER AMPLIFIERS:
PLAM1000
PLAM1200
PLAM2300
PLAM1600
PLAM3000
natural_image
Exterior view of a black and silver electronic device (no visible text or symbols)HIGH SPEED
CAR AMPLIFIER
USER'S MANUAL
Congratulations on purchasing the High Speed Power Amplifier. The amplifier has been designed using the latest electronic technology available, allowing you to produce high quality stereo reproduction in mobile applications. This system provides you with low harmonic distortion, a huge considerable amount of reserve voltage and high temperature stability.
Just enjoy the perfect sound this amplifier takes to you!
INSTALLATION
* Since the amplifier is sensitive to electrical and motor noise and interference from the amplifier may affect your radio reception, try to mount it at least 3 feet away from the receiver. Good locations include under a seat, in the trunk or hatch area.
* Please remember this is a high power unit which generates high electrical energy and heat. Therefore be sure to install the unit in a place with sufficient airflow, a minimum of dust and no moisture. Allow enough space around the cooling fins to permit reasonable airflow and cooling. It is important to ensure that the cooling fins of the heat sink are not against a panel or a surface preventing air circulation.
* Never mount the amplifier in a location that is subject to direct sunlight or exposed to moisture. Be sure to mount the amplifier to a strong, solid surface which will not give way under the stress of a sudden stop or accident.
* When mounting the amplifier on a side wall, try to position it so that the slots in the cooling fins are vertical. Amplifier should not be mounted on the bottom of a rear deck with the fins facing down because the heat will radiate back up into the amplifier. Leave yourself enough room on either side of the amplifier to make all the wire connections and adjust the controls. If you have a subwoofer box in your vehicle, you can mount the amplifier on the outside of the box.
Caution: If you are mounting the amplifier to the vehicle's floor, check beneath the car to be sure your screws won't puncture a brake or gas line.
WARNING!
Continuous exposure to sound pressure levels over 100dB may cause permanent hearing loss. High power autosound system may produce sound pressure levels well over 130dB, use common sense and practice safe sound please!
Technische Daten
| PLAM1000 | PLAM1200 | PLAM2300 | PLAM1600 | PLAM3000 | |
| Output Power Rating @ 4 Ohms | 35W×2 | 50W×2 | 75W×2 | 35W×4 | 75W×4 |
| @ 2 Ohms | 55W×2 | 100W×2 | 150W×2 | 55W×4 | 150W×4 |
| @ 1 Ohms | — | — | — | — | — |
| Bridged @ 4 Ohms | 110W×1 | 150W×1 | 200W×1 | 110W×2 | 200W×2 |
| Frequency Response | 10Hz~50KHz | 10Hz~50KHz | 10Hz~50KHz | 10Hz~50KHz | 10Hz~50KHz |
| Input Sensitivity | 0.1~1.0V | 0.1~1.0V | 0.1~1.0V | 0.2~5.0V | 0.2~5.0V |
| Signal To Noise Ratio | >90dB | >90dB | >90dB | >90dB | >90dB |
| THD&Noise | <0.01% | <0.01% | <0.01% | <0.01% | <0.01% |
| High Pass Cross Frequency | 120Hz~3KHz | 120Hz~3KHz | 120Hz~3KHz | 120Hz~3KHz | 120Hz~3KHz |
| Low Pass Cross Frequency | 50Hz~250Hz | 50Hz~250Hz | 50Hz~250Hz | 50Hz~250Hz | 50Hz~250Hz |
| Subsonic Filter | — | — | — | — | — |
| Bass EQ | 6dB/12dB@45Hz | 6dB/12dB@45Hz | 6dB/12dB@45Hz | 6dB/12dB@45Hz | 6dB/12dB@45Hz |
| Speaker Impedance | 2~16 Ω | 2~16 Ω | 2~16 Ω | 2~16 Ω | 2~16 Ω |
| Fuse Size | 1×20A | 1×30A | 1×40A | 2×15A | 2×30A |
| Dimensions (L×H×W) mm | 185×55×254 | 200×55×254 | 250×55×254 | 280×55×254 | 360×55×254 |
*All specifications subject to change without notice
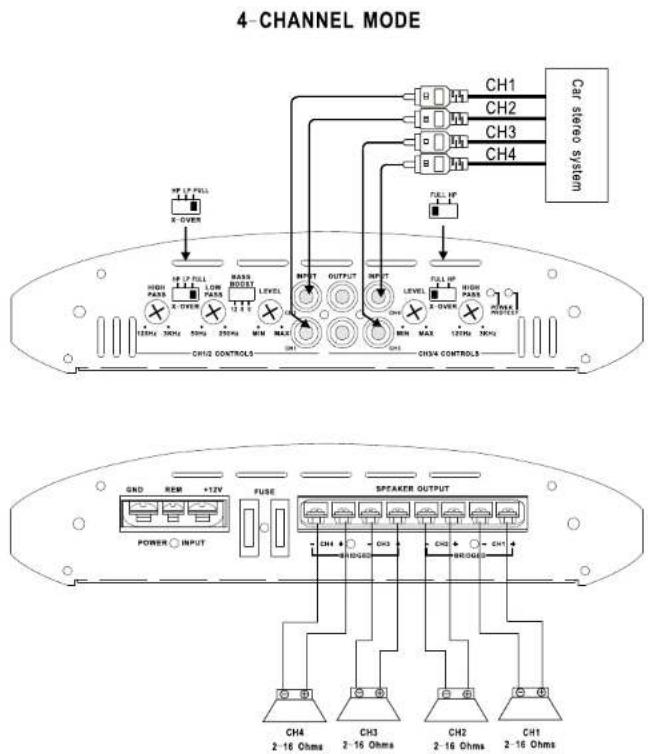
4 CHANNEL AMPLIFIER - APPLICATIONS
PLAM1600/PLAM3000
3-CHANNEL MODE
flowchart
graph TD
    A["CH1"] --> B["CH2"]
    A --> C["CH3"]
    A --> D["CH4"]
    B --> E["CH1"]
    C --> F["CH2"]
    D --> G["CH3"]
    H["HP UP FILL"] --> I["A-OVER"]
    J["HP UP FILL"] --> K["BASS RESET"]
    L["HIGH FADD"] --> M["LOW FADD"]
    N["HIGH FADD"] --> O["LEVEL"]
    P["LEVEL"] --> Q["INPUT"]
    R["OUTPUT"] --> S["INPUT"]
    T["LEVEL"] --> U["INPUT"]
    V["FILL UP"] --> W["K-OVER"]
    X["CH13 CONTROLS"] --> Y["CX"]
    Z["CH14 CONTROLS"] --> AA["CX"]
text_image
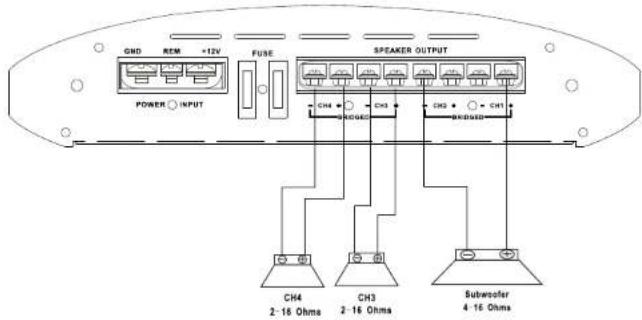
GND REM +12V FUSE SPEAKER OUTPUT POWER INPUT CH4 CH3 CH2 CH1 CH4 CH3 CH2 CH1 2-16 Ohms 2-16 Ohms Subwoofer 4-16 OhmsPOWER CONNECTION
text_image
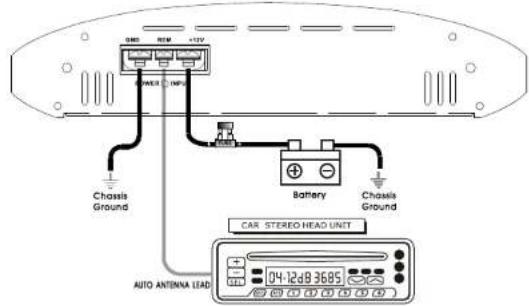
GSM +12V Chassis Ground Auto Antenna Lead Battery Chassis Ground CAR STEREO HEAD UNIT 04:12d9 3685IMPORTANT! Before making any connections, disconnect the car's battery until the installation is completed to avoid possible damage to the electrical system
* The +12V DC power cable should be heavy gauge stranded copper cable with heavy insulation, since it draws power directly from the positive battery terminal. Select the cable gauge at least 10mm^2 . And the ground cable gauge should be the same as the +12V DC.
* Connect the +12V Power terminal to the battery (+) position terminal. An in-line fuse must be installed in the +12V power cable near the battery less than 50mm. Without one, an accidental short circuit could pose a fire hazard and damage your amplifier. Connect the fuse holder to battery, however, do not install fuse at this time.
* Connect the GROUND Power terminal directly to the battery (−) position terminal or the car chassis. Ensure that all paint or other insulation is remove from around the hole area, and using self tapping screw, securely affix the bare wire ends to the vehicle chassis. Use as short as possible.
* Many radio's and other music sources have an output terminal for connection of the remote turn on of the power amplifier. CONNECT the output terminal to the amplifier REM control jack. If a radio doesn't have a remote turn on feature, you can connect the REM pole to external switch for positive +12V ON/OFF.
* To help minimize interference, it is best to run the power cables along the opposite side from the audio cables.
Caution: The power cables must be connected tightly. A loose connection may cause malfunctions or interference noise or distortion.
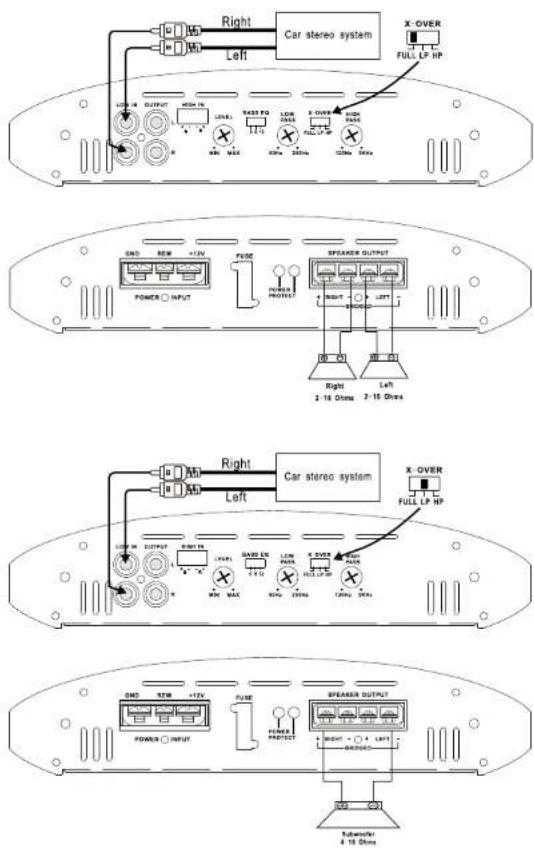
2 CHANNEL AMPLIFIER - FEATURES
PLAM1000/PLAM1200/PLAM2300

text_image
HIGH IN Accepts speaker level inputs from radios that do not line level (RCA) outputs LINE OUTPUT Allows you to connect additional amplifier BASS EQ Allows you to select the bass boost 6dB/12dB High Pass variable High Pass Filter from 120Hz to 3KHz LOW IN OUTPUT HIGH IN LEVEL BASS EQ LOW PASS X-OVER HIGH PASS MIN MAX 50Hz 120Hz 3KHz GAIN Adjusts the line level input from min to max LOW PASS Variable Low Pass Filter from 50Hz to 250Hz LINE INPUT Accepts line level (RCA) inputs from 0.1 to 1 volts CROSSOVER SWITCH Routes output of the low pass (LP), or the output of the high pass (HP) filter, or FULL to the internal power amplifier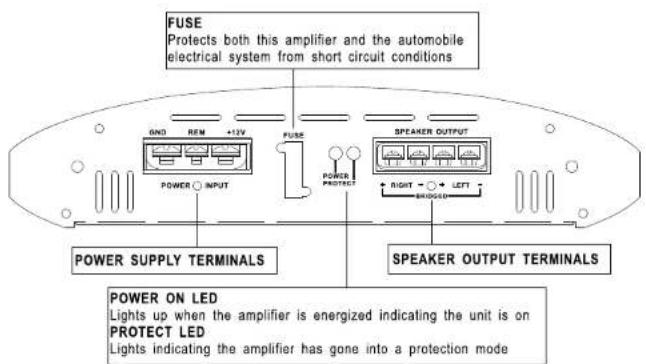
text_image
FUSE Protects both this amplifier and the automobile electrical system from short circuit conditions GND REM +12V FUSE POWER ○ INPUT POWER PROTECT SPEAKER OUTPUT RIGHT ○ LEFT POWER SUPPLY TERMINALS SPEAKER OUTPUT TERMINALS POWER ON LED Lights up when the amplifier is energized indicating the unit is on PROTECT LED Lights indicating the amplifier has gone into a protection mode4 CHANNEL AMPLIFIER - APPLICATIONS
PLAM1600/PLAM3000
flowchart
graph TD
    subgraph 4_CHANNEL_MODE
        CH1["CH1"] --> CH2["CH2"]
        CH2 --> CH3["CH3"]
        CH3 --> CH4["CH4"]
        CH4 --> CAR["Car stereo system"]
    end

    subgraph 4_CHANNEL_MODE
        CH1 -->|FULL HP| CH2
        CH2 -->|FULL HP| CH3
        CH3 -->|FULL HP| CH4
        CH4 -->|FULL HP| CH1
        CH1 -->|MAX INPUT| CH2
        CH2 -->|MAX INPUT| CH3
        CH3 -->|MAX INPUT| CH4
        CH4 -->|MAX INPUT| CH1
    end

    subgraph 4_CHANNEL_MODE
        CH1 -->|INPUT| CH2
        CH2 -->|INPUT| CH3
        CH3 -->|INPUT| CH4
        CH4 -->|INPUT| CH1
        CH1 -->|SPEAKER OUTPUT| CH2
        CH2 -->|SPEAKER OUTPUT| CH3
        CH3 -->|SPEAKER OUTPUT| CH4
    end

    style 4_CHANNEL_MODE fill:#f9f,stroke:#333,stroke-width:2px
    style 4_CHANNEL_MODE fill:#ccf,stroke:#333,stroke-width:2px
4 CHANNEL AMPLIFIER - APPLICATIONS
INPUT CONNECTIONS
* This amplifier has RCA connections for low level inputs. Low level signal is carried through RCA cables. it is preferred to use low level inputs to the amplifier if the head unit is equipped with the low level outputs.
SPEAKER OUTPUT CONNECTIONS
You do not need to make any adjustment for the input connection of amplifier before you connect the speaker output.
* Connect right and left speaker wire to corresponding speaker output terminals of the amplifier.
* Be sure to have the positive wire from the speaker to the positive speaker terminal of the amplifier and the negative wire from the speaker must connect with the speaker terminal of the amplifier. Reversing any of these connections will result in the speaker cones moving out of phase which causes bass cancellation.
LEVEL CONTROLS
Turn the VOLUME control on the amplifier to Min initially.
Once the initial power sequence has been performed, set the CD/RADIO volume control to roughly 80% of full. Insert a CD or tune to a radio station and slowly turn up the amplifier VOLUME control until you hear some distortion, and then back it off for clean sound.
4 CHANNEL AMPLIFIER - FEATURES
PLAM1600/PLAM3000

text_image
Low Pass variable Low Pass Filter from 50Hz to 250Hz High Pass variable High Pass Filter from 120Hz to 3KHz LINE INPUT Accepts line level (RCA) inputs from 0.2 to 5.0 Volts INPUT LEVEL Adjusts line level (RCA) Inputs from 0.2 to 5.0 Volts BASSEQ Allows you to select the Bass Boost 6dB/12dB CROSSOVER SWITCH Routes output of the low pass (LOW), or the output of the high pass (HIGH) filter, or FULL to the internal power amplifier POWER ON LED Lights up when the amplifier is energized indicating the unit is on PROTECT LED Lights indicating the amplifier has gone into a protection mode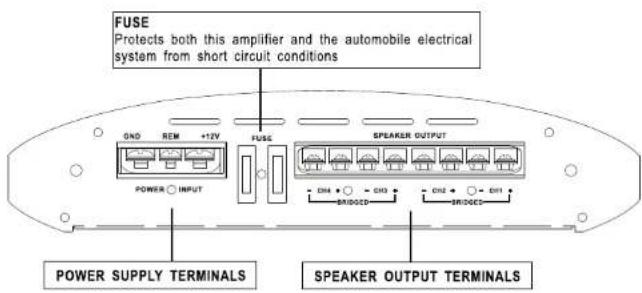
text_image
FUSE Protects both this amplifier and the automobile electrical system from short circuit conditions GND REM +12V FUSE SPEAKER OUTPUT POWER ○ INPUT DND ○ = DND BRIDDED DND ○ = DND BRIDDED POWER SUPPLY TERMINALS SPEAKER OUTPUT TERMINALS2 CHANNEL AMPLIFIER - APPLICATIONS
INPUT CONNECTIONS
* This amplifier has RCA connections for low level inputs. Low level signal is carried through RCA cables. it is preferred to use low level inputs to the amplifier if the head unit is equipped with the low level outputs.
* This amplifier has high input connection. High level input is used from radios that do not have line-level outputs.
* Be sure not to use both low and high level inputs simultaneously!
SPEAKER OUTPUT CONNECTIONS
You do not need to make any adjustment for the input connection of amplifier before you connect the speaker output.
* Connect right and left speaker wire to corresponding speaker output terminals of the amplifier.
* Be sure to have the positive wire from the speaker to the positive speaker terminal of the amplifier and the negative wire from the speaker must connect with the speaker terminal of the amplifier. Reversing any of these connections will result in the speaker cones moving out of phase which causes bass cancellation.
LEVEL CONTROLS
Turn the VOLUME control on the amplifier to Min initially.
Once the initial power sequence has been performed, set the CD/RADIO volume control to roughly 80% of full. Insert a CD or tune to a radio station and slowly turn up the amplifier VOLUME control until you hear some distortion, and then back it off for clean sound.
2 CHANNEL AMPLIFIER - APPLICATIONS
PLAM1000/PLAM1200/PLAM2300