PLMRMP1A - Receiver Pyle - Free user manual and instructions
Find the device manual for free PLMRMP1A Pyle in PDF.

User questions about PLMRMP1A Pyle
0 question about this device. Answer the ones you know or ask your own.
Ask a new question about this device
Download the instructions for your Receiver in PDF format for free! Find your manual PLMRMP1A - Pyle and take your electronic device back in hand. On this page are published all the documents necessary for the use of your device. PLMRMP1A by Pyle.
USER MANUAL PLMRMP1A Pyle
text_image
PYLE® HYDRAPLMRMP1A - PLMRMP1B - PLMRMB2CW PLMRMB2CB - PLMRKT2A - PLMRKT2B
2-Channel Amplifier
USER GUIDE
About PyleUSA
Pyle, founded in the 1960s, has evolved into a renowned manufacturer of high-quality advanced woofers. Our journey started with the iconic Pyle Driver, becoming a household name in original speakers. In the late 20th century, we expanded into replacement speakers, car audio, home audio, marine audio, and professional audio & musical instruments with our Pyle Pro line.
Pyle Car:
Transform your car into a perfect listening environment with our competitively priced speakers, amplifiers, and head units. Upgrade from factory speakers to enhance your music experience. Explore accessories like navigation systems, DVD players, iPod interfaces, and safety-focused cameras.
Pyle Home:
Discover a range of home entertainment products, including projectors, TVs, mounts, stands, and HD technology. Pyle Home offers bass-expanding mini speakers, headphones, vintage turntables, power amplifiers, horn speakers, and more for an enriched media experience at home and on the go.
Pyle Pro:
As the leading source of audio equipment worldwide, Pyle Pro caters to musicians, studio engineers, and amateurs. Our PA Systems, featuring wireless microphones, rechargeable batteries, and iPod/iPhone docks, are ideal for various events. Explore our emerging guitar line, effects pedals, and USB-to-analog converters without compromising on quality.
CONTENTS
IC WARNING 4
INSTALLATION PRECAUTIONS 4
CONTROLS, INPUT AND OUTPUT CABLES 5
ADJUSTMENT CONTROLS AND SETTINGS 6
POWER AND SPEAKER WIRING 7
REGISTER PRODUCT 7
READ ALL INSTRUCTIONS CAREFULLY BEFORE USING THIS PRODUCT. RETAIN THIS OWNER'S MANUAL FOR FUTURE REFERENCE.
California Prop 65 Warning
WARNING:
This product may expose you to chemicals, which is known to the state of California to cause cancer, birth defects and other reproductive harm. Do not ingest.
For more info go to: www.P65warnings.ca.gov
IC WARNING
- English:
This device complies with Industry Canada licence-exempt RSS standard(s). Operation is subject to the following two conditions:
(1) This device may not cause interference, and (2) This device must accept any interference, including interference that may cause undesired operation of the device.
- French:
This equipment complies with IC RSS-102 radiation exposure limits set forth for an uncontrolled environment. This equipment should be installed and operated with minimum distance 20cm between the radiator & your body.
Installation Precautions
-
Vessel Layout Investigation: Before drilling or cutting any holes, carefully investigate your vessel's layout.
-
Caution Near Critical Components: Take special care when working near the gas tank, fuel lines, hydraulic lines, and electrical wiring.
-
Operating Amplifier: Never operate the amplifier when it is unmounted. Attach all audio system components securely within the amplifier to prevent damage, especially in an accident.
-
Mounting Considerations: Do not mount this amplifier in a way that wire connections are unprotected, in a pinched condition, in contact with any metal surfaces in your marine vessel, or likely to be damaged by nearby objects.
-
Power Connection Safety: Before making or breaking power connections in your system, disconnect the marine vessel battery. Confirm that your head unit or other equipment is turned off while connecting the input jacks and speaker terminals.
Replacing Power Fuse:
If you need to replace the power fuse, use only an identical fuse to the one supplied with the amplifier. Using a fuse of a different type or rating may result in damage to your audio system or amplifier, which is not covered by the manufacturer's warranty.
Caution about Level Control:
Do not misuse the level control! Avoid mistaking the input level control for a volume control. It is designed ONLY to match the output level of your audio source to the input level of your amplifier. Do not adjust this input level to maximum unless your input level requires it.
Ignoring these instructions may result in an input overload to the amplifier, leading to excessive audio distortion and potentially causing the protection circuit to engage.
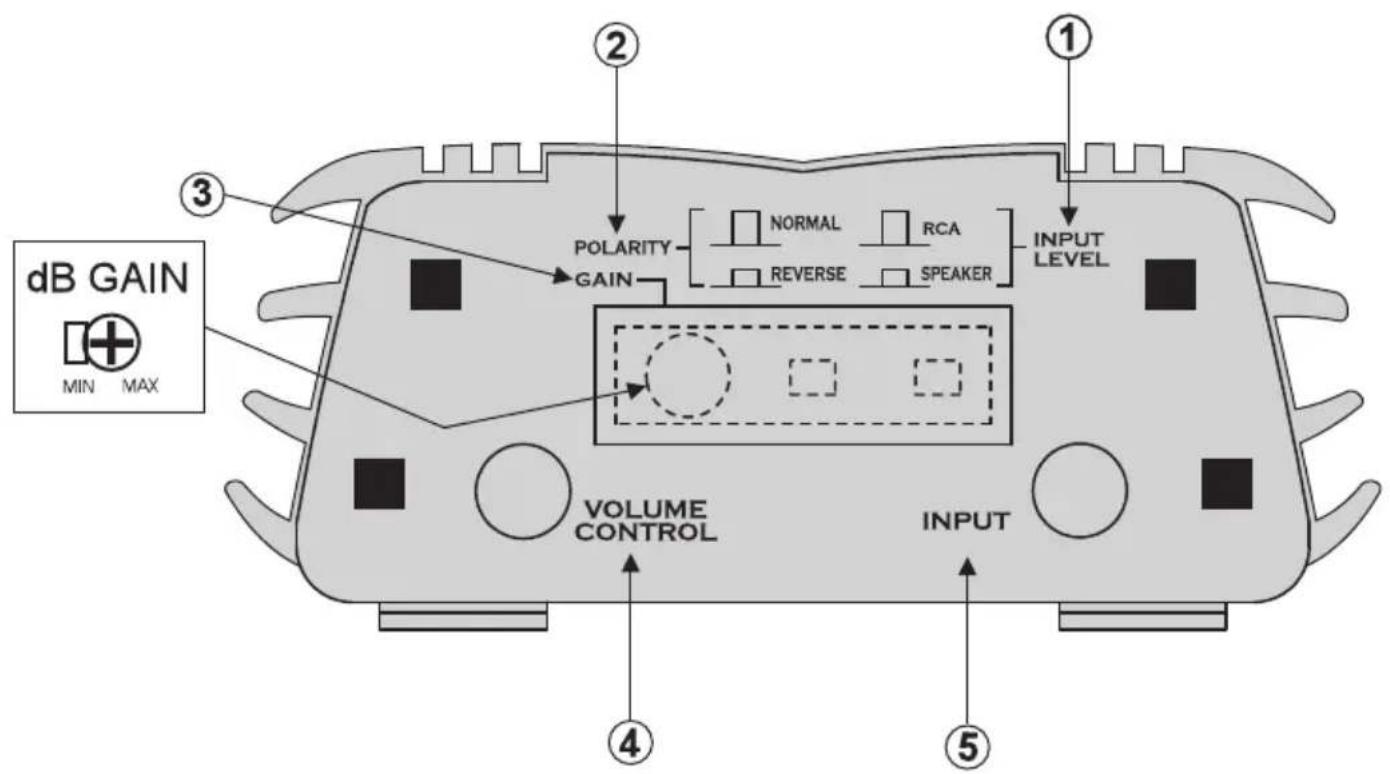
Controls, Input and Output Cables
text_image
dB GAIN MIN MAX ① ② POLARITY GAIN NORMAL RCA REVERSE SPEAKER INPUT LEVEL VOLUME CONTROL INPUT ③ ④ ⑤Adjustment Controls and Settings
1. INPUT LEVEL Switch:
The INPUT LEVEL switch determines the input sensitivity of the amplifier.
- For LINE-level sources (typically RCA connections), set it to LINE (out).
- When connecting to loudspeaker outputs, headphones, or high-level sources, set it to SPEAKER (in). Ensure to replace the watertight plug after adjustments.
2. POLARITY Switch:
The POLARITY switch optimizes bass performance when multiple sets of loudspeakers produce bass.
- Play bass-heavy music and switch between NORMAL and REVERSE positions to find the setting resulting in more pleasing bass response.
- If unsure or minimal interaction with other speakers, leave the switch in the NORMAL position.
3. GAIN Control:
The GAIN control adjusts the overall amplifier level.
- When used without volume control, set the gain to balance with other loudspeakers, keeping it as low as possible while ensuring full output power.
- With an external volume control, set it to FULL (clockwise) and adjust the amplifier gain until reaching full output power.
Adjusting Output Power Level
-
To determine full output power, turn the GAIN control clockwise until the apparent loudness reaches a point where it doesn't increase further. Leave the control at this setting.
-
VOLUME CONTROL Plug: This waterproof remote volume control, when installed, can turn off the Marine Amplifier Kits by turning it all the way down.
-
INPUT: Stereo RCA audio input for connecting other audio devices.
4. Connecting Bluetooth:
- Turn on the amplifier; the red Bluetooth indicator LED blinks.
- In your phone settings, find and open the "Bluetooth" function.
- Search for the Bluetooth device named "pyle amplifier."
After a successful connection, the red Bluetooth indicator LED will stay on. - Bluetooth Version: 3.0
- Note: Only models PLMRMB2CW and PLMRMB2CB feature built-in Bluetooth.
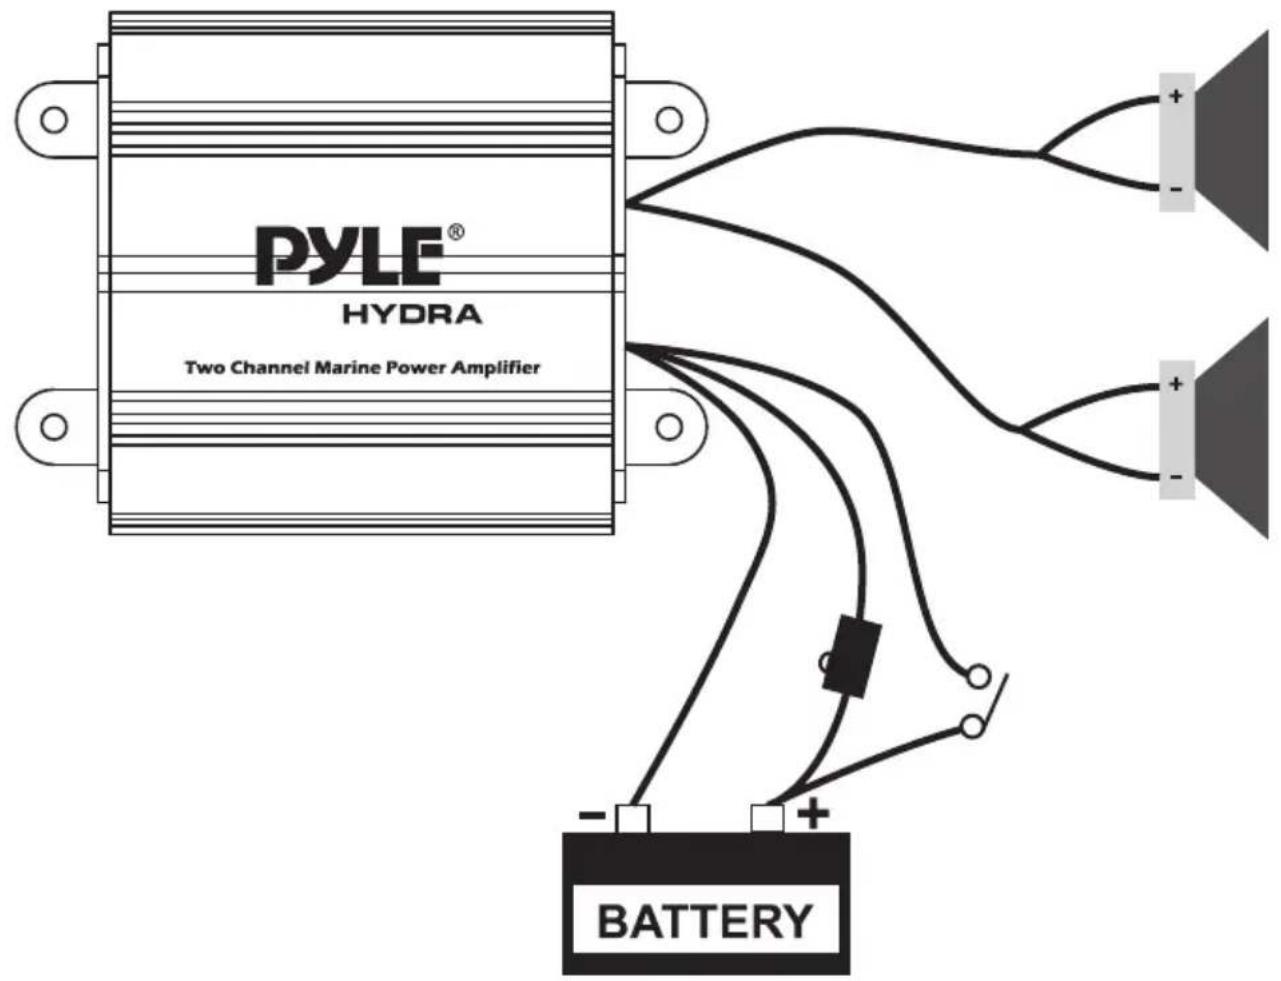
Power and Speaker Wiring
text_image
PYLE® HYDRA Two Channel Marine Power Amplifier BATTERYWire Color
Red
Black Blue
White Walte/Bladt Gray
Gray/Black
Description
Battery (•, 12dc
Barrery (-), Ground
Remote Turn On, 12vdC = ON
CHI (+)
CHI (-) CH2 (+I CH2 (-)
Register Product
Thank you for choosing PyleUSA. By registering your product, you ensure that you receive the full benefits of our exclusive warranty and personalized customer support.
Complete the form to access expert support and to keep your PyleUSA purchase in perfect condition.

text_image
QR code image containing encoded data, no visible human-readable textPyleUSA.com/register
PYLE®
PyleUSA.com

text_image
QR code image containing encoded data, no visible human-readable textQuestions or Comments?
We are here to help!
Phone: 1.718.535.1800
PyleUSA.com/ContactUs