K58USW - Television EKO - Free user manual and instructions
Find the device manual for free K58USW EKO in PDF.

| Product Type | LED Television |
| Screen Size | 58 inches (diagonal) |
| Resolution | 3840 x 2160 (4K UHD) |
| Display Technology | LED |
| Refresh Rate | 60 Hz |
| Smart TV | Yes, with built-in apps |
| Operating System | Linux-based proprietary |
| Wi-Fi | 802.11 b/g/n |
| Bluetooth | Yes, version 4.2 |
| HDMI Ports | 3 x HDMI 2.0 |
| USB Ports | 2 x USB 2.0 |
| Audio Output | 2 x 10W speakers |
| Power Consumption (typical) | 120 W |
| Stand Dimensions (W x D x H) | 1290 x 260 x 770 mm |
| Weight (with stand) | 14.5 kg |
| VESA Mount Pattern | 300 x 300 mm |
| TV Tuner | DVB-T2/C/S2 |
| Remote Control | IR remote included |
| Energy Class | A+ |
Frequently Asked Questions - K58USW EKO
User questions about K58USW EKO
0 question about this device. Answer the ones you know or ask your own.
Ask a new question about this device
Download the instructions for your Television in PDF format for free! Find your manual K58USW - EKO and take your electronic device back in hand. On this page are published all the documents necessary for the use of your device. K58USW by EKO.
USER MANUAL K58USW EKO
natural_image
Abstract blue and white swirling pattern with no text or symbolsINSTRUCTION
MANUAL
Please read this manual carefully before using, and keep it for future reference.
CONTENTS
| General | Safety | |
| TV | Stand | Installation |
| Wall | Mounting | |
| Controls | and | Connections |
| Magic | Remote | Control |
webOS GUIDE
| webOS | TV | - | Home |
| Managing | webOS | ||
| Tune | Live | TV | |
| Connecting to the Network | |||
| Wired | |||
| Wireless | |||
| Network | Setting | Warnings | |
HOW TO OPERATE TV
| Connecting to SIMPLINK (HDMI-CEC) | 25 | |||
| Shortcut | to | Accessibility | Menu | |
ENJOY LIVE TV
| Live | TV | Menu | |
| Checking | Program | Information | |
| Live | Playback | ||
| Recording | 3 | ||
| TV | Scheduler | ||
| Program | Scheduling | ||
| Manual | Scheduling | ||
| Managing | Recordings | ||
| Playing | Recordings | ||
| Teletext | 3 | ||
Set Teletext Language
7
1∠
2
CONTENTS (Cont.)
ENJOY CONTENT STORE
| Home | Tutorial | |
| Installing | Apps | |
| Content | Recommendation | |
| Content | Search | |
CONNECT EXTERNAL DEVICES
| Using | Home | Dashboard | |||
| Connecting | Home | IOT | Devices | ||
| Connecting | Smart | Devices | |||
| Controlling TV with ThinQ app | 43 | ||||
| Cast mobile screen to TV | 44 | ||||
| Playing sound from Smart device through TV Speakers | 45 | ||||
| Connecting | USB | ||||
| Viewing | Photos | and | Videos | ||
| Using | Photo | Player | |||
| Using | Video | Player | |||
| Setting | Additional | Options | |||
| Playing | Music | ||||
| Using | Music | Player | |||
| Watch Content saved in your PC on the TV | 54 | ||||
| PC | Screen | to | the | TV | |
| Web | Browser | 5 | |||
CONTENTS
SETTINGS
| Quick Settings | ||||
| Picture | ||||
| Selecting | Picture | Mode | ||
| Picture | Mode | Settings | ||
| Fine | Tuning | Picture | Mode | |
| Resetting | Picture | Mode | ||
| Setting the Advanced Control Options | 63 | |||
| Setting | the | Picture | Options | |
| Setting | the | Screen | Size | |
| Energy | Saving | Feature | ||
| Eye | Comfort | Mode | ||
| HDMI ULTRA HD Deep Colour | 65 | |||
| Instant | Game | Response | ||
| Sound | ||||
| Sound | Mode | |||
| Setting | Sound | Out (output) | ||
| Internal | TV | Speakers | ||
| Bluetooth | 6 | |||
| WiSA | Speakers | |||
| Optical | 6 | |||
| HDMI | ARC | |||
| Audio Line out / Wired Headphones | 69 | |||
| Playing sound through TV and External audio device together | 70 | |||
| TV | Installation | Type | ||
| Setting | Volume | Mode | ||
| DTV | Audio | Setting | ||
CONTENTS (Cont.)
Sound (continued)
| Adjusting | AV | Synchronization | |
| HDMI | Input | Audio | Format |
| LG | Sound | Sync | |
| Setting | Digital | Sound | Out |
Programmes
| Automatically Setting Up Programmes 73 | ||
| Manual | Programme | Tuning |
| Using | the Signal | Test |
| Edit | Programmes | |
| Edit | Programmes List | |
Connection
| Setting the TV Name | ||
| Network Conneciton Settings | ||
| Setting a | Wired Network | |
| Setting a | Wireless Network | |
| Device Connection Settings | ||
| SIMPLINK (HDMI-CEC) | ||
| Mobile Connection Settings | ||
General
| Language Settings | |
| Time | 8 |
| TV Rating and Programme Locks (Parental Guidance) | 81 |
| Application locks | 8 |
| Reset Password | 8 |
CONTENTS (Cont.)
General (continued)
| Managing | your | Account |
| Home | Settings | |
| Screen | Saver | |
| ECO | Mode | |
| TV | Power | Setting |
| Advertisement | ||
| Visually | Impaired | Menu |
| High | Contrast | Screen |
| Hard | of | Hearing |
| Subtitles | ||
Support
| Allow | automatic | updates | |
| Check | for | updated | |
| TV | Information | ||
| Notifications | |||
| Additional | Settings | ||
| Restore | Default | Settings | |
| Troubleshooting | 89 | ||
| Specifications | 99 | ||
| Customer | Support | ||
GENERAL SAFETY
Read this manual thoroughly before you start using the TV.
Store this manual, the completed warranty card, your receipt and the product packaging. The safety precautions instructions reduce the risk of fire, electric shock and injury when correctly complied to.
Please follow all instructions and take notice of all warnings.

The cover (or back) of the unit should not be removed to prevent risk of electric shock.
This unit must be serviced by a qualified service personnel only.

natural_image
Warning symbol of a lightning bolt inside a triangle (no text or numbers)
The lightning flash with symbol within the triangle is intended to warn you of a non-insulated dangerous voltage in the product's enclosure that could be of sufficient magnitude to generate a risk of electric shock to persons.
The exclamation point within the triangle is intended to warn you to the presence of important operating and maintenance instructions in the documents included with the product.
IMPORTANT INFORMATION
The lightning flash symbol within the triangle is intended to warn you of non-insulated dangerous voltage the product's enclosure that could be of sufficient magnitude to generate a risk of electric shock to persons.
- Using Cabinets or stands recommended by the manufacturer of the television.
- Only using furniture that can safely support the Products.
- Ensure the Product is not overhanging the edge of the supporting furniture.
- Do not place the product on a high furniture without securing both the furniture and the product to a stable support.
- Do not place the product on cloth or other conductive materials.
- Warn children of the dangers of climbing on furniture to reach the television or its controls and to call for an adult to assist.
GENERAL SAFETY INSTRUCTIONS (Cont.)
IMPORTANT INFORMATION
- Do not expose this appliance to rain or moisture as it may result in fire or an electric shock hazard
- Do not temper or change or modify the product in any way.
- Only use Accessories outlined and recommended by the manufacturer.
- Please do not expose the product to splashing or water contact
- Please do not place any object on top of the product including objects filled with liquids such as vases.
- Danger of explosion if battery is incorrectly placed. Replace with same or equivalent type.
Installation
Please follow instruction when installing this product in accordance with the instruction manual. This product must be positioned in a sufficiently stable location, it can be potentially hazardous due to falling and can cause injury, particularly to children if it positioned incorrectly.
- Before installing this TV set, make sure your outlet voltage corresponds to the voltage stated on the product rating label
- Do not use a damaged power cord, plug or loose outlet. Doing so may cause an electric shock.
- Do not plug several devices into the same outlet. Doing so may cause the outlet to overheat and start a fire. Make sure the outlet is readily accessible during operation of the equipment.
- Do not bend, twist or kink the power cord excessively.
- Do not allow anything to rest on or roll over the power cord and antenna cable. Doing so may cause a fire or an electric shock.
- Do not run the power cord near heat-producing appliances such as radiators, stoves or irons. The excessive heat could melt the insulation and expose live wires, resulting in fire or electric shock.
- Unplug this TV during lightning storms or when unused for long periods of time. Not doing so may result in fire or electric shock.
- Do not cover the ventilation openings of the product with items such as newspapers, tablecloths, curtains etc or insert objects into the slots available on the products. As this could result in the product temperature rising and could cause a fire.
- If you notice any unusual odors or smoke around the unit, immediately disconnect the unit from the outlet and contact the service center. Failure to do so may result in fire or electric shock.
- When not using the unit for long periods of time or when you are moving the unit please ensure to disconnect the power cord from the wall socket.
GENERAL SAFETY INSTRUCTIONS (Cont.)
- Please beware that Dust could accumulate over time on the unit and cause it to generate heat and or deteriorate insulation, which in turn may result in an electrical fire.
- The product is not intended for use by persons (including children) with reduced physical, sensory or mental capabilities, or young children of any age, They must be supervised product by a person responsible for their safety.
- Batteries from the remote control must be only removed by an adult, the adult must ensure to keep them out of reach of infants and children. Seek medical attention immediately if a child has swallowed a battery.
- Batteries (battery pack or batteries installed) shall not be exposed to excessive heat such as sunshine, fire or the like.
- To maintain the product do not use any chemical or cleaning agent or wet cloth, please only ensure to utilize a dry cloth to wipe it down from marks or dust and only after unplugging the product from the power socket.
- Please ensure to contact our call center for any repair or service required for the products.
WARNING!
It is STRONGLY RECOMMENDED that you ANCHOR this product.
Toppling furniture and TV's can cause serious injury or death.
TO HELP AVOID ANY SERIOUS OR FATAL INJURY, WE STRONGLY RECOMMEND THAT THIS PRODUCT BE PERMANENTLY FIXED TO THE WALL OR OTHER SUITABLE SURFACE. FIXING DEVICES ARE NOT INCLUDED SINCE DIFFERENT SURFACE MATERIALS REQUIRE DIFFERENT ATTACHMENTS. PLEASE SEEK PROFESSIONAL ADVICE IF YOU ARE IN DOUBT WHAT FIXING DEVICE TO USE.
If a television is not positioned in a sufficiently stable location, it can be potentially hazardous due to falling. Many injuries, particularly to children, can be avoided by taking simple precautions such as:
- Using cabinets or stands recommended by the manufacturer of the television.
- Only using furniture that can safely support the television.
- Ensuring the television is not overhanging the edge of the supporting furniture.
- Not placing the television on tall furniture (for example, cupboards or bookcases) without anchoring both the burniture and the television to a suitable support.
- Not standing the television on cloth or other materials placed between the television and supporting furniture.
- Educating children about the dangers of climbing on furniture to reach the television or its controls.
GENERAL SAFETY INSTRUCTIONS (Cont.)
Please make sure upon positioning this product, the place is:
- Not wet or damp and Well ventilated
- Away from direct sunlight or heaters.
- Away from splashes or food.
- Protected from excessive dust or grease.
- Do not install this equipment in a confined space such as a bookcase or similar unit.
- Do not install the TV set near heat sources such as radiators, stoves or other audio visual equipment that produce heat.
- Do not place containers with liquids, if liquid falls inside the products it may result in short-circuit, fire or electric shock.
- Do not place small metallic objects on top of the unit. Metal object falls inside the product it may result in short-circuit, fire or electric shock.
- Do not use or store flammable or combustible materials near the unit. Doing so may result in fire or explosion. Do not place any naked flame sources, such as lit candles, cigarettes or incense sticks on top of the TV set.
- The antenna must be installed away from high-voltage power line,
- Please contact an antenna professional installer to install the antenna to avoid incorrect installation which could result in fire, electric shock or serious injury.
• Install the unit at a reasonable distance from the wall to ensure sufficient ventilation. - If mains plug or an appliance coupler is used as the disconnect device, the disconnect device shall remain readily operable.

This symbol indicates that the appliance has double insulation between the dangerous mains voltage and the parts accessible to the user. In the event of repairs use only identical spare parts.
HDMI®
HIGH-DEFINITION MULTIMEDIA INTERFACE
"HDMI, the HDMI logo and High-Definition Multimedia Interface are trademarks or registered trademarks of HDMI Licensing LLC."
TV STAND INSTALLATION
CAUTION! LIFT TV FROM THE BOTTOM SIDE
TEAM LIFT REQUIRED, 2 OR MORE PERSONS
ALWAYS
Lift the TV by the BOTTOM side when removing from the box.
DO NOT
DO NOT Lift from the TOP/MIDDLE/SIDES.
Lifting from the TOP/MIDDLE/SIDES will damage the TV or its screen

natural_image
Three warning symbols: a hand pressing a button on a screen, a hand holding a switch, and a red triangular warning symbol with an exclamation mark (no text or labels)natural_image
Simple diagram of a black rectangular object with two upward arrows, no text or symbols present.When lifting the TV, DO NOT grip, grab or press on the TV Screen. Doing so will damage the screen.
PLEASE FOLLOW NEXT FEW PAGES ON INSTRUCTIONS TO INSTALL TV STANDS
TV STAND INSTALLATION (Cont.)
1
flowchart
graph TD
    A["Component 1"] --> B["Component 2"]
    B --> C["Component 3"]
    C --> D["Component 4"]
    D --> E["Component 5"]
    style A fill:#f9f,stroke:#333
    style B fill:#ccf,stroke:#333
    style C fill:#cfc,stroke:#333
    style D fill:#fcc,stroke:#333
    style E fill:#cff,stroke:#333
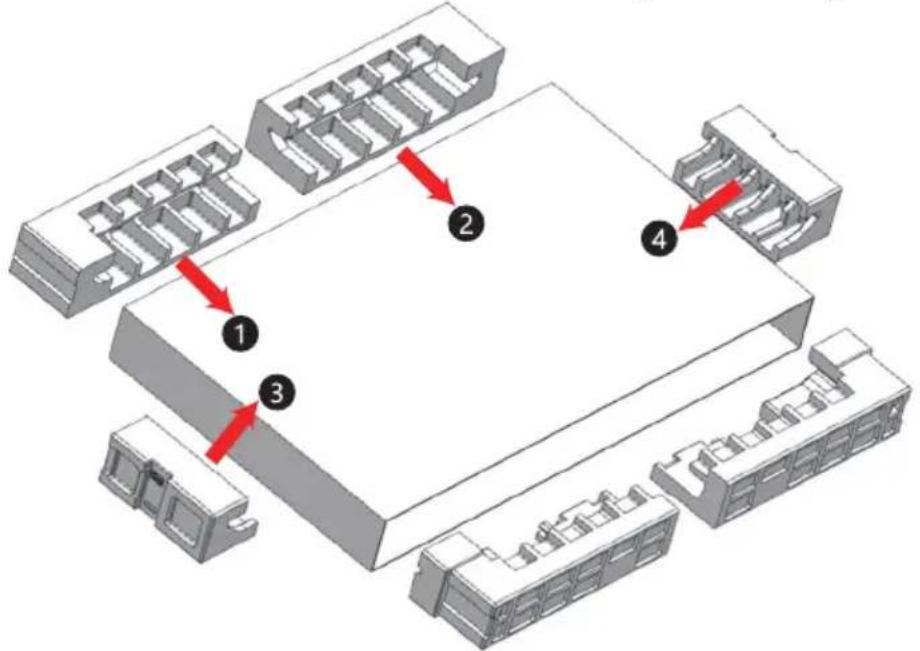
a. Once you have removed Top Shell Giftbox (packaging) up and away from the TV. The TV will remain standing with the Small bottom shell packaging with foam pieces.
NOTE: MAKE SURE 1 PERSON IS SUPPORTING THE TV AT ALL TIMES SO IT DOES NOT TIP OVER.
b. While 1 person is supporting the TV, the other person is to place the Top shell of giftbox on the floor, and insert the Side and Top foam pieces (1, 2, 3, 4) that were on the TV inside the giftbox to strengthen / support it. (Follow image on left).
2
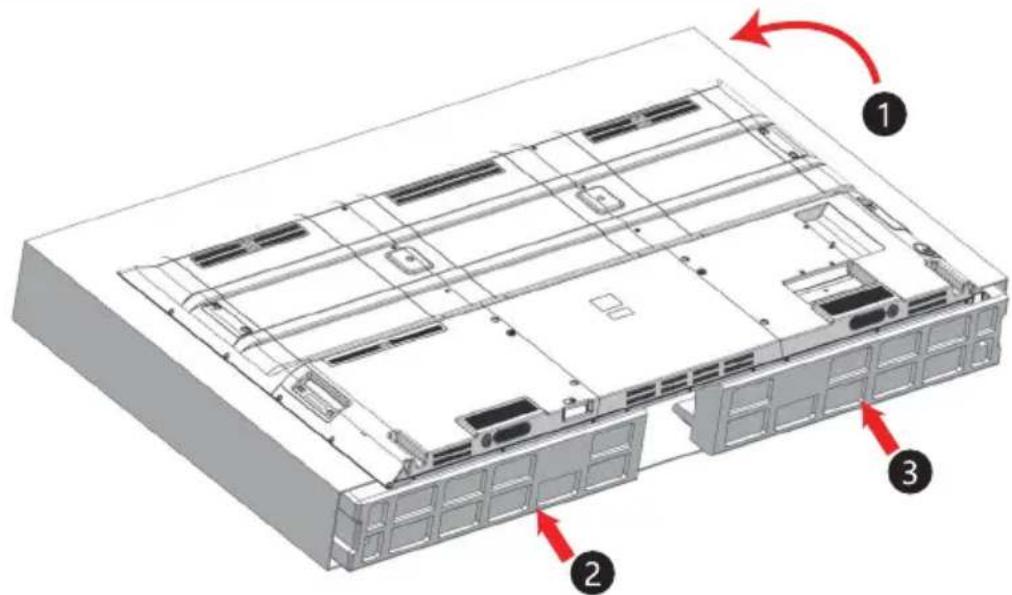
a. Carefully with 2 people (1 on each side) place the TV facing down on the giftbox with foam supports inside the giftbox.
NOTE: While placing TV onto giftbox with the front of TV facing down, make sure you are lifting from the bottom and holding the side to support the weight. DO NOT GRIP AND LIFT FROM SIDES.
b. Immediately after placing TV on giftbox, insert the 2x bottom foam pieces ② and ③ inside the bottom of giftbox to support the bottom frame of TV.
TV STAND INSTALLATION (Cont.)

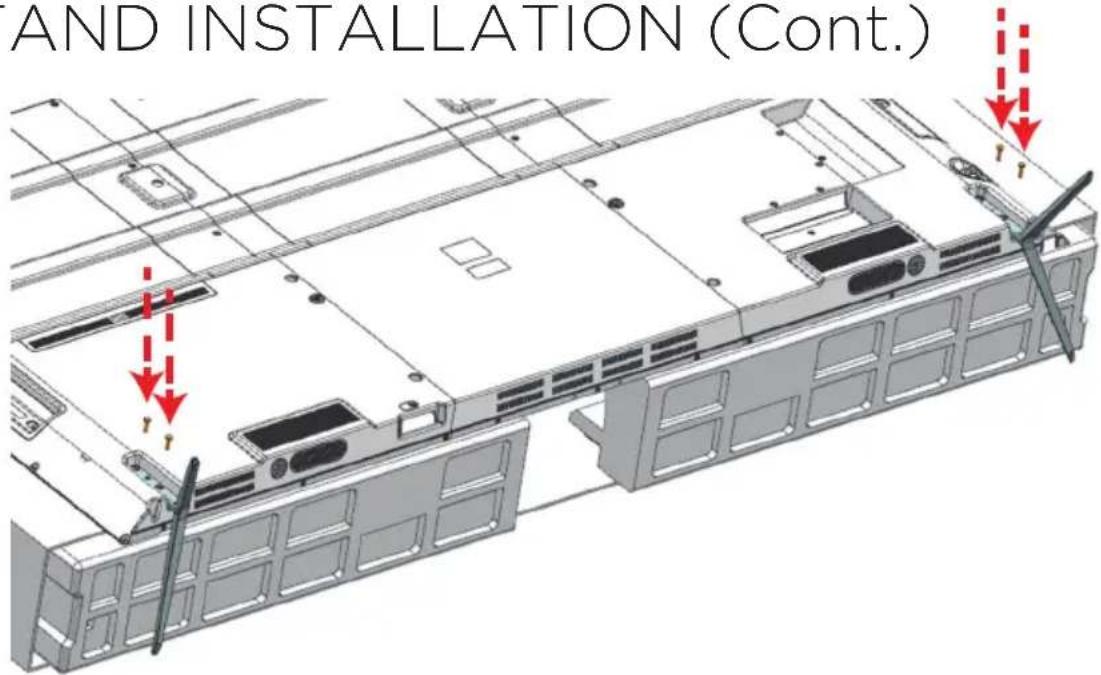
a. Now that the TV is placed on the giftbox with foam supports inside, Install the LEFT and RIGHT TV Stands and fix the screws securely to make sure that the TV stand is tightly installed to the TV.
b. Once both TV Stands are installed, Lift the Sides of TV gently and slowly until the TV is standing upright then place onto stable floor or Entertainment Cabinet.
NOTE: Make sure TV is upright BEFORE placing onto a surface. Putting the full TV weight on TV Stand at an angle may damage the TV stand.
WALL MOUNTING
Wall-Mounting Instructions
Please ensure the TV is not plugged into the wall socket and furthermore we recommend to get another person to assist in the following task.
• We recommend you use a professional installer as we assume no liability for any eventual damage to the product or injury to yourself if you mount the TV on your own.
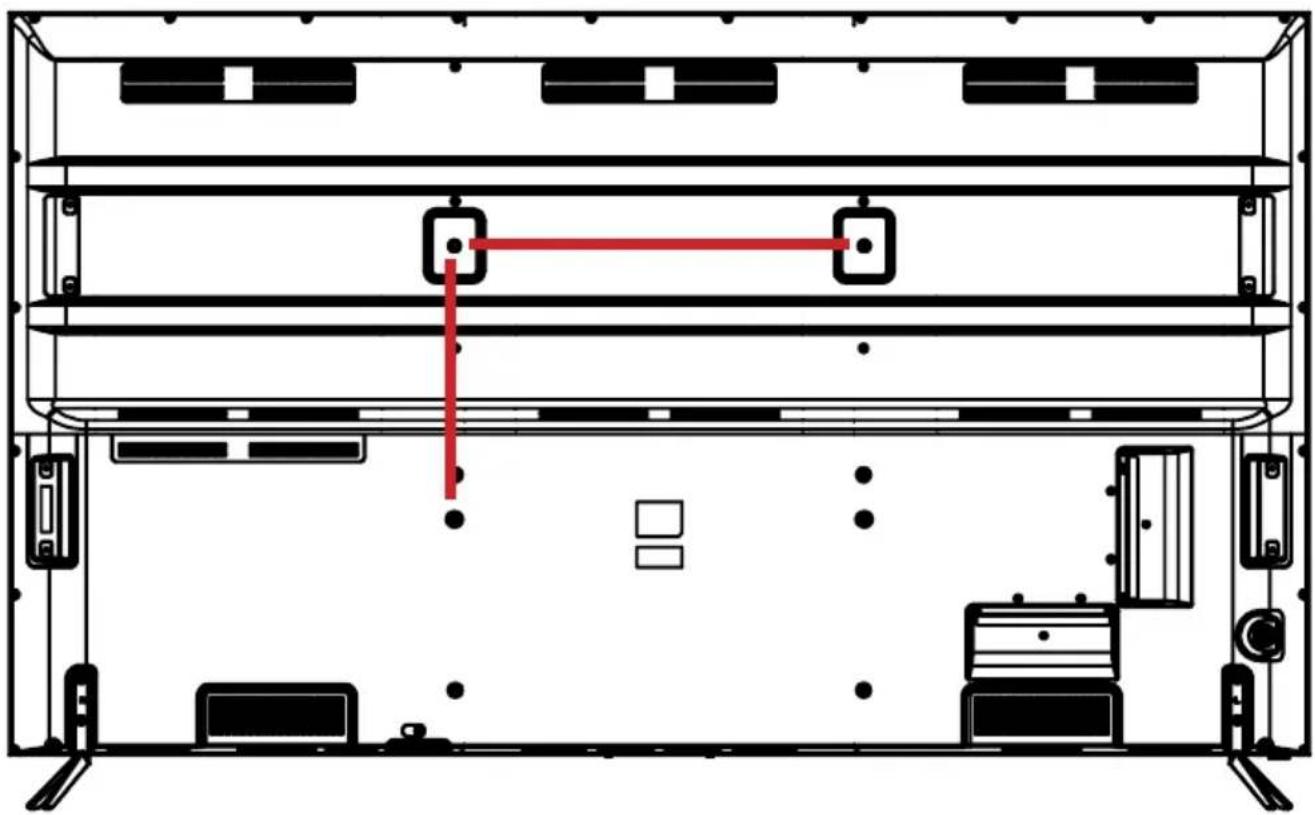
BACK OF TV
VESA PATTERN: 400 (h) x 600 (w) mm
natural_image
Technical line drawing of a server rack with multiple drive units and a red horizontal bar indicating a component (no text or symbols present)NOTE: If you are wall-mounting the TV, this should ONLY be done by a qualified installer.
CONTROLS AND CONNECTIONS (Cont.)
PRESS TO POWER ON OR OFF
- USBINPUT
- RJ45 (ETHERNET)
- VIDEO / AUDIO LEFT & RIGHT
- HEADPHONE OUT
- HDMI 3
- RF IN (ANTENNA)
- OPTICAL OUT
- HDMI 2 (ARC)
- HDMI 1
- USB INPUT
USB connection
Insert a USB storage device into the
USB port to record, playback of video/photo/music
Next few pages of MAGIC REMOTE CONTROL explains the following:
- First Time Pairing
- Re-Registering The Magic Remote Control
MAGIC REMOTE CONTROL (cont.)
Please follow instruction when pairing magic mouse remote control for your webOS TV
Your EKO Smart TV works with a Magic Remote Control (sold separately) that acts as both a cursor and a remote control and a Screen Remote that allows you to operate your Smart TV and the external devices connected to your Smart TV.
You can use the Magic Remote Control like a mouse to select and run content on your Smart TV. The Magic Remote Control also supports voice commands (ThinQ AI) and gestures to allow you convenient access to various Smart TV functions.
FIRST TIME PAIRING
Registering the Magic Mouse Remote Control
You must register the Magic Remote Control on your Smart TV when you use it for the first time. To register your Magic Remote Control using the Wheel (OK) button, perform the following steps:
- Turn on your Smart TV.
- Wait for 10 seconds while your Smart TV turns on.
- Aim the Magic Remote Control at the Smart TV, and then press the Wheel (OK) button. A message appears after the Magic Remote Control is registered.
- If the Magic Remote Control does not register, turn your Smart TV off and on again and repeat the registration process.
MAGIC REMOTE CONTROL (cont.)
RE-REGISTERING THE MAGIC REMOTE CONTROL
If the Magic Remote Control is not functioning properly, initialize it and then re-register it. To use the Smart Home (💡) button and BACK (◀) button on the Magic Remote Control to re-register the Magic Remote Control, perform the following steps:
-
Hold down the Smart Home (💡) button and BACK (◀) button on the Magic Remote Control for 5 seconds to initialize the Magic Remote Control.
-
Aim the Magic Remote Control at your Smart TV, and then press the Wheel (OK) button. A message appears after the Magic Remote Control is registered.
Note Aim the Magic Remote Control at your Smart TV, and then hold down the BACK (→) button for 5 seconds to re-register the Magic Remote Control.
REMOTE CONTROL (Cont.)
Using the Remote Control
- Battery should normally last for about one year.
- Do not mix old and new batteries in the remote
- Do not use different types of battery
- If you do not intend to use the unit for a long time, please remove batteries from the remote to avoid accident.
- Keep batteries away from children and pets.
- Never throw batteries into a fire.
- Do not drop, or impact the remote control as it void warranty immediately.
• The remote control operate at a range of 5 to 6M effectively - Do not expose the remote control sensor to a bright light.
OPENING REMOTE BATTERY COMPARTMENT TO REPLACE BATTERIES
- Turn the remote control over to its back.
- Press and slide the battery compartment to open the cover.
- Place 2x AAA batteries (provided) into the battery compartment and be sure to match the polarities (+/-) marked on battery compartment.
- Close and shut the battery compartment.
Make sure it clicks when completely closing it.

natural_image
Close-up of a glossy black pen tip with a visible crack, against a plain background (no text or symbols)
webOS GUIDE
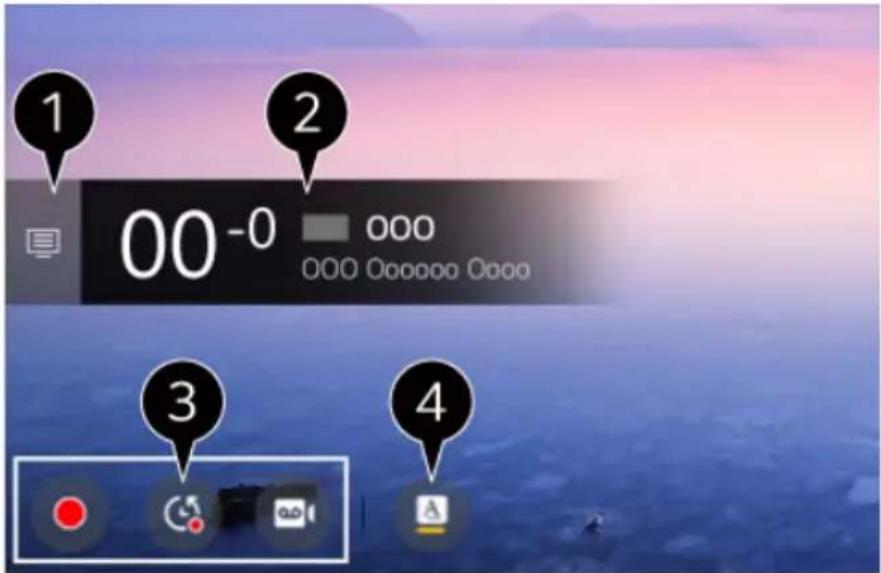
webOS TV - HOME
You can open the Home screen by pressing the 📋 button on your remote control. You can combine frequently used apps on a single screen and use whichever you want at any time.
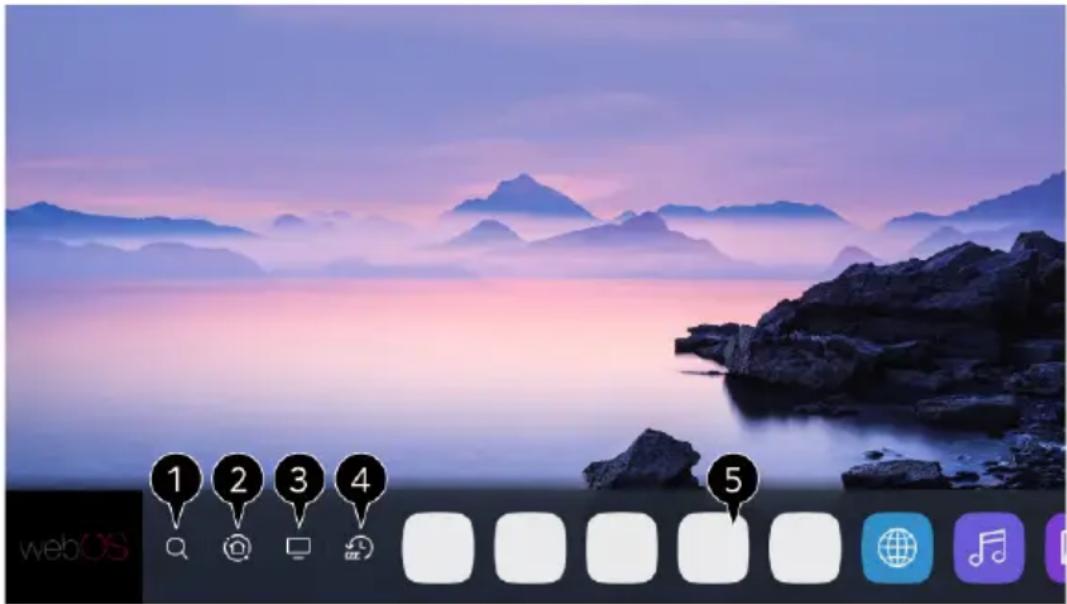
1. Search -
Launch content search of your webOS TV.
2. Connected devices Dashboard.
You can select or control a device (mobile, external device, Home IoT Devices, etc.) connected to the TV.
3. Open to the TV input you used recently.
4. Open the recently used app.
Long-press the button on the remote control or focus on the Recents. You can run or close a recently used app in the list provided in the Preview area at the top.
5. You can open, move, and delete the apps installed on your TV,
hover over on a App and It provides the Preview above it.
- You can check or run useful features of each app and recommended content on the Preview without entering into the app.
Some apps may not provide the Preview.
- The home screen will be displayed automatically when the TV is turned on. If you don't want the home screen to be displayed, set Home Auto
Launch of > General > Home Settings as Off.
The availability of and access to Contents and Services in device are subject to change at any time without prior notice.
webOS GUIDE (Cont.)
MANAGING webOS HOME
You can view a list of all apps installed on your TV, change their positions, or delete them.
- Select the app you want to edit, and press and hold the SELECT

button (located in between direction arrows) on the remote control.
This will activate the app edit mode or you can select the Edit mode
button at the right corner of the Home list to enter the App Edit mode.
- To move the app to your desired position, go to the position and press
the SELECT button.
To delete an app, select the "X" icon above the app.
You can move and delete as many apps as you wish before exiting
the edit mode.
You can also move apps with the / buttons on your remote control.
- After the editing is done, press the Close at the top right to exit the App
Edit mode. The default TV app cannot be edited.
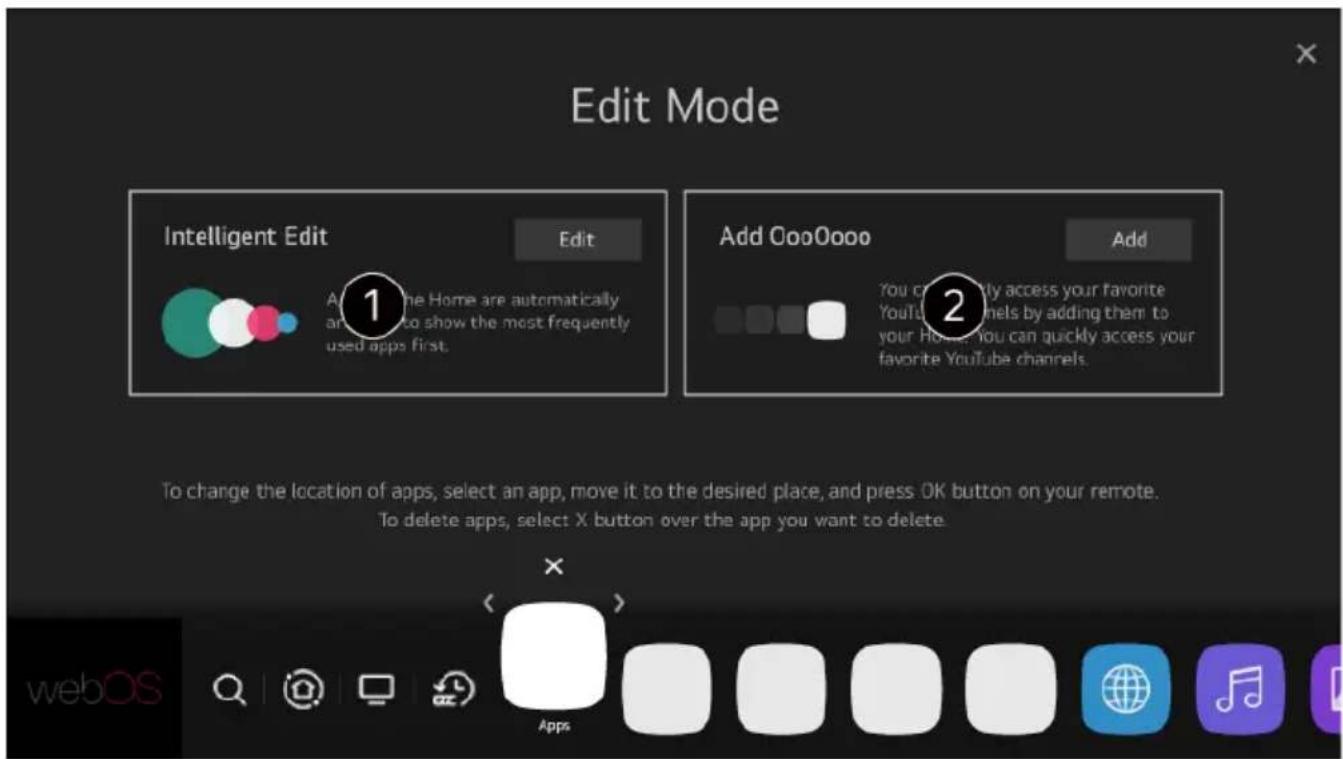
You can automatically edit position of all your apps with "Intelligent Edit".
Selecting this will adjust all apps to the front in order of what application is most frequently used.
webOS GUIDE (Cont.)
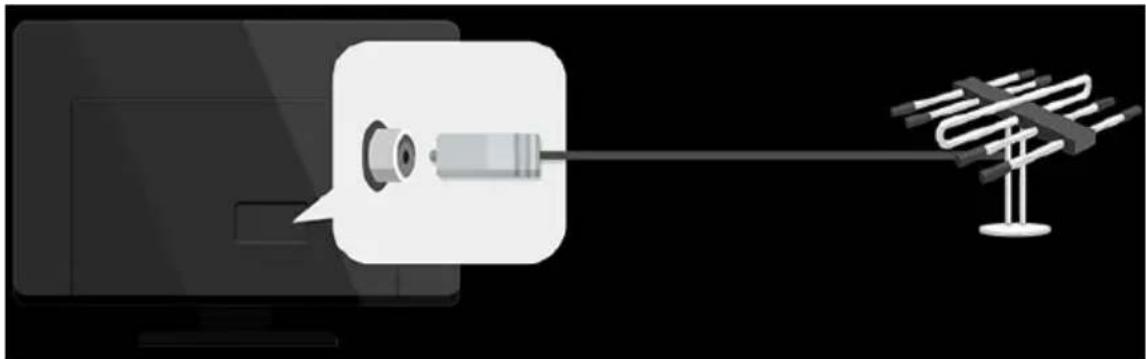
TUNE LIVE TV - PREPARATION (RF ANTENNA)
- Connect the broadcast antenna to the TV.
You can also connect a piece of equipment that can receive broadcasting such as a set-top box instead of the antenna.
Launch > Connection > Device Connection Settings -
Universal Control Settings.
natural_image
Diagram showing a computer monitor emitting a syringe to an antenna, with no visible text or symbols.- Start the

Programmes - Programme Tuning
(Programme Tuning & Settings) Auto Tuning.
Finds and adds only programmes being broadcast.
To solve a problem related to this function, refer to the Troubleshooting section of User Guide.
webOS GUIDE (Cont.)
CONNECTING TO THE NETWORK
If you configure settings for the network, you can use various services such as online contents and applications.
SELECTING A WIRED NETWORK
If you configure settings for the network, you can use various services such as online contents and applications.
- Connect the RJ45 port of the TV and the Router using a LAN/RJ45/ETHERNET cable. The router should be already be connected to the Internet beforehand. If the router supports DHCP, the TV will automatically connected to the network when you connect the TV to the network with a RJ45 cable.
If the Network Is Not Automatically Connected
-
Press the button on the remote control.
-
Select > Connection > Network Connection Settings > Wired Connection (Ethernet).
To see the details, click the Settings Connection Network Connection Settings in User Guide.
SELECTING A WIRELESS NETWORK
- Press the Settings button on the remote control.
- Select ALL SETTINGS icon > Connection > Network Connection Settings > Wi-Fi Connection.
- When the network search is complete, the list of networks available for connection is shown.
- Select a network to connect using the button
If your wireless LAN router is password protected, enter the password configured for the router.
To see the details, click the Settings > Connection > Network Connection Settings in User Guide.
webOS GUIDE (Cont.)
NETWORK SETTING WARNINGS
- Use standard LAN cable (connect to Cat7 or higher with RJ45 connector, 10 Base-T, or 100 Base TX LAN port).
- Resetting the modem may fix some network connection problems. Turn the power OFF, disconnect and reconnect it, and then turn the power on to solve the problem.
- The manufacturer is not responsible for any network connection problems or any faults, malfunctions, or errors caused by network connection.
- The network connection may not work properly because of network settings or the Internet service provider.
- DSL service must use a DSL modem; and cable service must use a cable modem. Since only a limited number of network connections may be available, TV network setting may not be used depending on the contract with Internet service provider. (If the contract does not allow more than one device per line, only the already-connected PC may be used.)
- A wireless network can experience interference from other devices that use the 2.4 GHz frequency (wireless phone, Bluetooth device, or microwave oven). Although interference can also happen when using the 5 GHz frequency, it is less likely to occur.
- The wireless environment can make wireless network service run slowly. Failure to turn off all local home networks may cause excessive traffic on some devices. The access point device must support wireless connections and wireless connection feature must be enabled on the device to have AP (access point) connection. Contact the service provider for availability of wireless connections on the access point.
- Check SSID and security settings of the AP. Refer to the appropriate documentation for SSID and security settings of the AP.
- Invalid settings of network devices (wired/wireless line sharer, hub) can cause the TV to operate slowly or not operate properly. Install the devices correctly according to the appropriate manual and network.
- The connection method may differ depending on the AP manufacturer.
- To solve a problem related to this function, refer to the Troubleshooting section of User Guide
HOW TO OPERATE TV
CONNECTING TO SIMPLINK (HDMI-CEC)
With a single remote control, you can easily manage various devices such as a soundbar or set-top box connected to a TV with HDMI.
Up to three devices can be connected and used simultaneously.
- Connect the SIMPLINK HDMI Output port to the TV HDMI IN port with an HDMI cable.
- Press the button on the remote control.
- Select > Connection > Device Connection Settings.
- Set SIMPLINK (HDMI-CEC) to On.
- Configure the Auto Power Sync settings to On or Off. (If Auto Power Sync is set to On, turning on a SIMPLINK-linked device will turn the TV on. When you turn off the TV, the device will also be turned off.)
- Turn on the connected device. When the TV automatically connects to the device, the input will change.
If the device is not automatically connected to the TV, click the Input button. This feature works only with devices with the SIMPLINK logo logo. Check for the SIMPLINK logo on the external device.
SHORTCUT TO ACCESSIBILITY MENU
You may go directly to Accessibility without entering the Advanced Settings menu.
- Press and hold the MUTE button on your remote control.
- You can set High Contrast, Grayscale, Invert Colours, etc.
ENJOY LIVE TV
LIVE TV MENU
You can use the relevant features with ease when watching TV broadcasts.
- Press the LIST button on the remote control.
-
Press in middle of direction arrows of remote control, then select PROGRAMMES.
-
PROGRAMMES - View a list of broadcast content that is currently being broadcast.
- GUIDE - You can view programmes and the schedule of each programmes.
- TV SCHEDULER - You can enter the time and date of a programme to schedule watching or recording it at the set time.
- RECORDINGS - You can check the recordings stored in the storage device and play the recordings.
The menu appears only if an external storage device is connected and the recorded video can be viewed.
- The programmes displayed in Programme List are a configuration of programmes provided by the broadcast service provider. Therefore, if the broadcast service provider has changed its programme configuration without notice, the programmes displayed in Programme List may differ from the actual TV programmes.
- Because programme information displayed in programme List includes information provided by external Electronic Programme Guide (EPG) providers, it may differ from the actual TV programmes.
- You must complete the settings of the network, region, and auto-programme to receive normal live broadcast service.
- The configurable items differ depending on model.

ENJOY LIVE TV (Cont.)
LIVE TV MENU
You can view programmes and the schedule of each programmes.
Press the remote control's LIST button, and select the Guide tab on the left side of the screen.
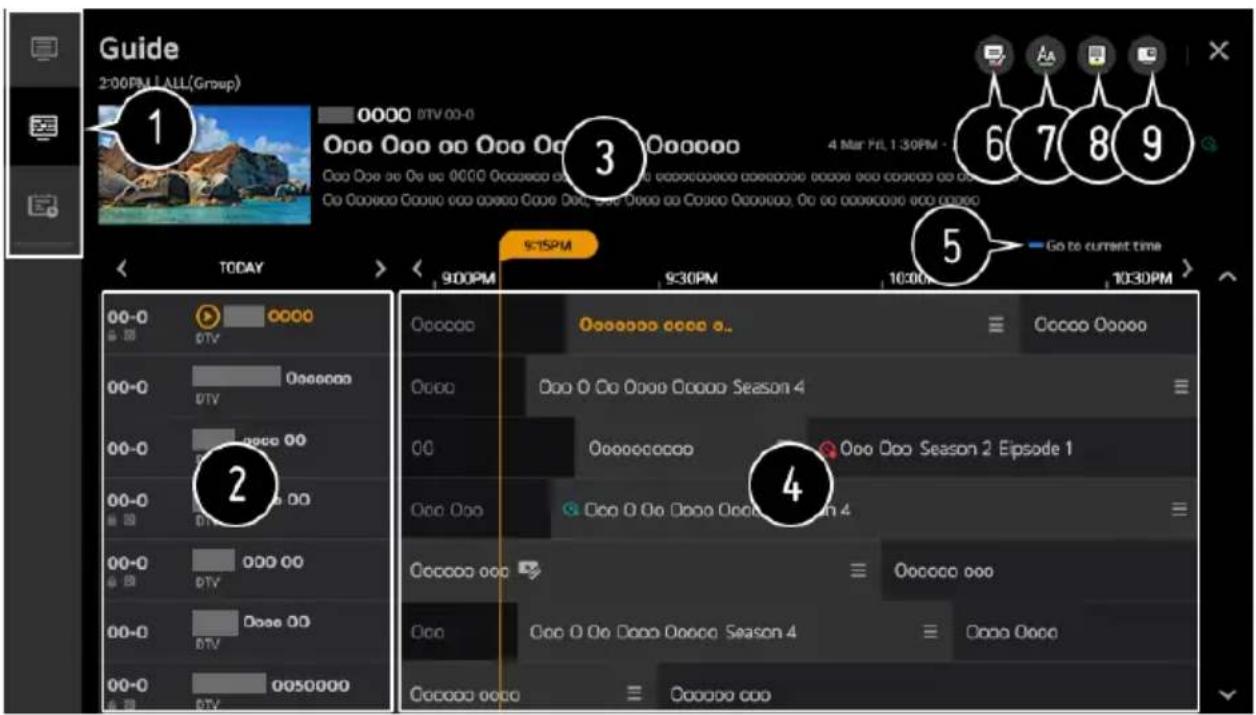
- Click on each area, and you can move to the app.
- You can view information on the programme and broadcaster.
- You can view information about the programme you are currently watching as well as the focused programme information.
-
Select the See Details button or the title of the desired programme. You can view more information on the programme and perform Watch/Record (only available on certain models) or Reminder/Scheduled Recording (only available on certain models), etc.
-
You will be taken to the programme list for the current date and time.
-
Launch Programme Manager.
-
You can change the size of the programme list to adjust the number of programmes displayed on the screen.
-
Sets the filter.
-
You can turn on/off Mini TV.
- Programme information is not displayed for programmes with no provided broadcast information.
- Some models may not be supported.
- The configurable items differ depending on model.
ENJOY LIVE TV (Cont.)
CHECKING PROGRAM INFORMATION
During watch the Live broadcast, press the Ⓞ (OK) button which is located in middle of the direction arrows. The Programme Banner appears.
- Move to programmes
- It displays the information about the programme you are watching. Select a programme banner to enter the detailed information pop-up to see the detailed programme information or run additional features related to the banner.
- You can view broadcast information about other programmes using the UP/DOWN buttons.
- You can view broadcast information about the programme you are currently watching using the LEFT/RIGHT buttons.
- Press the BLUE button on the remote control to move the banner's position.
- The features can be controlled only within the detailed information pop-up.
-
It displays content related to Recording/Live Playback.
-
If the programme you are watching includes information such as Subtitle or Audio Language, you can set these features.
SUBTITLE: You can set Subtitle.
AUDIO LANGUAGE : You can set Audio Language.
Only available with digital broadcasts.
Available features may vary depending on the broadcast signal
ENJOY LIVE TV (Cont.)
LIVE PLAYBACK
Using Live Playback (Real-time Playback)
It is a function you can use to temporarily save the programme you are currently watching to a USB HDD, so you can play back any scenes you might miss while watching TV. This function allows you to continue watching from where you were previously if you go out for a while.
-
Input the USB HDD in the USB port.
-
Press the (OK) button which is located in middle of the direction arrows.
-
Press the Start Live Playback button at the bottom of the screen.
-
During watch the live broadcast, select a point on the progress bar which you want by the pointer. You can also press the LEFT/RIGHT buttons on your remote control to use this feature.
Select a previous point than the current point on the progress bar

natural_image
Desert landscape with rocky terrain and icebergs, overlaid with UI icons for navigation and playback controls (no readable text or symbols)- The Live Playback function can be used only for broadcast programmes you view through the antenna input terminal. However, you cannot use this option while listening to a radio programme.
- Select a device to be used with Live Playback when two or more USB HDDs are connected to the TV.
- You cannot use a USB stick. Connect a USB HDD with 80 GB or more of total storage.
- If there is not enough remaining space in the USB HDD device, Live Play back may not work properly. To use Live Playback function, you need the USB HDD which has at least 2.3 GB.
- With the Live Playback function, you can play a programme back for up to two hours depending on remaining USB HDD capacity. This time may vary depending on your region.
- The videos saved in Live Playback mode are deleted if you turn off the TV without recording them.
- Changing between programmes during Live Playback will delete the data of the previous programme.
- Some models may not be supported.
ENJOY LIVE TV (Cont.)
RECORDING
With the webOS TV, you can use recording functions. Using Instant Recording
- Connect a USB HDD or USB stick to a USB port.
It is recommended that you record to a USB HDD.
- During watch the Live broadcast, press the located in middle of the direction arrows.
(OK) button which is
-
Press the Start Recording button at the bottom of the screen.
-
If you want stop the recording, press the Stop Recording button

MATTERS THAT REQUIRE ATTENTION OF RECORDING
- While recording, press the Ⓞ (OK) button to display information about the recording.
- The duration of the recording can be set before the recording starts.
- If multiple USB storage devices are connected, the last recorded storage device is selected automatically.
- The available capacity of the USB HDD partition must be at least 1 GB.
- There must be at least 4 GB of partition size on USB stick.
- The recordable time may vary depending on the capacity of your USB storage device.
- Upon the initial attempt to record to the USB memory, the TV will perform a performance test. Start recording after the test has been completed normally.
- Because of the content protection technology used, the recorded video cannot be played on PCs or other TV models. Also, the video cannot be played if the TV's video circuit is replaced.
- Do not remove the USB cable while recording.
- If you force your TV to power off while recording, the recorded content may not be saved. Ideally, you should stop the recording and check that the programme has been recorded before turning the TV off.
- Recording quality depends on the performance of the USB storage device.
- If a USB storage device is faulty, recording may not be completed properly.
- The USB storage device may not work or function properly when a USB hub or extension cable is used.
- Recording may be interrupted if the remaining storage capacity is insufficient. Use of a storage device with sufficient space for recording is recommended.
- The configurable items differ depending on model.
- Some functions may not be available while recording is in progress.
- Only broadcast programmes you view through the antenna input terminal can be recorded.
- Bluetooth and the USB port may not work properly when recording with a USB storage device.
- Recordings that are less than 10 seconds long will not be saved.
- You can save up to 600 pieces of content on a single partition.
ENJOY LIVE TV (Cont.)
TV SCHEDULER
You can enter the time and date of a programme to schedule watching or recording it at the set time.
-
Press the remote control's LIST button, and select the TV Scheduler tab on the left side of the screen.
-
Select the TV Scheduler at the top right.

-
You can change the alignment order or apply the filter.
-
You can set the Delete Mode.
-
You can set the New Scheduled Recording.
-
You can set the New Reminder.
-
Launch Guide.
PROGRAMME SCHEDULING
You can select a show to schedule it for watching or recording.
-
Press the remote control's LIST button, and select the Guide tab on the left side of the screen.
-
Select the programme you want.
If you want to record a live broadcast, click the Record or Watch button. In case of an upcoming programme, click the Scheduled Recording or Reminder button.
- Scheduled recording does not guarantee exact recording time of the programme because the programme will be record as the information of broadcaster.
- Applies to Digital broadcasting.
ENJOY LIVE TV (Cont.)
MANUAL SCHEDULING
You can select the date, time and programme to watch or record the programmes.
- Press the remote control's LIST button, and select the TV SCHEDULER tab on the left side of the screen.
- Select the TV Scheduler at the top right.
- Select the Set the new scheduled recording or the Set the new reminder at the top right.
- Select CREATE MANUALLY.
- Set the date, time, and programme to record or watch.
- The length of the scheduled recording should be at least 1 minute.
MANAGING RECORDINGS
You can view and play recordings stored on storage devices by using the Recordings app.
- Press the remote control's LIST button, and select the Recordings tab on the left side of the screen.
- Select the Recordings at the top right
![Recordings Newly added | All recordings (N) USB1: [16GB Free] ABCDEF ..(A') Ooo Oooo Oooo 2014.05.20 Ooo-Oooo 0000 2014.05.20 Oooo 0000 2014.05.20 0000000 2014.05.20](/content/2026/05/1040901/images/09e25473e10e477995f6292d2192eca536909476001b5f673073c2590dc45c1e.jpg)
- Select the storage device to play, the type of recording, the sorting method, and the view type.
- Select and delete the desired content.
- Display detailed information about the content.
You can change the title of the content in the detailed information pop-up. - Launch Search.
You can only play recordings made on the current TV in Recordings.
ENJOY LIVE TV (Cont.)
PLAYING RECORDINGS
You can access and operate basic features such as playback and pause on the playback screen.
-
Select your desired recording from the Recordings app.
-
You can control the playback of your desired recording by pressing the (OK) button which is located in middle of the direction arrows.

- You can operate basic playback-related features.
- You can do the settings related to play on repeat of the video.
- This switches you to a screen where you can set up additional features.
SETTING UP ADDITIONAL FEATURES
Press the Ⓐ (OK) button which is located in middle of the direction arrows.

- Return to Recordings.
- Display recordings list below thumbnail image while recordings playback.
- Turn subtitles on or off.
- Select audio language that can be outputted.
- You can set continue watching to resume playing from the last viewed scene.
- Returns to the basic operation screen.
- The configurable items differ depending on model
ENJOY LIVE TV (Cont.)
TO USE TELETEXT
Teletext is a free service provided by the TV station that offers text-based information about TV programmes, news and weather.
The teletext decoder of this TV can support the SIMPLE, TOP and FASTEXT systems.
- Press the More Actions button on the remote control.
- Select Teletext.
- The TELETEXT window appears.
- To view TV broadcasts and TELETEXT at the same time, press More Actions button on the remote control and select Teletext.
TO SET TELETEXT LANGUAGE
Use the Teletext language function when two or more Teletext languages are broadcast.
- Press the Settings button on the remote control.
-
Select All Settings icon > General > Language > Primary Teletext Language/SecondaryTeletext Language.
-
In Digital Mode Only
- If Teletext data in a selected language is not broadcast, the default language will be displayed.
- If you select the wrong local country, teletext may not appear correctly on the screen and some problems may occur during teletext operation.
ENJOY CONTENT STORE
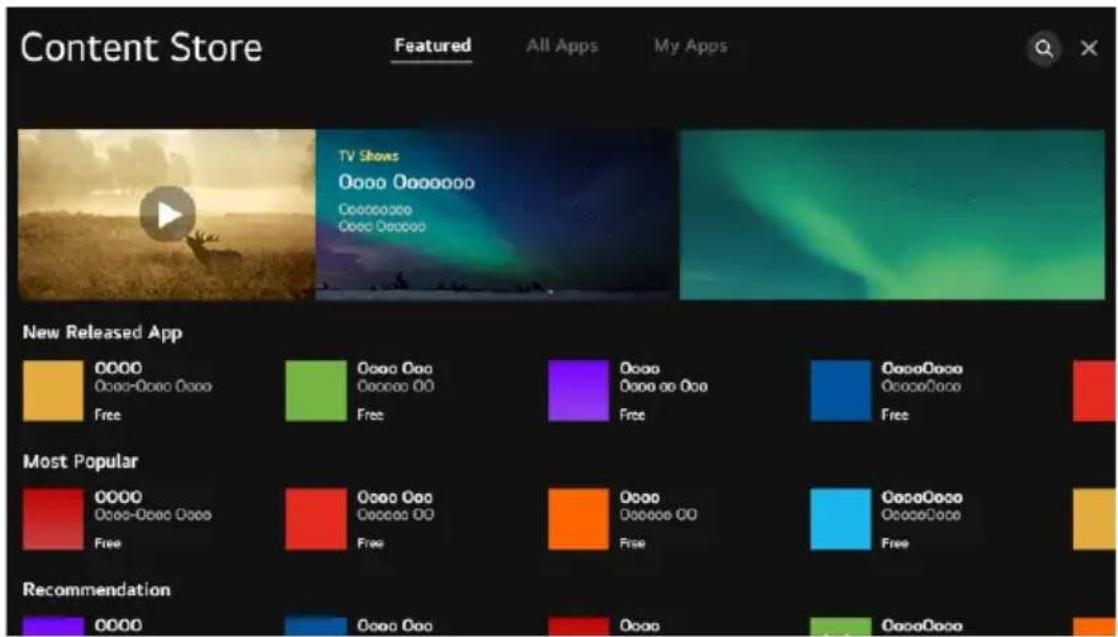
HOME TUTORIAL
You can download and use apps from various categories such as education, entertainment, lifestyle, news, and games.
-
Press the HOME button on the remote control.
-
Launch Content Store.
- Depending on the model, the provided contents may differ or some features may be limited.
- Exercise caution when in use by children. Children may have access to inappropriate online content through this product. You can block in appropriate online content by restricting access to some apps.
Configure the settings in > General > Safety > Application Locks.
ENJOY CONTENT STORE (Cont.)
INSTALLING APPS
You can install various apps on your TV from the Content Store.
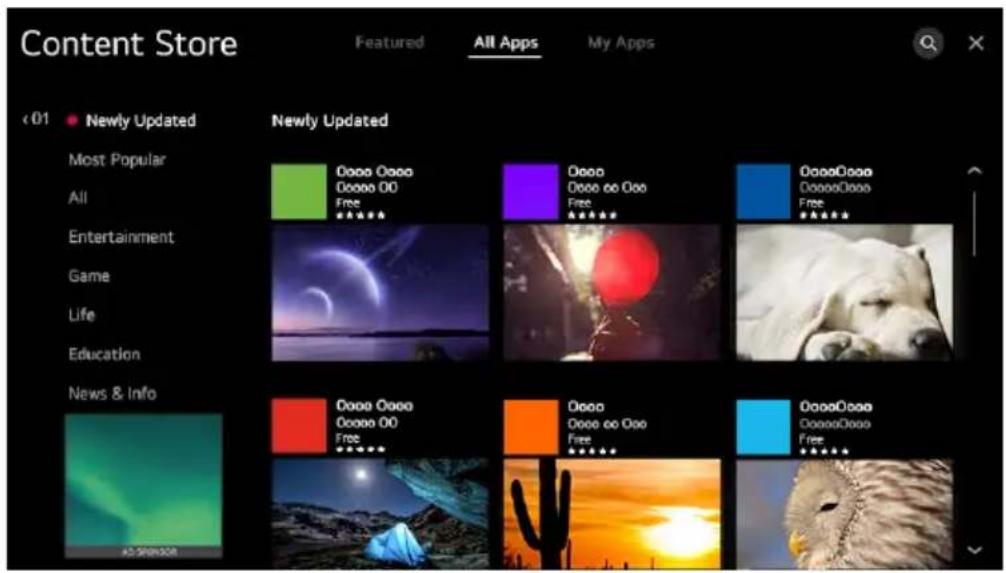
- Press the button on the remote control.
- Launch Content Store.
- Select All Apps category shown at the top of the screen. The list of available apps in the selected category will be shown.
- Select an app to set up from the list.
- Read the details of the app and then press Install.
-
When the installation is complete, you can run the app immediately.
-
Available categories may vary depending on the country or service status.
- If the storage on your TV is insufficient, you can install the apps by connecting an external memory device.
- Some USB storage devices may not be supported or may not work properly.
- USB stick containing apps from other TVs may not be used.
- You can delete apps you have downloaded in My Apps.
ENJOY CONTENT STORE (Cont.)
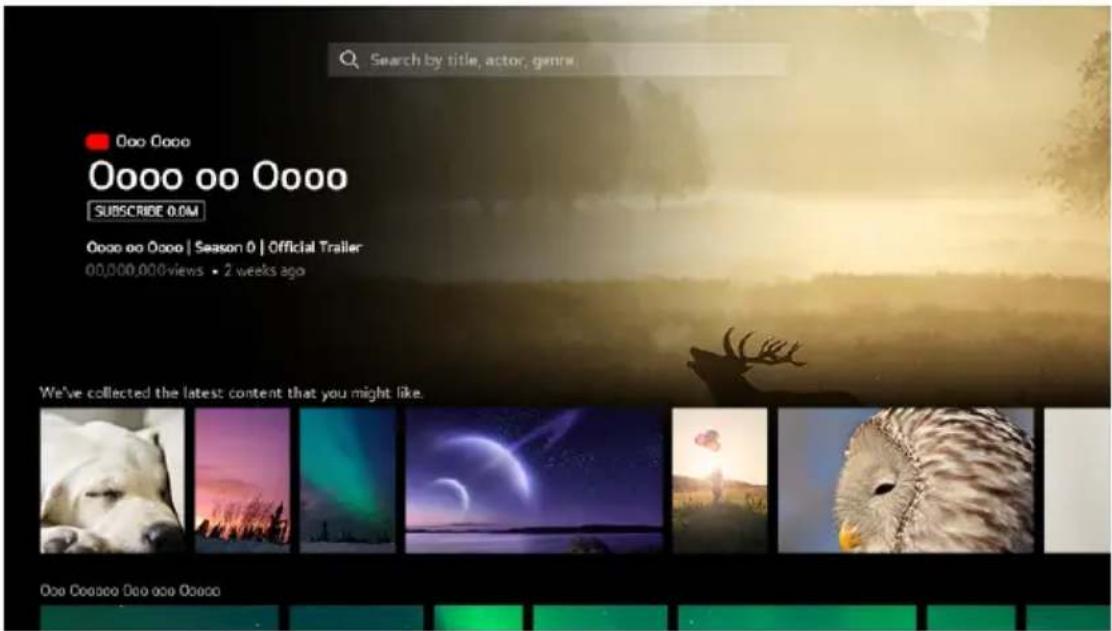
CONTENT RECOMMENDATION
You can get content recommendations based on the programme you are watching or TV viewing patterns.
If you are watching the TV using a set-top box, you must complete the setup of the universal remote control to use the recommendation feature normally. For more information, see How to Operate TV > Using Universal Remote Control in User Guide.
-
Press the button on the remote control.
-
Launch Search
- Some models may not be supported.
- You must connect to the network to use the recommendation feature.
- The supported services vary depending on countries, so the recommendations may be provided differently.
- The list of the recommendations may be less relevant or irrelevant, depending on the information of the programme you are watching.
ENJOY CONTENT STORE (Cont.)
CONTENT SEARCH
You can receive recommendations for content based on viewing patterns or search by yourself for the content you want.
- Press the button on the remote control.
- Launch Search.
- Search for a variety of content and information using the desired search terms.
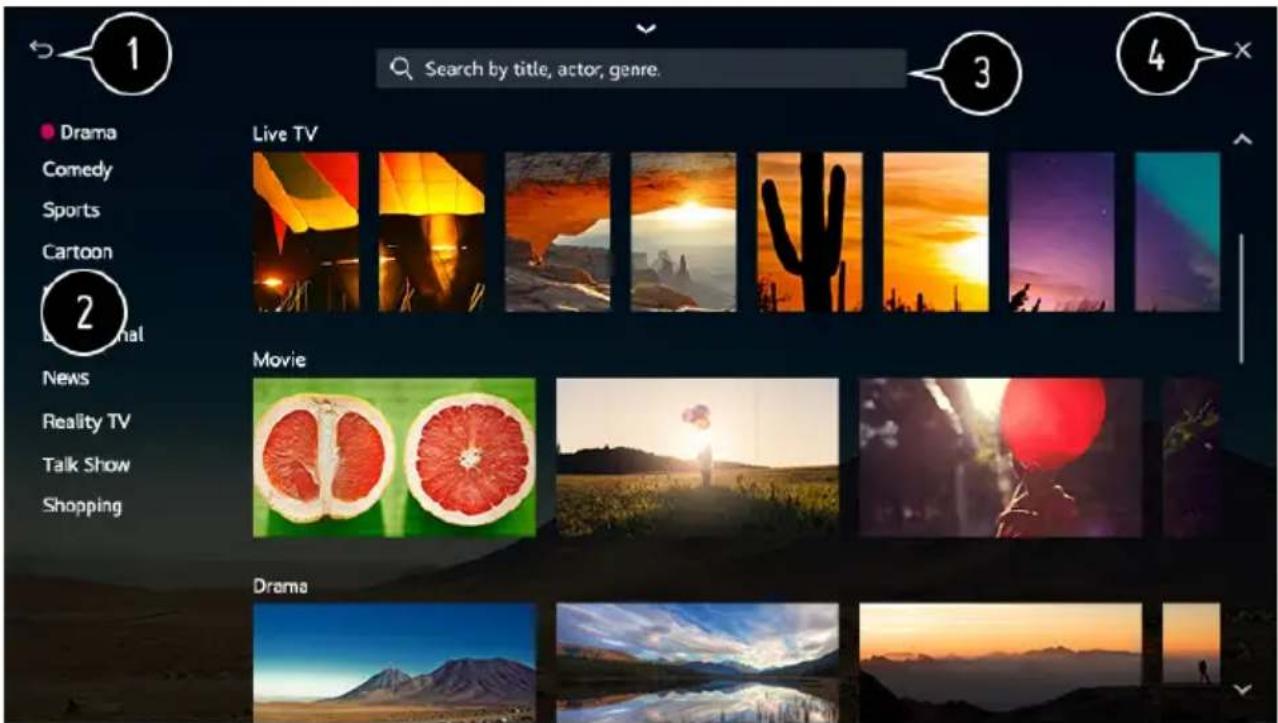
- Returns to the previous screen.
- Provides a list of content for the selected genre.
- Enter a search term.
-
Exit the Search.
-
You must connect to the network to use the search feature.
- Search results may vary depending on the programme, region, network settings, and whether you have agreed to the terms and conditions.
CONNECT EXTERNAL DEVICES
USING HOME DASHBOARD
You can select or control a device (mobile, external device, Home IoT Devices, etc.) connected to the TV. Press the 📤 button on the remote control and select Home Dashboard. You can also press and hold the 🔒 button on the remote control.
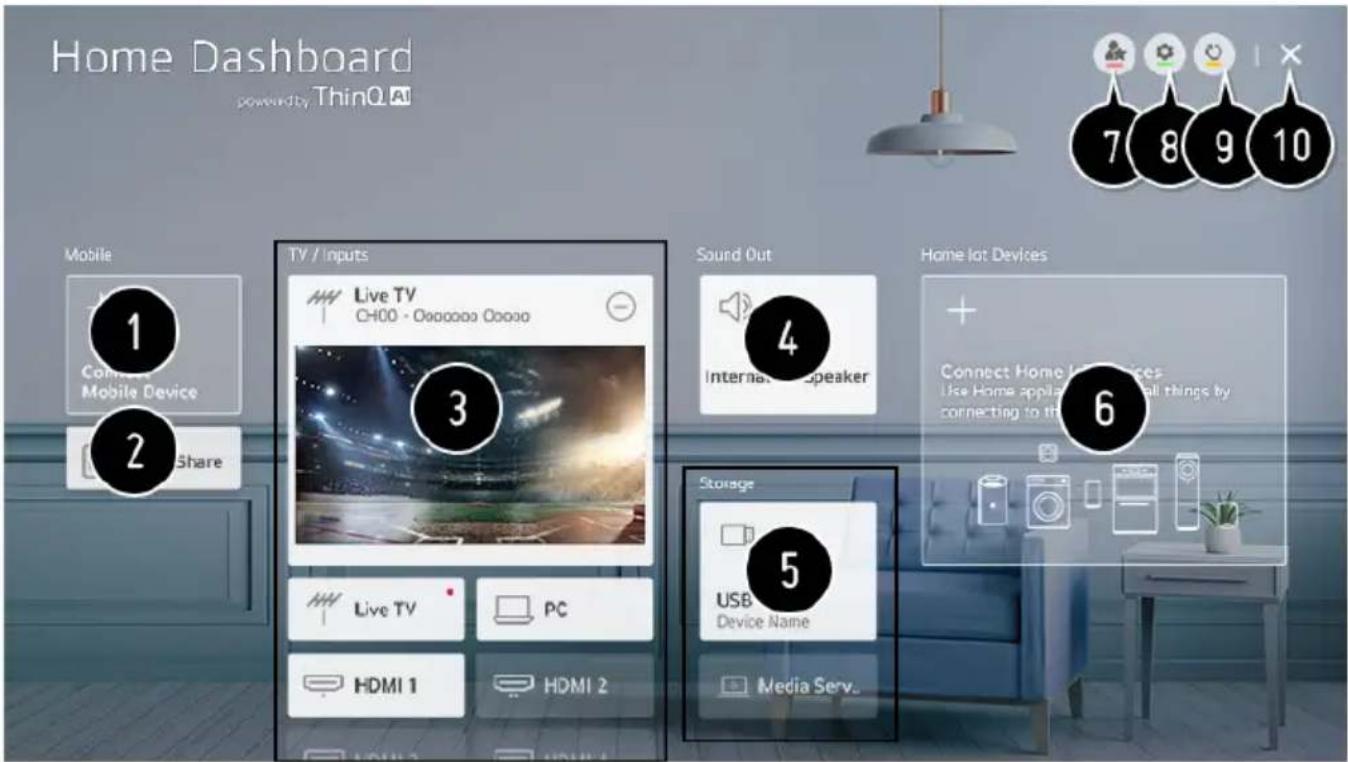
- You can check and select the smart device connected with the LG ThinQ app.
- You can play sound from a smart device connected via Bluetooth.
- You can check and select the external device connected through the external input port or network.
- The currently selected output speaker is displayed, and you can navigate to the output speaker settings screen.
- You can view and select the connected storage device.
- You can check and control the device connected via the Home IoT.
- You can easily control your device by presetting the desired operations.
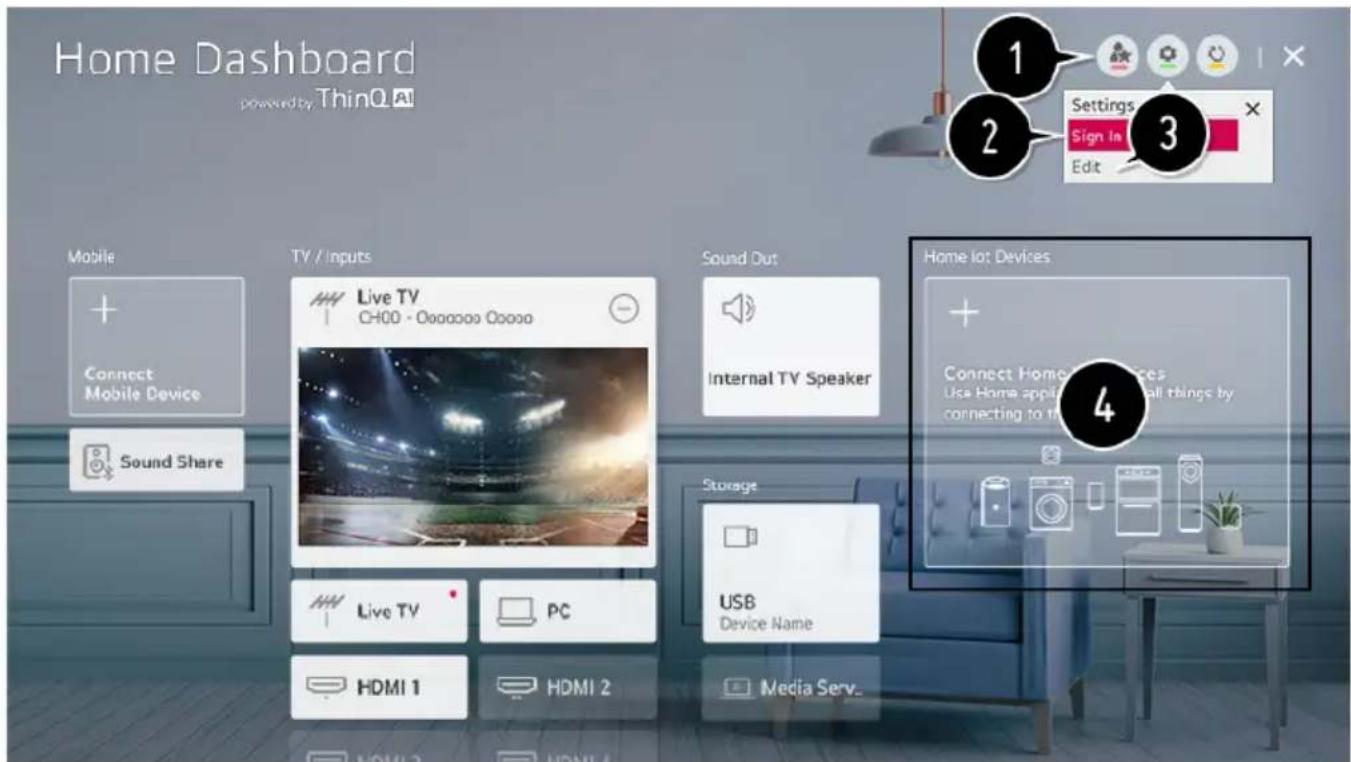
- Sign In: You can log in/out to and from the LG ThinQ account you created on mobile.
Edit : You can edit the name of the device connected to Inputs or Home IoT Devices or configure the related settings.
-
It refreshes the device list.
-
Exit the Home Dashboard.
- Available settings vary depending on the model or region
CONNECT EXTERNAL DEVICES (Cont.)
CONNECTING HOME IOT DEVICES
You can check and control the status of the connected Home IoT Devices.
- Install LG ThinQ app on your smartphone.
- Log in to your LG ThinQ account, and register your own LG ThinQ device.
-
Press the button on the remote control and select Home Dashboard.
-
Press the at the top right and select the Sign In.
-
Log in to your LG ThinQ account. A list of the registered LG ThinQ devices will appear.
-
If you are in an area where the LG ThinQ app is not in service, LG ThinQ device connection will not be supported.
- If you are controlling the external device from your mobile app, you might not be able to control the device from your TV. Quit the mobile app to control it from your TV.
CONTINUE TO NEXT PAGE 35
CONNECT EXTERNAL DEVICES (Cont.)
- You can easily control your device by presetting the desired operations.
- You can log in/out to and from the LG ThinQ account you created on mobile.
-
Edit List: You can rename, Show/Hide or change the order of the devices connected to Home IoT Devices.
Notification : If you turn it On, you can receive notifications about the status of the Home IoT Devices.
Delete : You can delete the connected device. You can only delete certain devices from the TV. -
You can check the connection guide for Home IoT Devices. You can connect and display the devices registered to your LG ThinQ account. Once the device is connected, the card will be changed to a smaller size and appear at the bottom of the device connection list.
-
Available settings vary depending on the model or region.
- IoT devices that can be connected to a TV are subject to change without notice.
- Connectable LG ThinQ devices and available functions may differ between mobile and TV.
CONNECT EXTERNAL DEVICES (Cont.)
CONNECTING SMART DEVICES
You can use a variety of features by connecting the TV to a smart device.
Connecting Your Smart Device to a TV Using the LG ThinQ App
- Download the LG ThinQ app from the app store of your smart device.
You can download the app easily by scanning the QR code
ANDROID iOS


- Connect your TV and smart device to the same Wi-Fi network.
You can check the Wi-Fi network of TV at

Connection >
Network Connection Settings > Wi-Fi Connection.
- Run the LG ThinQ app installed on your smart device.
- Follow the instructions from LG ThinQ app to connect your smart device to the TV. When your account information of LG ThinQ is linked to the TV, you can manage the IoT devices linked to your account using Home Dashboard of the TV.
CONNECT EXTERNAL DEVICES (Cont.)
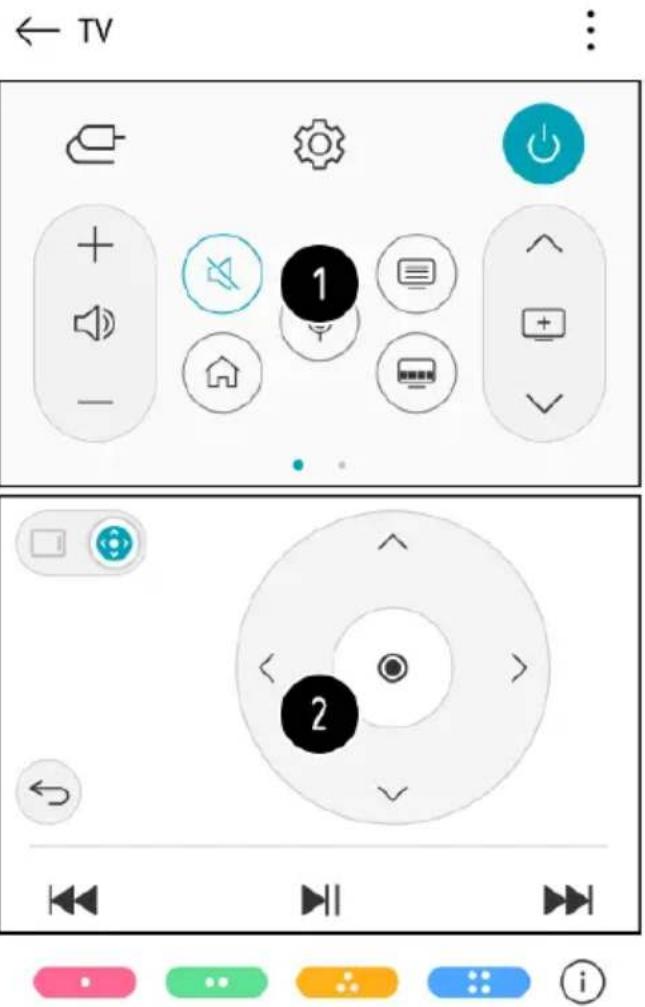
CONTROLLING YOUR TV WITH THE LG THINQ APP
You can tap the buttons on your smart device's screen to control the TV.
- When watching a broadcast, you can control the programme, volume, etc. or select the external input with voice commands instead of using the remote control.
- You can use the same functions as the Magic Remote's pointer and arrow keys.
- Some controls may be limited in external input mode.
- The app's screen and functionality are subject to change without prior notice.
- Available features may differ depending on your country and OS.
CONNECT EXTERNAL DEVICES (Cont.)
TO SEE THE MOBILE DEVICE'S SCREEN ON THE TV
- Enable Screen Share mode on the mobile device.
- Your TV will be displayed in the list of available devices.
- Select your TV and request connection.
- Select Accept in the connection request popup window.
- After the connection is established, the TV will display the screen of the connected device.
-
When you connect Screen Share for the first time, a popup will appear which allows you to select Decline, Accept or Block.
-
Decline : Do not connect the device. If you try to connect again, the popup will appear.
- Accept : You can connect the device. No connection popup will appear from the second time.
- Block : Do not connect the device. Even if you try to connect again, the popup will not appear and the connection will not work.
To cancel Block, go to > > Connection >
Mobile Connection Management > Screen Share.
- It is recommended that you always update your device to be connected to your TV to the latest OS version for a reliable connection.
- A non-LGE device may not be connected even when it is detected.
- It is recommended that you connect the device to a 5 GHz router because the performance may be affected by your wireless environment.
- The response rate may vary depending on the user's environment.
- It's differ from devices. For more information on the device you want to connect to, refer to its user guide.
- If connection fails repeatedly, turn off the TV and the device you want to connect to, then turn them back on and try again.
CONNECT EXTERNAL DEVICES (Cont.)
PLAYING SOUND FROM A SMART DEVICE THROUGH THE TV'S SPEAKERS
Connect a smart device to the TV via Bluetooth to play sound from the smart device through the TV's speakers.
- Turn the smart device's Bluetooth on, then select the TV from the list of devices.
- The TV will be connected to the smart device.
- If the output speaker is set to Bluetooth or has a setup history, the TV may not be detected in the list of smart devices.
- If the output speaker is set to Bluetooth, press and hold the input select button on the remote control to launch Home Dashboard, and then select Sound Share in the Mobile area to connect.
CONNECT EXTERNAL DEVICES (Cont.)
CONNECTING USB
Connect a USB storage device (USB HDD, USB stick) to the USB port on the TV to enjoy the content files stored on the USB storage device on your TV.
TIPS FOR USING A USB STORAGE DEVICE
- A USB storage device that has a built-in automatic recognition programme or uses its own driver might not be recognisable.
- Some USB storage devices may not be supported or may not work properly.
- If you use a USB extension cable, the USB storage device may not be recognised or may not work properly.
- Please use only USB storage devices formatted with the FAT32 or NTFS file system provided by Windows OS.
- It is recommended that you use an external USB HDD with a rated voltage of 5 V or less and a rated current of 500 mA or less. If you use a device requiring a higher voltage/current than the rated voltage/current, it may not operate properly due to lack of current.
- It is recommended that you use a USB hub or USB storage device with a power supply.
- We recommend using a storage device with a capacity of 32 GB for the USB memory and 2 TB or less for the USB hard disk.
- If a USB HDD with power-saving function does not work, turn the hard drive off and on again to make it work properly. See the owner's manual for the USB HDD for more information.
- Data on a USB storage device may be damaged, so it is recommended that you back up any important files. Users are responsible for data management. The manufacturer bears no responsibility.
CONTINUE TO NEXT PAGE (41)
CONNECT EXTERNAL DEVICES (Cont.)
- Press the button on the remote control. To remove the USB storage device, press the Eject button, which appears at the top when you focus on the USB storage device you want to remove.
- If you disconnect the USB storage device without selecting Eject, an error may occur in your TV or storage device.
- When you connect a USB storage device of a file system not supported by the TV to the USB IN port, the format message appears. To use the connected USB storage device, you should format the device first.
- After format, all the data of USB storage device will be deleted and formatted as NTFS or FAT32 file system.
- Press and hold the button on your remote control. Select the connected USB from HomeDashboard > Storage and select the Format button to format the USB storage device.
- When connecting a USB storage device, a random file/folder can be created to provide Smart TV services such as the saving and retrieving of thumbnail images.
CONNECT EXTERNAL DEVICES (Cont.)
VIEWING PHOTOS AND VIDEOS
You can view photos and videos using the Photo & Video app.
- Press the button on the remote control.
- Run the Photo & Video app.
- Select your desired storage device.
- Select and view your desired photo or video.
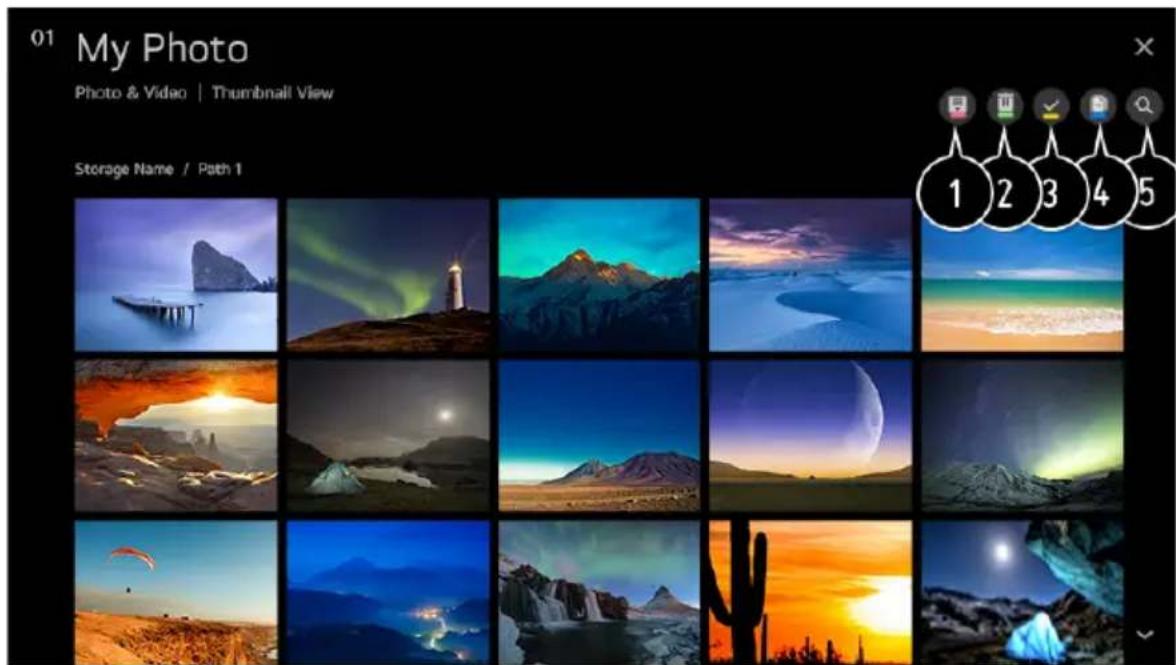
- Select your desired type of content and viewing method.
- Select and delete the desired content.
- You cannot delete files that are shared from other devices.
- Select the content you want to play. You can only select the same type of content as you first selected.
-
You can copy content to a USB storage device.
-
Some models may not be supported.
- Launch Search.
- Certain content may not be displayed on the list if the number of all content exceeds 40,000.
CONNECT EXTERNAL DEVICES (Cont.)
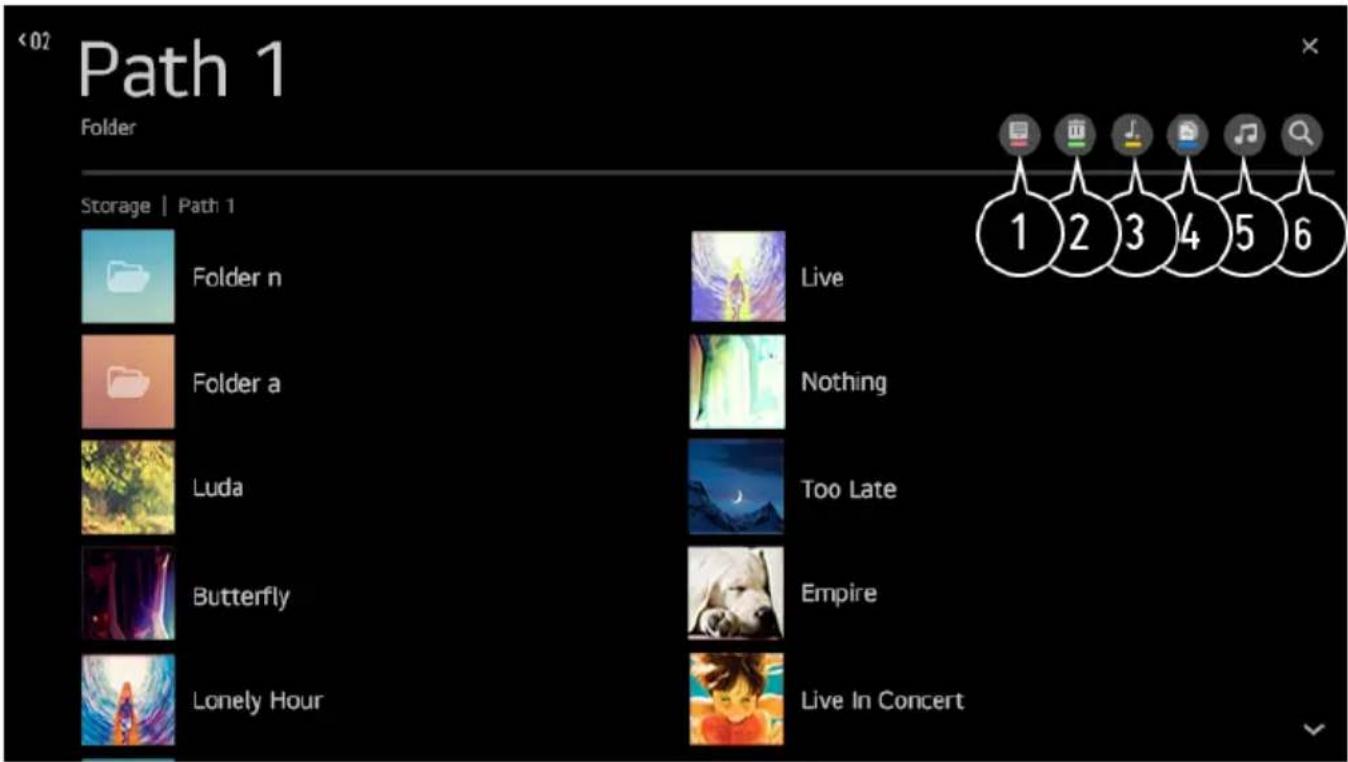
USING PHOTO PLAYER
Selecting a photo in the Photo & Video app runs the photo player. You can view your saved photos.
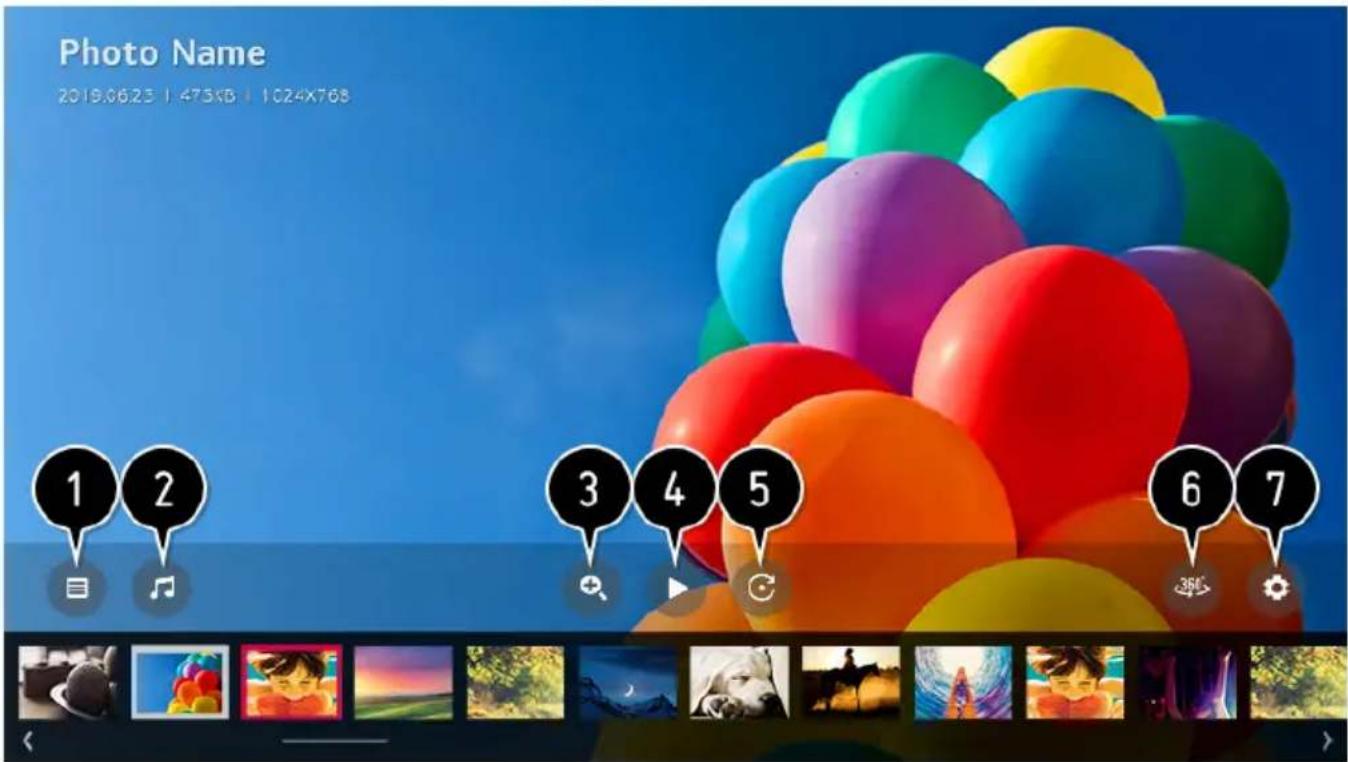
- Returns to the entire content list.
- You can play background music by running the music player.
- You can zoom in/out of the photos.
- Starts the slide show.
- Rotates photos.
- 360-degree photos can be viewed in 360 degrees.
- Using the 360° VR Play on a normal photo may distort the image.
- Some models may not be supported.
- You can set the size of a photo or change the speed and effect of a slide show.
- Some models may not be supported.
CONNECT EXTERNAL DEVICES (Cont.)
USING VIDEO PLAYER
Selecting a video in the Photo & Video app runs the video player. You can view your saved videos.
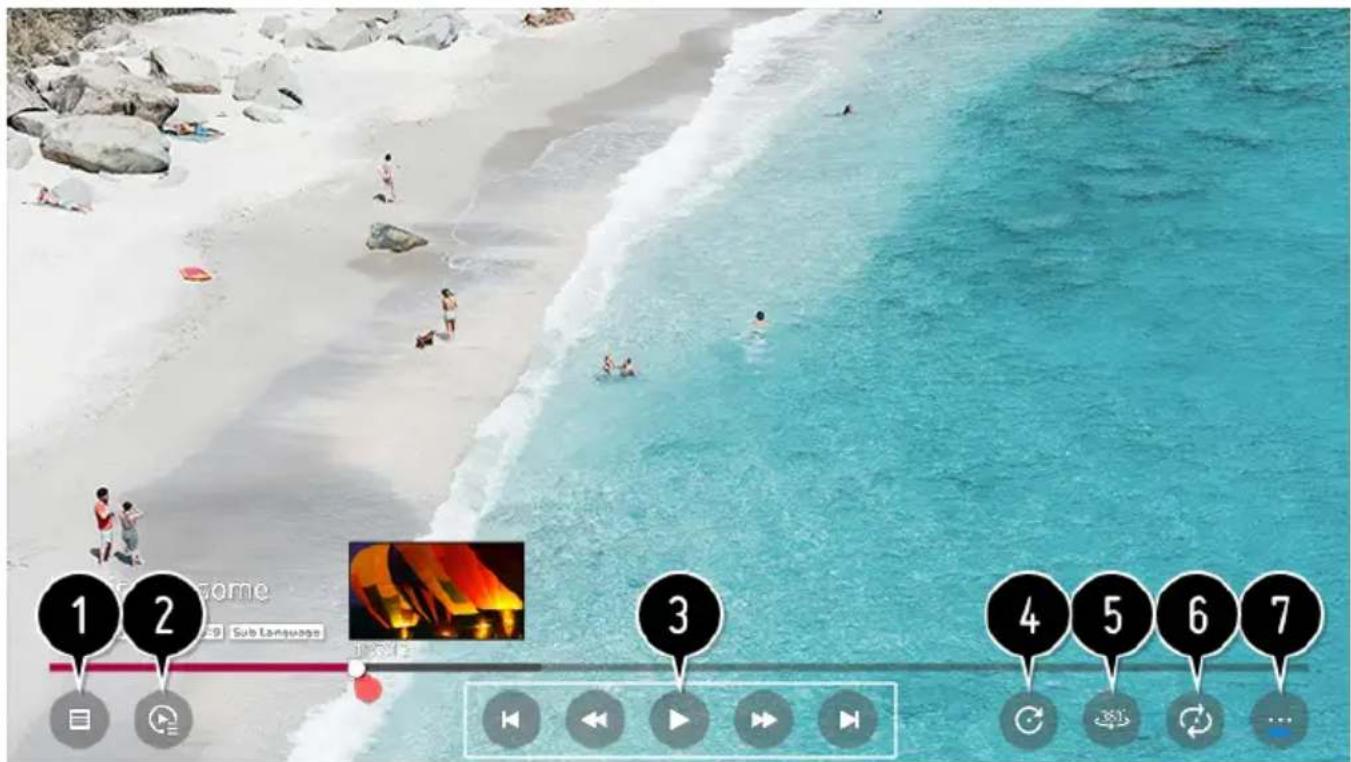
- Returns to the entire content list.
- You can select other content by displaying the playlist while watching a video.
- You can control basic video playback functions.
- Rotates videos.
- Some models may not be supported.
- 360-degree videos can be viewed in 360 degrees.
- Using the 360° VR Play on a normal video may distort the image.
- Some models may not be supported.
- You can do the settings related to play on repeat of the video.
- You can set additional options.
CONNECT EXTERNAL DEVICES (Cont.)
SETTING ADDITIONAL OPTIONS
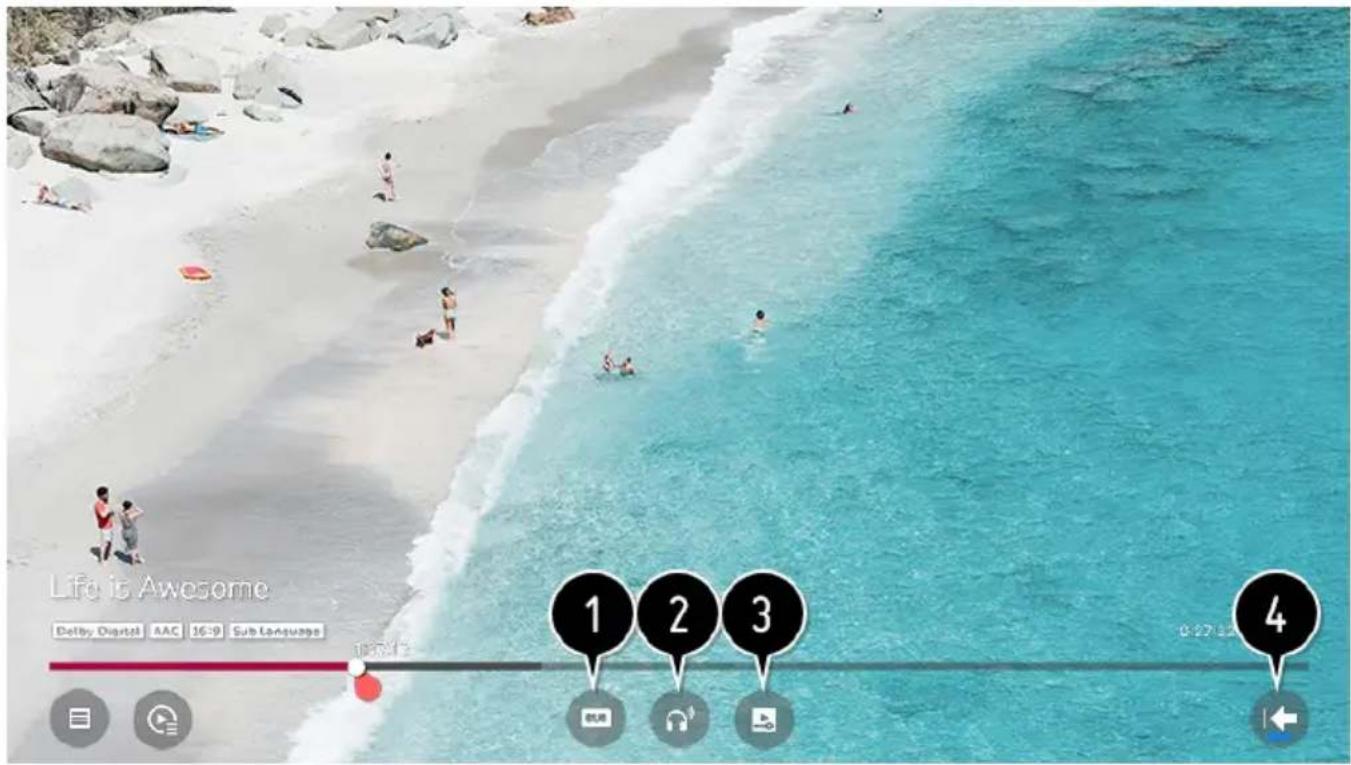
- You can change subtitle settings.
- You can set audio tracks.
- You can set continue watching to resume playing from the last viewed scene.
- Returns to the basic operation screen.
CONNECT EXTERNAL DEVICES (Cont.)
PLAYING MUSIC
You can listen to music by using the Music app.
- Press the HOME button on the remote control.
- Run the Music app.
- Select your desired storage device.
You can select your desired songs from all of your storage devices and add them to My Playlist.
- Select your desired music content and enjoy it.
- Select the desired type of content list.
-
Select and delete the desired content.
-
You cannot delete files that are shared from other devices.
- Select content and add it to My Playlist.
-
You can copy content to a USB storage device.
-
Some models may not be supported.
- Open the music player.
- Launch Search
CONNECT EXTERNAL DEVICES (Cont.)
You can play music conveniently by selecting the music files saved in the Music app or by selecting the music player icon during content playback in apps such as Photo & Video.

- You can play music from the selected storage device.
- You can set repeat playback and random playback.
-
The configurable items differ depending on model.
-
Screen Mode: You can turn the screen off while listening to music or display the music player in full-screen mode.
-
Screen Off: You can listen to music with the screen turned off.
-
You can change the position of the music player.
- You can minimize the music player.
- This feature closes the music player.
-
Lyrics are available for music files that provide them. In some music files, you can choose a lyric section and move the playback position.
-
The lyrics feature is only supported on some devices.
-
The lyrics may not be displayed in sync depending on the lyrics data in the music file.
-
Reopen your music player by pressing the VOLUME key on your remote control.
- You may not be able to use the music player for some features.
CONNECT EXTERNAL DEVICES (Cont.)
WATCH CONTENT SAVED IN YOUR PC ON THE TV
You can enjoy videos/music/photos stored on your PC on the TV when these devices are connected to the same network.
BROWSE THE CONTENT ON YOUR PC TO WATCH ON TV (WINDOWS 10)
- Connect your TV and PC to the same network.
- Right-click the file you want to play and select "Cast to Device".
- Select the name of the TV you want to watch from the displayed list, and playback will start on that TV.
- Even when multiple TVs or devices are connected, the selected file is only played through one device. The playback rate may vary depending on the network connection.
- To play on other operating systems or devices, refer to the manual of the operating system/device.
BROWSE AND WATCH THE CONTENT STORED ON THE PC USING THE TV (WINDOWS 10)
- Connect your TV and PC to the same network.
- Open the “Start” menu on your PC screen, search for “media streaming options” and then select the result that appears.
- Select the "Turn on media streaming" button in the window that opens.
- Allow all of the "media streaming options".
- Select "OK" to save the settings.
- Select the connected PC in the Home Dashboard app on the TV, and then select and play the file you want.
- To play on other operating systems or devices, refer to the manual of the operating system/device.
CONNECT EXTERNAL DEVICES (Cont.)
MATTERS THAT REQUIRE ATTENTION OF CONTENT SHARE
- Check your network settings if the content share option does not work properly.
- May not work properly on a wireless network. It is recommended that you connect to a wired network.
- May not work properly depending on the network environment.
- If multiple TVs are connected to one device, the content may not be played properly depending upon server performance.
- To watch a 1080p video through the content sharing function, a router using the 5 GHz frequency is required.
- If you use the existing 2.4 GHz router, the video may be laggy or not play properly.
- The Content Share function may not be supported for a router that does not support multi-cast. For more information, refer to the user guide that came with your router or contact the manufacturer.
- Captions are only supported on some connected devices.
- We recommend using the SmartShare PC software when viewing video subtitles.
- When a subtitle file is added later, disable the shared folder and then enable it again.
- The DRM files in the connected device will not play.
- Even for the file format supported by the TV, the supported file format may differ depending on the connected device environment.
- If there are too many folders or files in a folder, it may not work properly.
- The information on the file imported from the connected device may not be displayed correctly.
- Depending on the encoding, some streams may not play in content sharing mode.
CONNECT EXTERNAL DEVICES (Cont.)
TO SEE THE PC SCREEN ON THE TV
CONNECT WIRELESS
- Enable Screen Share mode on the PC. Your TV will be displayed in the list of available devices.
- Select your TV and request connection.
-
After the connection is established, the TV will display the screen of the connected device.
-
It is recommended that you always update your device to be connected to your TV to the latest OS version for a reliable connection.
- It is recommended that you use this function at close range.
- Start Screen Share faster by having your mobile device or PC connected to the same network as the TV.
- Though it can be connected without a wireless router, connecting your device to a 5 GHz router is recommended because the performance can be affected by the surrounding wireless environment.
- The response rate may vary depending on the user's environment.
- It's differ from Windows version. For more information on the device you want to connect to, refer to its user guide.
- If connection fails repeatedly, turn off the TV and the device you want to connect to, then turn them back on and try again.
CONNECT WIRED
Connect the PC with TV by HDMI cable.
CONNECT EXTERNAL DEVICES (Cont.)
USING THE WEB BROWSER
You can enter the website when you input the web address on the URL bar. If you input the search word, it will find the information about search word base on the search engine.
-
Press the button on the remote control.
-
Run the Web Browser application.
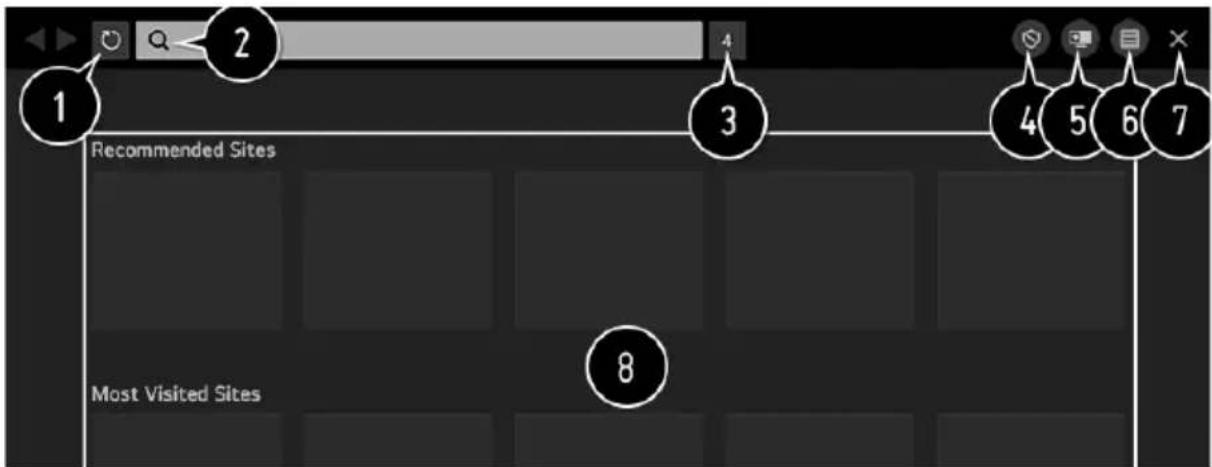
- You can refresh the web page you are viewing.
- You can type in a web address to navigate to a specific website or enter a search term directly.
- You can view the tabs that are currently open.
-
You can block ads within the web page you are viewing. However, this button is only displayed if Menu icons > Settings > Use Block Ads feature is set to On.
-
Split the screen to display the TV screen. You can browse web pages while watching TV.
-
You can zoom in or out on the screen while browsing the website. Add to bookmarks: You can add the website you are currently viewing to your Favourites.
History : You can view and delete the website visit history. Bookmarks : You can view and delete the list of websites you have added to your Favourites.
Settings: You can change the web browser settings.
- Exit the Web Browser.
- The new tab screen shows a list of Recommended Sites and Most Visited Sites. If you do not want Recommended Sites to be displayed, set Menu icons > Settings > Show
Recommended Sites to Off. Recommended Sites may vary by country and is only available in certain countries.
CONNECT EXTERNAL DEVICES (Cont.)
- The Web Browser app on your TV is a browser for TV, so it may work differently than the browser for your PC.
-
Some contents may not be played properly.
-
Flash Plug-in is not supported, and only HTML5 media is supported.
- Plug-in installation is not supported.
- Media in formats other than JPEG/PNG/GIF may not be played.
- Apps may be forced to shut down if the TV runs out of memory.
- The fonts provided on the TV are used. Depending on the content, characters may look different from PC or mobile browsers.
- File and font downloads are not supported.
- Caution is required because malicious or phishing sites are not automatically blocked.
- Some functions of Web Browser may not be supported temporarily due to external factors.
- The website can be accessed through the TV's Web Browser app, so care needs to be taken about children's access to harmful online contents.
You can lock the Web Browser app to prevent access to harmful online contents. Configure the settings in ⚙ > ⋮ All Settings icon > General Safety > Application Locks.
- If you experience problems while using Web Browser, refer to Troubleshooting in User Guide.
CHANGING WEB BROWSER SETTINGS
Select Menu icons Settings at the top of the Web Browser app.
On Startup - When starting the Web Browser app, you can set the app to operate in one of Open the New Tab page/Continue where I left off/Home page: custom websites.
Search Engines - You can select a search engine to search for when entering a keyword in the address bar. Search engine settings may be subject to change without notice based on the supplier's circumstances.
Show Recommended Sites - You can set whether or not to display a list of Recommended Sites on the new tab screen.
CONNECT EXTERNAL DEVICES (Cont.)
Always Show Address Bar - When set to On, the address bar and menu bar area at the top will always be displayed.
Automatic Web Browser Issue Report - When set to On, if a failure occurs due to insufficient memory (operation delay or malfunction, media playback failure, page loading failure, abnormal shutdown, etc.), the information is automatically sent to the LG Electronics (Korea) Web Browser development team. The submitted information will only be used to improve the Web Browser performance.
Use Block Ads - When set to On, a button will appear in the menu bar area at the top of Web Browser to turn the Use Block Ads feature on and off. Turning on the Use Block Ads feature speeds up page loading by blocking ads included in the website.
Site Filtering - You can register websites to block or allow.
Approved Sites : You can configure the settings to open the previously registered web pages only.
Blocked Sites : You can configure the settings to block specific websites. To use the Site Filtering function, you should enter the TV password. The initial password is set as “0000”. When France or Norway is selected for Country, the password is not “0000” but “1234”.
Pop-up Blocker - Blocks pop-ups that are automatically displayed by web pages.
Private Browsing - If set to On, a history of website visits will not be stored.
Do Not Track - You can request to not leave a history of your visit on the website. The operation may vary depending on the policy of the website.
Adaptive Streaming using JavaScript - The media streaming technology using JavaScript allows you to view video with optimised resolution. If this is set to Off, the resolution of the videos played in Web Browser is limited to 720p.
Cookies Settings - Enables the website to store and use cookie data.
Clear Browsing Data - Clear Cookies : Deletes cookie data. When deleted, you are logged out of most sites.
Clear All Browsing Data : Deletes all browsing history, including cookies.
SETTINGS
QUICK SETTINGS
Set of light-weight controls quickly and simply such as Picture Mode, Sound Out, Sleep Timer and so on.
Press the 🎨 button on the remote control.

- You can set Picture Mode.
- You can set Sound Mode.
- You can choose Sound Out.
- You can set Sleep Timer.
- Move to the Connection screen.
-
You can set more options.
-
You can add/delete the quick setting items or change their order.
SETTINGS - PICTURE
PICTURE
Selecting Picture Mode
- Press > Picture > Picture Mode Settings > Picture Mode
- Select the picture mode that is best suited to your viewing environment, preferences or video type.
- Select a picture mode. By adjusting and setting each item in more detail based on the mode, your video is better optimised for its characteristics.
- The configurable items differ depending on model.
When You Use Normal Signals
Vivid - Sharpens the image by increasing the contrast, brightness and sharpness.
Eco / APS - The Energy Saver feature changes settings on the TV to reduce power consumption.
- The configurable items differ depending on model.
Cinema - Suitable picture for movies.
Sports / Football / Cricket - Suitable picture for sports games. Sharpens the image of rapid movements such as kicking or throwing a ball.
- The name of the sport may differ depending on region.
Game - Suitable picture for gameplay.
When You Use the HDR Signals
Vivid - Sharpens the image by increasing the contrast, brightness and sharpness.
Standard - In a normal viewing environment, it opens a screen that can properly show the expressiveness and brightness of HDR.
Cinema - Suitable picture for HDR video signal.
Game - Suitable picture for gameplay.
- Depending on the input signal, the available picture modes may be different.
- When watching online service content, the Picture Mode may be changed to match the content being shown.
- Picture Mode change may modify Energy Saving settings and it can affect energy consumption.
- You can adjust their settings manually in the Energy Saving menu.
SETTINGS - PICTURE (Cont.)
PICTURE MODE SETTINGS
Fine-Tuning Picture Mode
Press 🎨 > : > Picture > Picture Mode Settings
- This feature allows you to adjust the selected picture mode in detail.
Backlight - Controls the level of screen brightness by adjusting the backlight. The closer to 100, the brighter the screen.
- Decrease the Backlight to reduce energy consumption.
- If the Energy Saving is set to Maximum, you cannot adjust the Backlight.
- In this case, navigate to > > Picture>
Energy Saving and set to Off or Minimum.
Contrast - Adjusts the contrast of the bright and dark areas of the picture. The closer to 100, the higher the contrast.
Brightness - Adjusts the overall screen brightness. The closer to 100, the brighter the screen.
- You may use the Brightness settings particularly to set the dark part of the image.
Sharpness - Adjusts the sharpness of the image. The closer to 50, the sharper and clearer the image.
Colour - Tones down or up the colours displayed on the screen. The closer to 100, the deeper the colour.
Tint - Adjusts the colour balance between red and green displayed on the screen. The closer to Red 50, the more red the colour will be. The closer to Green 50, the more green the colour will be.
Colour Temperature - Adjusts the colour tone of the entire image. As you lower the level, you get a warmer tone, and as you raise it, you get a cooler tone.
- The settings you specify only apply to the currently selected input mode.
- To apply your current picture settings to all input modes, select Apply to all inputs.
- Depending on the input signal or the selected picture mode, the available options may differ.
- The configurable items differ depending on model.
Resetting Picture Mode
Press 🎨 > : > Picture > Picture Mode Settings > Reset
If you want to reset the image settings to the factory defaults after configuring the image settings, select reset for each image mode.
SETTINGS - PICTURE (Cont.)
Setting the Advanced Control Options
Press ⚙️ > ⋮ > Picture > Picture Mode Settings > Advanced Controls.
Dynamic Contrast - Corrects the difference between the bright and dark sides of the screen for optimal results depending on the brightness of the picture.
Dynamic Colour - Adjusts the Colour and saturation of the picture to make the image more Colourful and lively.
Gamma - Adjusts the medium brightness of the picture.
- Select Low for a bright picture, select High1 or High2 for a dark picture or select Medium for medium brightness.
- Live Theatre or Expert (Bright Room)/Expert (Dark Room) can be selected from 1.9/2.2/2.4/BT.1886. High2/BT.1886 expresses the gradation in ITU-R BT.1886, which is an international standard.
- Depending on the input signal or the selected picture mode, the available options may differ.
Setting Picture Options
Press 🎨 > ⋮ > Picture > Picture Mode Settings > Picture Options Noise Reduction - Removes small dots that stand out so as to make the image clean.
Black Level - Adjusts the brightness of the dark parts of images.
Select High for a bright screen or select Low for a dark screen.
This feature can be used while watching content through an external input.
Real Cinema - Optimise display for movies.
TruMotion - Suitable the image quality of fast-moving pictures.
- Off: Turns off the TruMotion.
- Cinema Clear: Adjusts the shaking of the motion on the screen to make it feel like you are in a movie theatre.
- Natural : Sets images with a lot of motions to look natural and clear.
- Smooth : Softens fast-moving pictures.
- User : Sets TruMotion manually.
- De-Judder : Adjusts juddering on the screen.
- De-Blur : Reduces the blurring effects of motion.
- Motion Pro : Make fast-moving pictures clearer using the light control.
The advanced settings can be changed only in User mode.
Depending on the input signal or the selected picture mode, the available options may differ.
- The configurable items differ depending on model.
SETTINGS - PICTURE (Cont.)
Setting the Screen Size
Press ⚙ > ⋮ > Picture > Aspect Ratio Settings > Aspect Ratio
- You can change the screen size according to the type of content you are watching.
16:9 - Displays an aspect ratio of 16:9.
Original - Changes the aspect ratio to 4:3 or 16:9 depending on the input video signal.
4:3 - Displays an aspect ratio of 4:3.
Vertical Zoom - You can adjust the vertical dimension of the screen and align the screen vertically by using Adjust Zoom Ratio and Adjust Screen Position.
4-Way Zoom - You can adjust the horizontal/vertical/diagonal dimensions of the screen and align the screen horizontally/vertically by using Adjust Zoom Ratio and Adjust Screen Position.
- The configurable items differ depending on model.
- The picture may get distorted while zooming in or out.
- Selecting a different screen size from the original size may cause the image to look different.
- Depending on the combination of picture format and screen size, the edges may be hidden or shown in black, or both sides of the picture may flicker. Also, when selecting an item shown on the broadcast screen, the outline may not be aligned correctly.
- Depending on the input signal, the available screen sizes may be different.
View Screen with Just Scan
Press ⚙ > : > Picture > Aspect Ratio Settings > Just Scan
If you turn this feature On, you can view the content in the aspect ratio that is in the broadcast signal or content source. If the edge of the screen is not clean, please turn it Off.
- If set to Auto, the feature switches between On or Off status depending on the information contained in the video signal.
- The items that can be selected may vary depending on the current input.
SETTINGS - PICTURE (Cont.)
To Use Energy Saving Feature
Press 🎨 > ⋮ > Picture > Picture Energy Saving
- Reduces power consumption by adjusting screen brightness.
Off - Turns off the Energy Saving mode.
Minimum / Medium / Maximum - Applies the pre-set Energy Saving mode.
Screen Off - Screen is turned off and only sound is played.
- Press any button except the power and the volume buttons to turn the screen back on.
- If you use Energy Saving function, brightness of your TV will be affected.
To Use Eye Comfort Mode Feature
Press ⚙️ > : > Picture > Additional Settings > Eye Comfort Mode
The colour temperature will be adjusted to reduce eye fatigue.
- On: The colour temperature of your TV screen is adjusted.
- Off: Turns off the Eye Comfort Mode.
- Some models may not be supported.
HDMI ULTRA HD Deep Colour
Press 🎨 > : > Picture > Additional Settings > HDMI ULTRA HD Deep Colour
- If you connect a device that supports HDMI ULTRA HD Deep Colour, you can enjoy a clearer image.
- After connecting the playback device, set HDMI ULTRA HD Deep Colour to On.
- If the connected device does not support this function, it may not work properly.
- In that case, change the TV's HDMI ULTRA HD Deep Colour setting to Off.
Supported Display Resolution
On : Supports 4K@60 Hz (4:4:4, 4:2:2 and 4:2:0)
Off : Supports 4K@60 Hz (4:2:0)
SETTINGS - PICTURE (Cont.)
Using Instant Game Response
Press 🎨 > : > Sound > Additional Settings > Instant Game Response
- Set the HDMI port connected to the device to be On to enjoy games with the optimal video for the game.
- If the connected device does not support this function, it may not work properly.
- Set the HDMI ULTRA HD Deep Colour feature to On for the HDMI terminal connected to the gaming device to enable Instant Game Response.
- It works only when the >Sound >Sound Out is set to Internal TV Speaker/Audio Out (Line Out)/Wired Headphones/Wired Headphones + Internal TV Speaker.
- (The configurable items differ depending on model.)
- When the Instant Game Response is launched, the video may blink temporarily.
- If you turn this feature On, you cannot change some video settings items
SETTINGS - SOUND
SOUND
Press > > Sound > Sound Mode Settings
SOUND MODE
You can select the most suitable sound mode for each genre.
Standard - Optimises the sound for all types of content.
Cinema - Optimises the sound for cinemas.
Clear Voice III / Clear Voice IV - Boosts voice clarity.
Sports / Football / Cricket - Optimises the sound for sports games.
Music - Optimises the sound for music.
Game - Optimises the sound for gameplay.
Balance - You can adjust the volume of the left and right speakers.
ULTRA Surround - Enjoy an immersive soundscape with the virtual multi-programme surround sound effect.
- This option can be enabled if Sound Mode is set to Standard.
Equalizer - You can set the desired sound by adjusting the equalizer directly. (100 Hz/300 Hz/1 kHz/3 kHz/10 kHz)
- This option can be enabled if Sound Mode is set to Standard.
Reset - You can reset the sound effect settings.
- This option can be enabled if Sound Mode is set to Standard.
- This setting is only available for Internal TV Speaker.
- The configurable items differ depending on model
SETTINGS - SOUND (Cont.)
SETTING SOUND OUT
Press > > Sound > Sound Out
- When Instant Game Response is set to On, audio delays may occur if you set Sound Out to WiSA Speakers/Optical/HDMI ARC.
Switch to Internal TV Speaker or change >Sound > Additional Settings > HDMI Input Audio Format to PCM.
Internal TV Speaker - Audio is played through the TV's internal speakers.
Bluetooth - Wirelessly connect a Bluetooth audio device to enjoy TV sound more conveniently. Refer to the user manual of the Bluetooth audio device for details on how to connect and use the device.
- Press DEVICE LIST to view the connected devices or the devices that can be connected to connect any one of them.
- LG Sound Sync devices will automatically try to connect to the recently used devices when you turn the TV on.
-
We recommend that you connect an LG audio device that supports LG Sound Sync, using LG TV mode or LG Sound Sync mode on device.
-
If the device fails to connect, check the power of the device to connect to and check if the audio device is working properly.
- Depending on the type of the Bluetooth device, the device may not connect correctly or an abnormal behavior may occur such as unsynchronized video and audio.
(The mobile-only headsets may not work)
- Sound may stutter or sound quality may be reduced if:
- the Bluetooth device is too far from the TV;
- there are obstacles between the Bluetooth device and the TV; or
- used together with radio equipment such as a microwave oven or wireless LAN.
- If you continue to experience problems, we recommend using a wired connection. (Optical digital, HDMI (ARC) port)
CONTINUE TO NEXT PAGE (60)
SETTINGS - SOUND (Cont.)
WiSA Speakers - WiSA Speakers is a speaker that uses the technology to transmit a multi 5.1 channel sound wirelessly.
You can wirelessly connect the TV to the WiSA Speakers to enjoy high-quality sound.
Select DEVICE LIST to adjust detailed settings for WiSA Speakers.
- Some models may not be supported.
- To use the WiSA speakers, you need to connect the exclusive dongle.
- Connection issues between the WiSA Dongle and WiSA Speaker may occur in environments with wireless interference. In this case, contact the speaker manufacturer.
- For more information on the purchase of WiSA authorized products, check on www.wisaassociation.org.
Optical - You can connect an audio device that supports Optical to the optical digital audio output port to enjoy your TV's sound in richer quality and greater convenience.
- Only available for models with an optical digital port.
- For some devices, you can adjust the volume using the TV remote control.
HDMI ARC - Sound from the TV can be output through an external audio device connected via a HDMI (ARC) port.
- Select HDMI ARC to automatically turn on SIMPLINK. Once SIMPLINK is turned off, the output speaker settings automatically revert to the default settings for uninterrupted audio output.
Audio Out (Line Out) / Wired Headphones - Select Wired Headphones or Audio Out (Line Out) to optimise audio output according to the device connected.
- Some models may not be supported.
- If you connect the wired headphones while the TV is powered on, it automatically detects the wired headphones and redirects audio through them.
SETTINGS - SOUND (Cont.)
PLAYING AUDIO THROUGH THE TV'S INTERNAL SPEAKERS AND EXTERNAL AUDIO DEVICE SIMULTANEOUSLY
Audio can be played through the multiple devices simultaneously.
Optical + Internal TV Speaker - Audio is played through the TV's built-in speakers and the audio device connected to the digital optical audio output port simultaneously.
Wired Headphones + Internal TV Speaker - Audio is played through the TV's internal speakers and the Wired Headphones simultaneously.
- Some models may not be supported.
- If you connect the wired headphones while the TV is powered on, it automatically detects the wired headphones and redirects audio through them.
SETTINGS - SOUND (Cont.)
TV INSTALLATION TYPE
Press 🎨 > ⋮ > Sound > Additional Settings > TV Installation Type
This mode optimises the sound based on the TV setup.
Stand - Select this if the TV is installed in stand-type.
Wall-mounted - Select this if the TV is installed in wall-mounted type.
- This setting is only available for Internal TV Speaker
SETTING VOLUME MODE
Press > > Sound > Additional Settings > Volume Mode
Auto Volume - Click On to adjust the volume automatically for different broadcasting companies so you can always listen to programmes at the desired volume, even after switching the programmes.
Volume Increase Amount - Select Low/Medium/High to adjust the volume range. Higher values increase increments.
- This setting is only available for Internal TV Speaker.
DTV AUDIO SETTING
Press 📄 > ☐ > Sound > Additional Settings > DTV Audio Setting
When different audio types exist in an input signal, this function allows you to select the audio type you want.
If set to Auto the search order is AC4 > HE-AAC > Dolby Digital Plus > Dolby Digital > MPEG and output is produced in the first Audio Format found.
- The following search order may change depending on the country: AC4 > HE-AAC. Dolby Digital Plus > Dolby Digital > MPEG.
- If the selected Audio Format is not supported, another Audio Format may be used for output.
- Some models may not be supported.
ADJUSTING AV SYNCHRONIZATION
Press > : > Sound > Additional Settings >AV Sync Adjustment
Adjusts the synchronization of the sound from the speaker that is working.
The closer to Greater than, the slower the audio output.
Bypass, Outputs the broadcast signals or the sound from external devices without any audio delay. The audio may be output before the video because of the time the TV takes to process the video input.
- Available options vary by Sound Out setting.
SETTINGS - SOUND (Cont.)
HDMI INPUT AUDIO FORMAT
Press 🧑 > ⋮ > Sound > Additional Settings > HDMI Input Audio Format You can set the audio format for each HDMI input. When the voice delivered through the HDMI port is not synchronized, set it to PCM.
LG SOUND SYNC
Press 🎨 > ⋮ > Sound > Additional Settings > LG Sound Sync Connect the LG Sound Sync device to the optical digital input port and set Sound Out to Optical.
- By setting this feature to On, you can adjust the volume of the connected LG Sound Sync device using a TV remote control.
- If the auto-power feature of the sound bar that supports LG Sound Sync is set to On, the sound bar will be turned on or off together when the TV is turned on or off.
SETTING DIGITAL SOUND OUT
Press 🎨 > ⋮ > Sound > Additional Settings > Digital Sound Out You can configure the Digital Sound Out settings.
This setting is only available when Settings > All Settings icon > Sound > Sound Out is set to Optical/HDMI ARC.
- When Pass Through is enabled, sound effects may not be output.
- The codec output with a device may differ from input signals.
Dolby Atmos : Some models may not be supported.
SETTINGS - PROGRAMMES
AUTOMATICALLY SETTING UP PROGRAMME
Press 🎨 > ⋮ > Programmes > Programme Tuning > Auto Tuning
Automatically tunes the programmes.
- Select Country where the TV is used. Programme settings change depending on the country you choose.
- Initiate Auto Tuning.
- Set Auto Tuning following screen instructions.
- If Input Source is not connected properly, programme registration may not work.
- Auto Tuning only finds programmes that are currently broadcasting.
- If Safety is turned on, a pop-up window will appear asking for password.
MANUAL PROGRAMME TUNING
Press 🎨 > ⋮ > Programmes > Programme Tuning > (Programme Tuning & Settings) > Manual Tuning
This function is for manually searching and saving programmes.
- For digital broadcasting, signal strength and signal quality can be checked.
USE THE SIGNAL TEST
Press 🎨 > ⋮ > Programmes > Programme Tuning > (Programme Tuning & Settings) > Signal Test
- Shows the MUX and Service information etc.
- Signal test is only available in Antenna or Cable mode.
- Some models may not be supported.
SETTINGS - PROGRAMMES (Cont.)
EDIT PROGRAMMES
You can edit the selected programmes from all the stored programmes or add/delete them to/from the favourite programmes.
Edit All Programmes List
Press > : > Programmes > Programme Manager > Edit All Programmes You can lock or unlock the selected programmes from all the stored programmes, or you can set them to be skipped when switching programmes.
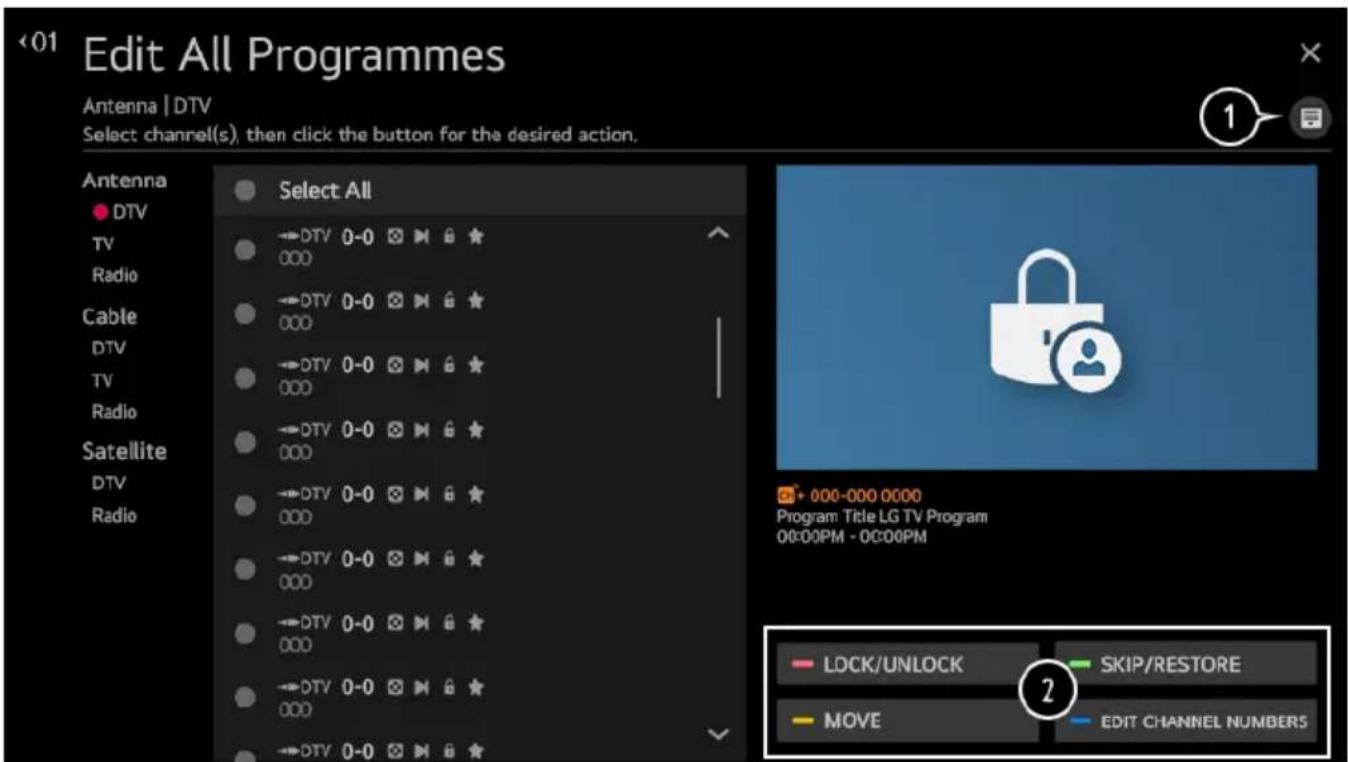
- Set the sorting option.
- Lock/Unlock: Lock the selected programmes or unlock the locked programmes.
Skip / Restore : Set the selected programmes to be skipped when switching programmes, or disable the skipping option of the programmes previously set to be skipped.
Move : Move the selected programmes.
Edit Programme Numbers : Change the numbers of the selected programmes.
Delete : Delete the selected programmes.
- Available features may vary depending on the broadcast signal.
- For a model that supports satellite programmemes, you can manage the satellite programmes in Edit Satellite Programmes (Advanced).
SETTINGS - PROGRAMMES (Cont.)
EDIT PROGRAMMES LIST
Press > : > Programmes > Programme Manager > Edit Favourites You can add/delete desired programmes to/from the favourite programmes, change their positions, etc
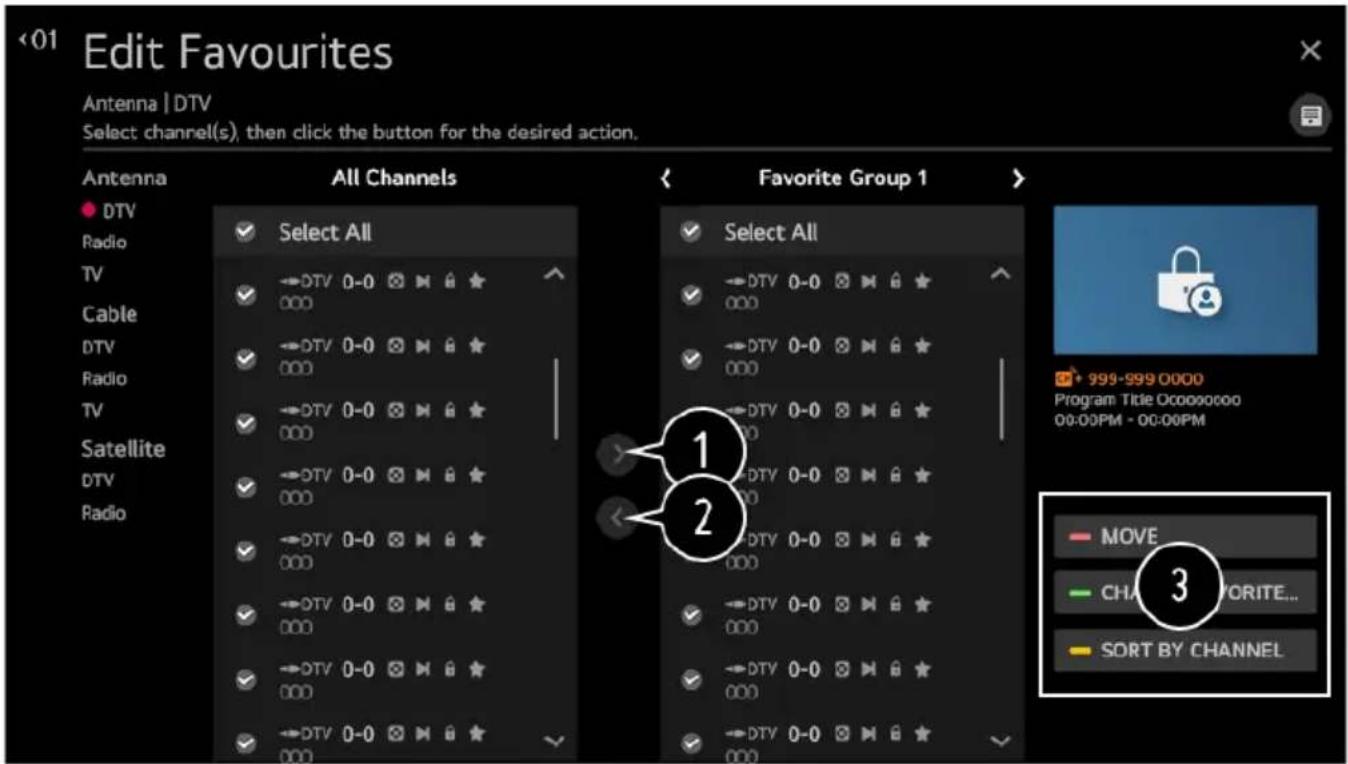
- Select the desired programmes from the all programmes list and press the button to add them to the favourite programmes list.
- Delete the selected programmes from the favourite programmes list.
- Move: Select one or more programmes in the Preferred Programmes list, press the Move button, and then select the position to move it to. The selected programmes will move to the position you selected. Change
Group Name : Change the name of the favourite programmes list.
Sort by Programme : Sorts the list of favourite programmes by programme.
SETTINGS - CONNECTION
SETTING THE TV NAME
Press > : > Connection > TV Name
You can use the screen keyboard to set the name for the smart TV to be used on the network. Up to 25 characters can be entered in case of English alphabet.
NETWORK CONNECTION SETTINGS
Press > : > Connection >Network Connection Settings
If you configure settings for the network, you can use various services such as online contents and applications.
SETTING A WIRED NETWORK
Select Wired Connection (Ethernet). If the router connected to the network supports the DHCP feature, connecting the TV and router by wire will automatically connects to the network. If the automatic setup is not supported, you can select Edit to manually set up the network connection.
SETTING A WIRELESS NETWORK
If you have set the TV up for a wireless network, you can check and connect to the available wireless Internet networks.
- Add a hidden wireless network
- If you input the name of network directly, you can add a wireless network.
Connect via WPS PBC - If the wireless router you want to connect to has a Wi-Fi Protected Setup-Push Button Configuration (WPS-PBC) feature, you can easily connect to the wireless router by pressing the WPS-PBC button on the router.
- Press the wireless router's WPS-PBC button and then go into Network Settings > Wireless Network > Select "Connect via WPS BPC", and it should automatically connect.
Connect via WPS PIN - This is a method to connect to an access point using a Wi-Fi Protected Setup-Personal Identification Number (WPS-PIN).
- Select the access point you want to connect to.
- Enter the PIN displayed on the access point's Wi-Fi device.
Advanced Wi-Fi Settings - Once you connect to a wireless network, you can view connection information such as detailed IP address information. In addition, you can change the IP address and DNS server address you want to connect to by pressing the Edit button.
- The IPv6 setup does not support Edit.
- For more information on how to connect to the network, see Getting Started with webOS TV > Connecting to the Network in User Guide.
SETTINGS - CONNECTION (Cont.)
MOBILE CONNECTION SETTINGS
Press > : > Connection > Device Connection Settings
You can link the information about the devices connected to the TV and configure settings related to operations.
SIMPLINK (HDMI-CEC) - With a single remote control, you can easily manage various devices such as a soundbar or set-top box connected to a TV with HDMI.
- To see the details, click the How to Operate TV Connecting to SIMPLINK (HDMI-CEC) in User Guide.
- Up to three devices can be connected and used simultaneously.
Auto Power Sync - If Auto Power Sync is set to On, turning on a SIMPLINK-linked device will turn the TV on. When you turn off the TV, the device will also be turned off.
LG Wireless Keyboard - This feature enables you to connect a LG wireless keyboard to your TV.
- Turn on the device, set it to pairing mode, and then click Connect on your TV screen. If there is a LG wireless keyboard previously connected, it will be automatically reconnected to your TV once your TV turns on. To disconnect the existing connection, click Disconnect.
LG Rolly Keyboard - This feature is only available for models with built-in Bluetooth dongles.
SETTINGS - CONNECTION (Cont.)
MOBILE CONNECTION SETTINGS
Press > : > Connection > Mobile Connection Management
You can set to use a smart device connected to the TV to control the TV or manage the connection history.
TV On With Mobile - If Turn on via Wi-Fi or Turn on via Bluetooth is set to On, you can turn on your TV using an application that supports TV On With Mobile.
- The TV should be connected to a network.
- The TV and the device to be used should be connected to the same network.
- The Turn on via Wi-Fi feature must be used in an app on a smart device that supports the feature.
- The Turn on via Bluetooth feature can only be used with certain LG Electronics smartphones.
- The TV must be plugged in.
- To connect for the first time, make sure the device to be used is ready to connect.
- Some models may not be supported.
Screen Share - You can delete the connection history of the device that was connected to the TV through Screen Share.
Sound Share - You can delete the connection history of the smart device that was connected to the TV via Bluetooth.
SETTINGS - GENERAL
CONFIGURING LANGUAGE SETTINGS
Press > > General > Language
You can choose the menu language displayed on the screen and the audio language of the digital broadcast.
Menu Language - You can select one of the menu languages to be displayed on the screen. The language for the speech recognition will be automatically set to the selected language for the menu.
- The speech recognition is only applied to some models.
Primary Audio Language / Secondary Audio Language - You can choose the language you want when watching a digital broadcasting programme, which includes multiple audio languages. For programmes that do not support multiple languages, the default will be used.
- Applies to Digital broadcasting.
Keyboard Languages - Select the language to use the on-screen keyboard.
To Set Teletext Language - To see the details, click the Enjoy Live TV TELETEXT in User Guide.
- In Digital Mode Only
CONFIGURING LANGUAGE SETTINGS
Setting the Location
Press > : > General > Location
You can change the location setting of your Smart TV.
Address Setting - You can set the Region and City of your TV.
Broadcast Country - You can set the broadcast country on your TV.
Service Area Postcode - This function is used to set the broadcast location of the TV by entering your postcode.
Services Country - If you don't set the Set Automatically, you can select the country manually.
- You must set the country manually when you are not connected to the network.
- The configurable items differ depending on model.
SETTINGS - GENERAL (Cont.)
TIME
Press ⚙ > ⋮ > General > Time
You can check the time or configure related settings.
Set Automatically - The TV time is automatically set to the time of digital broadcasting information sent from the broadcasting station or the time sent from the server.
Time / Date / Time Zone - You can manually set the time and date if the automatically set current time is incorrect.
- If you set the time manually with the antenna connected, schedule information, programme guide, etc. may not function correctly.
Custom Time Zone - When select the Custom in Time Zone, Custom Time Zone menu is activated.
TIMERS
Sleep Timer - Sets the TV to turn off at a specified time. If you do not want to use Sleep Timer, select Off.
Power On Timer - Set Power On Timer to On.
The TV is turned on and displays the set channel at the set time.
- Time : Set the time at which to turn the TV on.
- Timer Repeat : Set the day of the week. Set the option to None to operate the feature only once.
- Input : Set an external input to display when the power is turned on.
- Timer Programme : Set a channel to display when the power is turned on. This option can be set only when Input is set to TV.
- Volume : Set audio volume to use when the power is turned on.
Power Off Timer - Set Power Off Timer to On. The TV is turned off at the set time.
- Time : Set the time at which to turn the TV off.
- Timer Repeat: Set the day of the week. Set the option to None to operate the feature only once.
4 Hours Auto Power Off - If you do not press any button for 4 hours after the TV is turned on by a feature such as Power On Timer, the TV will be turned off automatically. To ensure the TV does not automatically turn off, set 4 Hours Auto Power Off to Off.
- Some models may not be supported.
- To use Power On Timer/Power Off Timer, set the time correctly.
- If Timer Repeat of Power On Timer/Power Off Timer is set to None. If the time set in the Power On Timer is passed while watching TV, the power will turn on automatically when it reaches the set time and the TV is turned off on the next day or later. If the time set in the Power Off Timer is passed while TV is in standby, the power will turn off automatically 80 when it reaches the set time while watching TV on the next day or later.
SETTINGS - GENERAL (Cont.)
ENABLING TV RATING LOCKS
This function operates according to information from the broadcasting station.
Therefore if the signal has incorrect information, this function does not operate.
Prevents children from watching certain adult's TV programmes, according to the ratings limit set. Enter a password to watch a blocked programme. Rating differs by country.
- Press the Settings button on the remote control.
- Press > General > Safety.
- Set Safety to On.
- Select TV Rating Locks.
- Supported only in the digital mode.
- Some models may not be supported.
- The initial password is set as "0000".
ENABLING PROGRAMME LOCKS
Blocks the programmes that contain inappropriate contents for children. The programmes can be selected but the screen is blank and the audio is muted. To watch a locked programme, enter the password.
- Press the button on the remote control.
- Select > General > Safety
- Set Safety to On.
- Select Programme Locks.
- Select the Programmes to lock.
- Select Lock / Unlock.
- The initial password is set as "0000".
- When France or Norway is selected for Country, the password is not "0000" but "1234".
SETTINGS - GENERAL (Cont.)
ENABLING APPLICATION LOCKS
You can lock or unlock the application.
- Press the button on the remote control.
- Select > General Safety.
- Set Safety to On.
- Select the Application Locks.
- Select the Applications to lock.
- The initial password is set as "0000".
- When France or Norway is selected for Country, the password is not - "0000" but "1234".
- The lock function is not immediately available for the currently running application.
RESET PASSWORD
- Press the > General > Safety > Reset Password
- Set or change the password for the TV.
- The initial password is set as "0000".
- When France or Norway is selected for Country, the password is not "0000" but "1234".
RESETTING A LOST PASSWORD
If you lose the password you set, you can reset it as follows:
- Press the button on the remote control.
- Select icon General > Safety.
- On the safety Menu > Press Programmes Up > Programmes Up > Programmes Down > Programmes Up on the remote control. The master password input window will appear.
- Enter the numbers "0313" in the master password input window, then press Enter. The password will be reset.
SETTINGS - GENERAL (Cont.)
MANAGING YOUR ACCOUNT
In Account Management, you can use your email address to create a new LG account. For more information, see Getting Started with webOS TV Account Management in User Guide.
HOME SETTINGS
1. Press

General > Home Settings
Home Auto Launch - You can set Home to launch automatically when turning on the TV.
Home Promotion - You can turn on or off the advertisements on the Home screen.
- The configurable items differ depending on model.
SETTINGS HELP
1. Press

General >Additional Settings >Settings Help
- If you select the setting menus, you will see the hints of the settings.
- Turn on/off description box in Settings.
RECOMMENDED - Leave description box ON, as this will explain all settings as you hover over them.
![Connection TV Name [LG] webOSTV Network Connection Settings Device Connection Settings Mobile Connection Management Network Connection Sat settings related to your wired / wireless network.](/content/2026/05/1040901/images/2b8a29105e58b8db1808d3b60d8f95edebe0e18c173e5dc5b71ff1949517924f.jpg)
SETTINGS - GENERAL (Cont.)
SCREEN SAVER
-
Press > General > Additional Settings > Screen Saver
-
When the currently displayed app has not received any user input for an hour, it will be replaced by a Screen Saver.
- Setting the Screen Saver feature to Off, maintains the same display for an extended period, which may compromises quality. The compromised screen may not be recoverable.
NO SIGNAL
- Press > General > Additional Settings > No Signal Image
- You can turn on or off the image displayed when there is no signal.
On: The default image is displayed if there is no signal.
Off: The No Signal message is displayed if there is no signal.
USING ECO MODE
- Press > General > Additional Settings > Eco Mode
- Set power options to reduce energy consumption.
Auto Power Off - Set the TV to turn off automatically when there has been no user input for a specified amount of time.
HDD Eco Mode - If you set the mode to On, the USB HDD connected to the TV will go into power-saving mode when it has been left unattended for an extended period of time.
- The configurable items differ depending on model
TV POWER SETTING
- Press > General > Additional Settings > Quick Start+
- This setting puts your TV in standby mode when it's turned off so it will start up more quickly the next time it's turned on.
- Set Quick Start+ to On.
- Some models may not be supported.
- Turning this option on may increase energy consumption.
TO SET POWER INDICATOR
-
Press > General > Additional Settings > Standby Light
-
You can turn the standby light on or off.
- Some models may not be supported.
SETTINGS - GENERAL (Cont.)
ADVERTISEMENT
1. Press

General > Additional Settings > Advertisement
- If your TV is connected to the Internet, webOS may use a frequency capping cookie to keep track of the number of times an ad is shown on your TV.
- This information is used to help limit the number of times the same ad is displayed. You can clear this cookie or turn it on or off at any time by going to the Advertisement setting on your TV.
- No personally identifiable information is tied to this cookie.
- Some models may not be supported.
SETTINGS - ACCESSIBILITY
MENU FOR THE VISUALLY IMPAIRED
Press ⚫ > ⋮ > Accessibility > Audio Description
- The contents on the screen will be described with voice for visually impaired viewers.
- You can use this function if the broadcasting company supports Audio Description for the visually impaired.
- Some models may not be supported.
CHANGING THE MENU TO HIGH-CONTRAST SCREEN
Press Ⓞ > ⋮ > Accessibility > High Contrast
- When this feature is set to On, it adjusts the background of some of the menus on the screen and font colours to highlight the contrast between the light and dark areas.
GRAYSCALE
Press 🎨 > ⋮ > Accessibility > Grayscale
- Change the colour of the menu on the screen to black and white tone to make its ambiguity very clear.
- Set to On.
INVERT COLOURS
Press > : > Accessibility > Invert Colours
- To enhance the visibility of the menus on the screen, you can invert and calibrate certain colours in some menus.
- Set to On
HARD OF HEARING
-
Press > Accessibility
-
Set Hard of Hearing to On. A caption will be provided for the hearing-impaired. When the Hard of Hearing is turned On, it will be prioritized over the general captions. Some models may not be supported.
SUBTITLES
-
Press > > Accessibility
-
Set Subtitles to On.
-
Set Hard of Hearing to On.
-
A caption will be provided for the hearing-impaired.
- When the Hard of Hearing is turned On, it will be prioritized over the general captions.
- Some models may not be supported.
SUPPORT
SOFTWARE UPGRADE
Press > : > Support > Software Update
Uses software update to check and obtain the latest version.
Allow Automatic Updates - If set to On, updates will be proceeded automatically without asking when there is a new update after a version check.
Check for updates - When checking for the latest update version, you can only perform updates if an update file of a later version is available. The TV automatically checks your software version but, if necessary, you can perform a manual check.
- The configurable items differ depending on model.
- The latest version can be obtained via digital broadcast signals or internet connections.
- Changing the programme while downloading the software via digital broadcast signal interrupts the download process. Returning to the initial programme allows downloading to resume.
- If software is not updated, certain functions may not work properly.
- In some countries, Allow Automatic Updates is not displayed if you are not connected to the Internet.
TV INFORMATION
Press > : > Support > TV Information
You can view information including Model, Serial Number, Device Name.
SUPPORT (Cont.)
NOTIFICATIONS
Press > : > Support > Notifications
You can view all notifications from TV apps and service at the same time. You can view and delete each notification message.
- For notifications that support shortcuts, you can go directly to that app or website.
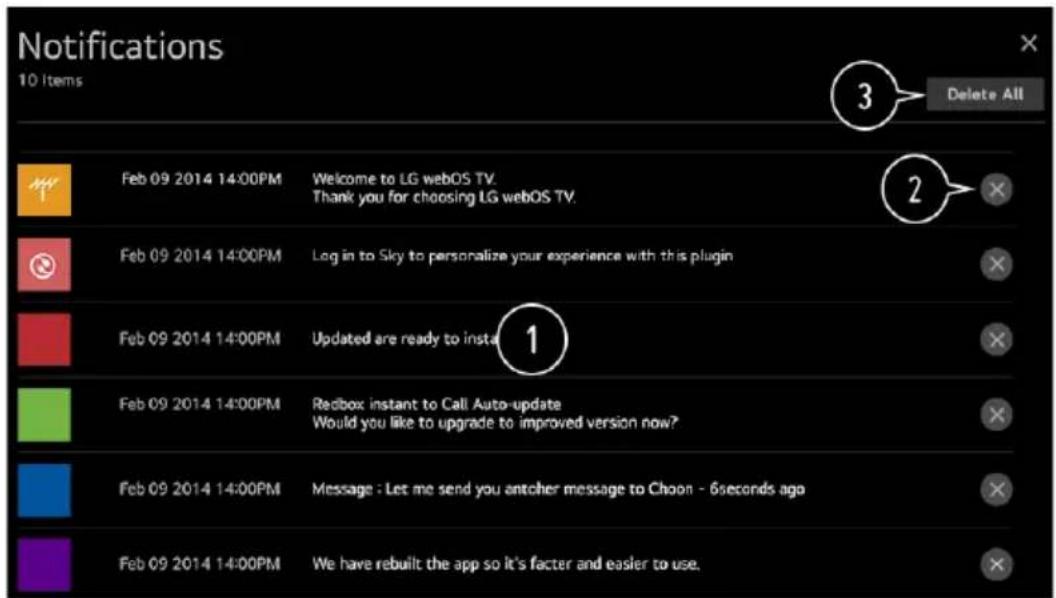
ADDITIONAL SETTINGS
Press > : > Support > Additional Settings
User Agreements - These are the terms and conditions for privacy for the use of Smart TV-related services.
Legal Notice - It's a legal notice for services provided via TV.
Open Source Software Notice - You can view the instructions for each item.
RESTORING THE DEFAULT SETTINGS
Press > : > Support > Reset to Initial Settings
Reset TV to its initial settings - This will revert all settings to their default values.
- After reset, the TV will automatically turn off and on.
- If Safety is set to On, you should type the password to Reset to Initial Settings.
- Do not turn off the power during initialization.
- We recommend that you reset the TV to Reset to Initial Settings before you sell it or transfer it to a third party.
TROUBLESHOOTING
TROUBLESHOOTING POWER/REMOTE CONTROL ISSUES
If you experience any of the problems below while using the product, please check the following:
I cannot turn on the TV.
- Please make sure your TV power plug is correctly connected to the outlet.
- If you are using a multi-outlet, check if it is working properly. To check whether a power strip is working properly, plug the TV's power plug directly to a wall outlet and observe its operation.
- Try to power on using the button on your TV set.
The power is on, but the screen comes on later.
This is because there is a noise-removal process to eliminate any possible noise that may appear during power-on. This does not mean the product is defective.
I cannot turn the TV on with the remote control.
Please make sure your TV power plug is correctly connected to the outlet.
- Replace the batteries in the remote control. (Use alkaline batteries.)
- Check if there is an obstacle blocking the signal in front of the TV's remote control receiver. If there is an obstacle, such as a soundbar, in front of the receiver at the bottom of the TV, IR recognition may not work properly.
The power turns off suddenly.
- Check whether the Power Off Timer, No Signal Auto Off or No Operation Auto Off is set.
- The TV will be turned off automatically if you do not press any buttons for 4 hours even after the TV is turned on at the time set by Reminder or Power On Timer.
- There is also a chance that the internal protection circuitry has activated because the internal temperature of the product has risen unusually or excessively
TROUBLESHOOTING (Cont.)
TROUBLESHOOTING SCREEN ISSUES
If you experience any of the problems below while using the product, please check the following:
- There may be no problem with the product.
- If you are using a set-top box, turn it off, and then turn it back on.
- Make sure that the set-top box is correctly connected to your TV.
It says there is no signal on the screen.
- Check whether the coaxial cable or the cable connected to the external device is properly connected to the TV.
- Go to to choose the connected input.
- Check if your external device, such as set-top box or Blu-ray player, is turned on.
I cannot see some programmes.
- Press the >Programmes >Programme Tuning (Programme Tuning & Settings) >Auto Tuning.
- If you are using a set-top box, consult its supplier.
The screen shakes after the momentary appearance of vertical/horizontal lines and net pattern.
Connect wireless telephones, hairdryers, electrical drills, etc. to a different power outlet. The problem may be caused by high-frequency electronic devices such as another TV or strong electro-magnetic sources nearby.
Each programme has a different image quality.
Depending on the type of videos provided by the broadcasters, programmes may have different image qualities.
If you are using a set-top box, consult its supplier.
There is a difference in image quality from those seen at the store.
Depending on the type of video provided by the broadcasters, there may be a difference in image quality from those displayed at the store.
TROUBLESHOOTING (Cont.)
A digitally broadcasted programme stops or its screen is broken.
This happens when a signal is weak or reception is unstable. Adjust the antenna direction or check the cable connection.
Press the ⚙️ > ⋮ > Programmes > Programme Tuning (Programme Tuning & Settings) > Manual Tuning
- If the signal strength is too low in Manual Tuning, contact the broadcasting station or management office to have the signals checked.
- If you are using a set-top box, consult its supplier.
When HDMI input is in use, a vertical solid line or colour blurring appears on the upper/lower/left/right edges of the screen.
Press the ⚙️ > : > Picture > Aspect Ratio Settings > Just Scan
- Set Just Scan to Off.
- Just Scan shows you the original image as it is. If the signal is weak, the top/bottom/left/right sides of the screen may be snowy.
I don't see anything, or the image keeps flickering when I try to connect the HDMI cable.
- Check whether your HDMI® cable is compliant with the specifications.
- You may experience flickering or a blank screen if the HDMI® cable is faulty (bent, broken).
- Make sure that the cable is correctly connected to the port. Bad or loose contact may cause display problems on the screen.
- If using a UHD set-top box, adjust > Picture > Additional Settings > HDMI ULTRA HD Deep Colour.
The screen looks too dim or dark.
-
Press the > Picture Picture Mode Settings Picture Mode
-
Switch Picture Mode to your desired picture mode. (Standard, Vivid, etc.) This applies to the current input mode only.
Press the ⚙ > ⋮ > Picture Energy Saving
- Switch Energy Saving to either Off or Minimum.
Press the ⚙ > : > Picture Additional Settings Eye Comfort Mode
- Switch Eye Comfort Mode to Off.
TROUBLESHOOTING (Cont.)
The screen is in black and white or displaying strange colours.
Check the input mode or cable connection.
- Go to to choose the connected input.
- You may get a black and white screen if you have connected to the COMPONENT IN but selected the AV.
- Go to and choose Component.
When you are connecting to the AV IN or COMPONENT IN, check to ensure each cable is matched with the corresponding colour connection.
- For component cables, make sure the video (red) cable and audio (red) cable are connected properly.
- AV IN/COMPONENT IN ports are available in certain models only.
ULTRA HD video does not display.
With some HDMI cables, signals may not be received.
- Change the settings of the connected device to the supported signal.
TROUBLESHOOTING (Cont.)
TROUBLESHOOTING PC CONNETION ISSUES
PC connection issues
- Press button on your remote control and select Home Dashboard.
- Select Edit in the upper right corner of Home Dashboard.
- In the Edit mode, set the icon of the HDMI terminal connected to the PC to PC to apply the video and aspect ratio settings that are aligned with the PC.
- To connect a different device to the same input terminal, you need to set the icon again because the settings of the Edit icon will not be automatically restored.
The screen remains blank after it is connected to a PC.
- Check that the PC is properly connected to the TV.
- Turn the TV off and back on using the remote control.
- Restart the PC with the TV on.
- Make sure that the output resolution set on the PC is set to the HDMI-PC supported resolution of the TV.
- To use dual monitors, check that the PC or notebook supports dual-monitor mode.
-
Reconnect the HDMI cable.
-
If you have connected the RGB output port of your PC to the HDMI IN of your TV, you need an RGB to HDMI gender.
- You will not see anything on the screen if you use an HDMI to RGB gender.
The screen is not fully shown or is lopsided when connected to a PC.
- Set the PC's resolution to one supported by the TV.
For more information, see Being Aware of the Information
Supported Resolution : HDMI-PC in User Guide.
-
Set the connected HDMI device's name to PC.
-
Press button on your remote control and select Home Dashboard.
-
Select Edit in the upper right corner. Change the icon of the HDMI port connected to Inputs to PC and select Save.
The sound does not play when the PC is connected with an HDMI cable.
Set TV as the default device in Sound > Playback in Control Panel of PC settings. Consult your manufacturer on whether your graphics card supports HDMI audio output.
TROUBLESHOOTING (Cont.)
TROUBLESHOOTING MOVIE PLAYBACK ISSUES
Troubleshooting Movie Playback Issues
If you experience any of the problems below while using the product, please check the following:
I cannot find a file in the Photo & Video.
- Check whether the files saved on your USB storage device can be read by the PC.
- Select to see if Filter is set to Photo & Video.
I see a message that says the file is not supported.
- Check that the file plays without any problems on the video player on a PC. (Check for file damage.)
- Check that the file extension is supported.
- Check that the resolution is supported.
- Check that the video codec is supported.
- Check that the frame rate is supported.
I cannot see the subtitles.
- Check that the file plays without any problems on the video player on a PC. (Check for file damage.)
- Check that the video and subtitle files have the same name. check that both the video file and the subtitle file are in the same folder.
- Check that the subtitle file format is supported.
- Check that the language is supported. (You can check the language of the subtitle file by opening the file in the Notepad.)
- If subtitles encoding is incorrectly set, subtitles may not be displayed properly.
- Select > ... in sube control panel at the bottom of the video playback screen and change the Code Page value.
If you play a video file stored on another device by using the content sharing feature, subtitles may not be available depending on the programme you use.
Subtitles are not supported if you are playing video through an NAS unit. Consult your NAS manufacturer.
My USB storage device is not recognised when connected.
- Check whether it is a USB storage device supported by the TV.
TROUBLESHOOTING (Cont.)
TROUBLESHOOTING RECORDING ISSUES
Troubleshooting Recording Issues
If you experience any of the problems below while using the product, please check the following:
How do I start recording?
- Connect a USB storage device with at least 4 GB of total space.
The device must have at least 1 GB of available space.
(Refer to Connecting External Devices Connecting USB in the User Guide for details on USB storage devices.)
Press the button on your remote control. Press the (record)
that appears on the bottom left of the screen to start recording.
Which signals support recording?
Real-time and scheduled recordings are available only for programmes directly by the TV.
- Programmes from the set-top box cannot be recorded.
- Protected content is not recorded.
Is Scheduled Recording possible even if the TV is off?
Scheduled Recording starts and completes recording at the set time even if the TV is off.
- Scheduled Recording does not function if the TV's power plug is unplugged.
TROUBLESHOOTING (Cont.)
TROUBLESHOOTING NETWORK CONNECTION ISSUES
Troubleshooting network connection Issues
If you experience any of the problems below while using the product, please check the following:
- You can check the network connection status as shown below.
Press > > Connection > Network Connection Settings >
Wired Connection (Ethernet) - Press > > Connection > Network Connection Settings >
Wi-Fi Connection > Advanced Wi-Fi Settings
TV network connection lost
When you are in the above mentioned WIRED or WI-FI menus, please check below:
When X appears next to TV icon
- Check the TV or the AP (Router).
- Check the connection status of the TV, AP (Router) and cable modem.
-
Power off and power on in the following order;
-
Turn your cable modem off and back on, and wait for the device to reset.
-
Turn the wired/wireless router off and back on, and wait for the device to reset.
-
Turn the TV off and on.
- If you want to establish a wired LAN connection, check whether an IP address can be obtained from your router properly. If you are setting up your network manually, check whether all settings are correct.
- If you want to establish a wireless connection, check the following points as well.
- Set your router's SSID (network name) or wireless channel.
- Set your router's security key.
- If you can't complete this setting, refer to the router's user manual and the instructions provided by your Internet provider. If you are still unable to establish your configuration, consult your router's manufacturer or your Internet service provider.
- If you are using a static IP, enter the IP directly.
CONTINUE TO NEXT PAGE (90)
TROUBLESHOOTING (Cont.)
Gateway network connection lost
When you are in the Menu's mentioned on page (89) WIRED or WI-FI menus, please check below:
When X appears next to Gateway
- Check the AP (Router) or consult your Internet service provider.
- Unplug the router/cable modem from the wall outlet, wait 10 seconds and reconnect it.
- Initialize (Reset) the AP (Router) or cable modem.
- Check the AP (Router) manufacturer's website to make sure your router has the latest firmware version installed.
- If you can't complete this setting, refer to the router's user manual and the instructions provided by your Internet provider. If you are still unable to establish your configuration, consult your router's manufacturer or your Internet service provider.
DNS network connection lost
When you are in the Menu's mentioned on page (89) WIRED or WI-FI menus, please check below:
When X appears next to DNS
- Check the AP (Router) or consult your Internet service provider.
- Unplug the router/cable modem from the wall outlet, wait 10 seconds and reconnect it.
- Initialize (Reset) the AP (Router) or cable modem.
- Check that the MAC address of the TV/AP (Router) is registered with your Internet service provider.
- (The MAC address displayed on the pane of the network status window should be registered with your Internet service provider.)
If you can't complete this setting, refer to the router's user manual and the instructions provided by your Internet provider. If you are still unable to establish your configuration, consult your router's manufacturer or your Internet service provider.
TROUBLESHOOTING (Cont.)
TROUBLESHOOTING CONTENT STORE ISSUES
Troubleshooting Contents Issues
If you experience any of the problems below while using the product, please check the following:
I cannot see any content in HOME.
You may not be able to see the content if the service country setting has been changed. Change to the service country you are going to use the service from in Press > : > General > Location > Services Country.
- If you cannot see some apps, it may be because you deleted them.
- Please reinstall the appropriate app.
- If the app is deleted, you can download the app at Content Store and re-install it. Go to Content Store to find and install the app you want.
- The content offerings are subject to change or interruption by the service provider.
TROUBLESHOOTING INTERNET BROWSER ISSUES
Troubleshooting internet browser Issues
If you experience any of the problems below while using the product, please check the following:
Some parts of a particular website are not visible when I am using the Internet.
- The Web Browser supports only HTML5 media and not Flash Plug-in.
- The Web Browser does not support plug-in installation.
You cannot save attachments or images.
If the Use Block Ads feature is turned on, the area on the website that appears to show an ad will appear blank. If some content on the website is hidden and invisible, try setting Menu icons > Settings
- Use Block Ads to Off in Web Browser. Sponsored AD on the new tab page will be displayed even if you set the Use Block Ads feature to Off.
The Internet browser automatically shuts down when I visit a website.
The Internet browser may be forced to shut down if the available memory size is not sufficient to accommodate the image information for a website.
When watching a video in Web Browser, the video is forced off.
You may be able to fix this by setting Menu icons Settings >
Adaptive Streaming using JavaScript to Off in Web Browser. The setting is not applied to tabs that were open before the change, and is only applied to tabs opened after the change.
SPECIFICATIONS
| Operating System | webOS TV |
| Resolution | 3840 x 2160 |
| Contrast ratio: | 3500 : 1 |
| Colours | 1.07 Billion Colours |
| Aspect Ratio | 16 : 9 |
| Multimedia Playback Format under USB Mode | Music: MP3, M4A, AAC, WMA |
| Movie: AVI, MP4, MPG, MKV, MOV, DAT, VOB, RM, RMVB | |
| Photo: JPG, BMP, PNG | |
| Power Source | 100-240V~ 50/60Hz |
| Power Consumption | 400W |
| Dimensions | With stand: 1903 (w) × 361.8 (d) × 1165.2 (h) mm |
| Without stand: 1903 (w) × 81 (d) × 1086.6 (h) mm | |
| Weight | Net: 46 kg |
| Gross: 59 kg |
三KO
CUSTOMER SUPPORT:
info@ayonz.com
DISTRIBUTED BY:
Ayonz Pty Ltd


- INSTRUCTION
- MANUAL
- CONTENTS (Cont.)
- CONTENTS
- GENERAL SAFETY
- IMPORTANT INFORMATION
- GENERAL SAFETY INSTRUCTIONS (Cont.)
- Installation
- WARNING!
- It is STRONGLY RECOMMENDED that you ANCHOR this product.
- Please make sure upon positioning this product, the place is:
- HDMI®
- TV STAND INSTALLATION
- CAUTION! LIFT TV FROM THE BOTTOM SIDE
- TEAM LIFT REQUIRED, 2 OR MORE PERSONS
- TV STAND INSTALLATION (Cont.)
- 1
- 2
- WALL MOUNTING
- Wall-Mounting Instructions
- BACK OF TV
- CONTROLS AND CONNECTIONS (Cont.)
- USB connection
- Next few pages of MAGIC REMOTE CONTROL explains the following:
- MAGIC REMOTE CONTROL (cont.)
- Please follow instruction when pairing magic mouse remote control for your webOS TV
- FIRST TIME PAIRING
- Registering the Magic Mouse Remote Control
- RE-REGISTERING THE MAGIC REMOTE CONTROL
- REMOTE CONTROL (Cont.)
- Using the Remote Control
- OPENING REMOTE BATTERY COMPARTMENT TO REPLACE BATTERIES
- webOS GUIDE
- webOS TV - HOME
- Search -
- Connected devices Dashboard.
- Open to the TV input you used recently.
- Open the recently used app.
- You can open, move, and delete the apps installed on your TV,
- webOS GUIDE (Cont.)
- MANAGING webOS HOME
- TUNE LIVE TV - PREPARATION (RF ANTENNA)
- CONNECTING TO THE NETWORK
- SELECTING A WIRED NETWORK
- If the Network Is Not Automatically Connected
- SELECTING A WIRELESS NETWORK
- NETWORK SETTING WARNINGS
- HOW TO OPERATE TV
- CONNECTING TO SIMPLINK (HDMI-CEC)
- SHORTCUT TO ACCESSIBILITY MENU
- ENJOY LIVE TV
- LIVE TV MENU
- ENJOY LIVE TV (Cont.)
- CHECKING PROGRAM INFORMATION
- LIVE PLAYBACK
- RECORDING
- MATTERS THAT REQUIRE ATTENTION OF RECORDING
- TV SCHEDULER
- PROGRAMME SCHEDULING
- MANUAL SCHEDULING
- MANAGING RECORDINGS
- PLAYING RECORDINGS
- SETTING UP ADDITIONAL FEATURES
- TO USE TELETEXT
- TO SET TELETEXT LANGUAGE
- ENJOY CONTENT STORE
- HOME TUTORIAL
- ENJOY CONTENT STORE (Cont.)
- INSTALLING APPS
- CONTENT RECOMMENDATION
- CONTENT SEARCH
- CONNECT EXTERNAL DEVICES
- USING HOME DASHBOARD
- CONNECT EXTERNAL DEVICES (Cont.)
- CONNECTING HOME IOT DEVICES
- CONTINUE TO NEXT PAGE 35
- CONNECTING SMART DEVICES
- CONTROLLING YOUR TV WITH THE LG THINQ APP
- TO SEE THE MOBILE DEVICE'S SCREEN ON THE TV
- PLAYING SOUND FROM A SMART DEVICE THROUGH THE TV'S SPEAKERS
- CONNECTING USB
- TIPS FOR USING A USB STORAGE DEVICE
- CONTINUE TO NEXT PAGE (41)
- VIEWING PHOTOS AND VIDEOS
- USING PHOTO PLAYER
- USING VIDEO PLAYER
- SETTING ADDITIONAL OPTIONS
- PLAYING MUSIC
- WATCH CONTENT SAVED IN YOUR PC ON THE TV
- BROWSE THE CONTENT ON YOUR PC TO WATCH ON TV (WINDOWS 10)
- BROWSE AND WATCH THE CONTENT STORED ON THE PC USING THE TV (WINDOWS 10)
- MATTERS THAT REQUIRE ATTENTION OF CONTENT SHARE
- TO SEE THE PC SCREEN ON THE TV
- CONNECT WIRELESS
- CONNECT WIRED
- USING THE WEB BROWSER
- CHANGING WEB BROWSER SETTINGS
- SETTINGS
- QUICK SETTINGS
- SETTINGS - PICTURE
- PICTURE
- Selecting Picture Mode
- When You Use Normal Signals
- When You Use the HDR Signals
- SETTINGS - PICTURE (Cont.)
- PICTURE MODE SETTINGS
- Fine-Tuning Picture Mode
- Resetting Picture Mode
- Setting the Advanced Control Options
- Setting Picture Options
- Setting the Screen Size
- View Screen with Just Scan
- To Use Energy Saving Feature
- To Use Eye Comfort Mode Feature
- HDMI ULTRA HD Deep Colour
- Supported Display Resolution
- Using Instant Game Response
- SETTINGS - SOUND
- SOUND
- SOUND MODE
- SETTINGS - SOUND (Cont.)
- SETTING SOUND OUT
- CONTINUE TO NEXT PAGE (60)
- PLAYING AUDIO THROUGH THE TV'S INTERNAL SPEAKERS AND EXTERNAL AUDIO DEVICE SIMULTANEOUSLY
- TV INSTALLATION TYPE
- SETTING VOLUME MODE
- DTV AUDIO SETTING
- ADJUSTING AV SYNCHRONIZATION
- HDMI INPUT AUDIO FORMAT
- LG SOUND SYNC
- SETTING DIGITAL SOUND OUT
- SETTINGS - PROGRAMMES
- AUTOMATICALLY SETTING UP PROGRAMME
- MANUAL PROGRAMME TUNING
- USE THE SIGNAL TEST
- SETTINGS - PROGRAMMES (Cont.)
- EDIT PROGRAMMES
- EDIT PROGRAMMES LIST
- SETTINGS - CONNECTION
- SETTING THE TV NAME
- NETWORK CONNECTION SETTINGS
- SETTING A WIRED NETWORK
- SETTING A WIRELESS NETWORK
- SETTINGS - CONNECTION (Cont.)
- MOBILE CONNECTION SETTINGS
- SETTINGS - GENERAL
- CONFIGURING LANGUAGE SETTINGS
- SETTINGS - GENERAL (Cont.)
- TIME
- TIMERS
- ENABLING TV RATING LOCKS
- ENABLING PROGRAMME LOCKS
- ENABLING APPLICATION LOCKS
- RESET PASSWORD
- RESETTING A LOST PASSWORD
- MANAGING YOUR ACCOUNT
- HOME SETTINGS
- Press
- SETTINGS HELP
- SCREEN SAVER
- NO SIGNAL
- USING ECO MODE
- TV POWER SETTING
- TO SET POWER INDICATOR
- ADVERTISEMENT
- SETTINGS - ACCESSIBILITY
- MENU FOR THE VISUALLY IMPAIRED
- CHANGING THE MENU TO HIGH-CONTRAST SCREEN
- GRAYSCALE
- INVERT COLOURS
- HARD OF HEARING
- SUBTITLES
- SUPPORT
- SOFTWARE UPGRADE
- TV INFORMATION
- SUPPORT (Cont.)
- NOTIFICATIONS
- ADDITIONAL SETTINGS
- RESTORING THE DEFAULT SETTINGS
- TROUBLESHOOTING
- TROUBLESHOOTING POWER/REMOTE CONTROL ISSUES
- I cannot turn on the TV.
- The power is on, but the screen comes on later.
- I cannot turn the TV on with the remote control.
- The power turns off suddenly.
- TROUBLESHOOTING (Cont.)
- TROUBLESHOOTING SCREEN ISSUES
- It says there is no signal on the screen.
- I cannot see some programmes.
- The screen shakes after the momentary appearance of vertical/horizontal lines and net pattern.
- Each programme has a different image quality.
- There is a difference in image quality from those seen at the store.
- A digitally broadcasted programme stops or its screen is broken.
- When HDMI input is in use, a vertical solid line or colour blurring appears on the upper/lower/left/right edges of the screen.
- I don't see anything, or the image keeps flickering when I try to connect the HDMI cable.
- The screen looks too dim or dark.
- The screen is in black and white or displaying strange colours.
- ULTRA HD video does not display.
- TROUBLESHOOTING PC CONNETION ISSUES
- PC connection issues
- The screen remains blank after it is connected to a PC.
- The screen is not fully shown or is lopsided when connected to a PC.
- The sound does not play when the PC is connected with an HDMI cable.
- TROUBLESHOOTING MOVIE PLAYBACK ISSUES
- I cannot find a file in the Photo & Video.
- I see a message that says the file is not supported.
- I cannot see the subtitles.
- My USB storage device is not recognised when connected.
- TROUBLESHOOTING RECORDING ISSUES
- How do I start recording?
- Which signals support recording?
- Is Scheduled Recording possible even if the TV is off?
- TROUBLESHOOTING NETWORK CONNECTION ISSUES
- TV network connection lost
- When X appears next to TV icon
- CONTINUE TO NEXT PAGE (90)
- Gateway network connection lost
- When X appears next to Gateway
- DNS network connection lost
- When X appears next to DNS
- TROUBLESHOOTING CONTENT STORE ISSUES
- Troubleshooting Contents Issues
- I cannot see any content in HOME.
- TROUBLESHOOTING INTERNET BROWSER ISSUES
- Some parts of a particular website are not visible when I am using the Internet.
- You cannot save attachments or images.
- The Internet browser automatically shuts down when I visit a website.
- When watching a video in Web Browser, the video is forced off.
- SPECIFICATIONS
- 三KO
Brand : EKO
Model : K58USW
Category : Television