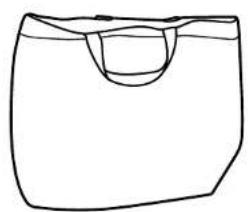
LullaGo Deluxe - Baby bed CHICCO - Free user manual and instructions
Find the device manual for free LullaGo Deluxe CHICCO in PDF.

| Product Type | Portable Baby Bed / Travel Cot |
| Model | LullaGo Deluxe |
| Brand | Chicco |
| Dimensions (L x W x H) | Approx. 120 x 65 x 70 cm |
| Weight | Approx. 8 kg |
| Recommended Age | 0-3 years (from birth until child can climb out) |
| Maximum User Weight | 15 kg |
| Material | Steel frame, polyester fabric, foam mattress |
| Mattress Included | Yes, removable and washable cover |
| Folding | Yes, with carry bag included |
| Canopy / Mosquito Net | Removable canopy with two positions |
| Power Source | None (manual assembly, no electronic components) |
| Assembly | Easy, no tools required; fold and unfold in seconds |
| Cleaning Instructions | Frame wipe with damp cloth; fabric spot clean with mild detergent; mattress cover machine washable |
| Safety Certification | Meets EN 716 standard for children's cots and travel cots |
| Spare Parts Availability | Contact Chicco customer service for replacement parts |
| Included Accessories | Carry bag, mosquito net (on some models), mattress |
Frequently Asked Questions - LullaGo Deluxe CHICCO
User questions about LullaGo Deluxe CHICCO
0 question about this device. Answer the ones you know or ask your own.
Ask a new question about this device
Download the instructions for your Baby bed in PDF format for free! Find your manual LullaGo Deluxe - CHICCO and take your electronic device back in hand. On this page are published all the documents necessary for the use of your device. LullaGo Deluxe by CHICCO.
USER MANUAL LullaGo Deluxe CHICCO
Read all instructions BEFORE assembly and USE of product. KEEP INSTRUCTIONS FOR FUTURE USE.
Failure to follow these warnings and the instructions could result in serious injury or death. For your child's safety, read the labels and owner's manual before using the product.
- PLEASE READ THESE INSTRUCTIONS CAREFULLY TO ENSURE THE SAFETY OF YOUR CHILD.
• ALWAYS PROVIDE THE SUPERVISION NECESSARY FOR THE CONTINUED SAFETY OF YOUR CHILD. - SUFFOCATION HAZARDS - Infants have suffocated:
• In gaps between extra padding and side of the bassinet, and - On soft bedding.
- Use ONLY the pad provided by Chicco. Never add a pillow, comforter, or another mattress for padding.
- SUFFOCATION HAZARD - When using the bassinet extension, make sure you fully unzip the extension. NEVER partially unzip the extension. Mattress must always be level.
- If a sheet is used with the pad, use only a fitted sheet specifically designed to fit snug with at least 2" (5cm) under all sides of the pad.
- Strings and cords can cause strangulation! DO NOT place items with a string around child's neck such as hood strings, pacifier cords, etc.
- DO NOT suspend strings over the bassinet or attach strings to toys.
-
DO NOT place the bassinet near a window where cords from blinds or drapes can strangle a child.
-
FALL HAZARD - To help prevent falls, do not use this product when the infant begins to push up on hands and knees or has reached 20lbs (9kg), whichever comes first.
- DO NOT carry bassinet with child in it.
- Be sure all sides are locked in position whenever child is in product.
- Before use, remove and dispose of all plastic bags and packaging materials and keep them out of reach of children.
- Do not use accessories, spare parts, or any component not supplied or approved by Chicco as they may make the bassinet unsafe.
- Keep bassinet away from stoves, heaters, fireplaces and other hazards which can cause injury to your child.
• To reduce the risk of SIDS
(Sudden Infant Death Syndrome), pediatricians recommend healthy infants be placed on their back to sleep unless otherwise advised by your physician. - DO NOT place more than one child in bassinet.
- Never use this product if there are any loose or missing fasteners, loose joints, broken parts, or torn mesh/fabric. Check periodically during use. Contact Chicco for replacement parts and instruction if needed. Never substitute parts.
ADVERTENCIA
natural_image
Line drawing of a mechanical component or bracket (no text or symbols)A. - Bassinet Frame
A. - Estructura de la cuna
natural_image
Simple line drawing of a closed rectangular object with rounded edges (no text or symbols)B. - Mattress pad
B. - Colchoneta
natural_image
Line drawing of five identical cylindrical rods arranged diagonally (no text or symbols)C. - Four Legs
C. - Cuatro patas
Components
Componentes

natural_image
Illustration of a curved, mesh-like structure with two small protrusions at the bottom (no text or symbols)D. - Canopy
D. - Capota
natural_image
Simple line drawing of two stylized bird heads with long antennae and beak (no text or symbols)E. - Toys
E. - Juguetes
natural_image
Simple line drawing of a rectangular object with a curved indentation (no text or symbols)F. - Tote
F. - Bolso
How to Assemble the Bassinet
Cómo armar la cuna

natural_image
Line drawing of a garment with two arms and a belt, showing a red directional arrow (no text or symbols)How to Assemble the Bassinet
Cómo armar la cuna
natural_image
Simple line drawing of a rectangular frame with four side handles, no text or symbols present
text_image
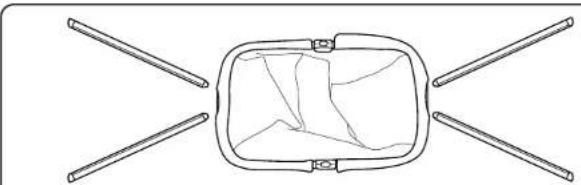
2 "CLICK" "CLIC"- To attach the 4 legs, lay out the legs next to the open Bassinet Frame with the release button facing towards each other, as shown.
Start at one end and insert each of two legs into the corresponding ends, make sure the Leg release buttons are facing each other. The snap buttons should lock into place. Repeat for the other 2 legs on the other end of the bassinet.
Pull on legs to make sure they are securely attached.
How to Assemble the Bassinet
Cómo armar la cuna
WARNING
FALL HAZARD - To help prevent falls, stop using the bassinet when infant begins to push up on hands and knees or weighs over 20lbs. (9kg), whichever comes first.
ADVERTENCIA
- Insert the Mattress Pad into the bottom of the Bassinet, as shown Make sure Mattress Pad is level.
Make sure the zippers are facing down when inserting the Mattress Pad.
natural_image
Line drawing of a baby bathtub with a seatbelt and arrow indicating rotation (no text or symbols)Extending the Bassinet
Extender la cuna
WARNING
SUFFOCATION HAZARD -When using the bassinet extension, make sure you fully unzip the extension. NEVER partially unzip the extension. Mattress must always be level.
text_image
Technical diagram illustrating a mechanical assembly with labeled steps and directional arrows indicating movement or force.ADVERTENCIA
natural_image
Line drawing of a baby bathtub with two red arrows indicating downward pressure (no text or symbols)- Make sure the Bassinet is completely extended.
Insert the Mattress Pad into the bottom of the Bassinet, as shown. Make sure Mattress Pad is level.
Make sure the zippers are facing down when inserting the Mattress Pad.
Attaching the Canopy
Sujetar la capota
text_image
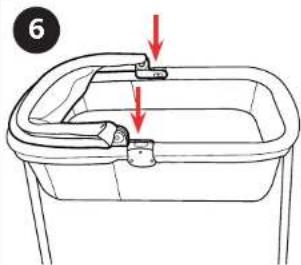
6- Insert both Canopy tabs into the brackets on the Bassinet Hinge. Make sure not to remove the plastic fabric tabs from the Bassinet Hinge.
Unfold the Canopy, as shown.
natural_image
Technical line drawing of a mechanical clamp or bracket assembly (no text or symbols)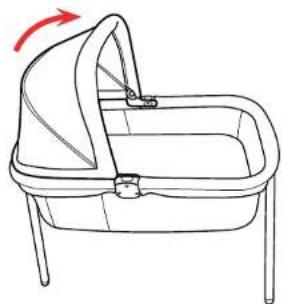
natural_image
Line drawing of a baby crib with a red arrow indicating rotation (no text or symbols)Attaching Toys
natural_image
Line drawing of a baby bathtub with a red circle highlighting the seat area (no text or symbols)- Slide the Toy strap into one of the loops on the inside of the Canopy.
Fold the hook and loop strap together to secure the toy, as shown.
natural_image
Simple line drawing of a hook being inserted into wires (no text or symbols)
natural_image
Simple line drawing of a cable or cable with a looped cable inserted, against a plain background (no text or symbols)Closing and Transporting the Bassinet
natural_image
Diagram of a vehicle's roof structure with two red circular arrows indicating direction (no text or symbols)- Remove the Mattress Pad and the Canopy from the Bassinet.
To release the legs, press in on the Release Button on each leg and pull the leg off of the Bassinet end as shown.

natural_image
Line drawing of a baby seat with legs and feet, showing seat structure and red directional arrows indicating movement (no text or symbols)Closing and Transporting the Bassinet
text_image
Diagram showing a device with highlighted components and a zoomed-in view of the component's base, likely illustrating a mechanical or electrical assembly.natural_image
Line drawing of a garment with red arrows indicating direction (no text or symbols)Closing and Transporting the Bassinet
How to Remove the Mattress Padding
natural_image
Simple line drawing of a rectangular object with a horizontal seam and a red arrow pointing to it (no text or symbols)
natural_image
Simple line drawing of a rounded rectangular object with a red upward arrow on its top surface (no text or symbols)- To remove the Mattress padding from the Mattress Cover, flip the Mattress over and locate both zippers. Undo the zippers and pull out both sections of padding, as shown.
To re-insert the Mattress padding repeat step 11 in reverse. Make sure to insert the padding with the board side on the same side as the zipper location.
When padding is replaced into cover, Make sure the padding is flat and does not create gaps when placed into bassinet.
How to Remove the Fabric
natural_image
Diagram showing a car interior with a red circle highlighting a component, and a zoomed-in view of the seat area (no text or symbols present)-
To remove the Bassinet Fabric from the Bassinet Frame, pull out the plastic tab from the bracket located on the side of the Bassinet Hinge. Repeat for the other side.
-
Para extraer la tela de la cuna del bastidor, tire de la lengüeta de plástico que está en el soporte metálico del lado de la bisagra. Repita del otro lado.
How to Remove the Fabric
SUFFOCATION HAZARD - Do not place child in the bassinet without the center board properly in place.
ADVERTENCIA
text_image
Technical diagram illustrating seatbelt usage with red arrows indicating force application on the seatbelt side.-
Locate the board in the Bassinet Fabric. Undo the hook and loop fastener, pull out the board and set aside.
-
Localice la tabla en la tela de la cuna. Abra el sujetador de gancho y bucle, retire la tabla y déjela aparte.
How to Remove the Bassinet Hinge
Cómo quitar la bisagra de la cuna
14

natural_image
Line drawing of a garment with two red circles highlighting features (no text or symbols)- Remove the Bassinet Hinges from the Bassinet Frame. Locate 2 snap buttons on the Bassinet Hinge as shown. Press in on both snap buttons, one at a time, and pull up on the Bassinet Hinge to remove. Repeat for the other Bassinet Hinge.

natural_image
Technical line drawing of a garment with two views showing front and side details (no text or symbols)How to Remove the Fabric
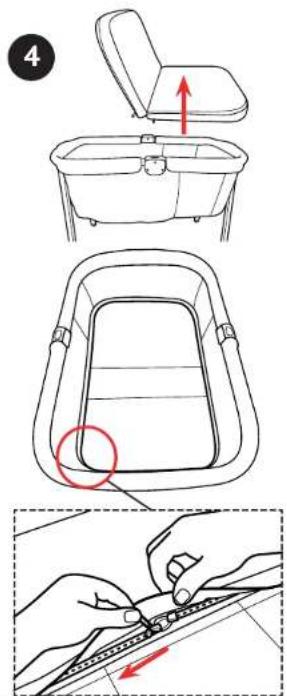
- To remove the Bassinet Frame arms, lay the Bassinet Frame on its side. Locate the zippers on each side of the Bassinet Frame end, as shown. Undo both zippers and pull out the Bassinet Frame arm. Repeat for the other side and set both arms aside.

natural_image
Illustration of a hand using a tool to adjust or install a mechanical component, with no visible text or symbols.natural_image
Line drawing of a chair with a red upward arrow indicating motion or force (no text or symbols)How to Reassemble
natural_image
Line drawing of a garment sleeve with clasp and waist detail (no text or symbols)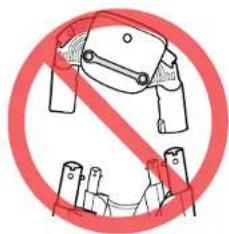
text_image
Prohibition sign with crossed-out hand holding a device and two hands holding test tubes, indicating no use or absence of testing.- To reassemble the bassinet, first attach the fabric to the Bassinet Frame (see step 15).
To attach the Bassinet Hinges to the Bassinet Frame arms, positioning the hinge so that the bracket is facing towards the inside of the bassinet, as shown.
natural_image
Technical line drawing of a mechanical component with a downward arrow indicating motion (no text or symbols)
text_image
Keyway Ranura de posicionamiento Pin Clavija
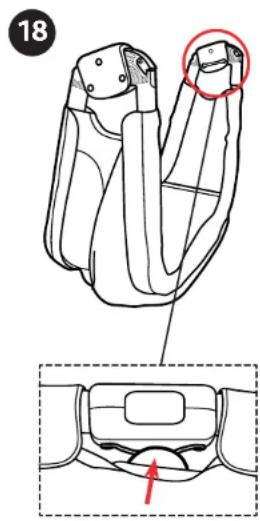
natural_image
Line drawing of a mechanical component with mounting holes and a curved base (no text or symbols)- Line up the Bassinet Hinge end with the keyway to the Bassinet Frame arm with the pin and insert the arm into the Hinge. (See fig. A)
The keyway covers the pin and the Snap Button will lock into position. Attach the other side of the Bassinet Hinge, again making sure the Snap Button locks. Pull on the Hinge to make sure it is securely attached.
Repeat steps 16 and 17 for the other Bassinet Hinge.
SUFFOCATION HAZARD - Do not place child in the bassinet without the center board properly in place.
natural_image
Technical illustration of a car seatbelt buckle with a highlighted section showing the seat (no text or symbols present)ADVERTENCIA
- Slide the plastic tab into the bracket located on the side of the Bassinet Hinge. Repeat for the other side.
To complete the Bassinet Fabric assembly, replace the board and secure the hook and loop fastener (see step 13).
Cleaning and Maintenance
This product requires regular maintenance. The cleaning and maintenance of the bassinet must only be carried out by an adult.
CLEANING
The bassinet and mattress have fabric covers that are completely removable and washable. Check the product regularly for signs of wear and damage and to ensure that it is assembled correctly. Should any part be damaged, do not use it and keep it out of reach of children. Do not clean the product with solvents, abrasive or harsh products.
Please refer to the care label for instructions on cleaning the fabric parts of the bassinet.
CLEANING PARTS
Periodically wipe clean plastic parts with a soft damp cloth. Always dry the metal parts to prevent the formation of rust. Do not immerse the floor boards in water. Wipe clean with a damp cloth and mild detergent (do not use bleach).
If you have any questions or comments about this product, or are missing any of the parts, please do not return this product to the store. Contact us in one of the following ways: