CR-100 USB - Dictaphone Beyertone - Free user manual and instructions
Find the device manual for free CR-100 USB Beyertone in PDF.

| Product Type | Digital Voice Recorder (Dictaphone) |
| Brand | Beyertone |
| Model | CR-100 USB |
| Recording Medium | Built-in Flash Memory |
| Recording Format | MP3 (high quality), WMA (long play) |
| Recording Modes | HQ (High Quality), SP (Standard Play), LP (Long Play) |
| Built-in Microphone | Omnidirectional, noise reduction |
| Speaker | Built-in, 8 Ohm, 1W |
| Connectivity | USB 2.0 Type-A (for file transfer and charging) |
| Power Source | Rechargeable Li-ion battery (3.7V, 300mAh) |
| Battery Life | Up to 12 hours recording (LP mode), 20 hours playback |
| Charging Time | Approximately 2 hours |
| Dimensions (L x W x H) | 108 x 38 x 14 mm |
| Weight | 45 g (including battery) |
| Display | OLED, 1.1 inch, monochrome |
| Buttons | Play/Stop, Record, Forward, Backward, Volume +/- |
| Additional Features | Voice-activated recording, A-B repeat, password protection |
| Included Accessories | USB cable, earphones, lanyard, carrying pouch |
| Storage Capacity | 8 GB (expandable via microSD up to 32 GB) |
Frequently Asked Questions - CR-100 USB Beyertone
User questions about CR-100 USB Beyertone
0 question about this device. Answer the ones you know or ask your own.
Ask a new question about this device
Download the instructions for your Dictaphone in PDF format for free! Find your manual CR-100 USB - Beyertone and take your electronic device back in hand. On this page are published all the documents necessary for the use of your device. CR-100 USB by Beyertone.
USER MANUAL CR-100 USB Beyertone
Installation and
User Guide
Congratulations!
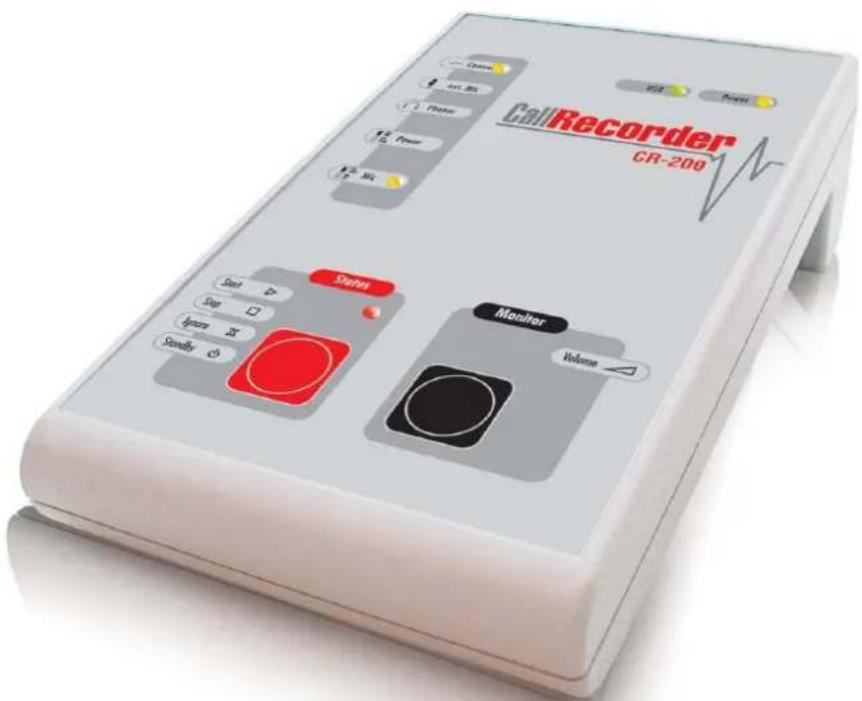
By purchasing the CallRecorder CR-100 USB or CR-200 you have acquired a high-quality digital accessory for your desk telephone that is easy to operate and lets you reliably document your business conversations in the form of audio recordings.
The CallRecorder is a professional, stand-alone solution offering practical functions such as data encryption, e-mail transmission of recordings and, if desired, fully automatic operation.
IMPORTANT NOTE:
This manual applies to both the CR-100 USB, which records phone calls via USB-cable directly onto a PC or laptop, and the CR 200, which records onto a USB flashdrive stick independently of a PC.
Whenever information and explanations refer to one of the versions specifically, the regarding section is marked correspondingly by the product type (in italics).
Table of contents
- CallRecorder applications and functions.... 5
- Important information....6
2.1 Legal advice on recording conversations 6
2.2 Connecting to telephone lines 6
2.3 Safety precautions....7
- Installing the appliance....8
3.1 What comes with the CallRecorder 8
3.2 Connecting the appliance 8
3.2.1 Connecting to telephones with a handset cable....9
3.2.2 Interfacing to the telephone's analogue connection line 10
3.2.3 CallRecorder settings 11
3.2.4 Other connections on the CallRecorder 14
3.2.5 Connecting by USB to your PC (CR-100 USB).... 15
3.2.6 Operation of the USB flashdrive stick (CR-200) 16
3.3 Installing the software.... 18
3.3.1 Installing the PC software.... 18
3.3.2 Installing the USB driver for USB-connection (CR-100 USB) 19
3.3.3 Finding the COM port number (CR-100 USB).... 19
3.3.4 Entering the COM port number (CR-100 USB) 21
- Getting started and recordings with the CR-100 USB 22
4.1 Basic software settings.... 23
4.2 Recording telephone conversations 26
4.3 Monitor function for telephone conversations.... 28
4.4 Recording in-room conversations....29
4.5 TAPI control....30
- Getting started and recordings with the CR-200 32
5.1 Settings of the unit / date and time.... 34
5.2 Recording telephone conversations 35
5.3 Monitor function for telephone conversations.... 36
5.4 Recording in-room conversations.... 37
5.5 External Control....38
- Playing back recordings 39
6.1 Import of recordings from the USB flashdrive stick (CR-200)....40
6.2 Recordings in the 'Archive' window 42
6.3 Sending recordings by e-mail 47
- Special settings and software updates.... 49
7.1 CR-100 USB configuration and settings.... 50
7.2 CR-200 configuration and settings 55
7.3 Software updates....60
7.3.1 Updating the PC software....60
7.3.2 Updating the device's system software (CR-100 USB) 60
- Troubleshooting 61
8.1 No USB connection to the PC (CR-100 USB) 61
8.2 Recording / playback not working.... 61
8.3 Support hotline 61
- Technical data....62
1. CallRecorder applications and functions
In the CallRecorder you have purchased a powerful and convenient accessory for your telephone that allows you to make optimum-quality recordings of your conversations. It also enables you to manage the recordings in a clear and structured way on your PC. As a stand-alone solution, the CallRecorder is a cost-effective alternative to complicated centralised systems.
Typical applications for the CallRecorder:
• Acoustic note-taking function for the personal recording of conversations
- Retrospective creation of written records of telephone conversations ('transcription')
• For subsequent reciprocal confirmation of verbal agreements with the other party
• Minuting of discussions during conference calls and meetings
• No more information is lost, even in conjunction with highly detailed conversations
The main features of the CallRecorder in brief:
• Recording of telephone conversations in a space-saving audio format
• Built-in microphone for alternative recording of in-room conversations
• Automatic audio adjustment for consistently optimum recording levels
- Can be used in fully automatic mode on the telephone - no information goes astray
• Suitable for all telephone systems - no work or programming on the PBX required
- Can be connected to almost any telephone with a handset cable
- Can also be connected to the analogue phone line (a/b)
• No need to open up the telephone or the telephone system
- Connection to PC or laptop, including power supply, via USB cable (CR-100 USB)
• Recording independently of a PC on USB memory flashdrive stick (CR-200)
• User-friendly PC software for archiving and finding recordings
• E-mail feature allows recordings to be forwarded to others
• Encoding of recorded files to prevent unauthorised eavesdropping
• Built-in loudspeaker for playing back recordings (CR-100 USB)
• Additional monitor function
- No sound card or 'sound on board' needed in the PC (CR-100 USB)
• TAPI support for automatic calling number recording (CR-100 USB)
2. Important information
Please read the following advice carefully before installing and taking your CallRecorder into operation.
2.1 Legal advice on recording conversations
Please ensure you comply with the relevant legal provisions regarding the recording of conversations and/or telephone conversations (which may vary from country to country). Before making any recording you should always tell the other party or parties that you intend to record the conversation, stating what you would like to use the recording for, and obtain the consent of all parties involved.
Undisclosed recordings of conversations and recordings for which no consent was obtained from the other party/parties cannot normally be used as evidence. In addition, the forwarding of recordings to third parties is generally considered a legally dubious practice.
We therefore recommend that you use your CallRecorder exclusively for recording conversations of a business nature for immediate transcription into a text file, for example.
2.2 Connecting to telephone lines
As described in the following section, the unit is connected to your telephone either by the telephone handset cable or, provided it is an analogue telephone, by plugging into the your telephone's input line (i.e. an a/b line; if necessary, please ask your telephone system service engineer).
Connecting to an analogue telephone's input line should be considered only if it is not possible to connect to the handset cable, e.g. in the case of cordless telephones with an analogue connection line.
IMPORTANT:
- Connection to the input line of an analogue telephone is intended exclusively as an option for internal telephone system extensions. Connecting to an analogue exchange line is not permitted!
- Connecting to the input line of digital telephones (system units) is also not permitted and can lead to damage both to the unit and to the CallRecorder.
We cannot accept any liability for damage caused as a result of any incorrect connections not specifically described as permitted in section 3.2 of this installation guide.
2.3 Safety precautions
- The CallRecorder should not be used in areas where the temperature is below 5^ C or above 45^ C. Condensation must be avoided, i.e. if you move the unit from a cold environment into a warm one, wait at least an hour for any moisture that may have formed on its internal components to dry out.
- For safety reasons, CallRecorder units must not be installed or used in bathrooms or any other damp areas.
- Protect the unit from direct sunlight, other sources of heat and any detrimental mechanical influences.
- The CallRecorder does not contain any elements that need to be operated by the user. Any opening of the unit by the user is therefore not allowed, except for changing jumper-settings for wire selection during installation (section 3.2.3), if necessary.
- Do not use detergents to clean the appliance. Wipe the unit with a slightly dampened cloth. Never use a dry cloth, as this can cause static to build up.
- As a mains adapter for your CallRecorder, you must use a BEYERTONE AG adapter (optionally available for the CR-100 USB, if needed).
- BEYERTONE AG provides no warranty for any damage to the appliance arising from improper operation, incorrect connection or the use of non-specified data in connection with the PC software.
- We cannot accept liability for any damage to or failure of any PBX systems or PCs/laptops connected to the CallRecorder, nor for any loss of data caused by improper or incorrect use of the hardware and/or software supplied.
- All text sections and illustrations in this user guide have been compiled with great care. Nevertheless, the possibility of errors cannot be ruled out entirely. We cannot therefore accept any liability for any such errors or omissions, nor for any consequences arising from them. This user guide is subject to change at any time.
• If passing the unit to a third party, always provide the full documentation with it. - All hardware and software systems provided with CallRecorder units are protected by copyright. They may be used only by the legal purchaser. All rights remain with BEYERTONE AG.
3. Installing the appliance
First check that you have got all of the parts listed under 'What comes with the Call-Recorder' and then install the unit as per the instructions in section 3.2 'Connecting the appliance'.
3.1 What comes with the CallRecorder
The box your appliance came in should have contained the following:
• The CR-100 USB or CR-200 appliance
• An RJ11 cable with two large 6/4 Western plugs (approx. 1.5m)
• An RJ16 cable with two small 4/4 Western plugs (approx. 0.5m)
• A USB type A plug to type B plug cable (only with CR-100 USB)
• A mains adapter plug 9V DC (only with CR-200)
- A CD-ROM with PC software, USB driver and documentation (only with CR-100 USB)
• A USB flashdrive stick incl. PC software and documentation (only with CR-200)
3.2 Connecting the appliance
In general, there are two different options for connecting your CallRecorder to your telephone:
- On telephones that have a handset cable, the CallRecorder should normally be inserted into this handset connection line (via the 'Handset' sockets on the Call-Recorder), as this ensures the best possible functionality.
- If no handset cable is accessible (e.g. on cordless phones), the unit can instead be plugged into the telephone's connection line (via the 'Line' socket on the CallRecorder), provided that this is an analogue line. The unit cannot be plugged into digital connection lines. In relation to this, please note also the advice in section 2.2.
IMPORTANT: Only ever use one of the two possible connection options. Never use both the 'Handset' and the 'Line' connection sockets at the same time!
Now please proceed with the installation step by step, as described on the following pages.
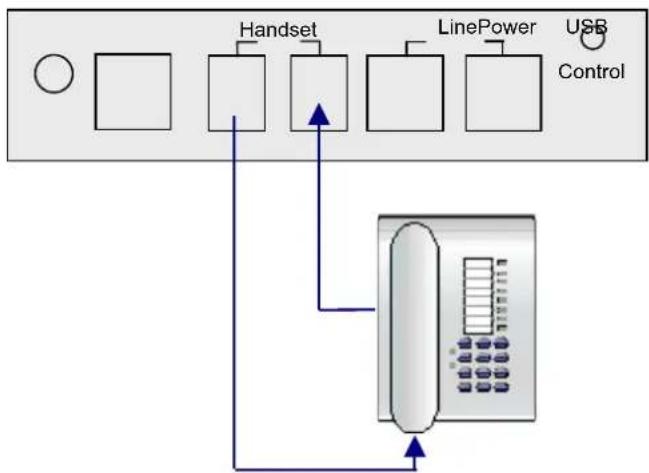
3.2.1 Connecting to telephones with a handset cable
- Basic view / position of the connections on the back of the unit enclosure:
flowchart
graph TD
    A["○"] --> B["Square"]
    B --> C["Handset"]
    C --> D["▲"]
    D --> E["Square"]
    E --> F["LinePower"]
    F --> G["Square"]
    G --> H["USB Control"]
    I["Phone"] --> J["Control"]
- Pull out the handset cable plug on the side of your telephone.
- Plug the free end of your handset cable in either of the CallRecorder unit's two 'Handset' sockets.
- Insert one of the plugs of the supplied RJ6 cable (small Western jack) into the CallRecorder unit's other 'Handset' socket.
- Then plug the other end of this cable into the now free handset connection socket on your telephone.
Tip: If the handset cable on your telephone does not have plug connectors, you can have a telephone engineer cut the cable at a suitable point and fit two RJ6 plugs (4/4 Western jacks) on the free cable ends. You then connect these plugs with the Call-Recorder unit's two 'Handset' sockets.
Please note, however, that such action will impact on your telephone supplier's warranty and guarantee rights. Furthermore, in the case of rented or leased telephone systems, for example, you should check in advance whether such modifications are allowed.
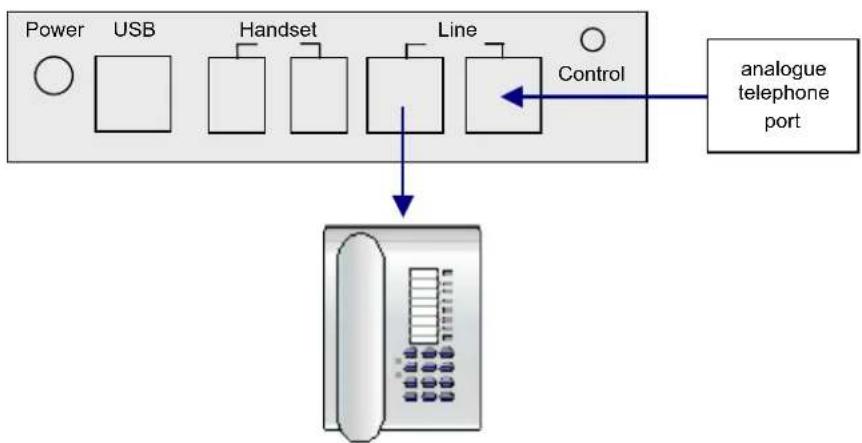
3.2.2 Interfacing to the telephone's analogue connection line
- Basic view / position of the connections on the back of the unit enclosure:
flowchart
graph TD
    A["Power"] --> B["USB"]
    B --> C["Handset"]
    C --> D["Line"]
    D --> E["Control"]
    E --> F["analogue telephone port"]
    G["Phone"] --> H["Ground"]
- Assure yourself that your telephone port is an analogue extension port (a/b port).
- Pull out the plug of your telephone connection cable on the side of your telephone.
- Plug the free end of the telephone connection cable into one of the CallRecorder unit's 'Line' sockets.
- Insert one of the plugs of the supplied RJ11 cable (large Western jack) into the CallRecorder unit's other 'Line' socket.
- Then plug the other end of this cable into the now free telephone connection socket on your receiver.
Tip: If the connection cable on your telephone does not have the right sort of connector plug (a Western jack), you can have a telephone engineer cut the cable at a suitable point and fit two RJ11 plugs (6/4 Western jacks) on the free cable ends. You then connect these plugs with the CallRecorder unit's two 'Line' sockets.
Please note, however, that such action will impact on your telephone supplier's warranty and guarantee rights. Furthermore, in the case of rented or leased telephone systems, for example, you should check in advance whether such modifications are allowed.
3.2.3 CallRecorder settings
Before you make your first recordings, there are just a few settings you might need to make on your CallRecorder appliance. You may not be able to determine the correct setting for some of the switches or jumpers described below until you start to make your first recordings. Nevertheless, it is best to familiarise yourself now with where the switches are located and how they work.
- Wire selection for handset / line connection ('Line A-B' switch with CR-100 USB)
As handset and telephone connection cables can be wired in different ways, the CR-100 USB is universally adaptable. If you need to make a change, all you have to do is flick a switch to make the correct adjustment.
If, when making your first recordings, you discover, for example, that when you connect the handset cable you can only hear yourself on the recording and not the other person, or that when plugging in the telephone connection cable you hear nothing at all on the recording, then simply change the position of the 'Line A-B' switch and try again.
If in switch position 'B' the volume difference between you and the other person is too big, you can additionally change the connection configuration by pulling two jumpers inside the unit. To do so, first disconnect all cables from the CR-100 USB and the carefully open the housing. Pull out the two single jumpers according to this drawing::
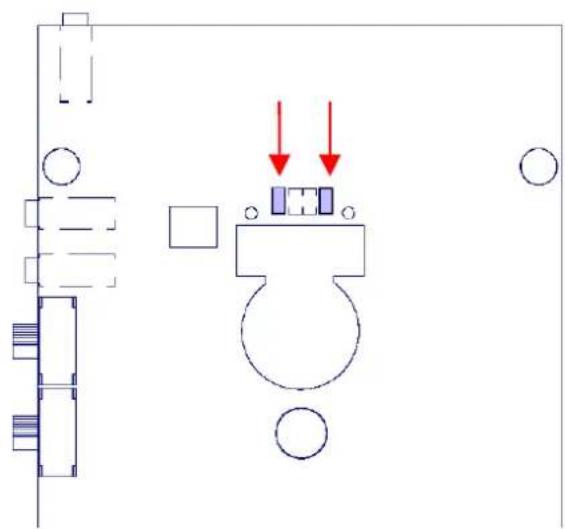
natural_image
Floor plan diagram showing room layout with furniture and directional arrows (no text or labels)After that, first close the housing completely. Only then, reconnect the cables to the CR-100 USB to put it into operation again. If you're not sure, let this configuration change be done by a telephone engineer.
- Wire selection for handset / line connection (internal jumpers with CR-200)
As handset and telephone connection cables can be wired in different ways, the CR-200 is universally adaptable.
If, when making your first recordings, you discover, that when you connect for example the handset, the volume difference between you and the other person is too big, you can pull jumpers inside the unit. To do so, first disconnect all cables from the CR-200 and then carefully open the housing.
Now, pull out either the two outer jumpers (green arrows) or the two inner jumpers (blue arrows) of the group of four (marked red), according to this drawing * :
After that, first close the housing completely. Only then, reconnect the cables to the CR-200 to put it into operation again. If you're not sure, let this configuration change be done by a telephone engineer.
* After that, do some test recordings. If the recording quality is worse than before, try pulling the other pair of jumpers.
NOTE: Different volume levels of both parties of the conversation recorded are usually depending on the phone set which the CallRecorder is connected to. They sometimes cannot be avoided completely even by the measures mentioned above. This is no fault of the CallRecorder device.
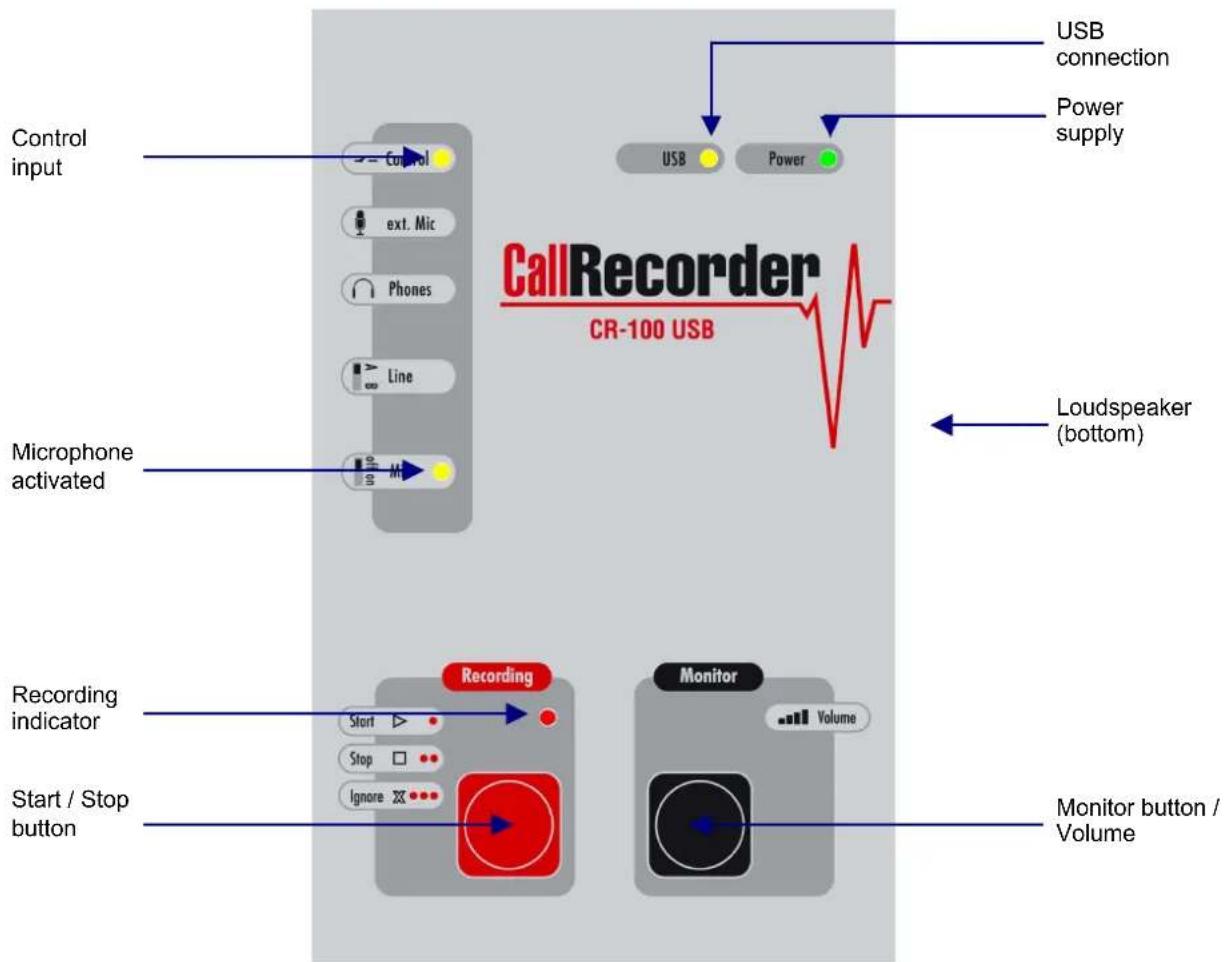
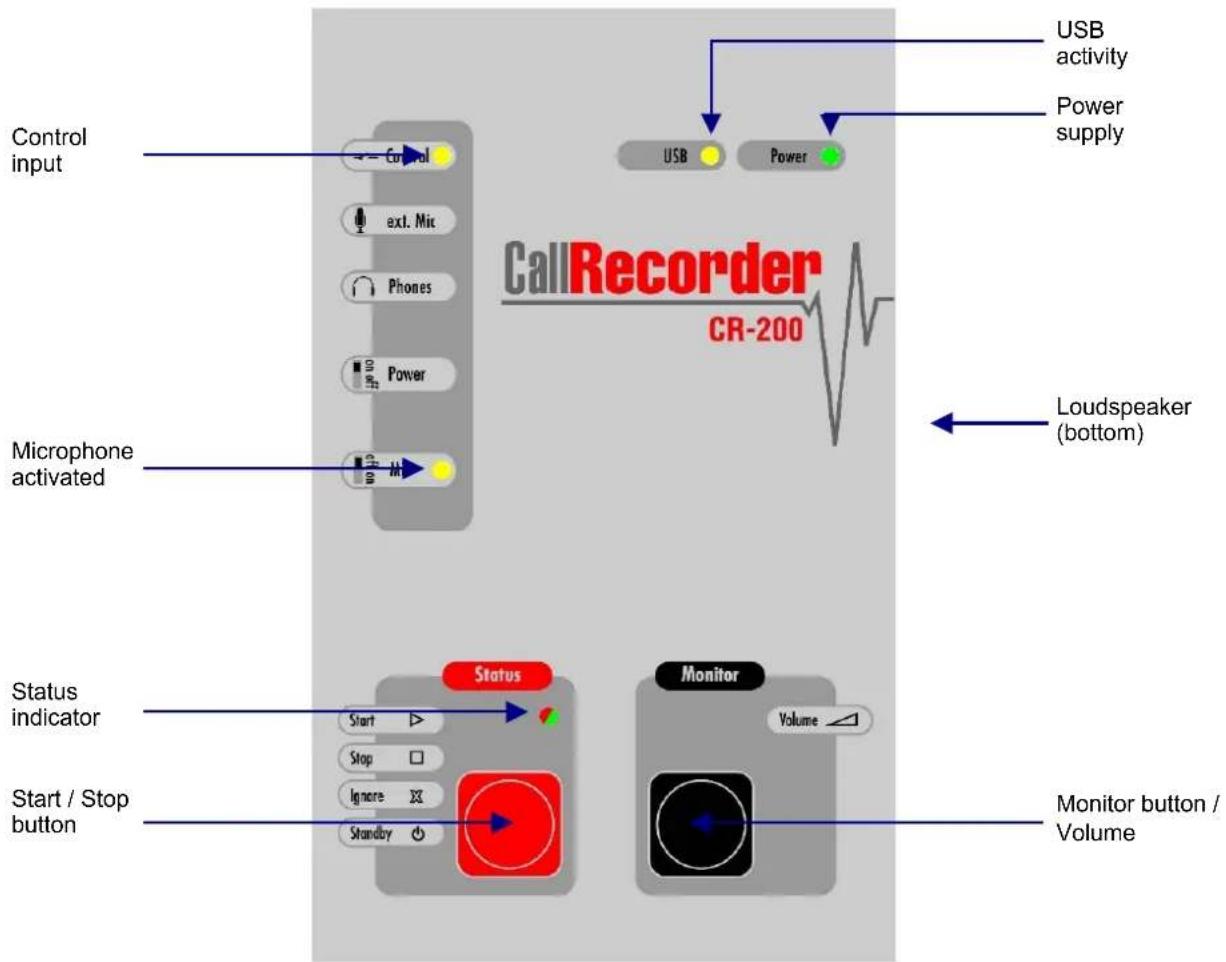
- Switching to microphone ('Mic off-on' switch)
You can use the CallRecorder not only to record telephone conversations but also, using the built-in microphone, to record in-room conversations, such as group discussions. To do this, simply move the 'Mic off-on' switch to the 'on' position, which is indicated by a yellow LED on the front panel. For a guide on further use of this feature, please see section 4.4 or 5.4. To make recordings of the telephone conversations via the handset or telephone connection cable, the 'Mic off-on' switch must be in the 'off' position.
NOTE: After recording an in-room conversation do not forget to put the 'Mic off-on' switch back to the 'off' position if you subsequently want to record telephone conversations again with your CallRecorder.
• Microphone input ('ext. Mic' socket)
To the input jack 'ext. Mic' (3.5mm jack plug) you can connect a suitable external microphone. The integrated microphone will be deactivated automatically then.
- Position of connections and switches on the left side of the unit (CR-100 USB):

- Position of connections and switches on the left side of the unit (CR-200):

- Switch on/off unit ('Power on-off' switch on CR-200)
If you don't need your CR-200 for a longer time, you can simply switch it off by means of this switch. Regardless of the backup time provided (see section 5.1), the internal clock will be powered nevertheless, as long as the power adapter is connected to the unit.
3.2.4 Other connections on the CallRecorder
The CallRecorder has a built-in loudspeaker, via which a monitor function is provided, i.e. enabling telephone conversations to be output, with or without being recorded, if, for example, the telephone does not have its own built-in speaker. (So-called 'hands-free' conversations are, however, not possible via the CallRecorder.)
With the CR-100 USB unit, you can also listen to recorded conversations using the PC software, without the PC needing a sound card or speaker itself.
• Headphones output ('Phones' socket)
In the instances described above, playback can also be via an external earphone or headphones (not included) instead of via the built-in loudspeaker. Any standard earphone or set of (mono/stereo) headphones can be connected by being plugged into the 'Phones' socket (3.5mm jack plug). This automatically cuts out the integrated loudspeaker.
• Control connection ('Control' socket)
For external control of the CallRecorder, an external switch/button can be connected to the 'Control' socket (3.5mm jack plug on the back of the unit). Depending on the functionality provided by the system software and enabled via the PC software, this switch can e.g. control the recording or enable play-back control similar to that of a dictation machine, e.g. when used as a foot-operated switch. To find out which functions can currently be controlled this way, please see the relevant information in the version of the system / PC software that you are using and/or the information in the following chapters (for CR-200 see 5.5).
The drawing below shows the basic connection of a switch/button via a 3,5mm jack plug cable:

IMPORTANT: The contact used here must be a dry contact.
3.2.5 Connecting by USB to your PC (CR-100 USB)
- Basic view / location of connections on the back of the unit enclosure:
flowchart
graph TD
    A["Handset"] --> B["Control"]
    C["LinePower"] --> D["Control"]
    E["USB"] --> F["Control"]
Now create a connection between the CR-100 USB unit and your PC or laptop. To do this, use the USB cable supplied:
- Start up your PC or laptop and wait until the operating system has completely loaded (i.e. until your PC is ready for use).
- Push the square (B type) USB plug into the socket marked 'USB' on the CR-100 USB unit.
- Push the flat (A type) USB plug into a free USB port on your PC / laptop.
Provided that your PC is running, a message should now appear on the screen (saying 'New hardware component found', or similar). Now proceed with installing the USB driver for your CR-100 USB unit, strictly following the procedure described in section 3.3.2.
NOTE: Your CR-100 USB unit is automatically supplied with power via the USB connection from your PC or laptop. The correct presence of a power supply is indicated via the green ('Power') LED on the CR-100 USB. If despite your PC/laptop being switched on and the USB connection plugged in the green LED does not light up, please note the following points:
- Check in the system controls of your PC or laptop whether supplying power to external devices is enabled on the USB connection you are using.
- If necessary, use an external mains adapter (available as an optional accessory) to supply power to the CR-100 USB, by connecting this to the 'Power' socket.
3.2.6 Operation of the USB flashdrive stick (CR-200)
The CR-200 records the phone calls - without a PC running online - directly to the USB flashdrive plugged into the CallRecorder. Insert the Flashdrive delivered with the unit into the socket "USB" on the rear panel of the device.
For the use of the USB flashdrive stick, please note the following:
- For recordings, a memory capacity of approx. 500 KB is needed per minute. So, a flashdrive with 1 GB will enable you to record more than 30 hours. All recordings will be stored as encoded '.CRB'-files.
- The USB flashdrive stick must be formatted FAT16 or FAT32. It is recommended to use FAT16.
- For reliable recording, the flashdrive should be formatted first. By doing so, all data on the flashdrive will be deleted. So you should make a copy of data needed, e.g. the PC software and the documents, on your harddrive. You can also download the latest version of these data from the website www.beyertone.com from the "Support" area free of charge. if you should have deleted them by mistake.
- After a number of recordings, the answer time of the flashdrive stick will increase, so the start of recordings may be delayed and small dropouts may occur. If you should notice this, please save all recordings made so far from the flashdrive to your PC/laptop using the Callrecorder PC software. After that, format the USB flashdrive stick again (all data will be deleted and lost, if not saved before).
- You can also use your own USB flashdrive stick, but please note, that BEYERTONE AG may not guarantee faultless operation in this case, as some flashdrive sticks have answer times that are too high. Anyhow, you should avoid unnecessary data on the stick. Do not only delete other data, but format the flashdrive stick again (see above), after saving the data to your harddrive.
- Before inserting the flashdrive stick, switch off the CR-200. Switch it on again after re-inserting the stick. If the CR-200 should not start up the flashdrive stick properly, switch it off and - after some seconds - on again. If you want to deactivate the CR-200 for a while, you should not switch off the unit completely, but use the standby mode (see section 5.2), as this enables much faster recovery.
IMPORTANT NOTES:
- Never pull out the flashdrive stick during a recording (status LED is red). By doing so, the current recording will be damaged, and the flashdrive my have to be formatted again before further use. Always stop a recording running before pulling out the flashdrive stick.
- The CR-200 automatically stops recording, when the minimum limit for free capacity is reached (see section 7.2). If this happens, save the recordings to the PC/laptop and format the flashdrive again for further use.
- Recordings will be stored in an encoded format ("CRB") onto the flashdrive stick. For playing back recordings and - if required - converting them to WAV-files, you have to use the CallRecorder PC software (see chapter 6).
- The "INFO.TXT" file on the USB flashdrive stick:
After each startup of the CR-200 and after each recording, a file named „INFO.TXT“ will be written to the flashdrive stick. If the flashdrive is connected to your PC/laptop, you can open the file, e.g. with the notepad editor, by simply double clicking it, and retrieve information about your CallRecorder:
In the first line you see the product name. After that, the software versions of the unit are displayed („PIC“ and „VNC“), which you should report to the support-hotline if asked for. Finally, the free memory space left for recordings on this flashdrive is displayed in minutes („Mem“).
Note: If you should use a flashdrive stick with a capacity of more than 4 GB, a maximum of 8.191 minutes of free space will be displayed anyway. As soon as the free space goes below that, the value stated will be the actual number of minutes again.
If you should find another line "Time ???" in the file, the realtime clock of the unit is currently invalid, and the clock has to be set by a configuration file (see section 7.2).
3.3 Installing the software
For the operation of the CallRecorder units you need the CallRecorder PC software. This can be found on the CDROM or flashdrive stick supplied. You can also download the latest versions from www.beyertone.com from the "Support" area free of charge.
The PC software from version 4.0 is the same for both variants of the CallRecorder. It is needed for the CR-100 USB as well as for the CR-200:
• for recording of conversations via USB cable (with CR-100 USB)
• for importing and converting recordings from the flashdrive stick (with CR-200)
• for archiving and playing back of recordings
• for configuration of the CallRecorder devices
The following steps describe how to install the required software components on your PC or laptop. Please be absolutely sure to do everything as described below:
3.3.1 Installing the PC software
For operation of the CallRecorder you have to set up the PC software on your PC or laptop. To do this, run the 'setup.exe' file from the directory for your preferred language in the 'Software' folder on the CDROM or Flashdrive Stick supplied with the unit. As you go through the process, follow the installation wizard's instructions.
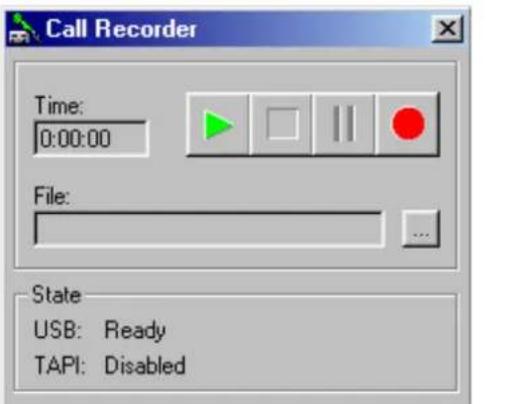
After the installation is finished, you can start up the PC software. As you do so, the software will place a small symbol (a microphone with a cassette) on your taskbar. All of the software's functions and settings screens can be launched from here by right-clicking with the mouse:
The menu options available to you are:
- 'Control Dialog' *: Launch the record / playback dialog window (* this menu item is only active when a CR-100 USB is connected)
- 'Archive': Launch the archive function for managing and replaying recordings
- 'Configuration ▶':
- 'Hardware': Settings of the CallRecorder unit
- 'Software': The PC software's settings and options
- 'Info': Information about the PC software version
- 'Lock menu': Protection against access with optional password (see section 3.3.4)
- 'Exit program': Close the software
NOTE: Recordings can be made with the CR-100 USB only when the PC software is running.
IMPORTANT: Before you use your CR-100 USB unit for the first time, you must enter the COM port number (see section 3.3.3) that you noted down after installing the USB driver into the PC software (see section 3.3.4).
3.3.2 Installing the USB driver for USB-connection (CR-100 USB)
As soon as you connect the CR-100 USB to your PC for the first time, a 'New hardware component found' message (or similar) will appear on the screen. Follow the instructions here step by step. As soon as you are asked to specify a driver for the new hardware, click on 'Browse' and specify as directory the 'drivers/USB' folder on the CD-ROM supplied with the CR-100 USB. You can then continue with the driver installation following the Windows system's instructions.
NOTE: The driver for your CR-100 USB consists of two components, i.e. after the first part has been successfully installed, your PC will start the driver installation process once more. Here again, specify as directory for the driver the 'Drivers/USB' folder on the CD-ROM.
IMPORTANT: Use only the driver on the CD-ROM. Under no circumstances use any standard driver that may be suggested by Windows, as your CR-100 USB unit will not be able to work properly with such a driver.
3.3.3 Finding the COM port number (CR-100 USB)
After being successfully installed, the USB driver registers itself in the system controls as a so-called 'virtual COM port'. The Windows system assigns a COM port number for this, which is important for the communication process between the PC software and the CR-100 USB unit.
After installing the driver, you therefore need to look up this number in the system controls of your PC or laptop and to make a note of it for the relevant entry into the PC software (see section 3.3.4).
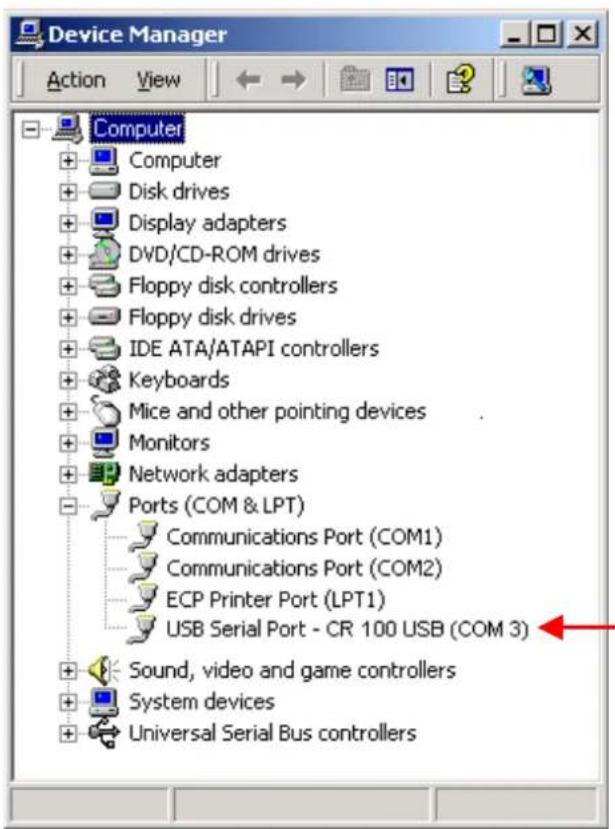
You will find the COM port number's entry in the system controls as follows:
- Click on 'Start ▶ Settings ▶ Control panel'.
- In 'Control panel' open 'System'.
- Select the 'Device manager' tab or the 'Hardware' tab and click there on the 'Device manager' button.
- Expand the 'Ports (COM & LPT)' entry in the list by clicking on the '+' symbol on that line.
- You will now see the 'USB Serial Port - CR 100 USB (COM x)' entry. 'x' here is the number of the COM port assigned for your CR-100 USB device. Please make a note of this.
NOTE: The entry described above is only visible in the control panel if your CR-100 USB unit is connected to your PC and ready for use. If the entry is missing, please check therefore that the device is correctly connected to a USB port on your PC or laptop.
- The example below shows an entry for COM port number 3:
3.3.4 Entering the COM port number (CR-100 USB)
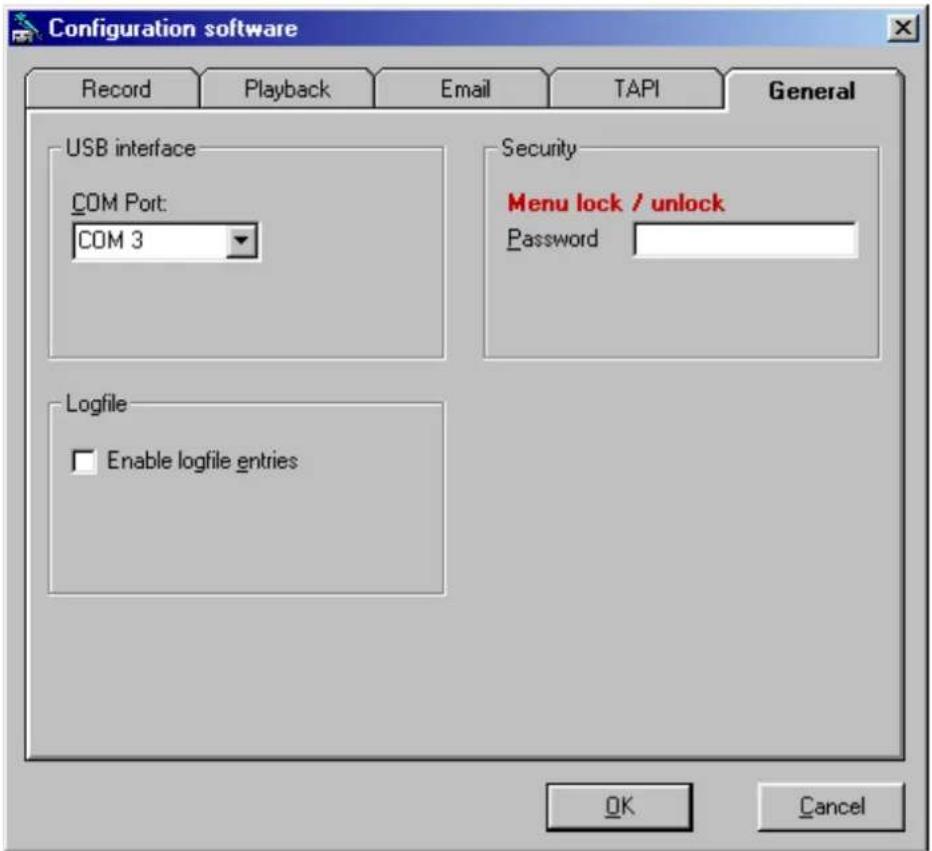
Start up the PC software and open 'Configuration / Software' from the menu (right click on the symbol in the task bar).
In ‘Settings’, click on the ‘General’ tab and under ‘COM Port’ in the ‘USB interface’ section enter your CR-100 USB unit’s COM port number, as ascertained from the Windows control panel (see section 3.3.3).
- 'General' tab:
Now you can make the first recordings with your CR-100 USB (continue with section 4). Later, you can also make further settings and use your CR-100 USB unit's other functions (see section 7.1).
Under 'Security' you can enter a password for the 'lock menu' function.
NOTE: The 'Enable logfile entries' makes it possible to keep a record of internal programme processes in a log file. This feature can be helpful in analysing faults if any functional problems arise and you should therefore enable it if asked to do so by technical support. The log file created in this way can then be found in the programme installation's 'Log' sub-directory.
4. Getting started and recordings with the CR-100 USB
NOTE: This entire chapter is about handling the CR-100 USB for recordings directly to the PC or laptop via USB-connection.
Once you have connected your CR-100 USB unit as per section 3 and installed all of the required software components, you can start using it and experimenting with your first recordings.
If it is not already running, start up the software. The little symbol on the taskbar will initially be bluish and will then become green as soon as a USB connection is established to the CR-100 USB unit. You can also see that there is an active USB connection by the yellow 'USB' LED being lit up on the unit itself.
You will see the displays and controls shown below on the top of the unit:
4.1 Basic software settings
Open 'Configuration / Software' via the menu (right click on the CallRecorder symbol on taskbar) and before making your first recording check the following settings, changing the entries if necessary.
- The 'Recording' tab:

Via 'Enable automatic recording' you cause the software to begin making a recording to file as soon as a start signal is relayed from the CR-100 USB (this can be produced by the press of a button or automatically at the start of every conversation – see section 7.1).
By using 'Show status dialog', you can opt to have a small window pop up during recordings that enables you, for instance, to stop the recording early. Otherwise all recordings take place in the background.
You set up under 'Audio format' whether the recording should be made in the standard WAV format (with a '.wav' file extension) or in the encoded CallRecorder format (with a '.cra' file extension). Standard WAV files can subsequently be played back over any PC fitted with a soundcard. Encoded files are given a password and can only be subsequently listened to via the PC software's archive function, after entry of the password.
If you want to use the encoded recording format, you can prescribe a standard password under 'Password', which will be used as a default for every recorded file. In combination with the 'Enable call details' dialog, you can also specify an individual password for each recording, even where a standard password has been set up. If you do not enter a standard password, you will be asked to enter a password at the end of each recording.
NOTE: Upon installation of the PC software the standard password is '1234'. Be sure to change this to a password of your own. If possible, use a combination of letters and numbers.
Tip: Use the encoded files option if, for example, you want to send recordings via e-mail to somebody else. Agree your own password with the recipient. If the e-mail falls into the wrong hands, the audio file cannot then be listened to by any unauthorised individuals.
If you select 'Save recording' in the 'End' section of this configuration tab, then once a recording is finished the corresponding file will be automatically backed up in the directory specified under 'Standard folder'. Alternatively you can select 'Remove recording' as the default action, if you only wish to keep certain recordings.
To do so, after finishing a recording you can call a dialog window 'Call details', where you can specify for each recording individually if you wish to keep the recording although 'Save recording' was selected or - vice versa - the recording should be saved although 'Remove recording' was selected. Additionally, in this dialog window another file name and directory for the actual recording can be specified using the button 'Save as'. Depending on the handling you wish to obtain, you can call the window 'Call details after call-end-detection' after an automatic recording stop via the signal detection (see chapter 7.1) and/or via 'Call details after manual stop' (Stop button).
The pre-defined function can also be executed automatically after an adjustable time by the option 'Execution after'. If you do not make an entry in the opened dialog window 'Call details', the window will then be closed automatically.
Removing of recordings can be done into the recycle bin by the option 'Remove to recycle bin, otherwise the recording will be deleted finally.
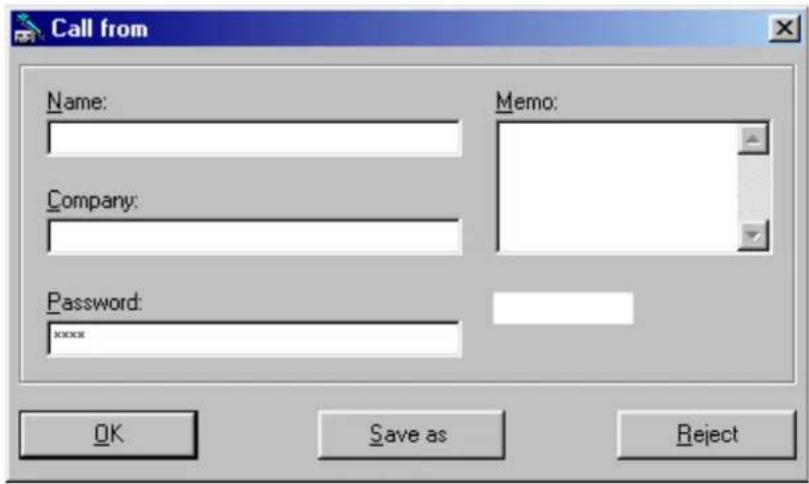
The dialog window ‘Call details’ additionally brings the option to enter the name of the other party, the name of their company and a short note (max. 90 characters) after the end of a recording.
NOTE: You can use the name, company and note entries as search criteria if you later need to find a recording again via the archive function. Using this dialog can therefore be very useful and is something we strongly recommend.
The function ‘Enable automatic file names’ lets the PC-Software generate a filename automatically for each recording. Otherwise a file name has to be entered manually for each recording.
The option ‘Cut silence’ should be used together with the automatic call-end-detection (see chapter 7.1). Hereby the duration of silence, which is necessary to detect the end, will be erased from the recording automatically when the filed is saved.
• Online help within the PC software:
NOTE: The PC software has an integrated contextual help function. This means that for each of the individual setting options you can display text-based information that will explain these further. To launch the help display, simply highlight the element you want help on and press the F1 key on your PC.
4.2 Recording telephone conversations
Having now installed your CR-100 USB unit and the PC software and made the main settings (see section 4.1), you can now start to record telephone conversations. To do this, the PC software must be running and the CR-100 USB unit must have an active connection to your PC or laptop (the yellow 'USB' LED on the appliance should be lit up and the symbol on the taskbar should be coloured green).
Tip: Copy the 'CallRecorder' programme symbol from the 'Start' menu into your PC's autostart directory. That way the PC software will always be launched whenever Windows is started up. Coupled with the 'Enable automatic recording' option you can thus set everything up so that recordings are essentially made automatically.
1. Start recording
Depending on how your CR-100 USB is configured (see section 7.1), a trigger that starts the recording is either produced automatically as soon as an audio signal from a telephone conversation is received from your telephone, or you are able to produce the start trigger manually by pressing the 'Start / Stop' button on the device.
Based on the configuration of the PC software's 'Enable automatic recording' option (see section 4.1), either an audio file now automatically starts to be recorded or you have to confirm the trigger relayed from the CR-100 USB by clicking on the record symbol in the dialog window to start the recording.
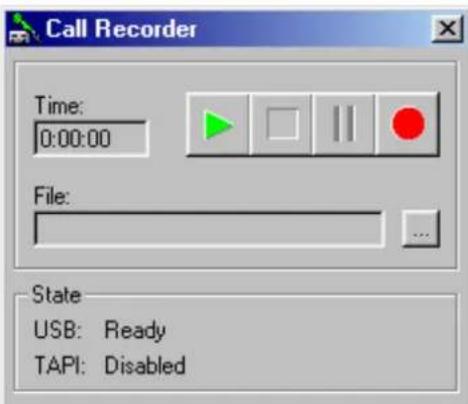
If you have neither enabled automatic triggering, nor wish to press the 'Start / Stop' button, you can also start a recording from your PC. To do this, you launch the 'Control Dialog' window from the menu by right-clicking on the CallRecorder symbol on the taskbar. In the 'Call Recorder' window you can then start the recording by clicking on the red record button.
NOTE: If you have connected your CR-100 USB to your telephone's analogue exchange line, you should possibly avoid using your CR-100 USB unit's fully automatic start feature, as if you did your recordings of outgoing calls would also include e.g. dialling as MF tones.
Therefore either deactivate the ‘Start recording automatically’ option in the configuration for the CR-100 USB unit itself (see section 7.1) or the ‘Enable automatic recording’ option in the PC software’s configuration (see section 4.1).
2. Finish recording
You can choose to have the recording stopped automatically by the CR-100 USB unit if no more audio signals are received for a given period, or you can manually press the 'Start / Stop' button to stop it (depending on how the CR-100 USB is configured – see section 7.1).
If the dialog window is displayed on screen (depends on the PC software configuration – see section 4.1) you can also finish the recording with an appropriate click on the stop button.
You can also temporarily pause the recording and continue it later both via the dialog window (pause button). Any recording made in this way is subsequently saved as one combined file.
3. Saving or discarding recordings
So that you can check it is recording, the red ('Recording') LED lights up on the CR-100 USB while a recording is being made. When the recording has finished, the red LED flashes for a few more seconds (the duration is adjustable, see section 7.1). While the red LED is flashing, you can discard the recording that has just finished, i.e. stop it being saved, by pressing again on the unit's 'Start / Stop' button.
However, if you have activated the 'Remove recording' option, you can decide to save the current recording by pressing on the unit's 'Start / Stop' button (see section 4.1).
Provided that you have activated a ‘Call details’ option in recording settings, another dialog window now appears that lets you record additional information, such as the name of the other party, their company name and a short note (max. 90 characters) on the subject matter of the conversation.
NOTE: You can later use the entries recorded here as search criteria to look for a recording via the archive function.
If encoded file saving in the .cra format is enabled, you can assign an individual password for the recording in this dialog window by overwriting the default standard password (assuming that one was specified at 'Configuration Software / Recording').
4. Playing back recordings
If the dialog window is on screen (this depends on the PC software configuration – see section 4.1), then once a recording has finished you can listen to the last recording made via the CR-100 USB itself by clicking on the green playback button.
For easy searching and playback of previously saved recordings, use the archive function, which is described in detail in chapter 6.
4.3 Monitor function for telephone conversations
The CR-100 USB unit's integrated loudspeaker also provides you with a monitor function for your telephone. You can use this at any time, no matter whether you are simultaneously making a recording or not. However, a so-called 'hands-free' function is not possible via the CR-100 USB.
You use the 'Monitor' button on the CR-100 USB to turn the speaker function on and also to select the desired volume level. Each press increases the volume by one level, of which there are 4 in total. After you have reached the top level, if you press the button again this switches the monitor function off. You can also turn the monitor function off from any other volume setting, by holding the button down for a second.
CAUTION: Feedback (a whistling sound) can occur if the volume level is too high. If this happens, select a lower volume level.
NOTE: You can also configure your CR-100 USB so that the monitor function is permanently activated. You can also set the standard volume level for this. You will find details on these settings in section 7.1.
4.4 Recording in-room conversations
The CR-100 USB has an integrated microphone that enables you to record not only telephone conversations but also in-room conversations, i.e. meetings and round-table discussions, for example. To make an in-room recording, you have to move the 'Mic' switch on the CR-100 USB into the 'on' position (see section 3.2.3, also regarding the connection of an external microphone). Then set up the CR-100 USB so that the distance to each participant in the conversation is about equal and also not more than approx. 1.5 to 2 metres.
NOTE: If the ‘Mic’ switch is in position ‘on’, the ‘Monitor’ function of the CR-100 USB is automatically disabled to avoid acoustic feedback. Moreover, if the ‘Mic’ switch is in ‘on’ position, the CR-100 USB unit’s possibly activated automatic call detection (see section 7.1) will be deactivated temporarily, as automatic detection of the start and end of such in-room conversations can cause the automated system to malfunction due to the varied volume levels involved.
However, if you have enabled automatic recording and automatic backup in the PC software (see section 4.1), you can conveniently control the recording of the conversation by using the Start / Stop button on the CR-100 USB. The red LED light shows you if the recording is being made.
NOTE: After recording an in-room conversation do not forget to put the 'Mic off-on' switch back into the 'off' position, if you subsequently want to record telephone conversations again with your CR-100 USB.
4.5 TAPI control
If you're using the CR-100 USB on a telephone which is connected to a telephone system and if your PC is connected to the telephone system by a so called "TAPI" interface (which e.g. enables dialling telephone numbers from the PC), then you can also control the CR-100 USB via the TAPI interface. This e.g. enables a direct control for recordings synchronised to the telephone's status and capturing the number of the party calling or called to be saved together with the recording.
To be able to use the TAPI functionality, first please make the following required settings. To do this, open 'Configuration / Software' from the menu (right click on the CallRecorder symbol on the taskbar).
- The 'TAPI' tab:
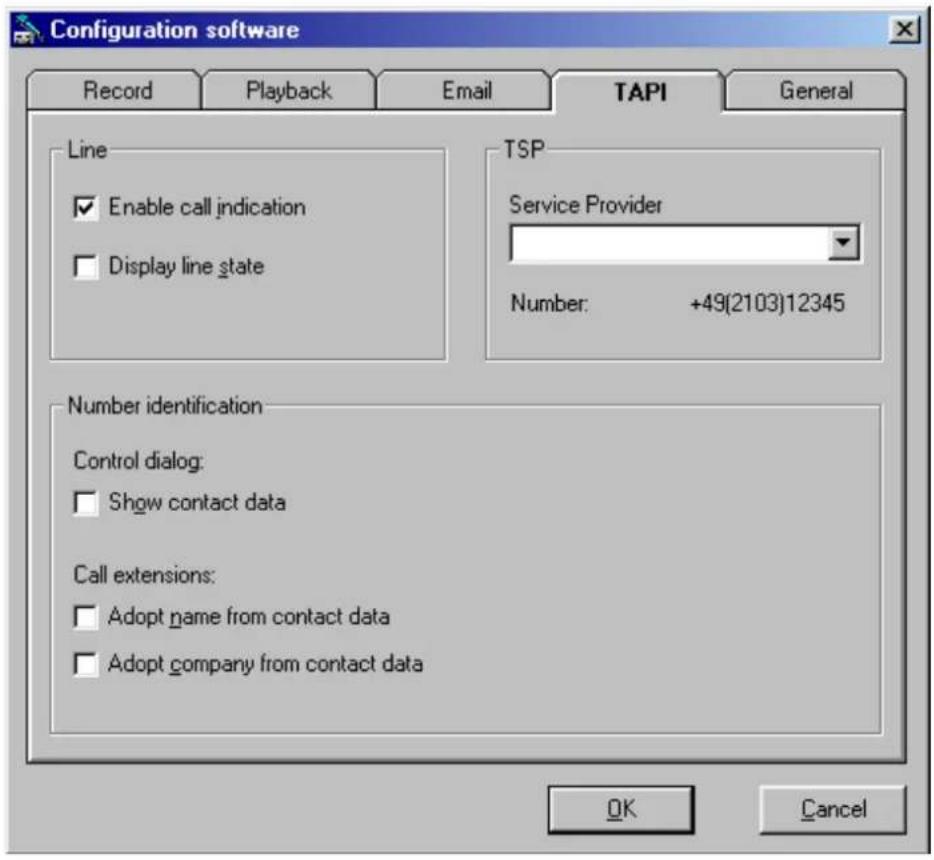
Enable TAPI control by clicking 'Enable call indication' and under 'TSP' choose the appropriate „Service Provider“ from your PC. The 'Number' shown is your own number registered for the TAPI driver on your PC.
NOTE: With call indication enabled via TAPI, the call-detection and call-end-detection via the CR-100 USB (audio control) will be ignored, because now the control of the recording is done via the TAPI control.
Additionally, you can now display changes of the TAPI status in the dialog window of the CR-100 USB by clicking 'Display line state'.
As an option, you can also 'Show contact data', when a number has been recognised by the TAPI interface and there is already an entry in the archive of the CR-100 USB matching this number.
Moreover, by using the options “Adopt name from contact data” and “Adopt company from contact data”, with new recordings the call details ,name‘ and ,company‘ can be adopted automatically from existing entries in the archive matching the number of the new call.
NOTE: TAPI functionality is available for the CR-100 USB from PC-software version 3.0 and device's system software version 2.3. See section 7.3 for updates.
5. Getting started and recordings with the CR-200
NOTE: This entire chapter is about handling the CR-200 for recordings on the USB flashdrive stick without a PC or Laptop connected.
Once you have connected your CR-200 unit as per chapter 3 and installed all of the required software components, you can start using it and experimenting with your first recordings.
Insert the USB flashdrive stick into the device an power it on.
You will see the displays and controls shown below on the top of the unit:
There are two important indicator lights on top of the CR-200 unit:
• the status LED (red/green/yellow)
• the USB LED (yellow)
The indicators will show the unit's status at any time.
The LED lights have this meanings:
Status LED:
| Indication Meaning | |
| yellow | waiting for flashdrive stick / starting the flashdrive stick |
| green | unit ready |
| red | recording active |
| red flashing after recording | timeout for discarding function (see 5.2) |
| Messages Meaning | |
| green flasing (short pulses) | unit in standby mode (see 5.2) |
| green flashing continuously | memory nearly full (see 7.2) |
| ret flashing continuously | memory full (see 7.2) |
| Errors Meaning | |
| red flashing after start-up | date/time invalid (see 5.1) |
| rot flashing (short pulses) | internal error -> unit restarts |
| yellow flicker after start-up | internal update running -> do not power off! |
USB LED:
| Indication Meaning | |
| 3x flashing | starting the USB port of the CR-200 |
| yellow light | USB flashdrive stick ready |
| flashing | read/write data |
| off | no flashdrive stick inserted or stick removed |
5.1 Settings of the unit / date and time
- Date and Time
The CR-200 records phone calls independently of a PC or laptop on the USB flashdrive stick inserted. To be able to memorise also the time and date the recording took place, the CR-200 has a built-in realtime clock. This clock has to be set to the actual time - at when taking the unit into operation for the first time.
To set the clock, you can generate a file „TIME.DAT“ using the CallRecorder PC software. This file is the copied to the flashdrive stick. Once the flasdrive is inserted into the CR-200, the unit will chekc for this file upon start-up an set the clock, if such file exists. After that, the file will be deleted to prevent from setting the clock again at a newly start-up of the unit.
The CR-200 has an internal backup for the realtime clock, which ensures correct date and time even if the power supply is disconnected. The maximum backup time without power supply is approx. 10 days. As long as the unit is only switched off by the „On - Off“ switch, the clock is being powered anyway. Please note that the full backup time will only be achieved, after the unit has been powered by the power supply for at least 30 minutes.
If the backup time is exhausted, when powering on the unit the status LED will flash red after starting up the flashdrive stick and before going into operation. Moreover, in the file INFO.TXT on the flashdrive stick there will be an entry „Time ???“ (see chapter 3.2.6). Recordings can of course be done, but time and date will be incorrect unless the clock is set again.
Regarding the generation of the "TIME.DAT" file for setting the clock, please refer to chapter 7.2. You can also set the clock any time later again, e.g. to adjust it to daylight saving time (which is not automatically done by the unit) or to adjust it.
- Configuration
On delivery, the CR-200 is set to a default configuration, which should be useful for most applications. Although, you can do some personal settings on the unit, e.g. you can deactivate the automatic start feature or set your individual password. Please refer to chapter 7.2 for configuration settings. By means of the CallRecorder PC software you can create a configuration file, which the unit will read from the USB flashdrive stick upon start-up and save to the internal memory. By using this mechanism, also user-dependent settings are possible, because the file will be kept on the flashdrive stick.
NOTE: The default password, which is used for all recordings, is '1234'. Be sure to change this to a password of your own. If possible, use a combination of letters and numbers.
5.2 Recording telephone conversations
Having now installed your CR-200 unit and the clock and optionally an individual configuration set, you can now start to record telephone conversations. To do this, the device has to be powered up, the USB flashdrive stick inserted and the „Status“ LED lighting green. If the LED is flashing green, the memory capacity is nearly exhausted. If it is flashing red, the flashdrive stick is full. In this case, you first have to import recordings from the flashdrive stick to you PC or laptop and delete the files on the flashdrive or format it. If the LED is flashing green with short pulses, the unit is in standby mode (see also item 5 below). Regarding the several indications of the LED, please also refer to the beginning of chapter 5.
1. Start recording
Depending on how your CR-200 is configured, the recording starts automatically as soon as an audio signal from a telephone conversation is received from your telephone, or you can manually start the recording manually by pressing the red 'Start / Stop' button on the device. On delivery, the automatic recording start is activated.
NOTE: If problems with the automatic recording start should occur, you should deactivate the 'Start recording automatically' option in the configuration of the CR-200 unit (see section 7.2).
2. Finish recording
You can choose to have the recording stopped automatically by the CR-200 unit if no more audio signals are received for a given period, or you can manually press the red 'Start / Stop' button to stop it (depending on how the CR-200 is configured – see section 7.2).
3. Saving or discarding recordings
So that you can check it is recording, the status LED lights up red on the CR-200 while a recording is being made. When the recording has finished, the LED flashes red for a few more seconds (the duration is adjustable, see section 7.2). While the LED is flashing red, you can discard the recording that has just finished, i.e. stop it being saved, by pressing again on the unit's red 'Start / Stop' button.
4. Playing back recordings
Recordings, that have been made with the CR-200, have to be imported from the USB flashdrive stick to your PC or laptop by means of the CallRecorder PC software first.
To do so, and for easy searching and playback of recordings, use the archive function, which is described in detail in chapter 6.
5. Standby mode
If you do not want to record your conversations temporarily, you do not need to switch off the CR-200 completely, but you can activate the standby mode of the unit. To do so, press the red button for approx. 2 seconds. The standby mode will be indicated by the "Status" LED flashing green (short pulses).
To set the unit back into operation again, press the red button again for 2 seconds. The "Status" LED will light green again. The standby mode will be memorised even when the CR-200 is switched off and on again.
5.3 Monitor function for telephone conversations
The CR-200 unit's integrated loudspeaker also provides you with a monitor function for your telephone. You can use this at any time, no matter whether you are simultaneously making a recording or not. However, a so-called 'hands-free' function is not possible via the CR-200.
You use the ‘Monitor’ button on the CR-200 to turn the speaker function on and also to select the desired volume level. Each press increases the volume by one level, of which there are 4 in total. After you have reached the top level, if you press the button again this switches the monitor function off.
CAUTION: Feedback (a whistling sound) can occur if the volume level is too high. If this happens, select a lower volume level.
NOTE: You can also configure your CR-200 so that the monitor function is permanently activated. You can also set the standard volume level for this. You will find details on these settings in section 7.2.
5.4 Recording in-room conversations
The CR-200 has an integrated microphone that enables you to record not only telephone conversations but also in-room conversations, i.e. meetings and round-table discussions, for example. To make an in-room recording, you have to move the 'Mic' switch on the CR-200 into the 'on' position (see section 3.2.3, also regarding the connection of an external microphone). Then set up the CR-200 so that the distance to each participant in the conversation is about equal and also not more than approx. 1.5 to 2 metres.
NOTE: If the ‘Mic’ switch is in position ‘on’, the ‘Monitor’ function of the CR-200 is automatically disabled to avoid acoustic feedback. Moreover, if the ‘Mic’ switch is in ‘on’ position, the CR-200 unit’s possibly activated automatic call detection (see section 7.2) will be deactivated temporarily, as automatic detection of the start and end of such in-room conversations can cause the automated system to malfunction due to the varied volume levels involved.
TIP: You can also - at the end of a telephone recording running - switch on the microphone temporarily to add a spoken comment regarding the conversation. Please note that the automatic recording stop will be deactivated as long as the microphone is switched on.
NOTE: After recording an in-room conversation do not forget to put the 'Mic off-on' switch back into the 'off' position, if you subsequently want to record telephone conversations again with your CR-200.
5.5 External Control
With the CR-200 the start-stop-control of the recording can alternatively be controlled by external signals. Two ways are possible:
• Control via analogue telephone line
• Control via external contact
Control via analogue telephone line can be done, if the CR-200 is connected within an analogue line as described in chapter 3.2.2. Activating the „Control“ input as described in chapter 7.2 will have the effect, that the CR-200 now automatically starts recording, when the telephone attached to the unit goes off-hook, and stops recording, when the phone goes on-hook again. (This way of control is not possible when the CR-200 is connected in the handset-cord of the telephone.)
Please do first connect the CR-200 into the analogue telephone line and only then activate the configuration. Otherwise the CR-200 would start a recording immediately. When the CR-200 is powered, the yellow LED "Control" will light up, when the unit is connected to an analogue telephone line and the telephone is on-hook. As soon as the phone goes off-hook, the LED goes off and the recording starts.
If according to chapter 3.2.4 an external contact is connected to the “Control” socket, the control via telephone line will be deactivated, and the start-stop-control will be done via the contact. This contact must be a dry contact n.c. (normally closed). To start a recording, the contact has to be opened.
Also in this configuration first the external contact has to be connected in closed position, and only then the configuration can be activated. Also here, the “Control” LED is light up in default position of the contact and will go off when the contact is opened.
Note:
The external control can also be used together with the internal or an external microphone.
The automatic start or stop function of the CR-200 by audio signal will be deactivated, when the external control function is used.
6. Playing back recordings
For playing back recordings of the CallRecorder, you need the CallRecorder PC software. For installation, please refer to chapter 3.3.1.
NOTE: With the CR-100 USB you can play back recorded conversations via your PC / laptop's soundcard or – especially if your PC has no audio facility – via the CR-100 USB unit's built-in loudspeaker.
IMPORTANT: The CR-200 does not support this functionality, so you have to choose 'soundcard' below to be able to listen to the recordings.
Before playing back a recording for the first time, check the relevant PC software settings and, if necessary, change them. To do this, open 'Configuration / Software' from the menu (right click on the CallRecorder symbol on the taskbar).
- 'Playback' tab:
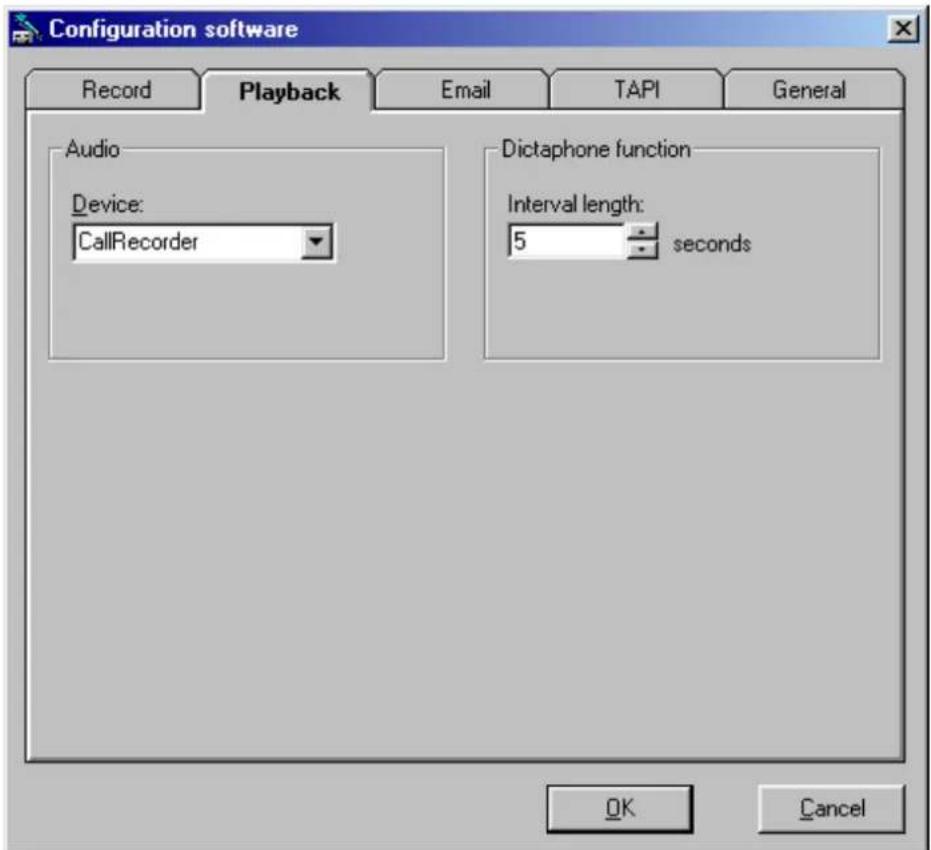
Select under 'Device' in the 'Playback' section whether you want to play back recordings via the CR-100 USB ('CallRecoder') or via your PC's 'Soundcard'.
The 'Interval length' specified here determines the excerpt length for the playback dialog for the optionally enabled looped replay of recorded excerpts (see below).
6.1 Import of recordings from the USB flashdrive stick (CR-200)
While the CR-100 USB directly records files onto the PC, the CR-200 will save recorded files independently on a USB flashdrive stick. For playing back and archiving these recordings, you first have to import them into the archive of the CallRecorder software.
To do so, please proceed as follows:
1. Insert USB flashdrive stick
Pull the flashdrive stick out of the CallRecorder and insert it into a free USB-slot on your PC or laptop.
If you (e.g. under Windows 98SE) should need a driver for the flashdrive stick (Hardware-Assistant comes up), you will find it on the website of the manufacturer of the flashdrive stick. If you should face problems in this, you can also lookup in the "Support" section under www.beyertone.com, or you may get in touch with the technical support of BEYERTONE AG (see section 8.3).
The USB flashdrive stick will be attached as a new drive on your PC. You can check this by opening the Windows-Explorers. On the flashdrive you will find your recordings as files with the ending ".CRB", and additionally a file named "INFO.TXT" (see section 3.2.6).
2. Open import window
For import of the recordings from the flashdrive stick, now open the 'Archive' window ('Archive' item in the menu after right click on the CallRecorder symbol on the taskbar), and there use the menu item "Archive / Import". You can also use the button from the menu bar of the Archive window. (For details regarding the Archive window, please see section 6.2.)
Now the following window will appear for importing recordings from the flashdrive stick (see next page):
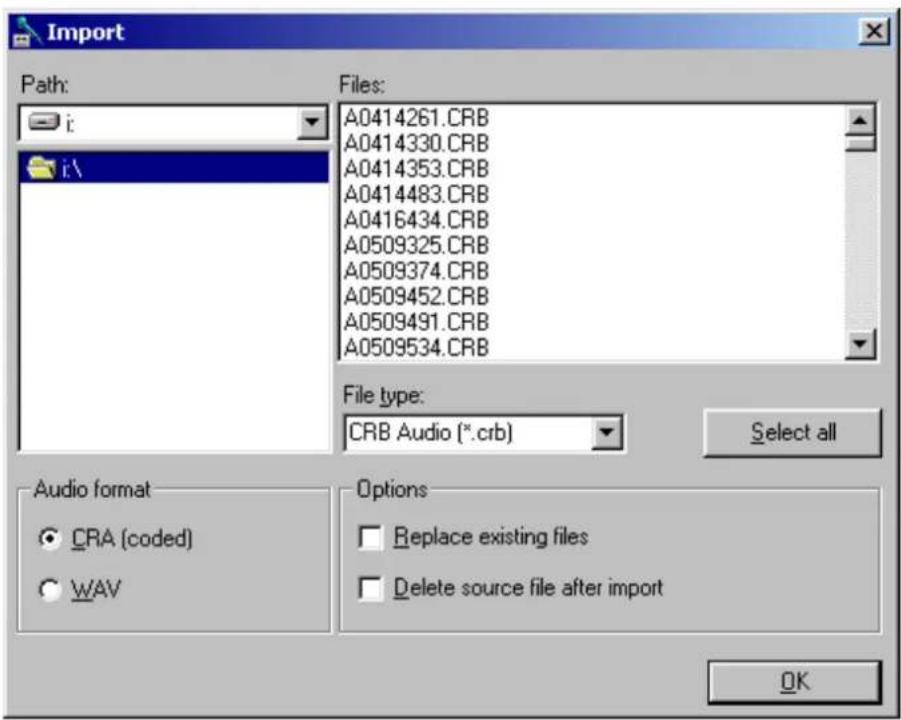
3. Import files
Under Path now choose the drive that represents the USB flashdrive stick, which is inserted in your PC/laptop. Under Files you will see the list of recordings saved in „CRB“-format on the flashdrive. You may Select all recordings or only certain files from the list. The filename is composed of one figure or letter A, B, C for the month, two figures for the day, each two figures for the hour and the minute and one figure for the 10 seconds of the point of time the recording started.
By Options you can choose, if you want to replace files with identical names if they already exist on the PC/laptop, and if the files should be deleted on the flashdrive stick after the import is done. Please note, that formatting the USB flashdrive stick after importing the files to the PC/laptop is essential for a reliable operation of the CR-200 (see section 3.2.6).
Under Audio Format you may select, if the imported files shall be saved again in an encoded format on the PC, or if they shall be saved as "normal" wav-files. If you choose „WAV“, you will have to enter the password with each file being imported, as the file will be decoded while importing.
NOTE: The password is stored in the CR-200 unit and can be changed by configuration of the unit (see chapter 7.2) The default password upon delivery of the unit is „1234“.
6.2 Recordings in the 'Archive' window
Looking for a particular recording, playing back recordings, editing the additional details and other useful functions are all done via the 'Archive' window, which you can open via the corresponding 'Archive' item in the menu (right click on the CallRecorder symbol on the taskbar).
NOTE: To have the e-mail profile requested when opening the archive see section 6.3.
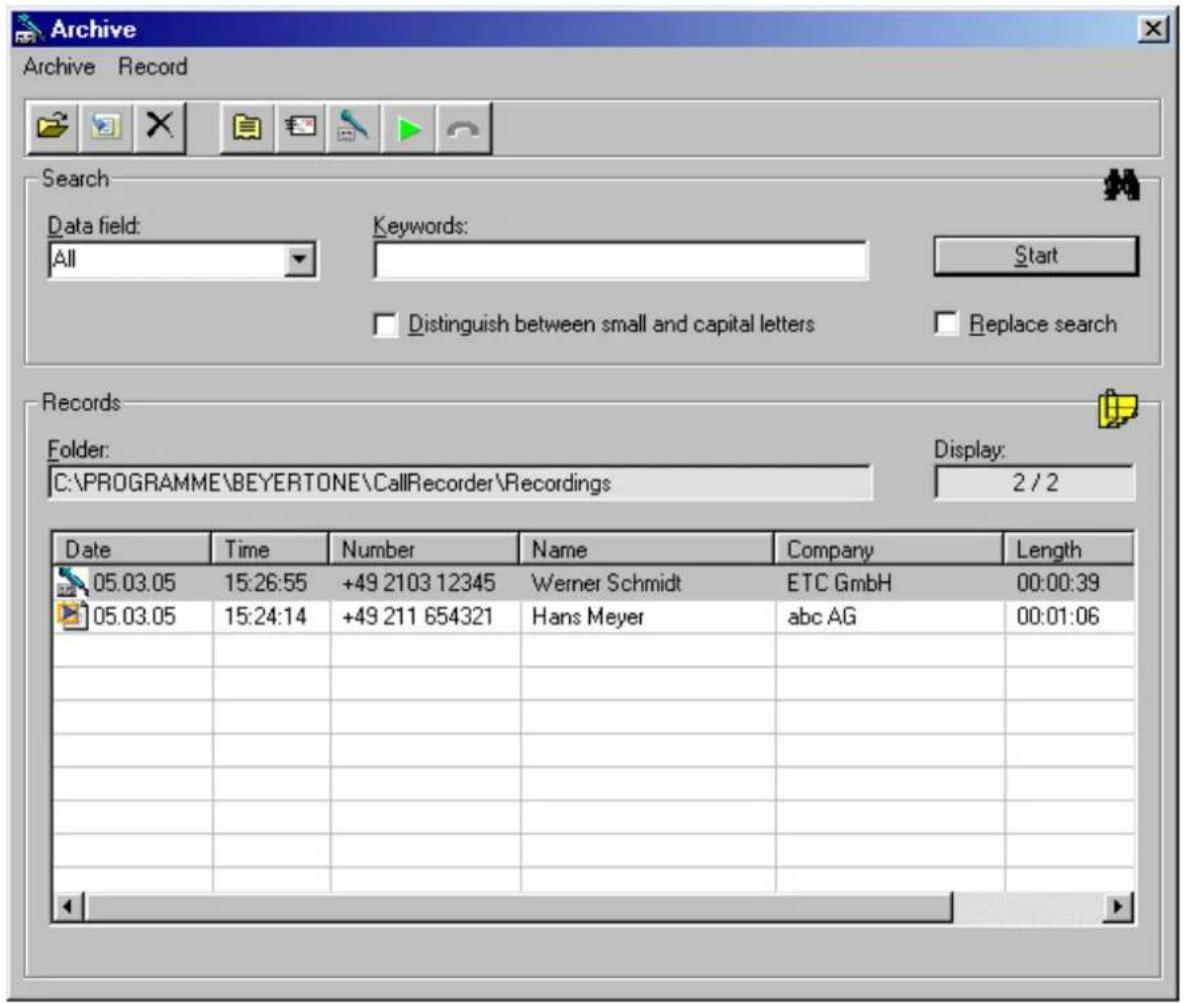
The archive's menu offers you the following options:
- 'Archive':
- 'Open': Enter a path for recordings (button: 📋)
• ,Import': Import recordings from the CR-200 (button: , see section 6.1) - 'Close': Close the archive window
- 'Record':
- 'Edit': Edit the additional information about the recording * (button:
- 'Play': Listen to the recording * (button: )
- 'Send to': Send recording by e-mail as a file attachment * (button: 1)
- 'Convert to...': Encode / decode recording * (button: 📄)
• ,Dial number': only available with TAPI-function (section 4.5) * (Button: 📋)
- 'Delete': Permanently delete recording * (button: ✗)
- 'Delete all': Permanently delete all recordings
(* these menu items are only active if a record is highlighted)
1. Search for a recording
If the recordings you want to work with are not located under the preset search path, you can select another directory by using 'Open archive'. You can see the current directory displayed under 'Folder' in the 'Records' section, along with the number of recordings in this folder.
In the ‘Records’ section you will now find a list of all of the recordings in the selected folder, including both those in ‘.wav’ and in the encoded ‘.cra’ format. The file formats are identified with symbols, as follows:
- Standard .wav file:
- Encoded file:
To find the file you are looking for from amongst a multitude of archived files, you can enter 'Keywords' in the 'Search' section and specify under 'Data field' which fields the system should search in for the keywords. You can optionally also have the search 'Distinguish between small and capital letters'.
When you click the 'Start search' button, the list of recordings displayed is filtered by the criteria you have entered, i.e. the list will now only show records that match your criteria.
If you select the 'Replace search' option, any new search that you then carry out will start with the complete list of recordings. If the option is not selected, you can gradually apply more and more criteria for filtering from the complete list by repeating the search several times until the record you want is found.
2. Edit a recording
Whenever the desired record is highlighted in the list, you are able to edit it. The ‘Edit record’ option lets you retrospectively record additional information such as the name and company of the other party in the conversation and/or to edit or add to the additional information that has already been saved (especially by recordings imported from the CR-200).
• The 'Edit record' window:
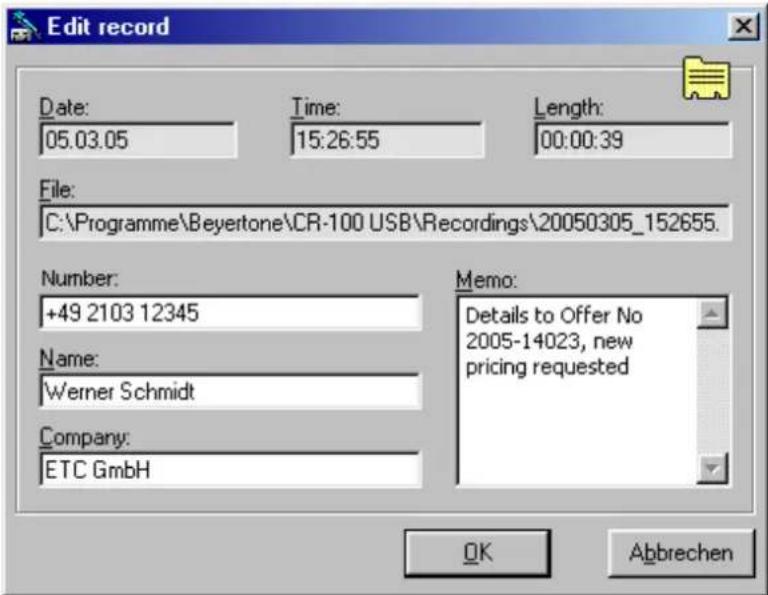
Tip: You can also call up this dialog window for a data record by double clicking on the relevant entry in the list.
The 'Play' option lets you listen to the selected record. The playback window opens up to do this (the playback window options are described in detail in the next section). If the file is an encoded file, you may be asked to enter the recording's password before the window opens.
By using 'Send to', you can send the selected recording as an e-mail file attachment via your PC to somebody else. You will find more details on this in section 6.3.
The ‘Convert to...’ menu item lets you retrospectively create an encoded file in the .cra format from a recording in the standard .wav format, and vice versa (in each case, only the applicable option is displayed). The appropriate password is required to encode or decode the file.
The 'Delete' and 'Delete all' functions respectively delete one ore more highlighted records or all of the recordings in the opened archive.
3. Playing back a recording
If you have highlighted a recording in the list of records and click 'Play', then - after password entry and file conversion in the case of encoded files - the playback window opens up:
• The ‘Playback’ window (options enabled):
![Playback File: 20050314_113305.wav Position: 0:00:00 Length: 0:00:00 [---] [...] Loop enabled low high Options Position Start: 0:00:00 End: 0:00:00 Speed slow normal fast OK](/content/2026/05/1040092/images/58d09102020fa766a353e3a96bef4d99b5cfee9b474961731f2f03496595b58c.jpg)
As well as the 'File' name of the selected recording you will initially see details of the playback's current 'Position' and of its 'Length'. There is also a graphical display in the form of a position marker that shows the current playback position. Using your mouse, you can drag this marker to any point of the recording to change the playback position of the recording currently being played.
To the left, below the position marker, there are a number of buttons that control starting (▶), stopping (■) and pausing (■) the playback, as well as returning to the start of the recording (▼). Below these is an adjuster for playback volume, which you can slide back and forth with your mouse (only applicable if the PC's soundcard is selected for playback - when playing back via the CR-100 USB unit, please use it's 'Monitor-button for volume setting).
To the right, next to the playback controls, there are three buttons that allow you to enable the replay of a given excerpt of the recording. These functions can, for instance, be very useful if a transcription of the recording needs to be made.
During playback of a recording, click on the ‘[...]’ button to start an endless, looped replay of a short section, starting from the current position. You can preset the length of this section under ‘Interval length’ in the software’s settings (see the start of section 6). By pressing again on this button, you move the section on one interval’s length and looped replay then continues of the next section.
NOTE: Depending on the version of the system software you have, you can also control this function in other ways, for instance with a foot-operated switch connected to the CR-100 USB unit's 'Control' socket (see section 3.2.4).
By using the ‘|<<’ button, you can go back to the active’s loop’s starting point, with the playback then restarting immediately from this position. You use the ‘<-->’ button to end an activated looped playback.
Via 'Loop enabled', you can also start a looped playback separately and manually set the loop's start and end points. If you enable 'Options', you will see more options relating to this displayed in the playback window.
Under 'Options' you are able to use position markers to manually set the start and end points for playback by dragging the relevant pointer with your mouse to the desired position, or through adopting the running playback's current position by clicking for start and end respectively on the appropriate button ( )
Finally, using the 'Speed' option, you can change the playback speed during playback. You may want to do this, for instance, to find certain passages faster or to be able to listen to the recording more slowly for transcription purposes. This option is not available on playback via the CR-100 USB unit itself, but only on playback via the soundcard in a PC or laptop (for settings see the start of section 6).
6.3 Sending recordings by e-mail
If your PC or laptop has an e-mail profile set up, you can send recordings as e-mail file attachments from the archive facility.
In order to be able to use the e-mail function, first please make the following required settings. To do this, open 'Configuration / Software' from the menu (right click on the CallRecorder symbol on the taskbar).
- The 'e-mail' tab:
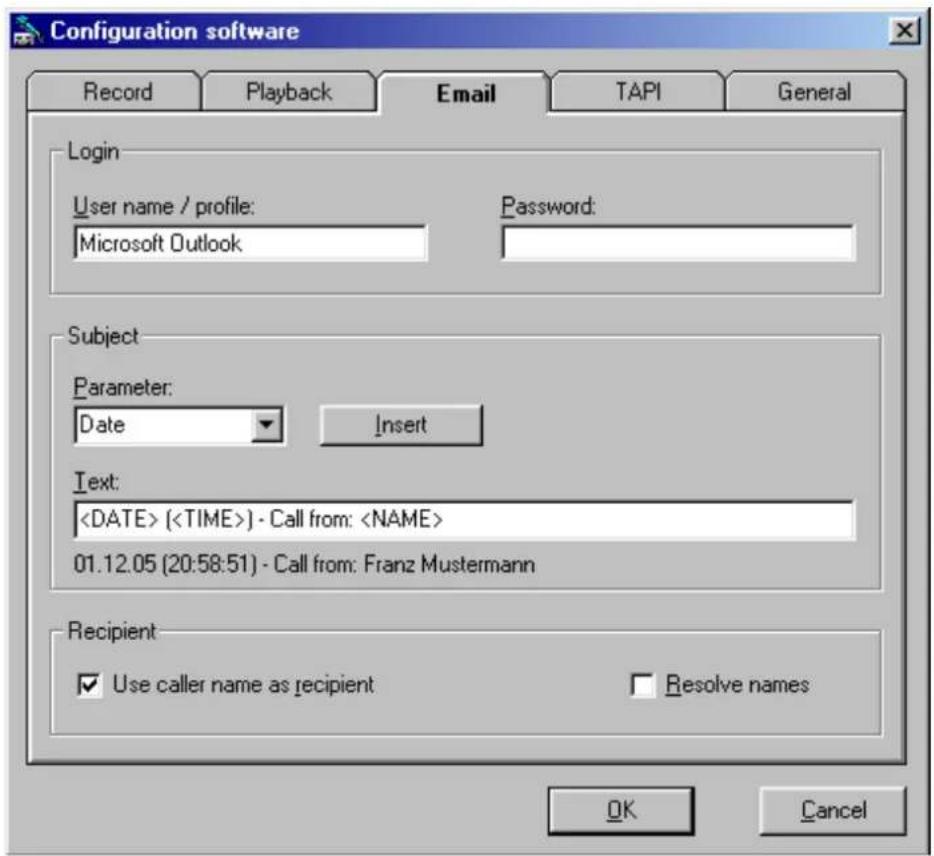
Enter in the 'User name / profile' field the name of an e-mail profile set up on your PC that you want the archive to log onto when it opens, plus, if applicable, the necessary log-on 'Password'.
NOTE: If you do not specify a valid profile here, there may be an appropriate prompt for one when the CallRecorder archive function opens.
Under 'Subject', you are able to format the subject line that you want your CallRecorder's archive function to transfer to your e-mail programme along with the attached recording. Under 'Parameter', select the data fields that you want to use and add these to the sample line ('Text') by clicking the 'Insert' button. Data fields are identified by square brackets. Add to these, if you want, with your own text. An example line for the output is shown underneath.
If you want to use the name of the caller saved with the recording as the recipient when it is transferred to your e-mail programme, enable the 'Use caller name as recipient' option under 'Recipient'. You can also make your e-mail programme look for the recipient e-mail address based on this name by checking the 'Resolve names' option.
Once you have configured these presets, then whenever you have a record highlighted in the archive you can transfer it to your e-mail programme to be mailed, either via the 'Record / Send to' menu item or by using the relevant button ( ).
Tip: To avoid any unauthorised listening to the recording by third parties, wherever possible use the CallRecoder's encoded recording format for files sent by e-mail.
IMPORTANT: If you send out encoded .cra files, then the recipient will also need to have the CallRecorder's PC software installed in order to be able to access the encoded file by entering the password via the archive function. However, a CallRecorder unit does not need to be attached. In this case, set 'Soundcard' as the playback device in the software (see also the start of chapter 6).
7. Special settings and software updates
Both the CR-100 USB and the CR-200 can - if required - be set with individual parameters differing from the delivery status. To do so, the CallRecorder PC software is needed to create the individual settings and transfer them to the device.
The way of doing is different for both product versions:
- With the CR-100 USB the configuration is directly transmitted via USB cable to the unit. This is only possible, when the unit is connected via USB to the PC: Usually, you first read the data from the unit, change the parameters required, and then write the data back to the unit. Additionally, you can save the settings as a file on the PC.
- With the CR-200 USB the CallRecorder PC Software creates a configuration file which will be saved to the USB flashdrive stick. From here, the CallRecorder will read the configuration upon start-up. You can start with a new configuration file, or you can open an existing one and do changes. Additionally, you can save the new settings as a file on the PC.
(The internal clock of the CR-200 will be set in a similar way through a special configuration file, if needed.)
In both CallRecorder versions the individual parameters will be stored permanently, in the CR-200 also then, when the configuration file should be removed from the flashdrive stick later. If the CR-200 finds a new configuration file on the flashdrive stick, it will replace the former settings.
7.1 CR-100 USB configuration and settings
You can configure the CR-100 USB's properties and parameters differently to the factory settings and thus adapt them to your individual needs. To configure the device, open the 'Configuration / Hardware' menu item (right click on the CallRecorder symbol on the taskbar).
The configuration menu offers you the following options:
- 'File':
- 'New': Create a new configuration (button: 📋)
- 'Open': Open a saved configuration (button: 📋)
- 'Save': Save the configuration (button: )
- 'Save as': Save the configuration under another name
- 'Close': Close the configuration window
- 'Communication':
- 'Read Parameters': Read the CR-100 USB unit's configuration into the PC (button: )
- 'Write Parameters': Write the configuration to the CR-100 USB (button: )
- 'Update Systemsoftware': Upload new systemsoftware to the CR-100 USB
In general you should make configuration changes by first loading the current parameters from your CR-100 USB, then altering the settings you want to modify and finally writing the amended parameters back to the device. If you wish to create a new file, please make sure to select the corresponding product version.
The save commands let you save the CR-100 USB's configuration on your PC as a file (with a '.crc' extension) so that, if you need to, you can open it again at a later date and transfer it back to the device.
NOTE: With the PC software not running (i.e. the yellow 'USB' LED is off), you can restore the configuration of your CR-100 USB to the factory settings by pressing for about 3 seconds on both of the buttons on the device until the red and yellow LEDs light up and then release the buttons again. You can then restart the PC software.
The various settings of the CR-100 USB's configuration are explained below. Please note that here too you can get a brief explanation of each element via the software by pressing the F1 key on your PC.
- The 'Device' tab:
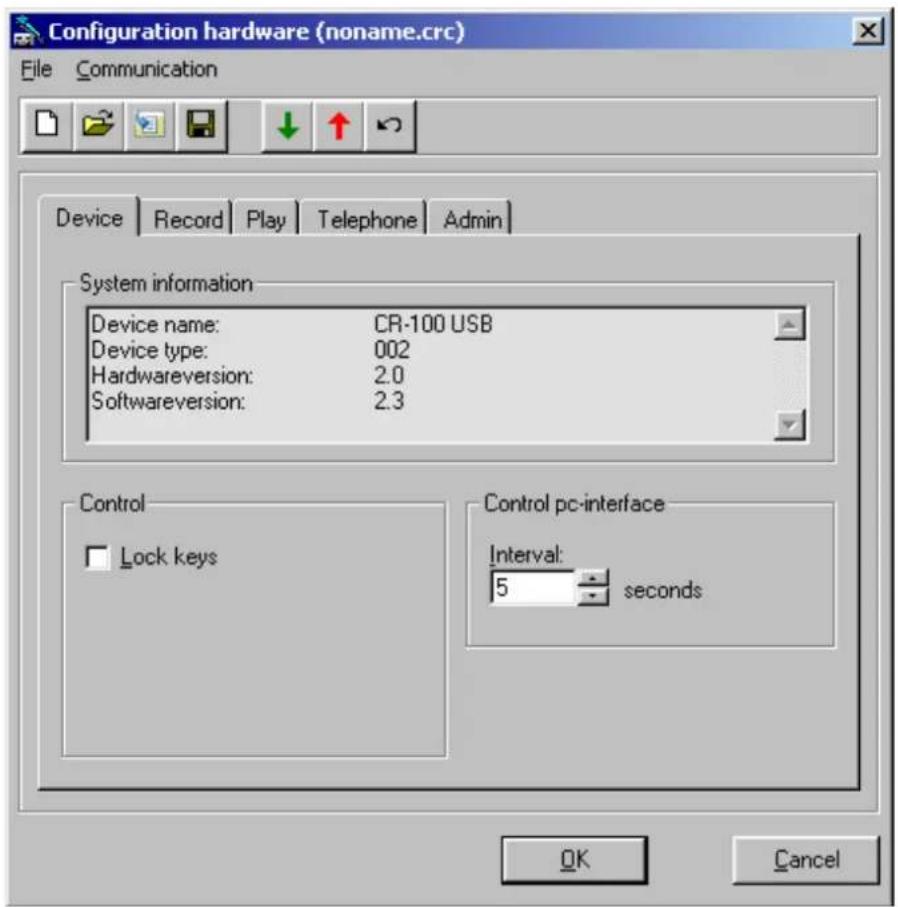
After the parameters have been loaded, the 'Device name and type' and the version of the 'System hard- and software' are displayed under 'System information'.
The 'Lock keys' function allows you to disable control of the CR-100 USB from the device itself. It can then only be controlled from the PC.
When the PC software is running, a check is made at the 'Interval' frequency set under 'Control PC interface' to make sure the CR-100 USB is available on your PC's USB port and ready for use.
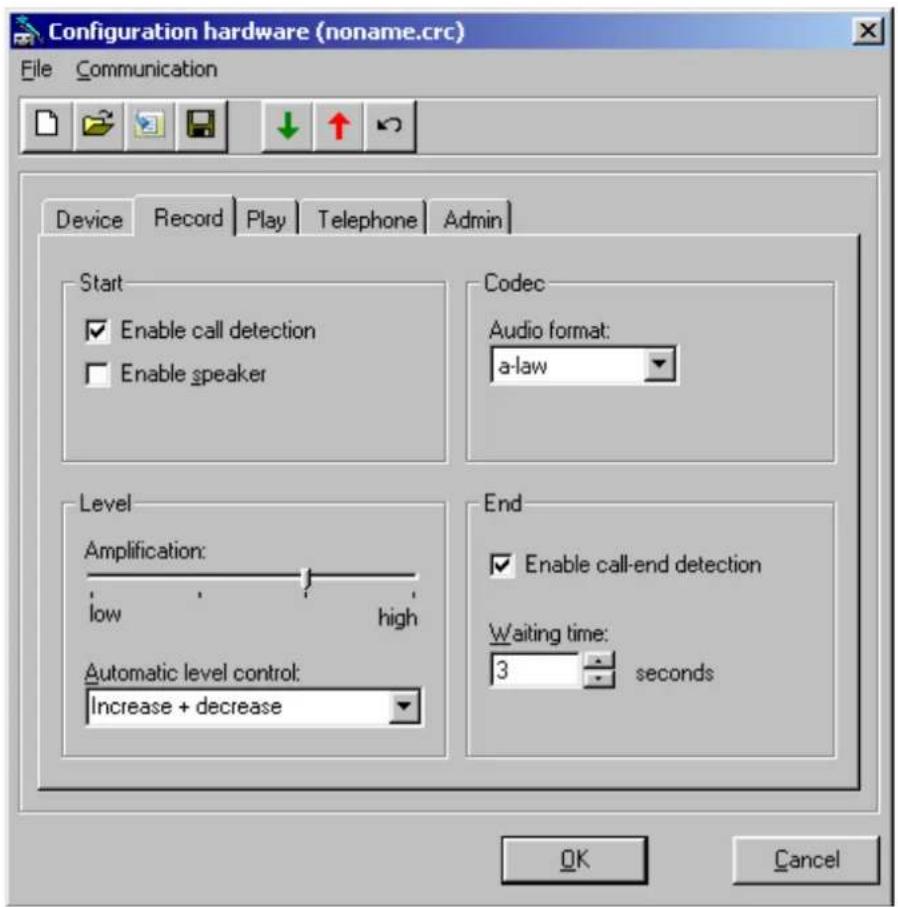
- The 'Record' tab:
'Enable call detection' in the 'Start' section lets you choose whether a start trigger is automatically produced by the CR-100 USB whenever the acoustic signals on the telephone exceed a certain threshold. In the PC software this can automatically trigger the start of a recording or automatically launch the record dialog window. Checking 'Enable speaker' predetermines that the CR-100 USB's monitor function will be automatically activated for every recording.
Under 'Codec', you can select either the so-called 'a-law' codec (Europe) or 'μ-law' codec (USA/Japan) for the recording's 'Audio format'. As a rule, your PC will be able to play back .wav files of either format without any problems.
In the ‘Level’ section you can set how high the ‘Amplification’ should be of the audio signal being received. Reduce this level if your recordings are distorted and increase it if they are too quiet. Alternatively, you can also enable ‘Automatic level control’, set with the desired action.
Under 'End', you are able to 'Enable call-end detection' and set the 'Waiting Time' for the discard function immediately after the recording has finished.
NOTE: You should disable both automatic call detection and automatic call-end detection for recordings made with the built-in microphone.
If the CR-100 USB unit is connected to an analogue telephone extension line via the 'Line' socket you should not set it up to start recording fully automatically. Instead, you should start the recording manually when the conversation actually begins.
- The 'Play' tab:
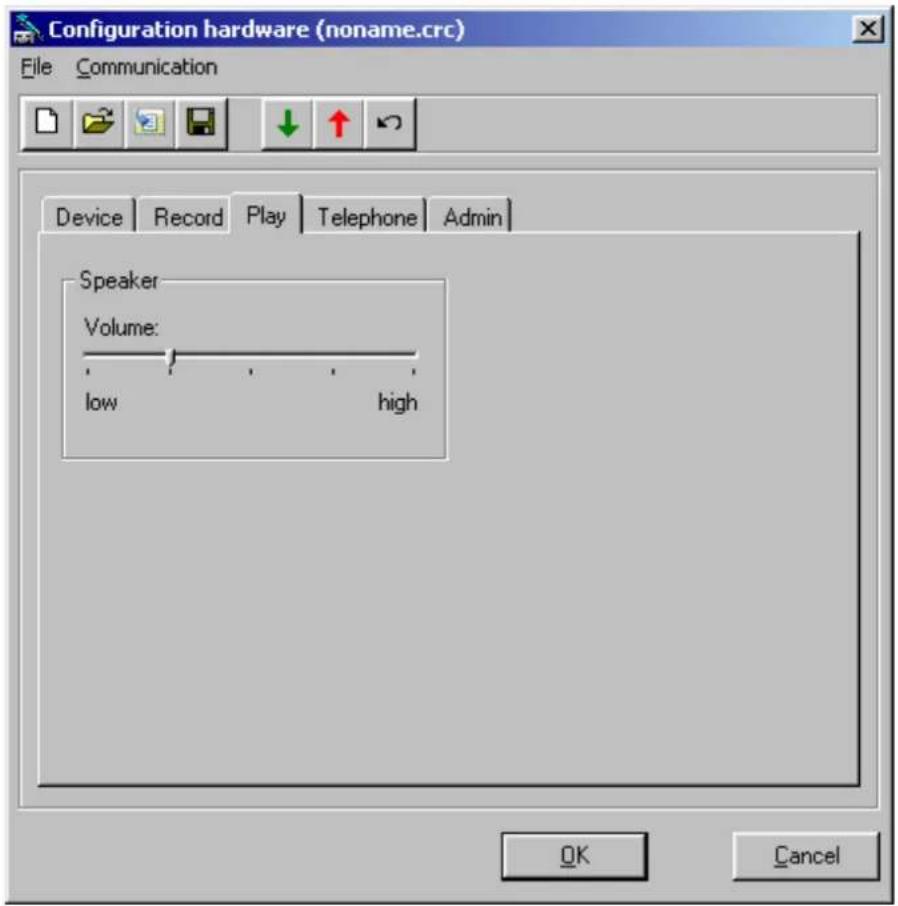
Set the default here for the 'Volume' at which the CR-100 USB unit should start off when in monitor mode or playing back recordings via the built-in loudspeaker (in each case you can adjust the volume through a range of levels by pressing the 'Monitor' button).
• The 'Telephone' tab:
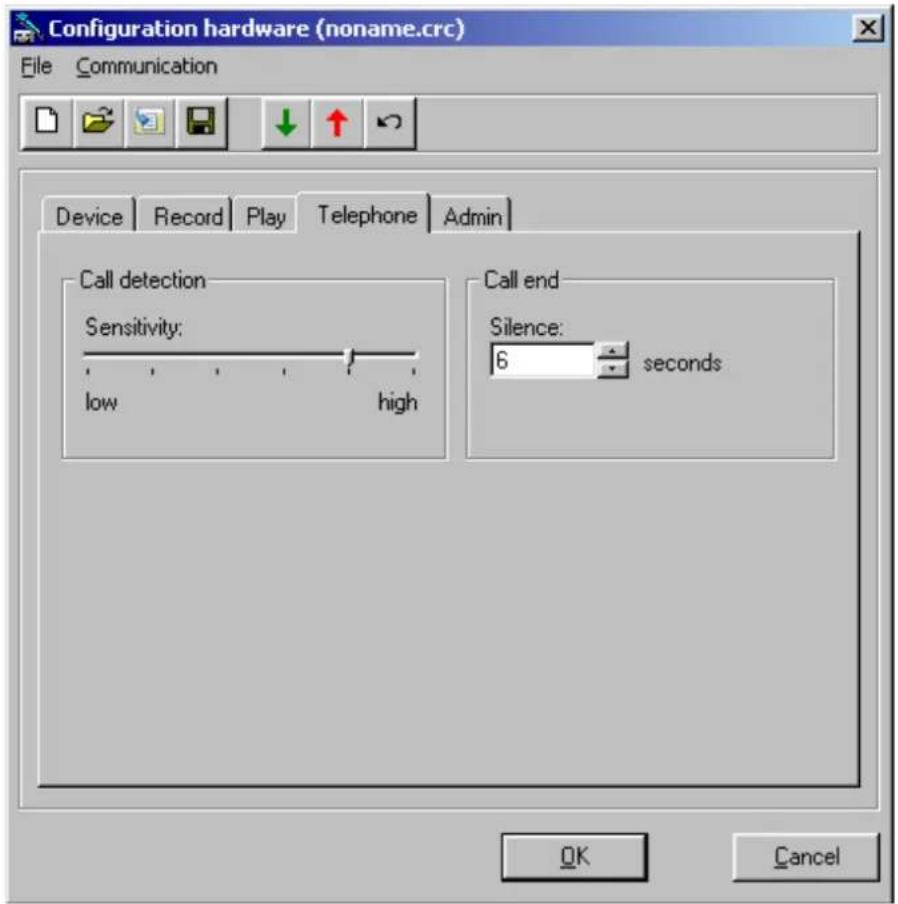
By moving the ‘Sensitivity’ slider you set up here how sensitive the reaction of the CR-100 USB should be for generating an automatic start trigger for the automatic ‘Call detection’ function.
Under 'Call end', you can set for how long 'Silence' has to be detected in order to stop the recording automatically.
Only change these two parameters if the unit's automatic mode is not working satisfactorily.
The next tab ‘Administrator’ provides settings, which should only be changed when advised by the technical support.
NOTE: By clicking the 📋 button you can restore the delivery settings of the hardware. After that, carry out the command 'Communication / Send Parameters'.
7.2 CR-200 configuration and settings
You can configure the CR-200's properties and parameters differently to the factory settings and thus adapt them to your individual needs. To configure the device, open the 'Configuration / Hardware' menu item (right click on the CallRecorder symbol on the taskbar).
The configuration menu offers you the following options:
- 'File':
- 'New': Create a new configuration (button: 📋)
- 'Open': Open a saved configuration (button: 📋)
- 'Save': Save the configuration (button: )
- 'Save as': Save the configuration under another name
- 'Close': Close the configuration window
Important: A new or changed configuration must be saved as a "config.crc"-file on the USB flashdrive stick. Only with this name the CR-200 will recognise it on start-up and read the parameters. Additionally, you can save the configuration file to your PC.
The other way round, you can open an existing configuration to make changes in it.
If you wish to create a new file, please make sure to select the corresponding product version.
Note: To restore the factory settings, you can press and hold both buttons on the device for approx. 2 seconds while you switch the unit on. After releasing the buttons, the „Status“ LED will flash 3 times yellow to show that the default configuration is being restored.
The various settings of the CR-200's configuration are explained below. Please note that here too you can get a brief explanation of each element via the software by pressing the F1 key on your PC.
- The 'Device' tab:
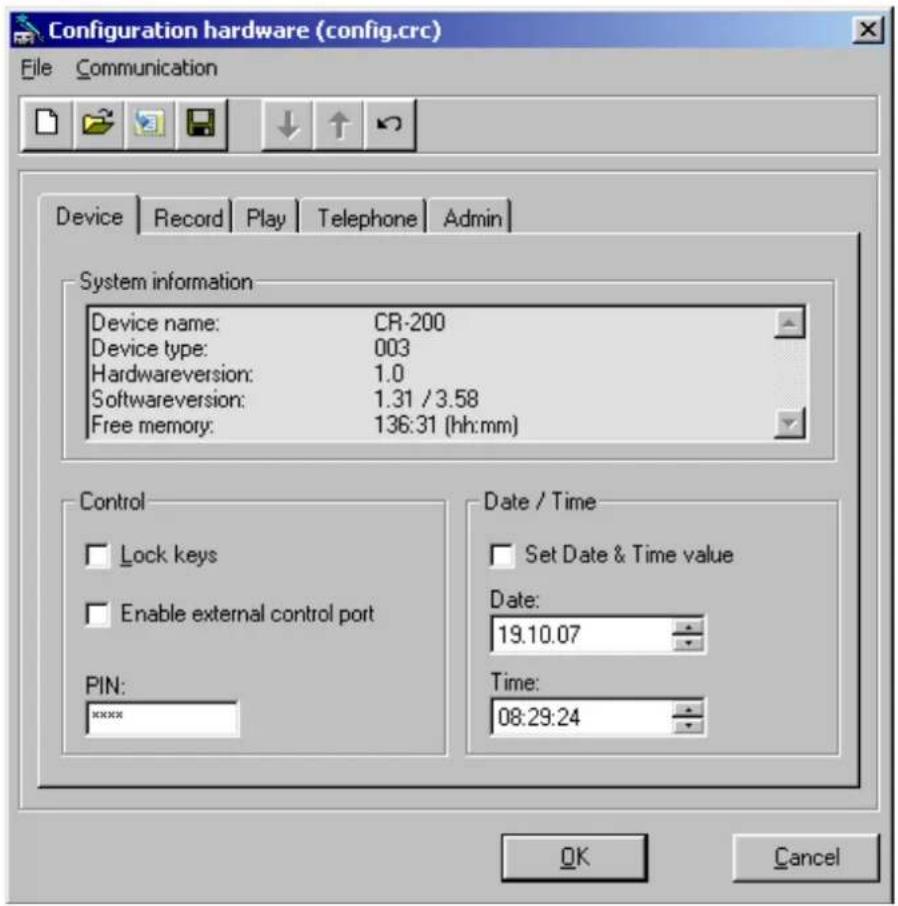
The 'Device name and type', the version of the 'System hard- and software' and the 'Free memory' on the USB flashdrive stick are displayed under 'System information', if the "INFO.TXT" file has been imported from the flashdrive stick before by clicking the button. (The maximum display for the memory available is 136:31, which corresponds to a 4 GB flashdrive).
The 'Lock keys' function allows you to disable the buttons on the CR-200. It can then only be controlled e.g. by automatic call detection. Moreover, the 'External control port' can be enabled here (see chapter 5.5).
Under "PIN" a maximum 6-character code (figures and letters) can be entered. Each recording of the CR-200 will contain this PIN code (Default: "1234").
By clicking 'Set Date & Time value', in addition to the configuration file a file TIME.DAT will be created to be saved on the USB flashdrive stick in order to set the internal clock of the CR-200. Please note, that taking out the flashdrive stick from the PC, inserting it into the CR-200 and starting up and reading the flashdrive stick takes some time. So, you should set the value the clock will be set to a little time ahead here.
- The 'Record' tab:

'Enable call detection' in the 'Start' section lets you choose whether the recording of the CR-200 starts automatically, whenever the acoustic signals on the telephone exceed a certain threshold. The 'Manual start/stop' via the red button on the device can also be activated or deactivated. Checking 'Enable speaker' predetermines that the CR-200's monitor function will be automatically activated.
Under 'Codec', you can select either the so-called 'a-law' codec (Europe) or 'μ-law' codec (USA/Japan) for the recording's 'Audio format'. As a rule, your PC will be able to play back .wav files of either format without any problems.
In the 'Level' section you can set how high the 'Amplification' should be of the audio signal being received. Reduce this level if your recordings are distorted and increase it if they are too quiet. Alternatively, you can also enable 'Automatic level control', set with the desired action.
Under 'End', you are able to 'Enable call-end detection' and set the 'Waiting time' for the discard function immediately after the recording has finished.
- The 'Play' tab:

Set the default here for the 'Volume' at which the CR-200 unit should start off when in monitor mode via the built-in loudspeaker (in each case you can adjust the volume through a range of levels by pressing the 'Monitor' button).
• The 'Telephone' tab:
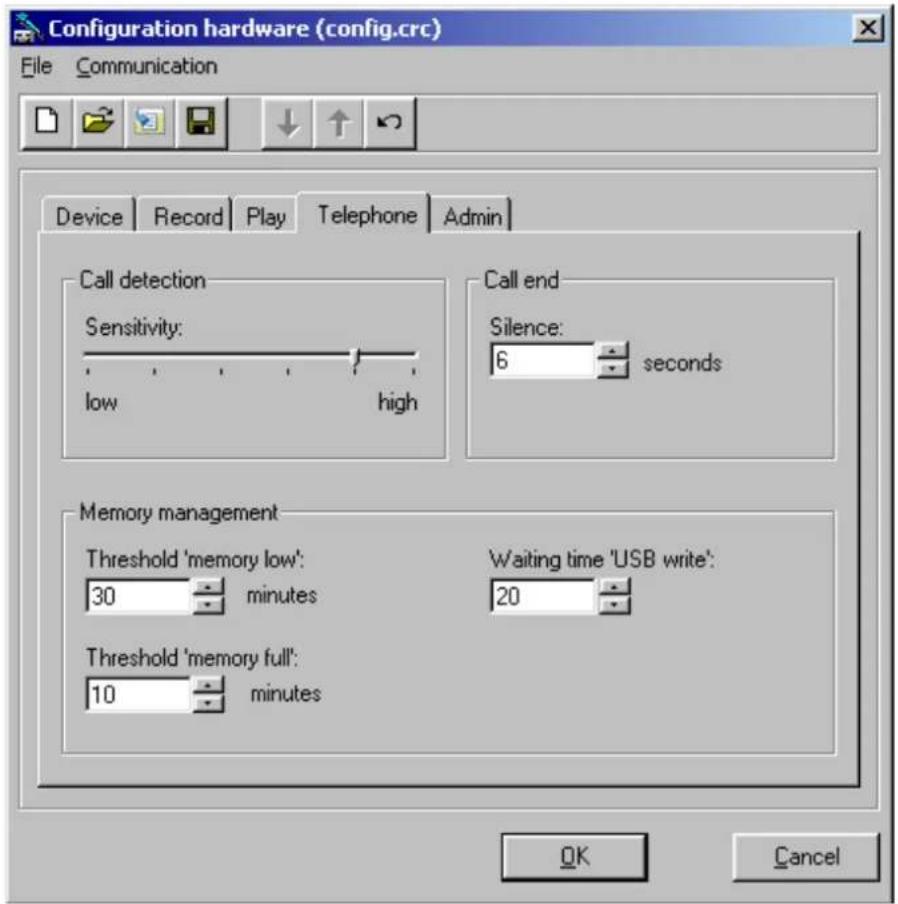
By moving the ‘Sensitivity’ slider you set up here how sensitive the reaction of the CR-200 should be for the automatic ‘Call detection’ function.
Under 'Call end', you can set for how long 'Silence' has to be detected in order to stop the recording automatically.
Under Memory management you can adjust, at which thresholds the „Status“ LED will show 'memory low' and 'memory full'. Moreover, there is a parameter to set the maximum internal 'Waiting time' for the USB flashdrive when recording.
Only change the parameters above if the unit is not working satisfactorily.
The next tab ‘Administrator’ provides settings, which should only be changed when advised by the technical support.
NOTE: By clicking the 📋 button you can restore the delivery settings of the hardware in the current window.
7.3 Software updates
Both the CallRecorder's system software and the PC software are constantly being further developed and enhanced. You can perform an update at any time to keep your installation totally up to date. You may also be asked by technical support to update your software in order to set up specific functions.
7.3.1 Updating the PC software
You can always find the latest PC software for the CR-100 USB and the CR-200 on the www.beyertone.com website under “Support / software”. Download the installation file you want onto your PC.
Now, first uninstall the existing CallRecorder software from your PC via the 'Software' item in your Control Panel.
Then perform the new set-up with the downloaded file, following the instructions of the installation wizard.
7.3.2 Updating the device's system software (CR-100 USB)
You can get new system software for your CR-100 USB device as a '.bin file' from the www.beyertone.com website or on request directly from the technical support.
If your CR-100 USB device is connected to your PC and the USB connection is live (i.e. the yellow 'USB' LED on the device is lit up), you can update the device's system software via the 'Configuration Hardware' window.
Carry out the ‘Communication / Update Systemsoftware’ item from the menu. Have the file for the new system software (*.bin extension) ready on a local drive and simply follow the instructions on your PC.
NOTE: You can see what version of the system software your CR-100 USB is currently running from the configuration data (see section 7.1).
8. Troubleshooting
8.1 No USB connection to the PC (CR-100 USB)
- Is the CR-100 USB unit's USB driver installed correctly? (section 3.3.2)
• Is the device receiving power? (green 'Power' LED, section 3.2.5)
• Is the PC software running? (sections 3.3.1 and 4) - Is the COM port's current number entered in the PC software? (sections 3.3.3 and 3.3.4)
8.2 Recording / playback not working
The recording does not start:
- Has automatic recording been enabled? (chapter 4 or 5 and 7)
The recording level is too poor:
• Is the CallRecorder connected correctly? (section 3.2)
- Are the wire selection and microphone switches in the right position? (section 3.2.3)
• Is the CallRecorder configured correctly? (chapter 7)
8.3 Support hotline
If you have any problems installing or using the CallRecorder and are unable to resolve these using this guide, BEYERTONE AG's customer service hotline is available to help:
Customer Service Hotline: +49 (0)2103 248020 or support@beyertone.com
Mon. – Thurs.: 08:00 - 17:00 CET Fridays: 08:00 - 15:00 CET
NOTE: Please have the hard- and software-version of your CallRecorder to hand.
9. Technical data
• The CR-100 USB Ver. 2 appliance
| USB port | type B socket, USB 1.1 standard; for PC USB port with 5 volt power supply |
| Line / Handset input | high impedance / symmetric / galvanically isolated |
| Ext. Microphone input | 3.5mm stereo jack for Elect.-Cond.-Microphone (3 mVss in 1 kOhm) |
| Headphones output | 3.5mm mono/stereo jack socket, max. 1.4 Veff (20 mW into 100 ohms) |
| Control input | 3.5mm jack socket for dry contact*, Uo = 5V / max. 1mA |
| Digitising | CCITT 64 kBit/s, A-law or μ-law selectable |
| Memory requirement | approx. 500 KB per minute of recording |
| Power supply | via USB bus, 5 volts, max. 150mA; alternatively via optional mains adapter |
| Optional mains adapter | 9 - 12V DC, 200 - 500mA |
| Ambient temperature | 5°C to 45°C, no condensation |
| Unit housing material | ABS |
| Dimensions | 175 x 105 x 25/55 mm |
| Weight | c. 250g (excl. cable) |
* Normally opened contact required for functionality (n.o.)
• The CR-200 appliance
| USB port | type A socket, USB 1.1 standard; for USB flashdrive stick (max. 100 mA) |
| Line / Handset input | high impedance / symmetric / galvanically isolated |
| Ext. Microphone input | 3,5mm stereo jack for Elect.-Cond.-Microphone (3 mVss in 1 kOhm) |
| Headphones output | 3.5mm mono/stereo jack socket, max. 1.4 Veff (20 mW into 100 ohms) |
| Control input | 3.5mm jack socket for dry contact*, Uo = 5V / max. 1mA |
| Digitising | CCITT 64 kBit/s, A-law or μ-law selectable |
| Memory requirement | approx. 500 KB per minute of recording (1 GB is approx. 30 hrs.) |
| Mains adapter | 9 V DC, 500 - 600mA |
| Ambient temperature | 5°C to 45°C, no condensation |
| Unit housing material | ABS |
| Dimensions | 175 x 105 x 25/55 mm |
| Weight | c. 250g (excl. cable) |
* Normally closed contact required for functionality (n.c.)
- Windows software
| Operating systems | Windows 98SE / Windows ME / Windows 2000 / Windows XP, in each case with Internet Explorer, version 5.5 or newer |
| Required disk capacity | c. 10MB free hard drive memory for software,c. 500KB per minute of recorded conversation |
'Windows' is a registered trademark of the Microsoft Corporation.
- CE-Conformity
In compliance with EC directive 89/336/EEC, the CR-100 USB meets the requirements of the relevant standards of EN 55022 / EN 55024.
BEYERTONE AG
Max-Volmer-Str. 29
D-40724 Hilden/Germany
Tel.: +49 (0) 2103 / 2480-0
Fax: +49 (0) 2103 / 2480-40
info@beyertone.com
www.beyertone.com