KW-204 CD - Alarm clock radio Superior - Free user manual and instructions
Find the device manual for free KW-204 CD Superior in PDF.

| Product Type | Alarm clock radio with CD player |
| Brand | Superior |
| Model | KW-204 CD |
| Dimensions (approx.) | 200 mm x 100 mm x 100 mm |
| Weight (approx.) | 0.5 kg |
| Power Supply | AC 230V ~ 50Hz, backup battery (2 x AA, not included) |
| Radio Bands | AM/FM |
| CD Player | Supports CD, CD-R, CD-RW |
| Alarm Modes | Radio, buzzer, or CD (dual alarm) |
| Snooze Function | Yes, 9-minute interval |
| Sleep Timer | Yes, adjustable (15, 30, 60, 90 minutes) |
| Display | LED with dimmer control |
| Preset Stations | 10 AM / 10 FM |
| Headphone Jack | 3.5 mm |
| Cleaning | Wipe with a soft, dry cloth. Do not use liquid cleaners. |
| Safety Warnings | Do not expose to water or excessive heat. Unplug during thunderstorms. |
| Spare Parts | Contact Superior customer support for replacement parts. |
| Manual | Available for free download in PDF format. |
Frequently Asked Questions - KW-204 CD Superior
User questions about KW-204 CD Superior
0 question about this device. Answer the ones you know or ask your own.
Ask a new question about this device
Download the instructions for your Alarm clock radio in PDF format for free! Find your manual KW-204 CD - Superior and take your electronic device back in hand. On this page are published all the documents necessary for the use of your device. KW-204 CD by Superior.
USER MANUAL KW-204 CD Superior
natural_image
Black and white portable electronic device with digital display and control buttons (no visible text or symbols)ALARM CLOCK CD RADIO
KW-204CD
WARNINGS
To reduce the risk of fire or electric shock, do not expose This appliance to rain or moisture.
EXPLANATION OF GRAPHIC SYMBOLS

CAUTION
RISK OF ELECTRIC SHOCK DO NOT OPEN

WARNING: TO REDUCE THE RISK OF ELECTRIC SHOCK DO NOT REMOVE COVER. NO USER SERVICEABLE PARTS INSIDE. REFER SERVICING TO QUALIFIED SERVICE PERSONNEL.

The lightning flash with arrowhead symbol, with in an equilateral triangle, is intended to alert user to the presence of uninsulated "dangerous voltage" within the product enclosure that may be of sufficient magnitude to constitute a risk of electric shock to persons.

The exclamation point within an equilateral triangle is intended to alert the user to the presence of important operating and maintenance (servicing) instruction in the literature accompanying the appliance.
HAZARD WARNING: TO REDUCE THE RISK OF FIRE OR ELECTRIC SHOCK, DO NOT EXPOSE THIS PRODUCT TO RAIN OR MOISTURE.
CLASS 1 LASER PRODUCT
CLASS1 LASER PRODUCT APPAREIL À LASER DE CLASSE1 PRODUIT LASER DE CLASSE1
This product contains a low-power laser emitter.
CAUTION
INVISIBLE LASER RADIATION WHEN OPEN AND INTERLOCK FAILED OR DEFEATED. AVOID DIRECT IXPOSURE TO LASER BEAM

PRECAUTIONS FOR USE
To ensure safe, appropriate use of your personal CD player, please follow the advice below:
Location
• Do not use the product in extremely hot, cold, dusty or damp conditions.
- Place the product on a smooth, flat surface. - Ensure that air is free to circulate through the product. Do not use it in a poorly ventilated place, cover it with a cloth or place it on carpet.
Power supply voltage
• Before using the product, check that its rated voltage is suitable for your mains supply.
Safety precautions
- When you plug in or unplug the power cord, always hold the plug rather than the cable. Pulling the cord could damage it and create a hazard.
• Always unplug the product from the mains if you do not intend to use it for an extended period.
- The On/Off button does not disconnect the product from the mains power supply. To disconnect the product from the power supply, you must unplug the power cord.
- This product should only be used in a horizontal position.
Condensation
• Water droplets or condensation may form inside the
CD player if it is left in a warm, damp atmosphere. The product may not operate correctly if condensation forms inside it.
- Leave the product in a warm, dry room for 1 to 2 hours to allow the condensation to evaporate. In the event of a problem, unplug the power cord and contact a qualified repair technician.
Warning: Ventilation Your personal CD player has should never be obstructed.
Liquid warning Never allow liquids to splash or drip onto the product. Never place a liquid-filled container (e.g. vase, jar, etc.) above it.
- "The apparatus shall not be exposed to dripping or splashing and that no objects filled with liquids, such as vases, shall be placed on apparatus."
- "The mains plug is used as the disconnect device and it shall remain readily operable. To be completely disconnect the power input, the mains plug of apparatus shall be disconnected from the mains."
- The apparatus will be use in open area - the ventilation should not be impeded by covering the ventilation openings with items such as newspaper, table-cloths, curtains etc. - no naked flame sources such as lighted candles should be placed on the apparatus:
- attention should be drawn to the environmental aspects of battery disposal,
POWER SOURCES
Power connection
- Plug the AC 240V Power Cord into an AC household outlet.
- If you want battery back up, insert two alkaline AAA battery (not included) into the battery compartment on the underside of the unit. Battery life is approximately 12 months.
- The batteries will remember the time during a power cut, but not display it.
- Normal display and function will resume when power is restored, replace the batteries annually.
NOTE: No battery is needed for normal operation.
PLAYER MAINTENANCE
Cleaning the Cabinet
IMPORTANT: Disconnect from Main Supply Before cleaning.wipe with a soft cloth. If the cabinet is very dirty, dampen the cloth with a weak solution of neutral detergent and water, and then wipe clean.
Cleaning the Lens
A dirty lens may cause the sound to skip and, If the lens is very dirty, the CD may not work. Open the disc cover and clean the lens as follow:
Dry Dust Particles
Using a camera lens brush/blower, blow on the lens couple times, then wipe it lightly with the brush to remove dust. Then, blow on the lens once more.
Finger prints
If the lens cannot be cleaned by using a brush/blower use a dry cotton swab.

natural_image
Line drawing of hands using a compass and ruler to cut a circular object (no text or symbols)DISC CLEANING, POWER FAILURE
natural_image
Illustration showing hands operating a portable device, disc, radio, sun, and cross symbol (no text or labels)Power failure
When AC power is interrupted, both time and alarm settings will be lost (unless 2 x AAA battery (not supplied) is installed) after power is restored. The digital display will blink to show power was interrupted. You must reset time and alarm times.
Battery back up
To keep alarm and time of day settings in memory during a brief power failure or accidental removal of AC cord from main socket, install 2 x AAA battery (not supplied) into the battery compartment on the underside of the unit.
Corrosion, oxidation, battery-leakage and any other gradually acidic defect of this nature will invalidate the guarantee.
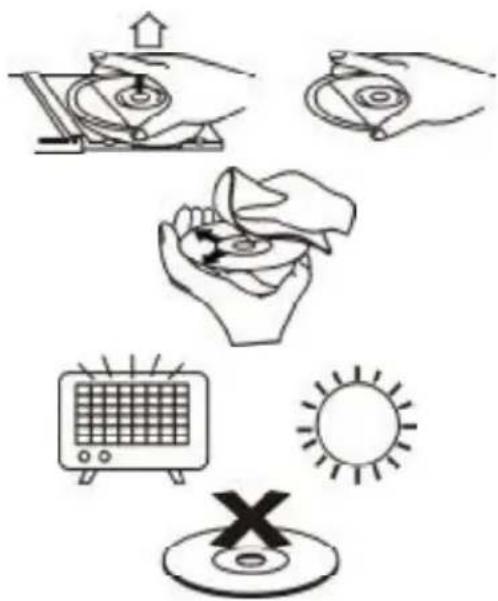
Cleaning the Disc
- To handle a disc use only one of the two manners.
Note: Do not touch the rainbow colored side. - To wipe a disc, use only a soft cloth. Do not use benzene or thinner which will damage the disc, the disc should always be wiped in a straight line from the centre to the edge. It should never be wiped in a circular motion.
- Never place the disc on other equipment or near any heat source. Avoid positions where the disc would be subjected to direct sunlight for long periods.
Maintenance and care
- Electronic products should never be subjected to extreme temperatures nor high humidity to ensure good performance and a long life-time.the clock radio should not be placed in bathing areas, or around stoves and radiators, etc.always leave sufficient space around the unit for ventilation.
- If necessary, only clean the cabinet of the unit with a soft dampened piece of cloth, (be sure the AC power cord is unplugged from the outlet). never use a polish or a strong detergent for cleaning since this can damage the finish of the cabinet.
- If the electric cable is damaged, it must be replaced by the manufacturer, or by the qualification persons, in order to avoid a danger
LOCATION OF CONTROLS

text_image
Labeled diagram of a device with numbered components for identification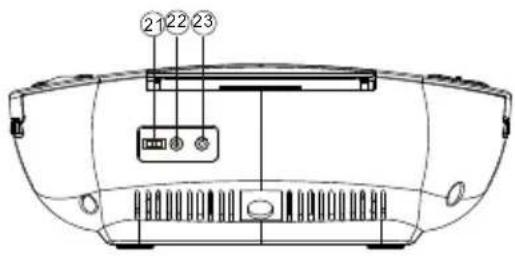
text_image
Diagram of a car front panel with numbered labels pointing to internal components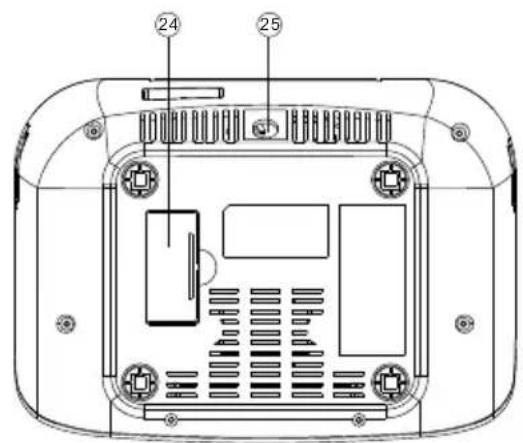
text_image
Technical diagram of a device rear panel with labeled components and internal layout
text_image
A J I H 2888 B C D E F GFunction of controls
- ON/OFF button
- CD DISPLAY button
- VOLUME control
- ALARM 1 button
- BAND (BUZZER/CD/RADIO/LINE IN) switch
- ALARM 2 button
- CLOCK/ADJ button
- SLEEP button
-
SNOOZE button
-
LED DISPLAY
A. ALARM 1 indicator
B. ALARM 2 indicator
C. SLEEP indicator
D. PROGRAM indicator
. REPEAT indicator
F 8NiCaO2E
G. PM indicator
H. FM Stereo indicator
I. RANDOM indicator
J. ON/OFF indicator
- CD door
- STOP button
- MINUTE/SKIP ▶ button
- PROGRAM button
- FUNCTION (CD/AM/FM/LINE IN) switch
- Dial Scale
- MODE button
- TUNING control
- SKIP/HOUR button
- PLAY/PAUSE button
- DIMMER (DIM/BRIGHT) switch
- MP3 LINE IN JACK
- Stereo Headphone Jack
- Battery Compartment
- AC mains
SETTING THE CLOCK/TIME
Connect the AC power cord to a wall outlet.
- 12:00 will show on the display and begin to flash.
- Press ▶/HOUR button to set the hour and then press MINUTE / ◀ button to set the minute.
- Press the CLOCK/ADJ button to confirm the time, the display will stop flashing.
- You can switch the clock display between 12H and 24H by holding the CLOCK/ADJ button for 2 seconds.
- During OFF MODE, you can press the CLOCK/ADJ button and then repeat step 2 and 3 to change the time as well.
Remarks: The clock does not keep time during a power failure.
- Slide the BUZZER/CD/RADIO/LINE IN switch into CD/RADIO/LINE IN position
- Slide the function (CD/AM/FM/LINE IN) switch into AM or FM position.
- Press the ON/OFF button into ON status, the ON/OFF indicator iwll light up
- Tune into a station using the TUNING control
- Adjust the VOLUME control to the desired level.
ANTENNA
FM: Extend the FM aerial wire to improve FM reception.
AM: Turn the unit for better AM reception.
CD PLAYING
- Open the disc compartment
- Place a disc in the centre with the label side facing up and close the Disc compartment
- Slide the function (CD/AM/FM/LINE IN) switch into CD position, then press the ON/OFF button into ON status.
- Teh total number of tracks will show on the display for 2 seconds and then the display will turn back to clock display.
- Press ▶/|| button to start playing the disc.
Note: you can press CD DISPLAY button to show the current track number that is playing current or the total number of tracks during STOP position in CD mode.
BASIC OPERATION
| To stop Playback | Press STOP button |
| To pause Playback | Press ▶/||button, To resume playback, press it again |
| To search for the beginning of a track | Press ||| | | button briefly |
| To locate a desired passage | Keep ◀◀ or ▶▶pressed. Release the button at the start of the desired passage. |
REPEAT/RANDOM MODEL
Press the MODE button before or during play. A single track, all tracks or random can. Each press changes the mode as follows: play
1 REPEAT
2 REPEAT ALL
3 RANDOM
4 REPEAT/RANDOM OFF
(Repeat indicator will flash) (Repeat indicator will be steady on) (Random indicator will be steady on) (Repeat indicator, Random indicator will turn off)
PROGRAMMED DISC PLAY
Up to 20 tracks can be programmable to play in a specific order by following these steps:
- Set the CD/AM/FM/LINE IN switch into CD
- Press the ON/OFF button into ON status, the ON/OFF indicator will light up
- Press the PROGRAM button
- PRESS the ◀ or ▶ button to select the track number
- Press the PROGRAM button when the desired track player is
- Repeat step 5nd to program more tracks.
- Press the PLAY/PAUSE button to start programm playback
To check the program
Press the PROGRAM button during stop mode. The programmed track number will be displayed in programmed order each time you press the PROGRAM button.
To erase the program
- Press the PROGRAM button and then the STOP button when the CD is stopped.
- Press the STOP button where the CD is playing the programmed
- Opening the disc compartment will also erase the contents of program memory.
TO SET THE ALARM TO WAKE TO BUZZER/CD/RADIO
The radio, buzzer or CD automatically sounds at the designated time every day. You can set in total two wake up times (ALARM 1, ALARM 2) into this unit.
Wake by CD/AM/FM/BUZZER (Please do under OFF mode, while the ON/OFF indicator is off)
- Press the ALARM 1 oALARM 2 button, the display will flash
- Use the MINUTE or HOUR button to set the desire wake up time.
- Press the ALARM 1 ALARM2 button after setting. The Alarm 1/ Alarm 2 active indicator will light up on the display respectively.
- Slide the BUZZER/ CD/RADIO/LINE IN selector into BUZZER position for BUZZER wake up. For CD/ AM/FM wake up, firstly slide the BUZZER/ CD/RADIO/LINE IN selector into CD/RADIO/LINE IN position, then slide and function selector into CD, AM or FM position and adjust the volume.
- To cancel ALRM 1 wake up, press the ALRM 1 button once, the active indicator will off. (Same for ALARM 2 cancellation)
LINE-IN FUNCTION
You can listen to the sound from external audio sources through APRC210
- Slide the buzzer/cd/radio/line-in switch to line in position
- Connect the external audio source through 3.5mm Line-in Jacks, located at the rear of unit.
Note: Connection cables are not included.
SNOOZE
- The alarm can be temporarily turned off by pressing the SNOOZE button; the ALARM 1 oA6ARM 2 indicator will flash at this time; the alarm will turn back on automatically minutes later.
TO ACTIVATE THE SLEEP FUNCTION
- Turn onlysided radio station or applying previously instructed.
- Press the SLEEP button and the SLEEP indicator will lightup the clock display.
- Repeatedly press the SLEEP button for the desired sleep time, 90,60,30,15 minute, the SLEEP indicator will light to indicate the sleep mode is activated.
- TO cancel sleep time, press the SLEEP button again until the SLEEP indicator goes off.
PRODUCT SPECIFICATIONS
RADIO
Receiving bands:
Frequency range:
AM/FM
AM 540 - 1600 kHz
FM 87.5 - 108.5 MHz
GENERAL
Power requirements:
AC 230V \~ 50 Hz
2 x AAA battery back up
Power consumption:
12 W
Dimension:
240(W)mm X 88(H )mm x 174(D) mm
Weight:
1.17kg (not including battery)
Line in jack:
3.5mm

Disposal of Used Electrical & Electronic Equipment
The meaning of the symbol on the product, its accessory or packaging indicates that this product shall not be treated as household waste. Please, dispose of this equipment at your applicable collection point for the recycling of electrical & electronic equipments waste. In the European Union and Other European countries which there are separate collection systems for used electrical and electronic product. By ensuring the correct disposal of this product, you will help prevent potentially hazardous to the environment and to human health, which could otherwise be caused by unsuitable waste handling of this product. The recycling of materials will help conserve natural resources. Please do not therefore dispose of your old electrical and electronic equipment with your household waste. For more detailed information about recycling of this product, please contact your local city office, your household waste disposal service or the shop where you purchased the product.