OR-CLR001 - Alarm clock radio ORION - Free user manual and instructions
Find the device manual for free OR-CLR001 ORION in PDF.

| Product Type | Alarm Clock Radio |
| Brand | Orion |
| Model | OR-CLR001 |
| Dimensions (Approx.) | 15 x 10 x 8 cm |
| Weight (Approx.) | 0.5 kg |
| Power Supply | AC 220-240V, 50/60 Hz; Backup battery: 1x CR2032 |
| Radio Bands | FM 87.5-108 MHz |
| Display Type | LED digital display with adjustable brightness |
| Alarm Function | Wake to radio or buzzer; snooze function |
| Additional Features | Dual alarm, sleep timer, 12/24 hour mode |
| Cleaning Instructions | Wipe with a soft, dry cloth. Do not use liquids or abrasive cleaners. |
| Safety Notes | Keep away from water and moisture. Disconnect from power before cleaning. |
| Spare Parts & Repairability | Battery compartment accessible for replacement; no user-serviceable parts inside. Contact support for repairs. |
| General Information | Designed for bedroom use. Includes instruction manual. Not covered by warranty if opened by unauthorized personnel. |
Frequently Asked Questions - OR-CLR001 ORION
User questions about OR-CLR001 ORION
0 question about this device. Answer the ones you know or ask your own.
Ask a new question about this device
Download the instructions for your Alarm clock radio in PDF format for free! Find your manual OR-CLR001 - ORION and take your electronic device back in hand. On this page are published all the documents necessary for the use of your device. OR-CLR001 by ORION.
USER MANUAL OR-CLR001 ORION
Dear Customer! Thank you for buying ORION products. Carefully read all instructions before operating and save this instruction manual for future reference
Dear Customer, Thank you for buying ORION products! Welcome to use!
1. IMPORTANT SAFEGUARDS
Please read these instructions carefully before connecting, operating or adjusting the unit. Follow all warnings and operating recommendations in this manual. Keep this manual for future reference.
- Before connecting the appliance check that the voltage indicated on the type plate corresponds to the mains voltage in your country.
- This appliance is not intended for use by persons (including children) with reduced physical, sensory or mental capabilities, or lack of experience and knowledge, unless they have been given supervision or instruction concerning use of the appliances by a person responsible for their safety.
- Do not use it under rain or in damp room.
- Do not allow the appliance to be placed or dropped into water or any other liquid.
- Do not reach for an appliance that has fallen into water. Turn off the power supply to the appliance and then unplug from the wall socket.
- Never operate this appliance if it has a damaged cord or plug, if it is not working properly, if it has been dropped or damaged, or dropped into water. Call the Consumer Service Centre for examination and repair.
- It is forbidden to repair the unit. Call the Consumer Service Centre for examination and repair.
- The product should be situated away from heat sources such as radiators, heat registers, stoves, or other products that produce heat. Do not expose the unit to direct sunlight, excessive dust or mechanical shocks. Do not place the unit near sources of open fire. Avoid leaving the clock radio in direct sunlight or in hot, humid, dusty places.
- Do not touch plug with wet hands.
- Unplug the appliance if you dont use it for a long time.
- In order to avoid electric shock do not remove the cover yourself. Do not repair and do not modify the unit. Technical maintenance must be performed only by qualified service personnel.
- Install the unit in places with proper ventilation. Do not block the ventilation openings of the unit.
- The appliance should be used for its intended purpose only. Only for household use.
- Do not allow children to play with the appliance.
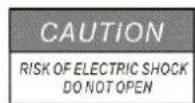
CAUTION: TO REDUCE THE RISK OF ELECTRIC SHOCK, DO NOT REMOVE COVER (ON BACK). NO USER SERVICEABLE PARTS INSIDE. REFER SERVICING TO QUALIFIED SERVICE PERSONNEL.

This lightning flash and arrowhead within the triangle is a warning sign alerting you of "dangerous voltage" inside the product.

The exclamation point within the triangle is a warning sign alerting you of important instructions.
2. DESCRIPTION
- Hour
- Minute
- Alarm Set/Off
- Sleep
- Tuning Control
- Volume Control/Buzzer
- Time Set
- AM/FM Band Selector
- Snooze Button
- On/Off/Auto Switch
- Hi-Lo Display Dimmer
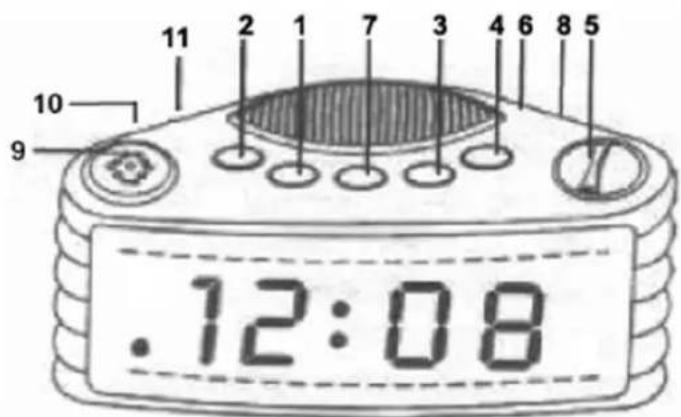
BOTTOM OF SET: Battery compartment for 9 Volt (6F22) battery (not included).
3. BRIGHTNESS DISPLAY
The brightness display has two preset levels. To set the brightness level, switch the Hi-Lo Display Dimmer (11) button to High or Low as preferred.
- Plug the AC line cord into 220V AC home outlet.
- The clock display will flash on and off.
- To set the correct time, press the Time Set Button (7) and Hour Button (1) together until the correct hour is displayed. Press the Time Set Button (7) and the Minute Button (2) together until the correct minute is displayed.
Note:
Connect a 9 Volt battery to the terminals inside the battery compartment for the power backup function. If the AC power supply is interrupted (as during a storm), the battery supplies power to keep the time and alarm setting in memory.
The display will not be lit and the alarm will not sound until actual power is restored. The battery only stores your settings in memory during a power failure.
5. RADIO OPERATION
- Slide the On/Off/Auto Switch (10) to 'On' position.
- Slide Band Selector (8) to FM or AM position.
- Turn the Volume Control (6) to desired volume.
- Turn the Tuning Control (5) to select your favorite station.
Note:
For AM reception, this radio incorporates a highly sensitive ferrite core bar antenna built into the unit.
For FM reception, this set is specially equipped with an external wire as FM antenna. Be sure to untwist it to fullest length for peak performance.
6. ALARM OPERATION
WAKE TO RADIO
Having selected your station and set the volume at the desired level, proceed as follows:
- Slide the On/Off/Auto Switch (10) to 'Auto' position.
- Press the Alarm Set Button (3) and the Hour Button (1) together until the correct hour is displayed. Press the Alarm Set Button (3) and the Minute Button (2) together until the correct minute is displayed. The wake up time is now entered into the timer memory.
- To check the wake up time, simply press the Alarm Set Button (3) and the clock will show the preset time. The preset wake up time will continue to be registered in the timer memory and the radio will switch on by itself at the same time the next day.
- To switch the radio off, simply press the Alarm Off Button (3).
WAKE TO BUZZER
Set the controls same with 'Wake to Radio' but Volume Control (6) to 'Buzzer' position. The buzzer can then be switched off by pressing the Alarm Off Button (3) or it can be converted to the radio by selecting switch (10) to 'On' position.
SNOOZE CONTROL
The Snooze Button (9) allows the user an extra sleep time of about 9 minutes after the radio alarm is switched on at the preset wake up time. When alarm sounds press Snooze Button (9). Alarm will turn off and sound again in 9 minutes. This Snooze function can be used repeatedly.
7. SLEEP TO MUSIC
The radio can be set to switch off automatically for a length of time from 1 minute to 1 hour 59 minutes. With all the controls preset in the 'Wake to Radio' positions, press the Sleep Button (4) and the Minute Button (2) together, to count down to the desired sleep time. To switch off the radio before the preset sleep time period, simply press the Snooze Button (9).
8. GENERAL CARE
The cabinet can be cleaned with a slightly damp cloth. Make sure the AC cord is disconnected from the outlet when cleaning.
9. SPECIFICATIONS
Alarm wake up
Sleep to music
Snooze function
Power source : 220V \~ 50Hz; 5W
DC back up : 9V (1×9V 6F22 not included)
LED display
Radio frequency : AM 530 - 1600KHz
FM 64 - 108MHz