
MSC-220 - Loudspeaker i-onik - Free user manual and instructions
Find the device manual for free MSC-220 i-onik in PDF.

| Product Type | Portable Bluetooth Speaker |
| Brand | i-onik |
| Model | MSC-220 |
| Dimensions (W x H x D) | Approx. 20 x 10 x 10 cm |
| Weight | Approx. 500 g |
| Power Supply | Built-in rechargeable battery (DC 5V via Micro USB) |
| Battery Capacity | 2000 mAh |
| Playing Time | Up to 8 hours |
| Charging Time | Approx. 3 hours |
| Bluetooth Version | 5.0 |
| Bluetooth Range | Up to 10 meters |
| Audio Input | Bluetooth, AUX 3.5mm, Micro SD card, FM radio |
| Speaker Power | 5W RMS |
| Frequency Response | 80 Hz - 20 kHz |
| Hands-free Function | Yes, built-in microphone |
| Controls | Buttons for power, volume, playback, and calls |
| Water Resistance | No (not waterproof) |
| Accessories Included | Micro USB charging cable, AUX cable, user manual |
| Cleaning | Wipe with a soft, dry cloth |
| Safety Warnings | Avoid exposure to water, heat, and strong magnetic fields |
| Repairability | Battery and amplifier can be serviced by qualified technician |
| Usage | Indoor and outdoor use (avoid rain) |
Frequently Asked Questions - MSC-220 i-onik
User questions about MSC-220 i-onik
0 question about this device. Answer the ones you know or ask your own.
Ask a new question about this device
Download the instructions for your Loudspeaker in PDF format for free! Find your manual MSC-220 - i-onik and take your electronic device back in hand. On this page are published all the documents necessary for the use of your device. MSC-220 by i-onik.
USER MANUAL MSC-220 i-onik
natural_image
Product photo of a tablet device with speakers and a remote control unit, no visible text or symbols on the main objects.MSC-220
Multimedia Speaker
Important Safety Instructions 8 Safety 8
Identifying the Pats ....9 Remote Control ....9 Unit....9
Replace the Remote Control Battery 10
Troubleshooting 10
Specifications.... 11
Standard Accessories.... 11

WARNING
RISK OF ELECTRIC SHOCK DO NOT OPEN

CAUTION: TO REDUCE THE RISK OF ELECTRIC SHOCK, DO NOT REMOVE COVER (OR BACK). NO USER-SERVICEABLE PARTS INSIDE. REFER SERVICING TO QUALIFIED SERVICE PERSONNEL.
The lightning flash with arrowhead symbol, within an equilateral triangle, is intended to alert the user to the presence of uninsulated “dangerous voltage” within the product’s enclosure that may be of sufficient magnitude to constitute a risk of electric shock to persons.
The exclamation point within an equilateral triangle is intended to alert the user to the presence of important operating and maintenance (servicing) instructions in the literature accompanying the appliance.
Safety
1 Read these instructions.
2 Keep these instructions.
3 Heed all warnings.
4 Follow all instructions.
5 Do not use this apparatus near water.
6 Clean only with dry cloth.
7 Do not block any ventilation openings. Install in accordance with the manufacturer's instructions.
8 Do not install near any heat sources such as radiators, heat registers, stoves, or other apparatus (including amplifiers that produce heat).
9 Protect the power cord from being walked on or pinched particularly at plugs, convenience receptacles, and the point where they exit from the apparatus.
10 Unplug this apparatus during lightning storms or when unused for long periods of time.
11 Refer all servicing to qualified service personnel. Servicing is required when the apparatus has been damaged in any way, such as power-supply cord or plug is damaged, liquid has been spilled or objects have fallen into the apparatus, the apparatus has been exposed to rain or moisture, does not operate normally, or has been dropped.
12 Unit shall not be exposed to dripping or splashing.
13 Do not place any sources of danger on the apparatus (e.g. liquid filled objects, lighted candle).
14 The mains plug is used as the disconnect device, the disconnect device shall remain readily operable.
15 Battery usage CAUTION-To prevent battery leakage which may result in bodily injury, property damage, or damage to the unit:
- Install all batteries correctly, + and - as marked on the unit.
- Do not mix batteries (Old and new or carbon and alkaline, etc.).
- Remove batteries when the unit is not used for a long time.
16 The batteries shall not be exposed to excessive heat such as sunshine, fire or the like.
17 Before operating this system, check the voltage of this system to see if it is identical with the voltage of your local power supply.
18 If the system is brought directly from a cold to a warm location, or is placed in a very damp room, moisture may condense on the lens inside the player. Should this occur, the system will not operate properly. Leave the system turned on for about an hour until the moisture evaporates.
19 When removing the power plug from the wall outlet, always pull directly on the plug, never yank on the cord.
Identifying the Pats
Remote Control

1
Turn on or turn off the speakers.
2 Bass
Boost low and bass.
3
Mute or resume the sound.
4
Increase the volume level.
5
Decrease the volume level.
Unit
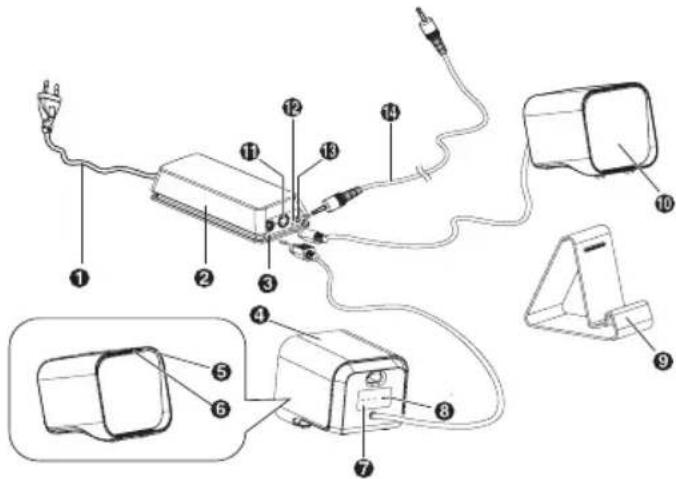
1 AC power cord: Connect the AC power cord to the wall socket. The power indicate light (12) shows green.
Note:
- Risk of product damage!
- Ensure that the power supply voltage corresponds to the voltage printed on the back or the underside of the unit.
2 Amplifier Box
3 Speakers out sockets-Right
4 Right speaker: be connected to right speaker out socket.
5 Remote control sensor
6 Indicate light:
1) Showes Red in STANDBY mode.
2) Show GREEN is in LINE IN source, Show ORANGE in is Bluetooth source.
3) Flashes quickly while to increase or decrease the volume level. Flashes slowly when the volume is max or lowest.
4) Flashes every second in MUTE mode; Switch to GREEN(ORANGE) when sound is resumed.
5) Flashes when turn on or turn off the bass.
7 VOL +/-
Increase or decrease the volume level.
8 ON/OFF
Turn on or turn off the unit.
9 DOCKING STATION
Place iPad, iPhone or iPod on it.
10 Left speaker
Be connected to left speaker out socket.
11 Speakers out sockets-Left
12 Power indicate light
Power indicate light is green when the power is provided.
13 LINE IN socket
14 LINE IN cable
- LINE IN socket on the amplifier.
- HEADPHONE socket on an external audio device.
Replace the Remote Control Battery
The provided Remote Control allows the unit to be operated from a distance.
- Even if the Remote Control is operated within the effective range (6m), remote control operation may be impossible if there are any obstacles between the unit and the remote control.
- If the Remote Control is operated near other products which generate infrared rays, or if other remote control devices using infrared rays are used near the unit, it may operate incorrectly. Conversely, the other products may operate incorrectly.
For First-time use:
The unit has a pre-installed lithium CR2025 battery. Remove the protective tab to activate the remote control battery.
To Replace the Remote Control Battery:
1 Pull out the battery tray and remove the old battery.
2 Place a new CR2025 battery into the battery tray with correct polarity (+/-) as indicated.
3 Insert the battery tray back into the slot.
Precautions Concerning Batteries
- When the Remote Control is not to be used for a long time (more than a month), remove the battery from the Remote Control to prevent it from leaking.
- If the batteries leak, wipe away the leakage inside the battery compartment and replace the batteries with new ones.
- Do not use any batteries other than those specified.
- Do not heat or disassemble batteries. Never throw them in fire or water.
- Do not carry or store batteries with other metallic objects. Doing so could cause batteries to short circuit, leak or explode.
- Never recharge a battery unless it is confirmed to be a rechargeable type.
Troubleshooting
To keep the warranty valid, never try to repair the system yourself. If you encounter problems when using this unit, check the following points before requesting service.
No power
- Ensure that the AC cord of the apparatus is connected properly.
- Ensure that there is power at the AC outlet.
- Press standby button to turn the unit on.
Remote control does not work
- Reduce the distance between the remote control and the unit.
- Insert the battery with its polarities (+/-) aligned as indicated.
- Replace the battery.
- Aim the remote control directly at the ensor on the front of the unit.
Specifications
General
Power Requirements ...... AC 220V-240V \~ 50-60Hz
Power Consumption 10W
Output Power 15W x 2
Total Harmonic Distortion 1%(1kHz, 1W)
Audio Input Sensitivity/Impedance: 200mV
Frequency Response 40Hz - 20kHz(+/-3dB)
Dimensions (W x H x D)
87 x 90 x 99mm (Main Speaker)
173 x 35 x 67mm (Adapter)
60 x 90 x 94mm (Docking Bracket)
Speaker
Impedance 8Ω
Rated Power 10W
Remote Control
Distance 6m
Angle 30
Standard Accessories
Remote Control ......x 1
Owner's manual....x 1
- Design and specifications are subject to change without notice.
Chips and More GmbH
Gewerbestr.7
D-79112 Freiburg
Tel.No. Support: 0180-5000251*
*€ 0,14/min. For calls from mobile networks, the price can be deviate.


Brand : i-onik
Model : MSC-220
Category : Loudspeaker